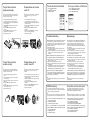
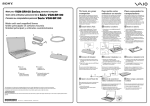
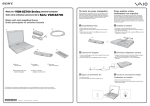
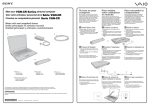
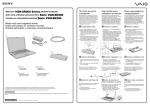
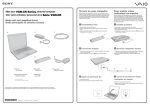
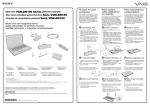
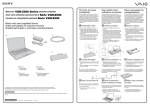
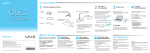
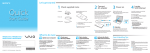
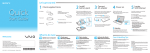
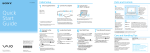
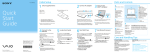
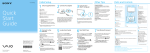
1
To turn on your computer
Meet your VGC-LT30 Series personal computer
Voici votre ordinateur personnel de la Série VGC-LT30
Before starting your computer for the first time, do not connect any other
hardware that did not originally come with your computer. Make sure to start
up your computer with only the supplied accessories connected and set up
your system. Upon completion, connect one device (for example, a printer,
an external hard disk drive, a scanner, and so on) at a time, following the
manufacturers’ instructions.
Main unit and supplied items
Unité principale et articles fournis
A
C
B
Pour mettre votre
ordinateur en marche
Avant de démarrer votre ordinateur pour la première fois, ne branchez
aucun autre matériel qui n'a pas été originalement livré avec l'ordinateur.
Assurez-vous de ne démarrer votre ordinateur qu'avec les accessoires
fournis, puis procédez à la configuration de votre système. Une fois cette
opération terminée, branchez un seul périphérique à la fois (par exemple,
une imprimante, un disque dur externe, un scanneur, etc.) en respectant les
instructions du fabricant.
1 Remove Back Panel Cover
1 Retirez le panneau arrière
When facing down your computer, be sure to place it on a soft cloth to avoid
damage to the LCD screen.
En plaçant votre ordinateur face en dessous, assurez-vous de le placer sur
un linge doux pour éviter d’endommager l’écran ACL.
1
2
1
2
Gently face down your computer.
Grasp the back panel cover 1 with both hands, gently pull it off, and
move the cover toward the base of the computer.
Placez délicatement l’ordinateur face en dessous.
Saisissez le panneau arrière 1 des deux mains, retirez-le délicatement
en le tirant vers la base de l'ordinateur.
1
D
G
H
F
E
I
J
K
ATI
TV
Won
d
er™
2 Connect AC Adapter
2 Branchez l’adaptateur c.a.
1
2
3
1
2
Plug one end of the power cord 1 into the AC adapter 3.
Plug the other end of the power cord into an AC outlet 2.
Plug the cable connected to the AC adapter 3 into the DC IN port 4 on
the computer.
3
Branchez une extrémité du cordon d’alimentation 1 dans l’adaptateur c.a. 3.
Branchez l’autre extrémité du cordon d’alimentation dans une prise de
d’alimentation c.a. 2.
Branchez le câble connecté à l’adaptateur c.a. 3 dans le port DC IN 4
de l'ordinateur.
L
Digit
al C
able
Tun
er
2
4
A Main unit
B AC adapter
Unité principale
Adaptateur c.a.
E Wireless mouse
F Remote commander *
Souris sans fil
I
Télécommande *
TV coaxial cable *
Câble coaxial TV *
J
8cm disc adapter
Adaptateur de
disques 8 cm
C Power cord
D Wireless keyboard
Cordon d’alimentation
Clavier sans fil
G Remote sensor control *
H AA batteries (6) or (8 *)
Capteur infrarouge *
Piles AA (6) ou (8 *)
K ATI TV Wonder™ Digital Cable Tuner **
Syntoniseur de câblodistribution
numérique ATI TV WonderMC **
L
The illustrations in this document may appear different from your model, depending on the country or area of your purchase.
Les illustrations du présent document peuvent différer de votre modèle, selon le pays ou la région où vous avez fait votre achat.
3-877-519-11 (1) © 2008 Sony Corporation
Printed in China
1
3 Replace Back Panel Cover
3 Replacez le panneau arrière
1
2
1
2
Put the prop-up stand 1 through the opening of the back panel cover 2.
Fit the projections inside the cover into the respective holes on the back of
the computer and push in the cover toward the computer.
Placer le support 1 dans l’ouverture sur le panneau arrière 2.
Placer les ergots à l’intérieur du panneau, dans leurs trous respectifs au
dos de l’ordinateur et pousser le panneau vers l’ordinateur.
2
VESA spacers (4)
Bagues d’écartement
VESA (4)
* On selected models only.
Sur les modèles sélectionnés uniquement.
** On selected models only. See the manual that came with the Digital Cable Tuner package. ATI and TV Wonder are trademarks of Advanced Micro Devices, Inc.
Sur les modèles sélectionnés uniquement. Consulter le manuel qui accompagne l’ensemble du syntoniseur de câblodistribution numérique. ATI et TV Wonder sont
des marques de commerce appartenant à Advanced Micro Devices, Inc.
3
1
4 Power ON
4 Mise sous tension
1
1
Press the power button until the power indicator turns on.
Appuyer sur l’interrupteur de mise sous tension jusqu’à ce que le voyant
d’alimentation s’allume.
To get the wireless
keyboard ready
Préparation du clavier
sans fil
To connect the wireless keyboard, it must be located within a
range of approximately 11.8 inches (30 cm) to approximately
39.4 inches (1 m) from the computer.
Pour brancher le clavier sans fil, celui-ci doit se situer dans un
rayon d’environ 30 cm (11,8 po.) à 1 m (39,4 po) de
l'ordinateur.
1
1
2
3
4
5
6
Insert the supplied four AA batteries 1 into the battery
compartment 2 on the bottom of the wireless keyboard.
Remove the back panel cover from the computer, and then
turn on your computer.
Slide the POWER switch 3 at the top of the keyboard to
the ON position.
Press the CONNECT button 4 on the back of the
computer.
Press the CONNECT button 5 on the bottom of the
keyboard within 10 seconds from step 4.
Replace the back panel cover.
2
3
4
5
6
To locate the User Guide
Pour repérer le Guide de l’utilisateur
1
2
3
1
2
3
Click Start
> Help and Support.
Click Manuals & Specifications.
Click VAIO User Guide.
Cliquez sur Démarrer
> Aide et support.
Cliquez sur Manuels & fiches techniques.
Cliquez sur Guide d’utilisation VAIO.
Insérez les quatre piles AA fournies 1 dans le
compartiment des piles 2 au bas du clavier sans fil.
Retirez le panneau arrière de l’ordinateur et mettez ensuite
l’ordinateur en marche.
Déplacez l’interrupteur POWER 3, situé au haut du clavier,
à la position ON.
Appuyez sur le bouton CONNECT 4 à l’arrière de
l’ordinateur.
Appuyez sur le bouton CONNECT 5 au bas du clavier
dans les 10 secondes suivant l’étape 4.
Replacez le panneau arrière.
4
Troubleshooting
Dépannage
What should I do if my computer does not start?
Que dois-je faire si mon ordinateur ne démarre pas?
The power indicator on your computer is off when the computer is not
securely attached to a source of power. Make sure the computer is securely
plugged into a power source and turned on. Make sure the VAIO power
indicator shows the power is on.
Additional suggestions include:
■ If your computer is booting from a floppy disk, eject the disk from the
floppy disk drive (if applicable).
■ If you notice condensation on your computer, do not use the computer
for at least one hour. Condensation may cause the computer to
malfunction.
Le voyant d’alimentation sur votre ordinateur est éteint lorsque l’ordinateur n’est
pas correctement branché sur une source d’alimentation. Assurez-vous que
l'ordinateur est fermement branché sur une prise électrique et qu'il est allumé.
Assurez-vous que le voyant d’alimentation VAIO indique que l’ordinateur est allumé.
Autres suggestions :
■ Si votre ordinateur s’initialise à partir d’une disquette, retirez la disquette
de son lecteur (si applicable).
■ Si vous remarquez des traces de condensation sur votre ordinateur,
attendez au moins une heure avant de l’utiliser. La condensation pourrait
causer le dysfonctionnement de l’ordinateur.
What should I do if my computer does not
recognize my wireless keyboard/mouse?
Que dois-je faire si mon ordinateur ne
reconnait pas mon clavier/ma souris sans fil?
■ Assurez-vous qu’aucune autre souris n’est branchée. Votre ordinateur ne
reconnait qu’une seule souris.
■ Assurez-vous que le clavier/souris sans fil est/sont sous tension.
■ Assurez-vous que les piles AA fournies sont correctement installées
dans le clavier/souris sans fil.
■ Essayez de rétablir la connexion entre votre ordinateur et le clavier/
souris sans fil. Suivez les étapes 4 à 5 dans Préparation du clavier
sans fil ou Préparation de la souris sans fil sur cette page.
2
1
5
3
To get the wireless
mouse ready
Préparation de la
souris sans fil
■ Make sure another mouse is not connected. Your computer does not
recognize more than one mouse.
■ Make sure the wireless keyboard/mouse is powered on.
■ Make sure the supplied AA batteries are properly installed in the wireless
keyboard/mouse.
■ Try re-establishing the connection between your computer and wireless
keyboard/mouse. Follow the steps 4 to 5 in To get the wireless
keyboard ready or To get the wireless mouse ready on this sheet.
To connect the wireless mouse, it must be located within a
range of approximately 11.8 inches (30 cm) to approximately
39.4 inches (1 m) from the computer.
Pour brancher la souris sans fil, idelle-ci doit se situer dans un
rayon d’environ 30 cm (11,8 po.) à 1 m (39,4 po) de
l'ordinateur.
How do I keep my computer updated?
Comment puis-je garder mon ordinateur à jour?
1
1
2
Download and install the latest updates regularly using the preinstalled
software applications, such as Windows Update and VAIO Update 3 so
that the computer can run more efficiently.
Téléchargez et installez les toutes dernières mises à jour régulièrement en
utilisant les applications logicielles préinstallées comme Windows Update
et VAIO Update 3 afin que l’ordinateur fonctionne de façon plus efficace.
To download and install the updates, your computer must be connected to
the Internet.
Pour télécharger et installer les mises à jour, votre ordinateur doit être
connecté à Internet.
HDD recovery
Récupération des fichiers du disque dur
2
3
4
5
6
Insert the supplied two AA batteries 1 into the wireless
mouse.
Remove the back panel cover from the computer, and then
turn on your computer.
Slide the power switch 3 on the bottom of the mouse to the
ON position.
Press the CONNECT button 2 on the back of the
computer.
Press the CONNECT button 4 on the bottom of the mouse
within 10 seconds from step 4.
Replace the back panel cover.
3
4
5
6
Insérez les deux piles AA fournies 1 dans la souris sans fil.
Retirez le panneau arrière de l’ordinateur et mettez ensuit
l’ordinateur en marche.
Déplacez l’interrupteur d'alimentation 3, situé au bas de la
souris, à la position ON.
Appuyez sur le bouton CONNECT 2 à l’arrière de
l’ordinateur.
Appuyez sur le bouton CONNECT 4 au bas de la souris
dans les 10 secondes suivant l’étape 4.
Replacez le panneau arrière.
®
Your computer is equipped with the VAIO Recovery Center, a utility
program that recovers your computer’s operating system and preinstalled
software to their original factory-installed settings.
Votre ordinateur est équipé de l’utilitaire VAIOMD Recovery Center, un
utilitaire qui restaure le système d’exploitation de votre ordinateur et les
logiciels préinstallés à leur configuration d’usine originale.
Be sure to create recovery discs immediately after your computer is ready
for use because there are no recovery discs provided with the computer.
Assurez-vous de créer des disques de restauration une fois que votre ordinateur
est prêt à utiliser, car aucun disque de récupération n’est fourni avec l'ordinateur.
For on-screen information about hard disk recovery:
1 Click Start > Help and Support.
2 Click Manuals & Specifications.
3 Click VAIO Recovery Center User Guide.
Pour tout affichage à l’écran de renseignements
concernant la récupération d’un disque dur :
1 Cliquez sur Démarrer > Aide et support.
2 Cliquez sur Manuels & fiches techniques.
3 Cliquez sur VAIO Recovery Center Guide d’utilisation.
Pour accéder à l’utilitaire VAIO Recovery Center à
partir sur système d’exploitation Windows VistaMD :
1 Cliquez sur Démarrer > Aide et support.
2 Cliquez sur Sauvegarde & réinstallation.
3 Cliquez sur VAIO Recovery Center.
2
3
1
4
To access the VAIO Recovery Center utility
from the Windows Vista® operating system:
1 Click Start > Help and Support.
2 Click Backup & Recovery.
3 Click VAIO Recovery Center.