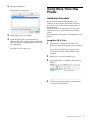
1
2-699-693-11 (1)
Printer Driver
(for Mac OS X)
Installation Guide
This guide describes installation and the use of the Printer
Drivers for Mac OS X.
Before Using this Software
Before using the printer driver, be sure to read the “ReadMe”
file located on the CD-ROM.
UP-CX1 Series
© 2006 Sony Corporation
Windows 2000
Table of Contents
Operation Environment Requirements ................3
About This Document ............................................3
Installing the Printer Driver .................................4
Before Installation ..............................................4
Installation Procedure .........................................4
Using More Than One Printer ..............................7
Installation Procedure .........................................7
Uninstalling the Printer Driver .............................9
Uninstallation Procedure ....................................9
Making Page Settings ..........................................10
Making Print Settings ..........................................11
Setting the Number of Copies ...........................11
Setting the Graphics Attributes .........................11
Checking the Print Settings ..............................12
Printing .............................................................12
Apple, Mac, Macintosh, and Mac OS are registered
trademarks of Apple Computer Inc. in the United States
of America and other countries.
Other company names and product names appearing in
this document are generally registered trademarks or
trademarks of their respective owners.
2
Windows 2000
Operation Environment
Requirements
The system requirements for use of the printer driver are
as follows.
• Operating system: Mac OS X 10.3 or later
• Computer: Macintosh computer running Mac OS X,
with USB port as standard equipment
• Memory: 128 MB or more
• Hard disk: At least 2 MB of free space at time of
installation
About This Document
The screen messages and other information shown in
this document assume connection of the UP-CX1. If
another printer model from the UP-CX1 series is
connected, read any occurrence of “UP-CX1” as the
model name of your printer.
The screen messages and other information shown in
this document assume the use of Mac OS X 10.4.x.
Actual messages may differ slightly depending on your
system and application software.
About USB 2.0
• The UP-CX1 series conforms to USB 2.0
specifications.
• USB 2.0 is fully backward compatible with USB 1.1.
• USB 2.0 supports conventional Full (low) speed and
Hi-Speed operation.
• In a USB 1.1 environment, connection and operation
at Full speed is possible. For Hi-Speed operation, the
following requirements must be met.
– Operating system
Mac OS X 10.3 or later
– Computer
Macintosh computer providing USB 2.0 port as
standard equipment
– Certified USB 2.0 cable
Note
The printer will not operate in a Mac OS X Classic
environment.
Operation Environment Requirements / About This Document
3
Windows 2000
3
Installing the Printer
Driver
Double-click the [UP-CX1Series.pkg] icon.
The following installation screen appears.
Before Installation
Connecting multiple printers
When several UP-CX1 series printers are connected to a
single computer, install the printer driver for the first
printer, according to the explanation in “Installation
Procedure.” Then connect the subsequent UP-CX1
series printers to the computer and refer to the section
“Using More Than One Printer.”
4
The Software License Agreement screen appears.
Installation Procedure
1
With the printer not yet connected to the computer,
turn power to the computer on.
2
Insert the supplied CD-ROM “PRINTER DRIVER
& INSTRUCTIONS FOR USE UP-CX1” into the
CD-ROM drive and double-click the [UPCX1Series] icon on the desktop. If you have
downloaded the driver from a web site, doubleclick the downloaded file to mount it, and then
double-click the [UP-CX1Series] icon on the
desktop.
The following screen appears.
Click [Continue].
5
Read the Software License Agreement and then
click [Continue].
The Software License Agreement acceptance sheet
appears.
Installing the Printer Driver
4
Windows 2000
6
To accept the Software License Agreement, click
[Agree].
The installation destination screen appears.
9
Enter the administrator [Name] and [Password],
and click [OK].
The restart confirmation sheet appears.
10 Click [Continue Installation].
The installation begins. When the procedure is
finished, the following restart message appears.
7
Select the boot disk as destination volume and click
[Continue].
The installation type screen appears.
11 Click [Restart].
The computer restarts and the installation is
complete.
8
Click [Install] or [Upgrade].
The Authenticate screen appears.
12 After the computer has restarted, connect the
printer to the computer using a USB cable, and turn
power to the printer on.
After a while, the printer will be automatically
recognized and available for use.
Installing the Printer Driver
5
Windows 2000
To verify that the printer is ready for use, bring up the
Printer List in the Printer Setup Utility. If the model
name of your UP-CX1 series printer is shown in the list,
the printer can be used.
To start the Printer Setup Utility, open [Applications] [Utilities] - [Printer Setup Utility].
2
Click the [Add] button.
The Printer Browser screen appears.
You can also bring up the Printer Browser screen by
clicking the [+] button in [Print and Fax].
Note
In Mac OS X 10.4.x, you can also check the Printer List
from [Print and Fax] under System Preferences.
If the printer is not recognized automatically, make the
setting manually as follows.
Using Mac OS X 10.4.x
1
Open [Applications] - [Utilities] - [Printer Setup
Utility].
3
Select the printer with your printer name in [Printer
Name] and “USB” in [Connection].
4
For [Print Using], select “SONY UP-CX1 series
printer”, and click the [Add] button.
The Printer List screen appears.
The printer is now available for use.
Using Mac OS X 10.3.x
1
Open [Applications] - [Utilities] - [Printer Setup
Utility].
The Printer List screen appears.
Installing the Printer Driver
6
Windows 2000
2
Click the [Add] button.
The following screen appears.
Using More Than One
Printer
Installation Procedure
3
In the popup menu, select [USB].
4
Select the printer with your printer name in
[Product] and “Sony” in [Type]. Select “SONY UPCX1 series printer” for [Printer Model]. Then click
the [Add] button.
If more than one UP-CX1 series printer is to be
connected to the computer, perform the installation
procedure for the second and subsequent printers as
described below.
The installation for the first printer must have been
completed correctly, as described in the preceding
section.
The explanation below applies for installing the second
printer.
Using Mac OS X 10.4.x
1
The printer is now ready for use.
Connect to the computer the UP-CX1 series
printers for which installation has been completed.
If more than two UP-CX1 series printers have
already been installed, connect them all to the
computer.
2
Turn power to all connected printers on.
3
Open [Applications] - [Utilities] - [Printer Setup
Utility].
4
Verify that all connected UP-CX1 series printers
are shown in the Printer List.
Using More Than One Printer
7
Windows 2000
5
Connect the printer to be added to the computer,
and turn power to that printer on.
4
After a while, the connected printer will be
automatically recognized and added to the Printer
List.
When the printer is added to the list, the installation
is complete.
If there is already a printer with the same name as
the printer to be added, change the name of the
existing printer. For example, if the new printer is
“UP-CX1” and there is already a “UP-CX1” in the
Printer List, change the name of that printer as
follows.
1 Select the printer for which the name should be
changed in the Printer List, and click the [Show
Info] button.
2 Enter the new name in the [Printer Name] field,
and click the [Apply Changes] button.
5
You can also check the Printer List from [Print and Fax]
under System Preferences.
Using Mac OS X 10.3.x
1
Connect to the computer the UP-CX1 series
printers for which installation has been completed.
Verify that all connected UP-CX1 series printers
are shown in the Printer List.
Connect the printer to be added to the computer,
and turn power to that printer on.
After a while, the connected printer will be
automatically recognized and added to the Printer
List.
When the printer is added to the list, the installation
is complete.
If more than two UP-CX1 series printers have
already been installed, connect them all to the
computer.
2
Turn power to all connected printers on.
3
Open [Applications] - [Utilities] - [Printer Setup
Utility].
Using More Than One Printer
8
Windows 2000
Uninstalling the Printer
Driver
Uninstallation Procedure
7
Open [Library] - [Printers] - [SONY] - [UP].
8
Move the files [UPCX1PM.plugin] and
[UPCX1PrintColorSetup.plugin] to the trash.
9
In the [Finder] menu, select [Empty Trash].
The printer driver is now uninstalled.
To uninstall the printer driver, proceed as follows.
1
Shut down all running applications.
2
Turn power to all UP-CX1 series printers connected
to the computer off and disconnect the USB cables.
3
Open [Applications] - [Utilities] - [Printer Setup
Utility].
The Printer List screen appears.
4
Select the printer model that you want to uninstall
in the Printer List and click the [Delete] button.
Perform this operation for all printers of the same
type that you want to uninstall.
(In Mac OS X 10.4.x, you can also select the printer
in the Printer List of [Print and Fax] under System
Preferences and delete the printer by clicking the
[-] button.)
5
Open [Library] - [Receipts].
6
Move [UP-CX1Series.pkg] to the trash.
Uninstalling the Printer Driver
9
Windows 2000
Making Page Settings
Before printing from an application, you should make
the required page attribute settings.
Page attributes include the printer to use, the paper size,
the paper orientation, and scale settings.
1
4
Select the desired paper [Orientation] setting.
5
Select the desired [Scale] setting when wishing to
enlarge or reduce the image while printing.
When the settings have been made, click the [OK]
button.
From the [File] menu in the application, select Page
Setup.
The Page Attributes sheet appears.
2
Select the printer to use from the [Format for] list.
3
For [Paper Size], select either [UPC-C13], [UPCC14], [UPC-C15], or [UPC-C48PF], depending on
the paper size inserted in the printer.
If another setting is selected, printing will not be
possible.
The maximum print area size according to the
[Paper Size] setting is as follows.
Paper Size
Maximum print area
UPC-C13
1,536 × 1,100 (pixels)
UPC-C14
1,848 × 1,248 (pixels)
UPC-C15
2,148 × 1,536 (pixels)
UPC-C48PF
2,448 × 1,248 (pixels)
Making Page Settings
10
Windows 2000
Making Print Settings
Before printing from an application, you should make
print settings on the print sheet.
To bring up the print sheet, access the [File] menu of the
application, select [Print], and select the printer from the
[Printers] popup menu.
Print settings include the number of copies to print, the
use of digital camera correction, color balance settings,
lightness, etc.
Setting the Graphics Attributes
Select the [Graphics] popup menu in the print sheet.
The settings for digital camera correction, color balance,
and lightness can be changed.
Digital camera correction
From the [Color Adjust] popup menu, select [Digital
Camera Correction]
Setting the Number of Copies
1
2
Select the [Copies & Pages] popup menu in the
print sheet.
Set the number of copies in the [Copies] field.
The setting range is 1 to 100 copies.
Settings higher than 100 will result in 100 copies
being printed.*
* For some applications, settings higher than 100
may be allowed.
When you select the [Use Digital Camera Correction]
check box, the settings become available.
• Selecting [Auto] will cause automatic processing for
optimum results.
• Selecting [Custom] causes the sliders for [Brightness],
[Contrast] and [Saturation] to become active. You can
also directly enter values in the edit boxes.
Click the [Restore Defaults] button if you wish to return
all digital camera correction settings to their default
condition.
Making Print Settings
11
Windows 2000
Color balance
From the [Color Adjust] popup menu, select [Color
Balance].
Adjust the color balance by moving the sliders left or
right, or by directly entering values in the edit boxes.
Click the [Restore Defaults] button if you wish to return
all color balance settings to their default condition.
Lightness
Checking the Print Settings
Select the [Summary] popup menu in the print sheet.
A list of print settings appears.
Printing
When all print settings are as desired, click the [Print]
button.
Printing is carried out using the settings made on the
page attributes sheet and the print sheet.
From the [Color Adjust] popup menu, select
[Lightness].
Adjust the lightness by moving the sliders left or right,
or by directly entering values in the edit boxes.
Click the [Restore Defaults] button if you wish to return
all lightness settings to their default condition.
Making Print Settings
12