1
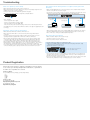
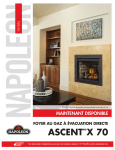
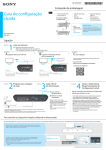
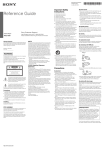
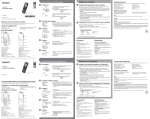
© 2012 Sony Corporation Printed in China 4-421-770-11(2) In the Box Quick Setup Guide US Network Media Player Remote control (Remote) (1) To insert batteries into the remote control Network Media Player NSZ-GS7/NSZ-GX70 (NSZ-GX70 is only for the US) AC power cord (1) HDMI cable (1) (NSZ‑GX70 only) Size AA batteries (2) What’s this? IR (infrared) Blaster cable (1) Sony Customer Support Quick Setup Guide (1) Getting Started (1) Reference Guide and other documents The IR Blaster enables you to control connected devices with your remote. Please see “To control connected devices using the remote” shown below for more information. USA: http://esupport.sony.com/ | 1-800-222-SONY Canada: http://esupport.sony.com/CA/ | 1-877-899-SONY Please Do Not Return the Product to the Store Connection step 1 Connect to your TV Follow : A to connect to your TV directly. : B to connect to your TV via AV Receiver : C if your connection differs from the diagrams below. A Direct to TV B To TV via AV Receiver C Other connection See Help Guide for other connection patterns. HDMI cable (supplied with NSZ-GX70 only) AV Receiver TV TV (optional) (optional) Set Top Box / Digital Video Recorder step 2 HDMI cable (not supplied) Prepare for Network connection Set Top Box / Digital Video Recorder step 3 AC power cord Connect to the power source Connect to the power source Change the TV input Note LAN cable (not supplied) From your PC http://www.sony.net/helpguide/r/networkplayer/ From your smartphone HDMI cable (not supplied) Switch the input selector on the TV so that the signal from the player appears on your TV screen. Then, a screen that shows how to setup your remote appears. Wireless LAN router*1*2 Broadband router*2 HDMI cable (supplied with NSZ-GX70 only) This will only appear the first time you setup your player. step 4 Start the Initial Setup Wizard Follow the directions for the Initial Setup displayed on screen. –The screen may stay dark for several seconds after the Sony logo appears, then the Initial Setup screen appears. –When the Initial Setup screen (on which a picture of a player and a hand holding a remote is displayed) appears, press and hold (Enter) to pair your remote with the player. –Complete the Network setup process, otherwise the Initial Setup Wizard cannot be closed. –It takes about 15 minutes to complete the Initial Setup. *1When using wireless connection, you need to set the Network Setup in the Initial Setup Wizard (on step 4). *2You can find MAC address in the Initial Setup Wizard (step 4) as needed. Select “Explain step” on “Connect to the Internet” screen. To control connected devices using the remote This player is equipped with a built-in IR Blaster that accepts remote commands and sends them to various connected devices to control them with your remote. This function works when the player is turned on. When you set the player close to a connected device (as illustrated on the right), you can control the device using the remote, including operations such as adjusting the volume of the TV or an AV Receiver. However, if you place the player in a location where IR signals cannot reach, you cannot control connected devices with the built-in IR Blaster. In this case, connect the supplied IR Blaster as follows: Connect the IR Blaster cable to the player. Place the IR Blaster so that the infrared transmitter points to the IR receiver (sensor) on the device you want to control, as illustrated on the right. IR Blaster * * Location of the IR receiver may vary depending on the product you are using. Troubleshooting There is no picture (screen is dark). –Make sure that the AC power cord is securely connected. The picture from the Set Top Box is not output correctly (via an AV Receiver). –Make sure that all the connecting cables are securely connected. (Especially, make sure HDMI IN and OUT are correctly connected.) –Make sure that HDMI cables are connected securely to the Set Top Box and to the player. –Change the input of the TV to display the signal from this player. –If the picture is still not output correctly, reconnect the TV directly to the player, and connect AV Receiver and the player with an optical digital cable as illustrated below. –Make sure that the power indicator is lit up white as illustrated below. –Turn the Set Top Box off, then turn it on again. Network Media Player Power indicator –Try the following: HDMI cable*1 –Turn the player off and on again. Optical digital cable*2 HDMI cable*2 –Turn the connected device off and on again. –Disconnect and reconnect the HDMI cable. –Disconnect the AC power cord from the player and reconnect it after about two minutes. –The HDMI OUT jack is connected to a DVI device that does not support copyright protection technology. The player cannot connect to the Internet. –Make sure that the LAN router or Wireless LAN router is on. –Make sure that the LAN cable is connected correctly when using a wired network connection. –Check the settings of the LAN router or Wireless LAN router. For details, refer to the operating instructions supplied with the LAN router or Wireless LAN router. –Move the player and the Wireless LAN router closer to each other. The Wireless LAN connection is affected by the surrounding environment (the wall material, radio wave receiving condition, obstacles between the player and the Wireless LAN router, etc.). –Move the player away from devices that use a 2.4 GHz frequency band (microwaves, Bluetooth devices, cordless digital devices, etc.), or turn off such devices. These devices may interrupt the communication between the player and the Wireless LAN router. –If you cannot get Wi-Fi over the Internet, please make sure you do not have a LAN cable connected. The player places priority on a LAN connection over a Wi-Fi connection. TV AV Receiver Set Top Box *1Supplied (NSZ-GX70 only) *2Not supplied –When this player and the TV are connected with HDMI cables via an AV Receiver, pictures may not be displayed properly due to the copyright protection feature of some Set Top Boxes. In this case, contact your Cable/Satellite TV Operators. The remote does not function. –Make sure that the batteries are inserted correctly. –Operate the remote closer to the player. –Disconnect and reconnect the AC power cord. –Perform re-pairing according to the following procedure. Press the CONNECT button, located on the bottom of the player, with a thin, sharp object such as the point of a pen, etc. Follow the instructions on the screen. Use a thin, sharp object such as the point of a pen to press the CONNECT button. –If the touch-pad of the remote is not operated for a while, it will not sense any attempts at operations. When you want to use it again, hold the remote up, or after clicking the touchpad, lift your finger off it for a few seconds. –Do not cover the upper left part of the remote because that is where the antenna is located. The remote may malfunction or may not work properly if you cover the antenna. Product Registration Please take a few minutes to register your product. This also allows us to contact you with important product notifications, or provides a record in case of product loss or theft. From your player Press (HOME) and select [All Apps] - [Product Registration] From your PC For customers in the USA: http://productregistration.sony.com/ For customers in Canada: http://www.sony.ca/register/