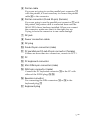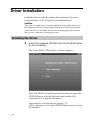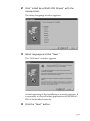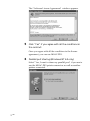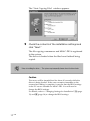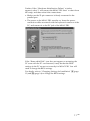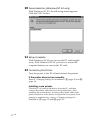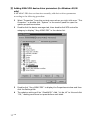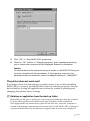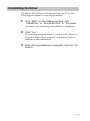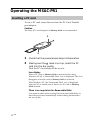
1
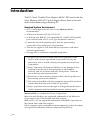
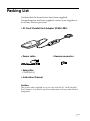
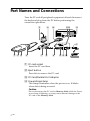
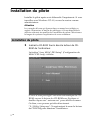
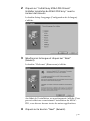
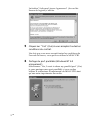
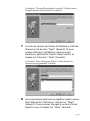
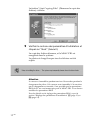
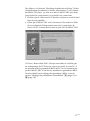
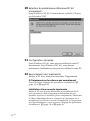
3-867-219-11 (1)
PC Card/ Parallel Port
Adaptor
Operating Instructions __________________ GB
Mode d’emploi ________________________ FR
MSAC-PR1
© 1999 by Sony Corporation
Safety Regulations
WARNING
To prevent fire or shock hazard, do not expose the unit to rain or moisture.
For the customers in the United States
Declaration of Conformity
Trade Name:
SONY
Model No.:
MSAC-PR1
Responsible Party: Sony Electronics Inc.
Address:
1 Sony Drive, Park Ridge, NJ, 07656 USA
Telephone No.:
201-930-6970
This device complies with Part 15 of the FCC Rules.
Operation is subject to the following two conditions.: (1)
This device may not cause harmful interference, and (2) this device must accept any
interference received, including interference that may cause undesired operation.
CAUTION
You are cautioned that any changes or modifications not expressly approved in this manual
could void your authority to operate this equipment.
Note:
This equipment has been tested and found to comply with the Limits for a Class B digital
device, pursuant to Part 15 of the FCC Rules.
These limits are designed to provide reasonable protection against harmful interference in a
residential installation. This equipment generates, uses, and can radiate radio frequency
energy and, if not installed and used in accordance with the instructions, may cause
harmful interference to radio communications. However, there is no guarantee that
interference will not occur in a particular installation. If reception, which can be determined
by turning the equipment off and on, the user is encouraged to try to correct the
interference by one or more of the following measures:
– Reorient or relocate the receiving antenna.
– Increase the separation between the equipment and receiver.
– Connect the equipment into an outlet on a circuit different from that to which the
receiver is connected.
– Consult the dealer or an experienced radio/TV technician for help.
For the customers in Germany
Directive: EMC Directive 89/336/EEC.
92/31/EEC
This equipment complies with the EMC regulations when used under the following
circumstances:
– Residential area
– Business district
– Light-industry district
(This equipment complies with the EMC standard regulations EN55022 Class B.)
Table of Contents
Introduction ................................................................................. 2
Packing List .................................................................................. 3
Part Names and Connections ..................................................... 4
Driver Installation ....................................................................... 6
Installing the Driver ............................................................................. 6
Changing Settings for Installation ................................................... 13
Uninstalling the Driver ...................................................................... 17
Operating the MSAC-PR1 ......................................................... 18
18
19
20
21
Troubleshooting ........................................................................ 22
Compatible Equipment ............................................................. 24
Specifications ............................................................................. 26
1 GB
GB
English
Inserting a PC card .............................................................................
Removing a PC card ...........................................................................
Instructions for Memory Stick ..........................................................
Changing the Drive Name ................................................................
Introduction
The PC Card/ Parallel Port Adaptor MSAC-PR1 used with the
Sony Memory Stick PC Card Adaptor allows data to be read
and written data using a desktop PC.
Required System Environment
• A PC Card Adaptor for use with a Sony Memory Stick is
recommended.
• A Microsoft Windows 95/98/NT 4.0 OS.
• A desktop type IBM PC/AT compatible PC, with D-sub25 parallel
port connector and a PS/2 or AT type keyboard connector.
• Cannot be used with anything other than the printer being
connected to the parallel port of the machine.
• This device supports ATA flashcards but operations with these
cannot be guaranteed.
• See page 24 for confirmed compatible equipment.
❏ No part of the software bundled with this equipment or this
User’s Guide may be reproduced in any form, nor may the
software be lent or rented without prior permission from Sony
Corporation.
❏ Sony Corporation disclaims all liability for any damage or loss
resulting from the use of this equipment or the bundled
software, and for all claims from any third parties. Please be
sure to back up any important data.
❏ Please refer to the warranty card provided with this product for
the warranty terms and conditions.
❏ The software bundled with this equipment must not be used in a
system other than that with which it is provided.
❏ Sony Corporation reserves the right to change the specifications
of this equipment and the bundled software without notice.
Memory Stick is a trademark of Sony Corporation.
Microsoft and Windows are registered trademarks of the Microsoft
Corporation in the United States and other regions.
IBM and PC/AT are registered trademarks of the IBM Corporation in
the United States and other regions.
Other company names and product names appearing in this document
are registered trademarks of those companies respectively.
2 GB
Packing List
Confirm that the items below have been supplied.
If something has not been supplied, contact your supplier or
local Sony Service personal.
• PC Card/ Parallel Port Adaptor (MSAC-PR1)
• Power cable
• Reverse connector
• Setup Disc
CD-ROM (1)
• Instruction Manual
Caution
The power cable supplied is for use only with the PC Card/Parallel
Port Adaptor. It cannot be used for connection with any other kind of
equipment.
3 GB
Part Names and Connections
Turn the PC and all peripheral equipment off and disconnect
the keyboard plug from the PC before performing the
connection operations.
5
6
0
!¡!£
!™
!¶
1 2 3
4
7
9
8
!∞ !¢ !§
1 PC card socket
Insert the PC card here.
2 Eject button
Press this to remove the PC card.
3 PC Card/Parallel Port Adaptor
4 Power/Access lamp
This lamp illuminates when the power is on. It blinks
when data is being accessed.
Caution
Do not disconnect the PC card or Memory Stick while the Power
access lamp is blinking, as it may cause internal damage to the
PC card or the Memory Stick.
4 GB
5 Printer cable
If you are not going to use the parallel port connector !¡
with the printer, it is not necessary to connect the printer
cable 6 to the connector.
6 Printer connector (D-sub 25-pin) (female)
If you are going to use the parallel port connector !¡ with
the printer, the printer cable is connected here once the
MSAC-PR1 driver has been installed. When you connect
the connector, make sure that it is the right way up.
Trying to force the connector in can cause damage.
7 DC jack
8 Power connection cable
9 DC plug
0 D-sub 25-pin connector (male)
!¡ PC parallel port D-sub 25-pin connector (female)
If there are more than two connectors, connect to LPT 1.
!™ PC
!£ PC keyboard connector
!¢ Mini DIN 6-pin connector (male)
!∞ DIN 5-pin connector (male)
Connect the PC keyboard connector !£ to the PC with
either of the 2 DIN plugs !¢ !∞.
!§ Reverse connector
For connecting the DIN connectors !¢ or !∞ to the
keyboard plug !¶
!¶ Keyboard plug
5 GB
Driver Installation
Install the driver with the printer disconnected. If you are
using Windows NT 4.0, log on as an administrator.
Caution
The screen examples shown in this manual are in English. However,
the language used for screen display depends on the selection made
when the driver is installed. Please select the language that matches
that of your computer’s operating system.
Installing the Driver
1
Insert the supplied CD-ROM into the CD-ROM drive
on the computer.
The “Sony MSAC-PR1 Setup” window appears.
If the CD-ROM automatic run has not been set, open the
CD-ROM drive with the Explorer and double click
“autorun.exe” to display the menu.
Alternatively you can directly specify “X:\
Utility\Setup.exe” (X is the CD-ROM drive name) to start
the installer.
6 GB
2
Click “Install Sony MSAC-PR1 Drivers” with the
mouse cursor.
The Setup Language window appears.
3
Select language and click “Next.”
The “Welcome” window appears.
At the beginning of the installation a warning appears. It
is necessary to close all other applications for the MSACPR1 to be installed correctly.
4
Click the “Next” button.
7 GB
The “Software License Agreement” window appears.
5
Click “Yes” if you agree with all the conditions in
the contract.
Once you agree with all the conditions in the license
agreement, you can use MSAC-PR1.
6
Parallel port sharing (Windows NT 4.0 only)
Select “Yes, I want to share my parallel port” if you are to
use the MSAC-PR1 printer connector as well as another
printer connected.
8 GB
The “Choose Destination Location” window appears.
7
The file path name for the installation appears.
Click the “Next” button. If you want to change the
directory for the installation, specify the path in the
box and then click the “Next” button.
The “Select Program Folder” window appears.
8
The program names registered in the start menu
appear. Click “Next.” If you want to change the file
name, input the name and then click “Next.”
9 GB
The “Start Copying Files” window appears.
9
Check the contents of the installation settings and
click “Next.”
The file copying commences and MSAC-PR1 is registered
in the system.
The driver is loaded when the files have finished being
copied.
Caution
The cursor will be immobilized for about 10 seconds while the
driver is being loaded. If the cursor remains immobile on the
screen after loading is complete, it may be that the BIOS settings
in the PC are not suitable for MSAC-PR1. You will need to
change the BIOS settings.
For details, refer to “Changing Settings for Installation” A (page
13) and B (page 14) to change the BIOS settings.
10 GB
Further, If the “Hardware Initialization Failure” window
appears, select “I will connect the MSAC-PR1 later” to shut down
the setup, and then recheck the connections.
• Make sure the 25-pin connector is firmly connected to the
parallel port.
• The power to the MSAC-PR1 must be on. Insert the power
connection cable associated with the keyboard connector of the
PC, and connect it to the DC jack of the MSAC-PR1.
If the “Removable Disk” icon does not appear on restarting the
PC even with the PC card inserted, it may be that the BIOS
settings in the PC are not set correctly for MSAC-PR1. You will
need to change the BIOS settings.
For details, refer to “Changing Settings for Installation” A (page
13) and B (page 14) to change the BIOS settings.
11 GB
10 Device Selection (Windows NT 4.0 only)
With Windows NT 4.0, the following screen appears.
Click the “OK” button.
11 Setup Complete
With Windows 95/98 you can use the PC card straight
away. With Windows NT4.0, you have to restart the
computer before you can use the PC card.
12 Connecting the Printer
Turn the power to the PC off and connect the printer.
If the printer does not run normally.
Refer to “Changing Settings for Installation” C (page 15) and D
(page 16).
Installing a new printer.
Turn the PC off, remove the device from the PC, and then
connect the printer cable directly to the parallel port. After
installing the printer driver, reconnect the printer cable to the
printer connector of this device, and perform a test print. If the
printing is unsatisfactory, refer to “Changing Settings for
Installation” C (page 15) and D (page 16).
12 GB
Changing Settings for Installation
The driver does not install satisfactorily.
If the response from the PC is lost during installation or an error occurs, it
may be that the parallel port settings in the BIOS of the PC are not suited to
the MSAC-PR1.
By changing the parallel port BIOS settings and adding parameters to the
driver, the situations above can be rectified.
A Changing the Parallel Port BIOS Settings
The method for changing the parallel port BIOS settings and the screens that are
displayed vary according to the type of computer that you are using. Refer to the
instruction manual for you computer for information regarding changing the
settings.
Method for Changing Settings (example)
1 Start the computer.
2
When the computer is powered up, A message “Press xx for setting”
appears at the bottom of the screen before the operating system
(Windows etc) screens appear. (For a computer that complies with the
Energy Star standard, this message appears at the top right corner of the
Energy Star logo screen.) Press the (xx) button as instructed by the message
before the message disappears from the screen. Pressing the (xx) button
invokes the BIOS settings screen.
Some computers do not display this message for BIOS settings. Refer to the
instruction manual for the computer for more information.
3
In most BIOS setting screens, there are 2 procedural steps that invoke the
screens for actually making the settings. First of all, start from the screen
that has the parallel port settings item in it. (Usually you will not know
from the first screen which screen contains the parallel port settings and
will have to refer to the instruction manual for the computer to open the
screen for the parallel port settings.)
4
BIOS setting possibilities vary from computer to computer, however,
normally the following options are available:
Auto→Enable→Disable
EPP→ECP→SPP→Bi-directional
(Some computers only have the first two options.)
Make the settings in the following way:
Auto→Enable→Disable
Set to Enable
EPP→ECP→SPP→Bi-directional Check operations with each setting.
13 GB
B Adding MSAC-PR1 device driver parameters (for Windows 95/98
only)
If the MSAC-PR1 does not function normally, add device driver parameters
according to the following procedure.
1
Select “Properties” from the context menu when you right click over “This
Computer” or double click “System” in the control panel to open the
system properties window.
2
Double click the device manager tab, then double click SCSI controller
category to display “Sony MSAC-PR1” in the device list.
3
Double click “Sony MSAC-PR1” to display the Properties window and then
click the Settings tab.
4
The adaptor setting will be “/flash/W95.” Add “/ni /de /di” to this and click
“OK,” making sure there is a space before each slash.
14 GB
5
Click “OK” in “Sony MSAC-PR1” properties.
6
Click the “OK” button in “System properties” and a message promoting
you to restart the computer will be displayed. Restart the computer.
Caution
On some machines the computer may not restart or the MSAC-PR1 may not
function normally with this procedure. If this happens, erase only the
parameters that you added to return the adaptor setting to “/flash/W95.”
The printer does not work well
If a printer which was functioning normally ceases to do so after installing
MSAC-PR1, or a newly installed printer does not function properly, this can
be rectified by closing all applications not directly related to printing and
changing the printer driver settings.
C Deleting an application from the start up folder
Depending on the type of printer you are using, the parallel port may be occupied
by some other application installed at the time of printer driver installation.
Such applications are automatically placed in the task tray when the computer is
started, interrupting communications between the PC and MSAC-PR1, resulting in
a printer malfunction to be mistakenly recognized and an error to be displayed.
15 GB
Refer to the instruction manual for the printer to check whether such applications
have been installed, and if they are, close them and perform a test print.
If the test print is successful, go to “Add/Remove Programs” in the “Control
Panel” and uninstall the application, or delete the short cut from the start up folder.
Such permanent applications are nearly always registered in the start up folder.
By deleting these applications from the start up folder they will not be launched
when the computer is restarted.
1
Click “ Start” on the taskbar.
2
Click “Taskbar” in “Settings” to open the “Taskbar Properties” window.
3
Click the “Start Menu Programs” tab.
4
Click “Remove” to display the “Remove Shortcuts/Folders” window.
5
Double click “StartUp” to display the application shortcuts.
6
Select the application shortcut you wish to delete and then click
“Remove”.
7
Click “Close” and the “Remove Shortcuts/Folders” window closes.
8
Click “OK” to close the “Taskbar Properties” window.
D Changing Printer Driver Settings
If “Enable bi-directional support for this printer” have been selected in the printer
driver settings, either or both the printer and the MSAC-PR1 will not function
normally.
In this case, change the settings to “Disable bi-directional support for this printer”
by the following procedure:
1
Click “Start” on the taskbar.
2
Click “Settings” and click “Printers” to display a list of printers.
3
Right click on the printer to which the MSAC-PR1 connector is connected
to open the properties sheet.
4
Click the details tab, and click “Spool Settings.”
5
Click the “Disable bi-directional support for this printer” radio button and
click “OK.”
6
Click the “OK” button to close the Properties sheet.
16 GB
Uninstalling the Driver
The MSAC-PR1 driver can be deleted from the PC by the
following procedure if it is no longer needed.
1
Click “Start” on the taskbar and then click
“UNINSTALL” in “Sony MSAC-PR1” in “Programs.”
A window for confirming uninstallation is displayed.
2
Click “Yes.”
The uninstall program starts. A window with “Remove
Programs From Your Computer” is displayed and the
deletion of files commences.
3
When the uninstallation is complete, click the “OK”
button.
17 GB
Operating the MSAC-PR1
Inserting a PC card
To use a PC card, insert the card into the PC Card/Parallel
port adaptor.
Caution
The Sony PC Card Adaptor for Memory Stick is recommended.
1
2
1
Check that the power/access lamp is illuminated.
2
Making sure the ▲ mark is on top, insert the PC
card into the slot gently.
Push the PC card firmly all the way in.
Icon display
When a PC card or Memory Stick is inserted when using
Windows 95/98, a “Removable Disk” icon is displayed. This icon
disappears when the card or Memory Stick is removed.
With Windows NT, the “Removable Disk” icon is displayed
when the PC is started even if there is no PC card or Memory
Stick inserted.
There is no recycle bin for Removable Disks
Care must be taken when erasing files from removable disks, as
these files are erased immediately without being transferred to
the recycle bin.
18 GB
Make backup copies of important data and files to some other
media.
Access
When accessing large files, an increased load is placed on the
computer and the movement of the cursor may be lost or other
processing stopped.
Wait until the file accessing has finished.
Removing a PC card
1
2
1
Check that the power/access lamp is not blinking.
Caution
Do not remove a PC card or Memory Stick while the power/
access lamp is blinking. If the card is removed while the lamp is
blinking, damage to the card or Memory Stick may occur. Also,
even when the lamp stops blinking, some processing may still be
taking place. To be safe, wait a while after the lamp has stopped
blinking before removing the card or Memory Stick.
2
Press the eject button and gently remove the card.
Caution
Do not attempt to remove, insert or access a PC card or Memory
Stick while the printer is printing. Printing may be halted, and a
printing error may be displayed.
Do not touch the connections of a PC card or Memory Stick with
you hands or metal object as this may result in damage.
19 GB
Instructions for Memory Stick
Memory Stick Operation
This device only supports the insertion and removal of
Memory Stick.
With a PC Card Adaptor for Memory Stick inserted into the
device, only a Memory Stick can be inserted.
When removing a Memory Stick, gently press the Memory
Stick eject button to prevent the Memory Stick from flying
out.
The PC does not recognize the state of the erase
protect switch.
If the PC card is used with the switch in the “LOCK” position
the response from the PC will be slow and data reading/
writing errors may occur. Use the card with the switch
released.
Further, make backup copies of important data and files to
some other media.
Memory Stick Format (initialization)
The Memory Stick comes supplied from the factory with a
suitable format. Please do not attempt to format it.
If the Memory Stick is reformatted by the PC it will not be in
a suitable condition to be read or written by other equipment
that supports Memory Stick.
If this happens, the Memory Stick can be used after it has
been reformatted by the other equipment with which it is to
be used.
20 GB
Changing the Drive Name
If you are using a Windows 95/98 computer, The drive name
for MSAC-PR1 can be changed with the following procedure:
1
Click the right button on “My Computer” and
select “Properties” from the context menu or
double click “System” in the control panel to
display “System Properties.”
2
Click the Device Manager tab and double click Disk
Drive Category.
All connected drives are displayed.
3
Double Click “Parallel Flash Unit”
The Properties window appears.
4
Click the Settings tab, and change the display for
the starting drive.
The next time Windows is started, this will be the drive
name.
21 GB
Troubleshooting
Before sending the equipment for repair, please check the
following points. If the equipment still fails to function
normally after you have checked everything, consult your
local Sony service personnel.
Please refer to your PC Operating Manual.
Symptom
Cause/Action
The MSAC-PR1 connector is connected to a printer but an
error occurs and printing cannot be done.
Or, reading/writing data cannot be done to the PC card.
There is some permanent application that keeps watch over
the state of the printer. Printing cannot be done and the
computer does not recognize the PC card in the normal way.
Close the permanent application.
Cause/Action
The parallel port settings on the computer are incorrect.
Try changing the BIOS settings.
Cause/Action
The printer is incompatible with this device.
Some printers cannot be used when connected to the MSACPR1 printer connector.
Symptom
When writing or reading from Memory Stick, a disk
writing error is displayed on a blue screen, with a warning
message that files or data may have been lost.
Cause/Action
The Memory Stick erase protect switch is set to the “LOCK”
position.
Release the LOCK on the Memory Stick. The data in the
Memory Stick will not be lost.
22 GB
Symptom
The data recorded in the PC card is flawed.
Cause/Action
The PC card was removed while being accessed from the
computer.
When the hour glass mark is being displayed during
accessing, the power/access lamp blinks. Allow ample time
after the lamp stops blinking before removing the PC card.
Symptom
The PC card cannot be inserted all the way into the PC
Card Adaptor.
Cause/Action
Some foreign object is lodged in the card slot of the PC Card
Adaptor.
Remove the foreign object.
Damage may occur to the internal connector in this case.
23 GB
Compatible Equipment
• Printers whose Compatibility has been Confirmed
HP LaserJet IIP/HP LaserJet 5L/ HP DeskJet 692/
HPDeskJet 720C
EPSON LQ-1010C/EPSON LQ-200/EPSON LQ-2070C
Canon BJC-330/Canon BJC-400J/Canon BJC-430J/
Canon BJC-4000/Canon BJC-4300
Fujitsu DL1100/ALPS MD-1000J/ALPS MD-2000J
Sony DPP-M55
• PC Cards whose Compatibility has been Confirmed
Hitachi
HB286008A3, HB286015A3, HB286030A3, HB286045A3,
HB286060A3
SanDisk
SDP3B-2-101-00, SDP3B-4-101-00, SDP3B-2-6-101-00,
SDP3B-8-101-00, SDP3B-10-101-00, SDP3B-20-101-00
I-O DATA DEVICE
PCFCA-10MS, PCFCA-20MS, PCFCA-40MS
PCFCA-85M
MELCO
DPF-10J, DPF-20J, DPF-40J
SCM Microsystems
PCF-10, PCF-20, PCF-40
24 GB
EPSON
EP10, EP20, EP40, EP85
Panasonic
BN-012ABP3, BN-020ABP3
TDK
SFD004M, SFD012M, SFD024M, SFD032M, SFD096M
HAGIWARA SYS-COM
HPC-FC20M
25 GB
Specifications
Parallel Port/PC Card Adaptor for Memory Stick (MSACPR1)
Supported OS
Windows 95/Windows 98/Windows NT 4.0
Compatible PCs
IBM PC/AT compatible (desktop type)
• D-sub 25-pin parallel port connector and PS/
2 or AT type keyboard connector required.
• Normal operation cannot be guaranteed
with notebook computers.
Dimensions
83mm×21mm×124mm(W×H×D)
Mass
150g approx.
Power source
(Voltage)
DC5V (supplied from keyboard connector)
Current consumed
150mA approx.
Environmental
conditions
0ºC-40ºC, 32ºF-104ºF (no condensation)
Host interface
Parallel port (IEEE1284.3 compliant)
Connector
Computer side: D-sub 25-pin (male) <parallel
port (IEEE1284.3 compliant)>
Printer side: D-sub 25-pin (female) <parallel
port (IEEE1284.3 compliant)>
• The device cannot be used if there is any
other equipment connected to the parallel
port. (scanner or other cartridge etc.)
Compatible PC cards PCMCIA compliant ATA/IDE specifications
• Recommended PC Cards
Sony: Memory Stick/PC Card Adaptor
(MSAC-PC1) <for use with Memory Stick >
26 GB
Table des matiéres
Introduction ................................................................................. 2
Contenu de l’emballage .............................................................. 3
Nom des pièces et connexions ................................................... 4
Installation du pilote ................................................................... 6
Installation du pilote ............................................................................ 6
Réglage des paramètres d’installation ............................................. 13
Désinstallation du pilote .................................................................... 17
Utilisation du MSAC-PR1 .......................................................... 18
Insertion d’une carte PC ....................................................................
Retrait la carte PC ...............................................................................
Instructions relatives au Memory Stick ...........................................
Changement de nom du lecteur .......................................................
18
19
20
21
Matériel compatible .................................................................. 24
Fiche technique ......................................................................... 26
1 FR
FR
Français
Dépannage ................................................................................ 22
Introduction
L’adaptateur de port parallèle/carte PC MSAC-PR1 utilisé avec
l’adaptateur de carte PC pour Memory Stick Sony vous permet
de lire et d’écrire des données à l’aide d’un PC de bureau.
Configuration minimale
• Il est recommandé de disposer d’un adaptateur de carte PC pour
Memory Stick Sony.
• Système d’exploitation Microsoft Windows 95/98/NT 4.0
• PC de bureau compatible IBM PC/AC, avec connecteur de port parallèle
D-sub 25 broches et connecteur de clavier de type PS/2 ou AT
• Ne peut être utilisé qu’avec l’imprimante raccordée au port
parallèle de la machine.
• Ce périphérique supporte les cartes flash ATA, mais les opérations
avec ces cartes ne sont pas garanties.
• Pour le matériel compatible confirmé, voyez page 24.
❏ Aucune partie du logiciel livré avec l’appareil ou du guide de
l’utilisateur ne peut être reproduite, sous quelque forme que ce
soit, et le logiciel ne peut être prêté ou loué, sans autorisation
préalable de Sony Corporation.
❏ Sony Corporation ne saurait être tenu responsable des dommages
ou pertes résultant de l’utilisation de cet appareil ou du logiciel
qui l’accompagne, ni des revendications émanant d’un tiers.
Faites une copie de sauvegarde des données importantes.
❏ Pour les conditions de garantie, voyez la carte de garantie qui
accompagne l’appareil.
❏ Le logiciel qui accompagne l’appareil ne devra être utilisé sur
aucun autre système que celui avec lequel il est livré.
❏ Sony Corporation se réserve le droit de modifier les spécifications
de l’appareil et du logiciel qui l’accompagne sans préavis.
Memory Stick est une marque de Sony Corporation.
Microsoft et Windows sont des marques déposées de Microsoft
Corporation aux Etats-Unis et dans d’autres régions.
IBM et PC/AT sont des marques déposées de IBM Corporation aux
Etats-Unis et dans d’autres régions.
Les autres noms de société et de produit qui apparaissent dans ce
document sont des marques déposées des entreprises respectives.
2 FR
Contenu de l’emballage
Vérifiez si les articles ci-dessous se trouvent bien tous dans
l’emballage.
S’il manque un article, contactez votre fournisseur ou votre
service après-vente Sony.
• Adaptateur de port parallèle/carte PC (MSAC-PR1)
• Câble d’alimentation
• Connecteur inverse
• Disque de configuration
CD-ROM (1)
• Mode d’emploi
Attention
Le câble d’alimentation fourni a été conçu exclusivement pour
l’adaptateur de port parallèle/carte PC. Ne le raccordez à aucun autre
périphérique.
3 FR
Nom des pièces et connexions
Mettez le PC et tous les périphériques hors tension et
débranchez la fiche du clavier au niveau du PC avant de
procéder aux connexions.
5
6
0
!¡!£
!™
!¶
1 2 3
4
7
9
8
!∞ !¢ !§
1 Emplacement de carte PC
C’est là que vous insérez la carte PC.
2 Touche d’éjection
Appuyez sur cette touche pour retirer la carte PC.
3 Adaptateur de port parallèle/carte PC
4 Voyant d’alimentation/accès
Ce voyant s’allume lorsque
l’appareil est sous tension. Il clignote pendant l’accès aux
données.
Attention
Ne déconnectez pas la carte PC ni le Memory Stick pendant que
le voyant d’alimentation/accès clignote. Vous pourriez
endommager l’intérieur de la carte PC ou du Memory Stick.
4 FR
5 Câble d’imprimante
Si vous ne prévoyez pas d’utiliser le connecteur de port
parallèle !¡ avec l’imprimante, vous n’aurez pas besoin
de raccorder le câble d’imprimante 6 au connecteur.
6 Connecteur d’imprimante (D-sub 25 broches)
(femelle)
Si vous prévoyez d’utiliser le connecteur de port parallèle
!¡ avec l’imprimante, raccordez le câble d’imprimante à
ce connecteur après avoir installé le pilote du MSAC-PR1.
Quand vous raccordez le connecteur, veillez bien à ce
qu’il soit dirigé dans le bon sens. Vous risquez
d’endommager le connecteur si vous l’insérez de force.
7 Prise CC
8 Câble de connexion d’alimentation
9 Fiche CC
0 Connecteur D-sub 25 broches (mâle)
!¡ Connecteur D-sub 25 broches de port parallèle du
PC (femelle)
S’il y a plus de deux connecteurs, raccordez-le à LPT 1.
!™ PC
!£ Connecteur de clavier du PC
!¢ Connecteur mini DIN 6 broches (mâle)
!∞ Connecteur DIN 5 broches (mâle)
Raccordez le connecteur de clavier du PC !£ au PC avec
l’une ou l’autre des 2 fiches DIN !¢ !∞.
!§ Connecteur inverse
Pour la connexion des connecteurs DIN !¢ ou !∞ à la
fiche du clavier !¶
!¶ Fiche du clavier
5 FR
Installation du pilote
Installez le pilote après avoir débranché l’imprimante. Si vous
travaillez sous Windows NT 4.0, ouvrez la session comme
administrateur.
Attention
Les exemples d’écran qui figurent dans ce manuel sont rédigés en
anglais. Néanmoins, la langue des affichages à l’écran dépend de la
sélection effectuée au moment de l’installation du pilote. Sélectionnez
la langue du système d’exploitation de votre ordinateur.
Installation du pilote
1
Insérez le CD-ROM fourni dans le lecteur de CDROM de l’ordinateur.
La fenêtre “Sony MSAC-PR1 Setup” (Configuration du
MSAC-PR1 Sony) s’affiche.
Si vous n’avez pas réglé l’exécution automatique du CDROM, ouvrez le lecteur du CD-ROM avec Explorer et
double-cliquez sur “autorun.exe” pour afficher le menu.
Ou bien, vous pouvez spécifier directement
“X:\Utility\Setup.exe” (X représentant le nom du lecteur
de CD-ROM) pour démarrer l’installateur.
6 FR
2
Cliquez sur “Install Sony MSAC-PR1 Drivers”
(Installer les pilotes du MSAC-PR1 Sony” avec le
curseur de la souris.
La fenêtre Setup Language (Configuration de la langue)
s’affiche.
3
Sélectionnez la langue et cliquez sur “Next”
(Suivant).
La fenêtre “Welcome” (Bienvenue) s’affiche.
Au début de l’installation, un avertissement s’affiche. Pour
pouvoir effectuer correctement l’installation du MSACPR1, vous devrez fermer toutes les autres applications.
4
Cliquez sur le bouton “Next” (Suivant).
7 FR
La fenêtre “Software License Agreement” (Accord de
licence de logiciel) s’affiche.
5
Cliquez sur “Yes” (Oui) si vous acceptez toutes les
conditions du contrat.
Une fois que vous avez accepté toutes les conditions de
l’accord de licence, vous pouvez utiliser le MSAC-PR1.
6
Partage du port parallèle (Windows NT 4.0
uniquement)
Sélectionnez “Yes, I want to share my parallel port” (Oui,
je veux partager mon port parallèle) si vous voulez
utiliser le connecteur d’imprimante du MSAC-PR1 ainsi
qu’une autre imprimante raccordée.
8 FR
La fenêtre “Choose Destination Location” (Sélectionner
l’emplacement de destination) s’affiche.
7
Le nom du chemin de fichier d’installation s’affiche.
Cliquez sur le bouton “Next” (Suivant). Si vous
voulez effectuer l’installation dans un autre
répertoire, spécifiez le chemin dans la boîte, et
cliquez sur le bouton “Next” (Suivant).
La fenêtre “Select Program Folder” (Sélectionnez le
dossier du programme) s’affiche.
8
Les noms des programmes enregistrés dans le menu
Start (Démarrer) s’affichent. Cliquez sur “Next”
(Suivant). Si vous voulez changer le nom du fichier,
tapez le nom et cliquez sur “Next” (Suivant).
9 FR
La fenêtre “Start Copying Files” (Démarrer la copie des
fichiers) s’affiche.
9
Vérifiez le contenu des paramètres d’installation et
cliquez sur “Next” (Suivant).
La copie des fichiers démarre, et le MSAC-PR1 est
enregistré dans le système.
Le pilote est chargé lorsque tous les fichiers ont été
copiés.
Attention
Le curseur s’immobilise pendant environ 10 secondes pendant le
chargement du pilote. Si le curseur reste immobile à l’écran alors
que le chargement est terminé, il est possible que les paramètres
BIOS du PC ne conviennent pas pour le MSAC-PR1. Vous devrez
modifier les paramètres BIOS.
Pour les détails sur le réglage des paramètres BIOS, voyez la
section “Réglage des paramètres d’installation” A (page 13) et
B (page 14).
10 FR
Par ailleurs, si la fenêtre “Hardware Initialization Failure” (Echec
d’initialisation du matériel) s’affiche, sélectionnez “I will connect
the MSAC-PR1 later” (Je vais raccorder le MSAC-PR1 plus tard)
pour fermer la configuration, et revérifiez les connexions.
• Vérifiez que le connecteur à 25 broches est bien raccordé à fond
dans le port parallèle.
• Il faut que le MSAC-PR1 soit sous tension. Raccordez le câble
de raccordement d’alimentation associé au connecteur de
clavier du PC, et branchez-le dans la prise DC du MSAC-PR1.
Si l’icône “Removable Disk” (Disque amovible) ne s’affiche pas
au redémarrage du PC bien que vous ayez inséré la carte PC, il
est possible que les paramètres BIOS du PC ne conviennent pas
pour le MSAC-PR1. Vous devrez modifier les paramètres BIOS.
Pour les détails sur le réglage des paramètres BIOS, voyez la
section “Réglage des paramètres d’installation” A (page 13) et
B (page 14).
11 FR
10 Sélection du périphérique (Windows NT 4.0
uniquement)
Sous Windows NT 4.0, l’écran suivant s’affiche. Cliquez
sur le bouton “OK”.
11 Configuration terminée
Sous Windows 95/98, vous pouvez utiliser la carte PC
directement. Sous Windows NT 4.0, vous devrez
redémarrer l’ordinateur pour pouvoir utiliser la carte PC.
12 Raccordement de l’imprimante
Mettez le PC hors tension et raccordez l’imprimante.
Si l’imprimante ne fonctionne pas normalement
Voyez la section “Réglage des paramètres d’installation” C
(page 15) et D (page 16).
Installation d’une nouvelle imprimante
Mettez le PC hors tension, débranchez le périphérique du PC,
puis raccordez le câble d’imprimante directement au port
parallèle. Après avoir installé le pilote d’imprimante, rebranchez
le câble d’imprimante dans le connecteur d’imprimante de ce
périphérique, et effectuez un essai d’impression. Si l’impression
n’est pas satisfaisante, voyez la section “Réglage des paramètres
d’installation” C (page 15) et D (page 16).
12 FR
Réglage des paramètres d’installation
L’installation du pilote n’est pas satisfaisante.
Si vous perdez la réponse du PC pendant l’installation ou qu’il se produit
une erreur, il est possible que les réglages du port parallèle dans le BIOS du
PC ne conviennent pas pour le MSAC-PR1.
Vous pourrez corriger la situation en modifiant les paramètres BIOS du port
parallèle et en ajoutant des paramètres au pilote.
A Réglage des paramètres BIOS du port parallèle
La méthode de réglage des paramètres BIOS du port parallèle et des écrans qui
s’affichent varie en fonction de votre ordinateur. Pour les informations sur le
réglage des paramètres, voyez le mode d’emploi de votre ordinateur.
Méthode de réglage des paramètres (exemple)
1 Démarrez l’ordinateur.
2
Lorsque l’ordinateur est sous tension, un message “Press xx for setting”
(Appuyez sur xx pour régler) s’affiche au bas de l’écran avant que les
écrans du système d’exploitation (Windows, etc.) n’apparaissent. (Avec un
ordinateur respectant la norme Energy Star, ce message s’affiche en haut
et à droite de l’écran renfermant le logo Energy Star). Appuyez sur la
touche (xx) comme indiqué dans le message avant que le message ne
disparaisse de l’écran. Quand vous appuyez sur la touche (xx), l’écran de
réglage du BIOS apparaît.
Certains ordinateurs n’affichent pas ce message pour le réglage du BIOS.
Pour tout complément d’information, reportez-vous au mode d’emploi de
l’ordinateur en question.
3
Sur la plupart des écrans de réglage du BIOS, vous devez effectuer deux
opérations pour rappeler les écrans afin de régler les paramètres.
Commencez par l’écran qui renferme la rubrique de réglage du port
parallèle. (Généralement, vous ne pouvez pas dire en voyant ce premier
écran quel est l’écran qui renferme les paramètres du port parallèle, et
vous devrez vous reporter au mode d’emploi de l’ordinateur pour ouvrir
l’écran de réglage du port parallèle.)
4
Les possibilités de réglage du BIOS varient d’un ordinateur à l’autre.
Néanmoins, vous disposez généralement des options suivantes :
Auto → Enable → Disable [Automatique → Valider → Invalider]
EPP → ECP → SPP → Bi-directional [EPP → ECP → SPP → Bidirectionnel]
(Certains ordinateurs ne possèdent que ces deux premières options.)
Réglez les paramètres de la façon suivante :
Auto → Enable → Disable [Automatique → Valider → Invalider] - Réglez
sur Enable (Valider).
EPP → ECP → SPP → Bi-directional [EPP → ECP → SPP → Bidirectionnel] Vérifiez les opérations avec chaque paramètre.
13 FR
B Ajout des paramètres du pilote de périphérique du MSAC-PR1 (sous
Windows 95/98 seulement)
Si le MSAC-PR1 ne fonctionne pas normalement, ajoutez les paramètres du pilote
de périphérique en procédant de la façon suivante.
1
Sélectionnez “Properties” (Propriétés) dans le menu contexte quand vous
cliquez avec le bouton droit sur “This Computer” (Cet ordinateur), ou
double-cliquez sur “System” (Système) dans le panneau de configuration
pour ouvrir la fenêtre des propriétés système.
2
Double-cliquez sur l’onglet du gestionnaire de périphérique, puis doublecliquez sur la catégorie de contrôleur SCSI pour afficher “Sony MSAC-PR1”
dans la liste des périphériques.
3
Double-cliquez sur “Sony MSAC-PR1” pour afficher la fenêtre des
propriétés, puis cliquez sur l’onglet Settings (Paramètres).
4
Le paramètre d’adaptateur s’affiche comme “/flash/W95”. Ajoutez-y “/ni /
de /di”, et cliquez sur “OK” en veillant bien à taper un espace avant
chaque barre oblique.
14 FR
5
Cliquez sur “OK” dans les propriétés de “Sony MSAC-PR1”.
6
Cliquez sur le bouton “OK” dans “System properties” (Propriétés système) ;
un message vous demande de redémarrer l’ordinateur. Redémarrez
l’ordinateur.
Attention
Avec certains ordinateurs, l’ordinateur peut ne pas redémarrer, ou le
MSAC-PR1 peut ne pas fonctionner normalement avec cette procédure.
Dans ce cas, supprimez uniquement les paramètres que vous avez ajoutés
pour ramener l’adaptateur au réglage “/flash/W95”.
L’imprimante ne fonctionne pas correctement
Si l’imprimante ne fonctionne plus correctement après l’installation de MSACPR1 alors qu’elle fonctionnait normalement avant, ou si une imprimante
nouvellement installée ne fonctionne pas correctement, vous pourrez corriger
la situation en fermant toutes les applications non directement liées à
l’impression et en modifiant les paramètres du pilote d’imprimante.
15 FR
C Suppression d’une application depuis le dossier de démarrage
Selon le type de votre imprimante, il est possible que le port parallèle soit occupé par
une autre application installée au moment de l’installation du pilote d’imprimante.
Ces applications sont automatiquement placées dans le tiroir des tâches au
démarrage de l’ordinateur, interrompant ainsi la communication entre le PC et le
MSAC-PR1 ; un dysfonctionnement d’imprimante est alors reconnu par erreur, et
une erreur s’affiche.
Reportez-vous au mode d’emploi de l’imprimante pour vérifier si ces applications
ont été installées, et si elles l’ont été, fermez-les et effectuez un essai d’impression.
Si l’essai d’impression est satisfaisant, allez à “Add/Remove Programs” (Ajout/
Suppression de programmes) dans le “Panneau de configuration” et désinstallez
l’application ; ou bien, supprimez le raccourci dans le dossier de démarrage. Ce
genre d’applications permanentes est presque toujours enregistré dans le dossier de
démarrage. En les supprimant du dossier de démarrage, elles ne seront plus
lancées lorsque vous redémarrerez l’ordinateur.
1
Cliquez sur “Start” (Démarrer) dans la barre des tâches.
2
Cliquez sur “Taskbar” (Barre des tâches) dans “Settings” (Paramètres) pour
ouvrir la fenêtre “Taskbar Properties” (Propriétés de la barre des tâches).
3
Cliquez sur l’onglet “Start Menu Programs” (Démarrer le menu des
programmes).
4
Cliquez sur “Remove” (Supprimer) pour afficher la fenêtre “Remove
Shortcuts/Folders” (Supprimer les raccourcis/dossiers).
5
Double-cliquez sur “Start” (Démarrer) pour afficher les raccourcis
d’application.
6
Sélectionnez le raccourci d’application que vous voulez supprimer, et
cliquez sur “Remove” (Supprimer).
7
Cliquez sur “Close” (Fermer). La fenêtre “Remove Shortcuts/Folders”
(Supprimer les raccourcis/dossiers) se referme.
8
Cliquez sur “OK” pour fermer la fenêtre “Taskbar Properties” (Propriétés
de la barre des tâches).
16 FR
D Réglage des paramètres du pilote d’imprimante
Si vous avez sélectionné “Enable bi-directional support for this printer” (Valider le
support bidirectionnel pour cette imprimante) dans les paramètres du pilote
d’imprimante, l’imprimante ou le MSAC-PR1 (ou les deux) ne fonctionneront pas
normalement.
Dans ce cas, réglez les paramètres sur “Disable bi-directional support for this
printer” (Invalider le support bidirectionnel pour cette imprimante) en procédant
de la façon suivante :
1
Cliquez sur “Start” (Démarrer) dans la barre des tâches.
2
Cliquez sur “Settings” (Paramètres), puis cliquez sur “Printers”
(Imprimantes) pour afficher la liste des imprimantes.
3
Cliquez avec le bouton droit sur l’imprimante à laquelle le connecteur du
MSAC-PR1 est connecté pour ouvrir la page des propriétés.
4
Cliquez sur l’onglet des détails, et cliquez sur “Spoul Settings” (Paramètres
de spoule).
5
Cliquez sur le bouton radio “Disable bi-directional support for this printer”
(Invalider le support bidirectionnel pour cette imprimante), puis cliquez sur
“OK”.
6
Cliquez sur le bouton “OK” pour fermer la page des propriétés.
Désinstallation du pilote
Si vous n’avez plus besoin du pilote du MSAC-PR1, vous
pouvez le supprimer du PC en procédant de la façon suivante.
1
Cliquez sur “Start” (Démarrer) dans la barre des
tâches, puis cliquez sur “UNINSTALL” (Désinstaller)
dans “Sony MSAC-PR1” de “Programs”
(Programmes).
Une fenêtre de confirmation de désinstallation s’affiche.
2
Appuyez sur “Yes” (Oui).
Le programme de désinstallation démarre. Une fenêtre
avec “Remove Programs From Your Computer”
(Supprimer les programmes dans votre ordinateur)
s’affiche, et la suppression des fichiers démarre.
3
Lorsque la désinstallation est terminée, cliquez sur
le bouton “OK”.
17 FR
Utilisation du MSAC-PR1
Insertion d’une carte PC
Pour utiliser une carte PC, insérez la carte dans l’adaptateur
de port parallèle/carte PC.
Attention
Nous vous recommandons d’utiliser l’adaptateur de carte PC Sony
pour le Memory Stick.
1
2
1
Vérifiez si le voyant d’alimentation/accès est
allumé.
2
Insérez la carte PC délicatement dans
l’emplacement en veillant à ce que le repère ▲ soit
dirigé vers le haut.
Enfoncez la carte PC à fond.
Affichage d’icône
Si vous insérez une carte PC ou un Memory Stick lorsque vous
travaillez sous Windows 95/98, une icône “Removable Disk”
(Disque amovible) s’affiche. Cette icône disparaît lorsque vous
retirez la carte PC ou le Memory Stick.
Sous Windows NT, l’icône “Removable Disk” (Disque amovible)
s’affiche au démarrage du PC, même si vous n’avez pas inséré de
carte PC ou de Memory Stick.
Il n’y a pas de corbeille pour les disques amovibles
Faites attention lorsque vous supprimez les fichiers d’un disque
amovible, car ces fichiers sont immédiatement effacés sans passer
par la corbeille.
18 FR
Faites des copies de sauvegarde des données et des fichiers
importants sur un autre support.
Accès
Quand vous accédez à un gros fichier, une charge accrue est
imposée à l’ordinateur, et le mouvement du curseur risque d’être
perdu ou d’autres opérations de traitement d’être interrompues.
Attendez que l’accès au fichier soit terminé.
Retrait la carte PC
1
2
1
Vérifiez que le voyant d’alimentation/accès ne
clignote pas.
Attention
Ne retirez pas la carte PC ni le Memory Stick alors que le voyant
d’alimentation/accès clignote. Si vous retirez la carte pendant
que le voyant clignote, vous risquez d’endommager la carte ou le
Memory Stick. Par ailleurs, même si le voyant a cessé de
clignoter, certaines opérations de traitement peuvent ne pas être
complètement terminées. A titre de sécurité, attendez quelques
instants après que le voyant a cessé de clignoter pour retirer la
carte ou le Memory Stick.
2
Appuyez sur la touche d’éjection et retirez
délicatement la carte.
Attention
N’essayez pas de retirer, d’insérer ou d’accéder à une carte PC ou
un Memory Stick pendant que l’imprimante fonctionne. Vous
risquez d’interrompre l’impression, et une erreur d’impression
s’affichera.
Ne touchez pas les connexions de la carte PC ni du Memory
Stick avec les mains ni avec un objet métallique car vous
pourriez provoquer des dommages.
19 FR
Instructions relatives au Memory Stick
Utilisation du Memory Stick
Ce périphérique ne supporte que l’insertion et le retrait du
Memory Stick.
Si vous insérez un adaptateur de carte PC pour Memory Stick
dans le périphérique, vous ne pourrez insérer qu’un Memory
Stick.
Pour retirer le Memory Stick, appuyez délicatement sur la
touche d’éjection du Memory Stick pour éviter que le Memory
Stick ne sorte brusquement de l’adaptateur.
Le PC ne reconnaît pas l’état du commutateur de
protection contre l’effacement.
Si vous utilisez la carte PC avec le commutateur sur la
position “LOCK” (Fermé), l’ordinateur répondra lentement et
il risque de se produire des erreurs de lecture/écriture des
données. Utilisez la carte avec le commutateur ouvert.
Par ailleurs, faites des copies de sauvegarde des données et
des fichiers importants sur un autre support.
Format du Memory Stick (initialisation)
Lorsque le Memory Stick quitte nos usines, il est prêt à
l’emploi. N’essayez pas de le formater.
Si le Memory Stick est reformaté par le PC, il ne sera plus
dans un état lui permettant d’être lu ou écrit par un autre
périphérique supportant le Memory Stick.
Dans ce cas, vous devrez reformater le Memory Stick avec le
périphérique avec lequel il doit être utilisé avant de pouvoir le
réutiliser.
20 FR
Changement de nom du lecteur
Si votre ordinateur fonctionne sous Windows 95/98, vous
pourrez changer le nom du lecteur du MSAC-PR1 en
procédant de la façon suivante :
1
Cliquez le bouton droit sur “My computer” (Poste
de travail) et sélectionnez “Properties” (Propriétés)
dans le menu contexte, ou double-cliquez sur
“System” (Système) dans le panneau de
configuration pour afficher “System Properties”
(Propriétés du système).
2
Cliquez sur l’onglet Device Manager (Gestionnaire
de périphérique) et double-cliquez sur Disk Drive
Category (Catégorie du lecteur de disque).
Tous les lecteurs raccordés s’affichent.
3
Double-cliquez sur “Parallel Flash Unit” (Unité flash
parallèle).
La fenêtre des propriétés s’affiche.
4
Cliquez sur l’onglet Settings (Paramètres), et
changez le paramètre affiché pour le lecteur de
démarrage.
La prochaine fois que vous démarrerez Windows, ce nom
sera le nom du lecteur.
21 FR
Dépannage
Avant d’apporter le matériel à réparer, veuillez vérifier les
points suivants. Si le matériel ne fonctionne toujours pas
normalement après que vous ayez tout vérifié, consultez le
personnel du service après-vente Sony.
Veuillez vous reporter au mode d’emploi de votre PC.
Symptôme
Le connecteur du MSAC-PR1 est raccordé à une
imprimante, mais il se produit une erreur et l’impression
est impossible.
Ou bien, il est impossible de lire/écrire des données sur la
carte PC.
Cause/Correction Il y a une application permanente qui surveille l’état de
l’imprimante. L’impression est impossible et l’ordinateur ne
reconnaît pas la carte PC normalement.
Fermez l’application permanente.
Cause/Correction Les paramètres du port parallèle de l’ordinateur sont mal
réglés.
Essayez de modifier les paramètres BIOS.
Cause/Correction L’imprimante n’est pas compatible avec ce périphérique.
Certaines imprimantes ne fonctionnent pas lorsqu’elles sont
raccordées au connecteur d’imprimante du MSAC-PR1.
Symptôme
Lors d’une écriture ou d’une lecture sur le Memory Stick,
une erreur d’écriture sur disque s’affiche sur un écran
bleu, avec un message d’avertissement signalant que des
fichiers ou des données ont pu être perdus.
Cause/Correction Le commutateur de protection contre l’effacement du
Memory Stick est réglé sur la position “LOCK” (Fermé).
Ouvrez le commutateur LOCK du Memory Stick. Les
données du Memory Stick ne seront pas perdues.
22 FR
Symptôme
The data recorded in the PC card is flawed.
Cause/Correction Les données enregistrées sur la carte PC sont altérées.
Vous avez retiré la carte PC pendant un accès à l’ordinateur.
Lorsque le sablier est affiché pendant un accès, le voyant
d’alimentation/accès clignote. Attendez suffisamment
longtemps après que le voyant a cessé de clignoter pour
retirer la carte PC.
Symptôme
Impossible d’insérer la carte PC à fond dans l’adaptateur
de carte PC.
Cause/Correction Il y a un corps étranger dans l’emplacement de l’adaptateur
de carte PC.
Retirez le corps étranger.
Dans ce cas, vous risquez d’endommager le connecteur
interne.
23 FR
Matériel compatible
• Imprimantes dont la compatibilité a été confirmée
HP LaserJet IIP/HP LaserJet 5L/ HP DeskJet 692/
HPDeskJet 720C
EPSON LQ-1010C/EPSON LQ-200/EPSON LQ-2070C
Canon BJC-330/Canon BJC-400J/Canon BJC-430J/
Canon BJC-4000/Canon BJC-4300
Fujitsu DL1100/ALPS MD-1000J/ALPS MD-2000J
Sony DPP-M55
• Cartes PC dont la compatibilité a été confirmée
Hitachi
HB286008A3, HB286015A3, HB286030A3, HB286045A3,
HB286060A3
SanDisk
SDP3B-2-101-00, SDP3B-4-101-00, SDP3B-2-6-101-00,
SDP3B-8-101-00, SDP3B-10-101-00, SDP3B-20-101-00
I-O DATA DEVICE
PCFCA-10MS, PCFCA-20MS, PCFCA-40MS
PCFCA-85M
MELCO
DPF-10J, DPF-20J, DPF-40J
SCM Microsystems
PCF-10, PCF-20, PCF-40
24 FR
EPSON
EP10, EP20, EP40, EP85
Panasonic
BN-012ABP3, BN-020ABP3
TDK
SFD004M, SFD012M, SFD024M, SFD032M, SFD096M
HAGIWARA SYS-COM
HPC-FC20M
25 FR
Fiche technique
Adaptateur de port parallèle/carte PC pour Memory
Stick (MSAC-PR1)
Système d’exploitation Windows 95/Windows 98/Windows NT 4.0
supporté
PC compatibles
Compatibles IBM PC/AT (PC de bureau)
• Connecteur de port parallèle D-sub 25
broches et connecteur de clavier de type PS/
2 ou AT nécessaires
• Le fonctionnement normal n’est pas garanti
avec les ordinateurs de type Notebook.
Dimensions
83mm×21mm×124mm(L×H×P)
Poids
Environ 150 g
Alimentation
(tension)
CC 5V (fourni par le connecteur du clavier)
Consommation
Environ 150mA
Conditions ambiantes 0ºC-40ºC, 32ºF-104ºF (pas de condensation)
26 FR
Interface serveur
Port parallèle (norme IEEE1284.3)
Connecteur
Côté ordinateur : D-sub 25 broches (mâle)
<port parallèle (norme IEEE1284.3)>
Côté imprimante : D-sub 25 broches (femelle)
<port parallèle (norme IEEE1284.3)>
• Le périphérique ne pourra pas fonctionner
s’il y a un autre périphérique raccordé au
port parallèle (scanner, autre cartouche, etc.).
Cartes PC
compatibles
Spécifications
ATA/IDE à la norme PCMCIA
• Cartes PC recommandées
Sony : Adaptateur de carte PC/Memory
Stick (MSAC-PR1) <pour utilisation avec le
Memory Stick>
Sony Electronics Inc.:
Customer Support
If you have any questions/comments related to this product,
please visit our Customer Support website at
http://www.sony.com/service
(If you do not have internet access, please call 1-800-222-SONY)
Printed in Japan