1
3-862-673-03 (1)
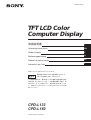
TFT LCD Color
Computer Display
取扱説明書
J
Operating Instructions
EN
Mode d’emploi
F
Bedienungsanleitung
D
Manual de instrucciones
ES
Instruzioni per l’uso
I
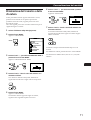
お買い上げいただきありがとうございます。
警告
電気製品は安全のための注意事項を守らないと、
火災や人身事故になることがあります。
この取扱説明書には、事故を防ぐための重要な注意事項と製品
の取り扱いかたを示しています。この取扱説明書と別冊の「安
全のために」をよくお読みのうえ、製品を安全にお使いくださ
い。お読みになったあとは、いつでも見られるところに必ず保
管してください。
CPD-L133
CPD-L150
© 1998 by Sony Corporation
Owner’s Record
The model and serial numbers are located at the rear of the unit.
Record the serial number in the space provided below. Refer to
these numbers whenever you call upon your dealer regarding this
product.
Model No.
Serial No.
WARNING
To prevent fire or shock hazard, do not expose
the unit to rain or moisture.
Dangerously high voltages are present inside
the unit. Do not open the cabinet. Refer servicing
to qualified personnel only.
FCC Notice
This equipment has been tested and found to comply with the
limits for a Class B digital device, pursuant to Part 15 of the FCC
Rules. These limits are designed to provide reasonable protection
against harmful interference in a residential installation. This
equipment generates, uses, and can radiate radio frequency energy
and, if not installed and used in accordance with the instructions,
may cause harmful interference to radio communications.
However, there is no guarantee that interference will not occur in a
particular installation. If this equipment does cause harmful
interference to radio or television reception, which can be
determined by turning the equipment off and on, the user is
encouraged to try to correct the interference by one or more of the
following measures:
– Reorient or relocate the receiving antenna.
– Increase the separation between the equipment and receiver.
– Connect the equipment into an outlet on a circuit different from that
to which the receiver is connected.
– Consult the dealer or an experienced radio/TV technician for help.
You are cautioned that any changes or modifications not expressly
approved in this manual could void your authority to operate this
equipment.
INFORMATION
This product complies with Swedish National Council for
Metrology (MPR) standards issued in December 1990 (MPR II) for
very low frequency (VLF) and extremely low frequency (ELF).
INFORMATION
Ce produit est conforme aux normes du Swedish National Council
for Metrology de décembre 1990 (MPR II) en ce qui concerne les
fréquences très basses (VLF) et extrêmement basses (ELF).
Hinweis
Dieses Gerät erfüllt bezüglich tieffrequenter (very low frequency)
und tiefstfrequenter (extremely low frequency) Strahlung die
Vorschriften des „Swedish National Council for Metrology (MPR)“
vom Dezember 1990 (MPR II).
INFORMACIÓN
Este producto cumple las normas del Consejo Nacional Sueco para
Metrología (MPR) emitidas en diciembre de 1990 (MPR II) para
frecuencias muy bajas (VLF) y frecuencias extremadamente bajas
(ELF).
Dieses Garät entspricht den folgenden europäischen EMVVorschriften für Betrieb in Wohngebieten, gewerblicher Gebleten
und Leichtindustriegebieten.
EN55022/1994 Klasse B
EN50082-1/1992
EN60555-2/1987
Hinweise
• Aus ergonomischen Gründen wird empfohlen, die
Grundfarbe Blau nicht auf dunklem Untergrund zu
verwenden (schlechte Erkennbarkeit, Augenbelastung bei zu
geringem Zeichenkontrast).
• Aus ergonomischen Gründen (flimmern) sollten nur
Darstellungen bei Vertikalfrequenzen ab 70 Hz (ohne
Zeilensprung) verwendet werden.
• Die Konvergenz des Bildes kann sich auf Grund des
Magnetfeldes am Ort der Aufstellung aus der korrekten
Grundeinstellung verändern. Zur Korrektur empfiehlt es sich
deshalb, die Regler an der Frontseite für Konvergenz so
einzustellen, daß die getrennt sichtbaren Farblinien für Rot,
Grün und Blau bei z.B. der Darstellung eines Buchstabens zur
Deckung (Konvergenz) gelangen.
Siehe hierzu auch die Erklärungen zu Konvergenz.
NOTICE
This notice is applicable for USA/Canada only.
If shipped to USA/Canada, install only a UL LISTED/CSA
LABELLED power supply cord meeting the following
specifications:
SPECIFICATIONS
Plug Type
Nema-Plug 5-15p
Cord
Type SVT or SJT, minimum 3 × 18 AWG
Length
Maximum 15 feet
Rating
Minimum 7 A, 125 V
NOTICE
Cette notice s’applique aux Etats-Unis et au Canada
uniquement.
Si cet appareil est exporté aux Etats-Unis ou au Canada,
utiliser le cordon d’alimentation portant la mention UL
LISTED/CSA LABELLED et remplissant les conditions
suivantes:
SPECIFICATIONS
Type de fiche
Fiche Nema 5-15 broches
Cordon
Type SVT ou SJT, minimum 3 × 18 AWG
Longueur
Maximum 15 pieds
Tension
Minimum 7 A, 125 V
この装置は、
情報処理装置等電波障害自主規制協議会
(VCCI)
の基準に基づくクラスB 情報技術装置です。
この装置は、
家庭
環境で使用することを目的としていますが、この装置がラジ
オやテレビジョン受信機に近接して使用されると、受信障害
を引き起こすことがあります。
取扱説明書に従って正しい取り扱いをしてください。
本製品は、
「高調波ガイドライン適合品」
であり、
通商産業省資
源エネルギー庁公益事業部作成の家電・汎用品高調波抑制対
策ガイドラインを満たしています。
As an ENERGY STAR Partner, Sony
Corporation has determined that this
product meets the ENERGY STAR
guidelines for energy efficiency.
2
本製品は社団法人日本電子工業振興協会が定めた「表示装置
の静電気および低周波電磁界」に関するガイドラインに適合
しております。
Getting Started
目次
準備
使用上のご注意 ................................................................................................................ 4
各部の名称とはたらき .................................................................................................... 5
接続する ........................................................................................................................... 6
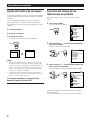
ディスプレイを自動調整する ......................................................................................... 8
メニュー言語を選ぶ ........................................................................................................ 9
画面の調整
画像の明るさを調整する ............................................................................................... 10
コントラストを調整する ............................................................................................... 10
メニュー画面について .................................................................................................. 11
ユーティリティディスクについて ............................................................................... 11
画像をくっきりさせる .................................................................................................. 12
画像の位置を調整する .................................................................................................. 13
本来の解像度で表示する ............................................................................................... 13
色温度を変える・調整する ........................................................................................... 14
メニュー画面の表示位置を変える ............................................................................... 14
バックライトを調整する ............................................................................................... 15
パワーセービング状態になる時間を設定する ........................................................... 15
調整や設定をロックする ............................................................................................... 16
工場出荷時の設定に戻す ............................................................................................... 16
J
その他
本機の対応信号と機能 .................................................................................................. 17
パワーセービング機能 .................................................................................................. 18
INFORMATION画面を表示する ................................................................................ 18
プラグ&プレイ .............................................................................................................. 18
入力信号警告表示 .......................................................................................................... 19
故障かな?と思ったら .................................................................................................. 19
保証書とアフターサービス ........................................................................................... 21
主な仕様 ......................................................................................................................... 22
• Macintoshは、Apple Computer Inc.の米国およびその他の国における登録商標です。
• WindowsとMS-DOSは、米国Microsoft Corporationの米国およびその他の国における
登録商標です。
•
•
•
•
IBM PC/ATとVGAは、IBM Corporationの登録商標です。
NEC PC-98は、NEC の登録商標です。
VESAは、Video Electronics Standard Associationの商標です。
この取扱説明書に表記されている上記以外の製品名は、それぞれの会社の商標または登録商
標です。
• この取扱説明書では、「」と「」については一部表記を省略しています。
3
準備
準備
お手入れのしかた
使用上のご注意
• お手入れをする前に、必ず電源プラグをコンセントから
使用・設置場所について
•
次のような場所での使用・設置はお避けください
• 異常に高温になる場所
•
•
•
•
炎天下や夏場の窓を閉め切った自動車内はとくに高温に
なり、放置すると変形したり、故障したりすることがあ
ります。
直射日光の当たる場所、熱器具の近く
変形したり、故障したりすることがあります。
激しい振動のある場所
強力な磁気のある場所
砂地、砂浜などの砂ぼこりの多い場所
海辺や砂地、あるいは砂ぼこりが起こる場所などでは、
砂がかからないようにしてください。故障の原因になる
ばかりか、修理できなくなることがあります。
液晶画面について
• 液晶画面を太陽にむけたままにすると、液晶画面を傷め
•
•
•
•
てしまいます。窓際や室外に置くときなどはご注意くだ
さい。
液晶画面を強く押したり、ひっかいたり、上にものを置
いたりしないでください。画面にムラが出たり、液晶パ
ネルの故障の原因になります。
寒い所でご使用になると、画像が尾を引いて見えたり、
画面が暗く見えたりすることがありますが、故障ではあ
りません。温度が上がると元に戻ります。
静止画を継続的に表示した場合、残像を生じることがあ
りますが、時間の経過とともに元に戻ります。
使用中に画面やキャビネットがあたたかくなることがあ
りますが、故障ではありません。
蛍光管について
本機は内部照明装置として専用蛍光管を使用しております
が、この蛍光管には寿命があります。画面が暗くなった
り、チラついたり、点灯しないときは、新しい専用蛍光管
に取り替えてください。蛍光管の交換については、お買い
上げ店またはソニーサービス窓口にお問い合わせくださ
い。
輝点・滅点について
画面上に常時点灯している輝点(赤、青、緑など)や滅点が
ある場合があります。
液晶パネルは非常に精密な技術で作られており、99.99%
以上の有効画素がありますが、ごくわずかの画素欠けや常
時点灯する画素があります。
4
•
•
•
抜いてください。
液晶の画面は特殊加工がされていますので、なるべく画
面にふれないようにしてください。また画面の汚れを拭
き取るときは、乾いた柔らかい布で拭き取ってくださ
い。
アルコール、シンナー、ベンジンなどは使わないでくだ
さい。変質したり、塗装がはげたりすることがありま
す。
化学ぞうきんをご使用の際は、その注意書きに従ってく
ださい。
殺虫剤のような揮発性のものをかけたり、ゴムやビニー
ル製品に長時間接触させると、変質したり、塗装がはげ
たりすることがあります。
搬送について
• 運ぶときは、画面の下部を両手でしっかり持ってくださ
い。落としたりするとけがや故障の原因となることがあ
ります。
• 修理や引っ越しなどで本機を運ぶ場合は、本機用の箱と
クッションを使用してください。
電源接続について
付属の電源コードをお使いください。
安全のため電源コードにはアース線が付
けられています。コンセントにプラグを
差し込む前に必ずアース線をアースへ接
続してください。
プラグの形状
AC100V用
壁やマウントアームに取り付けるとき
は
本機を、壁やマウントアームに取り付けて使用する場合
は、必ず専門の業者にご相談ください。
廃棄するときは
• 一般の廃棄物と一緒にしないでください。
ごみ廃棄場で処分されるごみの中にディスプレイを捨て
ないでください。
• 本機の蛍光管の中には水銀が含まれています。廃棄の際
は、地方自治体の条例または規則に従ってください。
準備
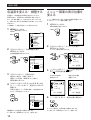
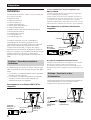
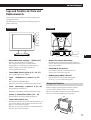
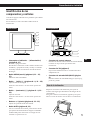
各部の名称とはたらき
使いかたについての詳しい説明は各ページをご覧くださ
い。本書のイラストはCPD-L150を使用しています。
後面
前面
1
2
3
4
5
6
J
7
8
9
1 u(電源)
スイッチとインジケーター 8 、1 8 ページ
電源を入/切するときに押します。
電源が入るとインジケーターが緑色に点灯します。
また、パワーセービング機能が働いているときには、
オレンジ色と緑色に交互に点滅するか、オレンジ色に
点灯します。
2 MENU (メニュー)ボタン 9 、12 ∼16 、18 ペー
ジ
調整などを行うためのMENU画面を表示するときに押
7 外部コントロール端子
外部コントロール用の端子です。RS-232C信号で外部
から本ディスプレイをコントロールすることができま
す。詳しくは、販売店等にご相談ください。
8 電源入力端子 7ページ
ACアダプターのDC出力コードを接続します。
9 RGB入力端子(HD15) 6 、7 ページ
コンピューターのアナログRGB 信号
(0.714 Vp-p、正
極性)
と同期信号を入力します。
します。
3 ¨(ブライトネス)˘ ボタン 9∼10、12∼16
ページ
画像の明るさ調整を選択するときに押します。
また、˘ボタンとしてメニューの項目を選択するときに
使います。
4 >(コントラスト)≥ ボタン 9∼10、12∼16ペー
ジ
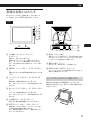
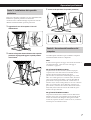
ディスプレイスタンドの使いかた
画面の向きを垂直方向に30度調整することができます。
画面の向きを変えるときは、図のように両手を画面の下部
に添えてください。
30°
コントラスト調整を選択するときに押します。
また、≥ボタンとしてメニューの項目を選択するときに
使います。
5 +/–調整ボタン 10、12∼16ページ
選択された項目の画面調整を行うときに使います。
6 AUTO(オート)ボタン 8、12∼13ページ
接続が終了したあとで押すと、コンピューターに合っ
た状態に画面が自動的に調整されます。
また、画像の位置がずれていたり、画像がぼやけてい
たりしたときに押します。
5
準備
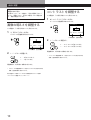
接続する
始めに、下記のものがそろっているかご確認ください。
液晶ディスプレイ(1)
ACアダプター(1)
端子カバー(1)
電源コード(1)
HD15ビデオ信号ケーブル(1)
Macintosh用変換アダプター(1)
Windows Monitor Information Disk/Utility Disk(1)
Macintosh用Utility Disk(1)
TCO ’95 Eco-document(1)
保証書(1)
取扱説明書(1)
安全のために(1)
ソニーご相談窓口のご案内(1)
本機は、DOS/Vコンピューターに対応しています。
また、ケーブルアダプターを使って、MacintoshやPower
Macintosh 、NEC PC-98シリーズを含む、水平周波数
30∼70kHzのコンピューターにも接続できます。さらに、
PALやNTSCのRGB信号も受けることができます。
接続できるコンピューターについては、販売店にご相談く
ださい。
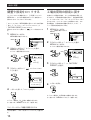
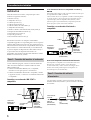
IBM PC/ATコンピューターまたは互換機に接
続する
HD15
コネクターへ
IBM PC/AT
コンピューター
または互換機
モニター出力へ
HD15ビデオ信号ケー
ブル(付属)
付属のHD15ビデオ信号ケーブルについて
本機はDDC1およびDDC2Bに対応するために、ビデオ信号ケーブ
ルの9番ピンを使っています。
お使いのコンピューターがDDC1またはDDC2Bに対応していない
機種であっても9番ピンの穴が開いている場合は、そのまま付属の
HD15ビデオ信号ケーブルを使って接続してください。お使いのコ
ンピューターが9番ピンの穴が開いていない場合は、付属のケーブ
ルでは接続できません。この場合は、販売店等にご相談ください。
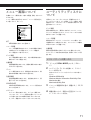
Macintoshコンピューターまたは互換機に接続
準備1: ディスプレイをコンピュー
ターにつなぐ
コンピューターの電源スイッチを切った状態で、ディスプ
レイ裏面のビデオ入力端子(HD15)と、コンピューターの
モニター出力を、付属のHD15ビデオ信号ケーブルで接続
します。
• IBM PC/ATコンピューターまたは互換機をお使いのとき
は、
「IBM PC/ATコンピューターまたは互換機に接続す
る」をご覧ください。
• Macintoshコンピューターまたは互換機をお使いのとき
は、
「Macintoshコンピューターまたは互換機に接続す
る」をご覧ください。
• NEC PC-98シリーズのコンピューターをお使いのとき
は、
「NEC PC-98シリーズのコンピューターと接続す
る」をご覧ください。
6
する
HD15
コネクターへ
Macintosh
コンピューター
または互換機
モニター出力へ
HD15ビデオ信号
ケーブル
(付属)
Macintosh用変換
アダプター(付属)
付属のMacintosh用変換アダプターをお使いのときは
付属のMacintosh用変換アダプターは、Macintosh LC、
Performa、Quadra、およびPower Macintoshシリーズに対応
しています。Macintosh IIシリーズやPower Bookなど一部の古
いモデルを接続するときは、市販のMacintosh用変換アダプター
が必要な場合があります。この場合は、販売店等にご相談くださ
い。
準備
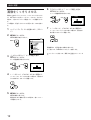
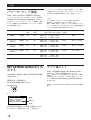
NEC PC-98シリーズのコンピューターに接続
する
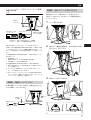
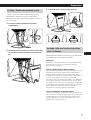
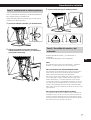
準備3: 端子カバーを取り付ける
接続が終わったら、付属の端子カバーを取り付けます。
端子カバーの取り付け、取り外しは、必ず画面を垂直にし
て行ってください。
HD15
コネクターへ
PC-98シリーズの
コンピューター
モニター出力へ
1
コード類をまとめる。
2
端子カバー裏面の突起部を、本体の取り付け部に
差し込んで、押し下げる。
3
端子カバーをネジ止めする。
HD15ビデオ信号
ケーブル
(付属)
PC-98シリーズまたはPC-H98シリーズ用変換
アダプター(別売り)が必要な場合があります。
J
NEC PC-98シリーズのコンピューターをお使いのときは
本機は、水平走査周波数24.8kHzの640×400ドット表示には対応
しておりません
(コンピューターの画像が画面に出ません)。した
がって、640×400ドットは31.5kHzの表示モードで使用してくだ
さい。
水平走査周波数31.5kHzの640×400ドット表示に対応している
PC-98シリーズ
• 98MATEシリーズ
• 98FELLOWシリーズ(PC-9801BA、BXは除く)
• PC-H98シリーズ(PC-H98Sは除く)
水平走査周波数31.5kHzの640×400ドット表示の設定方法
1 対応するPC-98シリーズ本体の電源を切った状態で、本ディス
プレイを接続します。
2 キーボードの「GRAPH」キーと「2」キーを押しながら、コン
ピューターの電源スイッチを入れます。
※ なお、アプリケーションによっては、31.5kHzの640×400ドッ
トモードでは正しく動作しないものもあります。詳しくは、各
アプリケーション提供会社にご確認ください。
準備2: 電源コードをつなぐ
本機の電源スイッチを切った状態で、付属のACアダプター
および電源コードをつなぎます。
ACアダプター
(付属)
電源入力
端子へ
電源コンセントへ
電源コード(付属)
ロック解除状態
ロック状態
7
準備
準備4: 本機とコンピューターの電源
を入れる
これで本機の準備が完了しました。
ご注意
「OUT OF SCAN RANGE」
、または「NO INPUT SIGNAL」
とい
う警告表示が出ているときは、19ページの
「入力信号警告表示」
を
ご覧ください。
Windows 95/98をお使いのお客さまは
本機がその性能を最大限に発揮できるよう、付属の
「Windows Monitor Information Disk/Utility Disk」から
新機種情報ファイルを、お使いのコンピューターにインス
トールしてください。
本機は、プラグ&プレイ規格である「VESA DDC」に対応
しています。お使いのコンピューターまたはグラフィック
ボードがDDC に対応している場合は、Windows 95/98の
「コントロールパネル」の中から、「プラグアンドプレイモ
、または本機の型名を選択してくだ
ニター(VESA DDC)」
さい。
コンピューターやグラフィックボードと本機の通信に不都
合がある場合は、
「Windows Monitor Information Disk/
Utility Disk」をインストールし、本機の型名を選択してく
ださい。
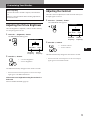
ディスプレイを自動調整す
る
画像がちらついたり、くっきりしていないときは、AUTO
ボタンを押すと接続したコンピューターの信号に適した状
態に自動的に調整されます。
コンピューターによっては、微調整が必要な場合がありま
す。その場合は、手動調整を行ってください。
(10ページ
からの「画面の調整」参照。)
1
本機の電源を入れる。
2
コンピューターの電源を入れる。
3
AUTOボタンを押す。
信号のピッチを合わせて、鮮明な画像になるように調
整します。同時に、画像が画面の中央に表示されるよ
うに調整されます。
AUTO
Windows NT4.0をお使いのお客さまは
Windows NT4.0では、Windows 95/98で表示される機
種名が表示されません。Windows NT4.0の取扱説明書を
ご覧になり、解像度、リフレッシュレート、色数を設定し
てください。
ご注意
• この機能はWindowsなど、表示可能エリア全体に画像が表示さ
れる場合に正しく動作します。
DOSプロンプトのような画面の一部にしか画像が表示されてい
ない場合や、背景を黒で使用している場合には正しく動作しな
いときがあります。
• 動作時に数秒間画像が消えることがありますが、故障ではあり
ません。
AUTOボタンを押しても、画像がちらついたり、
にじんだりしているとき
手動でピッチやフェーズなどを調整することもできます
。
(12ページ)
8
準備
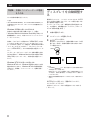
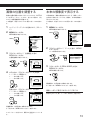
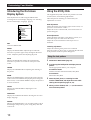
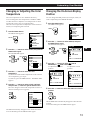
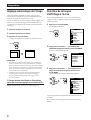
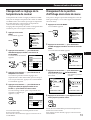
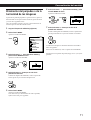
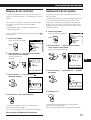
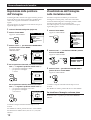
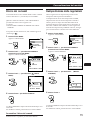
メニュー言語を選ぶ
日本語、英語、フランス語、ドイツ語、スペイン語、イタ
リア語の中から、選べます。
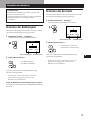
1
MENUボタンを押す。
MENU画面が表示されます。
MENU
MENU
OK MENU
EXIT
PHASE
PITCH
CENTER
ZOOM
COLOR
LANGUAGE
OPTION
2
≥/˘ボタンを押して、「LANGUAGE」を選び、
MENUボタンを押す。
LANGUAGE画面が表示されます。
J
LANGUAGE
MENU
ENGLISH
FRANÇAIS
DEUTSCH
ESPAÑOL
ITALIANO
日本語
3
≥/˘ボタンを押して、希望の言語を選び、
MENUボタンを押す。
MENU画面に戻ります。
MENU
MENU
OK MENU
終了
フェーズ調整
ピッチ調整
位置調整
ズーム
色温度調整
LANGUAGE
オプション
画面は、約30秒後に自動的に消えます。
すぐ消すには、MENUボタンをもう一度押します。
9
画面の調整
調整を始める前に
本機とコンピューターを接続し、両方の電源を入れてく
ださい。電源を入れて、30分以上経過してから調整する
と、最適な調整ができます。
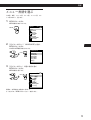
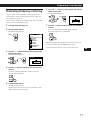
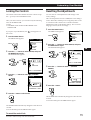
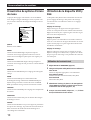
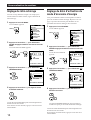
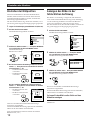
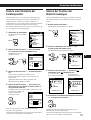
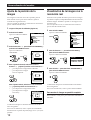
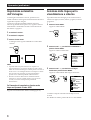
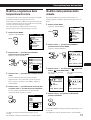
コントラストを調整する
この調整は、入力信号が変わっても保持されます。
1
>(コントラスト)≥ボタンを押す。
コントラスト調整画面が表示されます。
画像の明るさを調整する
コントラスト
この調整は、入力信号が変わっても保持されます。
1
26
¨(明るさ)˘ボタンを押す。
48.4kHz/ 60Hz
ブライトネス調整画面が表示されます。
ブライトネス
水平周波数* 垂直周波数*
2
+/ーボタンで調整する。
26
48.4kHz/ 60Hz
+. . . コントラストが強くなります。
ー. . . コントラストが弱くなります。
水平周波数* 垂直周波数*
2
調整画面は、約3秒後に自動的に消えます。
+/ー ボタンで調整する。
* コントラスト調整画面には、現在入力されている信号の水平周
+ . . . 明るくなります。
ー . . . 暗くなります。
調整画面は、約3秒後に自動的に消えます。
* ブライトネス調整画面には、現在入力されている信号の水平周
波数/垂直周波数も表示されます。
暗い部屋などで使用しているときに画面全体がまぶしい場合は
バックライトを調整します。
(15ページ)
10
波数/垂直周波数も表示されます。
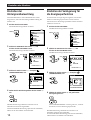
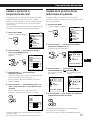
画面の調整
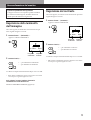
メニュー画面について
本機はメニュー画面を使って様々な調整(設定)をすること
ができます。
メニュー画面を日本語にするには、「メニュー言語を選ぶ」
をご覧ください(9ページ)。
MENU
OK MENU
終了
フェーズ調整
ピッチ調整
位置調整
ズーム
色温度調整
LANGUAGE
ユーティリティディスクに
ついて
付属のユーティリティディスクには、調整用のテストパ
ターンが入っています。ピッチ調整、フェーズ調整、位置
調整のときに、このテストパターンを画面に表示させ、調
整の目安にしてください。
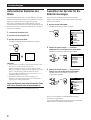
ピッチ調整
画面に縦縞が出たり、画面の一部がちらついたり、にじん
だりしている場合に行います。テストパターンの大きな縦
縞がなくなるように調整します。
オプション
フェーズ調整
終了
MENU画面を消すときに選びます。
画面全体がちらついたり、にじんだりしている場合、また
は横縞が出ている場合に行います。テストパターンの横縞
が最少になるように調整します。
フェーズ調整
フェーズ調整画面を表示します。文字や画像が全体的
に鮮明でないときに調整します。フェーズ調整は、
ピッチ調整をした後で行います。
ピッチ調整
ピッチ調整画面を表示します。文字や画像が部分的に
鮮明でないときに調整します。
位置調整
位置調整画面を表示します。画像を画面の中央に表示
させるときに選びます。
ズーム
位置調整
画像の位置が画面の中央からずれている場合に行います。
テストパターンの外周の赤枠が全部、画面に入るように調
整します。
テストパターンの使いかた
1
2
ズーム画面を表示します。画面全体に表示するか、画
像本来の解像度で表示するかを選びます。
Windows Monitor Information Disk/Utility Disk
Macintoshの場合
Macintosh用Utility Disk
色温度調整画面を表示します。色温度を変えたり、調
整したりするときに選びます。
LANGUAGE
オプション
オプション項目を表示します。オプション画面では、
バックライトや、メニュー画面の位置やパワーセービ
ング状態になるまでの時間を設定することができま
す。また、調整ボタンをロックすることもできます。
ユーティリティディスクを起動して、テストパ
ターンを表示する。
お使いのコンピューターに合ったディスクをお使いく
ださい。
Windows 95/98の場合
色温度調整
LANGUAGE画面を表示します。メニュー言語を変え
るときに選びます。
「ズーム」を「REAL MODE」にする。
(13ペー
ジ)
3
メニューで調整項目を選び、調整する。(12 、13
ページ)
4
調整が終わったら、画面上の[END]をクリックし
て、テストパターンを消す。
11
J
画面の調整
6
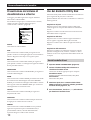
画像をくっきりさせる
≥/˘ボタンを押して、「フェーズ調整」を選び、
MENUボタンを押す。
フェーズ調整画面が表示されます。
画像の一部がちらついていたり、にじんでいたりするとき
は、AUTOボタンを押してください。それでも、直らない
場合は、下記のようにピッチ調整とフェーズ調整を行いま
す。
この調整は、現在入力されている信号に対してのみ有効で
す。
1
ユーティリティディスクを起動させる。(11ペー
ジ)
2
MENUボタンを押す。
MENU
フェーズ調整
26
7
+/ーボタンで、ずれがなくなるまで調整する。
ユーティリティディスクをお使いの場合は、横方向の
縞が最少になるように調整します。
MENU画面が表示されます。
MENU
MENU
OK MENU
終了
フェーズ調整
ピッチ調整
位置調整
ズーム
色温度調整
LANGUAGE
調整画面は、約30秒後に自動的に消えます。
すぐ消すには、MENUボタンをもう一度押します。
オプション
3
≥/˘ボタンを押して、「ピッチ調整」を選び、
MENUボタンを押す。
ピッチ調整画面が表示されます。
ピッチ調整
MENU
1328
4
+/ーボタンで、ずれがなくなるまで調整する。
ユーティリティディスクをお使いの場合は、縦方向の
大きな縞がなくなるように調整します。
5
MENUボタンを押す。
MENU画面に戻ります。
画面全体にまだ横縞が見られる場合は、続いてフェー
ズ調整を行います。
12
テストパターンを消すには、画面上の[END]をクリックしま
す。
画面の調整
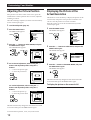
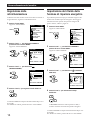
画像の位置を調整する
本来の解像度で表示する
画像の位置が画面の中央からずれているときは、AUTOボ
タンを押してください。それでも、直らない場合は、下記
のように位置調整画面で調整します。
この調整は、現在入力されている信号に対してのみ有効で
す。
工場出荷時は、画像を解像度にかかわらず、画面いっぱい
に表示する設定になっています。画像を、本来の解像度で
見ることもできます。
この設定は、現在入力されている信号に対してのみ有効で
す。
1
1
ユーティリティディスクを起動させる。
(11ペー
ジ)
MENUボタンを押す。
MENU画面が表示されます。
MENU
2
MENUボタンを押す。
MENU画面が表示されます。
MENU
MENU
MENU
LANGUAGE
オプション
3
LANGUAGE
オプション
2
J
≥/˘ボタンを押して、「ズーム」を選び、MENU
ボタンを押す。
ズーム画面が表示されます。
を選び、
≥/˘ボタンを押して、「位置調整」
MENUボタンを押す。
位置調整画面が表示されます。
MENU
ズーム
MENU
FULL MODE
REAL MODE
位置調整
H
V
26
4
終了
フェーズ調整
ピッチ調整
位置調整
ズーム
色温度調整
OK MENU
終了
フェーズ調整
ピッチ調整
位置調整
ズーム
色温度調整
OK MENU
3
≥ボタンを押して「REAL MODE」を選び、
MENUボタンを押す。
MENU画面に戻ります。
水平方向は、≥/˘ボタンを押して
「H」
を選び、
+/ーボタンで調整する。
位置調整
+ . . . 右に移動します。
ー . . . 左に移動します。
H
V
26
「V」を選び、
垂直方向は、≥/˘ボタンを押して
+/ーボタンで調整する。
位置調整
+ . . . 上に移動します。
ー . . . 下に移動します。
H
調整画面は、約30秒後に自動的に消えます。
すぐ消すには、MENUボタンをもう一度押します。
画面いっぱいに表示されるようにするには
手順3で˘ボタンを押して、
「FULL MODE」を選びます。
V
26
調整画面は、約30秒後に自動的に消えます。
すぐ消すには、MENUボタンをもう一度押します。
テストパターンを消すには、画面上の[END]をクリックしま
す。
13
画面の調整
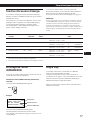
色温度を変える・調整する
色温度は、工場出荷時に9300Kに設定されています。
9300Kの他に、6500Kまたは5000Kに設定できます。
また、赤と青を調整して、好みの色にすることもできま
す。印刷される色と同じ色を画面上で再現したいときなど
に使います。
この調整は、入力信号が変わっても保持されます。
1
メニュー画面の表示位置を
変える
メニュー画面があるためにその部分の画質が調整できない
ときなどに、メニュー画面を移動します。
1
MENU画面が表示されます。
MENUボタンを押す。
MENU
MENU
MENU画面が表示されます。
MENU
MENU
MENUボタンを押す。
OK MENU
終了
フェーズ調整
ピッチ調整
位置調整
ズーム
色温度調整
OK MENU
終了
フェーズ調整
ピッチ調整
位置調整
ズーム
色温度調整
LANGUAGE
オプション
LANGUAGE
オプション
2
2
≥/˘ボタンを押して、「色温度調整」を選び、
MENUボタンを押す。
≥/˘ボタンを押して、「オプション」を選び、
MENUボタンを押す。
オプション画面が表示されます。
オプション
色温度調整画面が表示されます。
MENU
色温度調整
MENU
9300K
6500K
5000K
USER MODE
R 50
G 50
B 50
: 1M
: アンロック
OSD 水平位置
3
3
4
≥/˘ボタンを押して、色温度を選ぶ。
調整をする場合は、手順4へ進みます。
調整をしない場合は、MENUボタンを押すと、
MENU画面に戻ります。
」または
「B(青)
」を選
≥/˘ボタンを押して「R(赤)
び、+/ーボタンを押して、希望の色になるまで
調整する。
G(緑)を基準として、RやBを増減して色温度を変えま
すので、Gは固定されています。
≥/˘ボタンを押して、「 (OSD水平位置)」また
は「 (OSD垂直位置)」を選ぶ。
水平方向の位置を
調整するとき
垂直方向の位置を
調整するとき
オプション
オプション
: 1M
: アンロック
: 1M
: アンロック
OSD 水平位置
OSD 垂直位置
色温度調整
9300K
6500K
5000K
USER MODE
R 50
G 50
B 50
調整画面は、約30秒後に自動的に消えます。
すぐ消すには、MENUボタンをもう一度押します。
14
4
+/ーボタンを押して、希望の位置に移動する。
オプション画面は、約30秒後に自動的に消えます。
すぐ消すには、MENUボタンをもう一度押します。
画面の調整
バックライトを調整する
暗い場所で使用しているときに、画面が明るすぎてまぶし
いときは、バックライトを調整して見やすくします。
1
MENUボタンを押す。
MENU画面が表示されます。
MENU
MENU
OK MENU
終了
フェーズ調整
ピッチ調整
位置調整
ズーム
色温度調整
パワーセービング状態にな
る時間を設定する
パワーセービングディレイ機能を使って、パワーセービン
グ状態になるまでの時間を早める、または遅らせることが
できます。パワーセービング機能についての詳しい説明は
18ページをご覧ください。
1
MENUボタンを押す。
MENU画面が表示されます。
MENU
MENU
終了
フェーズ調整
ピッチ調整
位置調整
ズーム
色温度調整
LANGUAGE
オプション
2
OK MENU
を選び、
≥/˘ボタンを押して、「オプション」
MENUボタンを押す。
LANGUAGE
J
オプション
オプション画面が表示されます。
オプション
2
MENU
を選び、
≥/˘ボタンを押して、「オプション」
MENUボタンを押す。
オプション画面が表示されます。
: 1M
: アンロック
オプション
MENU
OSD 水平位置
3
≥/˘ボタンを押して、「
を選ぶ。
: 1M
: アンロック
(バックライト調整)
」
OSD 水平位置
オプション
26
:
: アンロック
3
ZZ...
(PWR SAVE
オプション
バックライト調整
4
≥/˘ボタンを押して、「
DELAY)」を選ぶ。
60MIN
1MIN
: 5SEC
: オフ
+/ーボタンを押して、希望の明るさにする。
PWR SAVE DELAY
4
+/ーボタンを押して希望の時間を選ぶ。
オプション画面は、約30秒後に自動的に消えます。
すぐ消すには、MENUボタンをもう一度押します。
設定を
「オフ」にすると、本機はパワーセービング状態
になりません。
オプション画面は、約30秒後に自動的に消えます。
すぐ消すには、MENUボタンをもう一度押します。
15
画面の調整
調整や設定をロックする
工場出荷時の設定に戻す
コントロールロック機能を使って、u(電源)スイッチと
MENUボタン、および本体前面のボタンの一部を除いて、
操作できないようにすることができます。
本機で行った調整や設定を、すべて工場出荷時に戻すこと
ができます。工場出荷時の設定に戻すと、色温度は9300K
に、ズームはフルモードに、パワーセービングディレイは1
分になります。コントロールロックは解除されます。その
他の調整は、工場出荷時の調整に戻ります。ただし、メ
ニュー言語の設定は変わりません。
「ロック」にすると、MENU画面で選ぶことができる項目は
「終了」と、
「オプション」の「コントロールロック」と
「FACTORY PRESET」のみになります。
」マークが表示されま
操作できないボタンを押すと、「
す。
1
MENUボタンを押す。
MENU画面が表示されます。
MENU
1
MENU
MENUボタンを押す。
終了
フェーズ調整
ピッチ調整
位置調整
ズーム
MENU画面が表示されます。
MENU
OK MENU
MENU
2
終了
フェーズ調整
ピッチ調整
位置調整
ズーム
2
OK MENU
≥/˘ボタンを押して、「オプション」を選び、
MENUボタンを押す。
オプション画面が表示されます。
を選び、
≥/˘ボタンを押して、「オプション」
MENUボタンを押す。
オプション
MENU
オプション画面が表示されます。
オプション
: 1M
: アンロック
MENU
: 1M
: アンロック
3
≥/˘ボタンを押して、「
ク)」
を選ぶ。
3
≥/˘ボタンを押して、「?(FACTORY
PRESET)」を選ぶ。
オプション
(コントロールロッ
オプション
: 1M
:
オン
: アンロック
: ロック
コントロールロック
4
FACTORY PRESET
4
+ボタンを押す。
ーボタンを押して、
「ロック」を選ぶ。
オプション画面は、約30秒後に自動的に消えます。
すぐ消すには、MENUボタンをもう一度押します。
オプション画面は、約30秒後に自動的に消えます。
すぐ消すには、MENUボタンをもう一度押します。
コントロールロック機能を解除するには
上記の手順4で、+ボタンを押して「アンロック」を選びま
す。
16
その他
その他
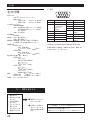
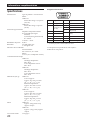
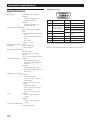
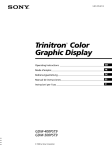
本機の対応信号と機能
本機は工場出荷時に、下記の代表的なモードがあらかじめ
設定されています。
新しい入力信号が入力されると、本機は適切な信号モード
を選び、高画質の画像を表示するように調整され、同じ入
力信号が入力されるたびに同じモードが選ばれるようにな
ります。
グラフィック
垂直周波数 モード
モード
解像度
水平周波数
1
–
15.625 kHz
50 Hz
625I
2
–
15.75 kHz
60 Hz
525I
3
640 × 350
31.5 kHz
70 Hz
MCGA
4
640 × 400
31.5 kHz
70 Hz
NEC PC-98
5
640 × 480
31.5 kHz
60 Hz
VGA-G
6
640 × 480
35.0 kHz
67 Hz
Macintosh
13” カラー
7
640 × 480
37.5 kHz
75 Hz
EVGA
8
640 × 480
43.3 kHz
85 Hz
VESA
9
720 × 400
31.5 kHz
70 Hz
VGAテキスト
10
720 × 400
37.9 kHz
85 Hz
VESA
11
800 × 600
37.9 kHz
60 Hz
SVGA
12
800 × 600
46.9 kHz
75 Hz
ESVGA
13
800 × 600
53.7 kHz
85 Hz
VESA
14
832 × 624
49.7 kHz
75 Hz
Macintosh
16” カラー
15
1024 × 768
48.4 kHz
60 Hz
VESA
16
1024 × 768
56.5 kHz
70 Hz
VESA
17
1024 × 768
60.0 kHz
75 Hz
EUVGA
18
1024 × 768
60.2 kHz
75 Hz
Macintosh
19” カラー
19
1024 × 768
68.7 kHz
85 Hz
VESA
工場出荷時の信号モード以外の入力信号に対しては、マル
チスキャン機能により必要な調整が行われますが、画像の
位置などの微調整が必要な場合があります。その場合は、
AUTOボタンを押すか、「画面の調整」に従って調整してく
ださい。調整値は、自動的にユーザーモードとして設定さ
れ、同じ入力信号が入力されるたびに選ばれるようになり
ます。
推奨する水平、垂直周波数のタイミングは
水平同期幅率:水平周波数タイミングの合計の4.8%以上
水平ブランキング幅:2.5µs以上
垂直ブランキング幅:450µs以上
解像度と色数を設定するには
コンピューターの取扱説明書をご覧ください。
カラーパレットの設定と表示される色数は、以下のとおりです。色
数は、コンピューターやグラフィックボードの性能によって制限さ
れます。
• High Color(16ビット)n 65536色
• True Color(24ビット)n 約1677万色
True Color(24ビット)に設定すると、画面の描画速度が少し遅く
なります。
17
J
その他
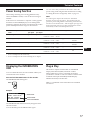
パワーセービング状態になるまでの時間は、メニュー画面
で設定することができます。15ページの「パワーセービン
グ状態になる時間を設定する」に従って設定してくださ
い。
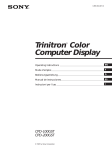
パワーセービング機能
本機は、VESA、NUTEKおよびENERGY STARのパ
ワーセービングガイドラインに対応しています。DPMS
(Display Power Management Signaling)に対応して
いるコンピューターやグラフィックボードに接続して操作
すると、自動的に下記の3段階のパワーセービング(省電
力)状態で動作します。
1
ご注意
ビデオ信号が入力されていないときは、画面に「NO INPUT
SIGNAL」という警告表示(19ページ)が表示されます。
設定した時間を過ぎると、直接アクティブオフ状態になりuインジ
ケーターの点灯がオレンジ色に変わります。水平・垂直同期信号が
入力されると自動的に通常の動作状態になります。
状態
画面
水平同期
信号
垂直同期
信号
通常動作
通常表示
有り
有り
CPD-L133
CPD-L150
≦ 30W (≦ 42W)
≦ 25W (≦ 35W)
ー
緑点灯
電力消費量
復帰するまで
本体(ACアダプターを含む) の時間
uインジケーター
2
スタンバイ
(第1段階)
画像無し
無し
有り
CPD-L133
CPD-L150
≦ 1.5W (≦ 4W)
≦ 1.5W (≦ 4W)
約3秒
緑、オレンジ点滅
3
サスペンド
(第2段階)
画像無し
有り
無し
CPD-L133
CPD-L150
≦ 1.5W (≦ 4W)
≦ 1.5W (≦ 4W)
約3秒
緑、オレンジ点滅
4
アクティブオフ
(第3段階)
画像無し
無し
無し
CPD-L133
CPD-L150
≦ 1.5W (≦ 4W)
≦ 1.5W (≦ 4W)
約10秒
オレンジ点灯
ー
ー
ー
CPD-L133
CPD-L150
≦ 1.5W (≦ 4W)
≦ 1.5W (≦ 4W)
ー
消灯
5
電源オフ
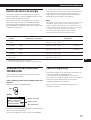
INFORMATION画面を表
示する
本機の機種名、製造番号、製造年をINFORMATION画面
で確認できます。
MENUボタンを5秒間押す。
INFORMATION画面が表示されます。
プラグ&プレイ
本機は、VESA標準のDisplay Data Channel (DDC)
規格である、DDC1とDDC2Bに対応しています。
DDC1のホストシステムが接続されているときは、本機は
VESAスタンダードに基づき、V.CLKに同期してデータラ
インへEDID (Extended Display Identification Data)
を出力します。
DDCは、Video Electronics Standard Associationの登録商
標です。
MENU
例
INFORMATION
MODEL : CPD-L150
SER. NO : 1234567
MANUFACTURED : 1998
機種名
製造番号
製造年
INFORMATION画面は、約30秒後に自動的に消えます。
すぐに消すには、MENUボタンをもう一度押します。
18
その他
入力信号警告表示
入力信号が正常でないときに、画面に次のような警告表示が
表示されます。
OUT OF SCAN RANGE
INFORMATION
入力信号が本機の仕様に合っていない。
NO INPUT SIGNAL
OUT OF SCAN RANGE
信号が入力されていない。
警告表示が出た場合は、下記の「故障かな?と思ったら」を
ご覧ください。
故障かな?と思ったら
J
お買い上げ店などにご相談いただく前に、下記の事項をご確認ください。
症状
原因と対策
画像が出ない
uインジケーターが点灯していな
いとき
• 電源コードを接続し直す。
• u(電源)スイッチが入っていない。
「NO INPUT SIGNAL」という
警告表示が出ているか、uインジ
ケーターがオレンジ色に点灯して
いるとき
• コンピューターがパワーセービング状態になっていると、画面が表示されません。コン
ピューターのキーボードのキーのどれかを押してみてください。
• コンピューターの電源が入っていない。
• 入力信号が正しく設定されていない。
• ビデオ信号ケーブルが接続されていない、またはゆるんでいる。(MacintoshやPC-98シ
リーズの場合は、変換アダプターをつなぐ。)
• HD15ビデオ信号ケーブルのピンが曲がっている。
「OUT OF SCAN RANGE」と
いう警告表示が出ているとき
• 入力信号の周波数が、本機の仕様に適合していない。
(水平周波数:30~70kHz 、
垂直周波数:50~85Hz )
コンピューターの取扱説明書に従って、入力信号の周波数を調整してください。
• 変換アダプターを使用しているときは、アダプターに異常がないかを確認する。
Macintoshシステムと接続して
• Macintosh用変換アダプターに異常がないかを確認する。
いるとき
NEC PC-98シリーズのコン
ピューターと接続しているとき
• 本機は、水平周波数24.8kHz、解像度640×400ドット表示モードには対応していません。
キーボードの「GRAPH」キーと
「2」
キーを押しながら、コンピューターの電源を入れて、水
平周波数を31.5kHzに変えてください。
(7ページ)
Windows 95/98を使用している
• 本機とつなぎ換えたデイスプレイがあるときは、それをつないで、画像が出たら以下を行っ
てください。Windows 95/98のデバイス選択画面で製造元にSONYを選び、本機の型名
(CPD-L133またはCPD-L150)を選びます。本機の型名が表示されないときは、
「プラグア
ンドプレイ」を選ぶか、「Windows Monitor Information Disk/Utility Disk」
からソニーコ
ンピューターディスプレイの新機種情報をインストールします
(8ページ)。
とき
次のページへつづく
19
その他
症状
原因と対策
画像が暗い
• バックライトを調整する(15ページ)。
• ブライトネスを調整する(10ページ)。
• 電源を入れた後、画面が明るくなるまで多少時間がかかります。そのままお待ちください。
画像が乱れている
• AUTOボタンを押す(8ページ)。それでも直らない場合は、ピッチとフェーズを調整する
(12ページ)。
• 入力しようとしている信号のグラフィックモードと周波数を確認する。グラフィックモード
と周波数が本機で使用できる範囲であっても、コンピューターによっては同期パルス幅が狭
すぎて正しく同期がとれない場合があります。
色むらがある
• AUTOボタンを押す(8ページ)。それでも直らない場合は、ピッチとフェーズを調整する
(12ページ)。
前面パネルのボタンでモニターを
調整することができない
• コントロールロックが「ロック」になっている。オプション画面でコントロールロックを「ア
ンロック」にする
(16ページ)。
白色が白く見えない
• 色温度を調整する(14ページ)。
画像の位置がずれている
• AUTOボタンを押す(8ページ)。
• 画像の位置を調整する(13ページ)。
• 信号やコンピューターによっては、画像が画面いっぱいまで広がらない場合があります。
画像の大きさが正しくない
•「ズーム」の設定を確認する(13ページ)。
画像がくっきりしていない
• AUTOボタンを押す(8ページ)。それでも直らない場合は、ピッチとフェーズを調整する
(12ページ)。
• コントラストや明るさを調整する(10ページ)。
画像が上下にゆれる、波状に乱れ
る
• 違う回線の電源につないでみる。
• 本機を違うコンピューターに接続してみる。
画像がちらつく
• AUTOボタンを押す(8ページ)。それでも直らない場合は、ピッチとフェーズを調整する
(12ページ)。
画像が二重、三重になる
• 延長コードや映像切り換え機の使用をやめる。
コードが長すぎることや接続がゆるいことなどが原因です。
波模様や縦縞が出る
• AUTOボタンを押す(8ページ)。それでも直らない場合は、ピッチとフェーズを調整する
(12ページ)。
• 故障のときは、お買い上げ店またはソニーサービス窓口にご連絡ください。
• お問い合わせのときは、本機の製品名と製品番号、接続しているコンピューターとビデオボードの仕様および名称をお知ら
せください。
20
その他
保証書とアフターサービス
保証書
• この製品は保証書が添付されていますので、お買い上げ
の際、お買い上げの販売店からお受け取りください。
• 所定事項の記入および記載内容をお確かめのうえ、大切
に保存してください。
• 保証期間は、お買い上げ日より1年間です。
アフターサービスについて
調子が悪いときはまずチェックを
/「故障かな?と思ったら」の項を参考にして、故障かど
うかをお調べください。
それでも具合が悪いときはサービス窓口へ
/ お買い上げ店、または添付の「ソニーご相談窓口のご案
内」にある、お近くのソニーサービス窓口にご相談くだ
さい。
J
保証期間中の修理は
/ 保証書の記載内容に基づいて修理させていただきます。
詳しくは保証書をご覧ください。
保証期間経過後の修理は
/ 修理によって機能が維持できる場合は、ご要望により有
料で修理させていただきます。
部品の保有期間について
当社では、コンピューターティスプレイの補修用性能部品
(製品の機能を維持するために必要な部品)を、製造打ち切
り後最低8年間保有しています。この部品保有期間を修理可
能の期間とさせていただきます。
保有期間が経過した後でも、故障箇所によっては、修理可
能の場合がありますので、お買い上げ店か、サービス窓口
にご相談ください。なお、補修用性能部品の保有期間は通
商産業省の指導によるものです。
ご相談になるときは次のことをお知らせください。
型名:CPD-L133 、CPD-L150
製造番号:
故障の状態:できるだけくわしく
購入年月日:
お買い上げ店
TEL.
お近くのサービスステーション
TEL.
21
その他
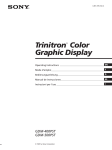
ピン配列
主な仕様
5 4 3 2 1
10 9 8 7 6
15 14 13 12 11
LCDパネル
a-Si TFT アクティブマトリックス
画面サイズ:
CPD-L133
CPD-L150
13.3インチ(33.8cm)
15.0インチ(38cm)
入力信号フォーマット
RGB動作周波数
水平:15.625kHz(625インターレース信号)
15.75kHz(525インターレース信号)
30∼70kHz
垂直:50∼85Hz
有効画素率
99.99%
水平:最大1024ドット
垂直:最大768ライン
電源電圧 使用電源:AC100∼240V/50–60Hz
入力電源:DC12V(専用ACアダプター)
消費電力量
解像度
ピン番号
1
2
3
4
5
6
7
信号名
R(赤)
G(緑)
(Composite
Sync on
Green)
B(青)
ID(アース)
DDCアース*
R(赤)アース
G(緑)アース
ピン番号
信号名
8
9
10
11
12
B(青)アース
DDC + 5V*
13
14
15
アース
ID(アース)
データライン
(SDA)*
水平同期
垂直同期
クロックライン
(SCL) *
* VESAによるDisplay Data Channel(DDC)規格
CPD-L133
本体:30W(最大)
ACアダプターを含む:42W(最大)
CPD-L150
本機の仕様および外観は、改良のため予告なく変更するこ
とがありますが、ご了承ください。
本体:25W(最大)
ACアダプターを含む:35W(最大)
最大外形寸法
(幅/高さ/奥行き)
CPD-L133
スタンド付:
約373×358×165mm
スタンドなし:
約373×272×71mm
CPD-L150
質量
付属品
スタンド付:
約398×366×165mm
スタンドなし:
約398×291×71mm
約4.9kg
(スタンドを含む)
CPD-L133
約5.3kg
(スタンドを含む)
CPD-L150
6ページをご覧ください。
万一、異常が起きたら
• 煙が出たら
• 変なにおいや音
がしたら
• 内部に異物が
入ったら
• ディスプレイを
落としたり、
キャビネットを
破損したときは
22
/ 1 電源プラグをコン
セントから抜く
2 お買い上げ店また
はソニーサービス
窓口に修理を依頼
する
ソニー株式会社 〒141-0001 東京都品川区北品川6-7-35
お問い合わせはお客様ご相談センターへ
●東京(03)5448-3311●名古屋(052)232-2611●大阪(06)539-5111
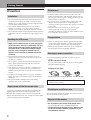
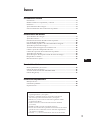
Getting Started
TABLE OF CONTENTS
Getting Started
Precautions ...........................................................................................................................
Identifying Parts and Controls ..........................................................................................
Setup ......................................................................................................................................
Automatically Adjusting the Picture ................................................................................
Selecting the On-Screen Display Language .....................................................................
4
5
6
8
8
Customizing Your Monitor
Adjusting the Picture Brightness ....................................................................................... 9
Adjusting the Contrast ........................................................................................................ 9
Introducing the On-Screen Display System ................................................................... 10
Using the Utility Disk ........................................................................................................ 10
Eliminating Flickering or Blurring .................................................................................. 11
Adjusting the Picture Position ......................................................................................... 12
Displaying the Picture at the Actual Resolution ........................................................... 12
Changing or Adjusting the Color Temperature ............................................................ 13
Changing the On-Screen Display Position ..................................................................... 13
Adjusting the Backlight .................................................................................................... 14
Setting the Power Saving Delay Time ............................................................................ 14
Locking the Controls ......................................................................................................... 15
Resetting the Adjustments ............................................................................................... 15
EN
F
D
ES
I
Technical Features
Preset and User Modes ..................................................................................................... 16
Power Saving Function ..................................................................................................... 17
Displaying the INFORMATION OSD ............................................................................ 17
Plug & Play ......................................................................................................................... 17
Additional Information
Warning Messages ............................................................................................................. 18
Troubleshooting ................................................................................................................. 18
Specifications ...................................................................................................................... 20
• Macintosh is a trademark licensed to Apple Computer, Inc., registered in
the U.S.A. and other countries.
• Windows® and MS-DOS are registered trademarks of Microsoft
Corporation in the United States and other countries.
• IBM PC/AT and VGA are registered trademarks of IBM Corporation of
the U.S.A.
• VESA is a trademark of Video Electronics Standard Association.
• ENERGY STAR is a U. S. registered mark.
• All other product names mentioned herein may be the trademarks or
registered trademarks of their respective companies.
• Furthermore, “™” and “®" are not mentioned in each case in this
manual.
3
Getting Started
Precautions
Installation
• Prevent internal heat build-up by allowing adequate air
circulation. Do not place the monitor on surfaces (rugs,
blankets, etc.) or near materials (curtains, draperies) that
may block the ventilation holes.
• Do not install the monitor near heat sources such as
radiators or air ducts, or in a place subject to direct
sunlight, excessive dust, mechanical vibration or shock.
• Do not place the monitor near equipment which generates
magnetism, such as a transformer or high voltage power
lines.
Maintenance
• Clean the cabinet, panel and controls with a soft cloth
lightly moistened with a mild detergent solution. Do not
use any type of abrasive pad, scouring powder or solvent,
such as alcohol or benzine.
• Do not rub, touch, or tap the surface of the screen with
sharp or abrasive items such as a ballpoint pen or
screwdriver. This type of contact may result in a scratched
picture tube.
• Clean the screen with a soft cloth. If you use a glass
cleaning liquid, do not use any type of cleaner
containing an antistatic solution or similar additive as this
may scratch the screen’s coating.
Transportation
Handling the LCD screen
• Bright points of light (red, blue or green) may appear
on the LCD screen. This is not a malfunction. The LCD
screen is made with high-precision technology and
more than 99.99 % of the picture element is intact.
However, some of the picture element may not
appear or some of the picture element may appear
constantly.
• Do not leave the LCD screen facing the sun as it can
damage the LCD screen. Take care when you place the
monitor by a window.
• Do not push or scratch the LCD screen. Do not place a
heavy object on the LCD screen. This may cause the
screen to lose uniformity.
• If the monitor is used in a cold place, a residual image
may appear on the screen. This is not a malfunction.
When the monitor becomes warm, the screen returns to
normal.
• If a still picture is displayed for a long time, a residual
image may appear. The residual image will eventually
disappear.
• The screen and the cabinet become warm during
operation. This is not a malfunction.
• When you transport this monitor, grip the bottom of the
screen firmly with both hands. If you drop the monitor,
you may be injured or the monitor may be damaged.
• When you transport this monitor for repair or shipment,
use the original carton and packing materials.
Warning on power connection
• Use an appropriate power cord for your local power
supply.
For the customers in the UK
If you use the monitor in the UK, please use the supplied
UK cable with the UK plug.
Examples of plug types
for 100 to 120 V AC
for 200 to 240 V AC
for 240 V AC only
The outlet should be installed near the equipment
and be easily accessible.
Replacement of the fluorescent tube
A specially designed fluorescent tube is installed as the
lighting apparatus for this monitor. If the LCD screen
becomes dark, unstable or does not turn on, replace the
fluorescent tube with an new one. Consult your Sony dealer
when replacing the fluorescent tube.
Mounting on a wall or an arm
Ask a specialist to mount the monitor on a wall or an arm.
Do not mount the monitor yourself.
Disposal of the monitor
• Do not dispose of the monitor with general waste.
Do not include the monitor with household waste.
• The fluorescent tube includes mercury. Dispose of the
monitor in accordance with the regulations of your
local sanitation authority.
4
Getting Started
Getting Started
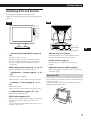
Identifying Parts and Controls
See the pages in parentheses for further details.
CPD-L150 is used for illustration purposes throughout this
manual.
Front
Rear
1
2
3
4
5
6
7
8
EN
9
F
1
2
u (power) switch and indicator (pages 8,
17)
8
MENU (menu) button (pages 8, 11 – 15, 17)
9
‹ (brightness) (ø ) button (pages 8 – 9, 11
– 15)
Adjusts the picture brightness.
Functions as the ø button when selecting menu items.
4
> (contrast) (‡ ) button (pages 8 – 9, 11 –
15)
Adjusts the contrast.
External control connector
Inputs the external control signal of RS-232 format.
Consult your dealer for further information.
Turns the monitor on or off.
The indicator lights up in green when the monitor is
turned on, and either flashes in green and orange or
lights up in orange when the monitor is in power
saving mode.
Displays the MENU OSD (On-Screen Display).
3
7
D
ES
DC IN connector (page 6)
Provides DC power to the monitor from the AC
adaptor.
I
RGB input connector (HD15) (page 6)
Inputs analog RGB video signals (0.714 Vp-p, positive)
and SYNC signals.
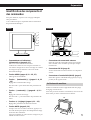
Use of the Tilt
Use the tilt feature to adjust the monitor to the desired angle
within 30° vertically.
To turn the monitor vertically, hold it at the bottom with
both hands as illustrated below.
30°
Functions as the ‡ button when selecting menu items.
5
+/– (adjust) buttons (pages 9, 11 – 15)
Adjusts the selected menu item.
6
AUTO button (pages 8, 11)
After you have connected this monitor, press the AUTO
button to automatically adjust the picture to the
computer.
You also should press this button if the picture is not
centered or if it is fuzzy.
5
Getting Started
If your PC system is not compatible with DDC1 and
DDC2B
Setup
Before using this monitor, check that the following items are
included in your carton:
• LCD monitor (1)
• AC adaptor (1)
• Rear cover (1)
• Power cord (1)
• HD15 video signal cable (1)
• Macintosh adapter (1)
• Windows Monitor Information Disk/Utility Disk (1)
• Macintosh Utility Disk (1)
• TCO’95 Eco-document (1)
• Warranty card (1)
• These operating instructions (1)
This monitor works with any IBM or compatible system
equipped with VGA or greater graphics capability.
Although this monitor works with other platforms running
at horizontal frequencies between 30 and 70 kHz, including
Macintosh and Power Macintosh systems, a cable adapter is
required. Please consult your dealer for advice on which
adapter is suitable for your needs. This monitor also can
receive the RGB signals of the PAL and NTSC systems.
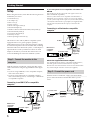
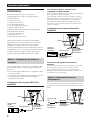
Step 1: Connect the monitor to the
computer
With the computer switched off, connect the video signal
cable to the monitor using the supplied HD15 video signal
cable.
• If you are using an IBM PC/AT or compatible computer,
refer to the section below.
• If you are using a Macintosh or compatible computer,
refer to the following section, “Connecting to a Macintosh
or compatible computer.”
This monitor uses the No. 9 pin in the video signal connector for
DDC1 and DDC2B compatibility.
Some PC systems which are not compatible with either DDC1 or
DDC2B may not accept the No. 9 pin. If you are not sure whether
your PC system accepts the No. 9 pin or not, use the HD15 (Female)
- HD15 (Male without the No. 9 pin) adapter (not supplied). Make
sure the male side (without the No. 9 pin) is connected to the
computer.
Connecting to a Macintosh or compatible
computer
to HD15
Macintosh or
compatible
computer
to monitor output
HD15 video
signal cable
(supplied)
Macintosh adapter
(supplied)
About the supplied Macintosh adapter
The supplied Macintosh adapter is compatible with Macintosh LC,
Performa, Quadra and Power Macintosh series computers.
Macintosh II series and some older versions of Power Book models
may need an adapter with micro switches (not supplied).
Step 2: Connect the power cord
With the monitor switched off, connect one end of the DC
power cord to the monitor and the other end to a power
outlet.
Connecting to an IBM PC/AT or compatible
computer
to a power outlet
Power cord
(supplied)
to HD15
IBM PC/AT or
compatible
computer
6
to monitor output
HD15 video
signal cable
(supplied)
AC adaptor
(supplied)
to DC IN
Getting Started
Getting Started
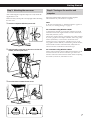
Step 3: Attaching the rear cover
After connecting the computer and power cord, attach the
supplied rear cover.
Make sure that you keep the screen upright when attaching
the rear cover.
1
Hook the computer cable and power cord.
Step 4: Turning on the monitor and
computer
First turn on the monitor, then turn on the computer.
The installation of your monitor is complete.
Note
If “OUT OF SCAN RANGE” or “NO INPUT SIGNAL” appears on
the screen, see “Warning Messages” on page 18.
For customers using Windows 95/98
To maximize the potential of your monitor, install the new model
information file from the supplied Windows Monitor Information
Disk/Utility Disk onto your PC.
This monitor complies with the “VESA DDC” Plug & Play standard.
If your PC/graphics board complies with DDC, select “Plug & Play
Monitor (VESA DDC)” or this monitor’s model name as the
monitor type in the “Control Panel” of Windows 95/98. If your
PC/graphics board has difficulty communicating with this monitor,
load the Windows Monitor Information Disk/Utility Disk and
select this monitor’s model name as the monitor type.
2
Insert the tabs on the back of the rear cover into the
catches, and then push down.
EN
For customers using Windows NT4.0
Monitor setup in Windows NT4.0 is different from Windows 95/98
and does not involve the selection of monitor type. Refer to the
Windows NT4.0 instruction manual for further details on adjusting
the resolution, refresh rate, and number of colors.
F
D
ES
I
3
Turn the screw to fasten the rear cover.
Unlocked
Locked
7
Getting Started
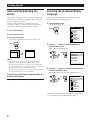
Automatically Adjusting the
Picture
Selecting the On-Screen Display
Language
If the picture is flickering or fuzzy, press the AUTO button.
The monitor is automatically adjusted to match the signal
from the connected computer.
Further fine adjustments may be needed with some
computers. In this case, manually adjust the monitor by
referring to “Customizing Your Monitor” on page 9.
You can select the OSD language from English, French,
German, Spanish, Italian, and Japanese.
1
Press the MENU button.
The MENU OSD appears.
MENU
MENU
1
Turn on the monitor.
2
Turn on the computer.
3
Press the AUTO button.
The picture is adjusted to fit the center of the screen.
OK MENU
EXIT
PHASE
PITCH
CENTER
ZOOM
COLOR
LANGUAGE
OPTION
AUTO
2
Press the ø /‡ buttons to select LANGUAGE, and
press the MENU button.
The LANGUAGE OSD appears.
MENU
ENGLISH
FRANÇAIS
DEUTSCH
ESPAÑOL
ITALIANO
Notes
• This function is intended for use with a computer running
Windows or similar graphic user interface software that
provides a full-screen picture. It may not work properly if the
background color is dark or if the input picture does not fill the
screen to the edges (such as an MS-DOS prompt).
• The screen may go blank for a few seconds while performing the
auto-sizing function. This is not a malfunction.
If the picture is flickering or fuzzy even after you
press the AUTO button
Adjust the Pitch and Phase manually (page 11).
LANGUAGE
œ{Œ
3
Press the ø /‡ buttons to select the desired language,
and press the MENU button.
The MENU OSD of the selected language appears.
MENU
MENU
OK MENU
EXIT
PHASE
PITCH
CENTER
ZOOM
COLOR
LANGUAGE
OPTION
The OSD automatically disappears after about 30 seconds.
To close the OSD, press the MENU button again.
8
Customizing Your Monitor
Getting
Started
Customizing
Your Monitor
Before adjusting
Connect the monitor and the computer, and turn them
on.
Wait for at least 30 minutes before making adjustments
for the best result.
Adjusting the Contrast
Once the contrast is adjusted, it will be stored in memory for
all input signals received.
1
Press the > (contrast) ‡ button.
The CONTRAST OSD appears.
CONTRAST
Adjusting the Picture Brightness
Once the brightness is adjusted, it will be stored in memory
for all input signals received.
1
26
48. 4kHz /
Horizontal
Frequency*
BRIGHTNESS
2
26
48. 4kHz /
Horizontal
Frequency*
2
60Hz
Press the ‹ (brightness) ø button.
The BRIGHTNESS OSD appears.
Vertical
Frequency*
Press the +/– buttons.
+. . . for more contrast
– . . . for less contrast
60Hz
EN
F
Vertical
Frequency*
Press the +/– buttons.
+ . . . for more brightness
– . . . for less brightness
The OSD automatically disappears after about 3 seconds.
*
D
The horizontal and vertical frequencies for the received input
signal appear in the CONTRAST OSD.
ES
I
The OSD automatically disappears after about 3 seconds.
*
The horizontal and vertical frequencies for the received input
signal appear in the BRIGHTNESS OSD.
If the screen is too bright when using the monitor in a
dark room
Decrease the BACKLIGHT (page 14).
9
Customizing Your Monitor
Introducing the On-Screen
Display System
Most adjustments are made using the MENU OSD.
To change the on-screen display language, see “Selecting
the On-screen Display Language” (page 8).
MENU
OK MENU
EXIT
PHASE
PITCH
CENTER
ZOOM
COLOR
LANGUAGE
OPTION
EXIT
Closes the MENU OSD.
PHASE
Displays the PHASE OSD. Adjust the phase when the
characters or pictures appear fuzzy throughout the entire
screen. Adjust the phase after adjusting the pitch.
PITCH
Displays the PITCH OSD. Adjust the pitch when the
characters or pictures are not clear at some parts of the
screen.
Using the Utility Disk
The supplied Utility Disk contains test patterns to be used
for Pitch, Phase, and Centering adjustments.
These test patterns will help you confirm that your
adjustments are correct.
Pitch adjustment
Adjust the Pitch if vertical stripes appear on the screen, or a
part of the screen flickers or blurs.
Adjust the screen so that the bold, vertical lines of the test
pattern disappear.
Phase adjustment
Adjust the Phase if the entire screen flickers or blurs, or if
horizontal stripes are observed on the screen.
Adjust the screen until the horizontal stripes are at a
minimum.
Centering adjustment
Adjust the Centering if the picture is not centered.
Move the picture up, down, left, or right until the red frame
at the perimeter of the test pattern disappears.
Using the test pattern
1
Set ZOOM to REAL MODE (page 12).
2
Load the supplied Utility Disk and display the test
pattern.
Use the appropriate disk for your computer.
For Windows 95/98
Windows Monitor Information Disk/Utility Disk
For Macintosh
Macintosh Utility Disk
3
Select the pitch, phase, or centering from the
monitor’s MENU OSD, and adjust the screen while
viewing the test pattern (pages 11, 12).
4
When you have finished, click [END]on the screen to
turn off the test pattern.
CENTER
Displays the CENTER OSD for adjusting the centering of
the picture.
ZOOM
Displays the ZOOM OSD for selecting the picture’s display
mode. Select FULL MODE to display the picture using the
entire screen, or select REAL MODE to display the picture at
its actual resolution.
COLOR
Displays the COLOR OSD for adjusting the color
temperature.
LANGUAGE
Displays the LANGUAGE OSD for selecting the on-screen
display language.
OPTION
Displays the OPTION OSD. You can adjust settings such as
the backlight, OSD position, power saving delay time and
control lock.
10
Getting
Started
Customizing
Your Monitor
Eliminating Flickering or Blurring
6
If a part of the screen is flickering or blurring, press the
AUTO button. If this operation does not work, adjust the
Pitch and Phase as follows.
Once the pitch and phase are adjusted, they will be stored in
memory for the current input signal.
1
Load the Utility Disk (page 10).
2
Press the MENU button.
The MENU OSD appears.
PHASE
26
Press the +/– buttons until the screen color becomes
uniform.
If you are using the Utility Disk, adjust until the
horizontal stripes are at a minimum.
OK MENU
EXIT
PHASE
PITCH
CENTER
ZOOM
COLOR
LANGUAGE
OPTION
3
MENU
7
MENU
MENU
Press the ø /‡ buttons to select PHASE, and press the
MENU button again.
The PHASE OSD appears.
The OSD automatically disappears after about 30 seconds.
To close the OSD, press the MENU button again.
To turn off the test pattern, click [END]on the screen.
EN
Press the ø /‡ buttons to select PITCH, and press the
MENU button again.
The PITCH OSD appears.
MENU
F
D
PITCH
ES
1328
4
Press the +/– buttons until the screen color becomes
uniform.
If you are using the Utility Disk, adjust so that the
vertical stripes disappear.
5
Press the MENU button.
The MENU OSD appears.
If horizontal stripes are observed over the entire screen,
adjust the Phase in the next step.
I
11
Customizing Your Monitor
Adjusting the Picture Position
If the picture is not in the center of the screen, press the
AUTO button. If this operation does not work, adjust the
centering as follows.
Once the centering is adjusted, it will be stored in memory
for the current input signal.
1
Load the Utility Disk (page 10).
2
Press the MENU button.
The MENU OSD appears.
The monitor is set at the factory to display the picture on the
screen in full, irrespective of the picture’s resolution. You
can also view the picture at its actual resolution.
Once the zoom is set, it will be stored in memory for the
current input signal.
1
MENU
OK MENU
EXIT
PHASE
PITCH
CENTER
ZOOM
COLOR
MENU
3
Displaying the Picture at the
Actual Resolution
Press the ø /‡ buttons to select CENTER, and press
the MENU button again.
The CENTER OSD appears.
CENTER
2
H
V
OK MENU
Press the ø /‡ buttons to select ZOOM, and press the
MENU button again.
The ZOOM OSD appears.
MENU
ZOOM
FULL MODE
REAL MODE
26
For horizontal adjustment, select H using the ø /‡
buttons and adjust the position using the +/–
buttons.
+ . . . to move the picture right
CENTER
– . . . to move the picture left
MENU
EXIT
PHASE
PITCH
CENTER
ZOOM
COLOR
LANGUAGE
OPTION
MENU
MENU
4
Press the MENU button.
The MENU OSD appears.
3
Press the ‡ button to select REAL MODE, and press
the MENU button again.
The MENU OSD appears.
H
V
26
For vertical adjustment, select V using the ø /‡
buttons and adjust the position using the +/–
buttons.
+ . . . to move the picture up
CENTER
– . . . to move the picture down
H
V
26
The OSD automatically disappears after about 30 seconds.
To close the OSD, press the MENU button again.
To turn off the test pattern, click [END]on the screen.
12
The OSD automatically disappears after about 30 seconds.
To close the OSD, press the MENU button again.
To display the picture on the screen in full
Press the ø button in step 3 to select FULL MODE.
Getting
Started
Customizing
Your Monitor
Changing or Adjusting the Color
Temperature
Changing the On-Screen Display
Position
The color temperature is set to 9300K at the factory.
You can change the color temperature to 6500K or 5000K.
Use this function to adjust the color temperature so that it
matches the actual colors of a printed picture.
Once the color temperature is adjusted, it will be stored in
memory for all input signals received.
You can change the OSD position (for example, when you
want to adjust the picture behind the OSD).
1
Press the MENU button.
The MENU OSD appears.
Press the MENU button.
The MENU OSD appears.
4
2
Press the ø /‡ buttons to select OPTION, and press
the MENU button again.
The OPTION OSD appears.
OPTION
9300K
6500K
5000K
USER MODE
R
G
B
EN
MENU
Press the ø /‡ buttons to select COLOR, and press the
MENU button again.
The COLOR OSD appears.
COLOR
MENU
3
OK MENU
EXIT
PHASE
PITCH
CENTER
ZOOM
COLOR
LANGUAGE
OPTION
MENU
2
MENU
OK MENU
EXIT
PHASE
PITCH
CENTER
ZOOM
COLOR
LANGUAGE
OPTION
MENU
1
MENU
F
: 1M
: UNLOCK
D
OSD H POSITION
50
50
50
3
OPTION
Press the ø /‡ buttons to select the color
temperature.
If you need to make further adjustments to the selected
color tempeature, go to step 4.
If you don’t, press the MENU button. The MENU OSD
appears.
Press the ø /‡ buttons to select R (red) or B (blue),
and press the +/– buttons to get the desired color.
The color changes as the R or B components increase or
decrease with respect to G (green).
Press the ø /‡ buttons to select
(OSD H
POSITION) or
(OSD V POSITION).
To adjust the horizontal
To adjust the vertical
position
position
: 1M
: UNLOCK
OSD H POSITION
4
OPTION
: 1M
: UNLOCK
OSD V POSITION
Press the +/– buttons to move the OSD to the desired
position.
COLOR
9300K
6500K
5000K
USER MODE
R
G
B
50
50
50
The OPTION OSD automatically disappears after about 30
seconds.
To close the OSD, press the MENU button again.
The OSD automatically disappears after about 30 seconds.
To close the OSD, press the MENU button again.
13
ES
I
Customizing Your Monitor
Adjusting the Backlight
If the screen is too bright when you are using the monitor in
a dark room, adjust the backlight.
1
Press the MENU button.
The MENU OSD appears.
OK MENU
EXIT
PHASE
PITCH
CENTER
ZOOM
COLOR
LANGUAGE
OPTION
MENU
2
MENU
Press the ø /‡ buttons to select OPTION, and press
the MENU button again.
The OPTION OSD appears.
OPTION
Setting the Power Saving Delay
Time
You can set the delay time before the monitor enters the
power saving mode. See page 17 for more information on
this monitor’s power saving capabilities.
1
Press the MENU button.
The MENU OSD appears.
MENU
: 1M
: UNLOCK
Press the ø /‡ buttons to select OPTION, and press
the MENU button again.
The OPTION OSD appears.
OPTION
MENU
: 1M
: UNLOCK
OSD H POSITION
3
Press the ø /‡ buttons to select
(BACKLIGHT).
OPTION
OK MENU
EXIT
PHASE
PITCH
CENTER
ZOOM
COLOR
LANGUAGE
OPTION
MENU
2
MENU
OSD H POSITION
3
Press the ø /‡ buttons to select
DELAY).
ZZ...
(PWR SAVE
OPTION
26
60MIN
1MIN
5SEC
OFF
: UNLOCK
BACKLIGHT
PWR SAVE DELAY
4
Press the +/– buttons to adjust the light level.
4
The OPTION OSD automatically disappears after about 30
seconds.
To close the OSD, press the MENU button again.
Press the +/– buttons to select the desired time.
When PWR SAVE DELAY is set to OFF, the monitor
does not go into power saving mode.
The OPTION OSD automatically disappears after about 30
seconds.
To close the OSD, press the MENU button again.
14
Getting
Started
Customizing
Your Monitor
Locking the Controls
Resetting the Adjustments
The control lock function disables all of the controls except
the u (power) switch and MENU button.
You can reset all of the adjustments and settings to the
factory settings.
The color temperature is reset to 9300K, the zoom setting is
reset to full mode, and the power saving delay time is reset
to one minute. The control lock is cancelled. All other
adjustments return to the default settings. The on-screen
language, however, does not change.
Once you select “LOCK,” you can select only the following
items in the MENU OSD:
• EXIT
• CONTROL LOCK and FACTORY PRESET in the
OPTION OSD
1
If you press any locked button, the
the screen.
1
Press the MENU button.
The MENU OSD appears.
Press the MENU button.
The MENU OSD appears.
MENU
OK MENU
EXIT
PHASE
PITCH
CENTER
ZOOM
COLOR
2
MENU
OK MENU
EXIT
PHASE
PITCH
CENTER
ZOOM
COLOR
MENU
MENU
2
mark appears on
Press the ø /‡ buttons to select OPTION, and press
the MENU button again.
The OPTION OSD appears.
Press the ø /‡ buttons to select OPTION, and press
the MENU button again.
The OPTION OSD appears.
F
MENU
D
: 1M
: UNLOCK
OPTION
ES
MENU
OSD H POSITION
: 1M
: UNLOCK
3
OSD H POSITION
3
Press the ø /‡ buttons to select
LOCK).
Press the ø /‡ buttons to select ? (FACTORY
PRESET).
OPTION
(CONTROL
: 1M
OPTION
ON
FACTORY PRESET
UNLOCK
LOCK
4
Press the + button.
CONTROL LOCK
4
EN
OPTION
Press the – button to select LOCK.
The OPTION OSD automatically disappears after about 30
seconds.
To close the OSD, press the MENU button again.
The OPTION OSD automatically disappears after about 30
seconds.
To close the OSD, press the MENU button again.
To cancel the control lock
Press the + button in step 4 to select UNLOCK.
15
I
Technical Features
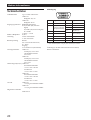
Preset and User Modes
This monitor has factory preset modes for the most popular
industry standards for true “plug and play” compatibility.
When a new input signal is entered, the monitor selects the
appropriate factory preset mode and momentarily adjusts
the phase calibration to provide a high quality picture to the
center of the screen. The calibration is stored in memory
and is immediately recalled whenever the same input signal
is received.
Resolution Horizontal Vertical
No. (dots × lines) Frequency Frequency Graphics Mode
1
—
15.625 kHz 50 Hz
625I
2
—
15.75 kHz
60 Hz
525I
3
640 × 350
31.5 kHz
70 Hz
MCGA
4
640 × 400
31.5 kHz
70 Hz
NEC PC-98
5
640 × 480
31.5 kHz
60 Hz
VGA-G
6
640 × 480
35.0 kHz
67 Hz
Macintosh
13” color
7
640 × 480
37.5 kHz
75 Hz
EVGA
8
640 × 480
43.3 kHz
85 Hz
VESA
9
720 × 400
31.5 kHz
70 Hz
VGA-Text
10
720 × 400
37.9 kHz
85 Hz
VESA
11
800 × 600
37.9 kHz
60 Hz
SVGA
12
800 × 600
46.9 kHz
75 Hz
ESVGA
13
800 × 600
53.7 kHz
85 Hz
VESA
14
832 × 624
49.7 kHz
75 Hz
Macintosh
16” color
15
1024 × 768
48.4 kHz
60 Hz
VESA
16
1024 × 768
56.5 kHz
70 Hz
VESA
17
1024 × 768
60.0 kHz
75 Hz
EUVGA
18
1024 × 768
60.2 kHz
75 Hz
Macintosh
19” Color
19
1024 × 768
68.7 kHz
85 Hz
VESA
16
For input signals that do not match one of the factory preset
modes, the digital Multiscan technology of this monitor
performs all of the adjustments necessary to ensure that a
clear picture appears on the screen for any timing in the
monitor’s frequency range. However, it may be necessary
to fine tune the vertical/horizontal centering. Simply press
the AUTO button or adjust the monitor according to the
adjustment instructions. The adjustments are stored
automatically as a user mode and recalled whenever the
corresponding input signal is received.
Recommended horizontal and vertical timing
conditions
Horizontal sync width duty should be 4.8% or higher of total
horizontal time.
Horizontal blanking width should be 2.5 µsec. or higher.
Vertical blanking width should be 450 µsec. or higher.
Adjusting the monitor’s resolution and color
number
Adjust the monitor’s resolution and color number by referring to
your computer’s instruction manual. The color number may vary
according to your computer or video board. The color palette
setting and the actual number of colors are as follows:
• High Color (16 bit) n 65,536 colors
• True Color (24 bit) n about 16.77 million colors
In true color mode (24 bit), speed may be slower.
Getting Started
Technical Features
You can set the delay time before the monitor enters the
power saving mode using the OSD. Set the time according
to “Setting the Power Saving Delay Time” on page 14.
Power Saving Function
This monitor meets the power-saving guidelines set by
VESA and ENERGY STAR, as well as the more stringent
NUTEK .
If the monitor is connected to a computer or video graphics
board that is VESA DPMS (Display Power Management
Signaling) compliant, the monitor will automatically reduce
power consumption in three stages as shown below.
Note
If no video signal is input to the monitor, the “NO INPUT
SIGNAL” message (page 18) appears. After the delay time has
passed, the power saving function automatically puts the monitor
into the active-off mode and the u indicator lights up orange. Once
the horizontal and vertical sync signals are detected, the monitor
automatically resumes its normal operation mode.
Power consumption
mode
Screen
Horizontal
sync signal
Vertical
sync signal
Power consumption
Recovery time
u Indicator
1
Normal operation
active
present
present
CPD-L133 ≤ 30 W* ≤ 42 W**
CPD-L150 ≤ 25 W* ≤ 35 W**
—
Green
2
Standby (1st mode)
blank
absent
present
CPD-L133 ≤ 1.5 W* ≤ 4 W**
CPD-L150 ≤ 1.5 W* ≤ 4 W**
Approx. 3 sec.
Green and orange
alternate
3
Suspend (2nd mode)
blank
present
absent
CPD-L133 ≤ 1.5 W* ≤ 4 W**
CPD-L150 ≤ 1.5 W* ≤ 4 W**
Approx. 3 sec.
Green and orange
alternate
4
Active-off (3rd mode)
blank
absent
absent
CPD-L133 ≤ 1.5 W* ≤ 4 W**
CPD-L150 ≤ 1.5 W* ≤ 4 W**
Approx. 10 sec.
Orange
5
Power-off
––
––
––
CPD-L133 ≤ 1.5 W* ≤ 4 W**
CPD-L150 ≤ 1.5 W* ≤ 4 W**
—
Off
EN
F
* Power consumption of the monitor only
** Power consumption of the monitor including the AC adaptor
D
ES
I
Displaying the INFORMATION
OSD
You can confirm the name, the serial number and the year
of manufacture of this monitor.
Press and hold the MENU button for five seconds.
The INFORMATION OSD appears.
Plug & Play
This monitor complies with the DDC1 and DDC2B
Display Data Channel (DDC) standards of VESA.
When a DDC1 host system is connected, the monitor
synchronizes with the V. CLK in accordance with the VESA
standards and outputs the EDID (Extended Display
Identification Data) to the data line.
DDC is a trademark of the Video Electronics Standard
Association.
MENU
Example
INFORMATION
MODEL : CPD-L150
SER. NO : 1234567
MANUFACTURED : 1998
Model name
Serial number
Year of manufacture
The INFORMATION OSD automatically disappears after
about 30 seconds.
To close the OSD, press the MENU button again.
17
Additional Information
Warning Messages
If there is something wrong with the input signal, one of the
following messages appears.
“OUT OF SCAN RANGE” indicates that the input signal is
not supported by the monitor’s specifications.
INFORMATION
OUT OF SCAN RANGE
“NO INPUT SIGNAL” indicates that no signal is input.
To solve these problems, see “Troubleshooting” below.
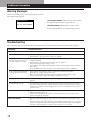
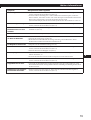
Troubleshooting
This section may help you isolate the cause of a problem and as a result, eliminate the need to contact technical support.
Symptom
Check these items
No picture
If the u indicator is not lit
• Check that the power cord is properly connected.
• Check that the u (power) switch is in the “on” position.
If the “NO INPUT SIGNAL”
message appears on the screen,
or if the u indicator is orange
• The screen is blank when the monitor is in power saving mode. Try pressing any key on the
computer keyboard.
• Check that your computer power switch is in the “on” position.
• Check that the input select setting is correct.
• Check that the video signal cable is properly connected and all plugs are firmly seated in
their sockets.
• Check the HD15 video input connector to ensure that no pins are bent or pushed in.
If the “OUT OF SCAN RANGE” • Check that the video frequency range is within that specified for the monitor.
message appears on the screen
Horizontal: 30 – 70 kHz, Vertical: 50 – 85 Hz
Refer to your computer’s instruction manual to adjust the video frequency range.
• If you are using a video signal cable adapter, check that it is correct.
If using a Macintosh system
• Check that the Macintosh adapter and the video signal cable are properly connected
(page 6).
If using Windows 95/98
• If you replaced an old monitor with this monitor, reconnect the old monitor and do the
following. Install the Windows Monitor Information Disk/Utility Disk (page 7) and select
“CPD-L133 or CPD-L150” from among the Sony monitors in the Windows 95/98 monitor
selection screen.
Picture is dark.
• Adjust the backlight (page 14).
• Adjust the brightness (page 9).
• It takes several seconds for the monitor to warm up after the power is turned on. The
picture will appear momentarily.
Picture is scrambled.
• Press the AUTO button (page 8). If this does not work, adjust the pitch and phase (page
11).
• Check this manual and confirm that the graphics mode and the frequency you are trying to
operate at is supported. Even if the frequency is within the proper range, some computers
may have a sync pulse that is too narrow for this monitor to sync correctly.
18
Getting
StartedInformation
Additional
Symptom
Check these items
Color is not uniform.
• Press the AUTO button(page 8). If this does not work, adjust the pitch and phase (page 11).
You cannot adjust the monitor
with the buttons on the front
panel.
• If the control lock function is set to on, set it to off using the OPTION OSD (page 15).
White does not look white.
• Adjust the color temperature (page 13).
Screen image is not centered.
• Press the AUTO button (page 8).
• Adjust the centering (page 12).
• Some video modes do not fill the screen to the edges. This problem tends to occur with
certain video boards.
The picture size is incorrect.
• Check the ZOOM setting (page 12).
Picture is fuzzy
• Press the AUTO button(page 8). If this does not work, adjust the pitch and phase (page 11).
• Adjust the contrast and brightness (page 9).
Picture bounces or has wavy
oscillations
• Try plugging the monitor into a different AC outlet, preferably on a different circuit.
• Try the monitor on a different computer in a different room.
Picture is flickering
• Press the AUTO button(page 8). If this does not work, adjust the pitch and phase (page 11).
Picture appears to be ghosting
• Eliminate the use of video cable extensions and/or video switch boxes if this symptom
occurs. Excessive cable length or a weak connection can produce this symptom.
Wavy or elliptical (moire)
pattern is visible
EN
• Press the AUTO button(page 8). If this does not work, adjust the pitch and phase (page 11).
F
D
ES
I
19
Additional Information
Specifications
LCD panel
Input signal format
Pixel efficiency
Resolution
Power requirements
Power consumption
Dimensions (w/h/d)
Mass
Panel type: a-Si TFT Active Matrix
CPD-L133
Picture size: 13.3 inches
CPD-L150
Picture size: 15.0 inches
RGB operating frequency:
fh: 15.625 kHz (625 interlace
signal)
15.75 kHz (525 interlace signal)
30 – 70 kHz
fv: 50 Hz — 85 Hz
99.99 %
H: max 1024 dots
V: max. 768 lines
Operation:
AC 100 – 240 V, 50 – 60 Hz
Input:
DC 12 V (using the AC adaptor)
CPD-L133
Display only: Max. 30 W
Including the AC adaptor:
Max. 42 W
CPD-L150
Display only: Max. 25 W
Including the AC adaptor:
Max. 35 W
CPD-L133
Including the stand:
Approx. 373 × 358 × 165 mm
(14 3/4 × 14 1/8 × 6 1/2 in.)
Monitor only:
Approx. 373 × 272 × 71 mm
(14 3/4 × 10 3/4 × 2 7/8 in.)
CPD-L150
Including the stand:
Approx. 398 × 366 × 165 mm
(15 3/4 × 14 1/2 × 6 1/2 in.)
Monitor only:
Approx. 398 × 291 × 71 mm
(15 3/4 × 11 1/2 × 2 7/8 in.)
CPD-L133
Approx. 4.9 kg (10 lb 12 oz)
including the stand
CPD-L150
Approx. 5.3 kg (11 lb) including
the stand
Supplied accessories
See page 6.
20
Pin assignment
5 4 3 2 1
10 9 8 7 6
15 14 13 12 11
*
Pin No.
Signal
Pin No.
Signal
1
Red
8
Blue Ground
2
Green
(Composite
Sync on Green)
9
DDC + 5V*
10
Ground
11
ID (Ground)
3
Blue
12
4
ID (Ground)
Bi-Directional
Data (SDA)*
5
DDC Ground*
13
H. Sync
6
Red Ground
14
V. Sync
7
Green Ground
15
Data Clock(SCL)*
Display Data Channel (DDC) Standard of VESA
Design and specifications are subject to change without
notice.
TABLE DES MATIERES
Préparation
Précautions ...........................................................................................................................
Identification des composants et des commandes ..........................................................
Installation ............................................................................................................................
Réglage automatique de l’image .......................................................................................
Sélection de la langue d’affichage à l’écran .....................................................................
4
5
6
8
8
Personnalisation du moniteur
Réglage de la luminosité de l’image ................................................................................. 9
Réglage du contraste ........................................................................................................... 9
Présentation du système d’écrans de menu ................................................................... 10
Utilisation de la disquette Utility Disk ........................................................................... 10
Suppression du scintillement ou du maculage ............................................................. 11
Réglage de la position de l’image .................................................................................... 12
Affichage de l’image suivant sa résolution réelle ......................................................... 12
Changement ou réglage de la température de couleur ................................................ 13
Changement de la position d’affichage des écrans de menu ...................................... 13
Réglage du rétro-éclairage ................................................................................................ 14
Réglage du délai d’activation du mode d’économie d’énergie .................................. 14
Verrouillage des commandes ........................................................................................... 15
Réinitialisation des réglages ............................................................................................. 15
EN
F
D
ES
I
Caractéristiques techniques
Modes présélectionnés et utilisateur ............................................................................... 16
Fonction d’économie d’énergie ........................................................................................ 17
Affichage de l’écran INFORMATION ............................................................................ 17
Plug & Play ......................................................................................................................... 17
Informations complémentaires
Messages d’avertissement ................................................................................................ 18
Dépannage .......................................................................................................................... 18
Spécifications ...................................................................................................................... 20
• Macintosh est une marque commerciale sous licence d’Apple
Computer, Inc., déposée aux Etats-Unis et dans d’autres pays.
• Windows® et MS-DOS sont des marques commerciales déposées de
Microsoft Corporation aux Etats-Unis et dans d’autres pays.
• IBM PC/AT et VGA sont des marques commerciales déposées d’IBM
Corporation of the U.S.A.
• VESA est une marque commerciale de Video Electronics Standard
Association.
• ENERGY STAR est une marque déposée aux Etats-Unis.
• Tous les autres noms de produits mentionnés peuvent être des
marques commerciales ou des marques commerciales déposées de
leurs sociétés respectives.
• Enfin, les symboles “™” et “®” ne sont pas mentionnés
systématiquement dans le présent mode d’emploi.
3
Préparation
Précautions
Installation
• Assurez une circulation d’air adéquate afin d’éviter toute
surchauffe interne. Ne placez pas l’appareil sur des
surfaces textiles (tapis, couvertures, etc.) ni à proximité de
tissus (rideaux, draperies) qui risquent d’obstruer les
orifices de ventilation.
• N’installez pas l’appareil à proximité de sources de
chaleur telles que des radiateurs ou des conduits d’air
chaud et ne le soumettez pas au rayonnement direct du
soleil, à de la poussière ou à de l’humidité en excès, ni à
des vibrations mécaniques ou à des chocs.
• Ne placez pas le moniteur à proximité d’appareils
générant un champ magnétique comme un convertisseur
ou des lignes à haute tension.
Manipulation de l’écran LCD
• Des points lumineux (rouges, bleus ou verts) peuvent
apparaître sur l’écran LCD. Il ne s’agit pas d’un
dysfonctionnement. L’écran LCD est fabriqué en
faisant appel à des technologies de haute précision et
plus de 99,99 % des éléments d’image sont intacts. Il
est cependant possible que certains éléments d’image
n’apparaissent pas ou que certains éléments d’image
apparaissent de manière constante.
• Ne laissez pas l’écran LCD orienté vers le soleil, car vous
risqueriez de lui causer des dommages. Prenez donc
garde lorsque vous placez le moniteur à côté d’une
fenêtre.
• N’appuyez pas et n’éraflez pas l’écran LCD. Ne posez pas
d’objets lourds sur l’écran LCD. Cela risque d’altérer
l’uniformité de l’écran.
• Si le moniteur est employé dans un endroit froid, il se
peut qu’une image résiduelle apparaisse à l’écran. Il ne
s’agit pas d’un dysfonctionnement. Lorsque le moniteur
se sera échauffé, l’écran reviendra à la normale.
• Si une image fixe reste affichée longtemps, il est possible
qu’une image résiduelle apparaisse. Cette image
résiduelle disparaîtra au bout d’un certain temps.
• L’écran et le châssis s’échauffent en cours de
fonctionnement. Il ne s’agit pas d’un dysfonctionnement.
Entretien
• Nettoyez le châssis, le panneau et les commandes à l’aide
d’un chiffon doux légèrement imprégné d’une solution
détergente neutre. N’utilisez aucun type de tampon
abrasif, de poudre à récurer ou de solvant tel que de
l’alcool ou de la benzine.
• N’éraflez pas, ne touchez pas et ne tapotez pas l’écran
avec un ustensile acéré ou abrasif comme un stylo à bille
ou un tournevis. Vous risquez sinon de rayer le tube
image.
• Nettoyez l’écran avec un chiffon doux. Si vous employez
un liquide de nettoyage pour vitres, n’utilisez aucun type
de nettoyant contenant une solution antistatique ou des
additifs similaires, car vous risqueriez de rayer le
revêtement de l’écran.
Transport
• Pour transporter ce moniteur, saisissez fermement le bas
de l’écran des deux mains. En laissant tomber le moniteur,
vous risquez de vous blesser ou d’endommager le
moniteur.
• Pour transporter l’appareil en vue d’une réparation ou de
son expédition, remballez-le dans le carton et les
matériaux de conditionnement d’origine.
Avertissement sur le raccordement à la
source d’alimentation
• Utilisez un cordon d’alimentation approprié à votre
source d’alimentation (secteur) locale.
Pour les clients au Royaume-Uni
Si vous employez le moniteur au Royaume-Uni, utilisez le
câble et la fiche prévus pour le Royaume-Uni (UK).
Exemples de fiches
pour 100 à 120 V CA
pour 200 à 240 V CA
pour 240 V CA
uniquement
La prise d’alimentation (secteur) doit se trouver à
proximité de l’appareil et être aisément accessible.
Remplacement du tube fluorescent
Un tube fluorescent spécial sert de source lumineuse pour
ce moniteur. Si l’écran LCD s’assombrit, devient instable ou
ne se met pas sous tension, remplacez le tube fluorescent.
Pour le remplacement du tube fluorescent, consultez votre
revendeur Sony.
Installation au mur ou sur un bras
Confiez à un spécialiste l’installation du moniteur au mur ou
sur un bras. Ne procédez pas vous-même au montage.
Elimination du moniteur
4
• N’éliminez pas ce moniteur avec les déchets ordinaires.
Ne jetez pas ce moniteur avec les ordures ménagères.
• Le tube fluorescent contient du mercure. Eliminez ce
moniteur conformément aux réglementations des
autorités sanitaires locales.
Préparation
Identification des composants et
des commandes
Pour plus de détails, reportez-vous aux pages indiquées
entre parenthèses.
C’est le CPD-L150 qui est représenté dans les illustrations
du présent mode d’emploi.
Arrière
Avant
1
2
3
4
5
6
EN
7
F
8
D
9
1
Commutateur et indicateur u
(alimentation) (pages 8, 17)
Mise sous ou hors tension du moniteur.
L’indicateur s’allume en vert lorsque le moniteur est
sous tension. Il clignote en vert et en orange ou s’allume
en orange lorsque le moniteur se trouve en mode
d’économie d’énergie.
2
Touche MENU (pages 8, 11 – 15, 17)
Affichage de l’écran MENU.
3
Touche ‹ (luminosité) (ø ) (pages 8 – 9, 11
– 15)
Réglage de la luminosité de l’image.
Sert de touche ø pour sélectionner des paramètres de
menu.
4
Touche > (contraste) (‡ ) (pages 8 – 9, 11 –
15)
Réglage du contraste de l’image.
Sert de touche ‡ pour sélectionner des paramètres de
menu.
5
7
8
Connecteur de commande externe
ES
Entrée du signal de commande externe au format RS232. Consultez votre revendeur pour de plus amples
informations.
I
Connecteur DC IN (page 6)
Assure l’alimentation CC du moniteur via l’adaptateur
secteur.
9
Connecteur d’entrée RVB (HD15) (page 6)
Entrée des signaux vidéo RVB analogiques (0,714 Vp-p,
positifs) et des signaux SYNC.
Inclinaison du moniteur
Inclinez le moniteur suivant l’angle désiré dans une plage
de réglage verticale de 30°.
Pour faire pivoter le moniteur verticalement, saisissez-le des
deux mains par le bas comme illustré ci-dessous.
30°
Touches +/– (réglage) (pages 9, 11 – 15)
Réglage des paramètres de menu sélectionnés.
6
Touche AUTO (pages 8, 11)
Lorsque vous avez raccordé ce moniteur, appuyez sur
la touche AUTO pour ajuster automatiquement l’image
en fonction de l’ordinateur.
Appuyez également sur cette touche si l’image n’est pas
centrée ou si elle est floue.
5
Préparation
Si votre système PC n’est pas compatible avec
DDC1 et DDC2B
Installation
Avant d’utiliser ce moniteur, vérifiez si vous avez bien reçu
les accessoires suivants :
• Moniteur LCD (1)
• Adaptateur secteur (1)
• Couvercle arrière (1)
• Cordon d’alimentation (1)
• Câble de signal vidéo HD15 (1)
• Adaptateur Macintosh (1)
• Windows Monitor Information Disk/Utility Disk (1)
• Macintosh Utility Disk (1)
• Eco-document TCO’95 (1)
• Carte de garantie (1)
• Ce mode d’emploi (1)
Ce moniteur utilise la broche n° 9 du connecteur de signal vidéo
pour la compatibilité DDC1 et DDC2B.
Certains systèmes PC qui ne sont pas compatibles avec DDC1 ni
avec DDC2B peuvent ne pas accepter la broche n° 9. Si vous n’êtes
pas certain si votre système PC accepte la broche n° 9, utilisez
l’adaptateur HD15 (femelle) - HD15 (mâle sans la broche n° 9) (non
fourni). Branchez le côté mâle (sans la broche n° 9) sur l’ordinateur.
Raccordement à un ordinateur Macintosh ou
compatible
vers HD15
Ce moniteur fonctionne avec tout système IBM ou
compatible doté d’une capacité graphique VGA ou
supérieure. Bien que ce moniteur fonctionne avec d’autres
plates-formes tournant à des fréquences horizontales
comprises entre 30 et 70 kHz, y compris des systèmes
Macintosh et Power Macintosh, un adaptateur de câble est
nécessaire. Consultez votre revendeur pour déterminer quel
adaptateur répond à vos besoins. Ce moniteur peut
également recevoir des signaux RVB des systèmes PAL et
NTSC.
1re étape : Raccordez le moniteur à
l’ordinateur
L’ordinateur étant hors tension, raccordez le câble de signal
vidéo au moniteur au moyen du câble de signal vidéo HD15
fourni.
• Si vous utilisez un ordinateur IBM PC/AT ou compatible,
consultez la section ci-dessous.
• Si vous utilisez un ordinateur Macintosh ou compatible,
consultez la section suivante “Raccordement à un
ordinateur Macintosh ou compatible”.
Raccordement à un ordinateur IBM PC/AT ou
compatible
6
Câble de signal
vidéo HD15
(fourni)
Adaptateur Macintosh
(fourni)
A propos de l’adaptateur Macintosh fourni
L’adaptateur Macintosh fourni est compatible avec les ordinateurs
Macintosh LC, Performa, Quadra et Power Macintosh.
Les ordinateurs Macintosh II et certains anciens modèles Power
Book peuvent nécessiter un adaptateur à microcommutateurs (non
fourni).
2e étape : Branchez le cordon
d’alimentation
Le moniteur étant hors tension, branchez une extrémité du
cordon d’alimentation CC sur le moniteur et l’autre
extrémité sur une prise murale (secteur).
Cordon
d’alimentation
(fourni)
vers la sortie du
moniteur
vers la sortie du
moniteur
vers une prise
murale
vers HD15
Ordinateur
IBM PC/AT ou
compatible
Ordinateur
Macintosh
ou compatible
Câble de signal
vidéo HD15
(fourni)
Adaptateur
secteur (fourni)
vers DC IN
Préparation
3e étape: Fixation du couvercle arrière
3
Tournez la vis pour fixer le couvercle arrière.
Lorsque vous avez raccordé l’ordinateur et le cordon
d’alimentation, installez le couvercle arrière fourni.
Maintenez l’écran bien verticalement lorsque vous fixez le
couvercle arrière.
1
Accrochez le câble d’ordinateur et le cordon
d’alimentation.
Déverrouillé
2
Insérez les pattes à l’arrière du couvercle arrière dans
les encoches et poussez ensuite le couvercle vers le
bas.
Verrouillé
EN
4e étape: Mise sous tension du moniteur
et de l’ordinateur
F
Mettez d’abord le moniteur sous tension, puis l’ordinateur.
L’installation de votre moniteur est terminée.
D
ES
Remarque
Si le message “OUT OF SCAN RANGE” ou “NO INPUT SIGNAL”
apparaît sur l’écran, reportez-vous à la section “Messages
d’avertissement” à la page 18.
Pour les clients utilisant Windows 95/98
Pour maximaliser le potentiel de votre moniteur, installez sur votre
ordinateur le nouveau fichier d’informations modèle depuis la
disquette “Windows Monitor Information Disk/Utility Disk”.
Ce moniteur est conforme á la norme Plug & Play “VESA DDC”. Si
votre PC/carte graphique est conforme á la norme DDC,
sélectionnez “Plug & Play Monitor (VESA DDC)” ou la désignation
de ce moniteur comme type de moniteur dans le “Control Panel”
sous Windows 95/98. Si votre PC/carte graphique a des difficultés
à communiquer avec ce moniteur, chargez la disquette “Windows
Monitor Information Disk/Utility Disk” et sélectionnez la
désignation de ce moniteur comme type de moniteur.
Pour les utilisateurs de Windows NT4.0
L’installation du moniteur sous Windows NT4.0 est différente de
celle sous Windows 95/98 et n’implique pas la sélection du type de
moniteur. Reportez-vous au mode d’emploi de Windows NT4.0
pour plus de détails sur le réglage de la résolution, le taux de
régénération et le nombre de couleurs.
7
I
Préparation
Réglage automatique de l’image
Si l’image devient scintillante ou floue, appuyez sur la
touche AUTO. Le moniteur se règle automatiquement en
fonction du signal de l’ordinateur raccordé.
Certains ordinateurs peuvent requérir d’autres réglages fins.
Dans ce cas, procédez au réglage manuel du moniteur en
consultant la procédure de “Personnalisation du moniteur”
à la page 9.
1
Mettez le moniteur sous tension.
2
Mettez l’ordinateur sous tension.
3
Appuyez sur la touche AUTO.
L’image est réglée pour s’afficher au centre de l’écran.
Sélection de la langue
d’affichage à l’écran
Pour l’affichage des menus, vous avez le choix entre les
langues suivantes : anglais, français, allemand, espagnol,
italien et japonais.
1
Appuyez sur la touche MENU.
L’écran MENU apparaît.
MENU
MENU
OK MENU
EXIT
PHASE
PITCH
CENTER
ZOOM
COLOR
LANGUAGE
OPTION
AUTO
2
Appuyez sur les touches ø /‡ pour sélectionner
LANGUAGE et appuyez ensuite sur la touche MENU.
Le menu LANGUAGE apparaît.
LANGUAGE
MENU
ENGLISH
FRANÇAIS
DEUTSCH
ESPAÑOL
ITALIANO
Remarques
• Cette fonction est destinée à être utilisée avec un ordinateur
tournant sous Windows ou un logiciel d’interface graphique
utilisateur similaire fournissant une image plein écran. Elle peut
ne pas fonctionner correctement si la couleur d’arrière-plan est
foncée ou si l’image d’entrée ne remplit pas l’écran jusqu’aux
bords (comme une invite MS-DOS).
• L’affichage à l’écran peut être désactivé pendant quelques
secondes pendant l’exécution de la fonction de réglage
automatique de la taille de l’image. Il ne s’agit pas d’un
dysfonctionnement.
œ{Œ
3
Appuyez sur les touches ø /‡ pour sélectionner la
langue de votre choix et appuyez ensuite sur la
touche MENU.
L’écran MENU de la langue sélectionnée apparaît.
MENU
Si l’image devient scintillante ou floue même
après que vous avez appuyé sur la touche AUTO
Réglez manuellement l’horloge et la phase (page 11).
MENU
OK MENU
QUITTE
PHASE
HORLOGE
CENTRAGE
ZOOM
COULEUR
LANGUAGE
OPTION
L’écran disparaît automatiquement au bout d’environ 30
secondes.
Pour refermer l’écran, appuyez à nouveau sur la touche
MENU.
8
Personnalisation du moniteur
Personnalisation du moniteur
Avant le réglage
Raccordez le moniteur et l’ordinateur et mettez-les sous
tension.
Pour obtenir les meilleurs résultats, attendez au moins
30 minutes avant de procéder aux réglages.
Réglage du contraste
Le réglage du contraste est enregistré dans la mémoire pour
tous les signaux d’entrée reçus.
1
Appuyez sur la touche > (contraste) ‡ .
L’écran de menu CONTRASTE apparaît.
Réglage de la luminosité de
l’image
CONTRASTE
26
Le réglage de luminosité est enregistré dans la mémoire
pour tous les signaux d’entrée reçus.
1
48. 4kHz /
Appuyez sur la touche ‹ (luminosité) ø .
L’écran de menu LUMINOSITE apparaît.
Fréquence
horizontale*
LUMINOSITE
2
Fréquence
verticale*
Appuyez sur les touches +/–.
+ . . . pour augmenter le contraste.
– . . . pour diminuer le contraste.
26
48. 4kHz /
60Hz
60Hz
EN
F
Fréquence
horizontale*
2
Fréquence
verticale*
D
L’écran disparaît automatiquement après environ 3
secondes.
ES
Appuyez sur les touches +/–.
*
+ . . . pour augmenter la luminosité.
– . . . pour diminuer la luminosité.
Les fréquences horizontale et verticale pour le signal d’entrée
reçu apparaissent dans l’écran CONTRASTE.
I
L’écran disparaît automatiquement après environ 3
secondes.
*
Les fréquences horizontale et verticale pour le signal d’entrée
reçu apparaissent dans l’écran LUMINOSITE.
Si l’écran est trop lumineux lorsque vous utilisez le
moniteur dans un endroit sombre
Diminuez le réglage RETROECLAIRAGE (page 14).
9
Personnalisation du moniteur
Présentation du système d’écrans
de menu
Utilisation de la disquette Utility
Disk
La plupart des réglages sont effectués via l’écran MENU.
Pour changer la langue d’affichage à l’écran, reportez-vous
à la section de “Sélection de la langue d’affichage à l’écran”
(page 8).
La disquette Utility Disk fournie contient des mires de test
pour le réglage de l’horloge, de la phase et du centrage.
Ces mires de test vous aideront à vérifier si vos réglages
sont corrects.
MENU
OK MENU
QUITTE
PHASE
HORLOGE
CENTRAGE
ZOOM
COULEUR
LANGUAGE
OPTION
QUITTE
Referme l’écran MENU.
PHASE
Affiche l’écran PHASE. Réglez la phase lorsque les
caractères ou les images apparaissent flous sur toute la
surface de l’écran. Réglez la phase après avoir réglé le pas.
HORLOGE
Affiche l’écran HORLOGE. Réglez l’horloge lorsque les
caractères ou les images ne sont pas clairs à certains endroits
de l’écran.
CENTRAGE
Affiche l’écran CENTRAGE pour le réglage du centrage de
l’image.
ZOOM
Affiche l’écran ZOOM pour la sélection du mode
d’affichage de l’image. Sélectionnez MODE ZOOM pour
afficher l’image sur toute la surface de l’écran ou MODE
RÈEL pour afficher l’image suivant sa résolution actuelle.
COULEUR
Affiche l’écran COULEUR pour le réglage de la température
de couleur.
LANGUAGE
Affiche l’écran LANGUAGE pour la sélection de la langue
d’affichage à l’écran.
OPTION
Affiche l’écran OPTION. Vous pouvez régler les paramètres
tels que le rétro-éclairage, la position des écrans de menu, le
délai d’activation du mode d’économie d’énergie et le
verrouillage des commandes.
10
Réglage de l’horloge
Réglez l’horloge si des lignes verticales apparaissent à
l’écran ou si une partie de l’écran scintille ou devient floue.
Réglez l’écran de façon à ce que les lignes verticales en gras
de la mire de test disparaissent.
Réglage de la phase
Réglez la phase si la totalité de l’écran scintille ou devient
floue ou si vous observez des lignes horizontales sur l’écran.
Ajustez l’écran jusqu’à ce que les lignes horizontales aient
été réduites au minimum.
Réglage du centrage
Réglez le centrage si l’image n’est pas centrée sur l’écran.
Déplacez l’image vers le haut, le bas, la gauche ou la droite
jusqu’à ce que le cadre rouge sur le périmètre de la mire de
test ait disparu.
Utilisation de la mire de test
1
Réglez ZOOM sur MODE RÉEL (page 12).
2
Chargez la disquette Utility Disk fournie et affichez la
mire de test.
Utilisez la disquette appropriée à votre ordinateur.
Pour Windows 95/98
Windows Monitor Information Disk/Utility Disk
Pour Macintosh
Macintosh Utility Disk
3
Sélectionnez l’horloge, la phase ou le centrage dans
l’écran MENU du moniteur et ajustez l’écran tout en
contrôlant la mire de test (pages 11, 12).
4
Lorsque vous avez terminé, cliquez sur [END]à l’écran
de façon à désactiver la mire de test.
Personnalisation du moniteur
Suppression du scintillement ou
du maculage
6
Si une partie de l’écran scintille ou devient floue, appuyez
sur la touche AUTO. Si cette opération reste sans effet,
réglez le pas et la phase en procédant comme suit.
Le réglage de l’horloge et de la phase sont enregistrés dans
la mémoire pour le signal d’entrée en cours.
1
Chargez la disquette Utility Disk (page 10).
2
Appuyez sur la touche MENU.
L’écran MENU apparaît.
MENU
MENU
3
PHASE
MENU
26
7
OK MENU
QUITTE
PHASE
HORLOGE
CENTRAGE
ZOOM
COULEUR
LANGUAGE
OPTION
Appuyez sur les touches ø /‡ pour sélectionner
HORLOGE et appuyez ensuite à nouveau sur la
touche MENU.
L’écran de menu HORLOGE apparaît.
Appuyez sur les touches ø /‡ pour sélectionner
PHASE et appuyez ensuite à nouveau sur la touche
MENU.
L’écran de menu PHASE apparaît.
Appuyez sur les touches +/– jusqu’à ce que les
couleurs de l’écran se soient uniformisées.
Si vous employez la disquette Utility Disk, procédez au
réglage de façon à ce que les lignes horizontales aient été
réduites au minimum.
L’écran de menu disparaît automatiquement au bout
d’environ 30 secondes.
Pour refermer l’écran de menu, appuyez à nouveau sur la
touche MENU.
Pour désactiver la mire de test, cliquez sur [END]à l’écran.
HORLOGE
1328
Appuyez sur les touches +/– jusqu’à ce que les
couleurs de l’écran se soient uniformisées.
Si vous employez la disquette Utility Disk, procédez au
réglage de façon à ce que les lignes verticales
disparaissent.
5
Appuyez sur la touche MENU.
L’écran MENU apparaît.
Si vous observez des lignes horizontales sur la totalité de
l’écran, procédez au réglage de la phase à l’étape
suivante.
F
D
ES
I
MENU
4
EN
11
Personnalisation du moniteur
Réglage de la position de l’image
Si l’image ne se trouve pas au centre de l’écran, appuyez sur
la touche AUTO. Si cette opération reste sans effet, réglez le
centrage en procédant comme suit.
Le réglage du centrage est enregistré dans la mémoire pour
le signal d’entrée en cours.
1
Chargez la disquette Utility Disk (page 10).
2
Appuyez sur la touche MENU.
L’écran MENU apparaît.
OK MENU
Le moniteur est réglé par défaut pour afficher l’image sur la
totalité de l’écran, quelle que soit la résolution de l’image.
Vous pouvez également visualiser l’image suivant sa
résolution réelle.
Le réglage du zoom est enregistré dans la mémoire pour le
signal d’entrée en cours.
1
QUITTE
PHASE
HORLOGE
CENTRAGE
ZOOM
MENU
3
MENU
Affichage de l’image suivant sa
résolution réelle
Appuyez sur les touches ø /‡ pour sélectionner
CENTRAGE et appuyez ensuite à nouveau sur la
touche MENU.
CENTRAGE
L’écran de menu CENTRAGE
apparaît.
H
V
2
26
Pour régler le centrage horizontal, sélectionnez H à
l’aide des touches ø /‡ et ajustez la position au
moyen des touches +/–.
+ . . . pour déplacer l’image vers la droite.
– . . . pour déplacer l’image
CENTRAGE
vers la gauche.
H
V
MENU
OK MENU
QUITTE
PHASE
HORLOGE
CENTRAGE
ZOOM
COULEUR
LANGUAGE
OPTION
MENU
MENU
4
Appuyez sur la touche MENU.
L’écran MENU apparaît.
Appuyez sur les touches ø /‡ pour sélectionner
ZOOM et appuyez ensuite à nouveau sur la touche
MENU.
L’écran de menu ZOOM apparaît.
MENU
ZOOM
MODE ZOOM
MODE R É E L
3
Appuyez sur la touche ‡ pour sélectionner MODE
RÉEL et appuyez ensuite à nouveau sur la touche
MENU.
L’écran MENU apparaît.
26
Pour régler le centrage vertical, sélectionnez V à
l’aide des touches ø /‡ et ajustez la position au
moyen des touches +/–.
+ . . . pour déplacer l’image vers le haut.
– . . . pour déplacer l’image
CENTRAGE
vers le bas.
H
V
L’écran de menu disparaît automatiquement au bout
d’environ 30 secondes.
Pour refermer l’écran de menu, appuyez à nouveau sur la
touche MENU.
Pour afficher l’image sur la totalité de l’écran
26
Appuyez sur la touche ø à l’étape 3 pour sélectionner
MODE ZOOM.
L’écran de menu disparaît automatiquement au bout
d’environ 30 secondes.
Pour refermer l’écran de menu, appuyez à nouveau sur la
touche MENU.
Pour désactiver la mire de test, cliquez sur [END]à l’écran.
12
Personnalisation du moniteur
Changement ou réglage de la
température de couleur
Changement de la position
d’affichage des écrans de menu
La température de couleur est réglée par défaut sur 9300K.
Vous pouvez changer la température de couleur sur 6500K
ou 5000K. Utilisez cette fonction pour régler la température
de couleur de façon à ce que l’image corresponde aux
couleurs réelles d’une image imprimée.
Le réglage de la température de couleur est enregistrée dans
la mémoire pour tous les signaux d’entrée reçus.
Vous pouvez changer la position d’affichage des écrans de
menu (par exemple, si vous voulez régler l’image derrière
l’écran de menu).
1
Appuyez sur la touche
MENU.
L’écran MENU apparaît.
MENU
2
1
MENU
OK MENU
QUITTE
PHASE
HORLOGE
CENTRAGE
ZOOM
COULEUR
LANGUAGE
OPTION
2
Appuyez sur les touches ø /‡ pour sélectionner
COULEUR et appuyez ensuite à nouveau sur la
touche MENU.
COULEUR
L’écran de menu COULEUR
apparaît.
9300K
6500K
5000K
MODE UTILISATEUR
MENU
R
50
V
50
B
50
4
Appuyez sur les touches ø /‡ pour sélectionner
OPTION et appuyez ensuite à nouveau sur la touche
MENU.
L’écran de menu OPTION apparaît.
EN
F
MENU
D
ES
: 1M
: DEVERR
I
POSITION OSD H
Appuyez sur les touches ø /‡ pour sélectionner
(POSITION OSD H) ou
(POSITION OSD V).
Pour ajuster la position
Pour ajuster la position
horizontale
verticale
OPTION
Appuyez sur les touches ø /‡ pour sélectionner R
(rouge) ou B (bleu) et appuyez ensuite sur les
touches +/– pour obtenir la couleur voulue.
Le couleur change suivant que la composante R ou B
augmente ou diminue par
COULEUR
rapport à V (vert).
L’écran de menu disparaît automatiquement au bout
d’environ 30 secondes.
Pour refermer l’écran de menu, appuyez à nouveau sur la
touche MENU.
OK MENU
OPTION
Appuyez sur les touches ø /‡ pour sélectionner la
température de couleur.
Si vous devez procéder à d’autres réglages de la
température de couleur sélectionnée, passez à l’étape 4.
Si ce n’est pas nécessaire, appuyez sur la touche MENU.
L’écran MENU apparaît.
9300K
6500K
5000K
MODE UTILISATEUR
R
50
V
50
B
50
MENU
QUITTE
PHASE
HORLOGE
CENTRAGE
ZOOM
COULEUR
LANGUAGE
OPTION
MENU
3
3
Appuyez sur la touche MENU.
L’écran MENU apparaît.
: 1M
: DEVERR
POSITION OSD H
4
OPTION
: 1M
: DEVERR
POSITION OSD V
Appuyez sur les touches +/– pour déplacer l’écran de
menu jusqu’à la position voulue.
L’écran de menu OPTION disparaît automatiquement au
bout d’environ 30 secondes.
Pour refermer l’écran de menu, appuyez à nouveau sur la
touche MENU.
13
Personnalisation du moniteur
Réglage du rétro-éclairage
Si l’écran est trop lumineux lorsque vous employez le
moniteur dans un endroit sombre, réglez l’intensité du
rétro-éclairage.
1
Appuyez sur la touche MENU.
L’écran MENU apparaît.
Vous pouvez définir la durée avant laquelle le moniteur
passe en mode d’économie d’énergie. Reportez-vous à la
page 17 pour des informations plus détaillées sur les
possibilités d’économie d’énergie de ce moniteur.
OK MENU
QUITTE
PHASE
HORLOGE
CENTRAGE
ZOOM
COULEUR
LANGUAGE
OPTION
MENU
2
MENU
Réglage du délai d’activation du
mode d’économie d’énergie
Appuyez sur les touches ø /‡ pour sélectionner
OPTION et appuyez ensuite à nouveau sur la touche
MENU.
L’écran de menu OPTION apparaît.
1
2
OPTION
: 1M
: DEVERR
Appuyez sur les touches ø /‡ pour sélectionner
(RETROECLAIRAGE).
OPTION
3
RETROECLAIRAGE
L’écran de menu OPTION disparaît automatiquement au
bout d’environ 30 secondes.
Pour refermer l’écran de menu, appuyez à nouveau sur la
touche MENU.
14
Appuyez sur les touches ø /‡ pour sélectionner
(ECONOMIE TEMPO).
OPTION
ZZ...
60MIN
1MIN
5SEC
NON
: DEVERR
Appuyez sur les touches +/– pour régler le niveau
d’intensité lumineuse.
: 1M
: DEVERR
POSITION OSD H
26
4
OK MENU
Appuyez sur les touches ø /‡ pour sélectionner
OPTION et appuyez ensuite à nouveau sur la touche
MENU.
OPTION
L’écran de menu OPTION
apparaît.
MENU
POSITION OSD H
MENU
QUITTE
PHASE
HORLOGE
CENTRAGE
ZOOM
COULEUR
LANGUAGE
OPTION
MENU
MENU
3
Appuyez sur la touche MENU.
L’écran MENU apparaît.
ECONOMIE TEMPO
4
Appuyez sur les touches +/– pour sélectionner la
durée de votre choix.
Lorsque ECONOMIE TEMPO est réglé sur NON, le
moniteur ne passe pas en mode d’économie d’énergie.
L’écran de menu OPTION disparaît automatiquement au
bout d’environ 30 secondes.
Pour refermer l’écran de menu, appuyez à nouveau sur la
touche MENU.
Personnalisation du moniteur
Verrouillage des commandes
Réinitialisation des réglages
La fonction de verrouillage des commandes désactive toutes
les commandes à l’exception du commutateur u
(alimentation) et de la touche MENU.
Vous pouvez réinitialiser tous les réglages et paramètres
aux valeurs par défaut.
La température de couleur est ramenée à 9300K, le zoom en
mode plein écran et le délai d’activation du mode
d’économie d’énergie à une minute. Le verrouillage des
commandes est désactivé. Les autres réglages sont restaurés
aux valeurs par défaut. La langue d’affichage à l’écran reste
cependant inchangée.
Lorsque vous avez sélectionné “VERR”, vous ne pouvez
plus sélectionner que les paramètres suivants dans l’écran
MENU :
• QUITTE
• VERROU REGLAGES et RÉGLAGE D’USINE dans
l’écran de menu OPTION
1
Si vous appuyez sur l’une des touches verrouillées, le
symbole
apparaît sur l’écran.
1
Appuyez sur la touche MENU.
L’écran MENU apparaît.
Appuyez sur les touches ø /‡ pour sélectionner
OPTION et appuyez ensuite à nouveau sur la touche
MENU.
L’écran de menu OPTION apparaît.
I
POSITION OSD H
3
Appuyez sur les touches ø /‡ pour sélectionner ?
(RÉGLAGE D’USINE).
OPTION
: 1M
OUI
DEVERR
VERR
4
RÉGLAGE D' USINE
4
Appuyez sur la touche +.
Appuyez sur la touche – pour sélectionner VERR.
L’écran de menu OPTION disparaît
automatiquement au bout d’environ 30
secondes.
Pour refermer l’écran de menu, appuyez à
nouveau sur la touche MENU.
Pour désactiver le verrouillage des commandes
Appuyez sur la touche + à l’étape 4 pour sélectionner
DEVERR.
F
ES
: 1M
: DEVERR
Appuyez sur les touches ø /‡ pour sélectionner
(VERROU REGLAGES).
OPTION
VERROU REGLAGES
EN
D
MENU
: 1M
: DEVERR
POSITION OSD H
OK MENU
OPTION
Appuyez sur les touches ø /‡ pour sélectionner
OPTION et appuyez ensuite à nouveau sur la touche
MENU.
L’écran de menu OPTION
OPTION
apparaît.
MENU
3
2
MENU
QUITTE
PHASE
HORLOGE
CENTRAGE
ZOOM
MENU
OK MENU
QUITTE
PHASE
HORLOGE
CENTRAGE
ZOOM
MENU
2
MENU
Appuyez sur la touche MENU.
L’écran MENU apparaît.
L’écran de menu OPTION disparaît automatiquement au
bout d’environ 30 secondes.
Pour refermer l’écran de menu, appuyez à nouveau sur la
touche MENU.
15
Caractéristiques techniques
Modes présélectionnés et
utilisateur
Ce moniteur est doté de modes présélectionnés par défaut
pour les normes industrielles les plus fréquentes de manière
à garantir une véritable compatibilité “plug and play”
(“branchez et démarrez”).
Lorsqu’un nouveau signal est entré, le moniteur sélectionne
le mode présélectionné par défaut approprié et ajuste
momentanément l’étalonnage de la phase de façon à assurer
une haute qualité d’image au centre de l’écran. L’étalonnage
est enregistré dans la mémoire et est immédiatement
restauré chaque fois que le même signal est entré.
Résolution
Fréquence
N° (points × lignes) horizontale
Fréquence Mode
verticale
graphique
1
—
15,625 kHz
50 Hz
625I
2
—
15,75 kHz
60 Hz
525I
3
640 × 350
31,5 kHz
70 Hz
MCGA
4
640 × 400
31,5 kHz
70 Hz
NEC PC-98
5
640 × 480
31,5 kHz
60 Hz
VGA-G
6
640 × 480
35,0 kHz
67 Hz
Couleur 13"
Macintosh
7
640 × 480
37,5 kHz
75 Hz
EVGA
8
640 × 480
43,3 kHz
85 Hz
VESA
9
720 × 400
31,5 kHz
70 Hz
VGA-Text
10
720 × 400
37,9 kHz
85 Hz
VESA
11
800 × 600
37,9 kHz
60 Hz
SVGA
12
800 × 600
46,9 kHz
75 Hz
ESVGA
13
800 × 600
53,7 kHz
85 Hz
VESA
14
832 × 624
49,7 kHz
75 Hz
Couleur 16"
Macintosh
15
1024 × 768
48,4 kHz
60 Hz
VESA
16
1024 × 768
56,5 kHz
70 Hz
VESA
17
1024 × 768
60,0 kHz
75 Hz
EUVGA
18
1024 × 768
60,2 kHz
75 Hz
Couleur 19"
Macintosh
19
1024 × 768
68,7 kHz
85 Hz
VESA
16
Pour les signaux d’entrée qui ne correspondent à aucun des
modes présélectionnés par défaut, la technologie Multiscan
numérique de ce moniteur procède à tous les réglages
requis pour assurer l’affichage d’une image claire sur l’écran
quelle que soit la synchronisation dans la plage de
fréquence du moniteur. Il peut cependant s’avérer
nécessaire de procéder à l’accord fin du centrage vertical/
horizontal. Appuyez simplement sur la touche AUTO ou
réglez le moniteur suivant les instructions de réglage. Les
réglages sont automatiquement mémorisés comme un mode
utilisateur et restaurés chaque fois que le signal d’entrée
correspondant est entré.
Conditions de synchronisation horizontale et
verticale préconisées
La largeur de synchronisation horizontale doit être de 4,8 % ou plus
de la durée horizontale totale.
La largeur de suppression horizontale doit être de 2,5 µs ou plus.
La largeur de suppression verticale doit être de 450 µs ou plus.
Réglage de la résolution du moniteur et du
nombre de couleurs
Ajustez la résolution du moniteur et le nombre de couleurs en vous
référant au mode d’emploi de votre ordinateur. Le nombre de
couleurs peut varier selon votre ordinateur ou votre carte vidéo. Le
réglage de la palette de couleurs et le nombre réel de couleurs se
présentent comme suit:
• High Color (16 bit) n 65.536 couleurs
• True Color (24 bit) n environ 16,77 millions de couleurs
En mode True Color (24 bit), la vitesse peut être inférieure.
Caractéristiques techniques
Fonction d’économie d’énergie
Ce moniteur satisfait aux normes d’économie d’énergie
définies par VESA et ENERGY STAR ainsi qu’aux normes
NUTEK plus strictes.
Si le moniteur est raccordé à un ordinateur ou à une carte
graphique vidéo compatible avec VESA DPMS (Display
Power Management Signaling), le moniteur réduit
automatiquement sa consommation électrique en trois
phases comme indiqué ci-dessous.
Vous pouvez définir le délai d’activation du mode
d’économie d’énergie via les écrans de menu. Définissez la
durée suivant la procédure de “Réglage du délai
d’activation du mode d’économie d’énergie” à la page 14.
Remarque
Lorsqu’aucun signal vidéo n’est transmis au moniteur, le message
“PAS ENTREE VIDEO” (page 18) s’affiche. Au terme de la durée
spécifiée, la fonction d’économie d’énergie met le moniteur en
mode inactif et l’indicateur u s’allume en orange. Dès que des
signaux de synchronisation horizontale et verticale sont détectés, le
moniteur repasse automatiquement en mode de fonctionnement
normal.
Mode de consommation
d’énergie
Ecran
Signal de synchro
horizontale
Signal de synchro
verticale
Consommation électrique
Temps de
reprise
Indicateur u
1
Fonctionnement normal
activé
présent
présent
CPD-L133 ≤ 30 W* ≤ 42 W**
CPD-L150 ≤ 25 W* ≤ 35 W**
—
Vert
2
Veille (1er mode)
vide
absent
présent
CPD-L133 ≤ 1,5 W* ≤ 4 W**
CPD-L150 ≤ 1,5 W* ≤ 4 W**
Approx.
3s
Vert et orange
en alternance
3
Interruption (2e mode)
vide
présent
absent
CPD-L133 ≤ 1,5 W* ≤ 4 W**
CPD-L150 ≤ 1,5 W* ≤ 4 W**
Approx.
3s
Vert et orange
en alternance
4
Inactif (3e mode)
vide
absent
absent
CPD-L133 ≤ 1,5 W* ≤ 4 W**
CPD-L150 ≤ 1,5 W* ≤ 4 W**
Approx.
10 s
Orange
5
Hors tension
––
––
––
CPD-L133 ≤ 1,5 W* ≤ 4 W**
CPD-L150 ≤ 1,5 W* ≤ 4 W**
—
Eteint
EN
F
D
* Consommation électrique du moniteur uniquement
** Consommation électrique du moniteur et de l’adaptateur secteur
ES
I
Affichage de l’écran
INFORMATION
Vous pouvez vérifier la désignation, le numéro de série et
l’année de fabrication de ce moniteur.
Maintenez la touche MENU enfoncée pendant cinq
secondes.
L’écran de menu INFORMATION apparaît.
Plug & Play
Ce moniteur satisfait aux normes DDC1 et DDC2B
Display Data Channel (DDC) de VESA.
Lorsqu’un serveur DDC1 est raccordé, le moniteur se
synchronise sur le signal V. CLK conformément aux normes
VESA et transmet les données EDID (Extended Display
Identification Data) à la ligne de données.
DDC est une marque commerciale de Video Electronics
Standard Association.
MENU
Exemple
INFORMATION
MODEL : CPD-L150
SER. NO : 1234567
MANUFACTURED : 1998
Désignation
Numéro de série
Année de fabrication
L’écran de menu INFORMATION disparaît
automatiquement au bout d’environ 30 secondes.
Pour refermer l’écran de menu, appuyez à nouveau sur la
touche MENU.
17
Informations complémentaires
Messages d’avertissement
Si une situation anormale se produit au niveau du signal
d’entrée, l’un des messages suivants apparaît.
“HORS PLAGE DE BALAYAGE” indique que le signal
d’entrée n’est pas supporté par les spécifications
d’affichage.
INFORMATION
HORS PLAGE
DE BALAYAGE
“PAS ENTREE VIDEO” indique qu’aucun signal n’est entré.
Pour résoudre ces problèmes, reportez-vous à la section
“Dépannage” ci-dessous.
Dépannage
Cette section peut vous aider à identifier la cause d’un problème et donc éviter de consulter le service d’assistance technique.
Symptômes
Vérifiez
Pas d’image
Si l’indicateur u n’est pas
allumé.
• Vérifiez si le cordon d’alimentation est correctement branché.
• Vérifiez si le commutateur u (alimentation) se trouve en position “ON” (marche)
Si le message “PAS ENTREE
VIDEO” apparaît sur l’écran ou
si l’indicateur u est allumé en
orange.
• L’écran est vide lorsque le moniteur est en mode d’économie d’énergie. Appuyez sur une
touche quelconque du clavier de l’ordinateur.
• Vérifiez si le commutateur d’alimentation de votre ordinateur est en position “ON”
(marche).
• Vérifiez si la sélection d’entrée est correcte.
• Vérifiez si le câble de signal vidéo est correctement branché et si toutes les fiches sont
fermement connectées dans leurs prises respectives.
• Vérifiez si le connecteur d’entrée vidéo HD15 ne comporte pas une broche faussée ou
enfoncée.
Si le message “HORS PLAGE
DE BALAYAGE message
apparaît sur l’écran.
• Vérifiez si la plage de fréquence vidéo correspond à celle spécifiée pour l’affichage.
Horizontale : 30 – 70 kHz, verticale : 50 – 85 Hz
Reportez-vous au mode d’emploi de votre ordinateur pour le réglage de la plage de
fréquence vidéo.
• Si vous utilisez un adaptateur de câble de signal vidéo, vérifiez s’il est correct.
Si vous utilisez un système
Macintosh.
• Vérifiez si l’adaptateur Macintosh et le câble de signal vidéo sont correctement branchés
(page 6).
Si vous utilisez Windows 95/98. • Si vous remplacez un ancien moniteur par ce moniteur, reconnectez l’ancien moniteur et
procédez comme suit. Installez la disquette “Windows Monitor Information Disk/Utility
Disk” (page 7) et sélectionnez “CPD-L133 ou CPD-L150” parmi les moniteurs Sony dans
l’écran de sélection de moniteur de Windows 95/98.
L’image est sombre.
• Réglez le rétro-éclairage (page 14).
• Réglez la luminosité (page 9).
• L’écran peut nécessiter quelques secondes d’échauffement après la mise sous tension.
L’image va bientôt apparaître.
L’image est brouillée.
• Appuyez sur la touche AUTO (page 8). Si cette opération reste sans effet, procédez au
réglage de l’horloge et de la phase (page 11).
• Vérifiez dans le présent mode d’emploi si le mode graphique et la fréquence que vous
essayez d’exploiter sont supportés. Même si la fréquence est comprise dans la plage
adéquate, il arrive que certains ordinateurs soient d’une impulsion de synchronisation trop
étroite pour que ce moniteur se synchronise correctement.
18
Informations complémentaires
Symptômes
Vérifiez
Les couleurs ne sont pas
uniformes.
• Appuyez sur la touche AUTO (page 8). Si cette opération reste sans effet, procédez au
réglage de l’horloge et de la phase (page 11).
Vous ne pouvez pas régler le
moniteur à l’aide des touches
du panneau frontal.
• Si la fonction de verrouillage des commandes est activée, désactivez-la à l’aide de l’écran
OPTION (page 15).
Le blanc n’est pas blanc.
• Réglez la température de couleur (page 13).
L’image à l’écran n’est pas
centrée.
• Appuyez sur la touche AUTO (page 8).
• Réglez le centrage (page 12).
• Certains modes vidéo ne remplissent pas l’écran jusqu’aux bords. Ce problème tend à se
produire avec certaines cartes vidéo.
La taille de l’image est
incorrecte.
• Vérifiez le réglage ZOOM (page 12).
L’image est floue.
• Appuyez sur la touche AUTO (page 8). Si cette opération reste sans effet, procédez au
réglage de l’horloge et de la phase (page 11).
• Réglez le contraste et la luminosité (page 9).
L’image sautille ou présente
des oscillations ondulatoires.
• Branchez le moniteur sur une autre prise murale (secteur), de préférence reliée à un autre
circuit.
• Essayez le moniteur sur un autre ordinateur dans un autre local.
L’image scintille.
• Appuyez sur la touche AUTO (page 8). Si cette opération reste sans effet, procédez au
réglage de l’horloge et de la phase (page 11).
Des images fantômes
apparaissent.
• Déconnectez les prolongateurs de câble vidéo et/ou les boîtiers de commutation vidéo si ce
symptôme se manifeste. Une longueur de câble excessive ou une mauvaise connexion peut
générer ce symptôme.
Un motif ondulatoire ou
elliptique (moiré) est visible.
• Appuyez sur la touche AUTO (page 8). Si cette opération reste sans effet, procédez au
réglage de l’horloge et de la phase (page 11).
EN
F
D
ES
I
19
Informations complémentaires
Spécifications
Type de panneau : a-Si TFT Active
Matrix
CPD-L133
Format de l’image : 13,3 pouces
(33,8 cm)
CPD-L150
Format de l’image : 15 pouces
(38 cm)
Format du signal d’entrée
Fréquence d’exploitation RVB :
fh: 15,625 kHz (625 signal
entrelacé)
15,75 kHz (525 signal entrelacé)
30 – 70 kHz
fv: 50 Hz — 85 Hz
Rendement des pixels 99,99 %
Résolution
H: 1024 points max.
V: 768 lignes max.
Puissance de raccordement
Fonctionnement :
100 – 240 V CA, 50 – 60 Hz
Entrée :
12 V CC (avec l’adaptateur secteur)
Consommation électrique
CPD-L133
Affichage uniquement :
Max. 30 W
Avec l’adaptateur secteur :
Max. 42 W
CPD-L150
Affichage uniquement :
Max. 25 W
Avec l’adaptateur secteur :
Max. 35 W
Dimensions (l/h/p)
CPD-L133
Avec le support :
Approx. 373 × 358 × 165 mm
(14 3/4 × 14 1/8 × 6 1/2 po)
Moniteur uniquement :
Approx. 373 × 272 × 71 mm
(14 3/4 × 10 3/4 × 2 7/8 po)
CPD-L150
Avec le support :
Approx. 398 × 366 × 165 mm
(15 3/4 × 14 1/2 × 6 1/2 po)
Moniteur uniquement :
Approx. 398 × 291 × 71 mm
(15 3/4 × 11 1/2 × 2 7/8 po)
Masse
CPD-L133
Approx. 4,9 kg (10 lb 12 oz),
support compris
CPD-L150
Approx. 5,3 kg (11 lb), support
compris
Accessoires fournis
Voir page 6.
Assignation des broches
5 4 3 2 1
10 9 8 7 6
15 14 13 12 11
Panneau LCD
20
*
Broche n°
Signal
Broche n°
Signal
1
Rouge
8
Masse bleu
2
Vert (synchro
composite sur
le vert)
9
DDC + 5V*
10
Masse
11
ID (masse)
3
Bleu
12
4
ID (masse)
Données bidirectionnelles
(SDA)*
5
Masse DDC*
13
Synchro H
6
Masse rouge
14
Synchro V
7
Masse vert
15
Données d’horloge (SCL)*
Norme Display Data Channel (DDC) de VESA
La conception et les spécifications sont sujettes à
modifications sans préavis.
INHALT
Vorbereitungen
Sicherheitsmaßnahmen .......................................................................................................
Lage und Funktion der Teile und Bedienelemente ........................................................
Anschließen des Geräts .......................................................................................................
Automatisches Einstellen des Bildes ................................................................................
Auswählen der Sprache für die Bildschirmanzeigen .....................................................
4
5
6
8
8
Einstellen des Monitors
Einstellen der Bildhelligkeit ............................................................................................... 9
Einstellen des Kontrasts ...................................................................................................... 9
Das Bildschirmmenüsystem ............................................................................................. 10
Die Dienstprogrammdiskette ........................................................................................... 10
Korrigieren eines flimmernden oder verschwommenen Bildes ................................. 11
Einstellen der Bildposition ............................................................................................... 12
Anzeigen des Bildes in der tatsächlichen Auflösung ................................................... 12
Ändern oder Einstellen der Farbtemperatur ................................................................. 13
Ändern der Position der Bildschirmanzeigen ............................................................... 13
Einstellen der Hintergrundbeleuchtung ........................................................................ 14
Einstellen der Verzögerung für die Energiesparfunktion ........................................... 14
Sperren der Bedienelemente ............................................................................................ 15
Zurücksetzen der Einstellungen ...................................................................................... 15
EN
F
D
ES
I
Technische Merkmale
Vordefinierte Modi und Benutzermodi .......................................................................... 16
Energiesparfunktion .......................................................................................................... 17
Anzeigen des Bildschirms INFORMATION ................................................................. 17
Plug & Play ......................................................................................................................... 17
Weitere Informationen
Warnmeldungen ................................................................................................................ 18
Störungsbehebung ............................................................................................................. 18
Technische Daten ............................................................................................................... 20
• Macintosh ist ein Warenzeichen der Apple Computer, Inc., in den USA
und anderen Ländern.
• Windows® und MS-DOS sind eingetragene Warenzeichen der
Microsoft Corporation in den USA und anderen Ländern.
• IBM PC/AT und VGA sind eingetragene Warenzeichen der IBM
Corporation in den USA.
• VESA ist ein Warenzeichen der Video Electronics Standard
Association.
• ENERGY STAR ist ein eingetragenes Warenzeichen in den USA.
• Alle anderen in diesem Handbuch erwähnten Warenzeichen oder
eingetragenen Warenzeichen sind Eigentum der jeweiligen
Unternehmen.
• Im Handbuch sind die Warenzeichen und eingetragenen Warenzeichen
nicht in jedem Fall ausdrücklich durch “™” bzw. “®” gekennzeichnet.
3
Vorbereitungen
Sicherheitsmaßnahmen
Installation
• Achten Sie auf ausreichende Luftzufuhr, damit sich im
Gerät kein Wärmestau bildet. Stellen Sie den Monitor
nicht auf Oberflächen wie Teppichen oder Decken oder in
der Nähe von Materialien wie Gardinen und
Wandbehängen auf, die die Lüftungsöffnungen
blockieren könnten.
• Stellen Sie den Monitor nicht in der Nähe von
Wärmequellen wie Heizkörpern oder Warmluftauslässen
oder an Orten auf, an denen er direktem Sonnenlicht,
außergewöhnlich viel Staub, mechanischen Vibrationen
oder Stößen ausgesetzt ist.
• Stellen Sie das Gerät nicht in der Nähe anderer Geräte auf,
die ein starkes Magnetfeld generieren, wie zum Beispiel
ein Transformator oder eine Hochspannungsleitung.
Hinweise zum LCD-Bildschirm
• Helle Lichtpunkte (rot, blau oder grün) können auf
dem LCD-Bildschirm zu sehen sein. Dies ist keine
Fehlfunktion. Der LCD-Bildschirm wird in einer
Hochpräzisionstechnologie hergestellt, und der Anteil
der effektiven Bildpunkte liegt bei über 99,99 %. Es ist
jedoch möglich, daß einige Bildelemente gar nicht
oder einige Bildelemente ständig angezeigt werden.
• Stellen Sie das Gerät nicht so auf, daß der LCD-Bildschirm
auf die Sonne gerichtet ist. Andernfalls könnte der LCDBildschirm beschädigt werden. Achten Sie darauf
besonders, wenn Sie den Monitor in der Nähe eines
Fensters aufstellen.
• Stoßen Sie nicht gegen den LCD-Bildschirm, und
zerkratzen Sie ihn nicht. Stellen Sie keine schweren
Gegenstände auf den LCD-Bildschirm. Andernfalls kann
die Gleichförmigkeit des Bildes gestört werden.
• Wenn Sie den Monitor in einer kalten Umgebung
benutzen, kann ein Nachbild auf dem LCD-Bildschirm zu
sehen sein. Dies ist keine Fehlfunktion. Sobald sich der
Monitor erwärmt, wird die Anzeige auf dem Bildschirm
wieder normal.
• Wenn Sie über längere Zeit ein Standbild anzeigen lassen,
kann ein Nachbild erscheinen. Dieses Nachbild
verschwindet nach einer Weile wieder.
• Bildschirm und Gehäuse erwärmen sich bei Betrieb. Dies
ist keine Fehlfunktion.
Austauschen der Leuchtstoffröhre
Eine spezielle Leuchtstoffröhre dient in diesem Monitor als
Lichtquelle. Wenn die Anzeige auf dem LCD-Bildschirm
dunkel oder instabil wird oder gar nicht mehr erscheint,
muß die Leuchtstoffröhre gegen eine neue ausgetauscht
werden. Wenden Sie sich dazu an Ihren Sony-Händler.
4
Wartung
• Reinigen Sie Gehäuse, Bedienfeld und Bedienelemente
mit einem weichen Tuch, das Sie leicht mit einem milden
Reinigungsmittel angefeuchtet haben. Verwenden Sie
keine Scheuermittel, Scheuerschwämme oder
Lösungsmittel wie Alkohol oder Benzin.
• Berühren Sie die Bildschirmoberfläche nicht mit scharfen,
rauhen oder spitzen Gegenständen wie zum Beispiel
Kugelschreibern oder Schraubenziehern. Andernfalls
könnte die Bildschirmoberfläche zerkratzt werden.
• Reinigen Sie den Bildschirm mit einem weichen Tuch.
Wenn Sie ein Glasreinigungsmittel verwenden, achten Sie
darauf, daß es keine Antistatik-Lösung oder ähnliche
Zusätze enthält, da diese zu Kratzern auf der
Beschichtung des Bildschirms führen könnten.
Transport
• Wenn Sie den Monitor transportieren, fassen Sie ihn mit
beiden Händen an der Unterseite des Gehäuses. Wenn Sie
den Monitor fallenlassen, könnten Sie sich verletzen, und
der Monitor könnte beschädigt werden.
• Wenn Sie den Monitor zur Reparatur oder bei einem
Umzug transportieren müssen, verpacken Sie ihn mit
Hilfe der Originalverpackungsmaterialien wieder im
Originalkarton.
Warnhinweis zum Netzanschluß
• Verwenden Sie das für die Stromversorgung in Ihrem
Land geeignete Netzkabel.
Für Kunden in Großbritannien
Wenn Sie den Monitor in Großbritannien verwenden,
benutzen Sie bitte das mitgelieferte Kabel mit dem für
Großbritannien geeigneten Stecker.
Beispiele für Steckertypen
für 100 bis 120 V
Wechselstrom
für 200 bis 240 V
Wechselstrom
nur für 240 V
Wechselstrom
Die Netzsteckdose sollte sich in der Nähe des Geräts
befinden und leicht zugänglich sein.
Montage an der Wand oder einem Schwenkarm
Wenn der Monitor an der Wand oder an einem
Schwenkarm montiert werden soll, wenden Sie sich bitte an
Fachpersonal. Versuchen Sie nicht, den Monitor selbst zu
montieren.
Entsorgen des Monitors
• Entsorgen Sie den Monitor nicht im Rahmen der
allgemeinen Müllabfuhr.
Der Monitor gehört nicht in den Hausmüll.
• Die Leuchtstoffröhre enthält Quecksilber. Entsorgen
Sie den Monitor in Übereinstimmung mit den lokalen
Müllentsorgungs- und Umweltschutzvorschriften.
Vorbereitungen
Lage und Funktion der Teile und
Bedienelemente
Weitere Informationen finden Sie auf den in Klammern
angegebenen Seiten.
Die Abbildungen in der gesamten Anleitung zeigen das
Modell CPD-L150.
Rückseite
Vorderseite
1
2
3
4
5
6
EN
7
F
8
D
9
1
Netzschalter und -anzeige u (Seite 8, 17)
Zum Ein- und Ausschalten des Monitors.
Die Anzeige leuchtet grün, wenn der Monitor
eingeschaltet ist, und blinkt grün und orange bzw.
leuchtet orange, wenn sich der Monitor im
Energiesparmodus befindet.
2
8
Taste ‹ (Helligkeit) (ø ) (Seite 8 – 9, 11 –
15)
Buchse für externe Steuerung
ES
Zum Einspeisen externer Steuersignale im RS-232Format. Weitere Informationen dazu erhalten Sie bei
Ihrem Sony-Händler.
I
Anschluß DC IN (Seite 6)
Über diesen Anschluß wird der Monitor mit
Gleichstrom vom Netzteil versorgt.
Taste MENU (Menü) (Seite 8, 11 – 15, 17)
Zum Aufrufen des Menüs MENU.
3
7
9
RGB-Eingang (HD15) (Seite 6)
Zum Einspeisen analoger RGB-Videosignale
(0,714 Vp-p, positiv) und SYNC-Signale.
Zum Einstellen der Bildhelligkeit.
Dient beim Auswählen von Menüoptionen als Taste ø .
4
Taste > (Kontrast) (‡ ) (Seite 8 – 9, 11 – 15)
Zum Einstellen des Kontrasts.
Dient beim Auswählen von Menüoptionen als Taste ‡ .
5
Tasten +/– (Einstellen) (Seite 9, 11 – 15)
Zum Einstellen der ausgewählten Menüoption.
6
Neigen des Monitors
Dank der Neigevorrichtung können Sie den Monitor
vertikal in einem Winkel von bis zu 30° neigen.
Stützen Sie den Monitor dazu bitte mit beiden Händen
unten ab, wie auf der Abbildung unten gezeigt.
30°
Taste AUTO (Seite 8, 11)
Drücken Sie nach dem Anschließen dieses Monitors die
Taste AUTO. Damit wird das Bild automatisch auf das
Signal vom Computer eingestellt.
Drücken Sie diese Taste außerdem, wenn das Bild nicht
zentriert oder verschwommen ist.
5
Vorbereitungen
Wenn Ihr PC nicht mit DDC1 und DDC2B
kompatibel ist
Anschließen des Geräts
Bevor Sie mit dem Monitor arbeiten, überprüfen Sie bitte, ob
folgende Teile mitgeliefert wurden:
• LCD-Monitor (1)
• Netzteil (1)
• Hintere Abdeckung (1)
• Netzkabel (1)
• HD15-Videosignalkabel (1)
• Macintosh-Adapter (1)
• Windows Monitor Information Disk/Utility Disk (1)
• Macintosh Utility Disk (1)
• TCO’95 Eco-Dokument (1)
• Garantiekarte (1)
• Diese Bedienungsanleitung (1)
Dieser Monitor arbeitet mit allen IBM- oder kompatiblen
Systemen mit VGA oder höheren Grafikfunktionen. Sie
können diesen Monitor auch mit Geräten anderer
Plattformen einsetzen, die mit Horizontalfrequenzen
zwischen 30 und 70 kHz arbeiten, einschließlich Macintoshund Power Macintosh-Systemen. In diesem Fall ist jedoch
ein Kabeladapter erforderlich. Bei Ihrem Händler können
Sie erfahren, welchen Adapter Sie gegebenenfalls benötigen.
Dieser Monitor arbeitet darüber hinaus mit den RGBSignalen von PAL und NTSC-Systemen.
Dieser Monitor verwendet Stift Nr. 9 im Videosignalanschluß für
DDC1- und DDC2B-Kompatibilität.
An einige PC-Systeme, die mit DDC1 oder DDC2B nicht
kompatibel sind, können Sie Stift Nr. 9 möglicherweise nicht
anschließen. Wenn Sie nicht sicher sind, ob Ihr PC-System den Stift
Nr. 9 unterstützt, verwenden Sie den Adapter HD15 (weiblich) HD15 (männlich, ohne Stift Nr. 9) (nicht mitgeliefert). Achten Sie
darauf, den männlichen Stecker (ohne Stift Nr. 9) an den Computer
anzuschließen.
Anschließen an einen Macintosh- oder
kompatiblen Computer
an HD15
Macintosh
oder
Kompatibler
Schritt 1: Schließen Sie den Monitor an
den Computer an
Schließen Sie bei ausgeschaltetem Computer den Monitor
mit dem mitgelieferten HD15-Videosignalkabel an den
Computer an.
• Wenn Sie mit einem IBM PC/AT oder einem kompatiblen
Computer arbeiten, fahren Sie mit dem Abschnitt unten
fort.
• Wenn Sie mit einem Macintosh- oder einem kompatiblen
Computer arbeiten, fahren Sie mit dem folgenden
Abschnitt, “Anschließen an einen Macintosh- oder
kompatiblen Computer”, fort.
Anschließen an einen IBM PC/AT oder
kompatiblen Computer
an
Monitorausgang
HD15Videosignalkabel
(mitgeliefert)
Macintosh-Adapter
(mitgeliefert)
Der mitgelieferte Macintosh-Adapter
Der mitgelieferte Macintosh-Adapter ist kompatibel mit Macintosh
LC, Performa, Quadra und der Power Macintosh-Serie.
Bei Modellen der Serie Macintosh II und älteren Power BookVersionen ist möglicherweise ein Adapter mit Mikroschaltern (nicht
mitgeliefert) erforderlich.
Schritt 2: Schließen Sie das Netzkabel an
Schließen Sie bei ausgeschaltetem Monitor das
Gleichtromkabel an den Monitor an, und stecken Sie den
Netzstecker in eine Netzsteckdose.
an HD15
an eine
Netzsteckdose
IBM PC/AT
oder
Kompatibler
6
an
Monitorausgang
HD15Videosignalkabel
(mitgeliefert)
Netzkabel
(mitgeliefert)
Netzteil
(mitgeliefert)
an DC IN
Vorbereitungen
Schritt 3: Anbringen der hinteren
Abdeckung
3
Drehen Sie zum Befestigen der hinteren Abdeckung
die Schraube nach rechts.
Bringen Sie nach dem Anschließen des Computers und des
Netzkabels die mitgelieferte hintere Abdeckung an.
Achten Sie darauf, den Bildschirm aufrecht zu halten, wenn
Sie die hintere Abdeckung anbringen.
1
Haken Sie das Computer- und das Netzkabel ein.
Gelöst
Angezogen
EN
2
Setzen Sie die Laschen an der Rückseite der hinteren
Abdeckung an den Halterungen an, und schieben Sie
die Abdeckung nach unten.
Schritt 4: Einschalten des Monitors und
des Computers
F
Schalten Sie zunächst den Monitor und dann den Computer
ein.
Die Installation des Monitors ist damit abgeschlossen.
D
ES
I
Hinweis
Wird “OUT OF SCAN RANGE” oder “NO INPUT SIGNAL” auf
dem Bildschirm angezeigt, schlagen Sie unter “Warnmeldungen”
auf Seite 18 nach.
Für Benutzer von Windows 95/98
Damit Sie den Monitor optimal nutzen können, installieren Sie die
Datei mit den neuen Modellinformationen von der mitgelieferten
Diskette “Windows Monitor Information Disk/Utility Disk” auf
Ihrem PC. Dieser Monitor entspricht dem Plug-and-Play-Standard
”VESA DDC”. Wenn Ihr PC bzw. Ihre Grafikkarte dem DDCStandard entspricht, geben Sie bitte “Plug & Play Monitor (VESA
DDC)” oder den Modellnamen dieses Monitors als Monitortyp in
der “Control Panel” von Windows 95/98 an. Wenn bei der
Kommunikation zwischen Ihrem PC bzw. Ihrer Grafikkarte und
dem Monitor Probleme auftreten, legen Sie die Diskette “Windows
Monitor Information Disk/Utility Disk” ein, und wählen Sie den
Modellnamen dieses Monitors als Monitortyp aus.
Für Benutzer von Windows NT 4.0
Die Installation des Monitors unter Windows NT 4.0 ist anders als
unter Windows 95/98. So brauchen Sie z.B. den Monitortyp nicht
auszuwählen. Näheres zum Einstellen der Auflösung, der
Bildwiederholrate und der Anzahl der Farben finden Sie im
Benutzerhandbuch zu Windows NT 4.0.
7
Vorbereitungen
Automatisches Einstellen des
Bildes
Auswählen der Sprache für die
Bildschirmanzeigen
Wenn das Bild flimmert oder verschwommen ist, drücken
Sie die Taste AUTO. Der Monitor wird automatisch auf das
Signal des angeschlossenen Computers eingestellt.
Bei einigen Computern kann darüber hinaus noch eine
Feineinstellung erforderlich sein. Stellen Sie den Monitor in
diesem Fall wie unter “Einstellen des Monitors” auf Seite 9
erläutert von Hand ein.
Als Sprache für die Bildschirmanzeigen können Sie
Englisch, Französisch, Deutsch, Spanisch, Italienisch und
Japanisch auswählen.
1
Drücken Sie die Taste MENU.
Die Bildschirmanzeige MENU erscheint.
MENU
1
Schalten Sie den Monitor ein.
2
Schalten Sie den Computer ein.
3
Drücken Sie die Taste AUTO.
Das Bild wird in die Mitte des Bildschirms gestellt.
OK MENU
MENU
EXIT
PHASE
PITCH
CENTER
ZOOM
COLOR
LANGUAGE
OPTION
AUTO
2
Wählen Sie mit den Tasten ø /‡ die Option
LANGUAGE aus, und drücken Sie die Taste MENU.
Die Bildschirmanzeige LANGUAGE erscheint.
LANGUAGE
MENU
Hinweise
• Diese Funktion ist speziell für Computer unter Windows oder
einer Software mit einer ähnlichen grafischen
Benutzeroberfläche konzipiert, bei der das Bild den ganzen
Bildschirm ausfüllt. Die Funktion arbeitet möglicherweise nicht
korrekt, wenn die Hintergrundfarbe dunkel ist oder das
eingespeiste Bild den Bildschirm nicht ganz ausfüllt, wie z. B.
die MS-DOS-Eingabeaufforderung.
• Während der automatischen Größeneinstellung wird
möglicherweise einige Sekunden lang ein leerer Bildschirm
angezeigt. Dies ist keine Fehlfunktion.
Wenn das Bild auch nach dem Drücken der Taste
AUTO noch flimmert oder verschwommen ist
Stellen Sie Pitch und Phase von Hand ein (Seite 11).
ENGLISH
FRANÇAIS
DEUTSCH
ESPAÑOL
ITALIANO
œ{Œ
3
Wählen Sie mit den Tasten ø /‡ die gewünschte
Sprache aus, und drücken Sie die Taste MENU.
Die Bildschirmanzeige MENU erscheint in der
ausgewählten Sprache.
MENU
MENU
OK MENU
ENDE
PHASE
PITCH
BILDLAGE
ZOOM
FARBE
LANGUAGE
OPTION
Nach etwa 30 Sekunden wird die Bildschirmanzeige
automatisch ausgeblendet.
Sie können die Bildschirmanzeige jedoch auch ausblenden,
indem Sie die Taste MENU erneut drücken.
8
Einstellen des Monitors
Einstellen des Monitors
Vorbereitungen
Verbinden Sie den Monitor mit dem Computer, und
schalten Sie beide Geräte ein.
Die besten Ergebnisse erzielen Sie, wenn Sie mindestens
30 Minuten warten, bevor Sie Einstellungen
vornehmen.
Einstellen des Kontrasts
Der Wert für den Kontrast, den Sie hier einstellen, wird für
alle eingespeisten Eingangssignale gespeichert.
1
Drücken Sie die Taste > (Kontrast) ‡ .
Die Bildschirmanzeige KONTRAST erscheint.
KONTRAST
Einstellen der Bildhelligkeit
Der Wert für die Helligkeit, den Sie hier einstellen, wird für
alle eingespeisten Eingangssignale gespeichert.
26
48. 4kHz /
1
Drücken Sie die Taste ‹ (Helligkeit) ø .
Die Bildschirmanzeige HELLIGKEIT erscheint.
HELLIGKEIT
Horizontalfrequenz*
2
Vertikalfrequenz*
Drücken Sie die Tasten +/–.
+ . . . Der Kontrast wird stärker.
– . . . Der Kontrast wird schwächer.
26
48. 4kHz /
60Hz
EN
60Hz
F
Horizontalfrequenz*
2
Vertikalfrequenz*
Drücken Sie die Tasten +/–.
+ . . . Das Bild wird heller.
– . . . Das Bild wird dunkler.
Nach etwa 3 Sekunden wird die Bildschirmanzeige
automatisch ausgeblendet.
*
D
ES
Die Horizontal- und die Vertikalfrequenz des gerade
eingespeisten Eingangssignals erscheinen in der
Bildschirmanzeige KONTRAST.
I
Nach etwa 3 Sekunden wird die Bildschirmanzeige
automatisch ausgeblendet.
*
Die Horizontal- und die Vertikalfrequenz des gerade
eingespeisten Eingangssignals erscheinen in der
Bildschirmanzeige HELLIGKEIT.
Wenn der Bildschirm in einem dunklen Raum zu hell ist
Verringern Sie den Einstellwert für HINTERGRUNDLICHT
(Seite 14).
9
Einstellen des Monitors
Das Bildschirmmenüsystem
Die Dienstprogrammdiskette
Die meisten Einstellungen nehmen Sie über die
Bildschirmanzeige MENU vor.
Wie Sie die Sprache für die Bildschirmanzeigen wechseln,
erfahren Sie unter “Auswählen der Sprache für die
Bildschirmanzeigen” (Seite 8).
Die mitgelieferte Dienstprogrammdiskette (Utility Disk)
enthält Testmuster zum Einstellen von Pitch, Phase und
Zentrierung.
Anhand dieser Testmuster können Sie Ihre Einstellungen
überprüfen.
MENU
OK MENU
ENDE
PHASE
PITCH
BILDLAGE
ZOOM
FARBE
LANGUAGE
OPTION
ENDE
Zum Schließen der Bildschirmanzeige MENU.
PHASE
Zum Aufrufen der Bildschirmanzeige PHASE. Stellen Sie
die Phase ein, wenn die Zeichen oder Bilder auf dem
gesamten Bildschirm verschwommen erscheinen. Stellen Sie
die Phase nach dem Einstellen des Pitch ein.
PITCH
Zum Aufrufen der Bildschirmanzeige PITCH. Stellen Sie
den Pitch ein, wenn die Zeichen oder Bilder in einigen
Bereichen des Bildschirms nicht scharf erscheinen.
BILDLAGE
Zum Aufrufen der Bildschirmanzeige BILDLAGE, mit der
Sie die Zentrierung des Bildes einstellen können.
Pitch-Einstellung
Stellen Sie den Pitch ein, wenn vertikale Streifen auf dem
Bildschirm erscheinen oder ein Bereich des Bildschirms
flimmert oder verschwommen ist.
Stellen Sie das Bild so ein, daß die fetten, vertikalen Linien
des Testmusters verschwinden.
Phaseneinstellung
Stellen Sie die Phase ein, wenn das Bild auf dem gesamten
Bildschirm flimmert oder verschwommen ist bzw. wenn
horizontale Streifen auftreten.
Stellen Sie das Bild so ein, daß die horizontalen Streifen auf
ein Minimum reduziert werden.
BILDLAGE
Stellen Sie die BILDLAGE ein, wenn das Bild nicht zentriert
ist.
Verschieben Sie das Bild nach oben, unten, links oder rechts,
bis der rote Rahmen als äußere Begrenzung des Testmusters
verschwindet.
Verwenden der Testmuster
1
Setzen Sie ZOOM auf REAL MODUS (Seite 12).
2
Legen Sie die mitgelieferte Dienstprogrammdiskette
ein, und rufen Sie das Testmuster auf.
Verwenden Sie die für Ihren Computer geeignete
Diskette.
Für Windows 95/98
Windows Monitor Information Disk/Utility Disk
Für Macintosh
Macintosh Utility Disk
3
Wählen Sie die Option zum Einstellen von Pitch,
Phase oder Bildlage in der Bildschirmanzeige MENU
des Monitors aus, und stellen Sie das Bild ein,
während das Testmuster angezeigt wird (Seite 11,
12).
4
Klicken Sie abschließend auf dem Bildschirm auf
[END]
. Damit wird das Testmuster ausgeschaltet.
ZOOM
Zum Aufrufen der Bildschirmanzeige ZOOM, mit der Sie
den Anzeigemodus für das Bild auswählen können. Mit
FULL MODUS wird das Bild auf dem gesamten Bildschirm
angezeigt, mit REAL MODUS wird es in der tatsächlichen
Auflösung angezeigt.
FARBE
Zum Aufrufen der Bildschirmanzeige FARBE, mit der Sie
die Farbtemperatur einstellen können.
LANGUAGE
Zum Aufrufen der Bildschirmanzeige LANGUAGE, mit der
Sie die Sprache für die Bildschirmanzeigen auswählen
können.
OPTION
Zum Aufrufen der Bildschirmanzeige OPTION. Hier
können Sie Optionen wie Hintergrundbeleuchtung, Position
der Bildschirmanzeigen, Tastensperrfunktion und
Verzögerung für die Energiesparfunktion einstellen.
10
Einstellen des Monitors
Korrigieren eines flimmernden
oder verschwommenen Bildes
Wenn ein Bereich des Bildschirms flimmert oder
verschwommen ist, drücken Sie die Taste AUTO. Wenn Sie
keine zufriedenstellenden Ergebnisse erzielen, stellen Sie
Pitch und Phase folgendermaßen ein.
Die Werte für Pitch und Phase, die Sie hier einstellen,
werden nur für das gerade eingespeiste Eingangssignal
gespeichert.
1
Legen Sie die Dienstprogrammdiskette ein (Seite 10).
2
Drücken Sie die Taste MENU.
Die Bildschirmanzeige MENU erscheint.
MENU
MENU
Wählen Sie mit den Tasten ø /‡ die Option PITCH
aus, und drücken Sie die Taste MENU erneut.
Die Bildschirmanzeige PITCH erscheint.
MENU
Wählen Sie mit den Tasten ø /‡ die Option PHASE
aus, und drücken Sie die Taste MENU erneut.
Die Bildschirmanzeige PHASE erscheint.
PHASE
MENU
26
7
Drücken Sie die Tasten +/–, bis die Bildschirmfarben
gleichmäßig sind.
Wenn Sie die Dienstprogrammdiskette benutzen, stellen
Sie das Bild so ein, daß die horizontalen Streifen auf ein
Minimum reduziert werden.
OK MENU
ENDE
PHASE
PITCH
BILDLAGE
ZOOM
FARBE
LANGUAGE
OPTION
3
6
Nach etwa 30 Sekunden wird die Bildschirmanzeige
automatisch ausgeblendet.
Sie können die Bildschirmanzeige jedoch auch ausblenden,
indem Sie die Taste MENU erneut drücken.
ES
I
1328
Drücken Sie die Tasten +/–, bis die Bildschirmfarben
gleichmäßig sind.
Wenn Sie die Dienstprogrammdiskette benutzen, stellen
Sie das Bild so ein, daß die vertikalen Streifen
verschwinden.
5
Drücken Sie die Taste MENU.
Die Bildschirmanzeige MENU erscheint.
Wenn auf dem gesamten Bildschirm horizontale Streifen
zu sehen sind, stellen Sie im nächsten Schritt die Phase
ein.
F
D
Zum Ausschalten des Testmusters klicken Sie auf dem
Bildschirm auf [END]
.
PITCH
4
EN
11
Einstellen des Monitors
Einstellen der Bildposition
Wenn sich das Bild nicht in der Mitte des Bildschirms
befindet, drücken Sie die Taste AUTO. Wenn Sie keine
zufriedenstellenden Ergebnisse erzielen, stellen Sie die
Zentrierung folgendermaßen ein.
Der Wert für die Zentrierung, den Sie hier einstellen, wird
nur für das gerade eingespeiste Eingangssignal gespeichert.
1
Legen Sie die Dienstprogrammdiskette ein (Seite 10).
2
Drücken Sie die Taste MENU.
Die Bildschirmanzeige MENU erscheint.
MENU
Anzeigen des Bildes in der
tatsächlichen Auflösung
Der Monitor ist werkseitig so eingestellt, daß das Bild in
voller Größe auf dem Bildschirm anzeigt wird, unabhängig
von der Auflösung des Bildes. Sie können das Bild aber
auch in der tatsächlichen Auflösung anzeigen lassen.
Der Wert für den Zoom, den Sie hier einstellen, wird nur für
das gerade eingespeiste Eingangssignal gespeichert.
1
OK MENU
MENU
MENU
Wählen Sie mit den Tasten ø /‡ die Option BILDLAGE
aus, und drücken Sie die Taste MENU erneut.
Die Bildschirmanzeige
BILDLAGE
BILDLAGE erscheint.
MENU
ENDE
PHASE
PITCH
BILDLAGE
ZOOM
FARBE
LANGUAGE
OPTION
2
H
V
Wählen Sie mit den Tasten ø /‡ die Option ZOOM
aus, und drücken Sie die Taste MENU erneut.
Die Bildschirmanzeige ZOOM erscheint.
26
MENU
4
Bei der horizontalen Einstellung wählen Sie mit den
Tasten ø /‡ die Option H aus und stellen die Position
mit den Tasten +/– ein.
+ . . . Das Bild wird nach rechts
BILDLAGE
verschoben.
H
– . . . Das Bild wird nach links
V
verschoben.
OK MENU
MENU
ENDE
PHASE
PITCH
BILDLAGE
ZOOM
3
Drücken Sie die Taste MENU.
Die Bildschirmanzeige MENU erscheint.
ZOOM
FULL MODUS
REAL MODUS
3
Wählen Sie mit der Taste ‡ die Option REAL MODUS
aus, und drücken Sie die Taste MENU erneut.
Die Bildschirmanzeige MENU erscheint.
26
Bei der vertikalen Einstellung wählen Sie mit den
Tasten ø /‡ die Option V aus und stellen die Position
mit den Tasten +/– ein.
BILDLAGE
+ . . . Das Bild wird nach oben
verschoben.
H
– . . . Das Bild wird nach unten
V
verschoben.
26
Nach etwa 30 Sekunden wird die Bildschirmanzeige
automatisch ausgeblendet.
Sie können die Bildschirmanzeige jedoch auch ausblenden,
indem Sie die Taste MENU erneut drücken.
Zum Ausschalten des Testmusters klicken Sie auf dem
Bildschirm auf [END]
.
12
Nach etwa 30 Sekunden wird die Bildschirmanzeige
automatisch ausgeblendet.
Sie können die Bildschirmanzeige jedoch auch ausblenden,
indem Sie die Taste MENU erneut drücken.
So lassen Sie das Bild in voller Größe auf dem
Bildschirm anzeigen
Wählen Sie in Schritt 3 mit der Taste ø die Option FULL
MODUS aus.
Einstellen des Monitors
Ändern oder Einstellen der
Farbtemperatur
Ändern der Position der
Bildschirmanzeigen
Die Farbtemperatur ist werkseitig auf 9300K eingestellt.
Sie können die Farbtemperatur ändern und 6500K oder
5000K einstellen. Stellen Sie mit dieser Funktion die
Farbtemperatur so ein, daß die Farben mit den tatsächlichen
Farben eines ausgedruckten Bildes übereinstimmen.
Der Wert für die Farbtemperatur, den Sie hier einstellen, gilt
für alle eingespeisten Eingangssignale.
Sie können die Bildschirmanzeigen verschieben, wenn Sie
z.B. den Bereich hinter einer Bildschirmanzeige einstellen
wollen.
1
Drücken Sie die Taste MENU.
Die Bildschirmanzeige MENU
erscheint.
MENU
1
MENU
OK MENU
3
ENDE
PHASE
PITCH
BILDLAGE
ZOOM
FARBE
LANGUAGE
OPTION
4
Wählen Sie OPTION mit den Tasten ø /‡ , und
drücken Sie die Taste MENU erneut.
Die Bildschirmanzeige OPTION erscheint.
Wählen Sie mit den Tasten ø /‡ die Option R (rot)
oder B (blau) aus, und stellen Sie mit den Tasten +/–
die gewünschte Farbe ein.
Die Farbe ändert sich in dem Maße, in dem die R- oder
B-Anteile im Hinblick auf
FARBE
G (grün) erhöht oder
verringert werden.
9300K
6500K
5000K
ANWENDERMODUS
R
50
G
50
B
50
Nach etwa 30 Sekunden wird die Bildschirmanzeige
automatisch ausgeblendet.
Sie können die Bildschirmanzeige jedoch auch ausblenden,
indem Sie die Taste MENU erneut drücken.
EN
F
OPTION
MENU
9300K
6500K
5000K
ANWENDERMODUS
R
50
G
50
B
50
Wählen Sie mit den Tasten ø /‡ die Farbtemperatur
aus.
Wenn an der ausgewählten Farbtemperatur
Feineinstellungen erforderlich sind, fahren Sie mit
Schritt 4 fort.
Andernfalls drücken Sie die Taste MENU. Die
Bildschirmanzeige MENU erscheint.
OK MENU
ENDE
PHASE
PITCH
BILDLAGE
ZOOM
FARBE
LANGUAGE
OPTION
Wählen Sie mit den Tasten ø /‡ die Option FARBE
aus, und drücken Sie die Taste MENU erneut.
Die Bildschirmanzeige
FARBE
FARBE erscheint.
MENU
MENU
MENU
2
2
Drücken Sie die Taste MENU.
Die Bildschirmanzeige MENU erscheint.
D
ES
: 1M
: FREIGB
I
POSITION H
3
Wählen Sie mit den Tasten ø /‡ die Option
(POSITION H) oder
(POSITION V) aus.
So stellen Sie die
So stellen Sie die
horizontale Position ein
vertikale Position ein
OPTION
4
OPTION
: 1M
: FREIGB
: 1M
: FREIGB
POSITION H
POSITION V
Verschieben Sie die Bildschirmanzeige mit den Tasten
+/– an die gewünschte Position.
Die Bildschirmanzeige OPTION wird nach etwa 30
Sekunden automatisch ausgeblendet.
Sie können die Bildschirmanzeige jedoch auch ausblenden,
indem Sie die Taste MENU erneut drücken.
13
Einstellen des Monitors
Einstellen der
Hintergrundbeleuchtung
Einstellen der Verzögerung für
die Energiesparfunktion
Wenn der Bildschirm in einem dunklen Raum zu hell
eingestellt ist, stellen Sie die Hintergrundbeleuchtung des
Monitors ein.
Sie können eine Verzögerungszeit angeben, nach der der
Monitor in den Energiesparmodus wechselt. Weitere
Informationen zu der Energiesparfunktion dieses Monitors
finden Sie auf Seite 17.
1
Drücken Sie die Taste MENU.
Die Bildschirmanzeige MENU erscheint.
MENU
1
Drücken Sie die Taste MENU.
Die Bildschirmanzeige MENU erscheint.
OK MENU
MENU
MENU
ENDE
PHASE
PITCH
BILDLAGE
ZOOM
FARBE
LANGUAGE
OPTION
2
Wählen Sie OPTION mit den Tasten ø /‡ , und
drücken Sie die Taste MENU erneut.
Die Bildschirmanzeige OPTION erscheint.
OK MENU
MENU
ENDE
PHASE
PITCH
BILDLAGE
ZOOM
FARBE
LANGUAGE
OPTION
2
OPTION
Wählen Sie OPTION mit den Tasten ø /‡ , und
drücken Sie die Taste MENU erneut.
Die Bildschirmanzeige OPTION erscheint.
MENU
OPTION
MENU
: 1M
: FREIGB
: 1M
: FREIGB
POSITION H
POSITION H
3
Wählen Sie mit den Tasten ø /‡ die Option
(HINTERGRUNDLICHT) aus.
OPTION
3
26
Wählen Sie mit den Tasten ø /‡ die Option
(STROMSPAREINST) aus.
OPTION
ZZ...
60MIN
1MIN
5SEC
AUS
: FREIGB
HINTERGRUNDLICHT
STROMSPAREINST
4
Stellen Sie die Beleuchtungsstärke mit den Tasten +/–
ein.
Die Bildschirmanzeige OPTION wird nach etwa 30
Sekunden automatisch ausgeblendet.
Sie können die Bildschirmanzeige jedoch auch ausblenden,
indem Sie die Taste MENU erneut drücken.
14
4
Wählen Sie mit den Tasten +/– die gewünschte
Verzögerungszeit aus.
Wenn STROMSPAREINST auf AUS gesetzt ist, wechselt
der Monitor nicht in den Energiesparmodus.
Die Bildschirmanzeige OPTION wird nach etwa 30
Sekunden automatisch ausgeblendet.
Sie können die Bildschirmanzeige jedoch auch ausblenden,
indem Sie die Taste MENU erneut drücken.
Einstellen des Monitors
Sperren der Bedienelemente
Zurücksetzen der Einstellungen
Mit der Tastensperrfunktion können Sie alle
Bedienelemente mit Ausnahme des Netzschalters u und
der Taste MENU sperren.
Sie können alle Einstellungen auf die werkseitigen Werte
zurücksetzen.
Dabei wird die Farbtemperatur auf 9300K, die ZoomEinstellung auf Anzeige in voller Größe und die
Verzögerung für die Energiesparfunktion auf 1 Minute
zurückgesetzt. Die Tastensperrfunktion wird deaktiviert.
Andere Einstellungen werden auf die Standardwerte
zurückgesetzt. Die Sprache der Bildschirmanzeigen wird
jedoch nicht gewechselt.
Wenn Sie SPER gewählt haben, lassen sich in der
Bildschirmanzeige MENU nur noch folgende Optionen
auswählen:
• ENDE
• TASTATUR und VOREINSTELLUNG in der
Bildschirmanzeige OPTION
Wenn Sie eine gesperrte Taste drücken, erscheint die
auf dem Bildschirm.
Markierung
1
1
Drücken Sie die Taste MENU.
Die Bildschirmanzeige MENU erscheint.
MENU
Drücken Sie die Taste MENU.
Die Bildschirmanzeige MENU erscheint.
MENU
ENDE
PHASE
PITCH
BILDLAGE
ZOOM
OK MENU
MENU
ENDE
PHASE
PITCH
BILDLAGE
ZOOM
2
OK MENU
MENU
2
Wählen Sie OPTION mit den Tasten ø /‡ , und
drücken Sie die Taste MENU erneut.
Die Bildschirmanzeige
OPTION
OPTION erscheint.
EN
Wählen Sie OPTION mit den Tasten ø /‡ , und
drücken Sie die Taste MENU erneut.
Die Bildschirmanzeige OPTION erscheint.
F
D
OPTION
MENU
ES
I
: 1M
: FREIGB
MENU
: 1M
: FREIGB
POSITION H
POSITION H
3
3
Wählen Sie mit den Tasten ø /‡ die Option
(TASTATUR) aus.
OPTION
Wählen Sie mit den Tasten ø /‡ die Option ?
(VOREINSTELLUNG) aus.
OPTION
: 1M
FREIGB
SPER
EIN
VOREINSTELLUNG
TASTATUR
4
4
Drücken Sie die Taste +.
Wählen Sie mit der Taste – die Option SPER aus.
Die Bildschirmanzeige OPTION wird
nach etwa 30 Sekunden automatisch
ausgeblendet.
Sie können die Bildschirmanzeige jedoch
auch ausblenden, indem Sie die Taste
MENU erneut drücken.
So heben Sie die Tastensperre wieder auf
Wählen Sie in Schritt 4 mit der Taste + die Option FREIGB
aus.
Die Bildschirmanzeige OPTION wird nach etwa 30
Sekunden automatisch ausgeblendet.
Sie können die Bildschirmanzeige jedoch auch ausblenden,
indem Sie die Taste MENU erneut drücken.
15
Technische Merkmale
Vordefinierte Modi und
Benutzermodi
Dieser Monitor verfügt über werkseitig vordefinierte Modi
für die gängigsten Industriestandards und bietet somit
echte “Plug & Play”-Unterstützung.
Wenn ein neues Eingangssignal eingespeist wird, wählt der
Monitor den geeigneten werkseitig vordefinierten Modus
aus und nimmt eine Phasenkalibrierung in bezug auf die
Bildschirmmitte vor, so daß eine hohe Bildqualität erzielt
werden kann. Die Kalibrierungseinstellung wird
gespeichert und sofort abgerufen, wann immer dasselbe
Eingangssignal eingeht.
Auflösung
HorizontalNr. (Punkte × Zeilen) frequenz
Vertikalfrequenz Grafikmodus
1
—
15,625 kHz
50 Hz
625I
2
—
15,75 kHz
60 Hz
525I
3
640 × 350
31,5 kHz
70 Hz
MCGA
4
640 × 400
31,5 kHx
70 Hz
NEC PC-98
5
640 × 480
31,5 kHz
60 Hz
VGA-G
6
640 × 480
35,0 kHz
67 Hz
Macintosh 13
Zoll, Farbe
7
640 × 480
37,5 kHz
75 Hz
EVGA
8
640 × 480
43,3 kHz
85 Hz
VESA
9
720 × 400
31,5 kHz
70 Hz
VGA-Text
10
720 × 400
37,9 kHz
85 Hz
VESA
11
800 × 600
37,9 kHz
60 Hz
SVGA
12
800 × 600
46,9 kHz
75 Hz
ESVGA
13
800 × 600
53,7 kHz
85 Hz
VESA
14
832 × 624
49,7 kHz
75 Hz
Macintosh 16
Zoll, Farbe
15
1024 × 768
48,4 kHz
60 Hz
VESA
16
1024 × 768
56,5 kHz
70 Hz
VESA
17
1024 × 768
60,0 kHz
75 Hz
EUVGA
18
1024 × 768
60,2 kHz
75 Hz
Macintosh 19
Zoll, Farbe
19
1024 × 768
68,7 kHz
85 Hz
VESA
16
Bei Eingangssignalen, die keinem der werkseitig
voreingestellten Modi entsprechen, führt der Monitor mit
Hilfe seiner digitalen Multiscan-Technologie alle
Einstellungen durch, die bei einem beliebigen Timing
innerhalb des für den Monitor gültigen Frequenzbereichs
für ein scharfes Bild nötig sind. Es kann jedoch mitunter
erforderlich werden, die vertikale und horizontale
Zentrierung feineinzustellen. Drücken Sie dazu einfach die
Taste AUTO, oder stellen Sie den Monitor wie in dieser
Anleitung beschrieben ein. Die Einstellungen werden
automatisch als Benutzermodus gespeichert und abgerufen,
wann immer das betreffende Eingangssignal eingeht.
Empfohlene Werte für das horizontale und
vertikale Timing
Das horizontale Synchronbreitenverhältnis sollte bei mindestens
4,8 % des horizontalen Gesamt-Timing liegen.
Die horizontale Austastbreite muß mindestens 2,5 µSek. betragen.
Die vertikale Austastbreite muß mindestens 450 µSek. betragen.
Einstellen der Auflösung des Monitors und der
Anzahl der Farben
Stellen Sie die Auflösung des Monitors und die Anzahl der Farben
anhand der Anweisungen im Benutzerhandbuch zu Ihrem
Computer ein. Die Anzahl der Farben kann je nach Computer oder
Grafikkarte variieren. Je nach der Einstellung unter “Farbpalette”
werden unterschiedlich viele Farben dargestellt:
• High Color (16 Bit) n 65.536 Farben
• True Color (24 Bit) n ca. 16,77 Mio. Farben
Im True Color-Modus (24 Bit) kann sich die Geschwindigkeit
verringern.
Technische Merkmale
Energiesparfunktion
Dieser Monitor entspricht den Energiesparrichtlinien der
VESA und des ENERGY STAR-Programms sowie des enger
gefaßten NUTEK-Standards.
Wenn der Monitor an einen Computer oder eine Grafikkarte
angeschlossen ist, der bzw. die VESA DPMS (Display Power
Management Signaling) unterstützt, wird der
Stromverbrauch des Geräts in drei Stufen, wie unten
erläutert, reduziert.
Sie können über die entsprechende Bildschirmanzeige eine
Verzögerungszeit angeben, nach der der Monitor in den
Energiesparmodus wechselt. Stellen Sie die
Verzögerungszeit wie unter “Einstellen der Verzögerung
für die Energiesparfunktion” auf Seite 14 beschrieben ein.
Hinweis
Wird kein Videosignal in den Monitor eingespeist, erscheint die
Meldung “KEIN EING SIGNAL” (siehe Seite 18). Wenn die
Verzögerungszeit verstrichen ist, schaltet die Energiesparfunktion
den Monitor automatisch in den deaktivierten Modus, und die
Anzeige u leuchtet orange. Sobald jedoch horizontale und vertikale
Synchronisationssignale eingehen, schaltet der Monitor
automatisch wieder in den normalen Betriebsmodus.
Energiesparstufe Bildschirm Horizontales
Vertikales
Synchronisationssignal Synchronisationssignal
Leistungsaufnahme
Zeit für
Reaktivierung
Anzeige u
1 Normalbetrieb
aktiv
vorhanden
vorhanden
CPD-L133 ≤ 30 W* ≤ 42 W**
CPD-L150 ≤ 25 W* ≤ 35 W**
—
Grün
2 Bereitschaft
(1. Stufe)
leer
nicht vorhanden
vorhanden
CPD-L133 ≤ 1,5 W* ≤ 4 W**
CPD-L150 ≤ 1,5 W* ≤ 4 W**
ca. 3 Sek.
Abwechselnd
grün und orange
3 Unterbrechung
(2. Stufe)
leer
vorhanden
nicht vorhanden
CPD-L133 ≤ 1,5 W* ≤ 4 W**
CPD-L150 ≤ 1,5 W* ≤ 4 W**
ca. 3 Sek.
Abwechselnd
grün und orange
EN
4 Deaktiviert
(3. Stufe)
leer
nicht vorhanden
nicht vorhanden
CPD-L133 ≤ 1,5 W* ≤ 4 W**
CPD-L150 ≤ 1,5 W* ≤ 4 W**
ca. 10 Sek.
Orange
F
5 Ausgeschaltet
—
—
—
CPD-L133 ≤ 1,5 W* ≤ 4 W**
CPD-L150 ≤ 1,5 W* ≤ 4 W**
—
Leuchtet nicht
D
ES
* Leistungsaufnahme des Monitors
** Leistungsaufnahme des Monitors einschließlich Netzteil
I
Anzeigen des Bildschirms
INFORMATION
Sie können den Modellnamen, die Seriennummer und das
Baujahr dieses Monitors anzeigen lassen.
Halten Sie die Taste MENU fünf Sekunden lang
gedrückt.
Die Bildschirmanzeige INFORMATION erscheint.
MENU
Plug & Play
Dieser Monitor entspricht den DDC-Standards (DDC =
Display Data Channel) DDC1 und DDC2B der VESA.
Ist der Monitor an ein DDC1-Host-System angeschlossen,
wird er gemäß dem VESA-Standard mit V.CLK
synchronisiert und gibt EDID-Signale (EDID = Extended
Display Identification Data) an die Datenleitung aus.
DDC ist ein Warenzeichen der Video Electronics Standard
Association.
Beispiel
INFORMATION
MODEL : CPD-L150
SER. NO : 1234567
MANUFACTURED : 1998
Modellname
Seriennummer
Baujahr
Die Bildschirmanzeige INFORMATION wird nach etwa 30
Sekunden automatisch ausgeblendet.
Sie können die Bildschirmanzeige jedoch auch ausblenden,
indem Sie die Taste MENU erneut drücken.
17
Weitere Informationen
Warnmeldungen
Wenn am Eingangssignal ein Fehler vorliegt, erscheint eine
der folgenden Warnmeldungen.
INFORMATION
NICHT IM
ABTASTBEREICH
“NICHT IM ABTASTBEREICH” gibt an, daß das
Eingangssignal nicht den technischen Daten des Monitors
entspricht.
“KEIN EING SIGNAL” gibt an, daß kein Signal eingeht.
Hinweise zum Beheben solcher Probleme finden Sie im
folgenden unter “Störungsbehebung”.
Störungsbehebung
Sie können die Ursache eines Problems gegebenenfalls anhand dieses Abschnitts erkennen und beheben, ohne daß Sie sich an
den Kundendienst wenden müssen.
Symptom
Überprüfen Sie bitte folgendes:
Es wird kein Bild angezeigt.
Die Anzeige u leuchtet nicht.
• Das Netzkabel muß korrekt angeschlossen sein.
• Der Netzschalter u muß sich in der Position “On” befinden.
Die Meldung “KEIN EING
SIGNAL” erscheint auf dem
Bildschirm, oder die Anzeige u
leuchtet orange.
• Der Bildschirm ist leer, wenn sich der Monitor im Energiesparmodus befindet. Drücken Sie
eine beliebige Taste auf der Computer-Tastatur.
• Der Netzschalter des Computers muß sich in der Position “On” befinden.
• Das Eingangssignal muß korrekt ausgewählt sein.
• Das Videosignalkabel muß korrekt angeschlossen sein, und alle Stecker müssen fest in den
Buchsen sitzen.
• Achten Sie darauf, daß am HD15-Videoeingangsanschluß keine Stifte verbogen oder
eingedrückt sind.
Die Meldung “NICHT IM
ABTASTBEREICH” erscheint
auf dem Bildschirm.
• Die Videofrequenz muß im für den Monitor angegebenen Bereich liegen.
Horizontal: 30 – 70 kHz, vertikal: 50 – 85 Hz
Schlagen Sie in der Bedienungsanleitung zum Computer nach, und stellen Sie den
Videofrequenzbereich ein.
• Wenn Sie einen Videosignalkabeladapter verwenden, überprüfen Sie, ob Sie den richtigen
Adapter angeschlossen haben.
Sie arbeiten mit einem
Macintosh-System.
• Der Macintosh-Adapter und das Videosignalkabel müssen richtig angeschlossen sein
(Seite 6).
Sie arbeiten mit einem
Windows 95/98-System.
• Wenn Sie einen älteren Monitor durch diesen Monitor ersetzt haben, schließen Sie den alten
Monitor wieder an, und gehen Sie folgendermaßen vor: Installieren Sie die Diskette
“Windows Monitor Information Disk/Utility Disk” (Seite 7), und wählen Sie aus den SonyMonitoren im Auswahlfenster für Monitore in Windows 95/98 den Eintrag “CPD-L133
oder CPD-L150” aus.
Das Bild ist zu dunkel.
18
• Stellen Sie die Hintergrundbeleuchtung ein (Seite 14).
• Stellen Sie die Helligkeit ein (Seite 9).
• Nach dem Einschalten des Geräts benötigt der Monitor einige Sekunden Aufwärmzeit. Das
Bild erscheint nach wenigen Sekunden.
Weitere Informationen
Symptom
Überprüfen Sie bitte folgendes:
Das Bild ist gestört.
• Drücken Sie die Taste AUTO (Seite 8). Wenn Sie keine zufriedenstellenden Ergebnisse
erzielen, stellen Sie Pitch und Phase ein (Seite 11).
• Lesen Sie in dieser Anleitung nach, ob der Grafikmodus und die Frequenz, mit der der
Monitor arbeitet, unterstützt werden. Auch wenn die Frequenz innerhalb des unterstützten
Bereichs liegt, arbeiten einige Computer möglicherweise mit einem
Synchronisationsimpuls, der für eine korrekte Synchronisation dieses Monitors zu kurz ist.
Farbe ist nicht gleichmäßig.
• Drücken Sie die Taste AUTO (Seite 8). Wenn Sie keine zufriedenstellenden Ergebnisse
erzielen, stellen Sie Pitch und Phase ein (Seite 11).
Der Monitor läßt sich mit den
Bedienelementen vorn nicht
einstellen.
• Wenn die Tastensperrfunktion eingeschaltet ist, schalten Sie sie über die Bildschirmanzeige
OPTION aus (Seite 15).
Weiß sieht nicht weiß aus.
• Stellen Sie die Farbtemperatur ein (Seite 13).
Das Bild befindet sich nicht in
der Mitte des Bildschirms.
• Drücken Sie die Taste AUTO (Seite 8).
• Stellen Sie die Zentrierung ein (Seite 12).
• Bei bestimmten Videomodi füllt die Anzeige nicht den gesamten Bildschirm. Dieses
Problem tritt besonders bei bestimmten Grafikkarten auf.
Die Bildgröße ist nicht korrekt.
• Überprüfen Sie die ZOOM-Einstellung (Seite 12).
Das Bild ist verschwommen.
• Drücken Sie die Taste AUTO (Seite 8). Wenn Sie keine zufriedenstellenden Ergebnisse
erzielen, stellen Sie Pitch und Phase ein (Seite 11).
• Stellen Sie Kontrast und Helligkeit ein (Seite 9).
Das Bild springt oder oszilliert.
• Schließen Sie das Netzkabel des Monitors an eine andere Steckdose, möglichst an einem
anderen Stromkreis, an.
• Testen Sie den Monitor an einem anderen Computer in einem anderen Raum.
EN
F
D
Das Bild flimmert.
• Drücken Sie die Taste AUTO (Seite 8). Wenn Sie keine zufriedenstellenden Ergebnisse
erzielen, stellen Sie Pitch und Phase ein (Seite 11).
ES
Doppelbilder sind zu sehen.
• Verwenden Sie keine Bildschirmverlängerungskabel und/oder Videoschaltboxen, wenn
dieses Phänomen auftritt. Zu lange Kabel oder eine störanfällige Verbindung können dieses
Problem auslösen.
I
Wellenförmige oder elliptische
Moiré-Effekte sind sichtbar.
• Drücken Sie die Taste AUTO (Seite 8). Wenn Sie keine zufriedenstellenden Ergebnisse
erzielen, stellen Sie Pitch und Phase ein (Seite 11).
19
Weitere Informationen
Technische Daten
Typ: a-Si-TFT-Aktivmatrix
CPD-L133
Bildgröße: 33,8 cm
CPD-L150
Bildgröße: 38 cm
Eingangssignalformat RGB-Betriebsfrequenz:
fh:15,625 kHz (625, InterlaceSignal)
15,75 kHz (525, Interlace-Signal)
30 – 70 kHz
fv: 50 Hz — 85 Hz
Effektive Bildpunkte
99,99 %
Auflösung
H: max. 1024 Punkte
V: max. 768 Zeilen
Betriebsspannung
Betrieb:
100 – 240 Volt Wechselstrom,
50 – 60 Hz
Eingang:
12 V Gleichstrom (mit Netzteil)
Leistungsaufnahme
CPD-L133
nur Display: max. 30 W
einschließlich Netzteil:
max. 42 W
CPD-L150
nur Display: max. 25 W
einschließlich Netzteil:
max. 35 W
Abmessungen (B/H/T) CPD-L133
Einschließlich Ständer:
ca. 373 × 358 × 165 mm
nur Monitor:
ca. 373 × 272 × 71 mm
CPD-L150
Einschließlich Ständer:
ca. 398 × 366 × 165 mm
nur Monitor:
ca. 398 × 291 × 71 mm
Gewicht
CPD-L133
ca. 4,9 kg einschließlich Ständer
CPD-L150
ca. 5,3 kg einschließlich Ständer
Mitgeliefertes Zubehör
Siehe Seite 6.
Stiftbelegung
5 4 3 2 1
10 9 8 7 6
15 14 13 12 11
LCD-Bildschirm
20
*
Stift Nr. Signal
Stift Nr.
Signal
1
Rot
8
Masse Blau
2
Grün (zusammengesetztes Grünsignal
mit Synchronisation)
9
DDC + 5V*
10
Masse
11
ID (Masse)
3
Blau
12
4
ID (Masse)
Bidirektionale
Daten (SDA)*
5
DDC-Masse*
13
H. Sync
6
Masse Rot
14
V. Sync
7
Masse Grün
15
Datentakt (SCL)*
DDC-Standard (DDC = Display Data Channel) nach VESA
Änderungen, die dem technischen Fortschritt dienen,
bleiben vorbehalten.
ÍNDICE
Procedimientos iniciales
Precauciones .........................................................................................................................
Identificación de los componentes y controles ................................................................
Instalación .............................................................................................................................
Ajuste automático de la imagen ........................................................................................
Selección del idioma de las indicaciones en pantalla .....................................................
4
5
6
8
8
Personalización del monitor
Ajuste del brillo de la imagen ............................................................................................ 9
Ajuste del contraste ............................................................................................................. 9
Introducción del sistema de indicaciones en pantalla .................................................. 10
Uso del disquete de utilidades ......................................................................................... 10
Eliminación del parpadeo o de la borrosidad de las imágenes .................................. 11
Ajuste de la posición de la imagen .................................................................................. 12
Visualización de la imagen con la resolución real ........................................................ 12
Cambio o ajuste de la temperatura del color ................................................................. 13
Cambio de la posición de las indicaciones en pantalla ................................................ 13
Ajuste de la luz de fondo .................................................................................................. 14
Ajuste del espacio de tiempo de retardo de ahorro de energía .................................. 14
Bloqueo de los controles ................................................................................................... 15
Restauración de los ajustes ............................................................................................... 15
EN
F
D
ES
I
Características técnicas
Modos predefinidos y de usuario ................................................................................... 16
Función de ahorro de energía .......................................................................................... 17
Visualización de la indicación INFORMATION ........................................................... 17
Función Plug & Play .......................................................................................................... 17
Información complementaria
Mensajes de aviso .............................................................................................................. 18
Solución de problemas ...................................................................................................... 18
Especificaciones ................................................................................................................. 20
• Macintosh es una marca comercial de Apple Computer, Inc.,
registrada en EE.UU. y otros países.
• Windows® y MS-DOS son marcas comerciales registradas de
Microsoft Corporation en Estados Unidos y otros países.
• IBM PC/AT y VGA son marcas comerciales registradas de IBM
Corporation de EE.UU.
• VESA es una marca comercial de Video Electronics Standard
Association.
• ENERGY STAR es una marca registrada de EE. UU.
• El resto de los nombres de los productos mencionados en este manual
pueden ser marcas comerciales o marcas comerciales registradas de
sus respectivas compañías.
• Además, “™” y “®” no se mencionan en cada caso en este manual.
3
Procedimientos iniciales
Precauciones
Instalación
• Con el fin de evitar el calentamiento interno, procure que
la unidad reciba una circulación de aire adecuada. No
coloque el monitor sobre superficies (mantas, colchas, etc.)
o cerca de materiales (cortinas, tapices) que puedan
bloquear los orificios de ventilación.
• No instale el monitor cerca de fuentes de calor, como
radiadores o conductos de aire caliente, ni lo exponga a la
luz solar directa, polvo excesivo, vibraciones mecánicas o
golpes.
• No coloque el monitor cerca de equipos que generen
magnetismo, como un transformador o líneas de alta
tensión.
Manejo de la pantalla LCD
• Es posible que aparezcan puntos brillantes de luz
(rojos, azules o verdes) en la pantalla LCD. Esto no es
un fallo de funcionamiento. La pantalla LCD está
fabricada con tecnología de alta precisión y más del
99,99 % de los elementos de imagen son intactos. No
obstante, algunos de dichos elementos pueden no
aparecer o algunos de ellos pueden aparecer
constantemente.
• No deje la pantalla LCD orientada hacia el sol, ya que
puede dañarse. Tenga cuidado cuando coloque el monitor
en una ventana.
• No ejerza presión sobre la pantalla LCD ni la arañe. No
coloque objetos sobre la pantalla LCD, ya que ésta puede
perder uniformidad.
• Si utiliza el monitor en un lugar frío, es posible que
aparezca una imagen residual en la pantalla. Esto no es un
fallo de funcionamiento. Cuando el monitor se caliente, la
imagen de la pantalla volverá a ser normal.
• Si muestra una imagen fija durante mucho tiempo, es
posible que aparezca una imagen residual, que
desaparecerá eventualmente.
• La pantalla y el exterior se calientan durante el
funcionamiento. Esto no es un fallo de funcionamiento.
Sustitución del tubo fluorescente
La unidad dispone de un tubo fluorescente, diseñado
especialmente, como aparato de iluminación de este
monitor. Si la pantalla LCD se oscurece, es inestable o no se
enciende, sustituya el tubo fluorescente por otro nuevo.
Consulte con el proveedor Sony cuando lo sustituya.
4
Mantenimiento
• Limpie el exterior, el panel y los controles con un paño
suave ligeramente humedecido con una solución
detergente poco concentrada. No utilice estropajos ni
detergentes abrasivos, ni disolventes, como alcohol o
bencina.
• No frote, toque ni manipule la superficie de la pantalla
con objetos afilados o abrasivos, como un bolígrafo o un
destornillador. Este tipo de contacto puede rayar el tubo
de imagen.
• Limpie la pantalla con un paño suave. Si utiliza un
líquido limpiador de cristales, asegúrese de que éste no
contenga soluciones antiestáticas o aditivos similares, ya
que puede rayar la capa de la pantalla.
Transporte
• Cuando transporte este monitor, agárrelo firmemente por
la parte inferior de la pantalla con las dos manos. Si deja
caer el monitor, puede producirse heridas o dañar dicho
monitor.
• Cuando transporte este monitor para su reparación o
traslado, utilice la caja y los materiales originales de
embalaje.
Aviso sobre la conexión de la alimentación
• Utilice un cable de alimentación apropiado para el
suministro eléctrico local.
Para los usuarios en el Reino Unido
Si utiliza el monitor en el Reino Unido, utilice el cable con
enchufe suministrado para dicho país.
Ejemplos de tipos de enchufe
para 100 a 120 V CA
para 200 a 240 V CA
para 240 V CA
solamente
La toma debe encontrarse cerca del equipo y ser de
fácil acceso.
Instalación en la pared o en un soporte
Para instalar el monitor en la pared o en un soporte,
consulte con personal especializado. El usuario por sí solo
no debe realizar este tipo de instalación.
Desecho del monitor
• No deseche el monitor junto con basuras ordinarias.
No incluya el monitor en basuras domésticas.
• El tubo fluorescente contiene mercurio. Deseche el
monitor de acuerdo con las normas de las autoridades
sanitarias locales.
Procedimientos iniciales
Identificación de los
componentes y controles
Consulte las páginas indicadas entre paréntesis para obtener
más información.
En este manual, se utiliza el modelo CPD-L150 en las
ilustraciones.
Parte posterior
Parte frontal
1
2
3
4
5
6
EN
7
F
8
D
9
1
Interruptor e indicador u (alimentación)
(páginas 8, 17)
Enciende y apaga el monitor.
El indicador se ilumina en verde cuando el monitor está
encendido, y parpadea en verde y naranja o se ilumina
en naranja cuando se encuentra en el modo de ahorro
de energía.
2
Botón MENU (menú) (páginas 8, 11 – 15,
17)
Muestra la indicación MENU.
3
Botón ‹ (brillo) (ø ) (páginas 8 – 9, 11 – 15)
7
8
Conector de control externo
ES
Introduce la señal de control externo de formato RS-232.
Consulte con el proveedor para obtener más
información.
I
Conector DC IN (página 6)
Proporciona alimentación de CC al monitor desde el
adaptador de CA.
9
Conector de entrada RGB (HD15) (página
6)
Introduce señales de vídeo RGB analógicas (0,714 Vp-p,
positivas) y SYNC.
Ajusta el brillo de la imagen.
Funciona como el botón ø al seleccionar opciones de
menú.
4
Botón > (contraste) (‡ ) (páginas 8 – 9, 11 –
15)
Ajusta el contraste.
Funciona como el botón ‡ al seleccionar opciones de
menú.
5
Uso de la inclinación
Emplee la característica de inclinación para ajustar el
monitor en el ángulo que desee dentro del margen de 30°
verticalmente.
Para girar el monitor verticalmente, agárrelo por la parte
inferior con las dos manos como se ilustra a continuación.
30°
Botones +/– (ajuste) (páginas 9, 11 – 15)
Ajustan la opción de menú seleccionada.
6
Botón AUTO (páginas 8, 11)
Una vez conectado este monitor, pulse el botón AUTO
para ajustar automáticamente la imagen al ordenador.
También debe pulsar este botón si la imagen no está
centrada o si aparece borrosa.
5
Procedimientos iniciales
Si el sistema del PC no es compatible con DDC1 y
DDC2B
Instalación
Antes de utilizar este monitor, compruebe que se han
incluido los siguientes artículos:
• Monitor LCD (1)
• Adaptador de CA (1)
• Cubierta posterior (1)
• Cable de alimentación (1)
• Cable de señales de vídeo HD15 (1)
• Adaptador Macintosh (1)
• Windows Monitor Information Disk/Utility Disk (1)
• Disquete de utilidades Macintosh (1)
• Documento Eco TCO’95 (1)
• Tarjeta de garantía (1)
• Este manual de instrucciones (1)
Este monitor funciona con cualquier sistema IBM o
compatible equipado con capacidad gráfica VGA o superior.
Aunque dicho monitor funciona con otras plataformas que
utilicen frecuencias horizontales comprendidas entre 30 y 70
kHz, incluidos los sistemas Macintosh y Power Macintosh,
es preciso emplear un adaptador de cable. Pídale consejo a
su proveedor sobre el adaptador adecuado a sus
necesidades. Este monitor puede recibir también las señales
RGB de los sistemas PAL y NTSC.
Paso 1: Conexión del monitor al ordenador
Con el ordenador apagado, conecte el cable de señales de
vídeo al monitor mediante el cable de señales de vídeo
HD15 suministrado.
• Si utiliza un ordenador IBM PC/AT o compatible,
consulte la sección que aparece a continuación.
• Si utiliza un ordenador Macintosh o compatible, consulte
la siguiente sección, “Conexión a un ordenador Macintosh
o compatible”.
Conexión a un ordenador IBM PC/AT o
compatible
Este monitor utiliza el pin nº 9 del conector de señales de vídeo para
la compatibilidad con DDC1 y DDC2B.
Ciertos sistemas de PC no compatibles con DDC1 o DDC2B pueden
no aceptar el pin nº 9. Si no está seguro de si el sistema de su PC
acepta dicho pin, utilice el adaptador HD15 (hembra) - HD15
(macho sin pin nº 9) (no suministrado). Compruebe que el lado
macho (sin pin nº 9) esté conectado al ordenador.
Conexión a un ordenador Macintosh o
compatible
a HD15
Ordenador
Macintosh o
compatible
a la salida del
monitor
Cable de
señales de
vídeo HD15
(suministrado)
Adaptador Macintosh
(suministrado)
Acerca del adaptador Macintosh suministrado
Este adaptador es compatible con los ordenadores de la serie
Macintosh LC, Performa, Quadra y Power Macintosh.
La serie Macintosh II y ciertas versiones más antiguas de los
modelos Power Book pueden requerir un adaptador con
microinterruptores (no suministrado).
Paso 2: Conexión del cable de
alimentación
Con el monitor apagado, conecte un extremo del cable de
alimentación de CC al monitor y el otro extremo a una toma
de corriente.
a HD15
a una toma de
corriente
Ordenador
IBM PC/AT o
compatible
6
a la salida del
monitor
Cable de
señales de
vídeo HD15
(suministrado)
Cable de
alimentación
(suministrado)
Adaptador de
CA
(suministrado)
a DC IN
Procedimientos iniciales
Paso 3: Instalación de la cubierta posterior
3
Gire el tornillo para fijar la cubierta posterior.
Una vez conectado el ordenador y el cable de alimentación,
fije la cubierta posterior suministrada.
Compruebe que mantiene la pantalla en posición vertical
cuando fije la cubierta posterior.
1
Conecte el cable del ordenador y el de alimentación.
Desbloqueado
2
Inserte las lengüetas de la parte trasera de la
cubierta posterior en los retenes y, a continuación,
ejerza presión hacia abajo.
Bloqueado
EN
Paso 4: Encendido del monitor y del
ordenador
F
Primero encienda el monitor y, a continuación, el
ordenador.
La instalación del monitor se ha completado.
D
ES
Nota
I
Si la pantalla muestra “OUT OF SCAN RANGE” o “NO INPUT
SIGNAL”, consulte “Mensajes de aviso” en la página 18.
Para los usuarios que utilicen Windows 95/98
Para aumentar el potencial del monitor, instale en el PC el archivo
de información sobre el nuevo modelo del disquete Windows
Monitor Information Disk/Utility Disk suministrado.
Este monitor cumple con el estándar Plug & Play “VESA DDC”. Si
su PC/tarjeta gráfica cumple con DDC, seleccione “Plug & Play
Monitor (VESA DDC)” o el nombre de modelo de este monitor
como tipo de monitor en “Control Panel” de Windows 95/98. Si su
PC/tarjeta gráfica presenta dificultades de comunicación con este
monitor, cargue el disquete Windows Monitor Information Disk/
Utility Disk y seleccione el nombre de modelo de este monitor como
tipo de monitor.
Para usuarios que utilicen Windows NT4.0
La configuración del monitor en Windows NT4.0 es diferente a la
de Windows 95/98 y en ella no es necesario seleccionar el tipo de
monitor. Consulte el manual de instrucciones de Windows NT4.0
para obtener información detallada sobre el ajuste de la resolución,
la frecuencia de barrido y el número de colores.
7
Procedimientos iniciales
Ajuste automático de la imagen
Si la imagen parpadea o es borrosa, pulse el botón AUTO. El
monitor se ajusta automáticamente a la señal del ordenador
conectado.
Ciertos ordenadores pueden requerir otros ajustes de
precisión. En este caso, ajuste el monitor manualmente
consultando la sección “Personalización del monitor” de la
página 9.
1
Encienda el monitor.
2
Encienda el ordenador.
3
Pulse el botón AUTO.
La imagen se ajusta en el centro de la pantalla.
AUTO
Selección del idioma de las
indicaciones en pantalla
Puede elegir inglés, francés, alemán, español, italiano o
japonés.
1
Pulse el botón MENU.
Aparece la indicación MENU.
OK MENU
EXIT
PHASE
PITCH
CENTER
ZOOM
COLOR
LANGUAGE
OPTION
MENU
2
MENU
Pulse los botones ø /‡ para seleccionar LANGUAGE, y
pulse el botón MENU.
Aparece la indicación LANGUAGE.
LANGUAGE
MENU
ENGLISH
FRANÇAIS
DEUTSCH
ESPAÑOL
ITALIANO
œ{Œ
Notas
• Esta función está destinada para utilizarse con un ordenador
que emplee Windows o un software similar de interfaz gráfica
de usuario que proporcione imágenes en pantalla completa. Es
posible que no funcione correctamente si el color de fondo es
oscuro o si la imagen introducida no llena la pantalla hasta los
bordes (como un indicativo MS-DOS).
• Es posible que la pantalla aparezca en blanco durante unos
segundos mientras se realiza la función de tamaño automático.
Esto no es un fallo de funcionamiento.
Si la imagen parpadea o es borrosa incluso
después de pulsar el botón AUTO
Ajuste el ancho y la fase manualmente (página 11).
3
Pulse los botones ø /‡ para seleccionar el idioma que
desee, y pulse el botón MENU.
Aparece la indicación MENU del idioma seleccionado.
MENU
MENU
OK MENU
SALIR
FASE
ANCHO
CENTRADO
ZOOM
COLOR
LANGUAGE
OPCION
La indicación desaparece automáticamente transcurridos
unos 30 segundos.
Para cerrar la indicación, vuelva a pulsar el botón MENU.
8
Personalización del monitor
Personalización del monitor
Antes de realizar el ajuste
Conecte el monitor y el ordenador, y enciéndalos.
Espere al menos 30 minutos antes de realizar los ajustes
con el fin de obtener el mejor resultado posible.
Ajuste del contraste
Una vez ajustado el contraste, se almacenará en la memoria
para todas las señales de entrada recibidas.
1
Ajuste del brillo de la imagen
Pulse el botón > (contraste) ‡ .
Aparece la indicación CONTRASTE.
CONTRASTE
Una vez ajustado el brillo, se almacenará en la memoria
para todas las señales de entrada recibidas.
1
26
Pulse el botón ‹ (brillo) ø .
Aparece la indicación BRILLO.
48. 4kHz /
BRILLO
Frecuencia
horizontal*
26
48. 4kHz /
Frecuencia
horizontal*
2
2
60Hz
Frecuencia
vertical*
Pulse los botones +/–.
60Hz
+ . . . para aumentar el contraste
– . . . para disminuir el contraste
Frecuencia
vertical*
Pulse los botones +/–.
+ . . . para aumentar el brillo
– . . . para disminuir el brillo
EN
F
D
La indicación desaparece automáticamente transcurridos
unos 3 segundos.
*
ES
Las frecuencias horizontal y vertical de la señal de entrada
recibida aparecen en la indicación CONTRASTE.
I
La indicación desaparece automáticamente transcurridos
unos 3 segundos.
*
Las frecuencias horizontal y vertical de la señal de entrada
recibida aparecen en la indicación BRILLO.
Si la pantalla es demasiado brillante al utilizarla en una
sala oscura
Disminuya el valor de RETROILUMINACION (luz de
fondo) (página 14).
9
Personalización del monitor
Introducción del sistema de
indicaciones en pantalla
La mayoría de los ajustes se realizan mediante la indicación
MENU.
Para cambiar el idioma de las indicaciones en pantalla,
consulte “Selección del idioma de las indicaciones en
pantalla” (página 8).
MENU
OK MENU
SALIR
FASE
ANCHO
CENTRADO
ZOOM
COLOR
LANGUAGE
OPCION
SALIR
Cierra la indicación MENU.
FASE
Muestra la indicación FASE. Ajuste la fase si los caracteres o
las imágenes aparecen borrosas en toda la pantalla. Ajuste la
fase después de ajustar el ancho.
ANCHO
Muestra la indicación ANCHO. Ajuste el ancho si los
caracteres o las imágenes no aparecen con nitidez en
determinadas partes de la pantalla.
Uso del disquete de utilidades
El disquete de utilidades (Utility Disk) suministrado
contiene patrones de prueba para utilizarse en los ajustes de
ancho, fase y centrado.
Dichos patrones ayudan a confirmar que los ajustes sean
correctos.
Ajuste de ancho
Ajuste el ancho si aparecen rayas verticales en la pantalla, o
si una parte de ésta parpadea o es borrosa.
Ajuste la pantalla de forma que desaparezcan las líneas en
negrita verticales del patrón de prueba.
Ajuste de fase
Ajuste la fase si toda la pantalla parpadea o aparece borrosa,
o si se observan rayas horizontales.
Ajuste la pantalla hasta que la presencia de las rayas
horizontales sea mínima.
Ajuste de centrado
Ajuste el centrado si la imagen está descentrada.
Desplace la imagen hacia arriba, abajo, izquierda o derecha
hasta que desaparezca el cuadro rojo del perímetro del
patrón de prueba.
Uso del patrón de prueba
1
Ajuste ZOOM en TAMAÑO REAL (página 12).
2
Cargue el disquete de utilidades (Utility Disk)
suministrado y muestre el patrón de prueba.
Utilice el disquete apropiado para su ordenador.
Para Windows 95/98
Windows Monitor Information Disk/Utility Disk
Para Macintosh
Macintosh Utility Disk
3
Seleccione el ancho, fase o centrado en la indicación
MENU del monitor, y ajuste la pantalla mientras
visualiza el patrón de prueba (páginas 11, 12).
4
Cuando acabe, haga clic en [END]en la pantalla para
desactivar el patrón de prueba.
CENTRADO
Muestra la indicación CENTRADO para ajustar el centrado
de la imagen.
ZOOM
Muestra la indicación ZOOM para seleccionar el modo de
visualización de la imagen. Seleccione PANTALLA
MAXIMA para mostrar la imagen en toda la pantalla, o
TAMAÑO REAL para mostrar la imagen con su resolución
real.
COLOR
Muestra la indicación COLOR para ajustar la temperatura
del color.
LANGUAGE
Muestra la indicación LANGUAGE para seleccionar el
idioma de las indicaciones en pantalla.
OPCION
Muestra la indicación OPCION. Es posible definir ajustes
como la luz de fondo, la posición de las indicaciones en
pantalla, el espacio de tiempo de retardo de ahorro de
energía y el bloqueo de los controles.
10
Personalización del monitor
Eliminación del parpadeo o de la
borrosidad de las imágenes
6
Pulse los botones ø /‡ para seleccionar FASE, y pulse
el botón MENU de nuevo.
Aparece la indicación FASE.
FASE
Si parte de la pantalla parpadea o aparece borrosa, pulse el
botón AUTO. Si esta operación no funciona, ajuste el ancho
y la fase de la siguiente forma.
Una vez ajustados el ancho y la fase, se almacenarán en la
memoria para la señal de entrada actual.
1
Cargue el disquete de utilidades (página 10).
2
Pulse el botón MENU.
Aparece la indicación MENU.
MENU
MENU
3
MENU
26
7
Pulse los botones +/– hasta que el color de la
pantalla sea uniforme.
Si utiliza el disquete de utilidades, realice el ajuste hasta
que la presencia de las rayas horizontales sea mínima.
OK MENU
SALIR
FASE
ANCHO
CENTRADO
ZOOM
COLOR
LANGUAGE
OPCION
Pulse los botones ø /‡ para seleccionar ANCHO, y
pulse el botón MENU de nuevo.
Aparece la indicación ANCHO.
La indicación desaparece automáticamente transcurridos
unos 30 segundos.
Para cerrar la indicación, vuelva a pulsar el botón MENU.
Para desactivar el patrón de prueba, haga clic en [END]en la
pantalla.
EN
F
D
ES
ANCHO
MENU
I
1328
4
Pulse los botones +/– hasta que el color de la
pantalla sea uniforme.
Si utiliza el disquete de utilidades, realice el ajuste de
forma que las rayas verticales desaparezcan.
5
Pulse el botón MENU.
Aparece la indicación MENU.
Si se observan rayas horizontales en toda la pantalla,
ajuste la fase en el paso siguiente.
11
Personalización del monitor
Ajuste de la posición de la
imagen
Visualización de la imagen con la
resolución real
Si la imagen no está en el centro de la pantalla, pulse el
botón AUTO. Si esta operación no funciona, ajuste el
centrado de la siguiente forma.
Una vez ajustado el centrado, se almacenará en la memoria
para la señal de entrada actual.
El monitor está ajustado de fábrica para mostrar la imagen
en pantalla completa, independientemente de la resolución
de dicha imagen. También es posible ver la imagen con su
resolución real.
Una vez ajustado el zoom, se almacenará en la memoria
para la señal de entrada actual.
1
Cargue el disquete de utilidades (página 10).
2
Pulse el botón MENU.
Aparece la indicación MENU.
1
OK MENU
SALIR
FASE
ANCHO
CENTRADO
ZOOM
COLOR
MENU
3
MENU
Pulse los botones ø /‡ para seleccionar CENTRADO, y
pulse el botón MENU de nuevo.
Aparece la indicación
CENTRADO
CENTRADO.
H
V
Pulse el botón MENU.
Aparece la indicación MENU.
OK MENU
SALIR
FASE
ANCHO
CENTRADO
ZOOM
COLOR
LANGUAGE
OPCION
MENU
2
MENU
Pulse los botones ø /‡ para seleccionar ZOOM, y
pulse el botón MENU de nuevo.
Aparece la indicación ZOOM.
MENU
ZOOM
MENU
26
PANTALLA MAXIMA
TAMAÑO REAL
4
Para el ajuste horizontal, seleccione H con los
botones ø /‡ y ajuste la posición con los botones +/–.
+ . . . para desplazar la imagen hacia la derecha
– . . . para desplazar la imagen
CENTRADO
hacia la izquierda
H
V
3
Pulse el botón ‡ para seleccionar TAMAÑO REAL, y
pulse el botón MENU de nuevo.
Aparece la indicación MENU.
26
Para el ajuste vertical, seleccione V con los botones
ø /‡ y ajuste la posición con los botones +/–.
+ . . . para desplazar la imagen hacia arriba
– . . . para desplazar la imagen
CENTRADO
hacia abajo
H
V
26
La indicación desaparece automáticamente transcurridos
unos 30 segundos.
Para cerrar la indicación, vuelva a pulsar el botón MENU.
Para desactivar el patrón de prueba, haga clic en [END]en la
pantalla.
12
La indicación desaparece automáticamente transcurridos
unos 30 segundos.
Para cerrar la indicación, vuelva a pulsar el botón MENU.
Para mostrar la imagen en pantalla completa
Pulse el botón ø en el paso 3 para seleccionar PANTALLA
MAXIMA.
Personalización del monitor
Cambio o ajuste de la
temperatura del color
Cambio de la posición de las
indicaciones en pantalla
La temperatura del color está ajustada de fábrica en 9300K.
Es posible cambiar la temperatura del color a 6500K o
5000K. Utilice esta función para ajustar la temperatura del
color de forma que coincida con los colores reales de una
imagen impresa.
Una vez ajustada la temperatura del color, se almacenará en
la memoria para todas las señales de entrada recibidas.
Es posible cambiar la posición de las indicaciones en
pantalla (por ejemplo, si desea ajustar la imagen detrás de la
indicación en pantalla).
1
Pulse el botón MENU.
Aparece la indicación MENU.
MENU
2
1
MENU
OK MENU
SALIR
FASE
ANCHO
CENTRADO
ZOOM
COLOR
LANGUAGE
OPCION
2
4
OK MENU
Pulse los botones ø /‡ para seleccionar OPCION, y
pulse el botón MENU de nuevo.
Aparece la indicación OPCION.
Pulse los botones ø /‡ para seleccionar COLOR, y
pulse el botón MENU de nuevo.
Aparece la indicación
COLOR
COLOR.
9300K
6500K
MENU
5000K
AJUSTE USUARIO
R
50
V
50
A
50
OPCION
D
: 1M
: DESBLO
ES
POSICION MENU H
Pulse los botones ø /‡ para seleccionar
(POSITION MENU H) o
(POSITION MENU V).
Para ajustar la posición
Para ajustar la posición
horizontal
vertical
OPCION
: 1M
: DESBLO
Pulse los botones ø /‡ para seleccionar R (rojo) o A
(azul), y pulse los botones +/– para obtener el color
que desee.
El color cambia en tanto los componentes R o A
aumenten o disminuyan con respecto a V (verde).
POSICION MENU H
4
OPCION
: 1M
: DESBLO
POSICION MENU V
Pulse los botones +/– para desplazar la indicación en
pantalla hasta la posición que desee.
9300K
6500K
5000K
AJUSTE USUARIO
R
50
V
50
A
50
La indicación desaparece automáticamente transcurridos
unos 30 segundos.
Para cerrar la indicación, pulse el botón MENU de nuevo.
EN
F
MENU
Pulse los botones ø /‡ para seleccionar la
temperatura del color.
Si es preciso realizar otros ajustes en la temperatura del
color seleccionada, proceda con el paso 4.
En caso contrario, pulse el botón MENU. Aparece la
indicación MENU.
COLOR
MENU
SALIR
FASE
ANCHO
CENTRADO
ZOOM
COLOR
LANGUAGE
OPCION
MENU
3
3
Pulse el botón MENU.
Aparece la indicación MENU.
La indicación OPCION desaparece automáticamente
transcurridos unos 30 segundos.
Para cerrar la indicación, pulse el botón MENU de nuevo.
13
I
Personalización del monitor
Ajuste de la luz de fondo
Si la pantalla presenta demasiado brillo al utilizar el monitor
en una sala oscura, ajuste la luz de fondo.
1
Pulse el botón MENU.
Aparece la indicación MENU.
OK MENU
SALIR
FASE
ANCHO
CENTRADO
ZOOM
COLOR
LANGUAGE
OPCION
MENU
2
MENU
Ajuste del espacio de tiempo de
retardo de ahorro de energía
Es posible ajustar el espacio de tiempo de retardo antes de
que el monitor entre en el modo de ahorro de energía.
Consulte la página 17 para obtener más información sobre la
característica de ahorro de energía de este monitor.
1
Pulse los botones ø /‡ para seleccionar OPCION, y
pulse el botón MENU de nuevo.
Aparece la indicación OPCION.
2
OPCION
MENU
OK MENU
SALIR
FASE
ANCHO
CENTRADO
ZOOM
COLOR
LANGUAGE
OPCION
MENU
MENU
Pulse los botones ø /‡ para seleccionar OPCION, y
vuelva a pulsar el botón MENU.
Aparece la indicación OPCION.
OPCION
: 1M
: DESBLO
MENU
POSICION MENU H
3
Pulse el botón MENU.
Aparece la indicación MENU.
: 1M
: DESBLO
Pulse los botones ø /‡ para seleccionar
(RETROILUMINACION).
OPCION
POSICION MENU H
3
26
Pulse los botones ø /‡ para seleccionar
(RETARDO A. ENERG).
OPCION
ZZ...
: DESBLO
60MIN
1MIN
5SEC
NO
RETROILUMINACION
4
Pulse los botones +/– para ajustar el nivel de luz.
RETARDO A. ENERG
4
Pulse los botones +/– para seleccionar el espacio de
tiempo que desee.
La indicación OPCION desaparece automáticamente
transcurridos unos 30 segundos.
Para cerrar la indicación, vuelva a pulsar el botón MENU.
Si RETARDO A. ENERG está ajustado en NO, el
monitor no entrará en el modo de ahorro de energía.
14
La indicación OPCION desaparece automáticamente
transcurridos unos 30 segundos.
Para cerrar la indicación, vuelva a pulsar el botón MENU.
Personalización del monitor
Bloqueo de los controles
Restauración de los ajustes
La función de bloqueo de los controles desactiva todos los
controles, excepto el interruptor u (alimentación) y el botón
MENU.
Es posible recuperar los valores ajustados en fábrica de
todos los ajustes.
La temperatura del color se restaura en 9300K, el ajuste de
zoom en el modo de pantalla completa y el espacio de
tiempo de retardo de ahorro de energía en un minuto. El
bloqueo de los controles se cancela. El resto de los ajustes
recuperan el valor por omisión. No obstante, el idioma en
pantalla no cambia.
Una vez seleccione “BLOQ”, podrá seleccionar solamente
los siguientes elementos en la indicación MENU:
• SALIR
• BLOQUEO DE AJUS y AJUSTES DE ORIGEN en la
indicación OPCION
1
Si pulsa cualquier botón bloqueado, aparecerá la marca
en la pantalla.
1
Pulse el botón MENU.
Aparece la indicación MENU.
2
MENU
OK MENU
2
MENU
OK MENU
SALIR
FASE
ANCHO
CENTRADO
ZOOM
COLOR
MENU
SALIR
FASE
ANCHO
CENTRADO
ZOOM
COLOR
MENU
Pulse el botón MENU.
Aparece la indicación MENU.
Pulse los botones ø /‡ para seleccionar OPCION, y
vuelva a pulsar el botón MENU.
Aparece la indicación OPCION.
F
OPCION
Pulse los botones ø /‡ para seleccionar OPCION, y
vuelva a pulsar el botón MENU.
Aparece la indicación
OPCION
OPCION.
MENU
D
ES
: 1M
: DESBLO
I
MENU
: 1M
: DESBLO
POSICION MENU H
3
POSICION MENU H
3
Pulse los botones ø /‡ para seleccionar
(BLOQUEO DE AJUS).
OPCION
Pulse los botones ø /‡ para seleccionar ? (AJUSTES
DE ORIGEN).
OPCION
: 1M
SI
DESBLO
BLOQ
AJUSTES DE ORIGEN
BLOQUEO DE AJUS
4
4
Pulse el botón +.
Pulse el botón – para seleccionar BLOQ.
La indicación OPCION desaparece automáticamente
transcurridos unos 30 segundos.
Para cerrar la indicación, vuelva a pulsar el botón MENU.
La indicación OPCION desaparece automáticamente
transcurridos unos 30 segundos.
Para cerrar la indicación, vuelva a pulsar el botón MENU.
Para cancelar el bloqueo de los controles
Pulse el botón + en el paso 4 para seleccionar DESBLO.
EN
15
Características técnicas
Modos predefinidos y de usuario
Este monitor dispone de modos predefinidos de fábrica
correspondientes a los estándar más comunes del sector de
auténtica compatibilidad “plug and play”.
Al recibirse una nueva señal de entrada, el monitor
selecciona el modo apropiado predefinido de fábrica y
ajusta momentáneamente el calibre de fase para mostrar
imágenes de alta calidad en el centro de la pantalla. El
calibre se almacena en la memoria y se recupera
inmediatamente cuando se recibe la misma señal de
entrada.
N°
Resolución
(puntos × líneas)
Frecuencia
horizontal
Frecuencia
vertical
Modo
gráfico
1
—
15,625 kHz
50 Hz
625I
2
—
15,75 kHz
60 Hz
525I
3
640 × 350
31,5 kHz
70 Hz
MCGA
4
640 × 400
31,5 kHz
70 Hz
NEC PC-98
5
640 × 480
31,5 kHz
60 Hz
VGA-G
6
640 × 480
35,0 kHz
67 Hz
Macintosh
13" color
7
640 × 480
37,5 kHz
75 Hz
EVGA
8
640 × 480
43,3 kHz
85 Hz
VESA
9
720 × 400
31,5 kHz
70 Hz
VGA-Text
10
720 × 400
37,9 kHz
85 Hz
VESA
11
800 × 600
37,9 kHz
60 Hz
SVGA
12
800 × 600
46,9 kHz
75 Hz
ESVGA
13
800 × 600
53,7 kHz
85 Hz
VESA
14
832 × 624
49,7 kHz
75 Hz
Macintosh
16" color
15
1024 × 768
48,4 kHz
60 Hz
VESA
16
1024 × 768
56,5 kHz
70 Hz
VESA
17
1024 × 768
60,0 kHz
75 Hz
EUVGA
18
1024 × 768
60,2 kHz
75 Hz
Macintosh
19" color
19
1024 × 768
68,7 kHz
85 Hz
VESA
16
Con respecto a las señales de entrada que no se
correspondan con ninguno de los modos predefinidos de
fábrica, la tecnología Multiscan digital de este monitor
realiza todos los ajustes necesarios con el fin de garantizar
imágenes nítidas para cualquier sincronización dentro del
margen de frecuencias del monitor. No obstante, es posible
que sea necesario ajustar con precisión el centrado vertical/
horizontal. Basta con pulsar el botón AUTO o con ajustar el
monitor según las instrucciones de ajuste. Los ajustes se
almacenan automáticamente como modo de usuario y se
recuperan al recibirse la señal de entrada correspondiente.
Condiciones de sincronización horizontal y vertical
recomendadas
El factor de ancho de sincronización horizontal debe ser del 4,8% o
más del tiempo total horizontal.
El ancho de supresión horizontal debe ser de 2,5 µseg. o más.
El ancho de supresión vertical debe ser de 450 µseg. o más.
Ajuste de la resolución y número de colores del
monitor
Consulte el manual de instrucciones del ordenador para ajustar la
resolución y número de colores del monitor. El número de colores
puede variar en función del ordenador o de la tarjeta de vídeo. El
ajuste de la paleta de colores y el número real de colores es de la
siguiente forma:
• High Color (16 bits) n 65.536 colores
• True Color (24 bits) n aproximadamente 16,77 millones de
colores
En el modo True Color (24 bits), la velocidad puede ser menor.
Características técnicas
Función de ahorro de energía
Este monitor cumple con las directrices sobre ahorro de
energía establecidas por VESA y ENERGY STAR, así como
con las normas NUTEK más estrictas.
Si el monitor se conecta a un ordenador o a una tarjeta
gráfica de vídeo que cumpla con VESA DPMS (Display
Power Management Signaling), dicho monitor reducirá
automáticamente el consumo de energía en tres etapas como
se muestra a continuación.
Es posible ajustar mediante la indicación en pantalla el
espacio de tiempo de retardo antes de que el monitor entre
en el modo de ahorro de energía. Ajuste el espacio de
tiempo según la sección “Ajuste del espacio de tiempo de
retardo de ahorro de energía” de la página 14.
Nota
Si el monitor no recibe ninguna señal de vídeo, aparecerá el mensaje
“NO SEÑAL” (página 18). Una vez transcurrido el espacio de
tiempo de retardo, la función de ahorro de energía introducirá al
monitor automáticamente en el modo activo-inactivo y el indicador
u se iluminará en naranja. Al detectarse las señales de
sincronización horizontal y vertical, el monitor recupera
automáticamente el modo de funcionamiento normal.
Modo de consumo
de energía
Pantalla
Señal de sincronización horizontal
Señal de sincronización vertical
Consumo de energía
Espacio de tiempo
de recuperación
Indicador u
1
Funcionamiento
normal
activa
presente
presente
CPD-L133 ≤ 30 W* ≤ 42 W**
CPD-L150 ≤ 25 W* ≤ 35 W**
—
Verde
2
Espera
(1er modo)
en
blanco
ausente
presente
CPD-L133 ≤ 1,5 W* ≤ 4 W**
CPD-L150 ≤ 1,5 W* ≤ 4 W**
Aprox. 3 seg.
Verde y naranja
alternados
3
Reposo
(2º modo)
en
blanco
presente
ausente
CPD-L133 ≤ 1,5 W* ≤ 4 W**
CPD-L150 ≤ 1,5 W* ≤ 4 W**
Aprox. 3 seg.
Verde y naranja
alternados
EN
4
Activo-inactivo
(3er modo)
en
blanco
ausente
ausente
CPD-L133 ≤ 1,5 W* ≤ 4 W**
CPD-L150 ≤ 1,5 W* ≤ 4 W**
Aprox. 10 seg.
Naranja
F
5
Alimentacióndesactivada
—
—
—
CPD-L133 ≤ 1,5 W* ≤ 4 W**
CPD-L150 ≤ 1,5 W* ≤ 4 W**
—
Apagado
D
ES
* Consumo de energía del monitor solamente
** Consumo de energía del monitor incluido el adaptador de CA
Visualización de la indicación
INFORMATION
Puede comprobar el nombre, número de serie y año de
fabricación de este monitor.
Pulse y mantenga pulsado el botón MENU durante cinco
segundos.
Aparece la indicación INFORMATION.
I
Función Plug & Play
Este monitor cumple con las normas de canal de datos de
visualización DDC1 y DDC2B de VESA.
Si se conecta un sistema central DDC1, el monitor se
sincronizará con V. CLK de acuerdo con las normas VESA y
enviará los datos de identificación de visualización
extendidos (EDID) a la línea de datos.
DDC es una marca comercial de Video Electronics
Standard Association.
MENU
Ejemplo
INFORMATION
MODEL : CPD-L150
SER. NO : 1234567
MANUFACTURED : 1998
Nombre del modelo
Número de serie
Año de fabricación
La indicación INFORMATION desaparece automáticamente
transcurridos unos 30 segundos.
Para cerrar la indicación, vuelva a pulsar el botón MENU.
17
Información complementaria
Mensajes de aviso
Si se produce algún problema con la señal de entrada,
aparecerá uno de los siguientes mensajes.
“FUERA DE RANGO EXPLORACION” indica que la señal de
entrada no cumple con las especificaciones de visualización.
INFORMATION
FUERA DE
RANGO EXPLORACION
“NO SEÑAL” indica que no se recibe ninguna señal.
Para solucionar estos problemas, consulte la sección
“Solución de problemas” a continuación.
Solución de problemas
Esta sección puede ayudarle a aislar la causa de los problemas y como resultado, eliminar la necesidad de ponerse en contacto
con apoyo técnico.
Problema
Compruebe estos puntos
Ausencia de imagen
Si el indicador u no está
iluminado
• Compruebe que el cable de alimentación esté correctamente conectado.
• Compruebe que el interruptor u (alimentación) se encuentre en la posición de “activado”.
Si el mensaje “NO SEÑAL”
aparece en pantalla, o si el
indicador u se ilumina en
naranja
• La pantalla se muestra en blanco cuando el monitor se encuentra en el modo de ahorro de
energía. Pulse cualquier tecla del teclado del ordenador.
• Compruebe que el interruptor de alimentación del ordenador se encuentre en la posición
de “activado”.
• Compruebe que el ajuste de selección de entrada sea correcto.
• Compruebe que el cable de señal de vídeo esté correctamente conectado y todos los
enchufes firmemente insertados en las tomas.
• Examine el conector de entrada de vídeo HD15 para comprobar que no hay pines doblados
ni arrancados.
Si el mensaje “FUERA DE
RANGO EXPLORACION”
aparece en pantalla
• Compruebe que el margen de frecuencia de vídeo se encuentre dentro de las
especificaciones de visualización.
Horizontal: 30 – 70 kHz, Vertical: 50 – 85 Hz
Consulte el manual de instrucciones del ordenador para ajustar el margen de frecuencia de
vídeo.
• Si utiliza un adaptador de cable de señal de vídeo, compruebe que sea el correcto.
Si utiliza un sistema Macintosh
• Compruebe que el adaptador Macintosh y el cable de señal de vídeo estén correctamente
conectados (página 6).
Si trabaja con Windows 95/98
• Si ha sustituido un monitor antiguo por este, vuelva a conectar el antiguo y realice lo
siguiente. Instale el disquete Windows Monitor Information Disk/Utility Disk (página 7) y
seleccione “CPD-L133 o CPD-L150” entre los diferentes monitores de Sony en la pantalla de
selección de monitores de Windows 95/98.
La imagen es oscura.
• Ajuste la luz de fondo (página 14).
• Ajuste el brillo (página 9).
• La unidad tarda varios segundos en calentarse una vez activada la alimentación. La imagen
aparecerá momentáneamente.
La imagen aparece codificada.
• Pulse el botón AUTO (página 8). Si esto no funciona, ajuste el ancho y la fase (página 11).
• Consulte este manual y compruebe que se admitan el modo gráfico y la frecuencia que
intenta emplear. Aunque la frecuencia se encuentre dentro del margen correcto, ciertos
ordenadores pueden tener impulsos de sincronización demasiado estrechos para que este
monitor se sincronice correctamente.
18
Información complementaria
Problema
Compruebe estos puntos
El color no es uniforme.
• Pulse el botón AUTO (página 8). Si esto no funciona, ajuste el ancho y la fase (página 11).
No es posible ajustar el monitor • Si la función de bloqueo de los controles está activada, desactívela mediante la indicación
OPCION (página 15).
con los botones del panel
frontal.
El color blanco no parece
blanco.
• Ajuste la temperatura del color (página 13).
La imagen no está centrada en
la pantalla.
• Pulse el botón AUTO (página 8).
• Ajuste el centrado (página 12).
• Ciertos modos de vídeo no llenan toda la pantalla hasta los bordes. Este problema tiende a
producirse con ciertas tarjetas de vídeo.
El tamaño de la imagen es
incorrecto.
• Compruebe el ajuste de ZOOM (página 12).
La imagen es borrosa.
• Pulse el botón AUTO (página 8). Si esto no funciona, ajuste el ancho y la fase (página 11).
• Ajuste el contraste y el brillo (página 9).
La imagen salta o presenta
oscilaciones.
• Enchufe el monitor en una toma de CA distinta, preferiblemente de otro circuito.
• Emplee el monitor con otro ordenador en otra sala.
La imagen parpadea.
• Pulse el botón AUTO (página 8). Si esto no funciona, ajuste el ancho y la fase (página 11).
Aparecen imágenes fantasma.
• No utilice cables prolongadores de vídeo y/o cajas de conmutación de vídeo si se produce
este problema. Éste puede deberse a la longitud excesiva de los cables o a una conexión
floja.
Se aprecian patrones
ondulados o elípticos (muaré).
• Pulse el botón AUTO (página 8). Si esto no funciona, ajuste el ancho y la fase (página 11).
EN
F
D
ES
I
19
Información complementaria
Especificaciones
Tipo: Matriz activa a-Si TFT
CPD-133
Tamaño de imagen: 13,3
pulgadas (33,8 cm)
CPD-150
Tamaño de imagen: 15,0
pulgadas (38 cm)
Formato de señal de entrada
Frecuencia de funcionamiento
RGB:
fh: 15,625 kHz (señal entrelazada
625)
15,75 kHz (señal entrelazada
525)
30 – 70 kHz
fv: 50 Hz — 85 Hz
Eficiencia de los pixeles 99,99 %
Resolución
H: máx. 1024 puntos
V: máx. 768 líneas
Requisitos de alimentación
Funcionamiento:
CA 100 – 240 V, 50 – 60 Hz
Entrada:
CC 12 V (con el adaptador de CA)
Consumo de energía
CPD-133
Sólo pantalla: Máx. 30 W
Incluido el adaptador de CA:
Máx. 42 W
CPD-150
Sólo pantalla: Máx. 25 W
Incluido el adaptador de CA:
Máx. 35 W
Dimensiones (an/al/prf)
CPD-133
Incluido el soporte:
Aprox. 373 × 358 × 165 mm
Sólo monitor:
Aprox. 373 × 272 × 71 mm
CPD-150
Incluido el soporte:
Aprox. 398 × 366 × 165 mm
Sólo monitor:
Aprox. 398 × 291 × 71 mm
Peso
CPD-133
Aprox. 4,9 kg, incluido el
soporte
CPD-150
Aprox. 5,3 kg, incluido el
soporte
Accesorios suministrados
Consulte la página 6.
Asignación de pines
5 4 3 2 1
10 9 8 7 6
15 14 13 12 11
Panel LCD
20
*
Pin nº
Señal
Pin nº
Señal
1
Roja
8
Masa azul
2
Verde
(sincronización en
verde compuesta)
9
DDC + 5V*
10
Masa
11
Identificación (masa)
3
Azul
12
4
Identificación (masa)
Datos bidireccionales
(SDA)*
5
Masa DDC*
13
Sincronización H.
6
Masa roja
14
Sincronización V.
7
Masa verde
15
Reloj de datos (SCL)*
Norma de canal de datos de visualización (DDC) de VESA
Diseño y especificaciones sujetos a cambios sin previo aviso.
INDICE
Operazioni preliminari
Precauzioni ...........................................................................................................................
Identificazione delle parti e dei comandi .........................................................................
Installazione ..........................................................................................................................
Regolazione automatica dell’immagine ...........................................................................
Selezione della lingua per la visualizzazione a schermo ...............................................
4
5
6
8
8
Personalizzazione del monitor
Regolazione della luminosità dell’immagine .................................................................. 9
Regolazione del contrasto ................................................................................................... 9
Presentazione del sistema di visualizzazione a schermo ............................................. 10
Uso del dischetto Utility Disk .......................................................................................... 10
Eliminazione del tremolio e della sfocatura .................................................................. 11
Regolazione della posizione dell’immagine .................................................................. 12
Visualizzazione dell’immagine nella risoluzione reale ................................................ 12
Modifica o regolazione della temperatura di colore .................................................... 13
Modifica della posizione della videata ........................................................................... 13
Regolazione della retroilluminazione ............................................................................. 14
Impostazione del ritardo della funzione di risparmio energetico .............................. 14
Blocco dei comandi ............................................................................................................ 15
Reimpostazione delle regolazioni ................................................................................... 15
EN
F
D
ES
I
Caratteristiche tecniche
Modi preimpostati e modi utente .................................................................................... 16
Funzione di risparmio energetico ................................................................................... 17
Visualizzazione della videata INFORMATION ........................................................... 17
Plug & Play ......................................................................................................................... 17
Informazioni aggiuntive
Messaggi di avvertimento ................................................................................................ 18
Guida alla soluzione dei problemi .................................................................................. 18
Specifiche ..................................................................................................... retrocopertina
• Macintosh è un marchio di fabbrica su licenza di Apple Computer,
Inc., registrato negli U.S.A. e negli altri paesi.
• Windows® e MS-DOS sono marchi di fabbrica registrati di Microsoft
Corporation negli U.S.A. e negli altri paesi.
• IBM PC/AT e VGA sono marchi di fabbrica registrati di IBM
Corporation negli U.S.A.
• VESA è un marchio di fabbrica di Video Electronics Standard
Association.
• ENERGY STAR è un marchio di fabbrica registrato negli U.S.A.
• Tutti gli altri nomi dei prodotti menzionati all’interno del manuale
possono essere marchi di fabbrica o marchi di fabbrica registrati delle
loro rispettive compagnie.
• Inoltre, “™” e “®” non vengono in questo manuale menzionati per
ciascun caso.
3
Operazioni preliminari
Precauzioni
Installazione
• Consentire una circolazione d’aria sufficiente per evitare il
surriscaldamento interno. Non posizionare il monitor
sopra tessuti o coperte oppure vicino a materiali, quali
tappeti o tendaggi, che potrebbero ostruire le prese di
ventilazione.
• Non installare il monitor vicino a fonti di calore, quali
radiatori o condotti d’aria oppure in luoghi soggetti alla
luce diretta del sole, a polvere eccessiva, a scosse o
vibrazioni meccaniche.
• Non posizionare il monitor vicino ad apparecchiature che
generano campi magnetici, quali trasformatori o linee di
alimentazione ad alta tensione.
Cura dello schermo LCD
• Sullo schermo LCD potrebbero apparire punti luminosi
(rossi, blu o verdi). Non si tratta di un problema di
funzionamento. Lo schermo LCD è stato creato
secondo una tecnologia di alta precisione e più del
99,99% degli elementi dell’immagine rimane intatto.
Tuttavia, alcuni elementi dell’immagine potrebbero
non apparire o apparire in maniera costante.
• Non lasciare lo schermo LCD rivolto verso il sole in
quanto potrebbe danneggiarsi. Fare quindi attenzione
quando si posiziona il monitor vicino ad una finestra.
• Non premere o graffiare lo schermo LCD e non poggiarvi
sopra oggetti pesanti, onde evitare che lo schermo perda
uniformità.
• Se il monitor viene usato in un ambiente freddo, sullo
schermo potrebbe apparire un’immagine residua. Non si
tratta di un problema di funzionamento e lo schermo
tornerà normale non appena il monitor si sarà riscaldato.
• Se un fermo immagine viene visualizzato per un lungo
periodo, potrebbe apparire un’immagine residua che poi
scomparirà.
• Il riscaldamento dello schermo e del rivestimento durante
l’utilizzo non è sintomo di un problema di
funzionamento.
Sostituzione del tubo fluorescente
L’apparato di illuminazione di questo monitor dispone di
uno speciale tubo fluorescente. Se lo schermo LCD diventa
scuro, instabile o non si accende, sostituire il tubo
fluorescente con uno nuovo. Per la sostituzione del tubo
fluorescente rivolgersi al rivenditore Sony locale.
4
Manutenzione
• Pulire il rivestimento, il pannello e i comandi con un
panno morbido leggermente inumidito con una soluzione
detergente delicata. Non usare alcun tipo di spugnette o
polveri abrasive né solventi, quali alcool o benzina.
• Non strofinare, toccare o picchiare la superficie dello
schermo con oggetti abrasivi o appuntiti quali penne a
sfera o cacciaviti, onde evitare di graffiare il cinescopio a
colori.
• Pulire lo schermo con un panno morbido. Se si usa un
liquido detergente per i vetri, non usare detergenti
che contengano soluzioni antistatiche o additivi simili, in
quanto potrebbero graffiare la pellicola protettiva dello
schermo.
Trasporto
• Durante il trasporto del monitor, afferrare saldamente il
fondo dello schermo con entrambe le mani, onde evitare
di far cadere il monitor danneggiandolo o arrecando
danni alla propria persona.
• Durante il trasporto del monitor per eventuali riparazioni
o spedizioni, usare i materiali di imballaggio originali.
Avvertenza per il collegamento
dell’alimentazione
• Usare un cavo di alimentazione adatto alla rete di
alimentazione locale.
Per i clienti nel Regno Unito
Se si usa il monitor nel Regno Unito, usare il cavo in
dotazione con la spina per il Regno Unito.
Esempi di tipi di spina
per CA da 100 a 120 V
per CA da 200 a 240 V
solo per CA
a 240 V
La presa deve essere installata vicino
all’apparecchiatura e facilmente accessibile.
Installazione a parete o su un braccio di supporto
Per l’installazione a parete o su un braccio di supporto,
rivolgersi esclusivamente a personale specializzato.
Smaltimento del monitor
• Per lo smaltimento del monitor non usare i cassonetti
per rifiuti ordinari.
Non gettare il monitor insieme ai rifiuti domestici.
• Il tubo fluorescente contiene mercurio. Per lo
smaltimento del monitor attenersi alle norme
dell’autorità sanitaria locale.
Operazioni preliminari
Identificazione delle parti e dei
comandi
Per maggiori informazioni vedere le pagine fra parentesi.
Il modello CPD-L150 viene utilizzato in questo manuale a
scopo illustrativo.
Lato posteriore
Lato anteriore
1
2
3
4
5
6
7
EN
8
F
9
D
1
Interruttore e indicatore u (accensione)
(pagine 8, 17)
Per accendere e spegnere il monitor.
Quando il monitor viene acceso l’indicatore si illumina
in verde, mentre lampeggia in verde e in arancione
oppure si illumina in arancione quando il monitor è nel
modo di risparmio energetico.
2
Tasto MENU (menu) (pagine 8, 11 – 15, 17)
Per visualizzare a schermo la videata MENU.
3
Tasto ‹ (luminosità) (ø ) (pagine 8 – 9, 11 –
15)
Per regolare la luminosità dell’immagine.
Funziona come il tasto ø per la selezione delle voci di
menu.
4
Tasto > (contrasto) (‡ ) (pagine 8 – 9, 11 –
15)
Per regolare il contrasto.
Funziona come il tasto ‡ per la selezione delle voci di
menu.
5
7
Connettore controllo esterno
ES
Immette il segnale di controllo esterno di formato
RS-232. Per maggiori informazioni rivolgersi al
rivenditore.
8
I
Connettore DC IN (pagina 6)
Fornisce l’alimentazione CC al monitor
dall’alimentatore CA.
9
Connettore ingresso RGB (HD15) (pagina 6)
Immette segnali SYNC e segnali video RGB (0,714 Vp-p,
positivo) analogici.
Regolazione dell’inclinazione
Regolare l’inclinazione del monitor in verticale
sull’angolazione desiderata entro 30°.
Per girare il monitor verticalmente, tenerlo sul fondo con
entrambe le mani come illustrato qui sotto.
30°
Tasti +/– (regolazione) (pagine 9, 11 – 15)
Per regolare le voci di menu selezionate.
6
Tasto AUTO (pagine 8, 11)
Dopo aver collegato questo monitor al computer,
premere il tasto AUTO per regolare automaticamente
l’immagine.
È inoltre possibile premere questo tasto quando
l’immagine non è centrata o è sfocata.
5
Operazioni preliminari
Se il sistema del proprio computer non è
compatibile con DDC1 e DDC2B
Installazione
Prima di usare questo monitor, verificare che
nell’imballaggio siano compresi i seguenti elementi:
• Monitor LCD (1)
• Alimentatore CA (1)
• Coperchio posteriore (1)
• Cavo di alimentazione (1)
• Cavo del segnale video HD15 (1)
• Adattatore Macintosh (1)
• Windows Monitor Information Disk/Utility Disk (1)
• Macintosh Utility Disk (1)
• TCO’95 Eco-document (1)
• Scheda garanzia (1)
• Queste istruzioni per l’uso (1)
Questo monitor funziona con qualsiasi sistema IBM o
compatibile dotato di capacità grafica VGA o superiore.
Sebbene questo monitor funzioni con altri sistemi di
piattaforme a frequenze orizzontali tra 30 e 70 kHz,
compresi i sistemi Macintosh e Power Macintosh, occorrerà
un adattatore per il cavo. Per il tipo di adattatore necessario
consultare il proprio rivenditore. Questo monitor può
inoltre ricevere segnali RGB dei sistemi PAL e NTSC.
Questo monitor usa il piedino N. 9 nel connettore del segnale video
per la compatibilità con DDC1 e DDC2B.
Alcuni sistemi di computer che non sono compatibili con DDC1 o
DDC2B potrebbero non accettare il piedino N. 9. Se non si è sicuri
che il proprio sistema accetti il piedino N. 9, usare l’adattatore
HD15 (femmina) - HD15 (maschio senza piedino N. 9) (non in
dotazione). Accertarsi che il lato maschio (senza piedino N. 9) sia
collegato al computer.
Collegamento ad un computer Macintosh o
compatibile
a HD15
Computer
Macintosh o
compatibile
all’uscita monitor
Cavo del segnale
video HD15
(in dotazione)
Adattatore Macintosh
(in dotazione)
Punto 1: Collegamento del monitor al
computer
Con il computer spento, collegare il cavo del segnale video
al monitor utilizzando il cavo del segnale video HD15 in
dotazione.
• Se si usa un computer IBM PC/AT o compatibile, vedere
la sezione qui sotto.
• Se si usa un computer Macintosh o compatibile, vedere la
sezione seguente “Collegamento ad un computer
Macintosh o compatibile”.
Collegamento ad un computer IBM PC/AT o
compatibile
Informazioni sull’adattatore Macintosh in
dotazione
L’adattatore Macintosh in dotazione è compatibile con i computer
serie Macintosh LC, Performa, Quadra e Power Macintosh.
Per la serie Macintosh II e per alcune versioni precedenti dei
modelli Power Book potrebbe essere necessario un adattatore con
microinterruttori (non in dotazione).
Punto 2: Collegamento del cavo di
alimentazione
Con il computer spento, collegare una estremità del cavo di
alimentazione CC al monitor e l’altra estremità ad una presa
di rete.
a HD15
ad una presa di
rete
Computer IBM
PC/AT o
compatibile
6
all’uscita monitor
Cavo del segnale
video HD15
(in dotazione)
Cavo di
alimentazione
(in dotazione)
Alimentatore CA
(in dotazione)
a DC IN
Operazioni preliminari
Punto 3: Installazione del coperchio
posteriore
3
Girare la vite per fissare il coperchio posteriore.
Dopo aver collegato il computer e il cavo di alimentazione,
installare il coperchio posteriore in dotazione.
Accertarsi che lo schermo rimanga in posizione verticale
durante l’installazione del coperchio posteriore.
1
Agganciare il cavo del computer e il cavo di
alimentazione.
Sbloccato
Bloccato
EN
Punto 4: Accensione del monitor e del
computer
2
Inserire le linguette situate all’interno del coperchio
posteriore negli appositi agganci e quindi premere
verso il basso.
F
Accendere prima il monitor e poi accendere il computer.
L’installazione del monitor è completata.
D
ES
Nota
Se sullo schermo appare il messaggio “OUT OF SCAN RANGE” o
“NO INPUT SIGNAL”, vedere la sezione “Messaggi di
avvertimento” a pagina 18.
Per gli utenti di Windows 95/98
Per potenziare al massimo il monitor, installare sul proprio
computer il nuovo file di informazioni sul modello dal disco
Windows Monitor Information Disk/Utility Disk.
Questo monitor è conforme allo standard Plug & Play “VESA
DDC”. Se la scheda grafica/PC è conforme a DDC, selezionare
“Plug & Play Monitor (VESA DDC)” o il nome del modello di
questo monitor come tipo de monitor dal “Control Panel” di
Windows 95/98. Alcune schede grafiche/PC non sono conformi a
DDC. Se la scheda grafica/PC ha difficoltà a comunicare con
questo monitor, caricare il disco Windows Monitor Information
Disk/Utility Disk e selezionare il nome del modello di questo
monitor come tipo di monitor.
Per gli utenti di Windows NT4.0
L’impostazione del monitor in Windows NT4.0 è differente da
Windows 95/98 e non occorre effettuare la selezione del tipo di
monitor. Per informazioni dettagliate sulla regolazione della
risoluzione, frequenza di refresh e numero di colore, consultare le
istruzioni per l’uso di Windows NT4.0.
7
I
Operazioni preliminari
Regolazione automatica
dell’immagine
Selezione della lingua per la
visualizzazione a schermo
Se l’immagine è tremolante o sfocata, premere il tasto
AUTO. Il monitor viene regolato automaticamente in base al
segnale del computer collegato.
Con alcuni computer potrebbero rendersi necessarie
ulteriori regolazioni fini. In questo caso, regolare il monitor
manualmente consultando la sezione “Personalizzazione
del monitor” a pagina 9.
È possibile selezionare la lingua per la visualizzazione a
schermo fra inglese, francese, tedesco, spagnolo, italiano e
giapponese.
1
Accendere il monitor.
2
Accendere il computer.
3
Premere il tasto AUTO.
L’immagine viene regolata adattandosi al centro dello
schermo.
AUTO
1
Premere il tasto MENU.
Appare la videata MENU
MENU
MENU
2
OK MENU
EXIT
PHASE
PITCH
CENTER
ZOOM
COLOR
LANGUAGE
OPTION
Premere i tasti ø /‡ per selezionare LANGUAGE e
premere il tasto MENU.
Appare la videata LANGUAGE.
LANGUAGE
MENU
ENGLISH
FRANÇAIS
DEUTSCH
ESPAÑOL
ITALIANO
œ{Œ
Note
• È possibile utilizzare questa funzione con computer che
eseguono Windows o un software di interfaccia grafica utente
simile che consenta un’immagine a schermo pieno. Se il colore di
sfondo è scuro o se l’immagine immessa non riempie lo schermo
fino ai bordi (come ad esempio un prompt di MS-DOS) è
possibile che si verifichino problemi di funzionamento.
• Durante l’esecuzione della funzione di dimensionamento
automatico, lo schermo potrebbe apparire vuoto per alcuni
secondi, non si tratta comunque di un problema di
funzionamento.
Se l’immagine è tremolante o sfocata anche
dopo aver premuto il tasto AUTO
3
Premere i tasti ø /‡ per selezionare la lingua
desiderata e premere il tasto MENU.
Appare la videata MENU della lingua selezionata.
MENU
MENU
OK MENU
USCITA
FASE
REG. PIXEL
CENTRATURA
ZOOM
COLORE
LANGUAGE
OPZIONI
Regolare manualmente REG. PIXEL e FASE (pagina 11).
La videata scompare automaticamente dopo circa 30
secondi.
Per chiudere la videata, premere di nuovo il tasto MENU.
8
Personalizzazione del monitor
Personalizzazione del monitor
Operazioni preliminari alla regolazione
Collegare il monitor e il computer e quindi accenderli.
Per ottenere risultati migliori, attendere almeno 30
minuti prima di effettuare le regolazioni.
Regolazione del contrasto
Una volta regolato, il contrasto verrà memorizzato per tutti i
segnali di ingresso ricevuti.
1
Regolazione della luminosità
dell’immagine
Premere il tasto > (contrasto) ‡ .
Appare la videata CONTRASTO.
CONTRASTO
Una volta regolata, la luminosità verrà memorizzata per
tutti i segnali di ingresso ricevuti.
1
26
48. 4kHz /
Premere il tasto ‹ (luminosità) ø .
Appare la videata LUMINOSITA.
Frequenza
orizzontale*
LUMINOSITA
2
60Hz
Frequenza
verticale*
Premere i tasti +/–.
26
48. 4kHz /
+ . . . per aumentare il contrasto
– . . . per diminuire il contrasto
60Hz
EN
F
Frequenza
orizzontale*
Frequenza
verticale*
La videata scompare automaticamente dopo circa 3 secondi.
2
Premere i tasti +/–.
*
+ . . . per aumentare la luminosità
– . . . per diminuire la luminosità
Nella videata CONTRASTO appaiono le frequenze orizzontale e
verticale per il segnale di ingresso ricevuto.
La videata scompare automaticamente dopo circa 3 secondi.
*
Nella videata LUMINOSITA appaiono le frequenze orizzontale
e verticale per il segnale di ingresso ricevuto.
Se lo schermo è troppo luminoso durante la
visualizzazione in una stanza buia
Diminuire la RETROILLUMINAZ. (pagina 14).
9
D
ES
I
Personalizzazione del monitor
Presentazione del sistema di
visualizzazione a schermo
La maggior parte delle regolazioni vengono effettuate
utilizzando la videata MENU.
Per modificare la lingua per la visualizzazione a schermo,
vedere la sezione “Selezione della lingua per la
visualizzazione a schermo” (pagina 8).
MENU
OK MENU
USCITA
FASE
REG. PIXEL
CENTRATURA
ZOOM
COLORE
LANGUAGE
OPZIONI
USCITA
Viene chiusa la videata MENU.
FASE
Viene visualizzata la videata FASE per regolare la fase
quando i caratteri o le immagini appaiono sfocati sull’intero
schermo. Regolare la fase dopo aver regolato il pixel.
REG. PIXEL
Viene visualizzata la videata REG. PIXEL per regolare il
pixel quando i caratteri o le immagini non appaiono nitidi in
alcune parti dello schermo.
Uso del dischetto Utility Disk
Il dischetto Utility Disk contiene modelli di test da utilizzare
per le regolazioni di pixel, fase e centratura.
Questi modelli di test serviranno a confermare la correttezza
delle regolazioni.
Regolazione del pixel
Regolare il pixel se sullo schermo appaiono delle righe
verticali oppure se una parte dello schermo è tremolante o
sfocata.
Regolare lo schermo in modo che le linee verticali marcate
del modello di test scompaiano.
Regolazione della fase
Regolare la fase se l’intero schermo appare tremolante o
sfocato oppure se appaiono delle righe orizzontali.
Regolare lo schermo fino a ridurre le righe orizzontali al
minimo.
Regolazione della centratura
Regolare la centratura se l’immagine non appare centrata.
Spostare l’immagine in alto, in basso, a sinistra o a destra
finché la cornice rossa sul perimetro del modello di test non
scompare.
Uso del modello di test
1
Impostare ZOOM su DIMENS. REAL (pagina 12).
2
Caricare il dischetto Utility Disk in dotazione e
visualizzare il modello di test.
Utilizzare il dischetto appropriato per il computer.
Per Windows 95/98
Windows Monitor Information Disk/Utility Disk
Per Macintosh
Macintosh Utility Disk
3
Selezionare pixel, fase o centratura dalla videata
MENU sul monitor e regolare lo schermo guardando
il modello di test (pagine 11, 12).
4
Una volta terminato, fare clic su [END]sullo schermo
per disattivare il modello di test.
CENTRATURA
Viene visualizzata la videata CENTRATURA per regolare la
centratura dell’immagine.
ZOOM
Viene visualizzata la videata ZOOM per selezionare il modo
di visualizzazione dell’immagine. Selezionare DIMENS.
ESTESA per visualizzare l’immagine utilizzando lo schermo
intero oppure selezionare DIMENS. REAL per visualizzare
l’immagine nella sua risoluzione reale.
COLORE
Viene visualizzata la videata COLORE per regolare la
temperatura di colore.
LANGUAGE
Viene visualizzata la videata LANGUAGE per selezionare
la lingua per la visualizzazione a schermo.
OPZIONI
Viene visualizzata la videata OPZIONI in cui è possibile
regolare le impostazioni per la retroilluminazione, la
posizione della videata, il ritardo della funzione di
risparmio energetico e il blocco dei comandi.
10
Personalizzazione del monitor
Eliminazione del tremolio e della
sfocatura
Se una parte dello schermo appare tremolante o sfocata,
premere il tasto AUTO. Se con questa operazione il
problema non viene risolto, regolare pixel e fase come
descritto di seguito.
Una volta regolati, pixel e fase verranno memorizzati per il
segnale di ingresso corrente.
1
Caricare il dischetto Utility Disk (pagina 10).
2
Premere il tasto MENU.
Appare la videata MENU.
MENU
MENU
3
6
Premere i tasti ø /‡ per selezionare FASE e premere
di nuovo il tasto MENU.
Appare la videata FASE.
FASE
MENU
26
7
Premere i tasti +/– finché i colori dello schermo non
diventano uniformi.
Se si utilizza il dischetto Utility Disk, effettuare la
regolazione in modo che le righe orizzontali vengano
ridotte al minimo.
OK MENU
USCITA
FASE
REG. PIXEL
CENTRATURA
ZOOM
COLORE
LANGUAGE
OPZIONI
Premere i tasti ø /‡ per selezionare REGOLAZ. PIXEL e
premere di nuovo il tasto MENU.
Appare la videata REGOLAZ. PIXEL.
La videata scompare automaticamente dopo circa 30
secondi.
Per chiudere la videata, premere di nuovo il tasto MENU.
Per disattivare il modello di test, fare clic su [END]sullo
schermo.
ES
REGOLAZ. PIXEL
I
1328
Premere i tasti +/– finché i colori dello schermo non
diventano uniformi.
Se si utilizza il dischetto Utility Disk, effettuare la
regolazione in modo che le righe verticali scompaiano.
5
Premere il tasto MENU.
Appare la videata MENU.
Se sull’intero schermo appaiono righe orizzontali,
regolare la fase seguendo il punto successivo.
F
D
MENU
4
EN
11
Personalizzazione del monitor
Regolazione della posizione
dell’immagine
Visualizzazione dell’immagine
nella risoluzione reale
Se l’immagine sullo schermo non appare centrata, premere
il tasto AUTO. Se con questa operazione il problema non
viene risolto, regolare la centratura come descritto di
seguito.
Una volta regolata, la centratura verrà memorizzata per il
segnale di ingresso corrente.
Il monitor è impostato in fabbrica per visualizzare
l’immagine a schermo pieno, senza tener conto della
risoluzione dell’immagine. È comunque possibile vedere
l’immagine anche nella sua risoluzione reale.
Una volta impostato, lo zoom verrà memorizzato per il
segnale di ingresso corrente.
1
Caricare il dischetto Utility Disk (pagina 10).
2
Premere il tasto MENU.
Appare la videata MENU.
OK MENU
USCITA
FASE
REG. PIXEL
CENTRATURA
ZOOM
MENU
3
MENU
1
Premere i tasti ø /‡ per selezionare CENTRATURA e
premere di nuovo il tasto MENU.
Appare la videata
CENTRATURA
CENTRATURA.
MENU
Premere il tasto MENU.
Appare la videata MENU.
H
V
OK MENU
USCITA
FASE
REG. PIXEL
CENTRATURA
ZOOM
COLORE
LANGUAGE
OPZIONI
MENU
2
MENU
Premere i tasti ø /‡ per selezionare ZOOM e premere
di nuovo il tasto MENU.
Appare la videata ZOOM.
ZOOM
26
MENU
DIMENS. ESTESA
DIMENS. REAL
4
Per la regolazione orizzontale, selezionare H usando i
tasti ø /‡ e regolare la posizione usando i tasti +/–.
+ . . . per spostare l’immagine a destra
– . . . per spostare l’immagine
CENTRATURA
a sinistra
3
Premere il tasto ‡ per selezionare DIMENS. REAL e
premere di nuovo il tasto MENU.
Appare la videata MENU.
H
V
26
Per la regolazione verticale, selezionare V usando i
tasti ø /‡ e regolare la posizione usando i tasti +/–.
+ . . . per spostare l’immagine verso l’alto
– . . . per spostare l’immagine
CENTRATURA
verso il basso
H
V
Per visualizzare l’immagine a schermo pieno
Premere il tasto ø al punto 3 per selezionare DIMENS.
ESTESA.
26
La videata scompare automaticamente dopo circa 30
secondi.
Per chiudere la videata, premere di nuovo il tasto MENU.
Per disattivare il modello di test, fare clic su [END]sullo
schermo.
12
La videata scompare automaticamente dopo circa 30
secondi.
Per chiudere la videata, premere di nuovo il tasto MENU.
Personalizzazione del monitor
Modifica o regolazione della
temperatura di colore
Modifica della posizione della
videata
La temperatura di colore è impostata in fabbrica su 9300K.
È possibile modificare la temperatura di colore
impostandola su 6500K o 5000K. Usare questa funzione per
regolare la temperatura di colore in modo che corrisponda
ai colori reali di un’immagine stampata.
Una volta regolata, la temperatura di colore verrà
memorizzata per tutti i segnali di ingresso ricevuti.
È possibile modificare la posizione della videata, ad
esempio quando si desidera regolare l’immagine che vi sta
dietro.
1
Premere il tasto MENU.
Appare la videata MENU.
2
4
MENU
2
9300K
6500K
5000K
MODALITA' UTENTE
R
50
V
50
B
50
OK MENU
Premere i tasti ø /‡ per selezionare OPZIONI e
premere di nuovo il tasto MENU.
Appare la videata OPZIONI.
EN
OPZIONI
F
MENU
D
: 1M
: SBLOC
ES
POSIZ MENU ORIZ
3
Premere i tasti ø /‡ per selezionare la temperatura di
colore.
Se occorre effettuare ulteriori regolazioni della
temperatura di colore selezionata, passare al punto 4.
In caso contrario, premere il tasto MENU. Appare la
videata MENU.
Premere i tasti ø /‡ per selezionare
(POSIZ MENU
ORIZ) o
(POSIZ MENU VERT).
Per regolare la posizione
Per regolare la posizione
orizzontale
verticale
OPZIONI
: 1M
: SBLOC
Premere i tasti ø /‡ per selezionare R (rosso) o B (blu)
e premere i tasti +/– per ottenere il colore desiderato.
Il colore cambia con l’aumentare o il diminuire dei
componenti R o B rispetto a V (verde).
POSIZ MENU ORIZ
4
COLORE
MENU
USCITA
FASE
REG. PIXEL
CENTRATURA
ZOOM
COLORE
LANGUAGE
OPZIONI
OK MENU
Premere i tasti ø /‡ per selezionare COLORE e
premere di nuovo il tasto MENU.
Appare la videata COLORE.
COLORE
MENU
3
Premere il tasto MENU.
Appare la videata MENU.
MENU
USCITA
FASE
REG. PIXEL
CENTRATURA
ZOOM
COLORE
LANGUAGE
OPZIONI
MENU
1
OPZIONI
: 1M
: SBLOC
POSIZ MENU VERT
Premere i tasti +/– per spostare le videata sulla
posizione desiderata.
9300K
6500K
5000K
MODALITA' UTENTE
R
50
V
50
B
50
La videata scompare automaticamente dopo circa 30
secondi.
Per chiudere la videata, premere di nuovo il tasto MENU.
La videata OPZIONI scompare automaticamente dopo circa
30 secondi.
Per chiudere la videata, premere di nuovo il tasto MENU.
13
I
Personalizzazione del monitor
Regolazione della
retroilluminazione
Impostazione del ritardo della
funzione di risparmio energetico
Se durante l’uso del monitor in una stanza buia lo schermo è
troppo luminoso, regolare la retroilluminazione.
È possibile impostare il tempo per ritardare l’ingresso del
monitor nel modo di risparmio energetico. Per maggiori
informazioni sulle capacità di risparmio energetico di
questo monitor, vedere a pagina 17.
1
Premere il tasto MENU.
Appare la videata MENU.
OK MENU
1
USCITA
FASE
REG. PIXEL
CENTRATURA
ZOOM
COLORE
LANGUAGE
OPZIONI
MENU
2
MENU
Premere i tasti ø /‡ per selezionare OPZIONI e
premere di nuovo il tasto MENU.
Appare la videata OPZIONI.
Premere il tasto MENU.
Appare la videata MENU.
OPZIONI
MENU
OK MENU
USCITA
FASE
REG. PIXEL
CENTRATURA
ZOOM
COLORE
LANGUAGE
OPZIONI
MENU
2
MENU
Premere i tasti ø /‡ per selezionare OPZIONI e
premere di nuovo il tasto MENU.
Appare la videata OPZIONI.
OPZIONI
MENU
: 1M
: SBLOC
: 1M
: SBLOC
POSIZ MENU ORIZ
POSIZ MENU ORIZ
3
Premere i tasti ø /‡ per selezionare
(RETROILLUMINAZ).
3
OPZIONI
Premere i tasti ø /‡ per selezionare ZZ... (RITARDO
POW SAV).
OPZIONI
26
60MIN
1MIN
5SEC
NO
: SBLOC
RETROILLUMINAZ.
RITARDO POW SAV
4
Premere i tasti +/– per regolare il livello della luce.
4
La videata OPZIONI scompare automaticamente dopo circa
30 secondi.
Per chiudere la videata, premere di nuovo il tasto MENU.
14
Premere i tasti +/– per selezionare il tempo
desiderato.
Se RITARDO POW SAV viene impostato su NO, il
monitor non entra nel modo di risparmio energetico.
La videata OPZIONI scompare automaticamente dopo circa
30 secondi.
Per chiudere la videata, premere di nuovo il tasto MENU.
Personalizzazione del monitor
Blocco dei comandi
Reimpostazione delle regolazioni
La funzione di blocco dei comandi disattiva tutti i comandi
eccetto l’interruttore u (accensione) e il tasto MENU.
Tutte le regolazioni e le impostazioni possono essere
reimpostate sulle impostazioni di fabbrica.
La temperatura di colore viene reimpostata su 9300K,
l’impostazione di zoom viene reimpostata sul modo a
schermo pieno e il tempo di ritardo della funzione di
risparmio energetico viene reimpostato su un minuto. Il
blocco dei comandi viene annullato. Le altre regolazioni
ritornano alle impostazioni predefinite. Tuttavia, la lingua
per la visualizzazione a schermo non viene modificata.
Quando si seleziona “BLOCC”, nelle videata MENU è
possibile selezionare solo le seguenti voci:
• USCITA
• BLOCC MENU e IMPOSTAZ. ORIGIN nella videata
OPZIONI
Se si preme uno dei tasti bloccati, sullo schermo appare il
contrassegno
.
1
Premere il tasto MENU.
Appare la videata MENU.
OK MENU
USCITA
FASE
REG. PIXEL
CENTRATURA
ZOOM
MENU
2
MENU
1
Premere il tasto MENU.
Appare la videata MENU.
Premere i tasti ø /‡ per selezionare OPZIONI e
premere di nuovo il tasto MENU.
Appare la videata OPZIONI.
OPZIONI
OK MENU
USCITA
FASE
REG. PIXEL
CENTRATURA
ZOOM
MENU
2
MENU
Premere i tasti ø /‡ per selezionare OPZIONI e
premere di nuovo il tasto MENU.
Appare la videata OPZIONI.
EN
F
OPZIONI
D
MENU
ES
MENU
: 1M
: SBLOC
: 1M
: SBLOC
I
POSIZ MENU ORIZ
POSIZ MENU ORIZ
3
3
Premere i tasti ø /‡ per selezionare
(BLOCC
MENU).
OPZIONI
Premere i tasti ø /‡ per selezionare ? (IMPOST.
ORIGINALI).
OPZIONI
: 1M
SBLOC
BLOCC
SI
IMPOST. ORIGINALI
BLOCC MENU
4
Premere il tasto – per selezionare BLOCC.
La videata OPZIONI scompare automaticamente dopo circa
30 secondi.
Per chiudere la videata, premere di nuovo il tasto MENU.
4
Premere il tasto +.
La videata OPZIONI scompare automaticamente dopo circa
30 secondi.
Per chiudere la videata, premere di nuovo il tasto MENU.
Per annullare il blocco dei comandi
Premere il tasto + al punto 4 per selezionare SBLOC.
15
Caratteristiche tecniche
Modi preimpostati e modi utente
Questo monitor dispone di modi preimpostati in fabbrica in
base agli standard industriali più diffusi di effettiva
compatibilità “plug and play”.
Quando viene immesso un nuovo segnale, il monitor
seleziona il modo preimpostato in fabbrica appropriato e
regola temporaneamente la calibrazione della fase per
fornire un’immagine di alta qualità al centro dello schermo.
La calibrazione viene memorizzata e immediatamente
richiamata qualora venga ricevuto lo stesso segnale di
ingresso.
N.
Risoluzione
(punti × linee)
Frequenza
orizzontale
Frequenza Modo
verticale
grafica
1
—
15.625 kHz
50 Hz
625I
2
—
15.75 kHz
60 Hz
525I
3
640 × 350
31.5 kHz
70 Hz
MCGA
4
640 × 400
31.5 kHz
70 Hz
NEC PC-98
5
640 × 480
31.5 kHz
60 Hz
VGA-G
6
640 × 480
35.0 kHz
67 Hz
Macintosh 13"
a colori
7
640 × 480
37.5 kHz
75 Hz
EVGA
8
640 × 480
43.3 kHz
85 Hz
VESA
9
720 × 400
31.5 kHz
70 Hz
VGA-Text
10
720 × 400
37.9 kHz
85 Hz
VESA
11
800 × 600
37.9 kHz
60 Hz
SVGA
12
800 × 600
46.9 kHz
75 Hz
ESVGA
13
800 × 600
53.7 kHz
85 Hz
VESA
14
832 × 624
49.7 kHz
75 Hz
Macintosh 16"
a colori
15
1024 × 768
48.4 kHz
60 Hz
VESA
16
1024 × 768
56.5 kHz
70 Hz
VESA
17
1024 × 768
60.0 kHz
75 Hz
EUVGA
18
1024 × 768
60.2 kHz
75 Hz
Macintosh 19"
a colori
19
1024 × 768
68.7 kHz
85 Hz
VESA
16
Per i segnali di ingresso che non corrispondono a nessuno
dei modi preimpostati in fabbrica, la tecnologia Multiscan
digitale di questo monitor esegue tutte le regolazioni
necessarie affinché sullo schermo appaia un’immagine
nitida per qualsiasi sincronizzazione nella gamma di
frequenza del monitor. Tuttavia, potrebbe essere necessaria
la sintonia fine della centratura verticale e orizzontale.
Premere semplicemente il tasto AUTO o regolare il monitor
in base alle istruzioni di regolazione. Le regolazioni
vengono memorizzate automaticamente come modo utente
e richiamate qualora venga ricevuto il segnale di ingresso
corrispondente.
Condizioni di sincronizzazione orizzontale e
verticale consigliate
L’ampiezza di sincronizzazione orizzontale deve essere il 4,8% o
superiore del tempo orizzontale complessivo.
L’ampiezza di cancellazione orizzontale deve essere di 2,5 µsec. o
superiore.
L’ampiezza di cancellazione verticale deve essere di 450 µsec. o
superiore.
Regolazione della risoluzione del monitor e del
numero di colore
Regolare la risoluzione del monitor e il numero di colore facendo
riferimento alle istruzioni per l’uso del proprio computer. Il numero
di colore può variare in base al computer o alla scheda video.
L’impostazione della tavolozza de colori e il numero reale dei colori
è descritto qui di seguito:
• High Color (16 bit) n 65.536 colori
• True Color (24 bit) n circa 16,77 milioni di colori
Nel modo True Color (24 bit), la velocità potrebbe essere inferiore.
Caratteristiche tecniche
Funzione di risparmio energetico
Questo monitor è conforme alle direttive di risparmio
energetico stabilite da VESA e ENERGY STAR, così come
alle più severe direttive NUTEK.
Se il monitor viene collegato ad un computer o ad una
scheda grafica video conforme a VESA DPMS (Display
Power Management Signaling), il consumo energetico verrà
automaticamente ridotto in tre fasi come descritto qui sotto.
Modo di consumo
energetico
Schermo Segnale di sincronizzazione orizzontale
È possibile impostare il tempo di ritardo per l’ingresso del
monitor nel modo di risparmio energetico utilizzando la
videata, come descritto nella sezione “Impostazione del
ritardo della funzione di risparmio energetico “ a pagina 14.
Nota
Se nel monitor non viene immesso alcun segnale video, appare il
messaggio “NO SEGNALE INGR” (pagina 18). Trascorso il tempo
di ritardo, la funzione di risparmio energetico fa entrare il monitor
automaticamente nel modo attivo-spento e l’indicatore u
lampeggia in arancione. Quando vengono individuati i segnali di
sincronizzazione orizzontale e verticale, il monitor ripristina
automaticamente il modo di funzionamento normale.
Segnale di sincronizzazione verticale
Consumo energetico
Tempo di
recupero
Indicatore u
1
Funzionamento attivo
normale
presente
presente
CPD-L133 ≤ 30 W*
CPD-L150 ≤ 25 W*
≤ 42 W**
≤ 35 W**
—
Verde
2
Attesa
(I modo)
vuoto
assente
presente
CPD-L133 ≤ 1.5 W*
CPD-L150 ≤ 1.5 W*
≤ 4 W**
≤ 4 W**
Circa 3 sec.
Verde e arancione
alternati
3
Sospeso
(II modo)
vuoto
presente
assente
CPD-L133 ≤ 1.5 W*
CPD-L150 ≤ 1.5 W*
≤ 4 W**
≤ 4 W**
Circa 3 sec.
Verde e arancione
alternati
4
Attivo-spento
(III modo)
vuoto
assente
assente
CPD-L133 ≤ 1.5 W*
CPD-L150 ≤ 1.5 W*
≤ 4 W**
≤ 4 W**
Circa 10 sec. Arancione
5
Spento
—
—
—
CPD-L133 ≤ 1.5 W*
CPD-L150 ≤ 1.5 W*
≤ 4 W**
≤ 4 W**
—
EN
F
Spento
D
* Consumo energetico del solo monitor
** Consumo energetico del monitor compreso l’alimentatore CA
ES
I
Visualizzazione della videata
INFORMATION
È possibile confermare il nome, il numero di serie e l’anno di
fabbricazione di questo monitor.
Premere e tenere premuto il tasto MENU per cinque
secondi.
Appare la videata INFORMATION.
MENU
Plug & Play
Questo monitor è conforme agli standard DDC1 e DDC2B
Display Data Channel (DDC) di VESA.
Quando viene collegato un sistema ospite DDC1, il monitor
si sincronizza con V. CLK in base agli standard di VESA e
trasmette gli EDID (Extended Display Identification Data)
alla linea dati.
DDC è un marchio di fabbrica di Video Electronics
Standard Association.
Esempio
INFORMATION
MODEL : CPD-L150
SER. NO : 1234567
MANUFACTURED : 1998
Nome del modello
Numero di serie
Anno di fabbricazione
La videata INFORMATION scompare automaticamente
dopo circa 30 secondi.
Per chiudere la videata, premere di nuovo il tasto MENU.
17
Informazioni aggiuntive
Messaggi di avvertimento
Se si verificano problemi con il segnale di ingresso, appare
uno dei seguenti messaggi.
“FUORI GAMMA SCANS” indica che il segnale di ingresso
non è supportato dalle specifiche di visualizzazione.
INFORMATION
FUORI GAMMA SCANS
“NO SEGNALE INGR” indica che non viene immesso alcun
segnale.
Per la soluzione di questi problemi, vedere la “Guida alla
soluzione dei problemi” qui sotto.
Guida alla soluzione dei problemi
Questa sezione permette di individuare la causa di un problema evitando di rivolgersi all’assistenza tecnica.
Sintomo
Verificare quanto segue
Nessuna immagine.
Se l’indicatore u non è
illuminato
• Verificare che il cavo di alimentazione sia collegato correttamente.
• Verificare che l’interruttore u (accensione) sia sulla posizione di “apparecchio acceso”.
Se sullo schermo appare il
messaggio “NO SEGNALE
INGR” o se l’indicatore u è
arancione
• Lo schermo è vuoto quando il monitor è nel modo di risparmio energetico. Provare a
premere un tasto sulla tastiera del computer.
• Verificare che l’interruttore del computer sia sulla posizione di “apparecchio acceso”.
• Verificare che l’impostazione della selezione di ingresso sia corretta.
• Verificare che il cavo del segnale video sia collegato correttamente e che tutte le spine siano
saldamente inserite nelle rispettive prese.
• Verificare che nel connettore di ingresso video HD15 non vi siano piedini piegati o male
inseriti.
Se sullo schermo appare il
messaggio “FUORI GAMMA
SCANS”
• Verificare che la gamma di frequenza video rientri in quella specificata per la
visualizzazione.
Orizzontale: 30 – 70 kHz, Verticale: 50 – 85 Hz
Consultare il manuale delle istruzioni del computer per regolare la gamma di frequenza
video.
• Se si usa un adattatore del cavo del segnale video, verificare che sia corretto.
Se si usa un sistema Macintosh
• Verificare che l’adattatore Macintosh e il cavo del segnale video siano collegati
correttamente (pagina 6).
Se si utilizza Windows 95/98
• Se con questo monitor è stato sostituito un vecchio monitor, ricollegare il vecchio monitor e
effettuare le seguenti operazioni. Installare il Windows Monitor Information Disk/Utility
Disk (pagina 7) e selezionare “CPD-L133 o CPD-L150” tra i monitor Sony nella schermata
di selezione monitor Windows 95/98.
L’immagine è scura.
• Regolare la retroilluminazione (pagina 14).
• Regolare la luminosità (pagina 9).
• Dopo l’attivazione dell’alimentazione, occorrono alcuni secondi perché venga avviata la
visualizzazione. L’immagine apparirà momentaneamente.
L’immagine è confusa.
• Premere il tasto AUTO (pagina 8). Se il problema non viene risolto, regolare pixel e fase
(pagina 11).
• Controllare questo manuale per una conferma che il modo grafica e la frequenza con cui si
desidera far funzionare il monitor siano supportati. Anche se la frequenza rientra nella
gamma appropriata, l’impulso di sincronizzazione di alcuni computer potrebbe essere
troppo ristretto per la corretta sincronizzazione di questo monitor.
18
Informazioni aggiuntive
Sintomo
Verificare quanto segue
Il colore non è uniforme.
• Premere il tasto AUTO (pagina 8). Se il problema non viene risolto, regolare pixel e fase
(pagina 11).
• Se la funzione di blocco dei comandi è attiva, disattivarla utilizzando la videata OPZIONI
Non è possibile regolare il
(pagina 15).
monitor con i tasti del pannello
anteriore.
Il bianco non appare bianco.
• Regolare la temperatura di colore (pagina 13).
L’immagine sullo schermo non
è centrata.
• Premere il tasto AUTO (pagina 8).
• Regolare la centratura (pagina 12).
• Alcuni modi video non riempiono lo schermo fino ai bordi. Questo problema tende a
verificarsi con alcune schede video.
La dimensione dell’immagine
non è corretta.
• Verificare l’impostazione di ZOOM (pagina 12).
L’immagine è sfocata.
• Premere il tasto AUTO (pagina 8). Se il problema non viene risolto, regolare pixel e fase
(pagina 11).
• Regolare il contrasto e la luminosità (pagina 9).
L’immagine salta o appare
oscillante.
• Provare a inserire la spina del monitor in una presa CA differente, preferibilmente in un
circuito diverso.
• Provare il monitor su un computer differente in un’altra stanza.
L’immagine è tremolante.
• Premere il tasto AUTO (pagina 8). Se il problema non viene risolto, regolare pixel e fase
(pagina 11).
L’immagine appare sdoppiata.
• Se si verifica questo problema, eliminare l’uso di prolunghe per il cavo video oppure di
cassette per l’interruttore video. Questi problemi possono verificarsi a causa di una
lunghezza eccessiva del cavo o di collegamenti deboli.
Appaiono disturbi ondulati o
ellittici (effetto moiré).
EN
F
D
ES
• Premere il tasto AUTO (pagina 8). Se il problema non viene risolto, regolare pixel e fase
(pagina 11).
I
19
Informazioni aggiuntive
Specifiche
Tipo di pannello: matrice attiva
a-Si TFT
CPD-L133
Dimensione immagine: 13,3
pollici (33,8 cm)
CPD-L150
Dimensione immagine: 15
pollici (38 cm)
Formato segnale di ingresso
frequenza di funzionamento RGB:
fr. or.: 15,625 kHz (segnale
interlacciato 625)
15,75 kHz (segnale
interlacciato 525)
30 – 70 kHz
fr. ver.: 50 Hz — 85 Hz
Efficienza pixel
99.99 %
Risoluzione
O: 1024 punti max
V: 768 linee max
Alimentazione
Funzionamento:
CA da 100 a 240 V, 50 – 60 Hz
Ingresso:
CC 12 V (con uso dell’alimentatore
CA)
Alimentazione
CPD-L133
Solo visualizzazione: 30 W max
Incluso l’alimentatore CA:
42 W max
CPD-L150
Solo visualizzazione: 25 W max
Incluso l’alimentatore CA:
35 W max
Dimensioni (l/a/p)
CPD-L133
Incluso il supporto:
Circa 373 × 358 × 165 mm
Solo monitor:
Circa 373 × 272 × 71 mm
CPD-L150
Incluso il supporto:
Circa 398 × 366 × 165 mm
Solo monitor:
Circa 398 × 291 × 71 mm
Peso
CPD-L133
Circa 4,9 kg incluso il supporto
CPD-L150
Circa 5,3 kg incluso il supporto
Accessori in dotazione
Vedere pagina 6.
Assegnazione dei piedini
5 4 3 2 1
10 9 8 7 6
15 14 13 12 11
Pannello LCD
20
Sony Corporation Printed in Taiwan
*
N. piedino Segnale
N. piedino Segnale
1
Rosso
8
Terra blu
2
Verde
(sincronizzazione
composita su verde)
9
DDC + 5V*
10
Terra
11
ID (terra)
3
Blu
12
4
ID (terra)
Dati bidirezionali
(SDA)*
5
Terra DDC*
13
Sinc orizzontale
6
Terra rosso
14
Sinc verticale
7
Terra verde
15
Orologio dati (SCL)*
Standard Display Data Channel (DDC) di VESA
Il design e le caratteristiche tecniche sono soggetti a
modifiche senza preavviso.