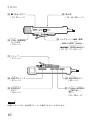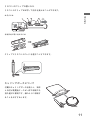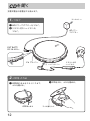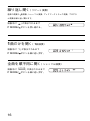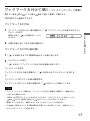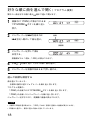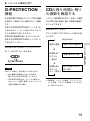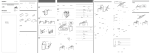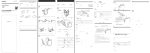
1
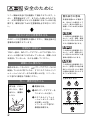
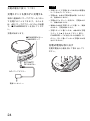
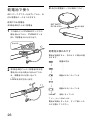
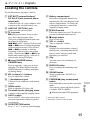
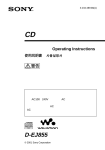
3-245-829-01(1)
CD
Operating Instructions
AC100 240V
AC
AC
AC
WALKMAN
D-EJ885
© 2002 Sony Corporation
v
4~8
1
AC
AC
1
b
2 AC
3
2
............................. 4
....................... 22
....................................... 9
.............................. 23
CD
1.
2. CD
3.
..................................... 26
............................................ 12
....................... 27
.................................. 12
............................................... 13
.................................. 28
............................................. 29
........... 16
1
1
................. 16
....................... 30
................ 32
............................................. 33
.......................... 16
........ 17
.......................... 18
.... 34
English
Locating the controls .................... 35
Troubleshooting ............................. 36
G-PROTECTION
..................... 19
CD
......................................... 19
SOUND
AVLS
HOLD
....... 20
............ 20
.............. 21
....................... 21
3
•
•
•
AC
•
=
AC
100V
•
4
AC
AC
5
•
•
MD CD DAT
AC
6
7 8
•
•
•
•
•
•
Ni-Cd
Ni-MH
•
Li-ion
•
•
•
•
AC
•
7
•
•
•
•
•
•
•
•
•
•
•
•
•
•
8
AC
1 EXT BATT/DC IN 4.5V
12 24 26
2 LINE OUT (OPTICAL)
22
3
/
u
•./> AMS/
search
12 13 17 18
CHARGE
4 x
•CHARGE
13 21 23 24
5 VOL
+ /–
13
6 i
12
7 OPEN
12
8
23 29
9 AVLS
20
q; G-PROTECTION
19
qs HOLD
21
qa
23
9
qd x
qg
13 21
14 16 20
qh
qf VOL
+/–
u
/
•ENT (enter) •
13
./> AMS/search
13 15 17 18
qj
11
qk HOLD
w; SOUND
21
20
ql DISPLAY
wa P (play) MODE/
19
15 18
CD
10
,
11
CD
1.
1 AC
2
AC
EXT BATT/
DC IN 4.5V
i
2. CD
2 CD
1 OPEN
OPEN
12
3.
VOL+/–
VOL+/–
1
1
2 VOL+/–
2 VOL+/–
–
+
1
/
2
x/CHARGE
x
AMS 1
AMS
2
.
.
2
3
AMS
2
>
AMS
3
>
2
3
.
2
>
2
1 AMS Automatic Music Sensor
2
>
3
1
1
.
13
• CD
2
•
•
• AVLS
NORM
•
LIMIT
AVLS
AVLS
LINE OUT (OPTICAL)
i
CD-R/CD-RW
CD-DA
CD-R
CD-RW
CD-DA
Compact Disc Digital Audio
CD
CD
CD
14
CD
P MODE/
P MODE/
P MODE/
1
1
•
SHUF
• ./>
PGM
15
1
P MODE/
1
1
P MODE/
SHUF
P MODE/
16
1
1
CD
99
CD10
1
2
1
1
P MODE/
2
•
• 11
CD
10
CD
•
• Lobatt
CD
17
64
1
PGM
P MODE/
2
>
.
3
000
4
5
2 3
5
PGM
PGM
P MODE/
•
3 64
• 65
000
18
B
G-PROTECTION
CD
G-PROTECTION
DISPLAY
CD
G-PROTECTION
1
2
G-PROTECTION
1
DISPLAY
CD
G-PROTECTION
1
x
(
x
2
DISPLAY
x
DISPLAY
–
–
CD
– CD-R/CD-RW
CD
1
19
SOUND
AVLS
SOUND
SOUND
AVLS
LIMIT
SOUND 1
SOUND 2
SOUND
AVLS
AVLS
NORM
SOUND 2
AVLS Automatic Volume Limiter
System
20
HOLD
HOLD
1
2x
AC
(
x/CHARGE
x
x/CHARGE
HOLD
CHARGE
HOLD
HOLD
HOLD
HOLD
HOLD
HOLD
HOLD
21
B
• CD
CD
•
AC
•
LINE OUT (OPTICAL)
i
LINE OUT
(OPTICAL)
DAT
G-PROTECTION
SOUND
• CD
L
R
G-PROTECTION
• SOUND
i
LINE OUT
(OPTICAL)
DAT
22
1
B
3 AC
•
•
V
v
3 (LR6)
• AC
CD
CHARGE
CHARGE
CHARGE
NH-10WM
V v
NH-14WM
DC IN 4.5V
1
AC
2
3
#
23
•
•
AC
•
AC
x/CHARGE
•
•
V
v
x/CHARGE
•
CHARGE
CHARGE
#
EXT BATT/
DC IN 4.5V
AC
24
•
1
4
1
r
○
○
○
○
r
○
r
○
○
○
○
○
•
r
r
Lobatt*
*
•
•
NH-10WM
NH-14WM
•
25
3
AC
EXT BATT/
DC IN 4.5V
3 (LR6)
1
v
PUSH
○
2
r
3
r
r
r
Lobatt*
*
26
○
○
○
○
LOCK
○
3 (LR6)
○
2
○
○
r
○
PUSH
AC
•
AC
AC
JEITA
• AC
•
http://www. baj.
or.jp/
27
B
CD
•
•
•
•
•
•
CD
•
–
–
–
–
–
–
–
•
•
28
29
/
VOL
VOL+
+
c AVLS
LIMIT
20
c LINE OUT (OPTICAL)
NORM
12
i
c LINE OUT (OPTICAL)
i
c
c
12
12
c
c
3
26
26
LR6
23 25
c
Lobatt
000
c
c
HiDCin
c AC
23
3
LR6
26
34
12 23 26
c
c HOLD
CD
Nodisc
HOLD
HOLD
21
c CD
CD
CD
c CD
c
c
c
c AC
c
12
CD
c CD-R/CD-RW
30
23
23 26
12
CD
CD-R/CD-RW
/
c HOLD
HOLD
HOLD
CHARGE
VOL+/–
21
c
(22
c MD
c
DAT
22
22
c
29
c CD
c
c
V
v
CHARGE
23
1
c
12 13 23 26
CD
23
c
c
c
c
c
(40°C
0°C
P MODE/
2
31
CD
•
8
•
•
1
•
1
•
32
90
D/A
G-PROTECTION
1
2
33
35
1 bit
20 Hz
20 000 Hz
+1
–2
NH-10WM2
5
dB
4.5 V
•
1
0.7 Vrms 47 kΩ
10 kΩ
2
NH-10WM2 +
69
74
104
110
•
2
1
5 mW+5 mW
JEITA/16 Ω
•
JEITA
16 Ω
1
–21 –15 dBm
630 690 nm
LR6 (SG)
JEITA
5°C 35°C
•
NH-10WM
2
•
DC 2.4 V
3 (LR6)
DC 3.0 V
•
×
×
135.0 × 135.0 × 19.1 mm
2
×
DC 4.5 V
AC
AC 100 V
AC 100
×
JEITA
135.4 × 135.5 × 19.3 mm
240 V
:
190 g
236 g
JEITA
JEITA
CE
—
EEA
—
33
AC
(1)
(2)
(1)
(2)
(1)
(1)
(1)
(1)
AC
(1)
(1)
(1)
34
SRS-Z1
SRS-Z1000
MDR-E868SP
MDR-EX70SL
MDR-A44SP
MDR-A105SP
NH-14WM
RK-G129
RK-G136
DCC-E84
DCC-E230
CPA-8
SRS-Z1
SRS-Z1000
MDR-E848LP
MDR-EX70LP
MDR-A44L
MDR-A110LP
NH-14WM
—
CPA-84U
DCC-E34CP
DCC-E345
CPA-9C
POC-5B
POC-10B
POC-15B
POC-5AB
POC-10AB
POC-15AB
POC-20AP
POC-15B
POC-15AB
B
English
Locating the controls
See the illustrations on pages 9 and 10.
qa Battery compartment
Insert the rechargeable batteries by
matching the 3 to the diagram in the
battery compartment. To charge the
rechargeable batteries, connect the
supplied charging stand.
qs qk HOLD switch
Locks the control on your CD player to
prevent accidental button presses.
qd x (stop) button
Press to stop play.
qf VOL +/– control
Turn to adjust the volume.
qg Display
Displays the track number, elapsed
playing time, remaining time/tracks,
battery status, and play mode and
functions you selected.
qj Clip
You can remove it and change its
direction.
ql DISPLAY button
Press to display the remaining time/
tracks.
w; SOUND button
Selects sound mode: SOUND 1 or
SOUND 2.
wa P MODE/ (play mode/repeat)
button
Press and hold to turn on the repeat play
mode.
Also selects various playback options:
1 (single), SHUF (shuffle),
(Bookmark) and PGM (program).
*1 Automatic Music Sensor
*2 Automatic Volume Limiter System
35
English
1 EXT BATT (external battery)/
DC IN 4.5 V jack (external power
intput jack)
Connects to the AC power adaptor. Also
connects to the external battery case.
2 LINE OUT (OPTICAL) jack
Connects to the stereo system.
3 qh Jog lever
u (play/pause/enter): Press to start
play. Press again to pause play.
Also press to add Bookmarks and enter
the tracks for PGM play.
./>(AMS*1/search): Flick toward
. or > once to find the beginning
of the current/next track. Flick toward
. or > repeatedly to find the
beginning of the previous/succeeding
tracks. Hold toward . or > to go
backward/forward quickly. Also use to
select tracks during PGM play.
4 x (stop)/CHARGE button•
CHARGE lamp
Press to stop play. Also press to start
charging. The lamp flashes when the
HOLD function is working, and lights
up during charge.
5 VOL (volume) +/– buttons
Press to adjust the volume.
6 i (headphones) jack
Connects to the earphones with remote
control.
7 OPEN switch
Slide to open the CD player lid.
8 Terminals for the charging stand
Connect to the supplied charging stand.
9 AVLS*2 switch
Set to “LIMIT” when you want to keep
down the maximum volume to protect
your hearing.
q; G-PROTECTION switch
Set to “1” or “2” to prevent sound skipping.
Troubleshooting
Should any problem persist after you have checked these symptoms, consult your nearest Sony
dealer.
Symptom
Cause and/or corrective actions
The volume does not
c Set the AVLS switch to “NORM.”
increase even if you turn c The earphones are connected to the LINE OUT (OPTICAL) jack.
VOL +/– in the + direction
Connect them to the i (headphones) jack.
repeatedly (even if you
press VOL + repeatedly
on the CD player).
Cannot adjust the
volume.
c The earphones are connected to the LINE OUT (OPTICAL) jack.
Connect them to the i (headphones) jack.
No sound, or noise is
heard.
c Connect the plugs firmly.
c Plugs are dirty. Clean the plugs with a dry soft cloth periodically.
The playing time is too
short when powered with
the dry batteries.
c Check that you are using alkaline batteries and not manganese batteries.
c Replace the batteries with new LR6 (size AA) alkaline batteries.
The playing time is too
short when powered with
the rechargeable
batteries.
c Charge and discharge the rechargeable batteries several times.
“Lobatt” or “000” appears c The rechargeable batteries are used up completely. Charge the batteries.
in the display. The CD
c The dry batteries are used up. Replace them with new LR6 (size AA)
does not play.
alkaline batteries.
“HiDCin” appears in the
display.
c Use only the supplied AC power adaptor or optional AC power adaptor.
c Use only the optional car battery cord.
c Remove all power sources, then insert the batteries or connect the AC
power adaptor again.
The CD does not play, or
“Nodisc” appears in the
display when a CD is
placed in the CD player.
c
c
c
c
c
c
c
c
c
CHARGE lamp flashes on
the CD player when you
press a button, and the
CD does not play.
36
The buttons are locked. Slide the HOLD switch back.
The CD is dirty or defective.
Check that the CD is inserted with the label side up.
Moisture condensation has occurred. Leave the CD player aside for
several hours until the moisture evaporates.
Close the lid of the battery compartment firmly.
Make sure the batteries are inserted correctly.
Connect the AC power adaptor to an AC outlet securely.
The CD-R/CD-RW was not finalized. Finalize the CD-R/CD-RW with
the recording device.
There is a problem with the quality of the CD-R/CD-RW, recording
device, or application software.
c The buttons are locked. Slide the HOLD switch back.
Symptom
Cause and/or corrective actions
Cannot adjust the volume c The CD player is connected to an audio device. Adjust the volume using
with VOL +/– on the CD
the volume control on the connected device.
player.
During recording with
optical digital
connection, the track
number cannot be
recorded correctly.
c Record the track number again using a MiniDisc recorder, DAT
recorder, etc.
c See the instruction manual that comes with the recording device.
The rechargeable
batteries cannot be
charged.
c The terminals on the charging stand are dirty. Wipe them with a dry
cloth, etc.
c The CD is playing. Stop play.
c The external battery case is connected to the CD player. Remove it and
start charging again.
c The CD player is not placed securely on the charging stand. Place the
player on the stand, aligning the V mark on the player and the v mark
on the stand. Make sure that the CHARGE lamp lights up.
Playback starts from the
point you stopped.
(resume function)
c The resume function is working. To start playing from the first track,
hold down the jog lever during stop until the first track starts playing or
open the lid of the CD player. Or, remove all power sources, then insert
the batteries or connect the AC power adaptor again.
Rustling noise is heard
from the CD.
c Close the lid of the battery compartment firmly.
When closing the lid of
the CD player, the CD
starts to rotate.
c The CD player is reading the information on the CD. It is not
malfunctioning.
You cannot operate the
CD player properly using
the remote control.
c The buttons on the CD player are kept pressed by mistake.
The LCD display becomes c You are using your CD player at high temperatures (above 40°C) or at
hard to see or slow down.
low temperatures (below 0°C). At room temperature, the display will
return to its normal operating condition.
c The CD player has entered the Bookmarked track play mode. Press
P MODE/ twice so that the player returns to the normal play mode.
English
“ ” is flashing quickly
in the display, and you
cannot locate the
beginning of the track or
the specific point in the
track.
37
38
English
39
048-794-5194
- 9:00 18:00
•
•
•
100%
Printed in Malaysia
VOC