1
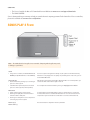
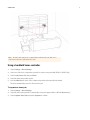
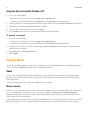
SONOS PLAY:3
Product Guide
THIS DOCUMENT CONTAINS INFORMATION THAT IS SUBJECT TO CHANGE WITHOUT NOTICE.
No part of this publication may be reproduced or transmitted in any form or by any means, electronic or mechanical, including but not limited to
photocopying, recording, information retrieval systems, or computer network without the written permission of Sonos, Inc.
SONOS and all other Sonos product names and slogans are trademarks or registered trademarks of Sonos, Inc. SONOS Reg. U.S. Pat. & Tm. Off.
Sonos products may be protected by one or more patents. Our patent-to-product information can be found here:
sonos.com/legal/patents
iPhone®, iPod®, iPad® and iTunes® are trademarks of Apple Inc., registered in the U.S. and other countries.
Windows® is a registered trademark of Microsoft Corporation in the United States and other countries.
Android® is a trademark of Google, Inc.
MPEG Layer-3 audio decoding technology licensed from Fraunhofer IIS and Thomson.
Sonos uses MSNTP software, which was developed by N.M. Maclaren at the University of Cambridge.
© Copyright, N.M. Maclaren, 1996, 1997, 2000; © Copyright, University of Cambridge, 1996, 1997, 2000.
All other products and services mentioned may be trademarks or service marks of their respective owners.
©2004-2012 by Sonos, Inc. All rights reserved.
The SONOS PLAY:3
The SONOS PLAY:3 is a wireless music system that lets you use any Sonos controller to control and enjoy all the music you
want all over your house (see "Sonos Controllers" on page 2 for more information).
• A 3 driver system delivers pure, clean, room-filling sound — perfect for bringing room filling music to a kitchen, bedroom, office, or just about any room in your home.
• Its small size and multiple orientations make it perfect for fitting on bookshelves, nightstands, corners, or just about
anywhere.
• Works seamlessly with the complete range of Sonos products.
New to Sonos?
It takes just a few steps to get your Sonos system up and running— simply follow the setup instructions packaged with your
PLAY:3. Once you’ve got it set up, you can add additional Sonos components any time.
Note: If you don’t plan to listen to music in the room where your broadband router is
located, you can connect a SONOS BRIDGE™ (purchased separately) to your router to activate
the SonosNet™ wireless mesh network, and place the PLAY:3 wherever you want to listen to
music.
Adding to an existing Sonos system?
Sonos can be easily expanded room by room. If you are adding this PLAY:3 to an existing Sonos system, you can turn directly
to "Adding to an Existing Sonos System" on page 6.
2
Product Guide
Your Home Network
To access Internet music services, Internet radio, and any digital music stored on your computer or Network-Attached
Storage (NAS) device, your home network must meet the following requirements:
Home network requirements
Note: Your network must have a high-speed Internet connection, as the Sonos system is
designed to provide you with online software updates. Your Sonos system must be registered
to receive these updates, so be sure to register during the setup process. We do not share
your e-mail address with other companies.
• High-speed DSL/Cable modem, or fiber-to-the-home broadband connection for proper playback of Internet-based
music services. (If your Internet service provider only offers Satellite Internet access, you may experience playback
issues due to fluctuating download rates.)
• If your modem is not a modem/router combination and you want to take advantage of Sonos' automatic online
updates, or stream music from an Internet-based music service, you must install a router in your home network. If
you do not have a router, purchase and install one before proceeding.
• If you are going to use a Sonos application on an Android™ smartphone, iPhone®, iPod Touch®, iPad® or other tablet,
you may need a wireless router in your home network. For more information, please visit our Web site at
http://faq.sonos.com/apps.
• Connect at least one Sonos component to your home network router using an Ethernet cable, and then you can add
other Sonos components wirelessly.
• For best results, you should connect the computer or NAS drive that contains your personal music library collection to
your home network router using an Ethernet cable.
Compatible operating systems
• Windows® XP SP3 and higher
• Macintosh® OS X 10.6 and higher
Note: For the latest system requirements, including supported operating system versions,
please visit our Web site at http://faq.sonos.com/specs.
Sonos Controllers
You can use any Sonos controller with the SONOS PLAY:3, including:
• The Sonos Controller for Android — Touch the Market button on your smartphone or tablet to download the free Sonos
application from the Android Market™
• The Sonos Controller for iPhone or the Sonos Controller for iPad — Tap the App Store button on your iPhone, iPod touch
or iPad to download the free Sonos application, or you can download the application from iTunes®. (If you download
from iTunes, you will need to sync before you see the Sonos logo display on your device)
3
SONOS PLAY:3
• The Sonos Controller for Mac or PC. Download from our Website at: www.sonos.com/support/downloads.
• The SONOS CONTROL
Sonos is always working on new ways to help you control the music any way you want. For the latest list of Sonos controllers,
please visit our Web site at www.sonos.com/products.
SONOS PLAY:3 Front
Note: The SONOS PLAY:3’s front grille is not removable. Tampering with the grille may result
in damage to your PLAY:3.
On/Off
• Using a Sonos controller, select Pause All from the
ROOMS pane (the Rooms menu on the CONTROL).
Status indicator
• Flashes white when powering up or connecting to
your Sonos music system.
• Solid white when powered up and connected to
your Sonos music system (normal operation).
Mute button
• Lights solid green when sound is muted.
• Flashes green rapidly when household mute or
unmute is about to take place.
• Flashes green slowly when a Sonos component is
connecting to your music system.
Volume up (+)
Volume down (-)
Your Sonos system is designed to be always on; the system uses minimal electricity
whenever it is not playing music. To quickly stop streaming music in all rooms, you can
use the Pause All feature.
Indicates the current status of the PLAY:3. When the PLAY:3 is in normal operation, you
can turn the white status indicator light on and off.
For a complete list of status indications, please go to http://faq.sonos.com/led.
To mute/unmute: Press the Mute button to mute or unmute the Sonos component.
To mute/unmute all: Press and hold the Mute button for 3 seconds to mute all Sonos
components in your household. Press and hold for 3 seconds to unmute them all.
Press these buttons to adjust the volume up and down.
4
Product Guide
SONOS PLAY:3 Back
Threaded mounting hole
1/4 inch (6.75mm) /
20-thread
The SONOS PLAY:3 has an integrated mounting hole on the back of the unit so it can be wallmounted if desired (mounting bracket not included.) See "Wall Mounting the PLAY:3" on page 5
for more information.
Ethernet switch connector
Use Category 5 Ethernet cable to connect to a router, computer, or additional network device
such as a network-attached storage (NAS) device.
LED indicators:
• Flashing Yellow (network activity)
• Green (link connection)
AC power (mains) input
(~100-240 V, 50-60 Hz)
Use the supplied power cord to connect to a power outlet.
Be sure to insert the power cord firmly into the back of the PLAY:3 until it is flush with the
back of the unit.
SONOS PLAY:3
5
Selecting a Location for Your PLAY:3
You can locate the SONOS PLAY:3 just about anywhere. Its compact size makes it easy to place the PLAY:3 on the kitchen
counter, or take it out to the patio with you. For maximum enjoyment, we have a few guidelines:
• The SONOS PLAY:3 can be positioned either horizontally or vertically to accommodate the desired space—the EQ (audio
equalization) will automatically adjust to create the best possible sound when the orientation is changed.
• The PLAY:3 is designed to work well even when placed next to a wall or other surface. For optimum performance,
maintaining more than 1 inch (2.5 cm) clearance around the back of the unit is recommended.
• Care should be taken if placing the SONOS PLAY:3 close to an older CRT television. If you notice any discoloration or
distortion of your picture quality, simply move the PLAY:3 further from the television.
• The SONOS PLAY:3 is not water-resistant. Don’t leave it outside during a rain storm or position it near water.
Wall Mounting the PLAY:3
The SONOS PLAY:3 has a 1/4 inch (6.75mm) integrated, threaded mounting hole. If desired, you can easily wall mount your
PLAY:3 using a suitable mounting bracket (not included). Simply choose a location that’s close to an electrical outlet, taking
care to avoid heat, steam, dripping water or hidden wiring, and follow the instructions included with your wall mount kit.
Note: Be sure the wall mount bracket you purchase will support at least 10lbs. (4.5 kgs).
6
Product Guide
Adding to an Existing Sonos System
Once you’ve got your Sonos music system set up, you can easily add more Sonos components any time (up to 32 rooms).
If your house has structured (built-in) network wiring, you can make a wired connection to the new Sonos component(s). If
you don’t have structured network wiring, our built-in wireless technology is ideal for you.
1. Select a location for your SONOS PLAY:3 (see "Selecting a Location for Your PLAY:3" on page 5 for optimal placement
guidelines.)
2. Attach the power cord to the SONOS PLAY:3, and apply power. Be sure to push the power cord firmly into the back of the
PLAY:3 until it is flush with the back of the unit.
3. If you are making a wireless connection, skip this step and continue on to step 4. If you are making a wired connection,
connect a standard Ethernet cable from your router or another Sonos component (or a live network wall plate if you have
built-in wiring) to an Ethernet switch connection on the back of the new Sonos component.
4. Choose one of the following options:
• Using a handheld Sonos controller: Select Add a Sonos Component from the Settings menu and follow the on-screen
prompts to add this component to your Sonos system.
• Using the Sonos Controller for Mac or PC: Select Add a Sonos Component from the Manage menu and follow the
prompts to add this component to your Sonos system.
Creating a Stereo Pair
The Stereo Pair setting allows you to group two PLAY:3s or two PLAY:5s in the same room to create a wider stereo experience.
In this configuration, one unit serves as the left channel and the other serves as the right channel. You cannot combine a
PLAY:3 and PLAY:5 unit—the Sonos components in the stereo pair must be the same.
Optimum placement information
• When creating a stereo pair, it is best to place the two Sonos components 8 to 10 feet away from each other, angled
inward to form a triangle with your favorite listening position.
• Your favorite listening position should be 8 to 12 feet from the PLAY:3 or PLAY:5 units. Less distance will increase bass,
more distance will improve stereo imaging.
SONOS PLAY:3
Note: The Stereo Pair setting is for use with PLAY:3 and PLAY:5 units only. Both Sonos
components in the stereo pair must be the same.
Using a handheld Sonos controller
1. Select Settings -> Room Settings.
2. Select one of the Sonos components you wish to create a stereo pair with (PLAY:3 or PLAY:5 only).
3. Select Create Stereo Pair, and touch Next.
4. Select the other unit you wish to pair.
5. Press the Mute button on the Sonos component you wish to become the left channel.
The units automatically connect to form a stereo pair.
To separate a stereo pair:
1. Select Settings -> Room Settings.
2. Select the stereo pair you wish to separate (the stereo pair appears with L + R in the Room name.)
3. Select Separate Stereo Pair, and touch Separate to confirm.
7
8
Product Guide
Using the Sonos Controller for Mac or PC
1. Choose one of the following:
2.
3.
4.
5.
• Using the Sonos Controller for PC: Select Settings from the Manage menu.
• Using the Sonos Controller for Mac: Select Preferences -> Room Settings from the Sonos menu.
Select one of the Sonos components (PLAY:3 or PLAY:5 only) you wish to pair from the Room Settings for drop-down list.
On the Basic tab, click Create Stereo Pair and then click Next.
Select the other unit you want to pair, and then click Next.
Press the Mute button on the Sonos component that will become the left channel.
To separate a stereo pair:
1. Choose one of the following:
• Using the Sonos Controller for PC: Select Settings from the Manage menu.
• Using the Sonos Controller for Mac: Select Preferences -> Room Settings from the Sonos menu.
2. Select the Sonos stereo pair you wish to separate from the Room Settings for drop-down (the stereo pair will appear
with L + R in the room name).
3. On the Basic tab, click Separate Stereo Pair.
4. Click Separate.
Playing Music
You can use any SONOS controller to select music— simply touch to select from the Music menu on a handheld controller, or
click to select from the MUSIC pane within the Sonos Controller for Mac or PC.
Radio
Sonos includes a radio guide that provides immediate access to thousands of free Internet radio stations and broadcast
programs. You can easily find radio from all over the world— music, news, and variety programming, including archived
shows and podcasts.
To select an Internet radio station, simply select Radio and choose a station.
Music services
A music service is an online music store or online service that sells audio on a per-song, per audiobook, or subscription basis.
Sonos is compatible with several music services - you can visit our Web site at www.sonos.com/howitworks/music/
partners for the latest list. (Some music services may not be available in your country. Please check the individual music
service’s Web site for more information.)
If you are currently subscribed to a music service that’s compatible with Sonos, simply add your music service user name and
password information to Sonos as needed and you’ll have instant access to the music service from your Sonos system.
SONOS PLAY:3
9
1. To add a music service, touch More Music from the Music menu on your handheld controller.
2. Select the Sonos-compatible music service you would like to add.
3. Select I already have an account. Type your music service user name and password, and then touch OK. Your user
name and password will be verified with the music service.
As soon as your credentials have been verified, the music service displays on the Music menu.
Free music service trials are available in some countries. (Please check the individual music service’s Web site for more
information.) If there is a music service trial visible on your More Music menu, simply touch it to select. Touch I’m new to
[music service], and then follow the prompts to activate the music trial. After the trial period is up, you will need to
subscribe to the music service to keep the music playing.
Music folders
The Sonos system can play music from any computer or network-attached storage (NAS) device on your home network
where you have shared music folders. During the setup process, you are guided through the process of accessing your
shared music folders (such as your iTunes library). Over time, you may wish to add or remove folders from this list.
To make changes to your shared folders list, select the Settings menu from a handheld Sonos controller and then choose
one of the following options:
• To add a new music folder to Sonos, select Manage Music Library -> Music Library Setup -> Add New Share.
• To remove a music folder, select Manage Music Library -> Music Library Setup. Touch the share you wish to remove
and then select Remove Share.
The Sonos system indexes your music folders so you can view your music collection by categories (such as artists, albums,
composers, genres, or tracks.) If you add new music to a folder that is already indexed, simply update your music index to
add this music to your Sonos music library.
• To update your music index, select Manage Music Library -> Update Music Index Now. If you’d like your music index
to update automatically each day, select Schedule Music Index Updates and then select a music index update time.
Equalization Settings
The SONOS PLAY:3 ships with the equalization settings preset to provide the optimal playback experience. If desired, you can
change the sound settings (bass, treble, balance, or loudness) to suit your personal preferences.
1. Using a handheld controller, select Settings -> Room Settings.
2. Touch to select a room.
3. Select Music Equalization, and then drag your finger across the bass, treble, or balance sliders to make adjustments.
4. To change the Loudness setting, touch On or Off. (The loudness setting boosts certain frequencies, including bass, to
improve the sound at low volume.)
10
Product Guide
Basic Troubleshooting
Note: Under no circumstances should the product be repaired by anyone other than an
authorized Sonos repair center, as this will invalidate the warranty. Please contact Sonos
Customer Support for more information. Do not open the system as there is a risk of electric
shock.
If a problem occurs, you can try the troubleshooting suggestions listed below. If one of these doesn’t remedy the problem, or
you are not sure how to proceed, please contact the Sonos Customer Support team and we’ll be happy to help.
SONOS PLAY:3 not detected during setup
A network or a firewall issue may be preventing the PLAY:3 from connecting to your Sonos system. If this is a wireless PLAY:3,
try moving the Sonos components closer together, or wire the PLAY:3 temporarily to see if the problem is related to wireless
interference.
If you encounter this message when installing the first Sonos component (wired to your router), you can try the steps below
to resolve this issue. If you are still experiencing problems, please contact Sonos Customer Support.
1. Check the firewall
Firewall software installed on the computer may be blocking the ports that Sonos uses to operate. First, disable all your
firewalls and try to connect again. If this resolves the problem, you should configure your firewall to work with the Sonos
Controller for Mac or PC. Please go to our Web site at http://faq.sonos.com/firewall for additional information. If this does not
resolve the problem, you can try step 2 below.
2. Check the router
You can bypass your router’s switch to determine whether there are any router configuration issues by connecting a BRIDGE
(or other Sonos component) as depicted in the following illustration (note that the BRIDGE and the computer still have
Internet access in this configuration):
SONOS PLAY:3
11
• Be sure that your cable/DSL modem is connected to the router’s WAN (Internet) port.
• Temporarily remove any other components that are wired to your network.
• Connect an Ethernet cable from the computer directly to the back of the Sonos component, and then connect another
Ethernet cable from the Sonos component directly to one of the LAN ports on your router.
• When you make a change to your network configuration, you may need to power cycle the Sonos component by
unplugging the power cord, and then plugging it back in.
• If you are not using a router, you can visit our Web site at http://faq.sonos.com/norouter for more information.
3. Check the wiring
Check the link/activity lights on both the router and the Sonos component. The link lights should be lit solid and the activity
lights should be blinking.
• If the link lights are not lit, try connecting to a different port on your router.
• If the link lights still do not light, try connecting a different Ethernet cable.
Not all rooms are visible
You are probably experiencing wireless interference. Change the wireless channel your Sonos system is operating on by
following the steps below.
• Using a handheld Sonos controller: From the Settings menu, touch Advanced Settings, and then Wireless Channel.
Choose another wireless channel from the list.
• Using the Sonos Controller for PC: Select Settings -> Advanced Settings from the Manage menu. On the General tab,
select another wireless channel from the list.
• Using the Sonos Controller for Mac: Select Preferences -> Advanced Settings from the Sonos menu. On the General
tab, select another wireless channel from the list.
12
Product Guide
It may take several seconds for the switch to take effect. If you have music playing, a short music dropout may occur during
the wireless channel change.
Important Safety Information
1. Read these instructions.
2. Keep these instructions.
3. Heed all warnings.
4. Follow all instructions.
5. Do not use this apparatus near water.
6. Clean only with dry soft cloth. Household cleaners or solvents can damage the finish on your Sonos components.
7. Do not install near any heat sources such as radiators, heat registers, stoves, or other apparatus that produce heat.
8. Protect the power cable from being walked on or pinched, particularly at plugs, convenience receptacles, and the point
where they exit from the apparatus.
9. Only use attachments/accessories specified by the manufacturer.
10. Unplug this apparatus during lightning storms or when unused for long periods of time.
11. Refer all servicing to Sonos qualified service personnel. Servicing is required when the apparatus has been damaged in
any way, such as power-supply cable or plug is damaged, liquid has been spilled or objects have fallen into the
apparatus, the apparatus has been exposed to rain or moisture, does not operate normally, or has been dropped.
12. The Mains plug should be readily available to disconnect the equipment.
13. Warning: To reduce the risk of fire or electric shock, do not expose this apparatus to rain or moisture.
14. Do not expose apparatus to dripping or splashing and do not place objects filled with liquids, such as vases, on the
apparatus.