1
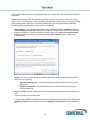
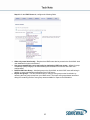
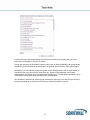
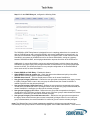
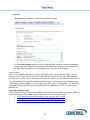
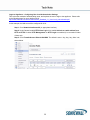
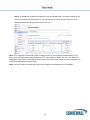
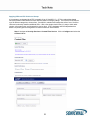
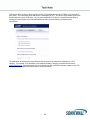
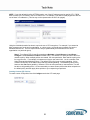
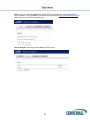
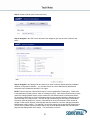
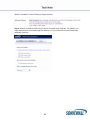
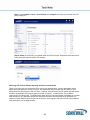
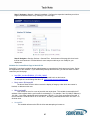
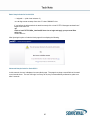
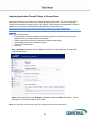
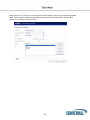
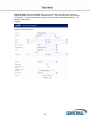
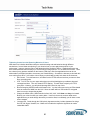
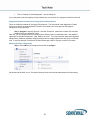
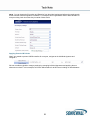
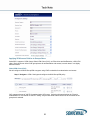
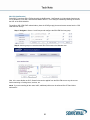
LDAP Leveraging LDAP Groups/ Users with SonicWALL UTM Appliance Contents Contents .............................................................................................................................................................. 1 Integrating LDAP/Active Directory with Sonicwall UTM ...................................................................................... 3 LDAP over SSL ............................................................................................................................................... 3 Configuring the CA on the Active Directory Server ..................................................................................... 3 Exporting the CA Certificate from the Active Directory Server............................................................................ 4 Importing the CA Certificate onto the SonicWALL .............................................................................................. 4 Configuring the SonicWALL Appliance for LDAP........................................................................................ 4 Authentication.................................................................................................................................................... 13 Single Sign-On Agent (SSO)......................................................................................................................... 13 Logon to Appliance – Configuring User Level Authentication Settings......................................................... 14 SonicOS Options That Leverage Groups/Users ............................................................................................... 17 Creating Firewall Rules with LDAP Groups/Users ........................................................................................ 17 Firewall Rules with Bandwidth Management & Logging ............................................................................... 20 Blocking Websites (Domain Names) for Groups/Users .................................................................................... 22 Blocking Domains with Firewall Rules....................................................................................................... 22 Allowing Specific Domains and Blocking All Others with Firewall Rules ...................................................... 24 Blocking HTTPS (SSL) Domains with SSL Control....................................................................................... 30 Configuring a SSL Blacklist and Whitelist ................................................................................................. 31 Applying Different CFS Policies to Groups ....................................................................................................... 33 Creating Custom CFS Policies.................................................................................................................. 35 Enforcing CFS Policies without Requiring All Users to Authenticate ............................................................ 39 Variables for Custom Block Page in SonicOS 5.2 .................................................................................... 40 Basic Sample Code for SonicOS 5.2 ........................................................................................................ 41 Advanced Sample Code for SonicOS 5.2 ................................................................................................. 41 Sample JavaScript Code for SonicOS 5.2 ................................................................................................ 44 Sample Code for SonicOS 5.1 or Earlier .................................................................................................. 44 Applying Application Firewall Polices to Groups/Users................................................................................. 45 Blocking All Websites except a Select Few with Application Firewall....................................................... 49 Tightening Control over the Browsing Behavior of Users ................................................................................. 50 Applying Intrusion Prevention Service Signatures to Groups/Users................................................................. 51 Blocking IM Traffic Categorically ............................................................................................................... 51 Applying Granular IM Policies ................................................................................................................... 52 Applying VPN Access Policies to Groups/Users............................................................................................... 53 Global VPN Client (GVC) .......................................................................................................................... 53 SSL-VPN (NetExtender)............................................................................................................................ 55 Guest Services (Wireless Guest Services) ....................................................................................................... 56 LHM – Lightweight Hotspot Messaging – External Authentication for Wireless Users............................. 57 2 Integrating LDAP/Active Directory with Sonicwall UTM SonicOS supports a range of different LDAP servers, the most popular being Active Directory (AD). AD is also an LDAP implementation. Please refer to the following paper as a supplement on how to configure LDAP settings. http://www.sonicwall.com/downloads/LDAP_Integration_Feature_Module.pdf LDAP over SSL Integrating your SonicWALL appliance with an LDAP directory service using SSL requires configuring your LDAP server for certificate management, installing the correct certificate on your SonicWALL appliance, and configuring the SonicWALL appliance to use the information from the LDAP Server. NOTE: SSL is not required for LDAP integration. The downside is that user credentials are sent across the network unencrypted. This is considered highly insecure. Before beginning your LDAP configuration, you should prepare your LDAP server and your SonicWALL for LDAP over TLS support. This requires: • • Installing a server certificate on your LDAP server. Installing a Certificate Authority (CA) certificate for the issuing CA on your SonicWALL appliance. The following procedures describe how to perform these tasks in an Active Directory environment. Configuring the CA on the Active Directory Server To configure the CA on the Active Directory server (skip the first five steps if Certificate Services are already installed): Step 1: Navigate to Start > Settings > Control Panel > Add/Remove Programs. Step 2: Select Add/Remove Windows Components. Step 3: Select Certificate Services. Step 4: Select Enterprise Root CA when prompted. Step 5: Enter the requested information. For information about certificates on Windows systems, see http://support.microsoft.com/kb/931125. Step 6: Launch the Domain Security Policy application: Navigate to Start > Run and run the command: dompol.msc. Step 7: Open Security Settings > Public Key Policies. Step 8: Right click Automatic Certificate Request Settings. Step 9: Select New > Automatic Certificate Request. Step 10: Follow through the wizard, and select Domain Controller from the list. 3 Exporting the CA Certificate from the Active Directory Server To export the CA certificate from the AD server: Step 1: Launch the Certification Authority application: Start > Run > certsrv.msc. Step 2: Right click on the CA you created and select Properties. Step 3: On the General tab, click the View Certificate button. Step 4: On the Details tab, select Copy to File. Step 5: Follow through the wizard, and select the Base-64 Encoded X.509 (.cer) format. Step 6: Specify a path and filename to which to save the certificate. Importing the CA Certificate onto the SonicWALL To import the CA certificate onto the SonicWALL: Step 1: Browse to System > CA Certificates. Step 2: Select Add new CA certificate. Select the certificate file you just exported. Step 3: Click the Import certificate button. Configuring the SonicWALL Appliance for LDAP The Users > Settings page in the administrative interface provides the settings for managing your LDAP integration: Step 1: In the SonicOS administrative interface, open the Users > Settings page. Step 2: In the Authentication method for login drop-down list, select either LDAP or LDAP + Local Users. Step 3: Click Configure. Step 4: If you are connected to your SonicWALL appliance via HTTP rather than HTTPS, you will see a dialog box warning you of the sensitive nature of the information stored in directory services and offering to change your connection to HTTPS. If you have HTTPS management enabled for the interface to which you are connected (recommended), check the “Do not show this message again” box and click Yes. 4 Step 5: On the Settings tab of the LDAP Configuration window, configure the following fields: • • • • • • • • Name or IP Address – The FQDN or the IP address of the LDAP server against which you wish to authenticate. If using a name, be certain that it can be resolved by your DNS server. Also, if using TLS with the ‘Require valid certificate from server’ option, the name provided here must match the name to which the server certificate was issued (i.e. the CN) or the TLS exchange will fail. Port Number – The default LDAP over TLS port number is TCP 636. The default LDAP (unencrypted) port number is TCP 389. If you are using a custom listening port on your LDAP server, specify it here. Server Timeout – The amount of time, in seconds, that the SonicWALL will wait for a response from the LDAP server before timing out. Allowable ranges are 1 to 99999, with a default of 10 seconds. Anonymous Login – Some LDAP servers allow for the tree to be accessed anonymously. If your server supports this (Active Directory generally does not), then you may select this option. Login User Name – Specify a user name that has rights to log in to the LDAP directory. The login name will automatically be presented to the LDAP server in full ‘dn’ notation. This can be any account with LDAP read privileges (essentially any user account) – Administrative privileges are not required. Note that this is the user’s name, not their login ID (e.g. John Smith rather than jsmith). Login Password – The password for the user account specified above. Protocol Version – Select either LDAPv3 or LDAPv2. Most modern implementations of LDAP, including Active Directory, employ LDAPv3. Use TLS – Use Transport Layer Security (SSL) to log in to the LDAP server. It is strongly recommended that TLS be used to protect the username and password information that will be sent across the network. Most modern implementations of LDAP server, including Active Directory, support TLS. Deselecting this default setting will display an alert that you must accept to proceed. 5 • • • Send LDAP ‘Start TLS’ Request – Some LDAP server implementations support the Start TLS directive rather than using native LDAP over TLS. This allows the LDAP server to listen on one port (normally 389) for LDAP connections, and to switch to TLS as directed by the client. Active Directory does not use this option, and it should only be selected if required by your LDAP server. Require valid certificate from server – Validates the certificate presented by the server during the TLS exchange, matching the name specified above to the name on the certificate. Deselecting this default option will present an alert, but exchanges between the SonicWALL and the LDAP server will still use TLS – only without issuance validation. Local certificate for TLS – Optional, to be used only if the LDAP server requires a client certificate for connections. Useful for LDAP server implementations that return passwords to ensure the identity of the LDAP client (Active Directory does not return passwords). This setting is not required for Active Directory. If your network uses multiple LDAP/AD servers with referrals, then select one as the primary server (probably the one that holds the bulk of the users), and use the above settings for that server. It will then refer the SonicWALL on to the other servers for users in domains other than its own. For the SonicWALL to be able to log in to those other servers, each server must have a user configured with the same credentials (user name, password and location in the directory) as the login to the primary server. This may entail creating a special user in the directory for the SonicWALL login. Note that only read access to the directory is required. Step 6 On the Schema tab, configure the following fields: • LDAP Schema – Select one of the following: – Microsoft Active Directory – RFC2798 inetOrgPerson – RFC2307 Network Information Service – Samba SMB – Novell eDirectory – User defined 6 • • • • • Selecting any of the predefined schemas will automatically populate the fields used by that schema with their correct values. Selecting ‘User Defined’ will allow you to specify your own values – use this only if you have a specific or proprietary LDAP schema configuration. Object class – Select the attribute that represents the individual user account to which the next two fields apply. Login name attribute – Select one of the following to define the attribute that is used for login authentication: – sAMAccountName for Microsoft Active Directory – cn for Novell eDirectory – uid for others Qualified login name attribute – Optionally select an attribute of a user object that sets an alternative login name for the user in name@domain format. This may be needed with multiple domains in particular, where the simple login name may not be unique across domains. By default, this is set to userPrincipalName for Microsoft Active Directory and mail RFC2798 inetOrgPerson. Note that userPrincipalName would allow login as, for example, “john.ourdomain.com” where mail would login as “[email protected]”. User group membership attribute – Select the attribute that contains information about the groups to which the user object belongs. This is memberOf in Microsoft Active Directory. The other predefined schemas store group membership information in the group object rather than the user object, and therefore do not use this field. Framed IP address attribute – Select the attribute that can be used to retrieve a static IP address that is assigned to a user in the directory. Currently it is only used for a user connecting via L2TP with the SonicWALL’s L2TP server to retrieve the IP address to assign to them from the directory. In the future this may also be supported for Global VPN Client. In Active Directory the static IP address is configured on the Dial-in tab of a user’s properties. Step 7: On the Directory tab, configure the following fields: 7 • • • • Primary Domain – The user domain used by your LDAP implementation. For AD, this will be the Active Directory domain name, e.g. yourADdomain.com. Changes to this field will, optionally, automatically update the tree information in the rest of the page. This is set to mydomain.com by default for all schemas except Novell eDirectory, for which it is set to o=mydomain. User tree for login to server – The location of where the tree is that the user specified in the settings tab. For example, in Active Directory the ‘administrator’ account’s default tree is the same as the user tree. Trees containing users – The trees where users commonly reside in the LDAP directory. One default value is provided which can be edited, and up to a total of 64 DN values may be provided. The SonicWALL will search the directory using them all until a match is found, or the list is exhausted. If you have created other user containers within your LDAP or AD directory, you should specify them here. Trees containing user groups – Same as above, only with regard to user group containers, and a maximum of 32 DN values may be provided. These are only applicable when there is no user group membership attribute in the schema's user object, and are not used with AD. All the above trees are normally given in URL format but can alternatively be specified as distinguished names (e.g. “myDom.com/Sales/Users” could alternatively be given as the DN "ou=Users,ou=Sales,dc=myDom,dc=com"). The latter form will be necessary if the DN does not conform to the normal formatting rules as per that example. In Active Directory, the URL corresponding to the distinguished name for a tree is displayed on the Object tab in the properties of the container at the top of the tree. NOTE: AD has some built-in containers that do not conform (e.g. the DN for the top level Users container is formatted as “cn=Users,dc=…”, using ‘cn’ rather than ‘ou’), but the SonicWALL knows about and deals with these, so they can be entered in the simpler URL format. Ordering is not critical, but since they are searched in the given order, it is most efficient to place the most commonly used trees first in each list. If referrals between multiple LDAP servers are to be used, then the 8 trees are best ordered with those on the primary server first, and the rest in the same order that they will be referred. NOTE: When working with AD, to determine the location of a user in the directory for the ‘User tree for login to server’ field, the directory can be searched manually from the Active Directory Users and Settings control panel applet on the server, or a directory search utility such as queryad.vbs in the Windows NT/2000/XP Resource Kit can be run from any PC in the domain. • Auto-configure – This causes the SonicWALL to auto-configure the Trees containing users and Trees containing user groups fields by scanning through the directories in search of all trees that contain user objects. To use auto-configure, first enter a value in the User tree for login to server field (unless anonymous login is set), and then click the Auto-configure button to bring up the following dialog: Step 8: In the Auto Configure dialog box, enter the desired domain in the Domain to search field. Select one of the following: o o Append to existing trees – This selection will append newly located trees to the current configuration. Replace existing trees – This selection will start from scratch and remove all currently configured trees first. Step 9: Click OK. The auto-configuration process may also locate trees that are not needed for user login. You can manually remove these entries. If using multiple LDAP/AD servers with referrals, this process can be repeated for each, replacing the Domain to search value accordingly and selecting Append to existing trees on each subsequent run. 9 Step 10: On the LDAP Users tab, configure the following fields: • • • • Allow only users listed locally – Requires that LDAP users also be present in the SonicWALL local user database for logins to be allowed. User group membership can be set locally by duplicating LDAP user names – Allows for group membership (and privileges) to be determined by the intersection of local user and LDAP user configurations. Default LDAP User Group – A default group on the SonicWALL to which LDAP users will belong in addition to group memberships configured on the LDAP server. Import user groups – You can click this button to configure user groups on the SonicWALL by retrieving the user group names from your LDAP server. The Import user groups button launches a dialog box containing the list of user group names available for import to the SonicWALL. 10 In the LDAP Import User Groups dialog box, select the checkbox for each group that you want to import into the SonicWALL, and then click Save. Having user groups on the SonicWALL with the same name as existing LDAP/AD user groups allows SonicWALL group memberships and privileges to be granted upon successful LDAP authentication. Alternatively, you can manually create user groups on the LDAP/AD server with the same names as SonicWALL built-in groups (such as ‘Guest Services’, ‘Content Filtering Bypass’, and ‘Limited Administrators’) and assign users to these groups in the directory. This also allows SonicWALL group memberships to be granted upon successful LDAP authentication. The SonicWALL appliance can retrieve group memberships efficiently in the case of Active Directory by taking advantage of its unique trait of returning a ‘memberOf’ attribute for a user. 11 Step 11: On the LDAP Relay tab, configure the following fields: The RADIUS to LDAP Relay feature is designed for use in a topology where there is a central site with an LDAP/AD server and a central SonicWALL with remote satellite sites connected into it via older low-end SonicWALL security appliances that may not support LDAP. In that case the central SonicWALL can operate as a RADIUS server for the remote SonicWALLs, acting as a gateway between RADIUS and LDAP, and relaying authentication requests from them to the LDAP server. Additionally, for remote SonicWALLs running non-enhanced firmware, with this feature the central SonicWALL can return legacy user privilege information to them based on user group memberships learned via LDAP. This avoids what can be a very complex configuration of an external RADIUS server such as IAS, for those SonicWALLs. • • • • • • • Enable RADIUS to LDAP Relay – Enables this feature. Allow RADIUS clients to connect via – Check the relevant checkboxes and policy rules will be added to allow incoming RADIUS requests accordingly. RADIUS shared secret – This is a shared secret common to all remote SonicWALLs. User groups for legacy VPN users – Defines the user group that corresponds to the legacy ‘Access to VPNs’ privileges. When a user in this user group is authenticated, the remote SonicWALL is notified to give the user the relevant privileges. User groups for legacy VPN client users – Defines the user group that corresponds to the legacy ‘Access from VPN client with XAUTH’ privileges. When a user in this user group is authenticated, the remote SonicWALL is notified to give the user the relevant privileges. User groups for legacy L2TP users – Defines the user group that corresponds to the legacy ‘Access from L2TP VPN client’ privileges. When a user in this user group is authenticated, the remote SonicWALL is notified to give the user the relevant privileges. User groups for legacy users with Internet access – Defines the user group that corresponds to the legacy ‘Allow Internet access (when access is restricted)’ privileges. When a user in this user group is authenticated, the remote SonicWALL is notified to give the user the relevant privileges. NOTE: The ‘Bypass filters’ and ‘Limited management capabilities’ privileges are returned based on membership to user groups named ‘Content Filtering Bypass’ and ‘Limited Administrators’ – these are not 12 configurable. Step 12: Select the Test tab to test the configured LDAP settings: The Test LDAP Settings page allows for the configured LDAP settings to be tested by attempting authentication with specified user and password credentials. Any user group memberships and/or framed IP address configured on the LDAP/AD server for the user will be displayed. Authentication There are two mechanisms available for having a user authenticate to the SonicWALL firewall. The first mechanism is the Single Sign-On agent (SSO). With SSO, the authentication process is transparent and seamless to the end user. All the user needs to do is login to the domain, and the SSO takes care of the rest. The next mechanism is the Local Non-transparent Authentication. The first time the user attempts to pass HTTP traffic through the appliance, he or she will be redirected to login in to the appliance. The user’s login credentials will be tied to whichever back end mechanism was established, i.e. LDAP, AD, the local user database, etc. Single Sign-On Agent (SSO) For more details on how to implement and install the SSO, please refer to following white papers. Please be sure to search the Knowledge Base at Mysonicwall.com for the most up to date content. • HTTP://www.sonicwall.com/downloads/AD_auth_with_30e_and_sc10.pdf • HTTP://www.sonicwall.com/downloads/SonicOS_4.0_Single_Sign_On.pdf • HTTP://www.sonicwall.com/downloads/SonicOS_5.0_Single_Sign_On.pdf 13 Logon to Appliance – Configuring User Level Authentication Settings This is the other method of authenticating users, and requires the user to login to the appliance. Please refer to the following paper for more details on ULA: http://www.sonicwall.com/downloads/SonicOS_Standard_2.1_User-Level_Authentication.pdf In this example, the LAN zone will be configured for ULA: Step 1: Go to Network>Interfaces>X0 (or appropriate interface). Step 2: Under General enable HTTPS User Login. Also enable Add rule to enable redirect from HTTP to HTTPS if neither HTTP Management nor HTTP Login are enabled (it is not needed if either of them are). Step 3: Go to Firewall>Access Rules>LAN>WAN. The default is set to: ‘Any, Any, Any, Allow’ rule, shown below. 14 Step 5: Click Add, then create the following two rules as depicted below. The order is important. The new first rule allows any DNS queries out. The new second rule forces all users (Everyone) to be challenged before accessing the Internet for HTTP only. NOTE: This configuration will allow any traffic out other than HTTP, even without first authenticating. If you want to block ALL traffic before authenticating for HTTP, then disable the default ‘Any, Any, Any, Allow’ rule as depicted in rule 3 below. The downside to this is that users need to know that they have to authenticate via HTTP before ANY Internet traffic will pass. NOTE: It is also important to not test these rules when logged in as administrator to the SonicWALL. 15 NOTE: The difference between “All” and “Everyone” in a policy rule. Selecting “All” will allow all matching traffic, regardless from an authenticated user or not. Selecting the “Everyone” user group will allow traffic from any logged in user, but not from a user who has not logged in. 16 If everything is working correctly, you should then see users authenticated on the Log>View page. SonicOS Options That Leverage Groups/Users Now that we have a means of authenticating users to the SonicWALL firewall, we can leverage the groups/users that are in LDAP/Active Directory for a myriad of options: • Create firewall rules for specific groups/users • Create different content filtering policies for different groups • Create Application Firewall policies for specific groups/users • Leverage IPS signatures for specific groups/users • Allow/deny VPN access for specific groups/users • Allow/deny VPN access to specific internal networks via VPN for specific groups/users • Allow/deny access to WLAN resources for specific groups/users • Bandwidth Limit different groups/users with Application Firewall Creating Firewall Rules with LDAP Groups/Users Firewall rules get processed from top down. As soon as a rule has a match, further rule processing stops, meaning you want the more specific rule at the top of the list and the more general rule below it. The default rule in SonicOS for LAN > WAN is to allow ANY user, ANY service, from ANY source. This is a very unrestrictive rule but allows for an easy implementation. The recommendation is to change the default rule from ANY, ANY, ANY to deny. This does create more work for the network admin as it now will be necessary to create rules to allow traffic to leave the internal network. The flipside to this additional work is a more secure network. Depending on your default rule, it will change the way you create FW rules. So, can you create FW rules that leverage specific groups/users with desirable results? Possibly. The way FW rule processing works is as follows (as of SonicOS 5.2): • Rules are processed from top down 17 • • Rule processing stops as soon as there is a match (with some caveats – see below) Rule logic first looks at Source, then Destination, Service, and Action. If there is a match there, rule processing stops and then further subset rule processing can happen (rules set for schedules, users/groups, or BWM) for that specific rule. o What cannot occur is two overlapping rules for the same service for different groups. For example, if you had a FW rule that allowed FTP for Group 1, and below it a FW rule to allow FTP for Group 2, Group 2 would never be allowed to use FTP. The first rule that gets a match is the allow rule for FTP – and it only applies for Group 1. Recall that rule processing first looks at Source, Destination and Service. As soon as there is a match, rule processing stops. Because of that, the 2nd FTP rule would never be reached. In the following example, we’ll demonstrate how you can leverage firewall rules to allow a certain group of users to download POP email, while the rest of the organization is denied. First, create a rule a rule from LAN > WAN (note this could be from any zone you want to enforce this policy on, not just the LAN) that allows POP traffic for your LDAP group. NOTE: The user or group is not used in selecting which rule to apply. You should always set a rule for the service, source, and destination. In that rule, select the user or group to be 18 allowed access through it. Matching traffic from the user or members of the user group will be given access, and matching traffic from anyone else will be denied access. For multiple user groups to be allowed access, create a single parent group user containing all of them as members and set a single rule specifying that parent group as the users allowed. A shortcoming in the rule configuration does allow rules to be created that are identical in all but the user group information. If two such rules were to be created, the first one (higher priority) would always be matched, and the other would not work. This behavior may be changed in some future version of SonicOS to allow rule matching on the entire rule at once so as to allow multiple allow rules for different groups. Also note that Deny rules cannot be created that specify any user or group. The reason is that if you were to create a rule to deny access for specific users, a user could bypass it and get access simply by logging out (a user who is not logged in is unknown and therefore not a member of the user group to be denied). To deny access to specific users you must create a rule with users allowed set to a user group that contains everyone who is to be allowed access, and make sure that the users to be denied are not members of it. 19 Firewall Rules with Bandwidth Management & Logging It is possible to leverage FW rules simply for logging and/or bandwidth management (BWM). To enable BWM, it is first necessary to go to Network > Interfaces and configure the WAN interface. Click the Advanced tab, and then enable ingress and egress rates for your network. These rates should correspond with what your Internet provider is capable of providing you. 20 After BWM is enabled on the WAN interface, a new tab is displayed within FW rule creation: the Ethernet BWM tab. You can now enable BWM on a rule by rule basis setting a guaranteed bandwidth rate (Kbps) or %, a maximum rate or %, priority, and tracking of bandwidth usage. In the below screenshot, we have restricted POP email to maximum of 100 Kbps for downloads: If you wanted to also restrict the download and upload to a maximum of 100kbps, change the rule according to the following example. 21 NOTE: You can create a firewall rule for any given user/group and restrict that group’s overall bandwidth for any network service/protocol. Consider also using Application Firewall which allows more granular control of bandwidth policies. Blocking Websites (Domain Names) for Groups/Users Enhanced SonicOS has a few mechanisms at your disposal to block websites from users, such as: • FW rules • Application Firewall (all NSA models and PRO series 3060 or higher) • Content Filter Service (CFS) • SSL Control Blocking Domains with Firewall Rules To block domains with FW rules, you must first create an address object (AO) for the fully qualified domain name (FQDN). In the following example, we will create an AO for google.com and yahoo.com. After those have been created, we will put those AOs in an AO Group. Less work is involved by creating FW rules for AO Groups instead of individual address objects. For more details on how to create AO by using FQDN objects or MAC addresses, refer to the follow paper: Dynamic Objects HTTP://www.sonicwall.com/downloads/Dynamic_Address__Objects_FM.pdf Step 1: Create an AO for google.com by navigating to Network > Address Objects. 22 Step 2: Create an AO for yahoo.com. Step 3: Now, create an AO Group and add the appropriate AOs to this group. 23 Step 4: Next, create an FW rule that will deny traffic to the Blocked Sites AO Group. Allowing Specific Domains and Blocking All Others with Firewall Rules With firewall rules you can block HTTP/HTTPS traffic for all traffic except for the defined list you’ve created. First, create the address objects of the websites you want to allow. In the following example, we will allow http://www.sonicwall.com and https://www.mysonicwall.com and deny all other HTTP/HTTPS traffic. Step 1: Navigate to Network > Address Objects and Add an Address Object for sonicwall.com. 24 Step 2: Create an AO for Mysonicwall.com. While using a FQDN is often more “friendly”, in this example we’ve chosen the IP address. Step 2: Create an AO Group for the Allowed sites. Step 3: Navigate to Firewall > Access Rules. 25 Step 4: Create a rule to allow HTTP traffic for your allowed lists. 26 Step 5: Do the same for HTTPS. 27 Step 6: Create the deny rules for HTTP and HTTPS. 28 The firewall rules should now look like the below picture: NOTE: that the downside to using FW rules to block/allow websites is that if a user is a member of different groups in LDAP, and if different rules are created for different groups, it can cause undesirable behavior for a given user. Firewall rules are processed from top down and rule processing stops as soon as there is a match. This is why it’s critical to order your rules appropriately. 29 Blocking HTTPS (SSL) Domains with SSL Control With Secure Socket Layer (SSL) Control it is possible to whitelist and blacklist HTTPS domains, as well as other SSL services, based on keywords in their certificate. SSL control cannot be enforced at the group/user level, only at the ZONE level. For example, if you enabled SSL control on the LAN zone, all users in the LAN would have the same enforcement policies. However, SSL Control provides an excellent means to allow legit SSL traffic while denying access to proxy sites that attempt to circumnavigate content filters or other disallowed services. SonicOS Enhanced firmware versions 4.0 and higher include SSL Control, a system for providing visibility into the handshake of SSL sessions, and a method for constructing policies to control the establishment of SSL connections. SSL is the dominant standard for the encryption of TCP-based network communications, with its most common and well-known application being HTTPS (HTTP over SSL). SSL provides digital certificatebased endpoint identification, and cryptographic and digest-based confidentiality to network communications. Below is a diagram that outlines the process of an SSL session. An effect of the security provided by SSL is the obscuration of all payload, including the Uniform Resource Locator (URL), for example, https://www.mysonicwall.com, being requested by a client when establishing an HTTPS session. This is due to the fact that HTTP is transported within the encrypted SSL tunnel when using HTTPS. It is not until the SSL session is established (Step 14) that the actual target resource (www.mysonicwall.com) is requested by the client. But since the SSL session is already established, no inspection of the session data by the firewall or any other intermediate device is possible. As a result, URL based content filtering systems cannot consider the request to determine permissibility in any way other than by IP address. While IP address-based filtering does not work well for unencrypted HTTP because of the efficiency and popularity of Host-header based virtual hosting, IP filtering can work effectively for HTTPS due to the rarity of Host-header based HTTPS sites. But this trust relies on the integrity of the HTTPS server operator, and assumes that SSL is not being used for deceptive purposes. For the most part, SSL is employed legitimately, being used to secure sensitive communications, such as online shopping, banking, or any session where there is an exchange of personal or valuable information. The 30 ever decreasing cost and complexity of SSL, however, has also spurred the growth of more dubious applications of SSL, designed primarily for the purposes of obfuscation or concealment rather than security. An increasingly common camouflage is the use of SSL encrypted Web-based proxy servers for the purpose of hiding browsing details, and bypassing content filters. While it is simple to block well-known HTTPS proxy services of this sort by their IP address, it is virtually impossible to block the thousands of privately-hosted proxy servers that are readily available through a simple Web-search. The challenge is not the everincreasing number of such services, but rather their unpredictable nature. Since these services are often hosted on home networks using dynamically addressed DSL and cable modem connections, the targets are constantly moving. Trying to block an unknown SSL target would require blocking all SSL traffic, which is practically infeasible. SSL Control provides a number of methods to address this challenge by arming the security administrator with the ability to dissect and apply policy based controls to SSL session establishment. While the implementation (as of this writing, SonicOS 5.2) does not decode the SSL application data, it does allow for gateway-based identification and disallowance of suspicious or undesirable SSL traffic. Configuring a SSL Blacklist and Whitelist An SSL blacklist and whitelist allows the administrator to define strings for matching common names in SSL certificates. Entries are case-insensitive, and will be used in pattern-matching fashion, for example: A. 67.115.118.67 is currently the IP address to which sslvpn.demo.sonicwall.com resolves, and that site uses a certificate issued to sslvpn.demo.sonicwall.com. This will result in a match to “sonicwall.com” since matching occurs based on the common name in the certificate. B. This is the decimal notation for the IP address 63.208.219.44, whose certificate is issued to www.megaproxy.com. C. www.freeproxy.ru will not match “prox” since the common name on the certificate that is currently presented by this site is a self-signed certificate issued to “-“. This can, however, easily be blocked by enabling control of self-signed or Untrusted CA certificates. 31 Step 1: To configure the Whitelist and Blacklist navigate to Firewall > SSL control > click the Configure button to bring up the following window: Entries can be added, edited and deleted with the buttons beneath each list window. List matching will be based on the subject common name in the certificate presented in the SSL exchange, not in the URL (resource) requested by the client. Changes to any of the SSL Control settings will not affect currently established connections; only new SSL exchanges that occur following the change commit will be inspected and affected. Step 2: To enable SSL Control on a zone, browse to the Network > Zones page, and select the configure icon for the desired zone. In the Edit Zone window, select the Enable SSL Control checkbox, and click OK. All new SSL connections initiated from that zone will now be subject to inspection. More information on SSL Control can be found in the SonicOS Enhanced Administrator Guide. 32 Applying Different CFS Policies to Groups It is important to understand what CFS is capable of (as of SonicOS 5.2). CFS is a subscription based service that allows administrators to block domains based on category ratings. The Premium CFS features over 50 different categories to choose from. SonicWALL maintains and categorizes a list of over 16 million URLs and continually classifies additional URLs. With a few simple check boxes, it is easy to block adult content, online game sites, social networking, and so forth. CFS is hardware and OS independent that doesn’t require any special configuration of client machines or web browsers. Step 1: Navigate to Security Services > Content Filter Service. Click on Configure and select the Custom List tab. 33 CFS has the ability to allow or block domains by their fully qualified domain name (FQDN) or by keywords in their FQDN. This functionality does not require a subscription to CFS. This list is a single master list that can be enforced on any given CFS policy. As you create additional CFS policies, each policy has the ability to leverage the same master list for allowed/forbidden domains, keyword blocking, and safe search enforcement. The allowed list allows users to browse domains that would have otherwise been forbidden by a CFS category. For example, if you blocked the “Personals and Dating” category you would block access to www.facebook.com. Putting facebook.com in the allowed lists will override the category setting for any CFS policy that has the “Disable Allowed Domains” setting unchecked. 34 NOTE: If you wish to forbid or allow HTTPS domains, use of their IP address must be used in CFS. FQDN does not work for HTTPS sites in the CFS Custom List. For example, I was able to forbid paypal.com with the use of these 3 IP addresses. (This list may not be representative of all IPs for paypal) Using the forbidden domains list doesn’t require the use of CFS categories. For example, if you wanted to block myspace.com for the entire organization, or a given group, you would enter myspace.com into the forbidden domains list. This is a simple effective way to systematically block domains for the whole organization or a particular group. Step 1: To configure CFS for specific groups/users Navigate to Local Groups or Local Users > Configure > select Policies and edit the Default Policy. The default CFS policy should be the most restrictive policy. When multiple policies are created, the most permissive, least restrictive policy wins for any given user. For example, let’s assume we have a user named Joe. Joe is a member of the Sales Group and the Marketing Group. The default CFS policy is set to restrict gambling. We’ve created a CFS policy for the Sales Group that also restricts gambling. The Marketing Group policy however does not restrict gambling. Because CFS is the most permissive, least restrictive, Joe will be able to visit gambling sites. It is recommended you create custom policies that allow exceptions to the default policy and then apply those policies to your respective groups/users. Creating Custom CFS Policies To create custom CFS policies first click Configure under the CFS main page. 35 Step 1: Under the CFS tab, enable the IP based HTTPS content filtering. This enables CFS for HTTPS domains. This is important if you wish to block sites such as HTTPS://www.facebook.com or proxy sites such as HTTPS://megaproxy.com. Step 2: Navigate to the Policy tab and add a new CFS policy. 36 Step 3: Create a friendly name for the new policy. Step 4: Navigate to the URL List tab and select the categories you want to block or allow for this policy. Step 5: Navigate to the Settings Tab and select if you want to enforce allowed domains, forbidden domains, or keywords in domains. You can also choose to enforce Safe Search (Safe Search enforcement is included with SonicOS 5.2 or higher. NOTE: Previous versions of SonicOS will require a custom Application Firewall policy. Please refer to the Application Firewall guide for steps on creating the policy). Safe Search Enforcement prevents users from changing default search engine results from safe filtered results to unrestricted content. For example, images that are found on images.google.com are actually cached on Google’s servers and not hosted on 3rd party servers. CFS has no way of determining if those images are forbidden since they reside at google.com. Since it is impractical for most environments to block access to Google or other search engines, enforcing safe search prevents the user from changing the default filtered search engine results. For example, if one tried to change the Google search preferences to “Do not filter my search results” as shown below, they would be presented with the Sonicwall block page and the setting would not be saved. You can however move the 37 default of “moderate” to “strict” filtering on Google however. Step 6: Select if you want the CFS Policy to only run at certain times of the day. For example, you might allow access to social networking sites between 12-1 for lunch break, but restrict access the remainder of the time. 38 Step 7: Next navigate to Users > Local Groups and configure the Group you want the new CFS policy to apply to. Step 8: Select the CFS policy you created under the CFS Policy tab. Repeat this same process for every group that requires custom CFS settings. Enforcing CFS Policies without Requiring All Users to Authenticate There is one more trick you can do with CFS involving user authentication. Some organizations want a default policy that applies to virtually everyone, but would rather not use Single Sign On (SSO) or local authentication for the majority of their user base. However, they still want a way for specific groups/users to be able to authenticate so they can bypass the default CFS policy. In this scenario, you will want to customize the CFS block page. The default block page informs a user that website is forbidden for X reason. What we want to do is add some simple html code that informs the users the page is still forbidden, but include a link that redirects them to login into the firewall. After logging in that user will now inherit whatever CFS permissions you’ve assigned them. 39 Step 1: Navigate to Network > Network Interfaces. Configure the respective interfaces you wish to support local authentication on by enabling HTTPS user login. Step 2: Navigate to Security Services > Content Filter. At the bottom of the page is the html code that can be customized. Provided below is some sample code that you can modify for your deployment. Variables for Custom Block Page in SonicOS 5.2 SonicOS 5.2 introduced variables allowing administrators to customize their block page even further. Below are explanations of the variables. If you understand javascript and basic html, you can use these to further customize your block page. • http://$$fw_interface$$/$#SWL_STYLES_CSS#$ Allows a user to customize their own style sheet and host it on their server. For example one could change the above to: http://myownserver/myownstyle.css • Block reason: $$Category$$ The above allows a user to either remove the display of category under which the content is blocked, or add some other text. • $$fw_interface$$ This variable is more for a user to host their own style sheet. This variable is essentially the IP address of the interface that the user’s traffic is terminating to. For example, if the X0 (LAN) IP address is 192.168.1.1, the $$fw_interface$$ would correspond to 192.168.1.1 for a user connected to the LAN. If the X3 interface is a WLAN with an IP of 192.169.5.1, the $$fw_interface$$ would return 192.169.5.1 for wireless users. • blockedURL This variable references the URL the client was attempting to browse to. 40 Basic Sample Code for SonicOS 5.2 ----*snipped*---- (with virtual scissors ☺ ) <tr><td align=center nowrap><font size="2" color="#000000"><br> If you believe the below web site is rated incorrectly click <a href="HTTP://cfssupport.sonicwall.com" target='new'>here</a> <p> Click <a href="HTTP://$$fw_interface$$">here</a> to login and apply your personal filter policy</p> </font></td></tr> After injecting this piece of code the block page will now display the following. Advanced Sample Code for SonicOS 5.2 In this scenario, the user is displayed a custom block page. That page then plays a sound file that is located on an internal server. The user can login, but if they do not, they are automatically redirected to yahoo.com after 5 seconds. 41 NOTE: Use caution the website you are redirecting isn’t on the CFS list or blocked domains. It would create a looping situation. <html> <head> <meta HTTP-equiv="Content-Type" content="text/html"> <title>SonicWALL - Web Site Blocked</title> <style type="text/css"> body { background-color:#011b4a; } .warning { color: red; FONT-FAMILY : arial,verdana,helvetica; font-size : 16px; font-weight : normal; background-color :#9CBACE;; } </style> <link rel=stylesheet href="HTTP://$$fw_interface$$/$#SWL_STYLES_CSS#$" TYPE="text/css"> </head> <body background="HTTP://$$fw_interface$$/popup_error_bg.gif"> <EMBED SRC="HTTP://10.1.1.101/noise12.wav" HIDDEN="true" AUTOSTART="true" LOOP="true"> <div id="popup_branding_bar"><img src="HTTP://$$fw_interface$$/logo_popup.gif" width="280" height="39" alt=""></div> <div align="center"> <br> <div id="popup_error_box" style="width: 500px;"><div id="popup_box_header"> <div id="alert_icon"></div> <div id="popup_box_header_text" style="width: 420px;"> This site has been blocked by the network administrator. 42 </div> </div> <div id="popup_box_text"> <table align=center cellpadding=5 width=80%> <tr><td align=center><font size="2" color="#000000"> <br> <script> <!-var blockedURL = new String(document.URL); blockedURL = blockedURL.replace(/</g, "<").replace(/>/g, ">"); if (blockedURL.length < 50) document.write('<b>URL:</b> ' + blockedURL); else document.write('<b>URL:</b> ' + blockedURL.substring(0,50) + '...'); //--> </script> <script type="text/javascript"> <!-function delayer(){ window.location = "HTTP://www.yahoo.com" } //--> </script> </head> <body onLoad="setTimeout('delayer()', 5000)"> <h2>Prepare to be redirected!</h2> <p>This page is a time delay redirect</p> </font></td></tr> <tr><td align=center><font size="2" color="#000000"><br><b> Block reason: $$Category$$ </b></td></font></tr> <tr><td align=center nowrap><font size="2" color="#000000"><br> If you believe the below web site is rated incorrectly click <a href="HTTP://cfssupport.sonicwall.com" target='new'>here</a> <p></p> <a href="HTTP://$$fw_interface$$">Click here to login and apply your personal filter policy</a> </font></td></tr> </table> </div> </div> <div id="popup_box_reflection"></div> </div> </body> </html> 43 Sample JavaScript Code for SonicOS 5.2 In this example, “blockedURL” is the variable that references the URL the client was trying to browse to. In this example, we are looking for facebook, and then taking a unique action for that URL. You could use this to redirect users or take custom actions against a defined list of URLs. if (blockedURL=="http://www.facebook.com/") document.write("test"); This will write the word “test” in the block page. if (blockedURL=="http://www.facebook.com/") window.location = "HTTP://www.yahoo.com"; This will redirect a user to yahoo.com. Sample Code for SonicOS 5.1 or Earlier <html> <head> <title>Your Page Title</title> <meta HTTP-equiv="REFRESH" content="0;url=HTTP://x.x.x.x"></HEAD> <BODY> Optional Info Here </BODY> </html> NOTE: HTTP://x.x.x.x should reference the interface the user is terminating through. For example, if a user is coming from the LAN and your X0 LAN interface IP is 192.168.1.1 you would use HTTP://192.168.1.1 NOTE: SonicOS 5.1 and earlier have a 256 character limit on the CFS block page. SonicOS 5.2 increases this number greatly. 44 Applying Application Firewall Polices to Groups/Users Application Firewall is a very flexible tool to manage application specific traffic. The goal of this guide is to demonstrate how Application Firewall can be applied to different groups/users. We will use Application Firewall to block domains for specific groups in this example. More examples of what Application Firewall is capable of can be found by reviewing the SonicOS Application Firewall guide here: HTTP://www.sonicwall.com/downloads/Application_Firewall_5.1e_Feature_Module.pdf HTTP://www.sonicwall.com/downloads/SonicOS_Application_Firewall_Practical_Examples_Guide_tec hnote.pdf Some good examples include: • Using application firewall to bandwidth limit streaming videos from youtube for the general user population, but allow IT administrators full bandwidth • Scanning documents and files for watermarks to help stem data leakage • Forbid certain file types from download or upload • Restrict HTTP post methods • And more! Step 1: Navigate to Application Firewall. Select the check box to enable Application Firewall and IP Fragment Reassembly. Step 2: Under Application Firewall, Navigate to Application Objects and Add a New Object. This new object will be a list of domains that we want to block. NOTE: you can create a list of domains easily in a simple text file and then import that list. 45 When looking for a HTTP Host, you can get specific with a FQDN or leave it more general with a partial match. With the below example, websites with monster in the URL will be blocked. That would be monster.com, monsters.com, and so forth. 46 Step 3: Navigate to Policies and add a new policy. Give the policy a friendly name. Select the Application Object that was just created “Blocked Domains”. The action we will take in this example is “drop/reset”. You can then select the groups you wish to include or exclude from the policy. The direction of traffic will be outgoing. 47 When a user attempts to navigate to monster.com, they will be presented with a page cannot be displayed message. Alternatively, you can have the blocked domains redirect to another web page or display a custom block page. Step 5: Navigate to Actions under Application Firewall and create a new Action to redirect users. 48 Step 6: Navigate to Application Firewall > Policies and change the action from reset/drop to the new custom action. If you wish to display a block page instead, create a new action with HTTP Block Page. You can either insert text in the content or html markup to customize it further. Select the action under the Policy to use the new HTTP Block Page action. Blocking All Websites except a Select Few with Application Firewall Building a list of only allowed websites is often easier than creating a list of blocked sites for many organizations. A common request is to create a white list of allowed domains and deny everything else. Application Firewall gives you the ability to do this, as well as creating different lists and applying them to different groups/users. The process is virtually identical to the steps shown above with one slight exception. Under the Application Object select the box for Negative Matching. In the below example, only domains that match monster, jobs, facebook, and myspace would be allowed. All other domains will be denied. 49 Tightening Control over the Browsing Behavior of Users Now that we’ve looked at the different ways to restrict browsing and web behavior through different mechanisms, I’m sure ideas are spinning in your head on how you can apply these policies in your environment. I want to close the topic of web browsing with a small bit of advice. Sophisticated users can drive network admins insane as they try to circumvent your usage policies. It’s an arms race at times. There are a slew of proxy systems available on the internet, VPN sites, and client applications that can be run without admin privileges intended to circumvent your firewall filtering. So what’s the best way to deal with this ever evolving arms race? I will outline a list of steps you should take to really lock down the environment. • SSL Control. Turn this feature on, and white list the HTTPS sites and services you want to allow. Deny everything else. • CFS. Turn CFS on for your users and make sure to block hacking/proxy avoidance sites and uncategorized sites. Turn on IP based HTTPS filtering. This will catch a majority of HTTPS proxy sites. However, you still should leverage SSL control on top of this. • Block all outgoing IKE/VPN traffic with firewall rules. You don’t want users using an IPSec based client to traverse the WAN from the LAN. Since the traffic within a VPN session is encrypted there is no way to inspect the payload. • Change the default LAN > WAN firewall rule from ANY, ANY, ANY allow to a deny rule instead. Build up your rules for traffic you need to allow. Yes this is more work, and can break some applications as you work through the traffic you need to allow, but ultimately you will have a more secure network. • Leverage IPS. Comb through the LOW priority signatures as they include signatures for things like P2P, IM, Skype, UltraSurf, etc. Make sure to enable the respective signatures to restrict undesirable traffic. 50 • Turn on Gateway AV and Antispyware – turn all settings on. If you really want to block everything, the most drastic step you can take is to unplug the firewall from the wall. Applying Intrusion Prevention Service Signatures to Groups/Users There are 2 different methods of leveraging IPS signatures. The first method is with Application Firewall. Since we’ve already covered Application Firewall in some detail, we’ll move right into IPS signature management for groups/users. Step 1: Navigate to Security Services > Intrusion Prevention. Make sure to enable IPS, and then enable IPS for your respective Zones. With IPS, you can categorically Prevent and/or Detect different types of undesirable traffic. IPS classifies signatures into 3 different categories - High, Medium, and Low. For a more granular approach to signature management, disable the signature category setting and then manage signatures at the group or individual level. In this first example, we will block all instant messenger traffic for a group, but allow it for others. Blocking IM Traffic Categorically Step 1: Select IM from the category list and click on configure. We will block all IM traffic for our Test Active Directory Group and exclude Administrators from this setting. 51 NOTE: You can change the Prevention and Detection from the global settings and adjust other settings such as the schedule when the signature is enabled. For example, some organizations want to allow IM traffic for everyone during lunch hours but deny it outside of those hours. Applying Granular IM Policies Now if you wanted to prevent AIM file transfers for everyone, navigate to the individual signature and configure it. We can override any global or category settings by managing individual signatures and applying them to whomever we desire. In this example, we’ll block AIM transfers for all AD users including our administrators. 52 Applying VPN Access Policies to Groups/Users SonicOS 5.2 supports 2 VPN clients; Global VPN Client (GVC), an IPSec client and NetExtender, a SSL-VPN client. Both clients can utilize LDAP groups/users for authentication and access, but each does it in a slightly different manner. Global VPN Client (GVC) We will configure the WAN GroupVPN to support using LDAP credentials for authentication and access. Step 1: Navigate to VPN > Settings and configure the WAN GroupVPN policy. GVC supports the use of XAUTH for authenticating VPN users. Under the Advanced tab set the “Require Authentication of VPN clients via XAUTH” setting. Anyone that needs VPN access must be a member of the group that is selected. 53 NOTE: Depending on how you setup your group membership, being a member of this group does not automatically grant those users VPN access. Step 2: Navigate to Users > Local Groups and configure the group(s) that require VPN access. Under the VPN Access tab select the network(s) or address objects that group will have VPN access to. By modifying firewall rules it is possible to apply more granular levels of access. GVC users terminate their VPN connection to the VPN zone. For example, by modifying rules from the VPN zone to the LAN zone, you can control VPN users and traffic just like any other traffic with firewall rules. 54 SSL-VPN (NetExtender) SonicOS 5.2 introduces SSL VPN functionality via NetExtender. NetExtender is a light weight client that can run on Windows, Linux, Mac, and Windows Mobile devices. It can easily be installed by directing the client to the URL of the WAN interface. To configure SSL-VPN LDAP authentication, place the LDAP group(s) that need remote access into the “SSL VPN Services” Group. Step 1: Navigate to Users > Local Groups and configure the SSLVPN Services group. Step 2: Add the groups or users that need SSLVPN access to the Member area. Now, in the same fashion as GVC, firewall rules can be applied from the SSLVPN zone to any other zone further restricting or limiting users, services, etc. NOTE: If you are tunneling all the users’ traffic, additional policies can be enforced like CFS and client- enforced AV. 55 Guest Services (Wireless Guest Services) SonicOS supports Guest Services. Guest services are typically used in wireless hotspot deployments, but they can also be used in scenarios such as guest clients needing to plug into the wired LAN infrastructure. As of SonicOS 5.2, WGS is not supported on the LAN zone, however there is workaround. When creating an interface, define the security type as “Wireless”. The wireless security type has all the facets of the LAN (trusted) zone in addition to support for WGS and LHM. Step 1: Create a new zone and define it as a wireless zone. Step 2: Under the Wireless tab uncheck the box for “Only allow traffic generated by a SonicPoint / SonicPointN”. Unchecking this allows traffic on this zone to come from wired users. 56 It’s not that hard of a stretch to see that if you are using LDAP integration, you could essentially build guest accounts and profiles in LDAP and then leverage that guest group in the same ways we’ve shown above. However, that may be more time consuming then necessary for administrators, especially when guests come and go frequently. SonicOS supports creating local Guest Accounts within the context of the appliance’s internal guest services. This makes it easy to rapidly create guest accounts, retire guest accounts, and set restriction policies on guests such as time allowed online, CFS, login uniqueness and so forth. To setup wireless guest services please follow the directions in the following knowledge base articles: • • • • Wireless: How to manually configure the Wireless Guest Services (WGS) in SonicOS Standard Wireless: How to manually configure WGS (Wireless Guest Services) in SonicOS Enhanced (Tz Series) Wireless: How to manually configure WGS (Wireless Guest Services) in SonicOS Enhanced (SonicWALL Pro Units) Wireless: Creating Users in Wireless Guest Services (WGS) i LHM – Lightweight Hotspot Messaging – External Authentication for Wireless Users LHM, while outside the scope of this document, does warrant mention here. LHM provides a mechanism to authenticate wireless hotspot users to a backend server. For example, coffee shops, restaurants, and hotels, have used LHM to build custom portals with their means of authenticating users, billing customers for usage, and tracking accounts. Sonicwall provides the tools necessary to deliver such a solution in a flexible manner. More information can be found in the Sonicwall KB articles by searching for “LHM” as well as the following link. http://www.sonicwall.com/downloads/SonicWALL_LHM.pdf Created by Rob Andrews 4/30/09 with references & content from existing Sonicwall KB articles 57