1
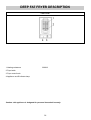
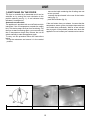
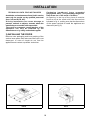
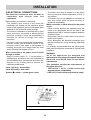
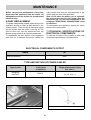
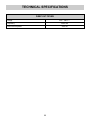
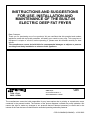
INSTRUCTIONS AND SUGGESTIONS
FOR USE, INSTALLATION AND
MAINTENANCE OF THE BUILT-IN
ELECTRIC DEEP FAT FRYER
Dear Customer,
Thank you for purchasing one of our products. We are confident that this practical and modern
appliance, made with top quality materials, will satisfy your needs in every way. This new piece of
equipment is simple to use but, before operating it, please read this booklet carefully for best
results.
The manufacturer cannot be held liable for consequential damages to objects or persons
resulting from faulty installation or misuse of this appliance.
TIPO: FD30
MOD.: SFR30
SMEG S.p.A.
Via Leonardo da Vinci, 4
42016 GUASTALLA - ITALIA
GB
The manufacturer cannot be held responsible for any inaccuracies due to printing or reproduction errors
contained in the present booklet. The features of the picture diagrams included are purely indicative. We
reserve the right to make any changes to our products that are deemed necessary or useful and in the
interest of the user that are not detrimental to essential operating and safety features.
COD. 01094SM (01094ING) - 10.03.2005
DEEP FAT FRYER DESCRIPTION
TYPE: FD30
1 Heating resistance
2300 W
2 Fryer kettle
3 Fryer control knob
4 Appliance on/off indicator lamp
Caution: this appliance is designed for personal household use only.
14
USE
· remove the kettle containing the oil taking care not
to burn yourself;
· unscrew the tap situated in the rear of the interior
casing (fig. 2);
· push the red button (fig. 3).
1) SWITCHING ON THE FRYER
The fryer is controlled by a thermostat and it can be
switched on by turning the knob clockwise to the
position desired (see fig. 1). A red indicator lamp
indicates it is switched on.
Automatic cut-off switch
The appliance is provided with a cut-off device which
intervenes if the oil temperature exceeds the safety
limit. This device stops the fryer from functioning. For
the fryer to start functioning again, you must wait until
the oil temperature drops; then release the cut-off
switch manually to start the appliance again.
To carry out this procedure follow the instructions
below:
· lift up the resistance and secure it in the vertical
position;
FIG. 1
If the red button does not release, it means that the
temperature sensor of the shut-down thermostat has
not cooled down sufficiently. Wait for a few minutes
then try again. If the problem persists even when the
appliance is cool contact your nearest service centre.
FIG. 2
15
FIG. 3
USE
CAUTIONS FOR FRYING
Only oil or vegetable fat should be used for frying.
Amount of oil / fat min. 2 - max. 2.5 l.
Avoid mixing different types of oil / fat. It is important
to fry at the right temperature for good results.
· Temperature too low: the food to be fried cooks
too slowly and absorbs oil / fat.
· Temperature too high: the food forms a dark
crust too quickly and the inside is not cooked.
· Do not use the fryer cover when cooking.
Almost all foods can be fried, e.g. chicken, fish, meat,
vegetables, fruit, potatoes. Watery products are less
suitable.
IMPORTANT ADVICE
- Before frying for the first time, wash the fryer
kettle and basket with a sponge and soap and
water (or use a product available on the market).
- Dry and polish with a clean dry cloth.
- Never leave the fryer unattended while in
operation.
- As the surface of the fryer becomes hot during
operation, children must be kept at a safe
distance.
- Do not put plastic cutlery in the hot oil.
- Change dirty oil immediately as it is easily
inflammable.
Dry the food to be fried well before cooking, shake off
any excess flour, press down bread-crumbs well.
If you intend to fry large quantities at any one time, it
is wise to remove the basket after a few minutes, so
that the oil can return quickly to its initial temperature.
In this way food fried will be more crispy.
The oil must be changed when food no longer
becomes crispy (even when the temperature is
adjusted correctly) or when the oil turns slightly darkcoloured.
Warning!
At no time should the oil come in contact with
water.
If in spite of all precautions taken the fryer
should accidentally catch fire:
· Switch off the fryer (or pull out the plug).
· Remove the basket.
· Cover it with the lid provided.
Never put out a fire with water!
- Do not place easily inflammable or deformable
objects directly under the fryer.
- Make sure that the power cables of electric
appliances do not come in contact with the hot
fryer.
HOW TO FRY
First of all set the desired temperature and wait until
the oil has reached this temperature.
Put the frying basket into the oil with the food to be
fried. When frying is done, lift the basket and shake it
lightly to drain off the excess oil.
Hook the basket on the hanging device to drain the
remaining oil.
16
CLEANING
For everyday cleaning use a damp cloth or with a
some hot water and detergent. Rinse in cold water
to remove any remaining detergent and dry the
surface.
2) CLEANING THE FRYER
With the proper care the fryer will maintain its
shine for a long time and will be easier to clean.
Use a sponge, water and soap (or a product
available on the market) to clean stainless steel
parts, but only when the appliance is cool. Then
shine it with a clean dry cloth, or a chamois cloth
for better results.
Water spots should be removed with vinegar or
lemon, or with a lime removal product.
In the case of tough deposits clean with "Sidol
for stainless steel" or with "Cerafix". Apply the
undiluted cleaner with a paper towel. Let the
product take effect, then remove it completely with
cold water and dry the parts with a dry cloth.
Warning! never empty oil into the water-pipe
drainage system. Take it to a special collection
centre for disposal. After use wait until the oil has
cooled down completely, then lift up the
resistance, remove the kettle and pour the oil into
a suitable container.
Do not scrape and scour the appliance to avoid
scratching it permanently. Use a soft brush to
loosen tough deposits. After cleaning the
appliance apply a metal cleaner.
17
INSTALLATION
Packaging (cardboard, bags, expanded
polystyrene, nails...) are potentially dangerous.
Keep them out of the reach of children.
An opening in the top of the piece of modular
furniture must be made with the dimensions
indicated in fig. 4, making sure that the dimensions
of the space required to install the appliance are
observed (see fig. 5).
TECHNICAL DATA FOR INSTALLERS
Installation and maintenance listed in this section
must only be carried out by qualified personnel
(law n° 46 and D.P.R. 447).
A faulty installation can cause damage to
persons, animals or objects, towards whom the
manufacturer cannot be held responsible.
The cut-off or automatic control devices of the
appliance can only be modified by the
manufacturer or by a duly authorized supplier.
3) INSTALLING THE FRYER
Remove outer packaging and inner packing of the
various loose parts, then make sure the fryer is not
damaged. In case of doubt do not use the
appliance and contact a qualified technician.
FIG. 4
FIG. 5
18
INSTALLATION
fingers, then remove the gasket's protection
paper and position the fryer in the opening made
in the worktop;
- secure the appliance by tightening the clamp
screws "F" (see fig. 7).
4) SECURING THE FRYER
To secure the fryer to the worktop the fastening
clamps accompanying this booklet must be
assembled. The following procedures must be
carried out to do this:
· remove all movable parts from the fryer;
· turn the appliance over taking care to place it on
a soft surface to avoid damaging the external
surfaces;
· remove the clamps "G" from the package and
install them as in the diagram in fig. 6.
After these steps have been carried out, the
special gasket that prevents liquids from leaking
can be installed. To fit this gasket correctly, please
strictly follow the directions below:
- detach the gasket strips from their support
taking care that the transparent protection
remains attached to the gasket;
- put the gasket "E" (fig. 6) in the correct position
under the edge of the worktop, so that the outer
side of the gasket fits perfectly with the external
perimeter of the worktop. The ends of the strips
must fit without overlapping;
- make sure the gasket adheres to the worktop
evenly all around, press it down with your
WARNING:
Note that the adhesive which joins the plastic
laminate to the worktop must be resistant to
temperatures of no less than 150°C to prevent the
covering from detaching.
The installer is advised that the rear wall,
adjoining and surrounding surfaces of the fryer
must be resistant to a temperature of 75 K.
USEFUL MEASUREMENTS
(mm)
FRYER
FIG. 6
A
B
C
D
285
485
60
60
FIG. 7
19
INSTALLATION
- The power cord must be placed in a way that it
does not reach an excess temperature of 75 K in
any position.
- To connect, do not use adaptors or switches as
they may cause false contacts resulting in
dangerous overheating.
When connection is made directly to the power
circuit:
5) ELECTRICAL CONNECTIONS
The electrical connection must be made in
conformity with current rules and
regulations.
Before making a connection, check that:
- The capacity and outlets of the electrical
installation are suitable for the maximum power
output of the appliance (see the information label
attached on the underside of the housing).
- Place a switch between the appliance and the
circuit of an appropriate size for the load of the
appliance and with a minimum aperture between
contacts of 3mm.
- Remember that the earth cable must not be
broken by the switch.
- As an alternative, the electrical connection may
also be protected by a high sensitivity differential
switch.
It is strongly recommended that the yellow-green
earth cable provided be connected to a good earth
installation.
- The outlet or installation is provided with a good
earth connection according to standards and
provisions currently in force. All responsibility is
declined for failure to comply with these
provisions.
- If a power cord is not supplied with the appliance,
connect a cable with a suitable section to the
terminal board (see table in paragraph 6)
keeping the earth wire longer than the lead
wires, following the diagram in fig. 8.
When connection to the power circuit is made
through an outlet:
WARNING:
All of our appliances are designed and
manufactured according to European standards
EN 60 335-1 and EN 60 335-2-13 and relative
amendments.
This appliance satisfies the requirements of
European directives:
- CEE 89/336 + 92/31 + 93/68 concerning
electromagnetic compatibility.
- CEE 73/23 + 93/68 concerning electrical safety.
- Apply to power cable "C", if not provided, a
standard plug suitable for the load indicated on
the information label. Connect the wires as in the
diagram in fig. 8 taking care to observe the
responses listed below:
Letter L (phase) = brown cable;
Letter N (neutral) = blue cable;
Symbol
(earth) = yellow-green cable.
FIG. 8
20
MAINTENANCE
Before carrying out maintenance of any kind,
disconnect the appliance from the mains. All
maintenance must be carried out by authorized
personnel only.
make certain that they are well positioned in the
guides along the side of the appliance.
Note: In the event the power cord is replaced,
the ground wire must be left longer than the
lead wires (fig. 10) and the instructions in the
paragraph "ELECTRICAL CONNECTIONS" must
be observed.
To reassemble the appliance repeat the steps
above in the reverse order.
6) PART REPLACEMENT
To replace components located inside the fryer the
resistance should be lifted up and secured in the
vertical position. Take out the oil kettle and loosen
the four screws that are under it (see fig. 8). The
work surface can now be detached from the
worktop giving access to all internal components.
To reassemble the work surface of the appliance
take care not to damage the power cables and
7) TECHNICAL SPECIFICATIONS OF
ELECTRICAL COMPONENTS
To facilitate the task of the installer a table with
component specifications is included below.
ELECTRICAL COMPONENTS OUTPUT
Name
W
Heating resistance
2300
TYPE AND SECTION OF POWER CABLES
Type of cable
Total output
of appliance
Neoprene
H05 RN-F
Single-phase power supply
230 - 240 V ~
3 X 1.5 mm2 (*)
2300 W
FIG. 9
FIG. 10
21
TECHNICAL SPECIFICATIONS
DEEP FAT FRYER
Voltage
230 – 240 V ~
Frequency
50/60 Hz
Total nominal power
2300 W
22
TECHNICAL ASSISTANCE AND SPARE PARTS
Before leaving the factory, this equipment was tested and adjusted by skilled personnel so as to
guarantee the best operating results.
Original spare parts can only be found at our technical service centres and authorized stores. Every
repair or adjustment necessary thereafter must be carried out with the greatest care by qualified
personnel.
For this reason we recommend you always contact the dealer you purchased it from or our nearest
service centre stating the make, model, series and type of problem experienced with the equipment. The
relevant specifications are stamped on the information label attached on the underside of the appliance
and on the label attached to the packing box. This information will allow the technician to procure the
appropriate spare parts and guarantee that the right action is taken promptly. It is recommended that you
note these specifications below so that they are readily available at all times.
MAKE: ........................................................
MODEL: .................................................…
SERIES: ....................................................
23
24