1
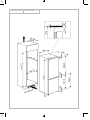
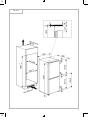
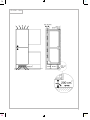
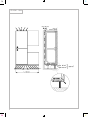
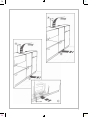
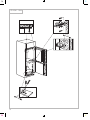
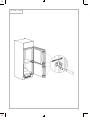
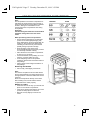
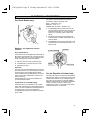
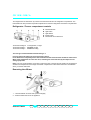
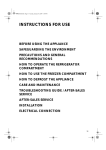
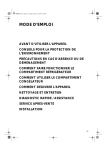
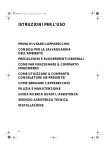
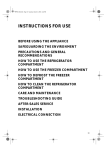
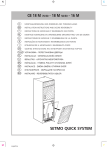
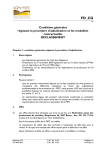
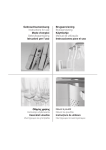
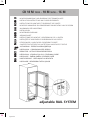
N C CB 18 M 70/30 - 18 M 50/50 - 16 M ç 23 45 67 8 9 0q wf d cg h j i MONTAGEANWEISUNG UND ÄNDERUNG DES TÜRANSCHLAGES INSTALLATION INSTRUCTIONS AND DOORS REVERSIBILITY INSTRUCTIONS DE MONTAGE ET REVERSIBILITE DES PORTES MONTAGE-AANWIJZING EN VERWISSELBARE DRAAIRICHTING VAN DE DEUREN ANVISNINGAR FÖR MONTERING INSTALLASJON MONTERINGSVEJLEDNING ASENNUSOHJEET INSTRUCCIONES DE MONTAJE Y REVERSIBILIDAD DE LA PUERTA INSTRUC¸OES DE MONTAGEM E REVERSIBILIDADE DAS PORTAS ISTRUZIONI PER IL MONTAGGIO E REVERSIBILITA PORTE ODHGIES EGKATASTASHS KAI ANTISTROFH ANOIGMATOS PORTAS USTANOVKA - PERESTANOVKA DVERC INSTALACJA - ODWRACALNOSC DRZWI BEALLITAS - AJTONYITAS MEGFORDITASA INSÅTALACIA - VYMENA POLOHY OTVARANIA DVERI INSTALACE - ZMEÅNA SMEÅRU OTVIRANI DVERÅI INSTALIRANE - OBRANE NA VRATATA INSTALARE - REVERSIBILITATEA US`ILOR adjustable RAIL SYSTEM M copertina Y N C CB 18 M 70/30 CB 18 M 70/30 - 2C 2 M Y N C CB 16 M 3 M Y N C CB 18 M 50/50 4 M Y N C CB 18 M - 16 M 5 M Y N C CB 18 M - 16 M 6 M Y N C 7 M Y N C CB 18 M 50/50 CB 18 M 70/30 CB 16 M 60/40 8 M Y N C CB 18 M - 16 M 9 M Y N C CB 18 M - 16 M 22 m m. 21 10 M Y N C CB 18 M - 16 M 11 M Y N C CB 18 M - 16 M 12 M Y N C ç 2 3 4 5 6 7 8 9 0 q w f d c Nach der Regulierung des Scharniers sicherstellen, daß zwischen den Holztüren und den Seiten der Sa¨ule kein direkter Kontakt besteht, um ein einwandfreies Schließen des Kühlschranks zu gewa¨hrleisten. After adjusting the appliance door/outer door connecting devices, ensure that the cupboard doors do not come into direct contact with the cupboard sides or the appliance doors may not close properly. Apre`s avoir re´gle´ le guide, s’assurer que les portes en bois ne sont pas en contact direct avec les flancs du meuble pour garantir une bonne fermeture de l’appareil. Na het afstellen van het scharnier controleren of er geen direct contact is tussen de houten deurtjes en de zijkanten van het meubel, dit om een correcte sluiting te garanderen. När du har reglerat monteringsanordningarna bör du försäkra dig om att det inte är direktkontakt mellan trädörrarna och kylskåpets sidor. Detta för att garantera att kylskåpets dörrar stängs ordentligt. Etter å ha regulert innfestingene mellom apparatdørene og ytterdørene av tre, må man forsikre seg om at ytterdørene av tre ikke kommer i direkte kontakt med selve apparatet, ellers kan det hende dørene ikke lukker seg ordentlig. Efter at have justeret beslagene mellem apparatets døre og køkkenskabets døre skal man sikre sig, at der ikke er direkte kontakt mellem køkkenskabets døre og sidevæg, da apparatets døre ellers ikke kan lukke ordentligt. Kun laitteen/kalusteen ovien kiinnitys on säädetty varmista, että puuovet eivät kosketa kalusteen reunoja, jotta laite voi sulkeutua moitteettomasti. Tras regular la pieza corredera, comprobar que las puertas de madera no toquen directamente los flancos de la columna y asegurar ası´ un cierre correcto. Apo´s ter regulado a guia, certifique-se que as portinholas de madeira na˜o toquem a borda da coluna para poder fechar correctamente o produto. Dopo aver regolato il traino assicurarsi che non ci sia contatto diretto delle portine in legno con i fianchi della colonna per garantire una corretta chiusura del prodotto. AFOZ RZUMISETE TO MENTESE BEBAIVUEITE OTI DEN ZPARXEI AMESH EPAFH ANAMESA STA JZLINA PORTAKIA KAI TIS PLEZRES THS KOLONAS VSTE NA EJASFALISETE TO SVSTO KLEISIMO TOZ PROIˇONTOS: Otregulirovav soölenenie, proveritˆ, ötob´ derevænn´e dverki ne kasalisˆ bokovin sto”ki dlæ obespeöeniæ horoœego zakr´tiæ pribora. Po dokonaniu regulacji ci„gie¿ nalez¨y upewnic˜ si„ czy drzwiczki drewniane nie stykaj“ si„ bezpos˜rednio ze s˜ciankami bocznymi, gdyz¨ nie zapewnia¿o by to dobrego zamkni„cia drzwi ch¿odziarki. Miuta˜n a ke˜szuˆle˜k ajtaja˜t/kuˆlsoø ajto˜t csatlakoztato˜ egyse˜geket bea˜ll˜totta, gyoøzoødjoˆn meg arro˜l, hogy a konyhaszekre˜ny ajtajai nem keruˆlnek koˆzvetlenuˆl e˜rintkeze˜sbe a konyhaszekre˜ny oldalaival, ellenkezoø esetben lehetse˜ges, hogy a ke˜szuˆle˜k ajtajai nem za˜ro˜dnak megfeleloøen. 13 M Y N C g h j i Po nastaven˜ spojovac˜ch prostriedkov dver˜/vonkajså˜ch dver˜ zariadenia sa uistite, zåe dvere skrine (kredenca) nepricha˜dzaju˜ do priameho kontaktu so stranami skrine, v opacånom pr˜pade sa dvere zariadenia nemusia spra˜vne zatva˜rat. Po nastaven˜ spojovac˜ch d˜lu– dv˜råek sporåebicåe / venkovn˜ch dv˜råek zkontrolujte, zda se dråeveåna˜ dv˜råka nedoty˜kaj˜ bocån˜ch d˜lu– sestavy, jinak by se dv˜råka spotråebicåe mohla zav˜rat s obt˜zåemi. Sled kato ste regulirali vratata/œarnirite na vratata na ureda, ubedete se öe vratite na vetrinite ne vlizat v præk kontakt s˜s stenite na vetrinite ili öe vratite na ureda mogat da se zatvaræt pravilno. Dupaı ce at`i reglat us`ile frigiderului/dispozitivul de asamblare a us`ilor externe, controlat`i ca us`ile dulapului saı nu intre œn contact direct cu paırt`ile dulapului sau ca us`ile aparatului saı nu se œnchidaı œn mod adecvat. 14 M Y N C CB 18 M - 16 M 15 M Y N C CB 16 M/18 M − − − − − − − − − − − ÄNDERUNG DES TÜRANSCHLAGES DOORS REVERSIBILITY REVERSIBILITE DES PORTES VERWISSELBARE DRAAIRICHTING VAN DE DEUREN OMHÄNGNING AV DÖRRAR OMHENGSLING AV DØRENE VENDING AF DØRE OVIEN KÄTISYYDEN VAIHTAMINEN REVERSIBILIDAD DE LA PUERTA REVERSIBILIDADE DAS PORTAS REVERSIBILITA PORTE − ANTISTREPTOTHTA THS PORTAS − PERESTANOVKA DVERC − ODWRACALNOS C DRZWI − AJTO NYITA S MEGFORDI TA SA − VY MENA POLOHY OTVA RANIA DVERI − ZMEÅNA SMEÅRU OTVI RA NI DVERÅI − OBRANE NA VRATATA − REVERSIBILITATEA US`ILOR 16 M Y N C CB 16 M/18 M 17 M Y N C CB 16 M/18 M − − − − − − − − − − − ÄNDERUNG DES TÜRANSCHLAGES DOORS REVERSIBILITY REVERSIBILITE DES PORTES VERWISSELBARE DRAAIRICHTING VAN DE DEUREN OMHÄNGNING AV DÖRRAR OMHENGSLING AV DØRENE VENDING AF DØRE OVIEN KÄTISYYDEN VAIHTAMINEN REVERSIBILIDAD DE LA PUERTA REVERSIBILIDADE DAS PORTAS REVERSIBILITA PORTE − ANTISTREPTOTHTA THS PORTAS − PERESTANOVKA DVERC − ODWRACALNOS C DRZWI − AJTO NYITA S MEGFORDI TA SA − VY MENA POLOHY OTVA RANIA DVERI − ZMEÅNA SMEÅRU OTVI RA NI DVERÅI − OBRANE NA VRATATA − REVERSIBILITATEA US`ILOR 18 M Y C Total Chlorine Free u N 4619 997 78974 M ç234567O90 qwMdcghDi Printed in Italy r 5/09/99 Y 33051-gb.fm5 Page 12 Tuesday, December 22, 1998 3:52 PM GB CONTENTS BEFORE USING THE APPLIANCE PAGE 13 SAFEGUARDING THE ENVIRONMENT PAGE 13 PRECAUTIONS AND GENERAL RECOMMENDATIONS PAGE 14 HOW TO USE THE REFRIGERATOR COMPARTMENT PAGE 15 HOW TO USE THE FREEZER COMPARTMENT PAGE 16 HOW TO DEFROST THE FREEZER COMPARTMENT PAGE 18 HOW TO CLEAN THE REFRIGERATOR COMPARTMENT PAGE 18 CARE AND MAINTENANCE PAGE 19 TROUBLESHOOTING GUIDE PAGE 19 AFTER-SALES SERVICE PAGE 20 INSTALLATION PAGE 20 ELECTRICAL CONNECTION PAGE 21 12 33051-gb.fm5 Page 13 Tuesday, December 22, 1998 3:52 PM BEFORE USING THE APPLIANCE Your new appliance is a combined fridge freezer exclusively for domestic use. The freezer compartment can be used to deep freeze fresh and cooked food, make ice cubes, and for the storage of frozen and deep-frozen food; defrosting the freezer is a manual procedure. The refrigerator compartment, which has an automatic defrost feature, is used for the storage of fresh food and beverages. To get the most out of your new appliance, read the user handbook thoroughly. The handbook contains a description of the appliance and useful tips for storing food. Keep this handbook for future consultation. 1. After unpacking the appliance, make sure that the doors shut properly. Any damage must be reported to your retailer within 24 hours after delivery of the appliance. 2. Wait at least two hours without moving the appliance before connecting it to the power supply. 3. Appliance installation and electrical connections must be carried out by a qualified technician in accordance with the manufacturer’s instructions and local regulations. SAFEGUARDING THE ENVIRONMENT 1. Packing The packaging material is 100% recyclable (marked with recycling symbol). Adhere to local regulations when disposing of packaging material. The packaging material (plastic bags, polystyrene parts, etc.) is potentially dangerous and must be kept out of reach of children. 2. Product The appliance is made from recyclable materials and must be scrapped in accordance with local waste disposal regulations. Make the appliance unusable by cutting off the power cord. The appliance must be consigned to an authorised collection centre for the recovery of refrigerant gas. Information: This appliance does not contain CFCs (replaced with R134a) or HFCs (replaced with R600a Isobutane). For information, refer to the rating plate affixed to the appliance. 13 33051-gb.fm5 Page 14 Tuesday, December 22, 1998 3:52 PM PRECAUTIONS AND GENERAL RECOMMENDATIONS • • • • • • • Use the refrigerator compartment only for storing fresh food and beverages and use the freezer compartment only for storing frozen food, freezing fresh food and making ice cubes. Do not cover or close the air vents. Do not store liquids in glass containers in the freezer compartment - danger of bursting. Do not eat ice cubes or ice lollies immediately after taking them out of the freezer compartment - risk of “cold” burns. Do not allow children to play or hide inside the appliance - risk of becoming entrapped and suffocating. Do not ingest the contents (non-toxic) of the ice packs. Before cleaning or servicing, always unplug the appliance or switch the power supply off. Declaration of conformity • This appliance is intended to come into contact with foodstuffs and conforms to D.L. 108 of 25.01.1992 (European Directive 89/109/EEC). Information Appliances with isobutane (R600a) Isobutane is a naturally occurring low environmental impact gas. Caution is required, however, because Isobutane is inflammable. Take care not to damage the pipelines of the refrigerant circuit. 14 33051-gb.fm5 Page 15 Tuesday, December 22, 1998 3:52 PM HOW TO USE THE REFRIGERATOR COMPARTMENT This appliance is a refrigerator with a 4 star freezer compartment. Defrosting of the refrigerator compartment is performed automatically. The refrigerator can operate in room temperatures between +10° C and +38° C. Optimal performance of the appliance depends on the climatic class, which is indicated on the rating plate. Switching on the appliance Plug in the appliance. The thermostat knob in the refrigerator compartment serves to adjust the temperature in both the refrigerator and freezer compartment if your appliance is equipped with a single compressor. Refrigerator compartment and freezer compartment temperature adjustment is independent in the case of appliances with two compressors (see product description sheet). Temperature adjustment 1. To ensure correct operation and the best possible food storage in both compartments, set the thermostat in accordance with the indications on the enclosed product description sheet. 2. To alter the temperature in the refrigerator and freezer compartments set the thermostat knob to: • lower numbers 1-2 (MIN) if you want to INCREASE the temperature; • higher numbers 5-7 (MAX) if you want to DECREASE the temperature. Thermostat setting z switches off all functions of the appliance including the interior light. Note: The room air temperature, the number of times the door is opened and the position of the appliance will affect the temperature in the refrigerator and freezer compartments. Take these factors into consideration when you set the thermostat. For example if the machine is operated in a room with high temperature you may need to set the thermostat to a low number. Using the refrigerator compartment Position the food as shown in the figure. A Cooked food B Fish, meat C Fruit and vegetables D Bottles E Butter F Dairy products, cheese Notes: • The space between the shelves and the rear wall of the refrigerator compartment must be unobstructed to allow air circulation. • Do not place the food in direct contact with the rear wall of the refrigerator compartment. • • • Do not place hot food in the refrigerator. Store liquids in closed containers. Storage of vegetables with high water contents can lead to the formation of condensation: this will not affect the correct operation of the appliance. 15 33051-gb.fm5 Page 16 Tuesday, December 22, 1998 3:52 PM HOW TO USE THE FREEZER COMPARTMENT The appliance has a 4 star freezer compartment in which food can be stored for the time indicated on the packaging. The freezer can also be used to freeze fresh food by positioning it on the racks; place frozen food in the lower basket so that there is no contact with fresh food that has yet to be frozen. The quantity of fresh food that can be frozen in 24 hours is shown on the rating plate. Freezing fresh food If your appliance is equipped with a single compressor: Set the thermostat knob to 2-3. If the appliance is equipped with a freeze button, press it to activate the function (the yellow indicator light will switch on). Also the red indicator light (models with control panel) may switch on. The red indicator light will switch off when the freezer compartment has reached the optimum temperature. Note: The freeze function makes it possible to freeze fresh food while maintaining the temperature in the refrigerator compartment at the optimum level. • • Rapid freezing function If your appliance is equipped with two compressors, activate the rapid freezing function 6 hours before inserting fresh food to obtain the maximum freezing power as indicated on the rating plate. Important: • Before freezing, wrap and seal fresh food in: aluminium foil, cling film, air and water-tight plastic bags, polythene containers with lids or special freezer containers. • Arrange the fresh food in the upper area of the freezer compartment, leaving sufficient space around each pack for the air to circulate. • The food will be completely frozen in 24 hours. • Press the rapid freezing button to switch off the function (yellow indicator light switches off). 16 Temperature alarm function (control panel versions) When the appliance is running normally or when food is being frozen, the red led may switch on (in certain models this will be accompanied also by an audible signal) informing you that the temperature in the freezer compartment is too high. This may occur in the following situations: • when the appliance is switched on for the first time; • when it is switched on following defrosting and cleaning; • if you load too much food at room temperature; • if the freezer door has been left ajar; • if the “freezer thermostat knob” on the control panel is advanced towards the “MAX” setting (intense cold); To mute the acoustic alarm press the “Fast freeze” button. When temperature in the freezer compartment has fallen to acceptable levels, the red indicator LED will switch off automatically. At this point remember to switch off the “Fast freeze” function. 33051-gb.fm5 Page 17 Tuesday, December 22, 1998 3:52 PM HOW TO USE THE FREEZER COMPARTMENT Note: The temperature in the freezer compartment is maintained at the ideal level for the storage of frozen food also during power failures of limited duration, although it is advisable to avoid opening the freezer compartment door during such periods. Important: The table alongside shows the recommended maximum storage time for frozen fresh foods. MONTHS FOOD When purchasing frozen food products: • ensure that the packaging is not damaged (frozen food in damaged packaging may have deteriorated). Avoid packages that are swollen or show evidence of damp areas indicating that the food may have thawed partially during its period of storage. • When shopping, leave frozen food purchases till last and transport the products in a thermally insulated cool bag. • Place the items in the freezer compartment as soon as you get home. • If food has thawed, even partially, do not refreeze it. Consume within 24 hours. • Avoid subjecting foods to temperature variations. Observe the “best before” date on the package. • Always observe the storage information on the package. Removing the baskets • Pull out fully, raise slightly and remove. Note: The freezer compartment can be used without the two upper baskets to increase storage space for large products. The lower basket must not be removed. Place the food products directly on the racks. After inserting food, ensure that the freezer compartment door closes properly. Making ice cubes • • • Pour water into the ice tray up to 2/3 full and place it in the freezer compartment. If the ice tray sticks to the shelves, do not use pointed or sharp objects to detach it. Bend the ice tray slightly to remove the cubes. 17 33051-gb.fm5 Page 18 Tuesday, December 22, 1998 3:52 PM HOW TO DEFROST THE FREEZER COMPARTMENT Before servicing or cleaning the appliance, unplug it from the mains or disconnect the electricity supply. Defrost the freezer compartment once or twice a year or when the formation of ice on the racks is excessive. It is perfectly normal for ice to form on the racks. The amount and speed at which the ice forms depends on room air temperature and humidity and the frequency with which the door is opened. Ice formation is concentrated on the racks at the top of the freezer compartment. If possible, defrost the freezer compartment when it is nearly empty. • • • • • • • • • • Remove the food from the freezer compartment, wrap in a newspaper and group together in a cool place or in a portable cooler. Leave the freezer door open so that the ice can thaw. Pull out the defrost water drain and place a tray below it. Clean the interior of the freezer compartment with a sponge and warm water and/or neutral detergent. Do not use abrasive products. Rinse the interior and dry thoroughly. Fit the drain back into place. Put the food back into the freezer compartment. Close the compartment door. Plug in the appliance / reconnect the electricity supply. Switch the appliance on. HOW TO CLEAN THE REFRIGERATOR COMPARTMENT The refrigerator compartment must be cleaned periodically. Defrosting of the refrigerator compartment is completely automatic. Droplets of water on the rear wall of the refrigerator compartment indicate that the periodic automatic defrost cycle is in progress. The defrost water is routed to a drain outlet and into a container on the compressor from which it evaporates. Clean the defrost water drain outlet regularly using the tool supplied with the appliance. This precaution ensures that defrost water is removed correctly from the interior of the refrigerator compartment. Before cleaning the refrigerator compartment, unplug the appliance from the mains. • Use a sponge with warm water and/or neutral detergent. • Rinse the interior and dry with a soft cloth. Do not use abrasive products 18 33051-gb.fm5 Page 19 Tuesday, December 22, 1998 3:52 PM CARE AND MAINTENANCE Prolonged disuse 1. Empty the refrigerator and freezer compartments. 2. Unplug the appliance from the mains. 3. Defrost and clean the interior of both compartments. 4. Leave the doors open to prevent the formation of mould, odours and oxidation. TROUBLESHOOTING GUIDE 1. The appliance is not working. • Is there a power failure? • Is the plug properly inserted in the socket? • Is the mains power switch set to ON? • Has the fuse blown? • Is the power cord in perfect condition? • Is the thermostat knob on position z (Stop)? 2. Temperature is not low enough. • Are the doors closed properly? • Is the appliance installed next to a heat source? • Is the thermostat setting correct? • Are the air circulation grilles blocked? 3. Temperature is too low. • Is the thermostat setting correct? 4. Water collects at bottom of refrigerator compartment. • Is the defrost water drain outlet blocked? 5. The interior light is not working. Perform the checks for problem 1, and then: • Unplug the appliance. To access the bulb, refer to the instructions and illustration on the attached product description sheet. • Check the bulb and, if necessary, replace it with an equivalent one (15 W max.). 6. Red LED on freezer control panel remains lit / acoustic alarm sounds. (see "How to use the freezer compartment") • Have you just loaded a large quantity of fresh food? • Freezer door properly closed? Notes: • The front edge of the appliance may be hot. This prevents the formation of condensation and is not a defect. • Gurgling and hissing noises due to expansion in the refrigerant circuit are normal. 19 33051-gb.fm5 Page 20 Tuesday, December 22, 1998 3:52 PM AFTER-SALES SERVICE Before calling After-sales Service: 1. See if you can solve the problem yourself with the help of the "Troubleshooting Guide". 2. Switch the appliance on again to see if the problem persists. If it does, switch off and wait for about an hour before switching on. 3. If the problem persists after this action, contact After-sales Service. Specify: • the nature of the fault, • the model, • the service number (the number after the word SERVICE on the rating plate on the inside of the appliance), • your full address, • your telephone number and area code. Note: The direction of door opening can be changed. If this operation is performed by After-sales Service it is not covered by the warranty. INSTALLATION • • • • • Install the appliance away from heat sources. Installation in a hot environment, direct exposure to the sun or installation near heat sources (heaters, radiators, cookers) will increase power consumption and should therefore be avoided. If this is not possible, the following minimum distances must be respected: • 30 cm from coal or paraffin stoves; • 3 cm from electric or gas cookers. Install the appliance in a dry, well-ventilated place. Clean the interior (see the relative heading in this handbook). Fit the accessories. Electrical connection • • • • • Electrical connections must be made in accordance with local regulations. Voltage and power consumption are indicated on the rating plate inside the appliance. The appliance must be earthed by law. The manufacturer declines all liability for injury to persons or animals and for damage to property resulting from failure to observe the above prescriptions. If the plug and socket are not of the same type, have the socket replaced by a qualified electrician. Do not use extension leads or adaptors. Disconnecting the appliance It must be possible to disconnect the appliance by unplugging it or by means of a two-pole switch fitted upline of the socket. 20 33051-gb.fm5 Page 21 Tuesday, December 22, 1998 3:52 PM ELECTRICAL CONNECTION For Great Britain only The wires in the mains lead are coloured in accordance with the following code: BLUE - “NEUTRAL” (“N”) BROWN - “LIVE” (“L”) GREEN AND YELLOW - “EARTH” (“E”) 1. The GREEN AND YELLOW wire must be connected to the terminal in the plug which is marked with the letter “E” or by the Earth symbol 4 or coloured green or green and yellow. 2. The BLUE wire must be connected to the terminal which is marked with the letter “N” or coloured black. 3. The BROWN wire must be connected to the terminal which is marked with the letter “L” or coloured red. Warning - this appliance must be earthed Fuse replacement If the mains lead of this appliance is fitted with a BS 1363A 13amp fused plug, to change a fuse in this type of plug use an A.S.T.A. approved fuse to BS 1362 type and proceed as follows: 1. Remove the fuse cover (A) and fuse (B). 2. Fit replacement 13A fuse into fuse cover. 3. Refit both into plug. Important: The fuse cover must be refitted when changing a fuse and if the fuse cover is lost the plug must not be used until a correct replacement is fitted. Correct replacement are identified by the colour insert or the colour embossed in words on the base of the plug. Replacement fuse covers are available from your local electrical store. Connection to a rewirable plug If the fitted plug is not suitable for your socket outlet, then it should be cut off and disposed of in order to avoid a possible shock hazard should it be inserted into a 13A socket elsewhere. A suitable alternative plug should then be fitted to the cable. For the Republic of Ireland only The information given in respect of Great Britain will frequently apply, but a third type of plug and socket is also used, the 2-pin, side earth type. In this case, the wire which is coloured GREEN AND YELLOW must be connected to the EARTH contact, and the two wires to the two pins, irrespective of colour. The supply to the socket must be fitted with a 16 amp fuse. 21 CB 18 M - 16M /1c PRODUCT DESCRIPTION GB 4 5 3 6 A 2 8 9 1 7 10 B 12 13 11 A. Refrigerator compartment B. 1. Crisper drawers Freezer compartment 10. Upper basket (for fast freezing of fresh food products) 2. Crisper cover 11. Storage area for frozen or deep-frozen food 3. Shelves / shelf area 4. Thermostat control knob / light 12. Ice cube tray (inside basket) 5. Top shelf 13. Freezer compartment inner door panel 6. Door trays 7. Bottle shelf 8. Removable bottle retainer 9. Rating plate (at side of crisper drawer) Cool zone Intermediate temperature Cold zone Note: the number of shelves and the design of the accessories may vary depending on the model. Shelves and door trays are all removable. Warning: refrigerator accessories are not dishwasher-resistant. DE GB FR NL ES PT IT GR SE NO DK FI CB 18 M - 16M /1c The fridge-freezer is switched on by means of the thermostat knob in the refrigerator compartment. The thermostat knob also provides temperature adjustment for both the refrigerator and freezer compartments. Refrigerator / Freezer compartment controls A. B. C. D. E. Thermostat knob Light switch Light diffuser Freeze button Thermostat control reference Thermostat setting z: no refrigeration, no light Thermostat setting 1 : minimum cooling Thermostat setting 7 : maximum cooling The average recommended thermostat setting is 3. Pressing the freeze button (D) increases freezing power. Fresh food will be completely frozen after 24 hours and the freeze function should be switched off. When room temperature is lower than 16°C, activating the freeze function (D) will improve food storage properties. Note: The room air temperature, the number of times the door is opened and the position of the appliance will affect the temperature of the fridge and freezer compartments. Take these factors into consideration when you set the thermostat. Removing the diffuser 1 - Hold the diffuser as shown and squeeze it slightly 2 - Slide it towards the rear of the appliance 4619 997 78992 DE GB FR NL ES PT IT GR SE NO DK FI