1
English
GB
ENVIRONMENTAL HINTS
For Great Britain only:
Packing
Do not throw the packing into the garbage: first sort out the
different materials (i.e.: steel, cardboard, polystyrene) following local regulations.
Conformity declaration
This appliance incorporates parts intended to come into contact
with foodstuffs in compliance with EEC directive 89/109/CEE.
Information
This appliance is free of CFC’s (refrigerant circuit contains R134a)
or free of HFC’s (refrigerant circuit contains R600a - Isobutane).
For more details, please refer to the rating plate on the appliance.
For appliances with Isobutane (R600a)
The refrigerant Isobutane is a natural gas of high environmental compatibility but which is inflammable. Therefore, it is essential to ensure that the ducts of the refrigerant circuit do not
get damaged.
KNOW YOUR APPLIANCE
The appliance you have just bought, marked by the
symbol,
allows the freezing - in of fresh and cooked food, the production
of ice cubes and the storage of frozen food. Please read these instructions carefully, as they include a description of your appliance
and the useful hints to enable you to achieve the best performances required to freeze fresh food and to store already frozen food.
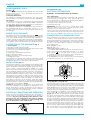
DESCRIPTION OF THE APPLIANCE (Fig. 1)
A) Control panel
1) Operation control lamp (green light)
2) Temperature control lamp (red alarm light) with acoustic signal
3) Fast freeze control lamp (yellow light)
4) Fast freeze switch
5) Temperature control knob (thermostat)
6) Open door alarm switch
B) Baskets (freezing - in and storage baskets)
C) Storage basket only.
Some models are supplied with containers filled with cooling
liquid(eutectics): remove them from the back of the basket(C)
and position them next to each other inside the basket.
INSTALLATION (Fig. 2)
Ensure that the appliance is not damaged. Transit damages must
be reported to your dealer within 24 hours of receipt of the appliance. The appliance should not be installed close to heat sources
such as cookers, central heating, boilers, sunlight, etc. It must
however be located in a well ventilated dry space. If the following
type of installation cannot be avoided, respect these side distances:
a) between appliance and oil or coal stoves: 30 cm minimum.
b) between appliance and gas or electric cooker: 3 cm minimum.
The appliance must stand on a stable and level surface: install it
following the instructions given on the rear of the template, delivered with the appliance. Leave the appliance to stand for two
hours before connecting it to the electricity supply. We suggest
that during this time the interior is cleaned with a sponge dampened in a solution of water and vinegar, after which the baskets
can be fitted into the appliance (Fig.3).
Attention: Accessibility to the plug has to be guaranteed
even after installation of the appliance to disconnect it, if required. Alternatively, connect the appliance to the mains by
means of a two-pole switching device with contact separation
of 3 mm situated in an accessible position.
ELECTRICAL CONNECTION AND OPERATION
Please check that the voltage indicated on the rating plate situated inside the compartment corresponds to the voltage in
your home (Fig. 4-5). The earthing of this appliace is compulsory by law. The manufacturer will accept no liability
for injury to persons or damage to objects arising from
the non observance of this requirement.
4
ELECTRICAL INFORMATION
WARNING - THIS APPLIANCE MUST BE EARTHED
Fuse replacement
If the mains lead of this appliance is fitted with a BS 1363A 13
amp fused plug, to change a fuse in this type of plug use an
A.S.T.A. approved fuse to BS 1362 type and proceed as follows:
1. Remove the fuse cover (A) and fuse (B)
2. Fit replacement 13A fuse into fuse cover
3. Refit both into plug.
IMPORTANT: The fuse cover must be refitted when changing a fuse and if the fuse cover is lost the plug must not be
used until a correct replacement is fitted.
Correct replacements are identified by the colour insert or the
colour embossed in words on the base of the plug. Replacement
fuse covers are available from your local electrical store.
CONNECTION TO A REWIREABLE PLUG
If the fitted plug is not suitable for your socket outlet, then it
should be cut off and disposed of in order to avoid a possible
shock hazard should it be inserted into a 13A socket elsewhere.
A suitable alternative plug should then be fitted to the cable.
The wires in this mains lead are coloured in accordance with
the following code:
BLUE "NEUTRAL" ("N")
BROWN "LIVE" ("L")
GREEN AND YELLOW "EARTH" ("E)
1. The GREEN AND YELLOW wire must be connected to the terminal in the plug which is marked with the letter "E" or by the
Earth symbol
or coloured green or green and yellow.
2. The BLUE wire must be connected to the terminal which is
marked with the letter "N" or coloured black.
3. The BROWN wire must be connected to the terminal which
is marked with the letter "L" or coloured red.
BROWN YELLOW & GREEN BLUE Connection to a
typical 13 amp plug
CABLE CLAMP
For the Republic of Ireland only
The information given in respect of Great Britain will frequently
apply, but a third type of plug and socket is also used, the 2-pin,
side earth type. In this case, the wire which is coloured GREEN
AND YELLOW must be connected to the EARTH contact, and
the other two wires to the two pins, irrespective of colour. The
supply to the socket must be fitted with a 16 amp fuse.
When the appliance is plugged in, if the thermostat knob is not
set to symbol ● , the green and the red lamps (1) and (2)
(Fig.1) light up and the temperature acoustic alarm sounds.
The green control light always remains alight and indicates the
operation of the appliance. The red control light remains alight
until the set operation temperature has been attained. It lights
up again when the temperature inside the freezer rises due to
frequent or prolonged door opening, and when the appliance
has been loaded with fresh food to be frozen. In this case,
switch on the fast freeze facility until the red control light goes
off. The acoustic signal indicates that the red control light is alight. It stops when the red control light goes off or when the
fast freeze facility is switched on (yellow control light on).
English
ADJUSTMENT OF THE TEMPERATURE
The thermostat (Fig. 1) controls the temperature inside the
appliance. Position ● indicates that the operation of appliance
is interrupted. The ideal storage temperature of frozen food
for a long time is -18°C. In normal ambient conditions (temperature between +20°C and +25°C), we suggest you adjust the
thermostat control knob to a middle position. To obtain colder
or warmer temperatures than -18°C, turn the thermostat control knob to the highest or lowest setting respectively. We remind you that internal temperatures are affected by the location
of the appliance, the temperature of the surrounding air, the
frequency of the door opening. The setting of the thermostat
may have to be varied to allow for these factors. To check the
temperature of the food stored, place the thermometer (if delivered) under the food; if it is placed on the food it will indicate
the temperature of the air which does not correspond to that of
the food stored.
USE OF THE FREEZER COMPARTMENT
This appliance is equipped with an acoustic alarm which
sounds when the door is left open. In case of prolonged door
opening, to stop the alarm pull switch (6) (Fig.1).
FREEZING IN (Fig. 6)
The amount of fresh food which can be frozen in a 24 hours
period at an ambient temperature of +25° C is stated on the
rating plate (Fig. 5).
- To freeze the maximum quantity of foods allowed, switch on
the fast freeze facility (4) (yellow light on) 24 h prior to loading
the foods, which should be positioned directly on the grid
without using the baskets.
At completion of the freezing-in operation, switch off the fast
freeze facility (yellow light off).
- The freezing-in time diminishes for loads less than the maximum.
- Very small loads can be frozen without switching on the fast
freeze facility.
Do not store warm foods in the freezer. Never re-freeze partially or completely defrosted foods.
Prepare and wrap foods to be frozen in aluminium or plastic
foils or place them in appropriate containers. Label the
packets indicating the freezing-in date and the contents. The
freezer compartment maintains the storage temperature for
15 hours approx. even in case of power failure.
We suggest however you leave the door closed during this time.
- Fizzy drinks should not be frozen and some products, such as
flavoured water ices, should not be consumed too cold.
Note: Due to the efficiency of the door seal, it is not always
possible to open the freezer door immediately after closing it.
Wait some minutes before trying to open it.
PRODUCTION OF ICE CUBES
3/4 fill the ice cube trays with water and place them in the low
temperature compartment. If the trays stick to the bottom of
the compartment, do not detach them with sharp or cutting instruments, which could damage the appliance. Use, if necessary, the handle of a spoon. To allow removal of ice cubes
from plastic trays, bend them slightly.
Attention: Do not eat ice cubes or ice lollies immediately after
removal from the low temperature compartment as they may
give rise to cold burns.
STORAGE OF FROZEN FOOD
When buying frozen food, it is suggested to use thermal bags or
cold boxes. They should be the last purchases made and should
be well wrapped in newspaper. When home, store them in the
compartment, with the least possible delay. In any case these
foods have to be used within the date printed on the packet.
THAWING
Here are some basic suggestions:
Raw vegetables: Do not thaw - put straight into boiling water and cook as usually.
Meat (large cuts): Thaw in the refrigerator without unwrapping
them. Before cooking, leave at room temperature for some hours.
(Small cuts): Thaw at room temperature or cook directly.
GB
Fish: Thaw in the refrigerator without unwrapping or cook directly before being completely thawed.
Previously cooked food: Re-heat in the oven without removing from its aluminium container.
Fruit: Thaw in the refrigerator.
DEFROSTING (Fig. 7)
Generally you need to defrost two or three times a year when
the layer of frost reaches a 3 mm thickness. We suggest you periodically remove the frost from the freezing plate by means of a
plastic scraper. Avoid using sharp or cutting instruments.
Defrosting should be carried out when the quantity of food stored is minimum. If the appliance is not emply, to avoid the food
thawing out during defrosting, switch on the fast freeze facility
some hours prior to defrosting so that the food stored reaches
the coldest temperature. Wrap the frozen food into several
layers of newspaper (or in a cover) and place them in the refrigerator or in a cool place. Adjust the thermostat control knob to
position ●, disconnect the appliance from the mains and leave
the door open. Remove the baskets by pulling forward and up.
Do not use commercial defrosting products as they could contain dangerous components. At completion of defrosting, clean
and dry the appliance carefully. Reconnect the freezer to the
mains supply and switch on the fast freeze facility. Reload the
freezer with the frozen food. Two hours after the red control
lamp switches off, switch off the fast freeze switch.
MAINTENANCE AND CLEANING
A periodic and proper maintenance will ensure a longer life to
your appliance. Disconnect the appliance from the mains supply
before any intervention (Fig. 8). Clean periodically the appliance
with a solution of water and vinegar (Fig. 9). Rinse and dry thoroughly. Never use abrasive or detergents. Clean periodically the
door gasket with water and dry carefully. Avoid soiling the door
gasket with oil or other grease which could damage it. After
cleaning, reconnect the appliance to the mains supply.
HINTS FOR HOLIDAYS (Fig. 13)
If you plan to be away for a long time, disconnect the appliance
from the mains, empty and clean the inside. Leave the door
open to prevent the appliance from smelling musty. If you plan
to be away for a short time, let the appliance operate normally.
SERVICE (Fig. 14-15)
The incorrect operation of the appliance is not always due to a
fault but it may also result from poor installation or usage.
To prevent unnecessary service calls for which you will be
charged, we suggest you consult this trouble-shooting guide.
1. If the red light is on continuously or flashing, the internal temperature is too high. Check that:
- the door is not properly shut (Fig. 13);
- the thermostat control knob is correctly set (see chapter
“Adjustment of the temperature”);
- the freezer is not near a source of heat;
- there is a large build up of frost on the inner walls;
- the air flow is not restricted.
If your appliance is fitted with a drawer situated on the bottom left hand side (Fig. 14-15), we suggest you remove it and
you clean the inside with a soft brush.
2. If the compressor functions continuously. Check that:
- the fast freeze switch is turned off;
- the ambient temperature is too warm;
- the door is not being opened too frequently.
3. The appliance is excessively noisy: Check that:
- the appliance is level.
4. The appliance does not operate. Check that:
- the thermostat control knob is not set to position ●;
- there is not a power failure;
- the plug is making good contact with the supply socket;
- any automatic circuit breakers have tripped or any fuses blown;
- the supply cable is intact (see also Note).
Note: When replacing a damaged supply cord, be sure the new
cord is correctly clamped. If you have followed this trouble
shooting guide and your freezer still does not work properly,
get in touch with your Retailer or Service Agent. State clearly
what is wrong and the type and serial number of your freezer.
5