1
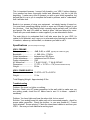
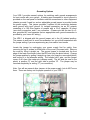
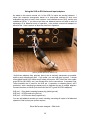
Using your VRE-1 Preamplifier
Congratulations on your purchase of the VRE-1 preamplifier. The VRE-1 is
simple to setup and operate, but that simplicity belies an exceptionally
sophisticated design that includes a great deal of innovative thinking and the best
parts available today. Although reading this manual may not be necessary for
you to begin enjoying your VRE-1, I urge you to take a few minutes to familiarize
yourself with the more novel aspects of its design.
Package contents:
•
•
•
•
•
•
the VRE-1 preamp
its companion power supply
1 analog power link cable by Stealth Audio Cables
1 utility power link cable
a polishing cloth
owner’s manual
Unpacking your VRE-1:
Your VRE-1’s box and packing have been carefully designed to protect it during
shipping. Please keep all packing materials - these may be important should you
ever need to store or ship your preamp again.
Both the VRE-1 and its power supply are placed in bags to protect their finish
during shipping. The power supply is finished in durable “powder coat” - a tough,
scratch-resistant finish. This may be cleaned with any sort of spray cleaner and
a paper towel, etc. The VRE-1 is built of Corian (a registered trademark of the
DuPont corporation - see www.Corian.com for more information) - a “solidsurface” material often used in home construction. Corian is a very tough, stonelike material that can withstand a lot of abuse, but the high polish on the VRE-1
chassis does require some care to maintain. Please use the polishing cloth
included for light cleaning, and avoid paper towels (which are slightly abrasive)
that may dull the finish over time. Any cleaning or polishing product suitable for
acrylic (or for Corian specifically) may be used, but good old Pledge works very
well for general maintenance. If cleaning is required first, a glass cleaner like
Windex and a soft rag should do the trick, followed by a shot of Pledge and the
polishing cloth. Clean the polishing cloth with your regular laundry as needed.
1
Preparing for use - locating your VRE-1:
Your VRE-1 has a lot of wonderful attributes, and one of them is the fact that
neither it nor its power supply produce appreciable heat. In addition, the Corian
chassis is fairly immune to heat, so the VRE-1 may be installed in an enclosed
cabinet. This means that you may locate your VRE-1 and its power supply pretty
much wherever you wish, although I recommend that you keep the VRE-1 at
least one foot from any piece of equipment that includes a transformer (including
its own power supply). This will minimize the possibility of picking-up any hum or
radiated noise. The power supply must be kept within the reach of its power link
cables (5 feet, or about 1.5M) but may be located at any angle as you deem
useful. Refer to the addendum at the end of this manual for more information
about the sonic effects of equipment racks and isolation bases.
Situate your VRE-1 and power supply, then attach the supplied power link
cables. Their connectors prevent you from making a mistake in alignment - they
will only mate one way. Both are locking. Align the key of the utility power link
cable with its mating connector (Power 2), press it in fully, and screw-down the
locking collar (do not over-tighten). The analog power link by Stealth (Power 1)
uses a special locking connection made by Neutrik. With the release tab in the
up position, line the connectors up and rotate the cable end slightly counterclockwise until it slides in. Press it in fully and rotate the cable end clockwise
until you hear the locking “click.” To disconnect, slide the locking tab back and
rotate the cable end counter-clockwise until it stops, and then pull it out.
Make sure the volume control is down (fully counter-clockwise) and the Mute
switch is also down (muted). Then plug-in the AC power cord. Your VRE-1 is
now on and ready for use. (Note: If you do not see the LEDs light on both the
power supply and VRE-1, please refer to the troubleshooting section at the end
of this manual.) There is no power switch because your VRE-1 is designed to
stay on continuously. Simply unplug the AC cord if you need to turn your preamp
off (engage Mute first).
Please Note: The VRE-1’s design includes a variety of practical safety features,
including a robust Mute and power system. You may connect or disconnect the
power cables in any sequence, even while the power supply is “live” (always be
sure that Mute is engaged). Both power link cables are required for operation,
but nothing bad will happen if only one is connected, since the VRE-1 simply
won’t work. So long as the VRE-1 is muted (Mute switch down), you won’t hear
anything from it. The Mute is designed as a true “brick wall.” When it is
engaged, nothing will escape the preamp (mute is engaged by default when the
power is off). Finally, even if the power goes off or on unexpectedly while the
VRE-1 is unmuted, you should hear little or nothing in the way of pops or thumps.
2
Front Panel layout
•
Input selector switch: Rotary switch selects one of 4 inputs.
•
Polarity switch and LED indicator: Sets system polarity (absolute
polarity, sometimes called “absolute phase”). Up is normal, non-inverted
polarity, and flipping the switch down inverts signal polarity. The LED then
lights to indicate that system polarity is inverted. Polarity switching is done
at the user’s discretion and “correct” system polarity is determined by ear.
•
Power LED: Indicates that system power is present.
•
Mute switch and LED indicator: Switch up for listen; down for mute.
The LED will light to indicate that mute is engaged.
•
Volume control: Set system volume with this precision 24-step
attenuator. Note: in order to extend the useful range of this control,
turning the control fully counter-clockwise (all the way down) does not turn
the sound fully off. Engage the Mute switch for system silence.
-------------------------------
3
Front Panel layout
•
Input selector switch: Rotary switch selects one of 4 inputs.
•
Polarity switch and LED indicator: Sets system polarity (absolute
polarity, sometimes called “absolute phase”). Up is normal, non-inverted
polarity, and flipping the switch down inverts signal polarity. The LED then
lights to indicate that system polarity is inverted. Polarity switching is done
at the user’s discretion and “correct” system polarity is determined by ear.
•
Power LED: Indicates that system power is present.
•
Mute switch and LED indicator: Switch up for listen; down for mute.
The LED will light to indicate that mute is engaged.
•
Volume control: Set system volume with this precision stepped
attenuator. Note: in order to extend the useful range of this control,
turning the control fully counter-clockwise (all the way down) does not turn
the sound fully off. Engage the Mute switch for system silence.
-------------------------------
Rear Panel layout
•
Power connections 1 & 2: Power 1 is the analog DC supply via the
Neutrik connector, while Power 2 supplies DC power to the relays, lights
and Monitor Out buffer.
•
Main Outputs: The XLR jacks provide balanced output via the Jensen
transformers, while the unbalanced RCA connections are direct-coupled to
the JFET buffer amplifiers.
•
Output Ground Switch: Normally left in “float” position. This switch
connects the outer electrode of the RCA jacks to either circuit ground
(“ground”) or leaves them unconnected (“float”). In some systems
grounding the outer RCA contact may be required to eliminate noise.
•
Monitor Out: Essentially the same as the “Tape Out” of the past, this
provides a buffer-isolated signal from the selected input. This output is not
controlled by the volume knob, and is useful for feeding a separate system
like a dedicated headphone amplifier.
•
Monitor Out Defeat Switch: In the interest of maximum purity of the main
signal path, the Monitor Out buffer may be switched off (defeated) if it is
not being used. Just switch this on or off as needed.
4
•
Circuit Ground Connector: This binding post offers access to the system
electrical ground if needed. There is normally no connection to this post.
•
Main Input Group: 4 pairs of inputs are provided, labeled 1 thru 4
(corresponding to the front panel Input Selector switch). Input 1 is a
dedicated balanced input with XLR connectors, while 2 thru 4 are via RCA
unbalanced connectors.
I feel that this will be the most useful
arrangement for most users since it is still rare for someone to have more
than 1 balanced source piece. However, the fact is that all of the inputs
are actually balanced - all connections go directly to the input transformers
via “floating” (ungrounded) lines. If you happen to have more than one
balanced source, custom XLR-to-RCA adapters are available to convert
inputs 2 thru 4 to fully-balanced operation.
VRE-1 Design Highlights
Your VRE-1 is the product of many years of careful research into all aspects of
preamplifier behavior - circuit topology, parts performance, physical layout,
chassis materials, and power supply design. After many years in the audio field
dealing with equipment that colors or changes sound, I wanted to develop a
preamplifier that would impose no character of its own, acting as a transparent
window onto the original music and recording. We’ve all heard that claim
before…the old “straight wire with gain” once again. Well…yes! That’s correct.
However, unlike past attempts sometimes characterized as “cold” and
“analytical,” my development work has been guided by an unwavering
commitment to deliver the warmth and soul of music as it is recorded and heard
in live circumstances. What I’ve achieved is a synthesis of the best attributes of
passive circuits (tonal neutrality, natural harmonic texture, freedom from noise
and active-circuit distortion) with the best characteristics of active preamps (great
dynamics, vivid clarity, wide-open dimensionality, outstanding bass foundation
and slam) as well as the relaxed musicality of the best tube designs.
Let’s address the issue of tubes for a moment. I have experimented extensively
with tubes, both in the preamp circuitry and in the power supply. In my
experience, tubes simply cannot deliver the degree of tonal neutrality that I
demanded for the VRE-1. My goal was not to make yet another “good sounding”
preamp, but rather to deliver an absolutely transparent window onto the original
recording or master tape.
My listening tests led me to an exceptionally transparent JFET buffer circuit with
no gain which, when paired with my choke-filtered power supply, produces
unparalleled overall performance. When I found the right set of coupling
transformers (Lundahl on the input; Jensen on the output), the last pieces of the
puzzle fell into place and the VRE-1 was born. Its transformers act as a kind of
5
near-ideal load on the input and confer that magic tube-like musicality. They also
act as a “brick wall” filter against DC and RFI contamination. In addition, they
allow the VRE-1 to be configured for voltage gain (up to +6dB) if it is needed.
Thus, the VRE-1 is a “passive” preamp -- but with gain.
Finally, all of the parts and materials used to build your VRE-1 are the best
available. A partial list includes parts from Lundahl Transformers, Jensen
Transformers, Avel-Lindberg, Shallco Switch, Black Gate, Audio Note, Vishay,
Van den Hul, Shunyata, Wonder Wire & solder, WBT, Neutrik, EAR Specialty
Composites, Vibrapod, and DuPont Corian.
Your VRE-1 delivers the following performance attributes:
•
Perfectly coherent clarity: seamless character top-to-bottom, with no
region emphasized or depreciated, with no sonic vagueness, muddiness,
smearing, or veil.
•
Top-to-bottom transparency: that “see-through” quality that gives you
the feeling of looking across the space and venue of the original recording.
•
Effortless dynamic expression: from the quietest passages to the
loudest, the VRE-1 portrays music’s full dynamic power and subtlety -from the thunderous strike of a drum to the nearly subliminal shift in a
singer’s breath.
•
Pinpoint focus and localization of instruments and voices within a 3-D
sound field – exquisitely clear individualization of musical lines.
•
Deep emotional connection with the music: perhaps the most elusive
and important quality of all.
•
The ability to achieve all of the above at any volume level.
•
Elegant simplicity of design with intuitive control operation.
•
A beautiful, non-resonant chassis (solid-surface-technology) which
makes an important contribution to its stunning performance.
•
Safe, reliable, low–voltage operation generates practically no heat.
•
Absolute reliability and stability of performance over time. The VRE-1
will always ready to deliver beautiful music, whether it is new or many
years old.
6
The Power Supply
The VRE-1’s companion power supply provides carefully tailored DC power for
the proper operation of your preamp. The “Power 1” connection provides +/- 24
VDC of choke-filtered, unregulated power, while the “Power 2” connection
provides +/- 24 VDC of fully regulated power for the relays, LEDs, and Monitor
Out buffer amplifier.
Power supply design is critical to superior performance. In a very real sense, it is
the power supply we are hearing when we listen to music. One of the keys to the
VRE-1’s superiority is that its JFET buffer circuitry does not require a regulated
supply, so this source of signal degradation was eliminated. Voltage regulators
are very much like amplifiers, and all of the same rules of sound quality apply to
them. Eliminating this regulator stage allows the VRE-1 to get that much closer
to being a true “window on the performance.”
The VRE-1 supply uses the finest quality parts I have found through careful study
and experimentation: a superb toroidal power transformer, soft-recovery diodes,
outstanding chokes from Lundahl, superior capacitors, resistors, and wire, and
selected damping feet. The critical analog power-link cable is custom-made for
the VRE-1 by Stealth Audio Cables, and uses their proprietary molybdenum carbon conductor technology.
This was chosen after lengthy listening
evaluations with a wide variety of cable options. Even the AC inlet is chosen for
superior clarity and transparency. Each power supply is “voiced” by ear before
delivery, which involves listening to the various permutations of transformer
secondary wiring. Its design and construction is an exercise in total “overkill” - its
current capability vastly exceeds the requirements of the VRE-1, but I feel this
translates into superior performance and reliability. Literally, only the best will do.
Chassis and Feet
Every aspect of an audiophile component’s design affects its performance to one
degree or another, and this is true of chassis materials as well. I discovered long
ago that different metals (aluminum, steel, stainless-steel, copper, brass, etc.)
produced different sonic results with a given circuit, and this led to my use of
aluminum and copper-plated steel as preferred chassis materials. However,
various experiments I did in the course of developing new designs began to
suggest that eliminating metal altogether might produce even better results. This
led to experiments with Nylon, Delrin, different types of wood, and finally to solidsurface synthetic materials. These materials are more difficult to work with than
traditional metals, but I consider the results to well worth the effort. The VRE-1’s
chassis is much more inert mechanically than traditional designs, and the
elimination of metal does away with certain colorations that get in the way of true
transparency.
7
Please Note: The VRE-1 is a hand-built work of “industrial art.” It is a beautiful
object, and a great deal of effort has gone into its creation. Ironically, because it
is hand-made, you may find small blemishes that do not occur in the routine
perfection of mass-marketed consumer goods. We believe you’ll accept these as
part of the unique personality of your VRE-1.
Your VRE-1 comes with a set of high-quality damping feet from Vibrapod.
However, you may wish to experiment with other types of feet, including hard
points. Any change in the feet will affect sonic performance, and it is up to you to
decide if the change is worthwhile. The best accessory feet I have experience
with are the Apex feet from Grand Prix Audio (see www.GrandPrixAudio.com for
more information). CAUTION: Vibrapod Isolators may blemish certain finishes.
Use drink coasters, playing cards, or other thin pieces of paper or plastic under
them to protect your fine furniture.
Interconnect Cables
The subject of interconnect cables is important because they can have a
profound impact on your system’s performance. Your VRE-1 has been designed
to be compatible with all types of cables, but choosing the right set of cables can
enhance your sense of involvement and your listening pleasure. Unfortunately,
there is no way to predict which cables will work best for you, and the fact that I
use a particular brand is no guarantee that they will work as well in your system.
You must evaluate cables by listening to them in your own system, and you must
not allow yourself to be overly swayed by reviews and other opinions. Trust your
own ears and your own judgement.
Break-in Period
The notion that audio equipment changes how it sounds or “breaks-in” over time
is controversial in some circles (much like everything in audio), but it is very real
to me. It seems clear to me that new pieces of equipment undergo a process of
change that may take a few days, or even a few weeks to complete. The exact
reasons why are endlessly arguable, but include electrical, thermal, chemical,
mechanical, and psychological effects. Honestly, I am not interested in debating
the reasons why, but I do want to make you aware of the process.
The break-in phenomenon has become more of an issue in recent years
because the latest high-performance parts seem to take longer to fully break-in.
Some newer parts (like carbon wire) take little or no time to sound their best, but
the great majority of new parts I have discovered take quite a while to fully reveal
themselves. A few parts, like the Lundahl amorphous-core transformers, take an
unusually long time - up to several weeks.
8
This is important because I cannot fully break-in your VRE-1 before shipping.
Your preamp has been thoroughly tested and listened-to, but this is just the
beginning. I make every effort to present you with a good initial impression, but
beyond that it is up to you to complete the break-in process, and to *understand*
that it will take time.
Break-in is a process of using your equipment - not simply leaving it turned on.
You must have something playing (music or some sort of break-in signal) to get
the job done. I feel that playing music normally works perfectly well, but there
are special CDs and LPs made as “break-in discs” that are favored by some.
Check with your audio dealer or music supplier if you are interested in these.
The main thing is to understand that it will take some time for your VRE-1 to
realize its full potential, and I urge you to relax and enjoy listening to music while
it breaks-in, warms-up, settles-down, or whatever you want to call it.
Specifications
(as usual, subject to change)
VRE-1 PREAMP
Gain (factory adjustable) --------Bandwidth -------------------------Output impedance -----------Output impedance -----------Power consumption -------AC Mains fuse -------------------Dimensions ------------------------Weight ----------------------------------
-6dB, 0 dB, or +6dB (typically set at 0dB unity gain)
+/- 3dB <5Hz - 170KHz
balanced out: 250 Ohms
unbalanced out: 50 Ohms
10W
T1A @ 115VAC / T.5A @ 230VAC
17.5”W x 12.75”D x 5”H (includes hardware & feet)
25 lbs
VRE-1 POWER SUPPLY
Dimensions-------------------------- 10.25”W x 9.5”D x 3.625”H
Weight ---------------------------------- 11 lbs
Total Shipping Weight - Approximately 42 lbs
Troubleshooting
Problem: No sound, no lights, no nothing.
Solution: Check your AC power connection to the wall outlet to make sure you
are getting power; check the AC Mains fuse to see if it is blown - replace if
necessary.
Problem: You have lights and hear the relays click, but no sound.
Solution: Your analog power link cable may not be connected properly - check for
proper cable connection. Check the obvious - is your amp turned on? Correct
input selected? Source playing? Check the interconnect cables to and from your
VRE-1. Be sure you have selected a working input.
9
Acknowledgements
This project has been in development for a long time, and I sincerely thank
everyone who contributed in any way to its success. However, there are a few
people I would like to point-out for their special contributions…
•
Jim Merod - For his to-the-point observations and criticism, and his
indefatigable efforts on behalf of music, musicians, and the audio
community.
•
Kris Jeter - His hard work keeps the wheels turning here at SMc Audio,
and his good humor makes the work go smoothly.
•
Carl and Lena Carpenter / Carpenter’s Fine Woodworking - Their
precision machining work on the original wooden prototypes and
subsequent Corian models made this project a reality.
•
Jerry Boncer - For all of his help in the past, and for his original design of
the JFET buffer circuit that made its way into the VRE-1.
•
Conrad Lindberg - For all of his help with circuit development and board
layout, and numerous practical suggestions.
•
Lundahl Transformers - For their enthusiastic support and useful technical
insights.
929 El Pajodo Place
Vista, CA 92084
Tel: 760-732-0352
[email protected] / www.SMcAudio.com
10
Getting the most from your VRE-1 preamplifier - a user’s guide
Suggestions for AC cords and accessories
After some thought, I have come to the decision to leave a “standard” AC cord
out of the parts complement. It is my experience that the AC cord is an integral
part of the sound of your VRE-1, and I suggest that you use the best power cord
you can find. Your VRE-1’s amplification circuitry may be thought of as a sort of
valve that modulates the power supply, and it is the quality of the power supply
that you actually hear. I have spent a great deal of time and effort in developing
the VRE-1 and its power supply, and I have examined every detail - right down to
the fuse. A great aftermarket AC cord is a must for getting the best-possible
performance, but I have chosen to not include an aftermarket cord for several
reasons, including matters of personal taste, system synergy, and cost.
My own experience includes cords from Kubala-Sosna (the “Emotion”), Acoustic
Zen (the “Gargantua”), AudioPrism (the “Super Natural S-2”), Magnan Audio (the
“Signature Power Cable’), and Shunyata Research (the “Anaconda”) to name a
few. These are all excellent cords, but each has its own personality and may or
may not work well in your system. Please take some time to do your own
evaluation and you will be rewarded with the best-possible performance from
your VRE-1.
Beyond the power cord (and, obviously, your interconnect cable choices) there
are matters of chassis damping and isolation to consider. Your VRE-1’s Corian
chassis is quite inert on its own, and I have fitted both it and the power supply
with excellent damping feet. Still, the fact remains that your choice of stand
and/or accessory feet will affect performance. In my own system, I have chosen
isolation stand systems by Grand Prix Audio (the “Monaco” series) and their
outstanding “Formula” carbon composite shelves (their “Apex” feet are also
outstanding). My experience suggests strongly that you will not hear everything
your VRE-1 (and your other equipment) has to offer unless you use an isolation
stand system of similar quality. Your choices may differ, but please give some
thought to this part of your system and its sonic effect.
The Corian chassis is both heavy and inert, but you may still wish to experiment
with added weight. Some piece of concentrated mass about the size of a book,
for instance - like a piece of marble, granite, or similar stone - may provide a
noticeable sonic benefit. Be sure to protect the Corian with some soft material.
I have also found that I like the effect of using a Shakti Electromagnetic Stabilizer
(aka the Shakti “Stone”) on top of the power supply. The effect is subtle, but I
feel it contributes to the overall smoothness and liquidity that I enjoy.
If, while enjoying your VRE-1 you find some beneficial accessory or “tweak,”
please let me know. I would appreciate hearing about your experience.
11
Grounding Options
Your VRE-1 provides several options for matching earth ground arrangements
for best results with your system. A binding post connected to circuit ground is
provided on the rear panel to facilitate external connections to other equipment
chassis grounds if need be, and an adjustable ground jumper is provided inside
the power supply. This jumper provides 3 options for the connection between
earth ground and circuit ground: A) isolated connection via an RC network
consisting of a 100 Ohm resistor in parallel with a .01uF capacitor, B) direct
(zero-ohm) connection, and C) no connection. (Please note that the use of a 3wire grounded AC cord assumes that an appropriate earth ground connection is
provided by your house AC wiring.)
The VRE-1 is shipped with this ground jumper set in the (A) isolated position.
This seems to work well in most circumstances, but you should experiment with
the jumper setting if you are experiencing any hum and/or buzz issues.
Locate the jumper by unplugging your power supply first for safety, then
removing the top 2 screws on either side of the cover (4 screws total). Remove
the cover by lifting it straight up. The ground jumper is located near the front
edge of the main circuit board, near the LED wire (see the photo below). Change
the jumper position by pulling it straight up (use your fingers or some small pliers)
and moving it to the alternate setting. The header has 3 pins, and the jumper
covers 2 at a time (the center pin is always used). The left side (as seen in the
photo) is position “A” and the right side is position “B”. The jumper may be
removed completely for setting “C” (no connection).
Note: You will see several other jumpers in the power supply, but do NOT move
them. These are factory-set for proper operation of your VRE-1.
12
Tuning the Stealth power link cable
Your VRE-1 uses a custom-built power-link cable from Stealth Audio Cables.
This cable includes a carbon-composite sleeve that will slide along its length.
The position of this sleeve has a “tuning” effect - moving it will affect the sound of
your preamp to some degree. I find the effect to be significant enough to bring it
to your attention. You may or may not find it meaningful in your system, but I
suggest that it is worth investigating.
In my listening tests I have found that a “golden ratio” tuning adjustment seems
to work well. The overall cable length is around 62” (157.5cm), and this places
the sleeve at about 24” (61cm) from one end (see photo below).
As always, I encourage you to experiment. I have also found that turning the
cable around (exchanging the ends) made some difference in the sound - a bit
more “laid back” in one direction, and a bit more dynamically lively in the other.
There is no explanation for this - the cable design is completely symmetrical (you
are also free to call me crazy if you wish ;-)
Have fun, and enjoy your music.
13
Using the XLR-to-RCA balanced input adaptors
As stated in the owner’s manual, all 4 of the VRE-1’s inputs are actually balanced. I
chose the connector arrangement based on a best-guess estimate of what most
audiophiles are likely to have in their systems - one balanced source (XLR), and the rest
unbalanced (RCA). If you have more than one balanced source and wish to take full
advantage of its balanced mode of operation, I can provide custom-built adaptors to
allow for this. Here is a photo of what they look like in operation:
photo by Frederic Beudot for 6Moons.com
I build these adaptors from premium parts to be as sonically transparent as possible,
and they work exceptionally well. If you prefer, you can build them yourself. I choose
silver-plated Neutrik XLR cable-mount female connectors, WBT Next-Gen silver cablemount RCAs (#0110AG), and I use Wonder Wire for the connections. A separate 22ga,
Teflon-insulated wire is used for the XLR pin 1 connection to chassis ground, and I
terminate it with a stacking-type banana plug to facilitate the use of multiple adaptors.
Connect the wires as follows (note that these are NOT typical XLR-RCA adaptors):
XLR pin 1 - flying lead to stacking banana plug (shield ground)
XLR pin 2 - to RCA center pin (plus hot)
XLR pin 3 - to RCA outer case (negative hot)
You can add whatever number you need, including converting all inputs to full-balanced
operation if that is what your system requires.
Steve McCormack, designer - SMc Audio
14