1
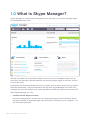
Skype Manager
User Guide
Version 3.0
Copyright © Skype Limited 2011
™
About this guide
Skype Manager™ is a web-based management tool that lets you centrally manage Skype
for businesses of any size.
This guide has been written for administrators of Skype Manager who are responsible for
overseeing their company's usage of Skype, excluding US registered Skype Managers. It
provides detailed, step-by-step guidance on how to set up and use Skype Manager.
This guide also contains help for people who are members of a Skype Manager with
guidance on how they can use the Members List and the actions that they can perform
within Skype Manager itself.
Please note that this guide does not cover the actions people can perform within Skype
itself, such as adding contacts, making calls, or changing their profile settings. For more
information on the actions that you can perform within Skype, please see:
support.skype.com
Finding more information
If you're new to Skype Manager and need to get up to speed fast, you may be interested
in the Skype Manager Quick Start Guide. This guide, along with a range of self-help
resources for both technical and non-technical issues, is available on the Skype Support
site:
support.skype.com
This site contains comprehensive information on how to get the most out of Skype,
including troubleshooters, FAQs, user guides, technical guides and quick start guides.
For information on all Skype for Business products, visit the Skype for Business area of
the Skype website:
skype.com/business
Contacting Skype
If you need help with your Skype Manager, you can find more answers in our Skype
Manager FAQs section by clicking Help in the top right corner of your Skype Manager.
Alternatively, if you need to contact Skype Customer Service about a specific problem
you’re having with Skype Manager, click Chat support to talk to a live chat representative.
Page 2 Skype Manager User Guide
Important
Emergency calling
Access to a broadband internet connection is required. Skype is not a replacement for
traditional telephone services and cannot be used for emergency calling.
Skype Connect is meant to complement existing traditional telephone services used with
a corporate SIP-enabled PBX, not as a stand-alone solution. Skype Connect users need
to ensure all calls to emergency services are terminated through traditional fixed line
telephone services, connected to the local exchange, or through other emergency calling
capable telephone services.
Online Numbers
Online Numbers are provided ‘as is’ and their ongoing availability to you is subject
to applicable local residency rules and regulatory practices. The terms related to
Online Numbers may change accordingly, such changes may include the imposition or
amendment of local residency requirements and/or require you to provide further user
information for continued access to defined Online Numbers. Such changes may impact
on your ability to use, purchase and allocate Online Numbers in the future. The terms that
relate to Online Numbers are clearly displayed within the Online Number purchase flow
and you need to agree to these prior to proceeding to purchase Online Numbers.
Page 3 Skype Manager User Guide
Contents
1.0 What is Skype Manager? : Page 6
5.7 Viewing details of your last purchase
2.0 Setting up your Skype Manager : Page 8
5.8 Setting up low balance alerts : Page 33
: Page 33
3.0 Getting started with Skype Manager
: Page 11
: Page 34
6.0 Features : Page 35
3.1 Signing in to Skype Manager : Page 11
3.2 Using the Dashboard : Page 11
6.1 Credit allocations
: Page 35
6.2 Subscriptions : Page 37
3.3 Using the toolbar : Page 13
3.4 Changing your Skype Manager's language
: Page 14
3.5 Using your Skype Manager
5.9 Redeeming a voucher or prepaid card
: Page 14
4.0 Members : Page 15
4.1 Adding members by creating business
Skype accounts : Page 16
4.2 Inviting members with personal Skype
accounts by email : Page 18
4.3 Inviting members with personal Skype
accounts by Skype Name : Page 19
4.4 Resending invites to members with
personal Skype accounts : Page 20
4.5 Deleting invites to members with personal
Skype accounts : Page 21
4.6 Managing your members : Page 21
6.3 Group video calling : Page 39
6.4 Voicemail
: Page 40
6.5 Online Numbers
: Page 42
6.6 Call forwarding : Page 47
6.7 Skype Connect
: Page 48
7.0 Reports : Page 49
7.1 Displaying the Summary report : Page 49
7.2 Displaying the Purchases report : Page 50
7.3 Displaying the Allocations report
: Page 52
7.4 Displaying a Member's Allocations report
: Page 52
7.5 Displaying the Usage report : Page 53
7.6 Displaying a Member's Usage report
: Page 55
7.7 Downloading reports and invoices : Page 55
4.7 Giving your members access to the
Members list : Page 27
5.0 Skype Credit : Page 28
5.1 Finding your Skype Manager credit
balance : Page 28
5.2 Buying credit for your Skype Manager
: Page 28
5.3 Verifying your company : Page 30
5.4 Changing your Skype Manager's currency
: Page 31
5.5 Changing your Skype Manager's Autorecharge settings : Page 31
5.6 Displaying your purchase limits : Page 32
Page 4 Skype Manager User Guide
8.0 Changing your company details : Page 57
9.0 Deleting your Skype Manager : Page 59
10.0 For members: Managing your settings
: Page 60
10.1 Activating your business Skype account
: Page 60
10.2 Finding out which Skype Manager you
belong to : Page 61
10.3 Viewing and changing your personal
details : Page 62
10.4 Giving consent for your Skype Manager
administrator to view your Skype usage
: Page 63
10.5 Adding other members of your Skype
Manager to your Skype Contact list
: Page 63
10.6 Viewing your Online Numbers : Page 64
10.7 Leaving your Skype Manager : Page 64
Page 5 Skype Manager User Guide
1.0 What is Skype Manager?
Skype Manager is a web-based management tool that lets you centrally manage Skype
for businesses of any size.
Quickly and easily set up business Skype accounts for your colleagues, keep track of
what they are spending, allocate features and monitor Skype usage in real time, all from
one central point.
Employees with business Skype accounts no longer need to worry about buying credit or
features themselves - they are allocated centrally from Skype Manager. And with Autorecharge set up they'll always have credit available to make that important business call.
With Skype Manager, you can:
•
Create business Skype accounts
Get your employees set up with their own business Skype account. Business Skype
accounts created in Skype Manager are owned and controlled by your company – not
the individual employee.
Page 6 Skype Manager User Guide
•
Allocate Skype Credit
Buy Skype Credit centrally and then allocate it to your employees as needed. Monitor
their expenditure and usage with reports that can be generated at a company,
departmental or employee level.
•
Allocate features
Give your employees the tools they need to collaborate and work smarter. Buy
and allocate features like subscriptions, group video calling, Online Numbers, call
forwarding and voicemail.
All products are pre-paid giving you flexibility over how you manage your company’s
expenditure on Skype and for many features, you can decide whether to be billed
monthly, quarterly or annually.
Skype Manager is the simple way to manage Skype in your business.
Page 7 Skype Manager User Guide
2.0 Setting up your Skype
Manager
It couldn't be easier to get started with Skype Manager. All you need to set up your Skype
Manager is to enter a Skype Name and password and register your company details
online.
Once you are signed in to Skype Manager, you can add the employees whose Skype
usage you want to manage, buy and allocate Skype Credit, allocate features and monitor
your company's Skype usage immediately. You can sign in to Skype Manager whenever
you have an internet connection available so you're not tied to one computer or location
when you need to administer Skype products and features across your business.
To set up your company’s Skype Manager:
1. Go to:
skype.com/go/skype.manager.setup
2. If you want to use an existing Skype account to set up your Skype Manager, enter your
Skype Name and password, then click Sign me in:
If you want to create a new Skype account specifically for your Skype Manager, click
No, I don’t have a Skype account, enter your details and click I agree – Continue:
Page 8 Skype Manager User Guide
The Skype account you use to set up your Skype Manager will be used to administer
Skype products and credit throughout your business. We therefore strongly
recommend you to click No, I don’t have a Skype account to create a new Skype
account.
You can now enter your company details:
3. Enter your full legally registered company name and select the country in which your
Page 9 Skype Manager User Guide
company is registered.
4. Enter the legally registered address of your company.
5. If required, enter your VAT number. Companies based outside the European Union
do not have to pay VAT when purchasing Skype Credit in Skype Manager. Companies
based within the European Union (except Luxembourg) do not have to pay VAT if they
provide a valid EU VAT code and declare they are purchasing the Skype Credit on
behalf of their business.
6. Check I have read and accept the Skype Business End User Licence Agreement and
the Skype Business Terms of Service.
7. Click Set up Skype Manager. You will be automatically signed into your Skype
Manager. The first thing you will see is the Dashboard.
Page 10 Skype Manager User Guide
3.0 Getting started with Skype
Manager
Skype Manager has been designed to help you work smarter. The Dashboard gives you
an overview of your company's Skype usage and there are separate areas dedicated to
Members, Features, and Reports, easily accessible from the toolbar.
This makes it easy for you to find your way around Skype Manager and to perform the
tasks needed to manage Skype effectively in your company.
3.1 Signing in to Skype Manager
Once you have set up your Skype Manager, you can sign in to it at any time by visiting:
skype.com/go/skype.manager.signin
Just enter your Skype Name and password and click Sign me in.
Note that if you are a new administrator for an existing Skype Manager, the following will
be displayed the first time that you sign in:
Once you have read the agreements, check I have read and accept the Skype Business
End User Licence Agreement and the Skype Business Terms of Service and click Sign
me in.
To ensure the safety of your company's information, you will be automatically signed out
of Skype Manager if you haven't used it in a while.
Alternatively, you can sign out of Skype Manager at any time by clicking Sign out in the
top right corner of your Skype Manager.
3.2 Using the Dashboard
When you sign in to Skype Manager, the Dashboard is always displayed first and provides
a useful overview of your company's Skype usage.
Page 11 Skype Manager User Guide
The Dashboard provides the following information:
•
Reports - the amount of Skype Credit you have allocated per month. Place your cursor
over a month to view the total expenditure for that month.
Alternatively, click a specific month to view the Summary report for that month. For
more information on the Summary report, please see 7.1 Displaying the Summary
report.
•
Account status - the status of your payment settings, which can be All OK, Attention
Required, or Problem.
•
Current balance - your Skype Manager credit balance, as well as an indication of
whether you have Auto-recharge enabled.
•
Upcoming allocations - the total value of allocations due to be deducted from your
Skype Manager credit balance in the next 30 days.
If you have insufficient credit to cover the cost of your allocations in the next 30 days,
the amount of credit that is missing is displayed below Upcoming allocations. Click
Buy more Skype Credit to add credit to your Skype Manager credit balance.
For more information on buying Skype Credit for your Skype Manager, please see 5.0
Skype Credit.
•
Your features - a summary of all of the features currently allocated to members of your
Page 12 Skype Manager User Guide
Skype Manager.
•
Your members - a summary of how many members you have, any changes that have
occurred since you last signed in and details of any outstanding invites or account
transfer requests.
•
News - the latest Skype Manager news.
3.3 Using the toolbar
The toolbar lets you move between the different areas of your Skype Manager.
The toolbar contains links to the following areas:
Dashboard
For an overview of your Skype Manager.
Members
For adding members to your Skype Manager and managing their details.
Features
For allocating features to your members and managing their details.
Reports
For keeping track of purchases, allocations, features and the Skype usage of your
members.
The toolbar also contains:
•
•
•
Your current Skype Manager credit balance.
The Buy Skype Credit button - for buying additional Skype Credit.
Search Members - Simply enter the member's name and a list of matching members
will appear below.
Click the member you are looking for to view that member's details.
Page 13 Skype Manager User Guide
3.4 Changing your Skype Manager's language
You can change the language in which your Skype Manager is displayed which will
include any communications sent from your Skype Manager so that you can use the
language you and your members are most familiar with.
To change your Skype Manager's language:
1. In the top right corner of Skype Manager, click Account details.
2. In the menu displayed on the left, click Skype Manager settings.
3. Click anywhere in the Skype Manager language row.
4. Select the language required from the drop-down list displayed and click Save. Your
Skype Manager will automatically refresh and display in the language that you have
selected.
3.5 Using your Skype Manager
Once you know your way round your Skype Manager, you can start to manage your
company's Skype usage.
The most important things you need to do now are:
1. Add members
Create business Skype accounts for your employees or invite people with personal
Skype accounts to join your Skype Manager as members.
For more information, please see 4.0 Members.
2. Buy Skype Credit
Before allocating credit or features to members of your Skype Manager for the first
time, you need to buy Skype Credit for your Skype Manager.
For more information, please see 5.0 Skype Credit.
3. Allocate Skype Credit and features
Provide your members with the Skype Credit and features they need to work smarter.
For more information, please see 6.0 Features.
4. Keep track of your company's usage of Skype
Monitor how your company uses Skype in real time with Skype Manager's reports.
For more information, please see 7.0 Reports.
Page 14 Skype Manager User Guide
4.0 Members
Members are the people whose Skype usage you want to manage in your Skype
Manager.
When you click Members in the toolbar of your Skype Manager, the All members screen
is displayed by default so you can see all the members that you currently manage within
your Skype Manager.
Before adding any new members, you should first decide whether you want to create new
business Skype accounts for them or invite them to join your Skype Manager using their
own existing personal Skype accounts.
A business Skype account is owned by the Skype Manager where it was created. You
control who uses the account and all the features and credit allocated to it.
A personal Skype account is owned by the person who created it. You cannot control who
uses it and there are limitations on the features and credit that you can allocate to it.
With a business Skype account, you can:
•
•
•
•
•
•
Change the email and password of the account holder
Permanently delete the account when it's no longer required
Take back any Skype Credit you've allocated to it
Allocate call forwarding
Set up Caller ID
Allocate an Online Number
You cannot do the above for a personal Skype account. Therefore, to retain full control
of your company's Skype usage, we recommend that you only add new members by
creating business Skype accounts for them.
Note that a member can only belong to one Skype Manager at a time. Also note that you
cannot invite members with personal Skype accounts if your company is registered in the
U.S. Please see your Terms of Service.
Page 15 Skype Manager User Guide
4.1 Adding members by creating business
Skype accounts
To create new business Skype accounts:
1. Click Members in the toolbar.
2. In the menu on the left, click Add members.
3. Click Create business accounts.
4. Enter the email address of each person you want to create a business Skype account
for and click Next.
Alternatively, you can import the details of the people you want to create an account
for by using a CSV file generated from your existing company directory. For more
Page 16 Skype Manager User Guide
information on how to do this, please see 4.1.1 Creating business Skype accounts
from a CSV file.
5. Skype Manager automatically suggests some Skype Names based on the information
you've entered. Click a suggested Skype Name to edit it.
You can also edit the new member's first name or last name, or set a password for the
new account. (The password needs to be at least six characters long and contain at
least one number.) If you edit a member's details, be sure to click Save and close.
If you don't set a password, the member will be sent an email requesting them to set
their own password. The member will need to set their password before they can start
using Skype.
You can also add another account at this point by clicking Add another account.
6. If required, you can add the new members to a group by selecting the name of the
group from the Add members to a group after their account is created drop-down
list or clicking create a group to create a new group.
Groups are a great way to manage members of your Skype Manager. For more
information on how to add your members to groups, please see 4.6.3 Adding
members to a group.
7. Click Create accounts.
The accounts are created and emails are sent to the people whose email addresses you
entered. New business Skype accounts have no Skype Credit or features allocated to
them. For more information on allocating credit and features, please see 6.0 Features.
4.1.1 Creating business Skype accounts from a CSV file
You can import the details of the people you want to create an account for by using a
CSV file generated from your existing company directory. The CSV file needs to have the
Page 17 Skype Manager User Guide
following columns:
•
•
•
First name
Last name
Email address
You can also add a column for Password. Setting a password is optional. If left blank,
the new member will be invited by email to create their own password to activate their
account. Passwords must be at least six characters long and contain at least one number.
To add members from a CSV file, follow the steps in 4.1 Adding members by creating
business Skype accounts and instead of entering the email addresses of each person,
click Browse next to or, import a CSV file with member data and select the CSV file that
you want to use before clicking on Next.
4.2 Inviting members with personal Skype
accounts by email
To invite members to join your Skype Manager with their personal Skype accounts by
using their email address:
1. Click Members in the toolbar.
2. In the menu on the left, click Add members.
3. Click Invite by email.
4. Enter the email address of each person you want to add and click Next.
5. Skype Manager confirms whether the email addresses that you have added are valid.
If required, you can add another email address at this point by clicking Add another
email address.
6. If required, you can add the new members to a group by selecting the name of the
group from the Add members to a group when they accept the invite drop-down list
or clicking create a group to create a new group.
Page 18 Skype Manager User Guide
Groups are a great way to manage members of your Skype Manager. For more
information on how to add your members to groups, please see 4.6.3 Adding
members to a group.
7. Click Send invites.
Emails are sent to the people that you specified, indicating that they have been invited
to join your Skype Manager. An email will be sent to you when a member accepts or
declines the request. The invite is valid for 30 days.
Note that you can preview the invite that will be sent to the new member before clicking
Send invites by clicking See invite text.
4.3 Inviting members with personal Skype
accounts by Skype Name
To invite members to join using their personal accounts by email:
1. Click Members in the toolbar.
2. In the Members menu on the left, click Add members.
3. Click or by Skype Name.
4. Either:
•
•
Enter the Skype Name of each of the members you want to invite or,
Check the box next to the Skype Name of each of the members that you want to
invite from your Skype contact list.
Note that your Skype contact list is only displayed on the Invite personal members by
Skype Name screen if you are currently signed in to Skype.
5. If required, add the members to a relevant group by selecting a group from the Add
members to a group when they accept the invite drop-down list or clicking create a
Page 19 Skype Manager User Guide
group to create a new group.
Groups are a great way to manage members of your Skype Manager. For more
information on how to add your members to groups, please see 4.6.3 Adding
members to a group.
6. Click Send invites. Emails are sent to the people that you specified, indicating that
they have been invited to join your Skype Manager. An email will be sent you when a
member accepts or declines the request.
4.4 Resending invites to members with
personal Skype accounts
To resend an invite to join your Skype Manager:
1. Click Members in the toolbar.
2. In the menu on the left, click Manage Invites.
A list of all of the members who have not yet accepted their invite to join your Skype
Manager is displayed.
3. Check the box next to each member to whom you want to resend an invite.
4. Click Resend invites.
Page 20 Skype Manager User Guide
4.5 Deleting invites to members with personal
Skype accounts
To delete an invite:
1. Click Members in the toolbar.
2. In the menu on the left, click Manage Invites.
A list of all of the members who have not yet accepted their invite to join your Skype
Manager is displayed.
3. Check the box next to each member to whose invite you want to delete.
4. Click Delete invites.
4.6 Managing your members
Once you have added your member, it's easy to manage their accounts. You can allocate
them Skype Credit and if they are members with business Skype accounts, allocate them
features and manage their details.
The quickest way to view or modify a member's details is to use the Search members
tool in the top right corner of Skype Manager. Simply enter the member's name and a list
of matching members will appear below.
Click the member you are looking for to view that member's details.
It's also possible to use the Filter this list tool to find members. To do so, click Members
in the toolbar to display a list of all members. Then click Filter this list to display the filter
options. You can filter by the date on which members joined Skype Manager, or by the
type of member. Only members matching this filter criteria are displayed.
Page 21 Skype Manager User Guide
Click the name of the member whose details you want to view.
On the Member's details screen you can:
•
•
•
•
•
Edit the member's personal details
Make the member an administrator of your Skype Manager
Add the member to a group
Change the member's password
Delete the member's account
Page 22 Skype Manager User Guide
You can also manage features for the specified member. To do so, click Features in the
menu on the left. For more information on allocating features, please see 6.0 Features.
To view reports on the member's Skype Credit usage and allocations, click Reports in the
menu on the left. For more information on reports, please see 7.0 Reports.
4.6.1 Editing a member's personal details
On the Member's details screen, you can change a member's first name, last name, job
title, email address and the group to which they belong. The member's Skype Name
cannot be changed and for members with personal Skype accounts their password and
email address also cannot be changed.
For members with personal Skype accounts, the above details are the ones used within
Skype Manager and displayed in the Members list. They are not the details associated
with the member's personal Skype account. Because it is a personal account, only the
personal account holder can modify these details.
Once you have made your changes, ensure that you click Save changes.
4.6.2 Making a member an administrator
To make a member an administrator of your Skype Manager:
1. View the details of the member who you want to make an administrator. For more
information on how to do this, please see 4.6 Managing your members.
2. Under Skype Manager settings, check Make this member a Skype Manager
administrator.
3. Click Save changes.
You can now notify the member that they can sign in as an administrator of your Skype
Manager. The first time a new administrator signs in to Skype Manager, they will be asked
to agree to the Skype Business End User Licence Agreement and the Skype Business
Terms of Service. For more information, please see 3.1 Signing in to Skype Manager.
If at any point you no longer want the member to be an administrator of your Skype
Manager, re-display the member's details, uncheck Make this member a Skype
Manager administrator and click Save changes. Note that if you remove yourself as an
administrator, you will automatically signed out of Skype Manager when you click Save
changes.
4.6.3 Adding members to a group
Groups are a great way to manage members of your Skype Manager. You can easily
allocate Skype Credit and features and monitor Skype usage for individual groups. For
example, you may want to categorize your members according to the department they
belong to within your company: Marketing, Human Resources, Engineering, etc.
To add a member to a new group:
Page 23 Skype Manager User Guide
1. View the details of the member who you want to add to a group. For more information
on how to do this, please see 4.6 Managing your members.
2. Under Skype Manager settings, click create a group.
3. Enter the group's name and click Create.
4. Click Save changes.
To add a member to an existing group:
1. View the details of the member who you want to add to a group. For more information
on how to do this, please see 4.6 Managing your members.
2. Under Skype Manager settings, select the group to which you want to add the
member from the drop-down list displayed.
3. Click Save changes.
To create a new group without adding any members to it:
1. Click Members in the toolbar.
A list of all the members of your Skype Manager is displayed by default.
2. In the menu on the left, click Create a group.
3. Enter the group's name and click Create.
To add more than one member to an existing group at the same time:
1. Click Members in the toolbar.
A list of all the members of your Skype Manager is displayed by default.
2. Check the box next to each member you want to add to the group.
Page 24 Skype Manager User Guide
3. Select the group to which you want to add the members from the drop-down list
displayed and click Move.
4.6.4 Changing a member's account currency
You can change the currency that a member's business Skype account uses so that it is
appropriate to their location.
Members with personal Skype accounts can change their own account currency. For
more information on the actions that your members can perform within Skype, please
see:
support.skype.com
Skype uses an exchange rate similar to that used by major credit cards. Changing the
currency denomination of a member's account will involve a small fee. To avoid this fee,
you should advise the member that they should first spend their existing Skype Credit
balance before you change the currency and allocate more credit.
To change a member's account currency:
1. View the details of the member whose account currency you want to change. For more
information on how to do this, please see 4.6 Managing your members.
2. Click anywhere in the Account currency row.
3. Select the required currency from the drop-down list displayed.
Page 25 Skype Manager User Guide
4. Click Save changes.
4.6.5 Changing a member's password
You can change the password for members with business Skype accounts, but not for
those members with personal Skype accounts.
To change the password of a member with a business Skype account:
1. View the details of the member whose password you want to change. For more
information on how to do this, please see 4.6 Managing your members.
2. Click Change password.
3. Enter the new password and click Save changes.
Once you have changed a member's password you will need to notify them of the
password update.
4.6.6 Deleting members
Deleting a personal Skype account will only remove it from your Skype Manager. The
account itself will retain any Skype Credit allocated to it. Any subscriptions or voicemail
assigned to the account will be cancelled when the expiry period is reached.
Deleting a business Skype account will permanently delete the account and all data
associated with it will be lost. You should therefore keep a record of any account
information you require before deleting the account. Any Skype Credit, or Online Numbers
previously assigned to the business account will be returned to your Skype Manager. Any
remaining subscriptions or voicemail allowances will be lost.
To delete a member:
1. View the details of the member that you want to delete. For more information on how
to do this, please see 4.6 Managing your members.
2. At the bottom of the Member's details screen, click Delete this account. A message is
displayed asking you to confirm that you want to remove the selected members from
your Skype Manager.
3. Click Delete to confirm that you want to remove the members.
To delete more than one member at the same time:
1. Click Members in the toolbar.
Page 26 Skype Manager User Guide
A list of all the members of your Skype Manager is displayed by default.
2. Check the box next to each member you want to delete.
3. Click Delete members. A message is displayed asking you to confirm that you want to
remove the selected members from your Skype Manager.
4. Click Delete to confirm that you want to remove the members.
4.7 Giving your members access to the
Members list
There’s an easy way for members to add colleagues to their Skype Contacts list. It is
called the Members list and any member of your Skype Manager can use it.
Note that access is given to all members. You cannot prevent access to the Members list
for individual members.
To give your members access to the Members list:
1. In the top right corner of Skype Manager, click Account details.
2. In the menu displayed on the left, click Skype Manager settings.
3. Under Company directory, click enable.
If you have to prevent access to the Members list for any reason, return to the Skype
Manager settings screen and click Disable under Company directory.
For more information on how your members can use the Members list, please see 10.5
Adding other members of your Skype Manager to your Skype Contact list.
Page 27 Skype Manager User Guide
5.0 Skype Credit
Before allocating credit or features to members of your Skype Manager for the first time,
you need to buy Skype Credit for your Skype Manager. It’s easy to buy Skype Credit in
Skype Manager. You can pay for Skype Credit using a credit card, PayPal and lots of other
ways. Once you have bought some Skype Credit, you can allocate it to your members for
calling or use it to buy features to allocate to your members.
If you want to learn more about how to allocate Skype Credit to your members, please
see 6.1 Credit allocations.
5.1 Finding your Skype Manager credit balance
Your current Skype Manager credit balance is always displayed on the toolbar of your
Skype Manager.
5.2 Buying credit for your Skype Manager
To buy Skype Credit for your Skype Manager credit balance:
1. Click Buy Skype Credit on the toolbar.
2. If this is the first time you've bought Skype Credit, select the payment method you
want to use and click Next.
When you set up Skype Manager, there is a limit to the maximum amount of Skype Credit
you can purchase, which depends on the payment method you use and how much Skype
Credit you've already purchased in any given month. The range of payment methods
available to you is also limited.
To access a wider range of payment methods and to increase your purchase limit,
you will need to get your company verified (if available for your country). For more
information, please see add 5.3 Verifying your company.
Page 28 Skype Manager User Guide
3. Select the amount of Skype Credit you wish to buy.
The amount of Skype Credit you can buy depends on the payment method that you
have selected and whether your company is verified. If you cannot buy an amount, the
option is disabled with an explanation of the reason why underneath.
Page 29 Skype Manager User Guide
4. Check or uncheck the Save time in the future with Auto-Recharge box to specify
whether you want to Auto-recharge your Skype Manager credit balance.
Auto-recharge is only available with PayPal or credit card payments and lets you
recharge your Skype Manager credit balance automatically when the balance falls
below a certain amount. If you have not verified your company, these payment
methods may be unavailable to you and you may not be able to Auto-recharge.
5. Click Buy now. Confirmation of your purchase will be displayed.
If you decide not to proceed with your purchase at any point, click Back to Skype
Manager in the top right corner of your Skype Manager to return to the Dashboard.
5.3 Verifying your company
When you set up Skype Manager, you are given a purchase limit that determines the
maximum amount of Skype Credit you can buy for your Skype Manager credit balance in
one go. The range of payment methods available to you is also limited.
To access a wider range of payment methods, or to increase your purchase limit, you will
need to get your company verified. It's easy to do so:
1. In the top right corner of Skype Manager, click Account details.
2. In the menu displayed on the left, click Payment settings.
3. Under Purchase limits, click Get verified now.
4. Enter your company details in the form displayed and click Submit.
Once you have submitted the form, Skype will check your company details and contact
you to confirm your request. Once we have confirmed your request, a wider range of
payment methods will become available to you and your payment limits will be increased.
This process is usually completed within 3 days but may take up to 2 weeks.
Verification is available for many but not all countries. Please contact Skype Customer
Page 30 Skype Manager User Guide
Service for details. For more information on how to do this, please see Contacting Skype.
Alternatively, you can make a request to buy larger amounts of Skype Credit by going to:
https://manager.skype.com/account/request-credit
If not already signed in to Skype Manager, you will need to sign in to see this screen.
5.4 Changing your Skype Manager's currency
You specify the currency in which your Skype Credit balance is calculated when you set
up your Skype Manager. However, you can change this to another currency if required.
Skype uses an exchange rate similar to major credit cards and this may involve a small
fee. To avoid this fee, first spend your existing Skype Credit and then change your
currency before buying more.
To change the currency:
1. In the top right corner of Skype Manager, click Account details.
2. In the menu displayed on the left, click Skype Manager settings.
3. Click anywhere in the Currency row.
4. Select your desired currency from the drop-down list and click Save.
To avoid exchange rate fees for Skype Credit allocations, you should ensure your chosen
currency in Skype Manager is the same as that used by most of your members.
Note that if your company’s registered address is in the United States, you cannot
change your currency from US dollars.
5.5 Changing your Skype Manager's Autorecharge settings
Auto-recharge works by automatically adding more Skype Credit to your Skype Manager
credit balance when it falls below a certain amount. For example, you can configure Autorecharge to purchase an additional €200 of Skype Credit whenever your balance falls
below €25.
Page 31 Skype Manager User Guide
You can select to enable Auto-recharge when you buy Skype Credit with PayPal or a
credit card. Note that if you have not verified your company, these payment methods may
be unavailable to you. For more information, please see 5.3 Verifying your company.
Once you have enabled Auto-recharge, you can change the amount that is added and the
level at which it is added (known as the trigger amount):
1. In the top right corner of Skype Manager, click Account details.
2. In the menu displayed on the left, click Payment settings.
3. Click anywhere in the Recharge amount row.
Note that the Auto-recharge section will not become available until you have
purchased Skype Credit for the first time.
4. Enter the amount to add when the trigger amount is reached and click Save settings.
5. Click anywhere in the Trigger amount row.
6. Enter the trigger amount and click Save settings.
If you no longer want to Auto-recharge your Skype Manager's Skype Credit, click Disable
in the Auto-recharge section of the Payment settings page.
5.6 Displaying your purchase limits
For details of the payment methods available to you and any limits on how much Skype
Credit you can buy for your Skype Manager credit balance:
1. In the top right corner of Skype Manager, click Account details.
2. In the menu displayed on the left, click Payment settings.
3. Next to Purchase limits, click Show limits.
Page 32 Skype Manager User Guide
The availability and purchase limits on different payment methods is displayed. Also
displayed is a summary of purchases made that month for each payment method.
Not all payment methods may be available for you to use. To see which payment methods
are available to you, click View payment methods available in your country under
Purchase limits.
To access a wide range of payment methods and to increase your purchase limit, you will
need to get your company verified. For more information on how to do this, please see
5.3 Verifying your company.
5.7 Viewing details of your last purchase
To view the payment details of your last purchase:
1. In the top right corner of Skype Manager, click Account details.
2. In the menu displayed on the left, click Payment settings.
Under Stored payment details, the payment method, the date of purchase and the
order number of your last purchase is displayed.
3. For more details on the order itself, click the order number to display its details.
4. To download the details of the order as a PDF for review away from Skype Manager,
click Download invoice as PDF.
5.8 Setting up low balance alerts
You can have an email alert automatically sent to you when the Skype Credit balance of
your Skype Manager falls below a certain amount. This can be useful to keep track of
your Skype Credit and help ensure your Skype Manager does not run out of Skype Credit.
Page 33 Skype Manager User Guide
The email alert will only be sent out to you and not to any other administrators of your
Skype Manager. Other administrators must set up their own alerts.
To set up a low balance alert:
1. In the top right corner of Skype Manager, click Account details.
2. In the menu displayed on the left, click Skype Manager settings.
3. To set up a new alert, click anywhere in the Low balance alert row.
4. Enter the amount that will trigger the alert and click Save.
If you decide at any point that you no longer need the alert, click Disable alert.
5.9 Redeeming a voucher or prepaid card
Skype Credit redeemed with business vouchers are added to your Skype Manager credit
balance.
To redeem a business voucher or prepaid card:
1. In the top right corner of your Skype Manager, click Account details.
2. In the menu on the left, click Redeem voucher.
3. Enter the unique number from your voucher or card and click Redeem voucher.
Page 34 Skype Manager User Guide
6.0 Features
In Skype Manager, you can help everyone in your business work smarter by managing
their Skype Credit, as well as their access to features like group video calling, voicemail
and call forwarding.
When you click Features in the toolbar of your Skype Manager, the Credit allocations
screen is displayed by default. On the left, a menu of features is displayed, along with the
number of members currently allocated that feature. Click a feature in the menu to see
which members that feature is allocated to and to manage how the feature is allocated.
Before allocating credit or features to members of your Skype Manager for the first time,
you need to buy Skype Credit for your Skype Manager. For more information on how to do
this, please see 5.0 Skype Credit.
6.1 Credit allocations
Your employees don't need to worry about buying Skype Credit for themselves - you
can allocate what they need from your Skype Manager. And with Auto-recharge, you can
ensure that their credit is automatically topped up whenever it falls below a set amount.
6.1.1 Allocating credit to members
To allocate Skype Credit to one or more members:
1. Click Features in the toolbar.
The credit allocations for your members are displayed by default.
Page 35 Skype Manager User Guide
2. Check the box next to each member to whom you want to allocate credit.
3. Under Add credit, enter an amount and click Add credit.
The allocated credit is immediately deducted from your Skype Manager credit balance
and added to the Skype account of the selected members. It will take a short while until
the new credit balance will be visible in your Skype Manager. (You may need to reload the
screen to see the new balance.)
To see a record of a Skype Credit allocation, go to the Allocations report. For more
information on how to display the Allocations report, please see 7.0 Reports.
6.1.2 Taking back credit from members
You can take back the Skype Credit that has been allocated to members with business
Skype accounts. Any taken back credit is refunded to your Skype Manager credit balance.
To take back all the credit currently allocated to one or more members:
1. Click Features in the toolbar.
The credit allocations for your members are displayed by default.
2. Check the box next to each member whose credit allocation you wish to take back.
3. Click Take back credit next to Add credit.
4. Confirm that you wish to take back the credit by clicking Take back credit.
The credit is refunded to your Skype Manager's credit balance.
6.1.3 Enabling Auto-recharge for members
When activated, Auto-recharge automatically tops up a member's Skype account balance
with a specified amount of credit whenever it falls below a certain amount. The credit is
Page 36 Skype Manager User Guide
deducted from your Skype Manager credit balance.
To enable Auto-recharge for one or more members:
1. Click Features in the toolbar.
The credit allocations for your members are displayed by default.
2. Check the box next to each member for whom you want to enable Auto-recharge.
3. Under Auto-recharge, click Activate / change.
4. Specify the following amounts:
•
•
Recharge member’s account with - enter the amount of credit to recharge.
•
Monthly recharge limit - enter the maximum amount of credit by which the
member's Skype account can be recharged in any month. When this limit is
reached, Auto-recharge will be suspended until the first day of the next month.
When balance falls below - enter the level at which the member's Skype account
will be recharged when it falls below this level.
5. Click Confirm.
6.1.4 Disabling Auto-recharge for members
To disable Auto-recharge for one or more members:
1. Click Features in the toolbar.
The credit allocations for your members are displayed by default.
2. Check the box next to each member for whom you want to disable Auto-recharge.
3. Click Disable next to Auto-recharge.
6.2 Subscriptions
Subscriptions can be a great way of saving money when calling phones. When you
Page 37 Skype Manager User Guide
allocate a subscription to your members, they will be able to make unlimited calls (a
fair use policy applies) to landlines (and even mobiles in some countries) covered by
the subscription. Subscriptions are available for calls to a single country; a region (for
example, Europe); or to over 40 countries worldwide.
You can change an allocated subscription for member up to three times a month. The
unused portion of the previous subscription is converted into credit that is allocated to
the member's account.
Note that if a member with a personal Skype account already has a subscription they
set up outside of Skype Manager, you cannot allocate an additional subscription to them
within Skype Manager
6.2.1 Allocating or changing subscriptions
To allocate a subscription to one or more members, or to change existing subscriptions:
1. Click Features in the toolbar.
2. In the menu on the left, click Subscriptions.
The subscription details of your members are displayed.
3. Check the box next to each member to whom you want to allocate a subscription.
4. Click Allocate / Change subscriptions.
5. Select the subscription you require, and how often you would like to be billed and click
Buy now.
The subscription will become available in a few minutes and its cost will be deducted
from your Skype Manager credit balance.
6.2.2 Cancelling subscriptions
To cancel a subscription for one or more members:
1. Click Features in the toolbar.
Page 38 Skype Manager User Guide
2. In the menu on the left, click Subscriptions.
The subscription details of your members are displayed.
3. Check the box next to each member whose subscription you want to cancel.
4. Click Cancel subscriptions.
5. Confirm that you want to cancel the subscription by clicking Cancel subscription.
The subscriptions and all the benefits will expire on the dates indicated for each
subscription. No further costs will be incurred.
6.3 Group video calling
Group video calling lets you work face-to-face with colleagues or customers, helping you
to build relationships and work more effectively. It's simple and cost effective to use, as
only the host needs to have a group video calling subscription.
When you allocate a group video calling subscription to your members, they will be able
to hold group video calls with three or more people (up to a maximum of 10), to help get
work done in more productive ways. All everyone needs is the latest version of Skype, a
laptop and a webcam.
6.3.1 Allocating group video calling
To allocate a group video calling subscription to one or more members:
1. Click Features in the toolbar.
2. In the menu on the left, click Group video calling.
The group video calling details of your members are displayed.
3. Check the box next to each member for whom you want to allocate a group video
calling subscription.
Page 39 Skype Manager User Guide
4. Click Allocate group video calling.
5. Select how often you would like to be billed and click Buy now.
The group video calling subscription will become available in a few minutes and its cost
will be deducted from your Skype Manager's credit balance.
6.3.2 Cancelling group video calling
To cancel a group video calling subscription for one or more members:
1. Click Features in the toolbar.
2. In the menu on the left, click Group video calling.
The group video calling subscription details of your members are displayed.
3. Check the box next to each member whose subscription you want to cancel.
4. Click Cancel group video calling.
5. Confirm that you want to cancel by clicking Cancel group video calling.
The group video calling subscriptions will expire on the dates indicated for each
subscription. No further costs will be incurred.
6.4 Voicemail
Voicemail lets you pick up messages that were left when you were busy or offline.
Unanswered calls are sent to voicemail and you can listen to the calls whenever you are
signed in to Skype.
Voicemail is included with a subscription. However, you can also allocate voicemail to a
member if the member does not have a subscription.
6.4.1 Allocating voicemail
To allocate voicemail to members without subscriptions or to change their voicemail:
1. Click Features in the toolbar.
2. In the menu on the left, click Voicemail.
The voicemail details of your members are displayed.
3. Check the box next to each member to whom you want to allocate voicemail.
Page 40 Skype Manager User Guide
Note that you cannot allocate voicemail to those members whose voicemail is already
activated as part of their subscription.
4. Click Allocate / Change Voicemail.
5. Select how often you would like to be billed and click Buy now.
Voicemail is allocated to the selected members. It might take a few minutes until you can
see it in your Skype Manager and for your members to be able to start using it.
Note that members will have to set up their voicemail, such as recording their voicemail
message, after it has been allocated. For more information on the actions that your
members can perform within Skype, please see:
support.skype.com
6.4.2 Cancelling voicemail
To cancel voicemail for one or more selected members:
1. Click Features in the toolbar.
2. In the menu on the left, click Voicemail.
The voicemail details of your members are displayed.
3. Check the box next to each member whose voicemail you want to cancel.
Note that you cannot cancel the voicemail of those members whose voicemail is
already activated as part of their subscription.
4. Click Cancel Voicemail.
5. Confirm that you want to cancel the voicemail by clicking Cancel Voicemail.
The voicemail will expire on the dates indicated for each member. No further costs will be
incurred.
Page 41 Skype Manager User Guide
6.5 Online Numbers
With Online Numbers, members can receive incoming calls from any phone - landline
or mobile. This is perfect if your members have customers or business colleagues who
don't use Skype. When someone dials an Online Number from a phone or mobile, the
member's Skype rings and they can pick up the call – wherever they are in the world.
Online Numbers cannot be allocated to members with personal Skype accounts, although
they can buy their own Online Numbers away from Skype Manager.
For members with business Skype accounts (or for SIP Profiles), you can allocate one or
more Online Numbers.
6.5.1 Allocating Online Numbers
To allocate Online Numbers to members with business Skype accounts or to SIP Profiles:
1. Click Features in the toolbar.
2. In the menu on the left, click Online Numbers.
The Online Numbers details for your members are displayed. Note that only members
with business Skype accounts are listed.
3. Check the box next to each member to whom you want to allocate Online Numbers.
4. Click Allocate Online Numbers.
5. Specify the country of the Online Number you would like and click Continue.
Page 42 Skype Manager User Guide
To be able to set up Online Numbers for some countries, your company needs to be
registered in that country.
6. Enter how many Online Numbers you require.
7. Select the region and area codes to use for your Online Numbers.
8. Select which Online Numbers you would like to buy.
Page 43 Skype Manager User Guide
If you want to select from a different set of numbers, click Show 10 different Online
Numbers.
9. Select how often you would like to be billed and click Buy now.
The Online Numbers are allocated to the members you have selected. It may take a few
minutes before the Online Numbers are displayed in Skype Manager and your members
can start using them.
6.5.2 Reallocating Online Numbers
You can reallocate an Online Number from one member with a business Skype account to
another member with a business Skype account (or to a SIP Profile). To do so:
1. Click Features in the toolbar.
2. In the menu on the left, click Online Numbers.
The Online Numbers details for your members are displayed. Note that only members
with business Skype accounts are listed.
3. In the list of members, click the row containing the name of the member whose Online
Number you want to reallocate.
Page 44 Skype Manager User Guide
4. Click Reallocate number.
5. Enter the name of the member to whom you want to reallocate the Online Number to
and click Confirm. The Online Number can only be reallocated to another member with
a business Skype account (or to a SIP Profile).
The Online Number is then reallocated to the specified member or SIP Profile.
6.5.3 Reactivating Online Numbers
You can reactivate any Online Number that has expired within the last 90 days. To do so:
1. Click Features in the toolbar.
2. In the menu on the left, click Online Numbers.
The Online Numbers details for your members are displayed. Note that only members
with business Skype accounts are listed.
3. In the list of members, click the row containing the name of the member whose Online
Number you want to reactivate.
4. Click Reactivate number.
5. Select how often you would like to be billed and click Buy now.
The Online Number is reactivated for the specified member or SIP Profile.
6.5.4 Cancelling Online Numbers
To cancel Online Numbers allocated to one or more members with a business Skype
account:
1. Click Features in the toolbar.
2. In the menu on the left, click Online Numbers.
The Online Numbers details for your members are displayed. Note that only members
with business Skype accounts are listed.
3. Check the box next to each member whose Online Numbers you want to cancel.
4. Click Cancel numbers.
5. Confirm that you want to cancel the Online Numbers by clicking Cancel numbers.
The Online Numbers will expire on the dates indicated for each member. No further costs
will be incurred.
6.5.5 Setting up Online Numbers as Caller ID
You can set up Caller ID for members with business Skype accounts so that the Online
Number allocated to them is displayed when calling landlines or mobiles from Skype.
Note that members with personal Skype accounts have to set up their own Caller ID.
To assign an Online Number as the Caller ID for a member:
Page 45 Skype Manager User Guide
1. View the details of the member you want to assign an Online Number as their Caller ID.
For more information on how to do this, please see 4.6 Managing your members.
2. In the menu on the left, click Features.
3. Click Set up Caller ID.
4. Select the Online Number you want to use as the member's Caller ID from the dropdown list.
For a list of countries in which Online Numbers can be used as Caller ID, refer to:
skype.com/allfeatures/calleridentification
5. Click Save settings.
6.5.6 Changing Caller ID
To change which Online Number is used as a member’s Caller ID:
1. Use the Search members tool in the top right corner of Skype Manager to find and
select the member whose Caller ID you want to change.
2. In the menu on the left, click Features.
3. Click anywhere in the Caller ID row.
4. Click Change Caller ID.
5. Select the new Online Number you want to allocate as the member's Caller ID from the
drop-down list.
6. Click Save Settings.
6.5.7 Disabling Caller ID
To disable Caller ID for a member:
1. Use the Search members tool in the top right corner of Skype Manager to find and
select the member whose Caller ID you want to disable.
2. In the menu on the left, click Features.
3. Click anywhere in the Caller ID row.
4. Click Disable Caller ID.
Page 46 Skype Manager User Guide
6.6 Call forwarding
With call forwarding, calls to the member are forwarded from Skype to a landline, mobile
or a co-worker's Skype Name. Calls can be forwarded to landlines and mobiles at Skype's
standard rates or to Skype Names for free. So when someone is away in a meeting or on
holiday, you can ensure important business calls are never missed.
Call forwarding can only be set up by an administrator of Skype Manager for members
with business Skype accounts.
6.6.1 Setting up call forwarding
To set up call forwarding for one or more selected members:
1. Click Features in the toolbar.
2. In the menu on the left, click Call forwarding.
The call forwarding details for your members are displayed. Note that only members
with business Skype accounts are listed.
3. Check the box next to each member to whom you want to set up call forwarding.
4. Add the number or Skype Name that calls will be forwarded to and click Save.
If you want to add another number or Skype Name that calls can be forwarded to, click
Add another number.
Page 47 Skype Manager User Guide
6.6.2 Disabling call forwarding
To disable call forwarding for one or more selected members:
1. Click Features in the toolbar.
2. In the menu on the left, click Call forwarding.
The call forwarding details for your members are displayed. Note that only members
with business Skype accounts are listed.
3. Check the box next to the members whose call forwarding you want to disable and
click Disable Call forwarding.
6.7 Skype Connect
Skype Connect provides connectivity between your business and the Skype community.
By adding Skype Connect to your existing SIP-enabled PBX, your business can save on
communication costs with little or no additional upgrades required.
You can configure your SIP-enabled PBX so that Skype calls can be made directly from
your desk phones at Skype's great low rates. You can also buy Online Numbers to let
customers with landlines and mobiles call you. By adding Click and Call buttons on your
company web pages and emails, all registered Skype users worldwide can reach your
business, reception or call center for free using Skype.
You can use Skype Manager to create SIP Profiles, buy channel subscriptions to activate
profiles and set up your calling options.
For more information about Skype Connect, please see skype.com/go/sip.
To find out how to use Skype Connect, please see our Skype Connect FAQs section on
support.skype.com or read our Skype Connect User Guide.
Page 48 Skype Manager User Guide
7.0 Reports
The Reports area of Skype Manager provides a useful way of keeping track of your
company's usage of Skype. There are four types of report available: Summary,
Purchases, Allocations and Usage. Use these reports to keep track of the Skype Credit
your company has purchased, allocated and used.
When you click Reports in the toolbar of your Skype Manager, the Summary report is
displayed by default. On the left, a menu of the reports available is displayed. Click a
report in the menu to view the report you require.
Members with personal accounts must provide their consent for administrators to view
information on their individual Skype usage. If they have not provided their consent, only
their current Skype Credit balance can be viewed by administrators.
If you are a member of a Skype Manager and want to learn how to give consent for the
administrator of your Skype Manager to be able to view details of your Skype usage,
please see 10.4 Giving consent for your Skype Manager administrator to view your
Skype usage.
7.1 Displaying the Summary report
This report provides a breakdown of where Skype Credit has been allocated in a given
month.
To display the Summary report:
1. Click Reports in the toolbar.
The Summary report is displayed by default.
Page 49 Skype Manager User Guide
2. You can specify the month on which to run the report by selecting the month from the
drop-down list in the menu on the left or by clicking Previous month or Next month. By
default, the current month is selected.
3. You can filter the report by group or type of member. For example, to display
the breakdown of allocations for the current month, but for members who are
also administrators of your Skype Manager only, click Filter this list, then select
Administrators from the Filter by type of member drop-down list.
The arrows next to each feature indicate whether the allocation is more than, equal to, or
less than the previous month.
7.2 Displaying the Purchases report
This report shows the purchases of Skype Credit you have made in a given month. This
report is particularly useful if you want to know how much Skype Credit your company
has bought.
To display the Purchases report:
1. Click Reports in the toolbar.
2. In the menu on the left, click Purchases to view the report.
Page 50 Skype Manager User Guide
3. You can specify the month on which to run the report by selecting the month from the
drop-down list in the menu on the left or by clicking Previous month or Next month. By
default, the current month is selected.
4. You can filter the report by what was purchased, payment method, the administrator
who made the purchase or the current status of the order. For example, to display only
Skype Credit purchases for the current month, but for only, click Filter this list, then
select Skype Credit from the Filter by item drop-down list.
5. To display more information on a specific purchase, including the payment method
used and the administrator who made the purchase, click the order number.
6. To download the details of the order as a PDF for review away from Skype Manager,
click Download invoice as PDF.
Page 51 Skype Manager User Guide
7.3 Displaying the Allocations report
This report provides a detailed list of the features allocated in a given month. This report
is particularly useful if you want to find out how much Skype Credit has been allocated
to particular features such as Voicemail or Online Numbers or who has been allocated
which features.
To display the Allocations report:
1. Click Reports in the toolbar.
2. In the menu on the left, click Allocations.
3. Click on the name of the feature whose allocations you want to view to display the
report.
The report provides details on when the allocation was made, the member it was
allocated to, the member it was allocated by and the amount allocated.
4. You can specify the month on which to run the report by selecting the month from the
drop-down list in the menu on the left or by clicking Previous month or Next month. By
default, the current month is selected.
5. You can filter the report by group or type of member. For example, to display the
breakdown of a feature's allocations for the current month, but for members who
are also administrators of your Skype Manager only, click Filter this list, then select
Administrators from the Filter by type of member drop-down list.
7.4 Displaying a Member's Allocations report
This report provides a detailed list of the features allocated to a specific member in a
given month. This report is particularly useful if you want to find out which features have
been allocated to a member and how much it has cost.
Page 52 Skype Manager User Guide
To display the Member's Allocations report:
1. View the details of the member whose report you want to view. For more information
on how to do this, please see 4.6 Managing your members.
2. In the menu on the left, click Reports, then Allocations.
3. You can specify the month on which to run the report by selecting the month from the
drop-down list in the menu on the left or by clicking Previous month or Next month. By
default, the current month is selected.
4. You can filter the report by item (feature) or the administrator who allocated the
features. For example, to display the breakdown of just the member's subscription
allocations for the current month, click Filter this list, then select Subscription from
the Filter by item drop-down list.
7.5 Displaying the Usage report
The Usage report is a detailed activity report of a specified member or SIP Profile's Skype
usage. It includes the date, duration and destination number of all calls and SMS made.
This report is particularly useful if you want to find out how an individual member or SIP
Profile is using Skype.
To display the Usage report:
1. Click Reports in the toolbar.
2. In the menu on the left, click Usage.
3. If this is the first time that you have attempted to display a Usage report, click I want
to access my members reports, then I want to access the reports.
You should be aware that by accessing and monitoring personal and traffic data of
Page 53 Skype Manager User Guide
members, you may be required to comply with the local data privacy laws in many
jurisdictions. Please familiarize yourself with the applicable laws for your location and
proposed use.
Note that members with personal Skype accounts have to give their consent for you to
access their reports. For more information on how a member can give consent, please
see 10.4 Giving consent for your Skype Manager administrator to view your Skype
usage.
If you no longer want to access the Usage report for specified members at any point
in the future, click I no longer want to access member's reports on this screen.
4. Enter the name of the member or SIP Profile and a list of matching members will
appear below.
Click the member you are looking for to view the report for that member.
5. You can specify the month on which to run the report by selecting the month from the
drop-down list in the menu on the left or by clicking Previous month or Next month. By
default, the current month is selected.
6. You can filter the report by type of usage. For example, to display the member's SMS
usage for the current month, click Filter this list, then select SMS from the Filter by
item drop-down list.
Page 54 Skype Manager User Guide
7.6 Displaying a Member's Usage report
The Usage report is a detailed activity report of a specified member's Skype usage. This
report is particularly useful if you want to find out how an individual member is using
Skype.
To display the Member's Usage report:
1. View the details of the member whose report you want to view. For more information
on how to do this, please see 4.6 Managing your members.
2. In the menu on the left, click Reports.
The Member's Usage report is displayed by default.
3. You can specify the month on which to run the report by selecting the month from the
drop-down list in the menu on the left or by clicking Previous month or Next month. By
default, the current month is selected.
4. You can filter the report by type of usage. For example, to display the member's SMS
usage for the current month, click Filter this list, then select SMS from the Filter by
item drop-down list.
7.7 Downloading reports and invoices
You can download Purchase and Allocation reports for a given month, as well as all
invoices generated in a given month. These can be downloaded as comma-separated
value (CSV) or PDF format files.
To download reports and invoices:
1. Click Reports in the toolbar.
2. In the menu on the left, click Download reports.
Page 55 Skype Manager User Guide
3. Choose the reports you would like to download and your desired format and click
Generate.
The selected reports and invoices are downloaded as a zip file.
Page 56 Skype Manager User Guide
8.0 Changing your company
details
When you set up your Skype Manager, you have to enter information about your company
such as its name, registration address and billing address. If your details change at
any time, for example, if your company changes address or name, you can update your
company details in your Skype Manager.
1. In the top right corner of Skype Manager, click Account details.
2. In the menu displayed on the left, click Company details.
3. Click anywhere in a rows to make the changes required:
•
Company name - the name of your company, which is displayed in the top right
corner of Skype Manager.
•
Registration number - the number allocated to your company by the Company
Registration Office where your company was registered. You can leave this blank if
you do not have a registration number or your company is not required to have one.
•
VAT number - your company's VAT number. You will not pay VAT when buying Skype
Credit if you provide an EU VAT number. VAT numbers start with a country-specific
prefix followed by a maximum of 12 alphanumerical digits or capital characters.
•
Registration address - the registered address of your company. Note that if your
Skype Manager is verified, you need to contact Skype Customer Service if you want
to change your registration address. Your verification status will not be affected.
For more information on how to contact Skype Customer Service, please see
Contacting Skype.
•
Billing address - the billing address of your company (this address is displayed on
all of your invoices). Same as registration address by default.
Page 57 Skype Manager User Guide
If you change your registration or billing address to a location in the United States, a
pop-up window will be displayed, notifying you of the changes that will occur if you
register your Skype Manager in the US and prompting you to agree to the US Skype
Business End User Licence Agreement and US Skype Business Terms of Service.
4. Whenever you make a change, click Save.
Page 58 Skype Manager User Guide
9.0 Deleting your Skype Manager
Deleting your Skype Manager will permanently delete all record of your company's Skype
usage. It will also permanently delete all business Skype accounts created in your Skype
Manager and any remaining features assigned to members will be cancelled.
We recommend that you keep a record of any information contained within your Skype
Manager likely to be required in future before you delete it.
To delete your Skype Manager:
1. Take back any remaining Skype Credit from the business Skype accounts created in
your Skype Manager. For more information on how to do this, please see 6.1.2 Taking
back credit from members.
2. Allocate all of your Skype Manager's Skype Credit balance to a personal Skype
account. For more information on how to do this, please see 6.1.1 Allocating credit to
members.
3. In the top right corner of Skype Manager, click Account details.
4. Click Skype Manager settings.
5. Click Delete this Skype Manager at the bottom of the Skype Manager settings page.
If you have any Skype Credit still assigned to business Skype accounts within your
Skype Manager, a message is displayed to notify you that this is the case. To find out
which business accounts still have Skype Credit allocated to them, click Show list.
Take back the Skype Credit from these business accounts before attempting to delete
your Skype Manager again.
6. Read the statements displayed and check the boxes next to them to accept them:
7. Enter your password to confirm that you want to delete your Skype Manager.
8. Click Delete Skype Manager.
If you decide not to go ahead with deleting your Skype Manager, click I've changed my
mind at the bottom of the page.
Page 59 Skype Manager User Guide
10.0 For members: Managing your
settings
This chapter provides information specifically for members of a Skype Manager.
When you become a member of a Skype Manager, an email is automatically sent to you
to let you know. You can belong to a Skype Manager with a business Skype account that
has been created for you or with a personal Skype account that you have created.
A business Skype account is owned by the Skype Manager where it was created. Only
the administrators of the Skype Manager where the account was created can control who
uses the account and all the features and credit allocated to it.
A personal Skype account is owned by the person who created it. The administrators of
the Skype Manager cannot control who uses it and there are limitations on the features
and credit that they can allocate to it.
If a business Skype account has been created for you, this email will contain a link so that
you can activate your account and change your personal details if required. If you have
been invited to join a Skype Manager using your personal Skype account, the email will
contain a link so that you can accept the invite.
Once you have joined your company's Skype Manager, you can view your Skype Manager
settings. You can review your account details and, if your administrator has allowed it, see
the Members list where you can view other members of your Skype Manager and use it
to add those members to your Contact list in Skype.
Note that although your administrator can allocate Skype Credit and features to your
account (depending on the type of account that you have), they cannot perform actions
on your behalf within Skype itself, such as adding contacts, making calls, or changing
profile settings. For more information on the actions that you can perform within Skype,
please see:
support.skype.com
10.1 Activating your business Skype account
If a business Skype account is created for you, you are sent an email welcoming you
to the Skype Manager where the account was created. You will need to activate your
account and set a password for it.
Note that if your administrator has set your password for you, please contact your
administrator to find out what your password is.
To activate your business Skype account:
1. Open the A Skype business account has been created for you email that has been
sent to you.
2. Click Please activate and set a password for your new account.
Page 60 Skype Manager User Guide
3. Under Your password, enter a password for the account.
4. Under About you, ensure that your personal details are correct.
5. Click Activate.
You can now view your Skype Manager settings in your account.
10.2 Finding out which Skype Manager you
belong to
Sign in to Skype and select Account from the Skype menu bar. If you have signed in
using a business Skype account being to a Skype Manager, a message indicating this is
displayed at the top of the screen.
The name of the Skype Manager you belong to is displayed under Settings and extras in
the bottom right of the screen.
Page 61 Skype Manager User Guide
10.3 Viewing and changing your personal
details
You can view the personal details held by the Skype Manager that you belong to in the
Skype Manager Settings screen.
If you have a personal Skype account, you can update your details. If you have a business
Skype account and need your personal details to be updated, please contact the
administrator of your Skype Manager.
To view your personal details:
1. Sign in to Skype and select Account from the Skype menu bar.
2. Under Settings and extras, next to Skype Manager, click View details. If you have a
business Skype account, your personal details are displayed but cannot be changed.
However, if you have a personal Skype account, you can change your personal details.
Page 62 Skype Manager User Guide
3. If you have a personal Skype account, you can edit your name and job title as needed.
Click Save Settings to save any changes that you make.
10.4 Giving consent for your Skype Manager
administrator to view your Skype usage
If you belong to a Skype Manager with a personal Skype account, the administrator of
your Skype Manager cannot view your Skype usage without your permission.
To give consent for your Skype Manager administrator to view your Skype usage:
1. Sign in to Skype and select Account from the Skype menu bar.
2. Under Settings and extras, next to Skype Manager, click View details.
3. Check I agree that the Administrator may see the detailed activity on my Skype
Account including my traffic data and purchase history.
4. Click Save Settings.
If you no longer want to give your consent at some point, repeat the above steps and
uncheck I agree that the Administrator may see the detailed activity on my Skype
Account including my traffic data and purchase history.
10.5 Adding other members of your Skype
Manager to your Skype Contact list
You can use the Members list to view the other members of your Skype Manager and add
them to your Contact list in Skype.
Note that the colleague must agree to the contact request before they can be added as
a contact.
Page 63 Skype Manager User Guide
To view the Members list and add other members to your Contact list:
1. Sign in to Skype and select Account from the Skype menu bar.
2. Under Settings and extras, next to Skype Manager, click View details.
3. Click Members list to view a list of all the members of your Skype Manager.
4. To add someone to your Skype Contacts list, click Add contact next to their name.
5. Depending on your browser, a message may be displayed, asking you to confirm that
you want to open Skype or asking if you want to allow access to Skype. Accept to
continue.
6. Before the contact can be added, you must send a contact request to the member.
Enter some text to introduce yourself and click Send request.
10.6 Viewing your Online Numbers
If you belong to a Skype Manager with a personal Skype account, you can see the details
of any Online Numbers you have.
To view your Online Numbers:
1. Sign in to Skype and select Account from the Skype menu bar.
2. Under Settings and extras, next to Skype Manager, click View details.
3. Click Online Numbers.
10.7 Leaving your Skype Manager
If you belong to a Skype Manager with a personal Skype account, you can leave your
Page 64 Skype Manager User Guide
Skype Manager at any time, for example, if you leave the company.
Note that if you leave your Skype Manager, the administrator will no longer be able to
allocate you Skype Credit, and any subscription allocated will end when the next payment
is due.
If you have a business Skype account, you should contact your administrator if you need
to leave your Skype Manager.
To leave your Skype Manager:
1. Sign in to Skype and select Account from the Skype menu bar.
2. Under Settings and extras, next to Skype Manager, click View details.
3. Click Leave Skype Manager.
4. Click Yes, I want to leave.
Page 65 Skype Manager User Guide
Copyright © Skype Limited 2011