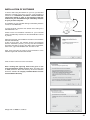
1
SEQS-6700
INSTRUCTION MANUAL
67
IMPORTANT SAFETY INSTRUCTIONS
When using an electrical appliance, basic safety precautions should always be followed, including the following.
Read all instructions before using this sewing machine.
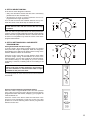
DANGER--To reduce the risk of electric shock:
1. This sewing machine should never be left unattended when plugged in. Always unplug this sewing machine from the electric
outlet immediately after using and before cleaning.
WARNING-
1. Do not allow to be used as a toy. Close attention is necessary when this sewing machine is used by or near children.
2. This appliance is not intended for use by persons (including children) with reduced physical, sensory or mental capabilities, or
lack of experience and knowledge, unless they have been given supervision or instruction concerning use of the appliance by
a person responsible for their safety. Children should be supervised to ensure that they do not play with the appliance.
3. Use this sewing machine only for its intended use as described in this manual. Use only attachments recommended by the
manufacturer as contained in this manual.
4. Never operate this sewing machine if it has a damaged cord or plug, if it is not working properly, if it has been dropped
or damaged, or dropped into water. Return the sewing machine to the nearest authorized dealer or service center for
examination, repair, electrical or mechanical adjustment.
!
to avoid a hazard.
6. Never operate the sewing machine with any air openings blocked. Keep ventilation openings of the sewing machine and foot
control free from the accumulation of lint, dust, and loose cloth.
7. Never drop or insert any object into any opening.
8. Indoors use only.
9. Do not operate where aerosol (spray) products are being used or where oxygen is being administered.
10. To disconnect, turn switch to the off („0“) position, then remove plug from outlet.
11. Switch off or unplug the appliance when leaving it unattended, unplug the appliance before carrying out maintenance or
replacing lamps.
12. Do not unplug by pulling on cord. To unplug, grasp the plug, not the cord.
"# $%
&!
%
14. Never sew with a damaged needle plate as this can cause needle to break.
15. Do not use bent needles.
"' *
%
+
17. Switch the sewing machine off (“0”) when making any adjustments in the needle area, such as threading needle, changing
needle, threading bobbin, or changing presser foot, etc.
18. Always unplug sewing machine from the electrical outlet when removing covers, lubricating, or when making any other user
servicing adjustments mentioned in the instruction manual.
19. To avoid electrical shock never put the machine nor the mains cable or mains plug into water or other liquids.
20. The LED lamp maximum power is 0.3w, maximum voltage is DC 5v, if the LED lamp is damaged, you should not use the
product and send it to the manufacture or service agent to repair or replace at once.
21. Attention the following to avoid injury:
- Unplug the foot controller of the appliance when leaving it unattended:
- Unplug the foot controller of the appliance before carrying out any maintenance.
CAUTION--
Moving parts-To reduce risk of injury, switch off before servicing. Close cover before operating
machine.
SAVE THESE INSTRUCTIONS
This product is for household use, or equivalent.
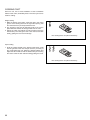
FOOT CONTROL (USA & Canada only)
Use Model YC-485 EC or Model JF-1000 with this sewing machine.
POLARIZED PLUGS CAUTION (USA & Canada only)
This appliance has a polarized plug (one blade wider than the other). To reduce the risk of electric shock, this plug is intended
This appliance complies with EEC Directive 2004/108/EC covering the electromagnetic compatibility.
Please note that on disposal, this product must be safely recycled in accordance with relevant National legislation
relating to electrical/ electronic products. If in doubt please contact your retailer for guidance.
&;<=>?@@>BF
&GH
&J
B
OVX"V&GH
&J
B
B
TABLE OF CONTENTS
1.GETTING TO KNOW YOUR MACHINE
3. PREPARATION FOR EMBROIDERY SEWING
\
---------------------------------------------------2
Accessories ----------------------------------------------------------------3
Set up your machine ----------------------------------------------------4
Spool pins ------------------------------------------------------------------4
Winding bobbin -----------------------------------------------------------5
Threading the bobbin thread ------------------------------------------6
Threading the top thread -----------------------------------------------7
Using automatic needle threader ------------------------------- 8 - 9
Needle, thread and fabric chart ------------------------------------ 10
Changing the needle -------------------------------------------------- 10
Adjusting top thread tension ---------------------------------------- 11
Changing presser foot ------------------------------------------------ 11
Control panel function ------------------------------------------ 12 - 14
Functions of operation switch panel ------------------------------- 15
Before attaching embroidery unit ---------------------------- 34 - 35
Attaching embroidery foot, Inserting the bobbin,
Threading the top thread, Extension table,
Attaching embroidery unit -------------------------------------------- 36
Removing embroidery unit ------------------------------------------- 36
Securing fabric in embroidery hoop ------------------------------- 37
Using fabric and stabilizer ------------------------------------- 38 - 39
Preparing the machine before installing the hoop ------------- 40
Attaching and removing embroidery hoop ----------------------- 40
Installation of software ------------------------------------------ 41 - 42
Function buttons when embroidering ------------------------------- 43
Operation switches, Thread tension control
Troubleshooting -------------------------------------------------- 44 - 47
Helpful information for embroidering with FUTURA
Multi hoop ---------------------------------------------------------- 48 - 51
Control panel when embroidering --------------------------------- 52
Helpful messages when embroidering --------------------------- 53
2. STARTING TO SEW
Quick reference table of stitch length and width --------- 16 - 19
Straight stitching ------------------------------------------------- 20 - 21
Keeping seams straight, Inserting zippers and piping
Hand-look quilt stitch -------------------------------------------------- 21
Straight stitch with auto tie-off function --------------------------- 21
Zigzag stitching --------------------------------------------------------- 22
Adjusting stitch width and length, Satin stitch
Placement of patterns
Blind stitch --------------------------------------------------------------- 23
Multi-stitch zigzag ------------------------------------------------------ 23
Stretch stitches --------------------------------------------------- 24 - 27
Straight stretch stitch, Overedge stitch, Ric-rac stitch,
Feather stitch, Blanket stitch, Honeycomb stitch,
Slant overedge stitch, Turkish stitch, Slant pin stitch,
Thorn stitch, Reinforced overedge stitch, Wizard stitch,
Crossed stitch, Pin stitch, Entredeux stitch,
Ladder stitch, Criss-cross stitch, Fishbone stitch
Sewing on a button ---------------------------------------------------- 27
Buttonholes -------------------------------------------------------- 28 - 31
Using buttonhole foot, Procedure, Corded buttonholes
Buttonholing with hard-to-sew fabrics, Manual buttonhole
Decorative sewing ----------------------------------------------------- 32
Suggestions for decorative stitching ------------------------------- 32
More sewing examples ----------------------------------------------- 33
4. OTHER THINGS YOU SHOULD KNOW
Presser foot lifter ------------------------------------------------------- 54
Feed dog control ------------------------------------------------------- 54
Converting to free-arm sewing ------------------------------------- 54
Performance checklist ------------------------------------------------ 55
Cleaning hook area and feed dogs -------------------------------- 56
Oiling inside the face cover ------------------------------------------ 57
Special accessories --------------------------------------------- 58 - 62
Satin stitch foot, Cut & hem, Straight stitch foot,
Open toe foot, Invisible zipper foot, Cording foot,
Darning / freehand embroidery foot, Even feed foot,
Edge guide / quilting bar, Twin needle,
Threading the twin needle, Wing needle
Helpful messages ------------------------------------------------ 63 - 64
For European version
Sewing machine
Dimensions: 567 mm × 240 mm × 317 mm
Mass of the equipment: 10.8 kg
Embroidery unit
Dimensions: 504 mm × 411 mm × 141 mm
Mass of the equipment: 3.0 kg
Rated Voltage: 230 V ~
Rated Frequency: 50 Hz
Rated input: 64 W
Using ambient temperature: Normal temperature
Acoustic noise level: less than 70 db(A)
1
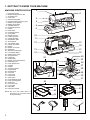
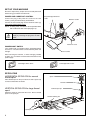
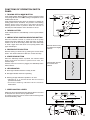
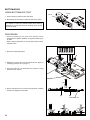
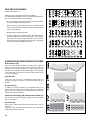
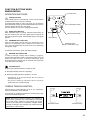
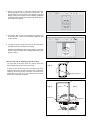
1. GETTING TO KNOW YOUR MACHINE
MACHINE IDENTIFICATION
1.
2.
3.
4.
5.
6.
7.
8.
9.
10.
11.
12.
13.
14.
15.
16.
17.
"{
19.
20.
21.
22.
23.
24.
25.
26.
27.
28.
29.
30.
31.
32.
33
34.
35.
36.
37.
38.
39.
40.
41.
42.
43.
44.
45.
46.
47.
48.
49.
Pre-tension guide
Bobbin winding tension disk
Threading lever
Face cover
Thread cutter/holder
Extension table (Accessory box)
Bobbin winder spindle
Bobbin winder latch
Operation buttons
Horizontal spool pin
Handle
Hand wheel
Power/light switch
Cord socket
Buttonhole lever
Feed dog control
Presser foot lifter
Thread guide
Twin thread guide
Presser foot screw
Needle
Bobbin cover plate
Needle bar
Alternate thread cutter
Foot release button
Needle clamp screw
All purpose foot
Feed dogs
Needle plate
Bobbin cover release button
Embroidery unit
Hoop release lever
Carriage
Handle
Accessory drawer
Hoop bracket
Release lever
Connector
Large hoop
Inner frame
Outer frame
Hoop adjusting screw
Hoop mounting plate
Small hoop
Power line cord
Foot control
USB cable
Instruction manual
NOTE: B e s u r e t h e U S B c a b l e i s
attached to your machine when
doing embroidery.
2
8
3
9
4
5
6
10
11
12
15
16
13
17
14
18
24
32
35 34
33
25
19
39
26
20
27
21
28
22
29
23
36
30
37 38
31
40
45
41
42
41
42
43
43
44
46
2
7
1
47
44
48
49
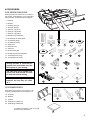
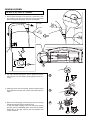
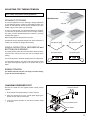
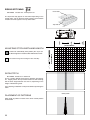
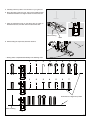
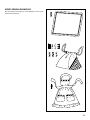
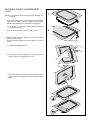
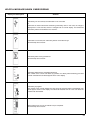
ACCESSORIES
FOR SEWING MACHINE
Sewing machine accessories are located in
the storage compartments of the removable
extension table, as indicated by the diagram.
1. Needles
2. Bobbins
3. Auxiliary spool pin
4. Spool pin felt disc
5. Spool pin cap (mini)
6. Spool pin cap (small)
7. Spool pin cap (large)
8. Buttonhole opener/Brush
9. Screwdriver for needle plate
10. Screwdriver (large)
11. Screwdriver (small)
12. Zipper foot
1
3
2
4
5
6
10
11
13. Blind hem foot
14. Satin foot
15. Button sewing foot
16. Buttonhole foot and underplate
17. Thread spool net (long)
7
8
9
18. Thread spool net (short)
The foot that comes on your
sewing machine is called the all
purpose foot and will be used for
the majority of your sewing.
12
14
13
15
The satin foot (14) is another very
useful foot and should be used
for most decorative sewing.
When purchasing additional
bobbins, be sure they are class
15 J.
16
17
18
FOR EMBROIDERY
Embroidery accessories are located in the
vinyl bag, packaged with the embroidery unit.
19. Vinyl bag
20. Bobbins
21. Scissors
20
19
21
22
22. Embroidery presser foot
23. Embroidery software CD
To install the software, refer to the CD
insert for more information.
23
3
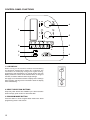
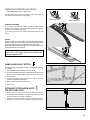
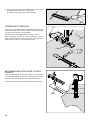
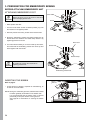
SET UP YOUR MACHINE
Be sure to wipe off any surplus oil from needle plate area
POWER LINE CORD/FOOT CONTROL
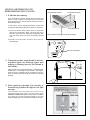
Connect the plug of the power line cord into the cord
socket (1) and your wall outlet (2) as illustrated.
Set power/light switch at
“OFF”
Machine socket
Connect the foot control plug into the machine socket (3),
when using sewing machine only.
NOTE: In sewing mode, the machine can be operated either
with or without the foot control (see page 15).
2
4
1
Always disconnect the machine from power
supply by removing the plug from the wall
outlet.
3
Pin
Power line cord
POWER/LIGHT SWITCH
Your machine will not operate until the power/light switch
is turned on. The same switch controls both the power and
the light.
Foot control
When servicing the machine, or when changing needles
or lights, etc., the machine must be disconnected from the
power supply.
Power/light switch “ON”
Power/light switch “OFF”
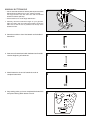
SPOOL PINS
HORIZONTAL SPOOL PIN for normal
thread spool
Spool
Place thread spool on the pin and secure with a spool cap
+%
Felt disc
VERTICAL SPOOL PIN for large thread
spool
Vertical spool pin
Attach the spool pin. Place felt disc over it. Place a thread
spool on the spool pin.
Thread retaining slit
Spool pin cap
4
Spool
Spool pin
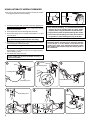
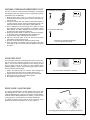
WINDING BOBBIN
Be sure to use Class 15 J bobbins.
1. Place a spool of thread on the spool pin, and secure it with
the spool pin cap. Pull the thread out from the spool and
place it through thread guides as shown in illustration.
1
2. Put end of thread through the hole in bobbin as shown.
Place bobbin onto the bobbin winder spindle as far as it
can go.
2
3. Holding onto the end of the thread, push the bobbin winder
latch against the bobbin until it clicks and bobbin starts to
rotate.
3
4. Bobbin will disengage automatically and the winding
mechanism will stop when the bobbin is full.
To stop the bobbin winding at any time during the winding
process, push the Start/Stop button and move the bobbin
winder latch to the right. Remove the wound bobbin and
cut the thread tail.
4
5
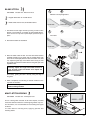
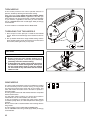
THREADING THE BOBBIN THREAD
1. Raise the needle to its highest position by rotating the hand
wheel counter clockwise (toward you).
2. Remove the bobbin cover plate by pushing the release
%
allow you to remove the cover.
3. Insert the bobbin making sure the bobbin rotates counterclockwise when you pull the thread.
NOTE: This is a very important step. The bobbin
must rotate counterclockwise when thread is pulled.
4. Pull thread through the slot (A) and then to the left.
A
5. With a finger held gently on top of the bobbin, pull the
thread until it stops in the slot (B). Then pull the thread
along the groove on the needle plate until it is snipped with
cutter on the top left.
Cutter
NOTE: Sewing can be started without having to pull
up the bobbin thread.
Groove
6. Replace the clear bobbin cover plate onto the needle plate.
B
6
A
THREADING THE TOP THREAD
A. Raise the presser foot lifter. Always be sure to raise the
presser foot lifter before threading the top thread. (If the
presser foot lifter is not raised, correct thread tension
cannot be obtained.)
B. Turn the hand wheel counter clockwise (toward you) until
the needle is in its highest position.
G
%
%
the thread with your right hand in the following order as
illustrated.
* Guide the thread through thread guides (1 & 2), and then
pull it down along the groove (3).
* Guide the thread into the thread guide (4).
* Pass the thread through the eye of the needle (5) from
front to back. (See following page for instructions on
operation of the Automatic Needle Threader.)
IMPORTANT:
To verify that the machine is threaded properly in the
tension discs, do this simple check:
1.) With the presser foot raised, pull the thread towards
the back of the machine. You should detect only
needle.
2.) Now lower the presser foot and again pull the thread
towards the the back of the machine. This time you
should detect a considerable amount of resistance
and much more deflection of the needle. If you do
not detect the resistance you have mis-threaded the
machine and need to re-thread it.
7
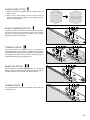
USING AUTOMATIC NEEDLE THREADER
¹ Be sure to raise the presser foot lifter and raise the needle
to its highest position before threading.
1. Thread the machine with your left hand while gripping the
thread with your right hand. Hook thread to the thread
guide on the needle bar and pull it toward you leaving
about 4” (10 cm) clear.
NOTE:
º For smooth threading, it is recommended that the
machine be set for straight stitch (in center needle
position) when using the automatic needle threader.
2. Hook thread into the twin thread guides (A and B).
º º Don’t lower the threading lever while the machine is
in operation or the threading hook may be broken.
3. Pull thread gently into the thread cutter/holder to cut and
hold it in place.
Don’t pull thread with strong force or thread may
be pulled off from needle hole after threading.
IMPORTANT: If the needle cannot be threaded with the
Automatic Needle Threader due to particular qualities
of the thread, or if the thread is too thick for the
needle being used, then manually thread the needle
after hooking the thread through the thread guide on
the needle bar.
4. Pull down the threading lever to its lowest position until the
twin thread guide rotates and stops.
Make sure that the guide doesn’t touch fabric, etc.
5. Release the threading lever and needle will be threaded
automatically. If it should not return to the original position,
raise it gently by hand.
6. Pull thread loop away from you.
If the needle has not been threaded correctly, rethread from STEP 1.
1
2
3
Twin thread guide
Thread guide
Thread cutter/holder
Threading hook
A
B
4
5
Threading lever
8
6
HELPFUL SUGGESTIONS:
º If the machine is not used frequently, put a drop of
sewing machine oil onto the felt disc.
Felt disc
º If the threading hook is deviated from needle hole,
adjust the position of the hook using a small screw
driver.
9
NEEDLE, THREAD AND FABRIC CHART
Your fabric will determine the choice of a needle and thread.
The following table is a practical guide to needle and thread
selection. Always refer to it before a new sewing project. For
general sewing, the same size and type of thread is used in
the bobbin as in the needle.
IMPORTANT:
Use only SINGER brand needles for best results. The
use of alternative brand needles can cause tension
issues or unsatisfactory results.
FABRICS
THREAD
NEEDLES
The fabrics below can be of any
%
synthetic, rayon, blends. They
are listed as examples of weight.
TYPE
Cotton-wrapped 2000 or 2020
LightBatiste
Polyester
red
Weight
Chiffon
100% Polyester
shank
Crepe
* Mercerized Size 60
Cotton-wrapped 2000 or 2020
Medium- Corduroy
Polyester
red
Weight
Flannel
100% Polyester
shank
Gabardine
* Mercerized Size 50
Gingham
Nylon
Linen
Muslin
Wool Crepe
Cotton-wrapped 2000 or 2020
Medium- Bonded Wovens
red
Polyester
Heavy
Canvas
shank
100% Polyester
Coating
* Mercerized Size 40
Denim
* "Heavy Duty"
Duck
Sailcloth
Knits
Bonded Knits
Double Knit
Jersey
Tricot
Cotton-wrapped
Polyester
Polyester
Nylon
2001 or 2045
yellow
shank
SIZE
11/80
orange
band
14/90
blue
band
16/100
purple
band
18/110
yellow
band
11/80
orange
band
14/90
blue
band
16/100
purple
band
Always disconnect the machine from power
supply by removing the plug from the wall outlet.
Flat side
Changing the needle
Needle
1. Raise the needle bar to its highest position by turning the
hand wheel counter clockwise (toward you).
2. Loosen the needle clamp screw by turning it toward you.
3. Remove the needle by pulling it downward.
4. Insert the new needle into the needle clamp with the +
side toward the back.
Pin
Needle clamp screw
5. Push the needle up as far as it can go.
6. Tighten the needle clamp screw firmly with the screw
driver.
Flat side toward the back
10
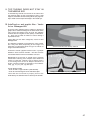
ADJUSTING TOP THREAD TENSION
Under side
Helpful Hint: A slight adjustment to a higher number or a
lower number may improve sewing appearance.
Well balanced
STRAIGHT STITCHING
The correct appearance of your stitching is largely determined
by the balanced tension of both top and bobbin threads. The
tension is well balanced when these two threads ‘lock’ in the
middle of layers of the fabric you are sewing.
Top side
%
%
you will need to adjust the tension control. Do this, however,
only after you have determined that the machine is correctly
threaded (see page 7).
Make all adjustments with presser foot ‘down’.
A balanced tension (identical stitches both top and bottom) is
usually only desirable for straight stitch sewing.
Top stitch too tight
Top stitch too loose
Decrease tension
Increase tension
ZIGZAG, SATIN STITCH, DECORATIVE and
BUTTON HOLE SEWING
For zigzag sewing, satin stitch and decorative stitch functions,
thread tension should be less than that for straight stitch
sewing.
It is recommended to decrease thread tension for buttonholes.
You will always obtain a nicer stitch and less puckering when
the upper thread appears slightly on the bottom side of your
fabric.
BOBBIN TENSION
The bobbin tension has been correctly set at the factory,
so you do not need to adjust it.
CHANGING PRESSER FOOT
Presser foot lifter
Be sure the needle is in the highest position. Raise presser
foot lifter.
3
1. Push presser foot release button to remove the foot.
2. Place the desired foot on the needle plate aligning the
presser foot pin with the foot holder.
1
3. Lower the presser foot lifter so that the foot holder snaps
on the foot.
Foot release button
2
Foot holder
11
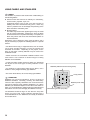
CONTROL PANEL FUNCTIONS
4
1
5
2
3
6
7
1. LCD DISPLAY
When turning on the machine without the embroidery
unit attached, straight stitch number 00, is selected. The
information on the display changes for regular sewing,
programming and embroidering. For regular sewing, the LCD
display shows the number of the selected stitch, an image of
the stitch, and stitch width and stitch length settings.
See page 13 for information about the display when creating a
stitch program, and page 52 for information about the display
when embroidering.
2. DIRECT SELECTION BUTTONS
Frequently used stitches are available by the direct selection
buttons. Simply press a button to select that stitch.
3. PROGRAM MODE BUTTON
Press this button to enter Program Mode. Read more about
programming under 4 and 5 below.
12
8
4. STITCH SELECTION DIAL
There are two main categories of stitches:
% (buttonholes are also included here)
% programmed into longer sequences.
Turn the dial to browse the available stitches one by one.
Press the center of the dial to step ten stitches at a time.
Example: To select stitch number 52, press the center
clockwise.
When the “ABC” Program Mode button has been pressed (see
3 above) turning the Stitch Selection Dial will browse through
letters and other programmable stitches. Selected stitch will
be sewn in one repetition only. Press the center of the dial to
program selected stitch.
5. STITCH SETTING/SCROLL AND DELETE
PROGRAM DIAL
Setting Stitch Width and Stitch Length
In sewing mode, stitch width (needle position for straight
stitch) and stitch length are displayed. Width and length are
automatically set to default for all stitches when turning on the
machine. Default numbers are underlined.
Press the center of the dial to toggle between stitch width
and stitch length setting. A LED indicator is lit next to the
selected setting. Turn the dial to adjust the selected setting.
The numbers change on the display as you turn, and the
underlining is removed, indicating that the new setting is not
default.
Note: When an arrow on either side of the stitch width/
stitch length value number disappears, the machine is
set at the maximum or minimum stitch width or length
available for that particular stitch.
The settings made for each stitch are saved until the machine
is turned off.
Scroll program and delete programmed stitches
When the “ABC” Program Mode button has been pressed
(see 3 above) turning the lower dial will scroll through the
programmed letters and stitches, displaying your program as
it will be stitched out.
Press the center of the dial to delete the last stitch in the
program. Press repeatedly or keep the center of the dial
pressed to continue deleting letters and/or programmed
stitches one at a time.
13
6. TWIN NEEDLE BUTTON
When using twin needles, press the twin needle safety button
regardless of the stitch you selected. Doing so will reduce
the stitch width automatically and save broken needles and
possible damage to your machine.
When the button is pressed, the LED indicator next to the
button is lit, indicating that Twin Needle Button is activated.
When turning the Stitch Selection Dial, the machine now
automatically skips all stitches that are not suitable for twin
needle, and a beep will sound when selecting buttonhole
pattern with the direct selection button, indicating that
buttonholes cannot be sewn with twin needle.
6
Note: Always select the Twin Needle Button prior to
selecting a pattern. This will preclude any possibility
of the twin needle breaking.
To disengage the Twin Needle Button button and return
the machine to normal sewing mode, either press the
Twin Needle button again or turn the machine off. Twin
Needle sewing is only active when the LED light next
to the Twin Needle button is lit.
It is recommended that you use SINGER Style 2025 twin
needles.
7. THREAD CUTTING MODE
Press this button to activate Thread Cutting Mode. The
machine will automatically cut the top and bobbin thread every
time you stop sewing. When activated, the LED indicator next
to the button is lit.
7
Note: Twin needle safety and Thread cutting mode
cannot be enabled at the same time.
8. THREAD TENSION CONTROL BUTTON
Press - to decrease and + to increase thread tension. While
pressing the button, thread tension adjustment mode is
displayed on LCD screen.
14
8
FUNCTIONS OF OPERATION SWITCH
PANEL
1. TACKING STITCH MODE BUTTON
Press Tacking Stitch Button and the sewing machine makes
F
%
START/STOP to sew.
Press Tacking Stitch button when the machine is stopped so
tacking stitch will be activated. The position of the tacking
stitches will be at the exact spot in the pattern where the
Tacking Stitch button is pushed. When the function is
activated, the LED indicator next to the button is lit red.
2
1
3
4
2. THREAD CUTTER
5
Press Thread Cutter to automatically cut the top and bobbin
threads.
3. NEEDLE STOP POSITION SELECTOR BUTTON
When the machine is turned on, needle is set at its up-stop
position with upper LED lamp lit. When the button is pushed,
needle is set at its down-stop position with lower LED lamp
lit. Push it again and it will return to its up-stop position with
upper LED lamp lit.
4. REVERSE STITCH BUTTON
6
Reverse stitch function
for straight and zigzag
stitches
Reverse sewing is carried out by pushing the reverse stitch
button. The machine will sew 4 stitches in reverse and stop.
5. START/STOP BUTTON
When the Start/Stop button is pushed, the machine starts
slowly, and when the button is pushed once more, the
machine stops.
However, when foot control is plugged, the Start/Stop button
will be inactive.
Tacking stitch function
for tie-off of other
stitches
6. LED INDICATOR
¿ Green light indicates machine is ready to start.
¿ Red light indicates machine is operating.
¿ Flashing red light indicates a problem or an error.
* Flashing for 2 - 3 seconds shows that an incorrect
operation was made.
* Continuous flashing indicates that the machine
malfunctions.
7. SPEED CONTROL LEVER
Sliding the lever sets desired sewing speed. When foot control
is used, the lever serves as a top speed limiter.
The speed control lever can be used in both the sewing mode
and the embroidery mode.
7
15
2. STARTING TO SEW
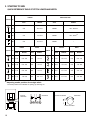
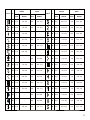
QUICK REFERENCE TABLE OF STITCH LENGTH AND WIDTH
LENGTH
STITCH
No.
AUTO
MANUAL
AUTO
MANUAL
00
2.5
0.5 - 4.8
CENTER
LEFT - RIGHT ¿
01
2.5
1.5 - 3.0
CENTER
LEFT - RIGHT ¿
02
2.5
2.0 - 4.0
CENTER
-
LENGTH
STITCH
NEEDLE POSITION
WIDTH
LENGTH
No.
STITCH
AUTO
MANUAL
AUTO
MANUAL
03
2.0
0.5 - 3.0
5.0
0 - 7.0
04
2.0
0.5 - 3.0
5.0
05
2.0
0.5 - 3.0
06
2.0
1.0 - 3.0
WIDTH
No.
AUTO
MANUAL
AUTO
MANUAL
07
1.5
0.3 - 2.5
6.0
2.5 - 7.0
0 - 7.0
08
2.0
1.0 - 3.0
3.0
1.0 - 6.0
5.0
0 - 7.0
09
2.5
1.5 - 3.0
3.5
3.5 - 7.0
3.0
2.0 - 7.0
10
2.0
1.0 - 3.0
6.0
3.0 - 6.0
¿ Adjusting needle position for straight stitch
13 needle positions are available for quilting, top stitching etc.
Counter
clockwise
Clockwise
Counter clockwise
Clockwise
Lower scroll dial
16
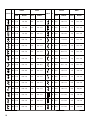
LENGTH
STITCH
WIDTH
LENGTH
No.
STITCH
AUTO
MANUAL
AUTO
MANUAL
11
2.5
1.5 - 3.0
3.5
3.5 - 7.0
12
2.0
1.0 - 3.0
3.0
13
2.5
1.5 - 3.0
14
2.0
15
WIDTH
No.
AUTO
MANUAL
AUTO
MANUAL
26
0.5
0.5 - 1.0
3.5
2.0 - 6.0
1.0 - 6.0
27
0.5
0.5, 0.8
5.0
2.0 - 7.0
-
-
28
1.3
1.0 - 2.0
6.3
3.8 - 6.3
1.0 - 2.5
5.0
3.0 - 7.0
29
2.5
1.5 - 2.5
7.0
3.5 - 7.0
2.5
1.5 - 2.5
5.0
3.0 - 7.0
30
1.8
1.5 - 2.5
5.0
3.0 - 7.0
16
2.0
2.0 - 4.0
-
-
31
2.5
1.5 - 2.5
5.0
4.0 - 7.0
17
-
-
5.0
5.0, 6.0
32
1.8
1.0 - 4.0
7.0
3.5 - 7.0
18
2.5
1.5 - 3.0
5.0
2.0 - 7.0
33
2.5
1.5 - 2.5
5.0
3.0 - 7.0
19
2.0
1.5 - 2.5
7.0
3.5, 7.0
34
2.5
1.0 - 2.5
7.0
3.0 - 7.0
20
1.8
0.8 - 2.5
7.0
3.5, 7.0
35
2.5
1.0 - 2.5
7.0
3.0 - 7.0
21
2.5
1.3 - 2.5
5.0
3.5 - 7.0
36
2.5
1.5 - 2.5
4.5
3.0 - 6.0
22
2.5
1.5 - 2.5
5.0
3.5 - 7.0
37
2.5
1.5 - 2.5
7.0
3.5 - 7.0
23
-
-
6.0
3.5, 6.0
38
2.5
1.5 - 2.5
4.5
3.0 - 6.0
24
-
-
6.0
3.5, 6.0
39
2.5
1.5 - 2.5
5.0
3.5 - 7.0
25
2.5
0.8 - 2.5
5.0
1.0 - 7.0
40
1.5
0.5 - 2.0
5.0
2.0 - 7.0
17
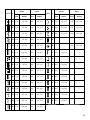
LENGTH
STITCH
18
WIDTH
No.
LENGTH
STITCH
AUTO
MANUAL
AUTO
MANUAL
41
2.5
1.5 - 2.5
5.0
3.5 - 7.0
42
2.5
1.3 - 3.0
6.0
43
2.0
1.5 - 3.5
44
0.8
45
WIDTH
No.
AUTO
MANUAL
AUTO
MANUAL
56
0.5
0.5 - 1.5
7.0
3.5 - 7.0
3.0 - 7.0
57
0.5
0.5 - 3.0
7.0
3.0 - 7.0
4.5
2.0 - 7.0
58
0.5
0.5 - 3.0
7.0
3.0 - 7.0
0.8 - 1.5
6.0
3.5, 6.0
59
2.5
1.5 - 2.5
7.0
3.5 - 7.0
0.5
0.5 - 1.5
7.0
3.5 - 7.0
60
2.5
1.5 - 2.5
7.0
3.5 - 7.0
46
0.5
0.5 - 1.5
7.0
3.5 - 7.0
61
0.8
0.8 - 1.5
7.0
3.5 - 7.0
47
0.5
0.5 - 1.5
7.0
3.5 - 7.0
62
0.8
0.8 - 1.5
7.0
3.5 - 7.0
48
0.5
0.5 - 1.3
6.0
3.0 - 6.0
63
0.5
0.5 - 1.5
7.0
3.0 - 7.0
49
0.5
0.5 - 2.5
7.0
3.5 - 7.0
64
0.5
0.3 - 1.5
7.0
3.0 - 7.0
50
0.5
0.5 - 1.5
7.0
3.0 - 7.0
65
0.5
0.5 - 1.5
7.0
3.0 - 7.0
51
0.5
0.5 - 1.5
7.0
3.0 - 7.0
66
0.5
0.5 - 1.5
5.0
3.5 - 7.0
52
0.5
0.5 - 1.5
7.0
3.5 - 7.0
67
0.8
0.8 - 1.5
6.0
3.5, 6.0
53
0.5
0.5 - 1.5
7.0
3.5 - 7.0
68
2.5
1.5 - 3.0
3.0
1.0 - 7.0
54
0.5
0.5 - 1.5
7.0
3.5 - 7.0
69
2.5
1.5 - 3.0
3.5
1.0 - 7.0
55
0.5
0.5 - 1.5
7.0
3.5 - 7.0
70
2.0
1.5 - 3.0
6.0
3.0 - 6.0
LENGTH
STITCH
WIDTH
No.
LENGTH
STITCH
AUTO
MANUAL
AUTO
MANUAL
71
2.5
1.5 - 3.0
3.0
2.0 - 7.0
72
2.5
1.5 - 3.0
3.5
73
2.0
1.5 - 3.0
74
2.5
75
WIDTH
No.
AUTO
MANUAL
AUTO
MANUAL
86
1.5
0.5 - 1.5
7.0
3.0 - 7.0
1.0 - 7.0
87
2.5
1.5 - 2.5
5.0
3.5 - 7.0
6.0
3.0 - 6.0
88
2.5
1.0 - 2.5
5.0
2.0 - 7.0
1.0 - 3.0
4.0
2.0 - 6.0
89
-
-
-
-
2.0
1.0 - 3.0
5.0
1.0 - 7.0
90
-
-
3.0
2.0 - 4.5
76
2.0
0.8 - 2.5
3.5
1.0 - 6.0
91
0.5
0.5, 0.8
-
-
77
2.5
1.5 - 2.5
5.0
3.0 - 7.0
92
-
-
-
-
78
2.5
1.5 - 3.0
3.0
1.0 - 7.0
93
0.5
0.5, 0.8
-
-
79
2.5
1.5 - 3.0
3.5
1.0 - 7.0
94
0.5
0.5, 0.8
-
-
80
2.5
1.5 - 2.5
5.0
3.5 - 7.0
95
0.5
0.5, 0.8
-
-
81
2.5
1.5 - 2.5
5.0
3.5 - 7.0
96
0.5
0.5, 0.8
-
-
82
2.5
1.5 - 2.5
4.5
3.0 - 6.0
97
0.5
0.5, 0.8
-
-
83
1.3
0.8 - 4.0
7.0
3.5 - 7.0
98
0.5
0.5, 0.8
-
-
84
1.3
0.8 - 4.0
7.0
3.5 - 7.0
99
0.5
0.5, 0.8
-
-
85
2.0
0.8 - 2.5
3.5
1.0 - 6.0
19
STRAIGHT STITCHING
00
Straight stitch is most frequently used for all types of sewing.
Let’s begin by following the steps below.
1. SETTINGS
Presser foot - All Purpose Foot
NOTE: Based upon the weight of the fabric, slight
A.
B.
C.
D.
E.
F.
G.
H.
I.
Thread cutter
Tacking stitch mode button
Needle up/down position selector button
Reverse stitch button
Start/stop button
Feed dog control (at rear side)
Presser foot lifter
Thread tension control button
Power/light switch
A
B
C
D
E
1
H
F
G
I
2
4
NOTE: Since a straight stitch has no width, the
stitch width control is used to change the needle
position.
3
2. Pull both threads under the presser foot toward the left of
the machine, leaving about 6” (15 cm) clear.
3. Place the fabric under the presser foot and lower the
presser foot lifter.
4. Turn the hand wheel counter clockwise (towards you) until
the needle enters the fabric.
5
5. Start the machine. Guide the fabric gently with your hands.
When reaching the edge of the fabric, stop the sewing
machine.
NOTE: The Needle Plate has both Metric and Inch
Markings as an aid for guiding your fabric when
sewing a seam.
6. First turn the hand wheel counter clockwise (toward you)
until the needle is in its highest position, then raise the
presser foot. Draw the fabric to the rear and cut off excess
thread with the thread cutter located on the bottom of the
face cover, as shown.
6
KEEPING SEAMS STRAIGHT
To keep the seam straight, use one of the numbered guide
lines on the needle plate. The numbers indicate distance from
the needle at its center position.
The guide line on the bobbin cover plate is a ¼” (6mm) seam
guide line, used for piecing quilt blocks or for sewing narrow
seams.
3/4" (19 mm)
5/8" (16 mm)
1/2" (13 mm)
3/8" ( 9 mm)
1/4" ( 6 mm)
20
INSERTING ZIPPERS AND PIPING
SETTINGS: Presser foot - Zipper Foot
Use the zipper foot to sew to the right or left of the zipper. It
can also be used to make or insert piping.
Needle to left of foot
Needle to right of foot
INSERTING ZIPPERS
To sew down the right side, attach left side of zipper foot to
presser foot holder so that the needle passes through the
opening on the left side of the foot.
To sew down the left side, attach right side of foot to foot
holder.
PIPING
G
%
Attach the right side of the zipper foot to the foot holder so that
the needle passes through the right side of the zipper foot.
%
forming seam tape for the piping.
Helpful Hint: Slight adjusting of the needle position to
sew closer to the piping may be accomplished with
the Stitch Width Control.
HAND-LOOK QUILT STITCH
02
This stitch is designed to look like hand sewing for topstitching
and quilting.
1. Thread bobbin with desired top stitching color.
2. Thread the needle with either invisible thread or with thread
that is a color which blends in with the fabric color, so it
doesn’t show.
3. Increase thread tension toward 6 or higher until you
achieve the desired appearance.
4. Set the stitich length at 4 (maximum).
5. Start to sew.
STRAIGHT STITCH WITH AUTO
TIE-OFF FUNCTION
16
1. Press the foot control and the machine will sew 4 stitches
forward and then 4 stitches in reverse and continue to sew
forward until the foot control is released.
2. Press the reverse button and the machine will sew 4
stitches in reverse and then 4 stitches in forward and stop.
21
ZIGZAG STITCHING
04 05
Under side
SETTINGS :Presser foot - All Purpose Foot
The top thread may appear on the bottom depending on the
thread, fabric, type of stitch and sewing speed, but the bobbin
thread must never appear on the top of the fabric.
Top side
STITCH WIDTH
mm
ADJUSTING STITCH WIDTH AND LENGTH
is values set automatically when pattern (No. 03) is set.
The stitch length is 2 mm and the stitch width is about 5 mm.
0.3
STITCH LENGTH
is the selection range when setting the value manually.
0 0.5 1.0 1.5 2.0 2.5 3.0 3.5 4.0 4.5 5.0 5.5 6.0 6.5 7.0
0
0.5
0.8
1.0
1.3
1.5
1.8
2.0
2.5
3.0
SATIN STITCH
SETTINGS: Presser foot - Satin Foot
This is a closely spaced stitch used for appliqué, bar-tacking,
etc. Slightly loosen the top thread tension for satin stitching.
Set the stitch length between 0.5 and 2.0, depending on the
weight of thread being used.
Use a backing of stabilizer to help avoid stitches puckering the
fabric.
Center position
PLACEMENT OF PATTERNS
Stitch width of pattern increases from center needle position
as illustrated.
22
BLIND STITCH
06
SETTINGS :Presser foot - Blind Hem Foot
2
1
Medium to heavyweight fabric
- Regular blind stitch for normal fabrics
- Elastic blind stitch for soft, stretchable fabrics
06
Under side
" ?
%*
fabrics or overcasting it on medium to heavyweight fabrics.
Then turn the hem up the required depth, press and pin in
place.
Under side
1
2
Fine fabric
2. Now fold the fabric as illustrated.
Under side
Under side
B
3. Place the fabric under the foot. Turn the hand wheel counter
clockwise (toward you) by hand until the needle swings fully
to the left. It should just pierce the fold of the fabric. If it does
not, adjust the guide (B) on the Blind hem Foot (A) so that
the needle just pierces the fabric fold and the guide just rests
against the fold.
3
A
NOTE: For a narrower or wider blind hem, first
manually adjust the length and width controls to
your desired length and width. Then adjust the
guide on the foot.
Sew slowly, guiding the fabric carefully along the edge of
the guide.
4. When completed, the stitching is almost invisible on the
right side of the fabric.
4
Top side
NOTE: It takes practice to sew blind hem. Always
MULTI-STITCH ZIGZAG
07
SETTINGS :Presser foot - All Purpose Foot
This is a strong stitch because as its name implies, it makes
three short stitches where the normal zig-zag makes only one.
For this reason, it is recommended for overcasting most types
of fabrics.
It is also ideal for mending tears, applying patches and
inserting elastic.
23
STRETCH STITCHES
SETTINGS :Presser foot - All Purpose Foot
Stretch stitches are mainly for use on knit or stretchable
fabrics, but can also be used on woven fabrics.
STRAIGHT STRETCH STITCH
Straight stretch stitch is far stronger than an ordinary straight
stitch because it locks three times - forwards, backwards and
forwards.
It is particularly suitable for reinforcing the seams of
sportswear in stretch and non-stretch fabrics, and for curved
seams which take a lot of strain.
Use this stitch also to top-stitch lapels, collars and cuffs to give
OVEREDGE STITCH
09
This stitch is especially used for making sportswear. It sews
repairing raw or worn edges as well.
RIC-RAC STITCH
18
The ric-rac stitch is provides a bold topstitch for decorative
borders. It is ideal for edging neck-bands, armholes, sleeves
and hems.
FEATHER STITCH
10
This stitch can be used for topstitching and for attaching lace
and trims.
It is also ideal for quilting applications and for edge-joining.
BLANKET STITCH
69 79
This stitch is commonly used for machine appliqué, though it
can be used decoratively as well.
When used for applique, adjust the length or width of the stitch
according to the desired look of the project.
24
HONEYCOMB STITCH
70
1. Make several rows of gathers across the fabric that you
wish to smock.
2. With a narrow strip of fabric directly under the line of
gathering, stitch over the gathers. The design will be a
series of small diamonds.
SLANT OVEREDGE STITCH
75
This stitch seams and overcasts in one operation to produce
a narrow, supple seam, particularly suited to swimwear,
sportswear, T-shirts, babywear in stretch nylon, stretch
towelling, jersey and cotton jersey.
TURKISH STITCH
The turkish stitch has three main uses. It is perfect for
+
%
overcasting and for seaming and overcasting in one operation
on slightly stretch fabrics and non-stretch ones such as linen,
tweed, and medium to heavy-weight cotton.
SLANT PIN STITCH
76 85
Use this stitch for decorative embellishment. It can also be
used for seams on stretch fabrics. Sew near the raw edge of
the fabric and trim close to the outside of the stitching.
THORN STITCH
25
It is a versatile stitch used for joining fabric pieces and as a
decorative touch.
25
REINFORCED OVEREDGE STITCH
80 81
+
They can also be used for smocking as well as for seam
WIZARD STITCH
15
The Wizard stitch, as well as being a decorative stitch, is ideal
for patching stretch fabrics such as jersey and knitwear.
CROSSED STITCH
74
@
%
PIN STITCH
68 78
The Pin stitch is a traditional stitch pattern used for picot like
edges and for appliqué work.
ENTREDEUX STITCH
71
Useful for decorative stitching on borders and for use in
heirloom sewing. The Entredeux stitch is most often sewn with
a Wing Needle (SINGER Style 2040) to create holes in the
stitch pattern.
26
LADDER STITCH
72
The Ladder stitch is primarily used for drawn thread
hemstitching. It can also be used for sewing over thin tape in
an opposite or same color. Place the stitch in the center and a
special effect will be obtained for decoration.
Another use for the ladder stitch is couching over narrow
ribbon, yarn or elastic.
For drawn thread work, choose a medium to heavy weight
linen-type fabric. After sewing, draw the thread out from within
the ladder for an open, airy appearance.
NOTE: Be sure to sew accurately along the grain line, if you
wish to draw out threads.
CRISS-CROSS STITCH
73 82
Used to sew and finish stretch fabrics or for decoration
especially of borders.
FISHBONE STITCH
77
Use to create decorative borders and for embroidery.
SEWING ON A BUTTON
90
SETTINGS :Presser foot - Button Sewing Foot
:Feed dog control Position your fabric and button under the presser foot. Lower
presser foot. Turn the hand wheel counter clockwise (toward
you) to make sure the needle clears both the left and right
openings of the button. Adjust width if required. Sew 10
stitches across.
If a shank is required, place a darning needle on top of the
button and sew over top of it.
Helpful Hint: To secure thread, pull both threads to
the backside of the fabric and tie together.
27
BUTTONHOLES
USING BUTTONHOLE FOOT
Tab B
Tab A
1. Insert a button in between tab A and tab B.
2. Buttonholes can be sewn to match the size of the button.
It is helpful to remove the extension table when sewing a
buttonhole, to keep the foot from vibrating when moving
across the table.
PROCEDURE
* Use an interfacing in the area of the garment where
buttonholes are placed. Stabilizer or regular interfacing can
be used.
* Make a practice buttonhole on a scrap of the fabric with the
selected button.
1. Select one buttonhole pattern.
94 95 96 97 98 99
2. Replace the presser foot with the buttonhole foot. (Refer to
“Changing presser foot” on page 11.)
3. Insert the button into the buttonhole foot. (Refer to “Using
buttonhole foot” above.)
(C)
4. Set the buttonhole lever (C) so that it drops down vertically
between the stoppers (A) and (B).
(A)
(B)
Buttonhole foot
(C)
(C)
28
(C)
5. Carefully mark the position of buttonhole on your garment.
6. Place the fabric under the foot. Pull out the bobbin thread
underneath the fabric to a length of about 4 inches to the rear.
7. Align the buttonhole mark on the fabric with the mark on
the buttonhole foot, and then lower the buttonhole foot.
Fabric marking
Mark
8. While holding the top thread, start the machine.
* Sewing will be completed automatically in the following order.
1
2
3
4
5
6
7
1
2
3
4
5
6
7
8
Buttonhole foot alignment position
Fabric marking
29
%
up the fabric in the center of the buttonhole.
Be careful not to cut any of the bartack threads.
CORDED BUTTONHOLES
Spur
%
spur and pull both ends of the cord forward under the foot and
tie off the cord as shown in the illustration.
Sew buttonhole so that zigzag stitches cover the cord.
When completed, release the cord from the foot. Using a
hand sewing needle, bring the cords to the wrong side of the
fabric, then tie to secure. Trim the excess cords.
BUTTONHOLING WITH HARD-TO-SEW
FABRICS
When buttonholing with hard-to-sew fabrics or along the edge
of multi-layered garments, attach the underplate (A) onto the
buttonhole foot as illustrated to make perfect buttonholes.
Place the fabric between the underplate and buttonhole foot.
(A)
30
MANUAL BUTTONHOLE
* Use the automatic buttonhole stitches (#94-99) and automatic
buttonhole foot for buttons up to 1 3/4 ” (45mm) in length.
For larger buttons use the satin foot and the manual
buttonhole stitches (#91-93).
1
* Use the satin foot to create larger buttonholes.
1. Carefully mark the buttonhole length on your garment.
Place the fabric with the buttonhole marking under the
satin foot so that the foot is positioned at the top of the
buttonhole mark.
V &
buttonhole.
2
91
3. Sew second bartack and stitch backward until needle
reaches beginning of buttonhole.
3
92
4. Stitch forward to the end of buttonhole mark to
complete buttonhole.
4
93
5. Stop sewing when you have completed the buttonhole
and press Tacking Stitch button to tie off.
5
31
DECORATIVE SEWING
Presser foot: Satin Foot.
Different types of decorative stitches are available.
The following are examples of how to use and sew these stitches.
You can use other stitches in the same way.
*
%
to check the stitch pattern to be used.
% wound onto the bobbin to make sure that the thread will not
run out during sewing.
&
?
particular fabric that you are working with. For example,
place a piece of tear-away stabilizer underneath the
stitching area when working with a cotton fabric. (See page
38 for more help with stabilizer selection.)
SUGGESTIONS FOR DECORATIVE STITCHING
Scallop Stitch (45)
This is an ideal decorative stitch for finishing the edges of
fabrics, such as those used for table linens or children’s
% %
the stitch with a stabilizer underneath the fabric. Trim the edge
of the fabric along the edge of the stitch, being careful not to
cut into the stitching.
Pyramid (46)
This stitch can be used for embellishing bias binding or
creating decorative borders on garments and home dec
projects.
Arrowhead (47)
In addition to using this pattern as a decorative stitch, it can
also be used as a triangular backtack stitch for reinforcing
places which can easily unravel. This is particularly useful for
sewing both edges of pockets..
Checker Board Zigzag (48) and Checker Double (51)
Use a bias tape and fold back the edge. Sew the checker
stitch on top of this.
Diamond (50)
Fold over the edge of the fabric and use this stitch to tidy up
the edge.
Scallop stitches and diamond stitches can be combined to
create other attractive patterns.
32
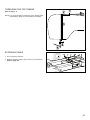
MORE SEWING EXAMPLES
See the sample to the right for more examples on how to use
the decorative stitches.
29
30 13
29
26
20
17
19
23
33
3. PREPARATION FOR EMBROIDERY SEWING
BEFORE ATTACHING EMBROIDERY UNIT
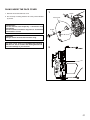
ATTACHING EMBROIDERY FOOT
Foot holder
CAUTION
Always be sure to turn off power to machine
before changing presser foot.
Screw
* Raise presser foot lifter.
* Turn the hand wheel counter clockwise (toward you) until
the needle is in its highest position.
Presser foot
1. Remove presser foot screw, presser foot and foot holder.
2. Attach the embroidery presser foot behind presser bar so
that the drive lever is above the needle clamp. Secure it by
tightening presser foot screw.
Drive lever
3. Turn hand wheel toward you to move needle up and down,
and check that the embroidery presser foot moves up and
down together with the needle.
Presser bar
Needle clamp
CAUTION
Be careful not to touch the needle when
replacing presser foot.
Embroidery presser foot
INSERTING THE BOBBIN
Refer to page 6.
* A large amount of thread is required for embroidering, so
be sure to use a full bobbin.
NOTE: During the embroidery process, bobbin thread creates
lint which gradually accumulates in the bobbin case.
It is recommended that the bobbin case is cleaned
periodically to keep the machine running its best.
See page 56 for information on cleaning the bobbin
case.
34
THREADING THE TOP THREAD
Refer to page 7 - 9.
NOTE: It is recommended to thread the upper thread before
transmitting a design to the machine for embroidery.
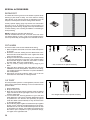
EXTENSION TABLE
1. Turn off power to machine.
2. Slide the extension table to left to remove it from machine.
(Refer to page 54.)
35
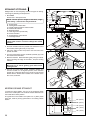
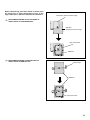
ATTACHING EMBROIDERY UNIT
CAUTION
Always be sure to turn off power to machine
before installing embroidery unit.
1
Connector cap
1. Turn off the machine.
Turn connector cap to the right to open.
Connector
V & on the machine and embroidery unit. Slide the embroidery
unit as far as it will go until it clicks into place.
2
Carriage
3. To make sure that the embroidery unit is fully engaged,
hold the handle of the embroidery unit and pull it towards
the left direction, checking that the embroidery unit does
not detach.
Note:
If embroidery unit is not securely installed, the finished
embroidery may be distorted. Make sure that the
embroidery unit is pushed in as far as it will go.
3
Don’t push the carriage or put strong pressure
on the embroidery unit while attaching or during
the embroidering process. Doing so may cause
CAUTION damage to the embroidery unit.
Handle
REMOVING EMBROIDERY UNIT
* Turn off the machine.
* Raise the presser foot.
* Remove embroidery hoop from machine.
(Refer to page 40.)
1
Release lever
1. Holding handle of embroidery unit, carefully slide toward
the left while pressing release lever.
Note:
Do not pull carriage when removing embroidery unit.
2
Handle
2. Turn the connector cap to the left to close for general
sewing.
Release lever
36
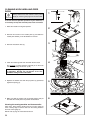
SECURING FABRIC IN EMBROIDERY
HOOP
NOTE: For information about using appropriate stabilizer, see
page 38.
1
1. Loosen hoop adjusting screw and place fabric between
inner and outer frame. Pull fabric edges to remove slack.
NOTE: Apply stabilizer when appropriate, see page 38.
side (large hoop only).
G
2. Slightly tighten the hoop adjusting screw and pull fabric
edges to remove slack.
Fit the two frames together by pressing down on the inner
frame.
2
Hoop adjusting screw
a. Tighten hoop adjusting screw.
b. Once fabric is properly positioned in embroidery frame
with no slack, securely tighten the screw.
c. Tighten the fabric in the frames so that it makes a sound
like a drum when the tightened surface is tapped with a
37
USING FABRIC AND STABILIZER
FABRIC
Use stabilizer to produce best results when embroidering on
the following fabrics.
¿ Fabrics which lack firmness or stability for embroidery,
such as cotton, polyester, rayon, etc.
Lightweight fabrics such as this, may lack firmness or
stability and when embroidered may pull in, which may
result in problems such as shrinkage and puckering of the
fabric around the embroidery area.
¿ Stretchy fabrics
The fabric may stretch when tightening the hoop, the result
may be uneven embroidery. Furthermore, when the fabric
is removed from the hoop after embroidery is complete, the
fabric may shrink and cause the embroidered pattern to
become distorted.
Embroidery can be applied to many types of fabrics, but it
may be necessary to prepare the following fabrics in a special
manner.
* For fabrics with a loopy or napped surface, such as towels,
use a water-soluble stabilizer on both the topside and
underside of the fabric. Depending on the project, a tearaway or soft mesh cut-away stabilizer may be used on the
underside instead.
* Denim and linen are considered unstable because of the
loose weave. Use a medium a medium weight cut-away
stabilizer on the backside.
* T-shirt type fabric usually requires at least one, sometimes
two layers of soft mesh-type cut-away stabilizer on the
backside.
Stabilizer (Adhesive surface facing down)
* For medium to heavyweight stable woven fabric, use a
medium to heavy weight tear-away type stabilizer.
* For soft or sheer fabrics, use a rinse-away type stabilizer.
STABILIZER
Stabilizer is a non-woven substance. There is a variety of
stabilizers available: tear-away, cut-away, and wash-away.
There are also specialty stabilizers such as those that are
removed by applying heat, adhesive stabilizers, etc. Which
stabilizer you choose will depend on the nature of the fabric on
which you are embroidering. Always follow the manufacturer’s
instructions on how to use and apply the stabilizer correctly.
The stabilizer should be larger in size than the hoop with
which it is being used. Follow stabilizer manufacturer’s
recommendations for use. Stabilizers can usually be obtained
from a fabric store.
38
Hoop position
Material (Under side)
Embroidering surface (Top side)
When embroidering onto fabric which is smaller than
the hoop size, or when embroidering close to the
edge of the fabric, attach the stabilizer as illustrated.
Embroidery surface at fabric edge
WHEN EMBROIDERING ALONG THE EDGE OF
FABRIC SUCH AS A HANDKERCHIEF
Stabilizer
(Adhesive surface facing)
Hoop inner frame
Stabilizer
WHEN EMBROIDERING A NARROW PIECE OF
FABRIC SUCH AS RIBBON TAPE
Ribbon tape
Stabilizer
Hoop inner frame
39
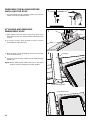
PREPARING THE MACHINE BEFORE
INSTALLING THE HOOP
1
1. Turn hand wheel counter clockwise (toward you) until the
needle comes to its highest position.
ATTACHING AND REMOVING
EMBROIDERY HOOP
1
(A)
1. Raise presser foot and needle, and push up lever (A) of
%
under it.
¿ To remove, pull the hoop forward to slide it out from
underneath the embroidery foot.
2. Slide the hoop onto the embroidery unit from front to back
until it clicks into place.
2
Carriage
¿ To remove, press the hoop release lever and slide the hoop
towards you.
NOTE: Before attaching the small hoop, turn on the power
switch to move the carriage to the ready position.
Hoop mounting plate
Hoop release lever
40
INSTALLATION OF SOFTWARE
%G
install the contents of the CD to your PC. This procedure is
refered to as instructions below in order to successfully install the
software for your FUTURA sewing & embroidery machine
on your personal computer.
The software for your FUTURA sewing & embroidery machine
comes on a CD-ROM disc.
In most personal computers the default drive setting for a
CD-ROM drive is “D:”
CD-ROM
Please insert the installation software for your FUTURA
sewing & embroidery machine into the CD-ROM disc receiver
in your PC.
After some seconds, the Installation Procedure of the software
will start automatically.
If after a short while, the software doesn’t automatically
start the installation process, you may start the installation
procedure manually by going to the “Start” option of Windows,
select “Run”, type “D:\FuturaStart.exe” and click on OK.
After some seconds the step-by-step installation of the
software begins with the Welcome window.
Click on “Next” to move on to the next screen.
After reading and agreeing with terms given in the
!"
#$# and again click
on Next, and then select the directory where the software
should be installed. It is highly recommended to use the
selected default directory.
Simply click on %' to continue.
41
Now you are prompted to select the Program Folder where
the shortcut for the software will be stored.
Simply click on %' to continue.
?!
during the installation set-up.
Pressing the "Next" button will finally start the copy and
to the given directory on the
hard disk.
A progress bar will indicate the stage at which the installation
%%
100%.
!
will automatically close after finish. Please wait for a short
while until this happens.
If the installation utility identifies a lack of available space
on your hard disk, an error message will prompt you to free
some hard disk space before proceeding with the installation.
You can always abort the installation procedure by clicking on
;
CORRECT START-UP PROCEDURE
WHEN EMBROIDERING
The following steps must be followed for proper start-up
protocol. If these steps are not followed precisely, you will
get a “Transmission Pending” error message.
Boot up your computer, but do not open the embroidery
software. Next attach the embroidery unit to your sewing
machine and connect the USB cable between your
computer and sewing machine.
1. Turn on your sewing machine. Make sure the needle has
been moved to the highest position by turning the hand
wheel towards you.
2. Double click on the FUTURA icon shortcut your desktop
to open up the embroidery software.
42
3. You are now ready to select and transmit a design to
your machine.
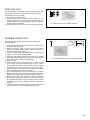
FUNCTION BUTTONS WHEN
EMBROIDERING
Thread Cutter
OPERATION SWITCHES
THREAD CUTTER
Press Thread Cutter to automatically cut the top and bobbin
threads whenever the machine is stopped.
If Thread Cutting Mode is active (see page 14), the machine
will automatically cut the top and bobbin thread every time the
machine stops at the end of a color block.
Use auto thread cut only when changing thread colors.
Forward stitch button
START/STOP BUTTON
When start/stop button is pushed, machines starts slowly. To
stop the machine, push the button again and the machine will
stop sewing and the needle automatically stops at its highest
position.
Reverse stitch button
LED indicator
FORWARD STITCH BUTTON
After the embroidery design has been transferred to the
machine, the embroidery can be advanced one stitch at a
time. Note: The embroidery hoop will move as it is advancing
through the design.
Start/stop button
(For embroidery only)
To advance continuously, press and hold this button.
REVERSE STITCH BUTTON
To back up through a design that is already in progress,
press the Reverse Stitch button. Pressing the button once will
reverse one stitch at a time. To reverse continuously, press
and hold this button. Design may be reversed all the way back
LED INDICATOR
¿ Green light indicates machine is ready to start.
¿ Red light indicates machine is operating.
¿ Flashing red light indicates a problem or an error.
* Flashing for 2 - 3 seconds shows that an incorrect
operation was made.
* Continuous flashing indicates that the machine
malfunctioned or is malfunctioning.
THREAD TENSION CONTROL
Thread tension is automatically set at “E” for embroidery,
when the embroidery unit is attached.
You may wish to re-adjust thread tension according to the type
of fabric and thread being used.
NOTE: When sewing designs created by the software for
Photo Stitch (optional) it is recommended to decrease
the thread tension toward “0” and activate the Speed
Limiter, by checking the box in Machine navigator, before
sending the design to the machine. This ensures the best
performance of the machine.
Decrease tension
Increase tension
43
TROUBLESHOOTING
SKIPPED STITCHES AND THREAD
BREAKAGES OCCUR
Needle tip is broken.
Replace needle.
Thread path is
incorrect.
EMBROIDERY PATTERN IS MIS-ALIGNED
MACHINE SIDE
Embroidering is
continuing when
thread is tangled.
HOOP SIDE
No stabilizer attached
when using light or
stretch fabric.
Refer to page 7 - 9.
Needle is bent.
Thread is tangled
around spool holder.
If the thread remains
tangled, the fabric
may pucker and
embroidery. Stop
embroidering, remove
the hoop and untangle
the thread.
Replace needle.
Attach stabilizer to
the fabric.
Refer to page 38 39.
Fabric is not tight
enough in the hoop.
Refer to page 4.
Upper thread tension
is too tight.
Needle is not installed
correctly.
Install the needle correctly.
Refer to page 10.
Thread or fabric bits
have collected under
the needle plate.
Remove the thread
or fabric bits. Refer to
page 56.
This can cause fabric
to pucker and result
in uneven feeding,
reduce the thread
tension.
Refer to page 11.
Needle tip is broken
or needle is too thick.
Embroidery hoop
is not correctly
attached.
Upper thread tension is
too tight.
Adjust the thread tension.
Refer to page 11.
A thin needle is being
used for heavy fabric.
Replace with a thicker
needle. Generally, at
least a #14 needle
should be used.
To check the elasticity
of the thread, hold a
length of thread of about
6 inches at both ends
and pull it, check the
length at which it breaks.
If using a highly-elastic
thread, reduce the upper
thread tension.
44
Tighten the fabric in
the frames so that
when the fabric is
%
it makes a sound like
a drum.
Refer to page 37.
Select a correct
needle.
Refer to page 10.
Thread is tangled
somewhere along the
thread path.
If the thread is tangled
on the spool pin or
somewhere along the
thread path, this will cause
the thread to hang up and
not advance through the
machine. This will increase
the upper thread tension
and cause the fabric to
pucker. Check the thread.
Refer to page 7 - 9.
Attach the hoop
securely to the hoop
bracket with the hoop
mounting screws.
Refer to page 40.
Hoop is obstructed
against free motion.
Check around the
hoop and remove
things which cause
obstruction.
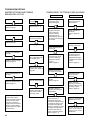
HELPFUL INFORMATION FOR
EMBROIDERING WITH FUTURA
Embroidered section
Embroidering direction
1. If stitches are missing
If the embroidery machine detects that the thread has
broken, it may continue to embroider up to about eight
stitches without any thread (blank stitches) before it
automatically stops.
2
1
In such cases, use the following procedure to step back
through the embroidering data to the point for continuing.
1. Press the reverse switch (stitch return) to step back
through the embroidery data. The hoop will move
back one stitch at a time. Step back through the data
until the blank area has been completely passed
over.
3
5
4
6
8
7
automatically stop
Blank stitches resulting from thread breakage
2. Restart the embroidery machine and continue
embroidering.
Reverse stitch button
2. Computer screen says thread is broken,
machine lights are flashing lights and
making a beeping sound, but thread is
not broken.
Upper thread is not in the thread tension. Rethread upper
thread, (see 7 “Threading the Top Thread”.) Placing the
small net that is supplied with the accessories over the
spool of thread may ensure that the thread is unwinding
properly.
3. After resizing a design, the density of
the stitching is either too tight or not tight
enough.
The software will recalculate the stitch on an
imported design when sizing, but only when using
DESIGN>CHANGE SIZE option. It does have a limitation
of re-sizing up to 149% and down sizing to 51% and
while still being able to re-calculate the stitches correctly.
45
4. Will the density of a design be adjusted
when resizing design ?
When sizing designs in the software you can resize
designs from the Library in the hoop on screen and keep
the design integrity. All other formats should be changed
in the DESIGN/CHANGE SIZE menu in order to change
the stitch count.
5. Resizing individual letters
You can resize individual letters after you have brought
them into the hoop and exited the text window. Left
click, drag a box around the desired letter, and size
accordingly. Because the letters are built-in, the letter will
keep the appropriate density.
6. Deleting part of a design
Left click and drag a box around the desired area. To
select additional areas, hold down the CONTROL key
and left click on next area. Once selected, touch the
DELETE key on your keyboard.
7. Is there a way to increase the density of
the lettering?
The density is set to a standard value of 4/10th of mm,
which is usually the standard density used for Lettering.
The value is not editable.
8. Why does a design sometimes split up
into very small segments? One color
block can end up ‘divided’ into several
blocks.
The machine has a certain limit of stitches that it can
accept. So what most probably happens is that these are
big blocks that are cut after exceeding the limit, leaving a
certain number of stitches (could possibly be only a few)
as a separate block.
46
9. TOP THREAD DOES NOT STAY IN
THE NEEDLE EYE
If embroidering several color blocks in the same color
the machine might cut the top thread too short. If that
happens, deactivate Thread Cutting Mode (see page 2829) to make sure the top thread stays in the needle eye.
10. AutoPunch TM
Art vs. Bitmapped Art
There are many different types of images or formats of
B
\ %
using vector type images, such as .wmf. The software
must be able to recognize a color (block) of information.
A “. bmp” can be made of millions of colors making it
impractical for use.
Clipart falls into two basic categories, Vector Art and
Bitmapped Art.
The software is capable of vectorizing the “.bmp” image,
but it may lose detail, depending on the image. It is
essential to understand about the type of artwork or
image used with AutoPunch.
Vector Art / Vector Art (mode vectoriel) / Vector Art
Vector Art is a clean “graphic” blocks of color – by simple
definition. Some common formats - .wmf and .emf are
two formats that the Auto Punch software can read.
Bitmapped Art is the type of “format” that is typically
saved when scanning. The computer sees millions of
colors to create the “realistic” type of image. Even a
3-color design that we see as simple has billions of
pixels. Common formats recognized by the software:
.bmp, .jpg, .tif, .pcx, .pcd, .tga, and .psd.
Tips for AutoPunchTM
* Scan art with a “high resolution” (200-300 DPI).
* Scan at 3-6 times larger than the intended output.
Bitmapped Art / Bitmapped Art (mode point) / Bitmapped Art
Lines that are too narrow to properly sew out are
eliminated by the software when it cleans up the artwork.
47
Multi-Hoop
Multi-Hooping is a special feature in the software that will allow
embroidery data which is larger than a single embroidery hoop
to be sent to the machine to stitch out, while making it easy to
rehoop the fabric so that each part of the design lines up exactly.
This embroidery data may be a single design that is too large for
the hoop or a combination of smaller embroidery elements and/
or lettering, that when combined together make a much larger
&?"
Fig. 1
The Multi-Hoop feature splits the design elements in up to four
different parts and then sews them precisely, matching one
section to the other. When re-hooping the fabric, the Multi-Hoop
feature will compensate for misalignment if the fabric has been
placed slightly askew in the hoop.
When stitching an embroidery design that is too large for the
%
F
Multi-Hoop utilizes a system where three alignment points (A, B,
and C) are input on cross lines that have been marked onto the
fabric. When these points are input, they inform the machine
exactly as to how the fabric is positioned into the hoop and will
therefore sew the design to the alignment of the cross lines. If
the fabric is slightly askew, this system will compensate for it and
sew accordingly. Please note: the Multi-Hoop feature will only
compensate for a slight misalignment in the vertical cross line.
Please try to hoop the fabric as accurately as possible.
Fig. 2
Fabric
Cross line
Preparing the Fabric
Please note: The fabric must be large enough to
accommodate the amount of hoops that will be required to
stitch out the design.
1. Using a very%
vertically down the center of the fabric.
Intersection of cross
lines must be at perfect
90 degree angles.
Cross line
2. Mark a line horizontally across the center of the fabric.
The vertical and horizontal lines must be at precise right
angles to each other. These lines will now be referred to
as the”cross lines”. These cross lines will be used to set
the fabric into the hoop according to the divided design
layout.
Please Note: a thin line is very important to the
In the Software
1. Select Tools from the horizontal tool bar, select Hoop
and then select Multiple.
2. A single hoop appears on the screen marked with #1 in
the upper left corner.
Please note: Up to three
additional hoops will
appear as the design
data requires.
48
3. Select a large design or individual design elements
and arrange them in the hoop area on the screen. The
example shown uses lettering and designs from the
Design Library that is built into the software. (Additional
%
+%
4. The design data is sent to the machine for sewing one
section at a time. Click on the “Transmit to Machine” tool
on the tool bar.
5. The grey area (#1 Hoop) is the first of the embroidery
data that is sent to the machine for sewing.
Set fabric and stabilizer into the hoop, aligning cross lines
of data 1 within the guide line markings of the hoop. (See
V#
There are two sets of markings on the inner hoop.
On each side of the hoop there is a Center Hoop line
which indicates the exact center of the hoop.
Guide line
Fig. 3
In each corner of the hoop there are markings which
together define the maximum sewing area for Multiple
Hooping. These marks are referred to as Guide lines.
Guide lines are to be set on the horizontal and vertical
cross lines on the fabric as shown.
Center point line
Guide line
Fig. 4
A
Data 1
Data 2
C
Guide line
B
Data 4
Guide line
Data 3
49
6. The next screen prompts you to input the first of three
alignment points, A, B, and C. These alignment points
will inform the machine exactly where the crosslines are
positioned in the hoop. It is extremely important that the
points are accurately input on the cross lines.
The machine display shows “MH” as illustrated, and the
cross lines for data 1 with input point A blinking.
A
7. Use the shift buttons on the machine to move the hoop,
until the needle comes to point A on the cross line, and
push the OK button.
Note: If a mistake is made when entering the points, press the
Clear button, to clear the point(s).
Left
50
Right
Up
Down
OK
Clear
8. Once point A is entered, the PC screen and machine display
will prompt you to enter in points B and C. Follow the same
procedures for inputting points B and C.
In a case where the three points were input wrong,
and they do not form an exact right angle, the software
will show the following error message and give you an
opportunity to enter the alignment points again.
B
C
9. When all three points are input, click on Send design in the
Machine Navigator box to send design portion of data 1 to
the machine. Embroider the design.
10.After all colors of the design from hoop 1 have been
embroidered, click on Exit in the Machine Navigator box
and the screen will prompt you to enter the information
from the data 2 area. Use the same procedure to re-hoop
the fabric, send the data 2 design to the machine and input
the A, B and C points.
The machine display will show the “cross line” positions
in the hoop for data 2 and the input points A, B and C
blinking. Embroider the data 2 design.
11. Follow the same procedure for data 3 and data 4.
A
B
C
51
CONTROL PANEL WHEN
EMBROIDERING
Go to stitch position
When embroidering, the dials on the control panel are used to
step through the design color by color and within a color block.
After transferring desired design(s) to your FUTURA sewing
and embroidery machine, the display shows number of current
color block and total number of color blocks as illustrated.
The three horizontal lines indicate the beginning (bottom line),
middle and end (top line) of the current color block. As the
block is stitched out, a progress bar on the right side of the
display will show the approximate current position in the color
block.
Step between
color blocks
OK
STEP BETWEEN COLOR BLOCKS
To step between the transferred color blocks, press the center
of the lower dial. “BL” is shown on the display. The arrows
indicate which direction you can step between the color
blocks.
Turn the lower dial. The current color block number changes.
When having reached desired color block, press OK. The
block.
GO TO APPROXIMATE STITCH POSITION
WITHIN A COLOR BLOCK
To go to a certain part of current color block, press the center
of the upper dial. The horizontal line on the display indicate
the approximate current position in the color block.
Turn the upper dial clockwise to step forward, and counterclockwise to step backward in the design. Each step equals
one tenth of the color block.
Example: If a color block contains 150 stitches, each step
corresponds to 15 stitches.
When having reached desired position in the color block,
press OK. The hoop moves to that position. Fine tune by using
the Needle Stop Up/Down and Reverse buttons as described
on page 43.
52
HELPFUL MESSAGES WHEN EMBROIDERING
Display on control panel
Situation
Embroidery unit is mounted, but USB cable is not connected.
or
USB cable is disconnected after transferring embroidery data. In this case, the image is
displayed for a few seconds, and then changed back to normal display. The transferred
embroidery data is still available in the machine.
USB cable is connected, but embroidery data is not transferred yet.
All LED lamps are turned off.
Embroidery data is being transferred.
All LED lamps are turned off.
A
Embroidery data has been completely transferred.
The number of the current color block (A) (number one directly after transferring) and total
number of transferred color blocks (B) are shown on the display.
B
A
Embroidery in progress.
The number of the currently stitched out color block (A) and total number of transferred color
blocks (B) are shown on the display. The status bar indicates how far in the color block the
machine has embroidered.
B
When last block or one unit of endless hoop is completed.
All LED lamps are turned off.
53
4. OTHER THINGS YOU SHOULD KNOW
PRESSER FOOT LIFTER
There are three positions for your presser foot.
1. Lower the presser foot to sew.
2. Raise the lifter to the middle position to insert or remove fabric.
3. Lift it to its highest position to change the presser foot or to
remove thick fabric.
FEED DOG CONTROL
The feed dogs control the movement of the fabric that is
being sewn. They should be raised for all general sewing
purposes and lowered for darning, freehand embroidery and
monogramming so that you, not the feed dogs, are moving the
fabric.
You do not have to lower the feed dogs when attaching the
embroidery unit, as they lower automatically.
Feed dog control
Down
CONVERTING TO FREE-ARM SEWING
+
arm model.
With the extension table in position, it provides a large working
+
F
%
and pull it off to the left as shown. To replace, slide the
extension table back into place until it clicks.
With the extension table removed the machine converts into a
slim free-arm model for children’s clothes, cuffs, trouser legs,
and other hard-to-reach places.
54
PERFORMANCE CHECKLIST
GENERAL PROBLEMS
Machine does not sew.
* Power switch is turned off.- Turn on the switch. (see page 4).
* Buttonhole lever is not raised when sewing stitch patterns.
– Raise buttonhole lever. (see page 28 - 29).
* Buttonhole lever is not lowered when sewing buttonhole.
– Lower buttonhole lever. (see page 28 - 29).
Machine jams/knocks.
* Thread is caught in hook. - Clean hook. (see page 40).
* Needle is damaged. - Replace needle. (see page 10).
Fabric does not move.
* Presser foot is not lowered - Lower presser foot. (see page 54).
* Stitch length is too short - Lengthen stitch length. (see page 12 - 13).
* Feed dogs are lowered - Raise feed dogs. (see page 54).
STITCHING PROBLEMS
Machine skips stitches.
* Needle is not all the way up into needle clamp. (see page 10).
* Needle is bent or blunt. - Replace needle. (see page 10).
* Machine is not threaded correctly. (see page 7 - 9).
* Thread is caught in hook. - Clean hook. (see page 40).
Stitches are irregular.
* Needle size is not correct for thread and fabric. (see page 10).
* Machine is not threaded correctly. - (see page 7 - 9).
* Top thread tension is too loose. (see page 11).
* Fabric is being pulled or pushed against machine feeding action. - Guide it gently.
* Bobbin has not been wound evenly. - Rewind bobbin. (see page 5).
Needle breaks.
* Fabric is being pulled or pushed against machine feeding action. - Guide it gently.
* Needle size is not correct for thread and fabric. (see page 10).
* Needle is not all the way up into the needle clamp. (see page 10).
THREAD PROBLEMS
Needle thread breaks.
* Machine is not threaded correctly. (see page 7 - 9).
* Top thread tension is too tight. (see page 11).
* Needle is bent. - Replace needle. (see page 10).
* Needle size is not correct for thread and fabric. (see page 10).
Bobbin thread breaks.
* Bobbin case is not threaded correctly. (see page 6).
* Lint accumulates in bobbin case or hook. - Remove lint (see page 40).
Fabric puckers.
* Top thread tension is too tight. - Adjust thread tension. (see page 11).
* Stitch length is too long for sheer or soft fabric. - Shorten stitch length. (see page 12 - 13).
55
CLEANING HOOK AREA AND FEED
DOGS
1
CAUTION
Always disconnect the machine from power
supply by removing the plug from the wall-outlet.
To ensure the best possible operation of your machine, it
is necessary to keep the essential parts clean at all times.
(1)
1. Raise the needle to its highest position.
2
2. Remove two screws on the needle plate (1) and slide the
needle plate toward you as illustrated for removal.
3. Remove the bobbin case (2).
3
(2)
4. Clean the feed dogs and hook area with the lint brush.
4
Put one drop of sewing machine (optional) oil on the hook
race as indicated by the arrows. (A, B)
NOTE: SINGER(page 57) Brand Sewing Machine Oil
=> %>? suited for sewing machine lubrication.
5. Replace the bobbin case with the projection (3) positioned
against the spring (4).
(A)
(B)
5
(3)
6. Make sure that the needle is at its highest position and put
and slide the needle plate into position as illustrated.
Cleaning the sewing machine and footcontroller
After using, keep sewing machine and foot control (page 2)
clean. Use dry rags to remove dust from the sewing machine
and foot control (page 2).
NOTE: Use dry rags to avoid electrical shock.
56
6
(4)
OILING INSIDE THE FACE COVER
1. Remove two screws and face cover.
1
2. Put one drop of sewing machine oil to the points indicated
by arrows.
Screw
Face cover
Helpful Hints :
For the machine used frequently : It should be oiled
periodically.
For the machine used after a long interval : It should be
oiled before it is used.
Screw
CAUTION:
Always remove the dust and lint before oiling.
For best results always use SINGER Brand Sewing
Machine Oil. Use of oil other than Sewing Machine Oil
will cause damage to your machine.
2
57
SPECIAL ACCESSORIES
SATIN FOOT
The Satin stitch foot is grooved on the bottom to permit dense
stitching to pass under it easily. It is most useful for sewing
satin stitches. It can also be used as an alternative to the All
Purpose or All Purpose Foot when sewing stretch stitches.
Closely spaced zigzag (page 23) stitches are called satin
stitches. This is an attractive stitch used primarily for
appliqueing and bar tacking. Slightly loosen top thread tension
for satin stitching. Use a backing of stabilizer or interfacing to
avoid puckering.
NOTE on starting to sew with satin stitch foot:
Pull both threads under the foot, to the left of the foot of the
foot before starting to sew in order to hold threads with the
foot or top thread may be entangled on the underside of fabric.
CUT & HEM
This foot is used to trim excess material while sewing.
1. Move the plastic sleeve that covers the needle clampscrew
to the right.
2. Attach the cut & hem, making sure the attachment’s “arm”
%
screw, securing the foot.
# &%
%
%
%%
the stitch width. Never use a straight stitch.
4. Cut a ½” wide by 1”deep notch at the top edge of your
fabric.
5. Place the fabric OVER the first metal platform and then
UNDER the second metal platform. If the foot is not cutting,
it is usually because the material is not placed OVER the
6. Sew slowly and gently guide the fabric. The cut & hem
works best if no more than ½” is being trimmed.
5.0 - 7.0
03
09
2.0 - 4.5
76
* The cut & hem is an optional accessory.
1/4” FOOT
This foot provides a perfect ¼” seam guideline, which is useful
when piecing quilt blocks. Markings on the foot alert when to
pivot the fabric.
1. Select straight stitch.
2. Snap on the ¼” Foot.
3. Stitch the pre-cut fabric pieces together. Keep the fabric's
edge even with the foot's right edge. There is no need to tie
off at the seam ends.
4. Iron the seams flat, ensuring precision of your work and
better alignment of all corners. All seam allowances should
be positioned in one direction and preferably be placed
under the darker-colored material, so they cannot be seen
on the right fabric side.
5. Place matching strips together as desired and pin together
at each corner, ensuring accurate alignment of all corners.
Remember that even the smallest discrepancies will add
up and distort your design. Join together the strips and iron
the seams. Upon completion of your patchwork design,
iron again on the right fabric side.
58
00
* The straight stitch foot is an optional accessory.
OPEN TOE FOOT
This foot provides a more visible view of the area that you will
be stitching. Because of its open area at the front, you can
see markings much more easily.
1. Set machine to desired stitch.
2. With a marking pencil or chalk, trace the outline for your
design or pattern on the right side of the garment. Hint: Use
a marker that can be removed easily in case the stitching
does not cover it completely.
3. Sew, following the outline you have traced onto your fabric.
30
46
49
* The open toe foot is an optional accessory.
INVISIBLE ZIPPER FOOT
This foot provides a hidden closing on skirts, dresses and
other garments.
1. Verify that the needle will line up with the opening of the
foot before starting to sew.
2. Before closing the seam on your project, use a fabric
marker to mark the desired bottom end of the zipper on
both sides of the zipper opening.
3. Fold in and press the seam allowances of both opening
edges and open out the pressed edges.
teeth of the zipper end at the creased edge.
5. Baste in place.
6. Place the fabric under the presser foot, so that the teeth
of the zipper are lined up with the groove of the zipper
foot. Topstitch the zipper in place, ensuring that the needle
penetrates the tape of the zipper close to the teeth.
Continue sewing until the presser foot reaches the zipper’s
slider, backstitching at the end of the seam.
7. On the opposite side, close the zipper. With right sides
together, make sure the two sides of the zipper are properly
aligned. Pin in place, open the zipper and baste in place.
8. Place the fabric under the presser foot, so that the teeth of
the zipper are again lined up with the groove of the zipper
foot. Topstitch the zipper in place, ensuring that the needle
penetrates the tape of the zipper as close to the teeth as
possible.
9. Continue sewing the second seam until the presser foot
reaches the zipper’s slider, backstitching at the end.
3.5
2.0 - 4.5
00
* The invisible zipper foot is an optional accessory.
59
CORDING FOOT
Sew over one, two or three standards of cord to embellish
+%
used for cording.
Single cording
1. Mark the design on the fabric. Insert the cord in the center
groove of the cording foot from the right side opening. Pull
the cord about 5cm (2 inches) behind the foot.
2. The grooves of the foot will hold the length of the cord in
place while the stitches are being formed over the cord.
3. Select the stitch and adjust the stitch width so that the
stitches are just covering the cord. Lower the foot and sew
slowly, guiding the cord over the design.
03
* The cording foot is an optional accessory.
Triple cording
1. Push the sewing thread to the left and insert three cords
into the grooves of the foot and pull out 5cm (2 inches) of
the cords behind the foot. Select the desired pattern and
adjust the stitch width so that the stitches are just covering
the cords. Lower the foot and sew slowly guiding the cords.
07
10
* The cording foot is an optional accessory.
60
DARNING / FREEHAND EMBROIDERY FOOT
For designs and monograms
This foot is used to create freehand embroidery, monograms
and stippling when the machine is set in regular sewing mode
(embroidery unit not attached).
1. Drop the feed dogs. To do so, remove the free arm. On
the backside of the exposed area, move the lever from the
right to the left.
2. Thread the needle with the machine embroidery thread. If
you have chosen a rayon sheen as embroidery thread, use
3. Place a stabilizer on the back layer of the fabric to create
fabric stiffness and prevent distortion of the fabric during
embroidering. The fabric stabilizer can be further secured
by spraying it with a temporary adhesive.
4. Draw your chosen design, or letter for sewing a monogram,
on the fabric using a disappearing fabric-marking pen.
5. Hoop the fabric. Pull it tight with an even tension.
6. Place the hooped fabric under the darning/ freehand
embroidery foot and lower the foot.
7. Sew with a fast speed while guiding the fabric slowly.
8. When the design is complete, pull the threads to the back
and neaten or tie a knot. Trim away the stabilizer and press
the fabric.
3.0 - 5.0
03
For freehand embroidery
00
* The darning / freehand embroidery
foot is an optional accessory.
EVEN FEED FOOT
This foot has its own set of feed dogs that work in conjunction
with the machine’s feeding system to improve the flow of
fabric. This is particularly important when sewing several
layers of fabric, such as in quilting. It is also valuable when
matching plaids or stripes, and in sewing pile types of fabrics
such as velour and ultra-suede.
1. Secure the walking foot to the shank, while making sure
the extension arm slips over the needle clamp screw.
2. Tighten the thumb screw to secure the foot to the shank.
3. Place two pieces of fabric right sides together.
4. Sew seam from top to bottom.
3.0 - 5.0
00
* The even feed is an optional ccessory.
EDGE GUIDE / QUILTING BAR
The edge guide/quilting bar is best utilized when paired with
the all purpose foot or the 1/4" foot (optional accessory). The
edge guide/quilting bar is used to sew perfect straight seams.
It can be used to stitch parallel lines in quilting, or can be used
to help guide you to sew 5/8 of an inch seam allowances.
To attach the guide, simply insert it into the opening of the
shank at the back of the presser foot on your machine.
* The edge guide (quilting bar) is an optional accessory.
61
TWIN NEEDLE
A twin needle produces two rows of parallel stitches for
pintucks, double top stitching and decorative sewing.
When using twin needles, When using twin needles, always
engage the twin needle button, regardless of the stitch you
have selected. This will prevent broken needles and damage
to your machine, regardless of the stitch you have selected.
Use of a SINGER Brand twin needle (Style 2025) is strongly
recommended.
The twin needle is not included with the SEQS-6700.
THREADING THE TWIN NEEDLE
1. Place a spool on each spool pin. Thread the two threads
as one. Draw one thread through each needle from front to
back.
2. Pick up bobbin thread as for single needle sewing. Pull the
three threads together under the presser foot to the back of
the machine, leaving about 6” (15 cm) clear.
NOTE: Needle threader cannot be used to thread the
twin needle.
Helpful Hints:
1. Always select the twin needle mode prior to
selecting a pattern. This will preclude any
possibility of the twin needle breaking.
2. To disengage twin needle sewing mode and return
the machine to normal sewing mode, either press
the twin needle button again or shut the machine
off. Twin needle is only active when the twin needle
switch is lit red.
WING NEEDLE
The wing needle (sometimes known as hemstitching needle)
is most commonly used in heirloom sewing. A wing needle
has wings that extend from either side of the needle. This
extra wide needle will create holes in the fabric to produce a
decorative effect.
The wing needle works best with stitches that have a repeated
back and forth motion.
You will obtain better results if you use the wing needle in
It may be necessary to decrease the upper tension slightly
for a better quality stitch, do a test sample before sewing your
garment.
Do not use the built-in needle threader when working with the
wing needle.
The wing needle is not included with the SEQS-6700.
Use of a SINGER brand wing needle (Style 2040) is strongly
recommended.
62
71
72
79
HELPFUL MESSAGES
Messages are displayed with LED lamps above stitch pattern numbers on control panel and/or PC screen. When a message is
F
%
%
F
On control panel
Problem ¼ Correction
Sewing
Embroidery
Machine is locked up due to thread entangled with bobbin case or rotation interrupted forcibly.
Î Turn off power switch and eliminate the problem that caused the machine to stop.
Bobbin winder is locked up due to thread entangled around spindle or rotation interrupted forcibly.
Î Turn off power switch and eliminate the problem that caused the bobbin winder to stop.
Buttonhole is selected on selection button, but buttonhole lever is raised.
Î Lower buttonhole lever and begin sewing buttonhole.
Buttonhole lever is not raised.
Î Raise buttonhole lever when sewing stitch patterns or embroidery.
Foot control is connected while operating with start/stop button or start/stop button is pushed while
foot control is connected.
Î Disconnect foot control or restart sewing by depressing foot control.
Foreign particle like tip of needle, screwdriver etc. is detected on machine socket for foot control.
Î Remove foreign particle.
63
On control panel
Problem ¼ Correction
Sewing
Breakage of top thread is detected.
Î supply or rethread top thread and restart.
Unable to start with needle lowered.
Î Raise needle and restart.
Unable to start with presser foot lifted.
Î Lower presser foot and restart.
Hoop size is too small to move hoop to original position.
Î Turn off power switch and attach larger hoop.
1-17
(Error message
number)
64
Embroidery
Hoop size is smaller than embroidery data.
Î Attach appropriate hoop and restart.
Defect in sewing data.
Î Transmit correct data.
System error occurs.
Î Turn off and on power switch to eliminate the problem that caused the system error to
occur. If the error number should not disappear, consult an authorized technician.
MEMO
65
© Part No. 83959
5/12