1
3in1 / A525pro 3in1 /
AccuCut A515pro
A535pro 3in1
CZ
RUS
Instruction Manual
Manuel d’utilisation
Bedienungsanleitung
Manuale d’istruzioni
Gebruiksaanwijzing
Manual de instrucciones
Manual de instruções
Bruksanvisning
Instrukcja obsługi
Návod k obsluze
Használati útmutató
aa
English
4
Français
6
Deutsch
8
Italiano
10
Nederlands
12
Español
14
Português
16
Svenska
18
Polski
20
Česky
22
Magyar
24
Pycc
26
CZ
RUS
A
Please read these instructions carefully and keep them in a safe place for
later reference.
Lisez attentivement ce manuel d’utilisation et conservez-le en lieu sûr pour
pouvoir en disposer ultérieurement.
Bitte lesen Sie diese Bedienungsanleitung sorgfältig durch und bewahren
Sie sie zum späteren Nachschlagen gut auf.
Si prega di leggere attentamente le presenti istruzioni d'uso e di
conservarle a portata di mano per ogni ulteriore consultazione.
Lees deze gebruiksaanwijzing zorgvuldig door en bewaar deze vervolgens
op een makkelijke plaats bij de machine, zodat u deze, indien nodig, nog
eens kunt raadplegen.
Lea detenidamente el el manual de instrucciones y consérvelo para
futuras consultas.
Favor ler esta instrução de manejo com atenção e guardá-la bem para
futuras consultas.
Läs igenom denna bruksanvisning noggrant och förvara den på säker
plats så att du kan slå upp i den vid behov.
Prosimy o uwa˝ne zapoznanie si´ z poni˝szà instrukcjà i
przechowywanie jej w dost´pnym miejscu, tak by by∏a zawsze
dost´pna.
âtûte prosím tento návod pozornû a uchovejte jej na bezpeãném mistû
pro pozdûj‰í pouÏití.
Kérjük gondosan olvassa el a kezelési útmutatót és tárolja biztonságos
helyen.
oy, py .
A1
C
B
5
3
2
4
1
D
E
F
3in1 / A525pro 3in1 /
AccuCut A515pro
A535pro 3in1
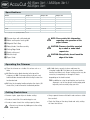
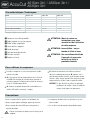
Specifications
Models
A515pro 3in1
A525pro 3in1
A535pro 3in1
Product code
AC001230
AC001235
AC001240
Sheet Capacity 80g/m2*
30
30
30
Cutting Length
380mm
457mm
609mm
Integrated Paper Guide
A4, A5, A6 & A7
A3, A4, A5, A6 & A7
A3, A4, A5, A6 & A7
Size Guide
Centimetres and Inches
Centimetres and Inches
Centimetres and Inches
Score
1-5 sheets
1-5 sheets
1-5 sheets
Perforate
1-5 sheets
1-5 sheets
1-5 sheets
* refer to paragraph 4 in the operating the trimmer, section D.
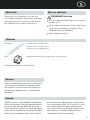
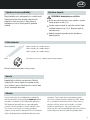
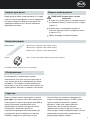
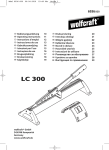
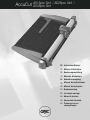
Trimmer base with calibrated grid
Metric and Imperial scale guide
Please retain this information
NOTE: regarding
safe operation of this
paper trimmer
Magnetic Back Stop
Rotary blade / handle assembly
Cutting Edge Guide
should be operated
CAUTION: byTrimmer
an adult or under adult
supervision
Safety cutting mat
Manual clamp
Paper Guide
Sharp blade, do not touch the
CAUTION: edge
of the blade
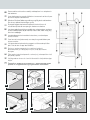
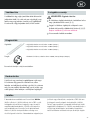
Operating the Trimmer
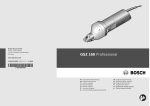
1
Place the trimmer on a stable, flat surface such as a
table.
2
A. Slide the rotary blade housing to the top of the
stationary rail. A1. To change cutting style push and
hold the blade selector knob while turning to select the
function desired.
3
B. Raise the clamping handle and place the sheets (30
sheets Max.) to be trimmed at the desired position.
4
C. Hold sheets securely in place and lower the
clamping handle. D. Push down on the rotary blade
housing and slide to cut. Several cutting passes may be
necessary to completely cut through all sheets
depending on the load inserted.
TIP: In addition to using the grid pattern and scale for
alignment, use the transparent cutting edge guide
to quickly and accurately align your cuts.
Cutting Restrictions
• Remove staples, paper clips etc. before cutting.
• Do not cut metal film, film containing glass etc.
• Do not cut more sheets than cutting capacity allows.
4
• Do not carry trimmer by holding on to the cutting
blade handle.
• Always operate trimmer with both hands and on a stable
base or desk.
• Check the fittings of the rotary blade and safety cutting
rail from time to time.
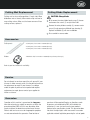
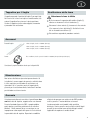
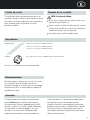
Cutting Mat Replacement
Cutting mat has four cutting positions (2 each side). When
blade does not cut cleanly, either rotate or flip mat over to
new cutting surface. When mat has been worn on all four
cutting surfaces, replace it.
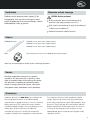
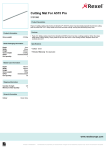
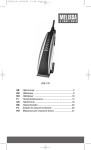
Cutting Blade Replacement
CAUTION: Sharp blade
1
F. To remove the rotary blade housing cap (2), loosen
and remove the screws (1) on right hand side.
2
Remove the rotary blade assembly (3); remove center
screw (4) and separate multiblade from housing (5).
Replace multiblade (5) with new multiblade.
3
Re-assemble in reverse order.
Accessories
Cutting mats:
2 Cutting mats, Part number 1756601 (A515pro)
2 Cutting mats, Part number 1756602 (A525pro)
2 Cutting mats, Part number 1756603 (A535pro)
Blades:
1 Multiblade disk, Part number 1756606 (A515pro/A525pro/A535pro)
Refer to your local reseller for availability.
Service
Do not attempt to service or repair the unit yourself. If your
trimmer is under warranty return it to the point of purchase
for replacement or repair. If your trimmer is no longer
under the point of purchase return period and requires
replacement or repair, please contact your supplier for
further assistance.
Guarantee
Operation of this machine is guaranteed for two years
from date of purchase, subject to normal use. Within the
guarantee period, GBC will at its own discretion either
repair or replace the defective machine free of charge.
Defects due to misuse or use for inappropriate purposes
are not covered under the guarantee. Proof of date of
purchase will be required. Repairs or alterations made
by persons not authorised by GBC will invalidate the
guarantee. It is our aim to ensure that our products
perform to the specifications stated. This guarantee does
not affect the legal rights which consumers have under
applicable national legislation governing the sale of goods.
5
3in1 / A525pro 3in1 /
AccuCut A515pro
A535pro 3in1
Caractéristiques Techniques
Modèle
A515pro 3in1
A525pro 3in1
A535pro 3in1
Code Produit
AC001230
AC001235
AC001240
Capacité de coupe (A4 80g/m2)
30
30
30
Longueur de coupe
380 mm
457 mm
609 mm
Tracés
A4, A5, A6 & A7
A3, A4, A5, A6 & A7
A3, A4, A5, A6 & A7
Graduations
Centimètres et Pouces
Centimètres et Pouces
Centimètres et Pouces
Rainage (capacité en feuilles)
1-5 feuilles
1-5 feuilles
1-5 feuilles
Pré-Découpage (capacité en feuilles)
1-5 feuilles
1-5 feuilles
1-5 feuilles
* CF paragraphe “Pour utiliser la coupeuse” section 4-D
Coupeuse avec table quadrillée
Règle graduée en cm et en pouces
Merci de suivre ces
ATTENTION : instructions
pour votre
sécurité lors de l’utilisation
de cette coupeuse
Butée arrière magnétique
Lame rotative / poignée
Guide de marge
Tapis de coupe de sécurité
Pression manuelle
Repères et tracés
Lame affûtée – ne pas
ATTENTION : toucher
le fil de la lame
Une surveillance étroite de
ATTENTION : l’appareil
est nécessaire
lorsqu’il est utilisé à
proximité d’enfants
Pour utiliser la coupeuse
1
Installer la coupeuse sur une surface plane et stable
comme une table.
2
A. Faites glisser tête de coupe rotative vers le haut du
rail. A1. Pour changer de style de coupe, appuyer et
maintenir appuyé le sélecteur de lame tout en tournant
jusqu’au style de coupe désiré.
3
B. Soulevez la poignée de pression et positionnez les
feuilles (30 feuilles maximum) à couper.
4
C. Maintenez fermement les feuilles en place et
abaissez la poignée de pression. D. Appuyez sur la
tête de coupe rotative et faites-la glisser pour couper.
Plusieurs allers-retours peuvent être nécessaires pour
couper toutes les feuilles selon la quantité insérée.
ASTUCE : En plus d’utiliser la grille et la règle pour
positionner vos feuilles, utilisez le guide de
marge afin d’aligner vos documents.
Précautions
• Avant la coupe, ôter les agrafes, les trombones etc.
• Ne pas couper papier métallique, papier de verre etc.
• Ne pas couper plus de feuilles que ne le permet la
capacité de coupe.
Ne pas transporter la coupeuse en la tenant par la
• poignée.
6
• La coupeuse des deux mains et installez-la sur une
surface stable.
• Les vis de la lame de coupe et du guide de coupe.
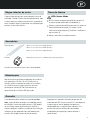
Tapis de Coupe
Pour remplacer la lame de coupe
La tapis de coupe a quatre positions de coupe (2 de
chaque côté). Lorsque la lame ne réalise plus une coupe
nette, faire pivoter le tapis ou le retourner pour obtenir une
nouvelle surface de coupe. Lorsque le tapis a été
endommagé sur les quatre positions, il doit être remplacé.
ATTENTION: Lame affûtée
1
F. Pour enlever le capuchon de la tête de coupe (2),
défaire et retirer les vis du côté droit (1).
2
Retirer le capuchon (3), défaire la vis centrale (4) et ôter
la lame de son logement (5). Remplacez la multilame
par une nouvelle (5).
3
Réassembler dans le sens contraire.
Accessoires
Bandes de coupe :
2 Bandes de coupe, code article 1756601 (A515pro)
2 Bandes de coupe, code article 1756602 (A525pro)
2 Bandes de coupe, code article 1756603 (A535pro)
Lames :
Code produit du disque multilame 1756606 ( A515pro/A525pro/A535pro)
Pour connaître la disponibilité de ces accessoires, renseignez-vous auprès de votre revendeur.
Service Technique
N’essayez pas de réparer vous même votre produit. Si
votre coupeuse est sous garantie, retournez la à votre
revendeur pour échange ou réparation. Si elle ne l’est plus,
merci de vous approcher de votre fournisseur, pour plus de
renseignements.
Garantie
Le fonctionnement de cette machine est garanti pendant
deux ans à compter de la date d’achat, sous réserve
de conditions normales d’utilisation. Durant la période
de garantie, GBC choisira de réparer ou remplacer
gratuitement la machine. Les défauts dus à une mauvaise
utilisation ou une utilisation non appropriée ne sont pas
couverts par cette garantie. La preuve de la date d’achat
sera demandée. Les réparations ou modifications
effectuées par des personnes non autorisées par GBC
invalideront la garantie. Notre objectif est de nous
assurer que nos produits réalisent les performances
déclarées. Cette garantie n’affecte pas les droits légaux
des consommateurs au titre de la législation nationale
en vigueur régissant la vente des biens de consommation.
7
3in1 / A525pro 3in1 /
AccuCut A515pro
A535pro 3in1
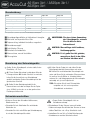
Beschreibung
Modell
A515pro 3in1
A525pro 3in1
A535pro 3in1
Bestellnummer
AC001230
AC001235
AC001240
Schneidekapazität 80g/m2
30
30
30
Verarbeitet Formate
380mm
457mm
609mm
Schneidevorlagen
A4, A5, A6 & A7
A3, A4, A5, A6 & A7
A3, A4, A5, A6 & A7
Masseinteilung
in cm und Zoll
in cm und Zoll
in cm und Zoll
Nut
1-5 Blätter
1-5 Blätter
1-5 Blätter
Perforierung
1-5 Blätter
1-5 Blätter
1-5 Blätter
* im Bezug auf Absatz 4, Punkt “D” im folgenden Abschnitt „Benutzung des Schneidegeräts”
Schneidegerätgrundfläche mit kalibriertem Liniengitter
Metrischer und imperialer Mass-Stab
Für eine sichere Anwendung
ANMERKUNG: des
Schneidegeräts, erinnern
Sie sich bitte an diese
Informationen!
Papieranschlag, individuell einstellbar, magnetisch
Schneidemessergriff
Schnittkanten-Führung
Sicherheits-Schneidematte
Klemmschiene, manuell feststellbar
Führungslinien
Messerklinge nicht berühren,
ACHTUNG: Verletzungsgefahr.
Es ist große Vorsicht geboten,
ACHTUNG: wenn
dieses Gerät in der Nähe
von Kindern betrieben wird.
Benutzung des Schneidegeräts
1
Stellen Sie das Schneidegerät auf eine stabile, flache
Oberfläche, z. B. Tisch.
2
A. Führen Sie den Messerkopf an die obere Seite der
Führungsschiene. A1. Um den Schnittstil zu wechseln,
halten Sie die Auswahltaste am Schneideknopf
gedrückt und drehen Sie den Schneideknopf auf den
gewünschten Schnittstil.
3
B. Stellen Sie den Befestigungshebel für die
Klemmschiene nach oben und legen Sie das Papier
(max. 30 Blatt) so ein, dass es an der gewünschten
Position geschnitten wird.
4
C. Halten Sie das Papier fest und stellen Sie den
Befestigungshebel der Klemmschiene nach unten.
D. Drücken Sie anschließend den Messerknopf nach
unten und führen Sie ihn entlang der Führungsschiene
hin und her. Um alle Blätter zu schneiden können
mehrere Hin- und Herbewegungen des Messerknopfes
notwendig sein, je nach Papieranzahl.
TIPP: Für exakten Schnitt nach Führungslinien
empfehlen wir, sich am transparenten
Schneidelineal zu orientieren.
Schneidevorschriften
• Entfernen Sie vor dem Schneiden Heftklammern,
Büroklammern etc.
Sie das Schneidegerät nicht am
• Tragen
Schneidemesserknopf.
• Schneiden Sie kein Metall oder Glas enthaltende
Materialien etc.
• Bitte bedienen Sie den Trimmer immer mit beiden
Händen und sorgen Sie dafür daß der Trimmer auf einer
stabilen Öberfläche wie z. Bsp. Schreibtisch steht.
• Schneiden Sie nicht mehr Blätter pro Schneidevorgang,
als wie die Schneidekapazität erlaubt.
8
• Kontrollieren Sie von Zeit zu Zeit die Befestigung der
Schneidemesser und der Sicherheitsschiene.
Schneideunterlage
Austausch des Schneidemessers
Die Schneidematte hat vier Positionen (zwei auf jeder
Seite). Wenn das Schneidemesser nicht sauber schneidet,
drehen Sie die Unterlage zur neuen Schneideoberfläche.
Wenn die Unterlage an allen vier Positionen abgenutzt ist,
ersetzen Sie sie.
ACHTUNG: Scharfes Messer!
1
F. Um den Messerknopf zu entfernen (2), lösen Sie die
Schraube an der rechten Seite (1).
2
Nehmen Sie den Messerknopf ab (3), entfernen Sie die
Schraube in der Mitte (4) und entnehmen Sie das
multifunktionale Messer (5). Ersetzen Sie den
multifunktionalen Messerknopf durch einen neuen.
3
Montage in umgekehrter Reihenfolge.
Zubehöv
Schneidematte:
2 schneidematten 1756601 (A515pro)
2 schneidematten 1756602 (A525pro)
2 schneidematten 1756603 (A535pro)
Blades:
1 multifunktionales Messer 1756606 ( A515pro/A525pro/A535pro)
Zum Nachkaufen wenden Sie sich an Ihren örtlichen Fachhänder.
Service
Versuchen Sie nicht das Gerät selbst zu reparieren. Falls
Ihre Schneidemaschine noch innerhalb der Garantie sich
befindet, bringen Sie das Gerät zum Austausch oder zur
Reparatur zu ihrem Händler züruck, benötigt die Maschine
eine Reparatur ausserhalb der Garantiezeit, kontaktieren
Sie bitte Ihren lokalen Händler für entsprechende
Unterstützung.
Garantie
Wir übernehmen die Garantie für die Funktionsfähigkeit
dieser Maschine bei normaler Nutzung für 2 Jahre ab
Kaufdatum. Innerhalb des Garantiezeitraums repariert oder
ersetzt GBC die schadhafte Maschine kostenlos und nach
eigenem Ermessen. Mängel aufgrund von Mißbrauch oder
Zweckentfremdung fallen nicht unter die Garantie. Das
Kaufdatum ist nachzuweisen. Reparaturen oder
Veränderungen, die durch nicht von GBC autorisierte
Personen durchgeführt werden, heben die Garantie auf.
Wir wollen sicherstellen, dass unsere Produkte die in den
Spezifikationen angegebene Leistung erbringen. Diese
Garantie beeinträchtigt keine gesetzlichen Rechte, die
Verbraucher gemäß der jeweils geltenden nationalen
Rechtsprechung bezüglich des Verkaufs von Waren haben.
9
3in1 / A525pro 3in1 /
AccuCut A515pro
A535pro 3in1
Specifiche tecniche
Modello
A515pro 3in1
A525pro 3in1
A535pro 3in1
Codice Prodotto
AC001230
AC001235
AC001240
Capacità di taglio (80g/m2)
30
30
30
Lunghezza di taglio
380mm
457mm
609mm
Guida allineamento carta
A4, A5, A6 & A7
A3, A4, A5, A6 & A7
A3, A4, A5, A6 & A7
Scala di misurazione
Centimentri e pollici
Centimentri e pollici
Centimentri e pollici
Cordonare
1-5 fogli
1-5 fogli
1-5 fogli
Zigrinare
1-5 fogli
1-5 fogli
1-5 fogli
* Vedi numero 4, paragrafo “Azionare la taglierina, sezione D
Base quadrettata
Scala metrica e in pollici
Fermo magnetico orizzontale
Lama rotante / cursore per il taglio
Guida di taglio
Tappetino di sicurezza
Lama manuale
Seguire attentamente le istruzioni
NOTA: prima
di utilizzare la taglierina
Attenzione la lama è affilata –
NOTA: Non
toccare il bordo della lama
Fare molta attenzione se il
NOTA: prodotto
viene utilizzato in
presenza di bambini
Guida allineamento foglio
Funzionamento
1
Posizionare la taglierina su un piano stabile come un
tavolo.
2
A. Fate scivolare la rotella di taglio fino all’estremità
superiore del binario di scorrimento. A1. Per cambiare
stile di rifilo, ruotate la rotella di taglio, trattenendola,
fino a selezionare lo stile desiderato.
3
B. Sollevate la levetta di rifilo e posizionate
accuratamente i fogli (Max. 30) da rifilare sulla
base di taglio.
4
C. Trattenete i fogli e abbassate la levetta di rifilo.
D. Premete la rotella di taglio e fatela scivolare per
iniziare l’operazione di rifilo. Potrebbe essere
necessario ripetere l’operazione di scorrimento della
lama più volte in base allo spessore dei fogli da rifilare.
SUGGERIMENTO: Oltre ad utilizzare la griglia di
allineamento del foglio, potete utilizzare anche
la guida di rifilo trasparente per allineare
facilmente i fogli.
Avvertenze
• Rimuovere eventuali punti metallici e graffette prima di
procedere al taglio.
• Non tagliare pellicole metalliche o contenenti parti
vetrose.
• Non tagliare un numero di fogli maggiori di quanti ne
consenta la capacità della taglierina.
10
Non premere il cursore per il taglio durante
• l’eventuale
trasporto della taglierina da un posto
all’altro.
• Si raccomanda di utilizzare la taglierina con entrambe le
mani e su di una base fissa.
• Controllare periodicamente i ganci della lama rotante e il
binario di scorrimento di sicurezza.
Tappetino per il taglio
Il tappetino prevede 4 posizioni di taglio (2 per ogni lato).
Nel caso in cui la lama non tagliasse correttamente, fate
ruotare il tappetino fino a trovare la giusta posizione.
Qualora il tappetino risultasse danneggiato, rimuoverlo
e procedere alla sostituzione.
Sostituzione della lama
Attenzionne la lama è affilata
1
F. Per rimuovere il cappuccio della rotella di taglio (2),
allentare e rimuovere le viti sul lato destro (1).
2
Rimuovere la lama rotante (3); rimuovere la vite centrale
(4) e separare la lama dal telaio (5). Sostituite la lama
con un nuovo disco multilama (5).
3
Riassemblare seguendo la procedura contraria.
Accessori
Barre di taglio:
2 Barre di taglio, Codice 1756601 (A515pro)
2 Barre di taglio, Codice 1756602 (A525pro)
2 Barre di taglio, Codice 1756603 (A535pro)
Lame:
Disco multilama; Codice parte di ricambio 1756606 ( A515pro/A525pro/A535pro)
Contattare il proprio rivenditore locale per la disponibilità
Manutenzione
Non tentare di effettuare riparazioni personalmente. Se
la taglierina è ancora coperta da garanzia, restituirla dove
è stata acquistata per richiedere la sostituzione o la
riparazione. Se la macchina non è più coperta dalla
garanzia per la restituzione diretta, contattare il fornitore
per richiedere assistenza tecnica.
Garanzia
Il funzionamento di questa macchina è garantito per due
anni dalla data di acquisto, soggetto ad un uso normale.
Durante il periodo di garanzia GBC, a proprio giudizio,
potrà riparare o sostituire gratuitamente la macchina
difettosa . Difetti provocati da un uso errato o un uso
improprio non sono coperti dalla garanzia. Sarà richiesta
la prova della data di acquisto. Riparazioni o modifiche
effettuate da persone non autorizzate da GBC rendono
nulla la garanzia. È nostro obiettivo assicurare il
funzionamento dei nostri prodotti nelle specifiche
dichiarate. Questa garanzia non ha effetto sui diritti legali
garantiti ai consumatori come effetto di leggi nazionali
applicabili che regolano la vendita di beni.
11
3in1 / A525pro 3in1 /
AccuCut A515pro
A535pro 3in1
Technische gegevens
Model
A515pro 3in1
A525pro 3in1
A535pro 3in1
Artikel nummer
AC001230
AC001235
AC001240
Snijcapaciteit (80 grams papier)
30
30
30
Snijlengte
380mm
457mm
609mm
DIN-verdeling op snijplateau
A4, A5, A6 & A7
A3, A4, A5, A6 & A7
A3, A4, A5, A6 & A7
Snijplateau-verdeling
Centimeters en Inches
Centimeters en Inches
Centimeters en Inches
Recht
1-5 vellen
1-5 vellen
1-5 vellen
Perforatielijn
1-5 vellen
1-5 vellen
1-5 vellen
* Zie paragraaf 4-D in ‘Bediening van de rolsnijder’.
Papiertafel met rasterverdeling
Maataanduiding in cm en inch
Gelieve deze informatie
OPMERKING: over
het veilig werken met
de rolsnijmachine steeds
te bewaren.
Papierstop handmatig instelbaar
Snijmes met beschermkap
Rooster met maataanduiding
Veilige snijmat
Dmv drukbalk
Lineaal
Opgepast scherp mes OPMERKING: raak
de rand van het mes
niet aan.
Scherp toezicht is vereist
OPMERKING: wanneer
dit product wordt
gebruikt in de buurt van
kinderen.
Bediening van de rolsnijder
1
Plaats de rolsnymachine op een vlak, stabiel oppervlak,
zoals een tafel.
2
A. Duw de meskop naar de bovenzijde van de
machine. A1. Om van snystyl te veranderen de
meskeuzeknop indrukken en draaien om de gewenste
snystyl te selecteren.
3
B. Maak de drukbalk los door de hendel omhoog te
halen. Plaats het te snijden materiaal (max. 30 vel 80
grams) in de gewenste positie.
4
C. Hou het materiaal goed op de plaats en zet het vast
door de drukbalk naar beneden te halen door de hendel
naar beneden te drukken. D. Duw de meskop naar
beneden en beweeg heen en weer om te snijden.
Afhankelijk van het materiaal of de hoeveelheid papier
is het mogelijk dat u het mes meerdere malen op en
neer dient te bewegen om alles goed te snijden.
TIP: Naast het gebruik van het rooster met
maataanduidingen, kunt u ook gebruik maken van de
transparante lineaal om snel en precies te snijden.
Voorzorgen bij het snijden
• Verwijder nietjes, paperclips, enz. voor het snijden.
• Snij nooit metalen film, film waar glas in zit, enz.
• Snij nooit meer dan de snijcapaciteit toelaat.
12
• Draag de rolsnijder nooit bij de houder van het
snijmes.
• Gebruik de rolsnijmachine altijd met twee handen en op
een controleer vlakke, stabiele ondergrond.
• Verifieer regelmatig de bevestiging van de snijkop en de
aandruklineaal.
Snijmat
Vervangen van het snijmes
De snijmat heeft vier snijposities (2 aan elke zijde).
Wanneer het mes niet meer mooi afsnijdt, dient u de mat
te draaien of om te keren, om een nieuw vlak te gebruiken.
Wanneer de mat op alle vier de snijposities beschadigd is,
dient u ze te vervangen.
OPMERKING: scherp mes
1
F. Om de beschermkap te verwijderen (2), de schroeven
losdraaien en verwijderen (1).
2
Om de verschillende messen op de snijkop te
vervangen (3), de middelste schroef losdraaien (4) en
de messen verwijderen (5). Vervang het oude mes door
een niew (5).
3
In omgekeerde volgorde weer in elkaar zetten.
Accessories
Snijstrip:
2 Snijstrip, Artikelnummer 1756601 (A515pro)
2 Snijstrip, Artikelnummer 1756602 (A525pro)
2 Snijstrip, Artikelnummer 1756603 (A535pro)
Snijkoppen:
1 snijkop met meerdere messen 1756606 ( A515pro/A525pro/A535pro)
Neem contact op met uw locale GBC dealer voor meer informatie.
Service
Probeer nooit zelf onderhoud of reparatie aan de machine
uit te voeren. Mocht de machine onderhoud of reparatie
nodig hebben binnen de garantieperiode, ga dan terug naar
uw verkooppunt. Valt de machine niet meer onder garantie,
neem dan contact op met een GBC dealer voor verdere
informatie.
Guarantee
De werking van deze machine is gegarandeerd voor twee
jaar vanaf de datum van aankoop, afhankelijk van normaal
gebruik. Binnen de garantieperiode zal GBC ter eigen
beoordeling de defectieve machine gratis repareren of
vervangen. Defecten als een gevolg van verkeerd gebruik
of gebruik voor ongeschikte doeleinden zijn niet gedekt
onder de garantie. Bewijs van datum van aankoop zal
vereist worden. Reparaties of veranderingen uitgevoerd
door niet door GBC geautoriseerde personen zullen de
garantie ongeldig maken. Wij streven ernaar te verzekeren
dat onze producten voldoen aan de vastgelegde
specificaties. Deze garantie heeft geen invloed op de
wettelijke rechten van consumenten onder de toepasbare
nationale wetgeving die de verkoop van goederen regelt.
13
3in1 / A525pro 3in1 /
AccuCut A515pro
A535pro 3in1
Especificaciones
Modelo
A515pro 3in1
A525pro 3in1
A535pro 3in1
Referencia
AC001230
AC001235
AC001240
Capacidad hojas – 80g/m2
30
30
30
Luz de corte
380mm
457mm
609mm
Guía de papel integrado
A4, A5, A6 & A7
A3, A4, A5, A6 & A7
A3, A4, A5, A6 & A7
Guía de papel
Centímetros y pulgadas
Centímetros y pulgadas
Centímetros y pulgadas
Doblado
1-5 hojas
1-5 hojas
1-5 hojas
Perforado (trepado)
1-5 hojas
1-5 hojas
1-5 hojas
* Diríjase al párrafo 4 del manual de instrucciones de la cizalla, sección D
Base de guillotina calibrada
Guía de escala métrica y en pulgadas
Conserve esta información
NOTA: relacionada
con el funcionamiento
de esta guillotina de papel
Tacón lateral ajustable
Conjunto de mango/cuchilla giratorio
Guía de margen lateral
La hoja está afilada. No toque el
NOTA: borde
Listón de corte de seguridad
Pisón manual
Guía de papel
las medidas de precaución
NOTA: siExtreme
hay niños en las proximidades
Funcionamiento de la guillotina
1
Coloque la guillotina en una superficie estable, plana,
como una mesa.
2
A. Deslice la maneta a la parte superior de la cizalla.
A1. Para cambiar el tipo de corte presione y gire el
selector a la posición deseada
3
B. Levante la sujeción y coloque las hojas (máx. 30) en
la posición deseada de corte.
4
C. Mantenga las hojas firmemente y baje la sujeción.
D. Presione la maneta y deslícela a lo largo del rail.
Pueden ser necesarios varios pases de la cuchilla para
completar el corte dependiendo de la cantidad de papel
a cortar.
TIP: Además de utilizar la guía impresa para alinear los
documentos, utilice la guía transparente para
colocar sus documentos más rápidamente.
Limitaciones de corte
• Extraiga las grapas, clips de papel, etc. antes de cortar.
• No corte láminas metálica, láminas que contengan
vidrio, etc.
• No corte más hojas de las que permita la capacidad.
No transporte la guillotina sujetándola por el
• mango
de la cuchilla de corte.
14
• Utilice siempre la cizalla con ambas manos y sobre una
base estable
• Chequee los ajustes de la cuchilla y la guía de corte
habitualmente.
Listón de corte
Cambio de la cuchilla
El listón de corte tiene cuatro posiciones de corte (2 en
cada lado). Cuando la cuchilla no corte limpiamente, gire o
de la vuelta al listón para colocar otra nueva superficie de
corte. Cuando el listón esté dañado en las cuatro
posiciones, cámbielo.
NOTA: La hoja está afilada
1
F. Para quitar el protector de la cizalla (2), retire las los
tornillos de la parte derecha (1).
2
Retire la cuchilla (3); quite el tornillo central (3) y separe
el juego (4) de cuchillas de la carcasa (5). Reemplace la
multicuchilla (5) por la nueva multicuchilla.
3
Ensamble la nueva cuchilla en orden inverso.
Accesorios
Listón de corte:
2 Listón de corte, Referencia 1756601 (A515pro)
2 Listón de corte, Referencia 1756602 (A525pro)
2 Listón de corte, Referencia 1756603 (A535pro)
Cuchillas:
Disco multi-cuchilla, referencia 1756606 ( A515pro/A525pro/A535pro)
Diríjase a su suministrador para consultar disponibilidad.
Mantenimiento
No intente reparar la máquina por sí mismo. Si su cizalla
está en garantía llévela al punto de venta para su
reparación o cambio. Si su cizalla no está en este período
de garantía consulte a su suministrador para indicarle el
procedimiento a seguir.
Garantía
El funcionamiento de esta máquina está garantizado
durante 2 años desde la fecha de compra bajo una
utilización normal. Durante el período de garantía, GBC
reparará o sustituirá a su criterio la máquina defectuosa
sin coste alguno. Los defectos debidos a una mala
utilización o a un uso con otra finalidad no quedan
cubiertos bajo esta garantía. Se requerirá prueba de
la fecha de compra. Las reparaciones o modificaciones
realizadas por personas no autorizadas por GBC
invalidarán la garantía. Nuestro objetivo es que nuestros
productos funcionen según las especificaciones indicadas.
Esta garantía no afecta a los derechos legales que los
consumidores tengan bajo la legislación nacional vigente
sobre la venta de artículos.
15
3in1 / A525pro 3in1 /
AccuCut A515pro
A535pro 3in1
Especificações
Modelo
A515pro 3in1
A525pro 3in1
A535pro 3in1
Product code
AC001230
AC001235
AC001240
Capacidade de folhas – 80 gr./m2
30
30
30
Largura de corte
380mm
457mm
609mm
Guia para papel integrada
A4, A5, A6 & A7
A3, A4, A5, A6 & A7
A3, A4, A5, A6 & A7
Guia de papel
Centimetros e Polegadas
Centimetros e Polegadas
Centimetros e Polegadas
Dobrado
1-5 folhas
1-5 folhas
1-5 folhas
Perforado
1-5 folhas
1-5 folhas
1-5 folhas
* referir-se ao parágrafo 4 em “Funcionamento da Guilhotina”, seção D.
Base da guilhotina graduada
Guia de escala métrica e em polegadas
Conserve esta informação
NOTA: relacionada
com o funcionamento
desta guilhotina de papel
Guia lateral para alinhamento
Conjunto de punho/lâmina giratório
Guia de Corte
Régua de corte de segurança
Grampo Manual
Lâmina Afiada - não toque o fio da
NOTA: lâmina
É necessária uma vigilância
NOTA: rigorosa
se o aparelho for utilizado
perto de crianças
Guia de Papel
Funcionamento da guilhotina
1
Coloque a guilhotina numa superfície estável e plana,
como uma mesa.
2
A. Deslize o conjunto punho/lamina para o alto da
Guilhotina. A1. Para trocar de corte, aperte e segure
o punho e vire o botao ate chegar ao corte desejado.
3
B. Levante o grampo manual e coloque as folhas para
serem cortadas ( 30 folhas Max.).
4
C. Segure as folhas firmamente e abaixe o grampo.
D. Aperte para baixo o cnjunto punho/lamina e deslizes
para cortar. Varios deslizes talvez sejam desejados para
cortar todas as folhas dependendo da quantidade
colocada.
DICA: Alem de usar a regua e o guia de papel,
utilize o guia de corte transparente para alinhar
seus cortes.
Limitações de corte
• Retire agrafos, clips metálicos, etc. antes de cortar.
• Não corte metal, películas que contenham vidro, etc.
• Não corte mais folhas do que a capacidade permitida.
Não transporte a guilhotina suspensa pelo
• manipulo
do punho da lâmina de corte.
16
• Utilize sempre a cisalha com ambas as mãos e sobre
uma base estável.
• Controle os ajustes da lâmina e da guia de corte
frequentemente.
Régua inferior de corte
A régua inferior de corte tem quatro posições, (duas de
cada lado). Quando a lâmina não corta perfeitamente, rode
e volte a régua para colocar uma outra nova superfície de
corte. Quando a régua está danificada nas quatro posições
possíveis, é necessário trocá-la.
Troca da lâmina
NOTA: Lâmina Afiada
1
F. Para remover o conjunto punho/lâmina de corte (2),
remova os pregos localizados no lado direito (1).
2
Remova o conjunto punho/lâmina de corte (3), remova o
parafuso localizado no centro (4) e separe a multi
lamina do resto do conjunto (5). Substitua a multilamina
por uma nova (5).
3
Monte a nova lâmina na ordem contrária.
Acessórios
Guias de corte:
2 Guias de corte, Referência 1756601 (A515pro)
2 Guias de corte, Referência 1756602 (A525pro)
2 Guias de corte, Referência 1756603 (A535pro)
Lâminas:
1 Multi-lamina, Parte numero: 1756606 ( A515pro/A525pro/A535pro)
Contacte o seu representante para saber a disponibilidade.
Manutenção
Não tente realizar pessoalmente operações de assitência
nem reparação na Cisalha. Se sua Cinsalha esta na
Garantia, retorne-a ao ponto de venda para assistência.
Se a Cisalha não esta na pela garantia e nescesita
reparação ou substituição, Por favor contacte um
representante de assistência GBC para ajuda.
Garantia
O funcionamento desta máquina é garantido por dois
anos, a partir da data de compra, em condições normais
de utilização. Durante o prazo de garantia, a GBC poderá,
ao seu critério, reparar gratuitamente ou substituir a
máquina defeituosa. Defeitos causados por uma utilização
incorrecta ou não apropriada não estão cobertos pela
garantia. Será exigida a prova da data de compra.
Reparações ou alterações realizadas por pessoal não
autorizado pela GBC anulam a garantia. É nosso objectivo
assegurar que os nossos produtos funcionem em
conformidade com as especificações indicadas. Esta
garantia não afecta os direitos dos consumidores
estabelecidos pela legislação nacional referente à
venda de bens.
17
3in1 / A525pro 3in1 /
AccuCut A515pro
A535pro 3in1
Specifikationer
Modell
A515pro 3in1
A525pro 3in1
A535pro 3in1
Artikelnummer
AC001230
AC001235
AC001240
Max antal ark – 80gr/m2
30
30
30
Skärlängd
380mm
457mm
609mm
Integrerad pappers guide
A4, A5, A6 & A7
A3, A4, A5, A6 & A7
A3, A4, A5, A6 & A7
Storleks guide
Centimeter och tum
Centimeter och tum
Centimeter och tum
Bigning
1-5 ark
1-5 ark
1-5 ark
Perforerat
1-5 ark
1-5 ark
1-5 ark
* refererar till paragraf 4 i Manualen om skärmaskinen, sektion D.
Trimmer / skärmatta med kalibrerat rutmönster
Guide i meter- och imperialskala
Behåll denna information ang
NOTERA: säkerhetsinstruktioner
på denna
Magnetiskt ryggstöd
pappers trimmer
Skärhuvud / handtag
Vasst blad – rör inte vid
FÖRSIKTIGHET: kniveggen
Skärkantsguide
Säkerhetsskärmatta
Manuell klämma
En vuxen ska alltid finnas
FÖRSIKTIGHET: med
om enheten används
där det finns barn
Pappersguide
Användning
1
Placera trimmern på ett plant och stabilt underlag.
2
A. För skärhuvudet till toppen av skenan. A1. För att
ändra skärstil tryck ner och håll skärbladsknappen men
du vrider för att välja den önskade funktionen.
3
B. Lyft klämhandtaget och placera pappersarken (max
30 ark) som ska skäras i den önskade positionen.
4
C. Håll fast arken och sänk klämhandtaget.
D. Tryck ner skärhuvudet och dra för att skära. Flera
skäromgångar kan vara nödvändigt för att kunna skära
komplett igenom alla ark, beroende på antalet ark.
TIPS: Som tillägg till användningen av rutmönstret
och linjalen för inställning, använd gärna den
transparenta skärkantsguiden för en snabb och
exakt skärinställning.
Restriktioner vid skärning
• Avlägsna gem, häftklamrar etc före skärning.
• Skär inte metallfilm-/folie etc, film/material som
innehåller glas, etc.
• Skär inte mer än skärkapaciteten medger.
Bär inte trimmern genom att hålla på/i
• skärhuvudet/handtaget.
18
• Använd alltid trimmern med bägge händerna och på ett
stabilt underlag.
• Kontrollera att knivbladet och skydds skärskenan är
ordentligt fästa vid olika tidspunkter.
Skärmatta
Byte av skärblad
Skärmattan har fyra skärpositioner (2 på varje sida).
Om inte bladet skär igenom, antingen roterar eller hoppar
skärmmatan över till en ny skäryta. När skärmattan har
blivit skadad på alla fyra ställena ska den bytas ut.
FÖRSIKTIGHET: Vasst blad
1
F. För att ta bort skärhuvudets kåpa (2), lossa skruvarna
på höger sida (1).
2
För att ta bort hela skärhuvudet (3), lossa mittenskruven
(4) och separera knivbladen från huvudet (5). Byt ut
multibladet med ett nytt multiblad (5).
3
Montera ihop på motsatt sätt.
Tillbehör
Skärmattor:
2 Skärmattor, artikelnr 1756601 (A515pro)
2 Skärmattor, artikelnr 1756602 (A525pro)
2 Skärmattor, artikelnr 1756603 (A535pro)
Blad:
1 Multifunktionellt knivblad, tillbehör 1756606 ( A515pro/A525pro/A535pro)
För tillgänglighet hör med er lokala återförsäljare.
Service
Reparera inte produkten på egen hand. Om skärmaskinen
har en giltig garanti gå tillbaka till inköpsstället för byte
eller reparation. Om skärmaskinenen inte längre har en
giltig garanti och behöver repareras, vänligen kontakta
leverantören.
Garanti
Apparaten garanteras fungera två år från inköpsdatumet
om den används normalt. Inom garantiperioden reparerar
eller ersätter GBC, efter egen bedömning, en felaktig
maskin kostnadsfritt. Garantin täcker inte fel som uppstått
genom felaktig användning eller användning för olämpliga
ändamål. Bevis på inköpsdatum krävs. Garantin upphävs,
om reparationer eller modifieringar görs av personer som
inte är auktoriserade av GBC. Det är vårt mål att se till att
våra produkter uppfyller de angivna specifikationerna.
Denna garanti påverkar inte de lagliga rättigheterna som
konsumenterna har enligt den tillämpliga nationella
lagstiftningen för försäljning av produkter.
19
3in1 / A525pro 3in1 /
AccuCut A515pro
A535pro 3in1
Dane techniczne
Model
A515pro 3in1
A525pro 3in1
A535pro 3in1
Kod produktu
AC001230
AC001235
AC001240
llość ciętych kartek - 80g/m2
30
30
30
Długość cięcia
380mm
457mm
609mm
Wzorniki formatów na blacie
A4, A5, A6 & A7
A3, A4, A5, A6 & A7
A3, A4, A5, A6 & A7
Miara rozmiarów
Centymetry i cale
Centymetry i cale
Centymetry i cale
Zagięcie
1-5 kartek
1-5 kartek
1-5 kartek
Perforacja
1-5 kartek
1-5 kartek
1-5 kartek
* patrz akapit 4 w obs∏udze gilotyny, sekcja D.
Podziałka na podstawie gilotyny
Wielkości podawane w calach i jednostkach układu
metrycznego
Magnetyczna blokada tylna
Obrotowy nóż / uchwyt
Zacisk papieru
Podkładka zabezpieczająca
Ze względów bezpieczeństwa należy
UWAGA: zachować
powyższą informację
UWAGA: Nie dotykaj krawędzi ostrza
Należy zachować szczególną
UWAGA: ostrożność,
jeśli w pobliżu
urządzenia znajdują się dzieci
Zacisk ręczny
Prowadnica do papieru
Obsługa gilotyny
1
UmieÊciç gilotyn´ na stabilnej, p∏askiej powierzchni
takiej jak stó∏ czy biurko.
2
A. Przysunàç os∏on´ ostrza obrotowego do górnej
cz´Êci nieruchomej prowadnicy. A1. To change cutting
style push and hold the blade selector knob while
turning to select the function desired.
3
B. UnieÊç uchwyt dociskowy i umieÊciç kartki (maks.
30 sztuk) do przyci´cia w ˝àdanej pozycji.
4
C. Przytrzymaç kartki pewnie w miejscu i opuÊciç
uchwyt dociskowy. D. Docisnàç os∏on´ ostrza
obrotowego i przesunàç, przycinajàc kartki. Zale˝nie
od gruboÊci w∏o˝onych kartek, do ich pe∏nego
przyci´cia mo˝e byç konieczne wykonanie kilku
przesuni´ç ostrza.
Wskazówka: Oprócz szablonu siatki i skali do
wyrównania papieru mo˝na pos∏u˝yç si´ przezroczystà
prowadnicà kraw´dzi tnàcej, aby szybko i dok∏adnie
wyrównaç kartki.
Zalecenia dotyczące cięcia
20
• Przed przycięciem papieru należy usunąć z niego
spinacze, zszywki itp.
Nie wolno przenosić gilotyny trzymając ją za
• ostrze.
• Nie wolno ciąć metalowych folii, folii zawierającej szkło
itp.
• Obsługa trimera powinna być zawsze dwuręczna na
stabilnej podstawie lub stole.
• Nie wolno ciąć większej liczby arkuszy niż jest to
możliwe.
• Proszę od czasu do czasu sprawdzać mocowanie noża
rotującego I osłaniającej nóż listwy.
Podkładka
Wymiana ostrza tnącego
Podkładka zostać ułożona w jednej z 4 pozycji (2 dla
każdego boku). Jeśli ruch noża nie jest płynny, należy
obrócić lub podkładkę. Po zniszczeniu każdego z czterech
boków podkładki, należy ją wymienić.
UWAGA: Należy zachować
1
F. Aby zdemontować osłonę ostrza obrotowego należy
poluzować i wyjąć wkręty po prawej stronie (2) (1).
2
Wyjąć zespół ostrza obrotowego (3); wyjąć wkręt środkowy (4)
i oddzielić ostrze od obudowy (5).
3
Zmontować ponownie w odwrotnej kolejności.
Części
Podkładki do cięcia:
2 Podkładki do cięcia, numer części 1756601 (A515pro)
2 Podkładki do cięcia, numer części 1756602 (A525pro)
2 Podkładki do cięcia, numer części 1756603 (A535pro)
Noże:
1 Tarcza wieloostrzowa, numer części 1756606 (A515pro/A525pro/A535pro)
Informacje na temat dostępności można uzyskać u lokalnego sprzedawcy.
Serwis
Nie wolno samodzielnie serwisować ani naprawiać
urządzenia. Jeśli przycinarka jest na gwarancji, należy
oddać ją do punktu zakupu w celu wymiany lub naprawy.
Jeśli przycinarka nie podlega już zwrotowi do punktu
zakupu, a wymaga wymiany lub naprawy, aby uzyskać
dalszą pomoc należy skontaktować się ze sprzedawcą.
Gwarancja
Udzielamy gwarancji na dwa lata pracy urzàdzania od
daty zakupu pod warunkiem, ˝e urzàdzenie b´dzie
eksploatowane w sposób okreÊlony w instrukcji. W okresie
obj´tym gwarancjà GBC naprawi lub wymieni wadliwe
urzàdzenie wed∏ug swojego uznania, nie pobierajàc za to
˝adnej op∏aty. Niniejsza gwarancja nie obejmuje
uszkodzeƒ wynikajàcych z niew∏aÊciwej eksploatacji
urzàdzenia lub jego u˝ycia niezgodnie z przeznaczeniem.
Przy sk∏adaniu reklamacji nale˝y przedstawiç dowód
zakupu. Naprawy lub zmiany konstrukcyjne dokonane
przez osoby nieupowa˝nione przez GBC powodujà utrat´
gwarancji. Dà˝ymy do tego, by nasze produkty spe∏nia∏y
podane specyfikacje. Niniejsza gwarancja nie narusza w
niczym praw przys∏ugujàcym konsumentom na mocy
odpowiedniego prawa krajowego okreÊlajàcego zasady
sprzeda˝y towarów.
21
3in1 / A525pro 3in1 /
AccuCut A515pro
A535pro 3in1
Technická specifikace
Model
A515pro 3in1
A525pro 3in1
A535pro 3in1
Kód výrobku
AC001230
AC001235
AC001240
Řezací kapacita 80 g/m2
30
30
30
Délka řezu
380 mm
457 mm
609 mm
Vodítka papíru
A4, A5, A6 & A7
A3, A4, A5, A6 & A7
A3, A4, A5, A6 & A7
Měřítko
Metrické a palcové
Metrické a palcové
Metrické a palcové
Rýhování
1-5 listů
1-5 listů
1-5 listů
Perforace
1-5 listů
1-5 listů
1-5 listů
* Pro vlastní fiezání stlaãte fiezací hlavu a posouvejte jí.
Pokud je souãasnû fiezáno vût‰í mnoÏství listÛ papíru, mÛÏe b˘t pro dokonal˘ fiez nezbytné pfiesunout fiezací hlavu vícekrát.
Základní deska řezačky s kalibrovanou mřížkou
Vodítko s metrickým a palcovým měřítkem
Prosíme, uchovejte tyto
POZNÁMKA: informace
týkající se
bezpečného provozu této
řezačky na papír
Magnetický zadní doraz
Řezací hlava/ rukojet’
Vodící pravítko
Bezpečnostní řezací podlożka
Ruční přítlak
Vodítko papíru
POZNÁMKA: Nedotýkejte se ostří břitu
V přítomnosti dětí je při řezání
POZNÁMKA: třeba
dbát zvýšené opatrnosti
Obsluha řezačky
1
Umístûte fiezaãku na pevn˘, rovn˘ povrch, napfiíklad na
desku nebo na stÛl.
2
A. PosuÀte fiezací hlavu na horní konec li‰ty. A1. Pro
zmûnu typu fiezání drÏte stlaãenou fiezací hlavu a
otáãením zvolte poÏadovan˘ fiez.
3
B. Nadzvednûte páãku a umístûte papíry urãené k
ofiezu (max. 30 listÛ) do poÏadované polohy.
4
C. Pevnû pfiidrÏujte papíry a pfiemístûte páãku smûrem
dolÛ. D. Pro vlastní fiezání stlaãte fiezací hlavu a
posouvejte jí. Pokud je souãasnû fiezáno vût‰í mnoÏství
listÛ papíru, mÛÏe b˘t pro dokonal˘ fiez nezbytné
pfiesunout fiezací hlavu vícekrát.
TIP: K rychlému a pfiesnému zarovnání fiezan˘ch
materiálÛ vyuÏijte, vedle mfiíÏky a stupnice,
prÛhledné vodící pravítko.
Omezení při řezání
• Před řezáním odstraňte kancelářské a drátěné sponky
atd.
Nepřenášejte řezačku za rukojet’ řezací
• hlavy.
• Neřezejte kovové fólie, fólie obsahující sklo atd.
• S řezačkou pracujte vždy oběma rukama a na
stabilním podkladu.
• Neřezejte více listů, než dovoluje kapacita řezačky.
• Občas zkontrolujte uchycení kotoučového nože.
22
CZ
Výměna řezací podložky
Řezací podložka má 4 možné polohy (2 na každé straně).
Pokud čepel neřeže čistě, pootočte nebo převrat’te
podložku na nový řezací povrch. Když je povrch
opotřebován ve všech čtyřech polohách, podložku
vyměňte.
Výměna čepele
POZNÁMKA: Nedotýkejte se ostří břitu
1
F. Pro odstranění krytu řezací hlavy uvolněte a vyjměte
šrouby po pravé straně (2) (1).
2
Vyjměte soupravu čepelí (3); odstraňte centrální šroub
a oddělte čepele od krytu (4) (5). Soupravu čepelí (5)
nahrate novou.
3
Opětné smontování provete stejným způsobem v
opačném pořadí.
Příslušenství
Řezací podložky:
2 Řezací podložky, obj.č.1756601 (A515pro)
2 Řezací podložky, obj.č.1756602 (A525pro)
2 Řezací podložky, obj.č.1756603 (A535pro)
Nože:
1 Vícečepelový kotouč, obj.č. 1756606 ( A515pro/A525pro/A535pro)
Ohledně dostupnosti kontaktujte Vašeho prodejce.
Servis
Nepokoušejte se řezačku sami opravovat. Pokud je
výrobek ještě v záruce, obrate se na prodejce, který
zajistí výměnu či opravu. Pokud řezačka v záruční době
již není, kontaktujte dodavatele.
Záruka
Provoz tohoto stroje je za pfiedpokladu standardního
zpÛsobu pouÏívání zaruãen po dobu dvou let od data
zakoupení. V prÛbûhu záruãní doby bude spoleãnost
GBC bezplatnû provádût opravy stroje nebo podle
vlastního uváÏení rozhodne o v˘mûnû vadného stroje.
Tato záruka se nevztahuje na závady zpÛsobené
nesprávn˘m zacházením nebo pouÏíváním k nevhodn˘m
úãelÛm. Bude poÏadováno pfiedloÏení dokladu o datu
zakoupení. Opravy nebo úpravy provedené osobami,
které k tomu nebyly oprávnûny spoleãností GBC, budou
mít za následek ztrátu platnosti záruky. Na‰ím cílem je,
aby byla zaji‰tûna funkce na‰ich v˘robkÛ v souladu s
uveden˘mi specifikacemi. Tato záruka neovlivÀuje
zákonná práva, která pro spotfiebitele vypl˘vají z pfiíslu‰né
národní legislativy upravující podmínky prodeje zboÏí.
23
3in1 / A525pro 3in1 /
AccuCut A515pro
A535pro 3in1
Műszaki leírás
Modell
A515pro 3in1
A525pro 3in1
A535pro 3in1
Termékszám
AC001230
AC001235
AC001240
Lapkapacitás - 80g/m2
30
30
30
Vágási hosszúság
380mm
457mm
609mm
Integrált papírvezető
A4, A5, A6 & A7
A3, A4, A5, A6 & A7
A3, A4, A5, A6 & A7
Vonalzó beosztása
Centiméter és hüvelykbeosztás
Centiméter és hüvelykbeosztás
Centiméter és hüvelykbeosztás
Horony
1-5 lap
1-5 lap
1-5 lap
Perforálás
1-5 lap
1-5 lap
1-5 lap
* hivatkozással a trimmer mıködtetésérŒl szóló D szakasz 4. paragrafusára
Vágógép fokbeosztással ellátott ráccsal
Metrikus (SI) és az angolszász mértékegységbeosztással
Kérjük, hogy a papírvágógép
MEGJEGYZÉS: biztonságos
működtetése
érdekében őrizze meg a
használati utasítást!
Mágneses határoló - ütköztető
Forgókés/vágófej
Papir leszoritio
Biztonsági védőborítás
Kézi leszorító
Papír vezeték
Vigyázat a kés éles - ne érjen a
MEGJEGYZÉS: kés
éléhez.
ügyeljen arra, hogy
MEGJEGYZÉS: aKülönösen
berendezés működtetése
közben gyermekek is lehetnek
a közelében!
A vágógép működtetése
1
Helyezze a vágógépet egy stabil, sima felületre, pl.
munkaasztalra vagy íróasztalra.
2
A. Csúsztassa a körkéses vágójejet a vezetŒsín felsŒ
részére.
3
B. Emelje fel a kézi leszorítót és helyezze a gépre, a
megfelelŒ pozicióba az elvágandó lapokat (Max 30
lapot).
4
C. Tartsa meg a beállított pozicióba a behelyezett
lapokat és közben engedje le a kézi leszorítót.
D. Nyomja le a körkéses vágófejet és csúsztassa
végig a vezetŒsínen. Esetenként - a vágandó
lapszámtól függŒen - a vágófej többszöri
végigcsúsztatására is szükség lehet a lapok
komplett átvágása céljából.
ÖTLET : A kívánt helyen való gyors és pontos
vágáshoz az asztalon található nyomtatott
vonalakon kívül használja az átlátszó vágóél
vezetéket is.
Fontos tudnivalók
• Vágás előtt távolítsa el a tűzőkapcsokat, gemkapcsokat,
stb.
A vágógépet soha ne szállítsa a vágófejnél
• fogva.
• Ne vágjon fémréteget, rétegelt üveget, stb.
• A papírvágót mindig csak két kézzel, stabil felületen
vagy asztallapon szabad használni.
• Ne vágjon több lapot egyszerre, mint amennyit a
vágógép kapacitása megenged.
24
• Rendszeresen ellenőrizzük a forgópenge és a biztonsági
vágósín rögzítéseit.
Védőborítás
A vágókés cseréje
A védőborítást négy vágási pozícióhoz lehet felhasználni
(oldalanként kettő). Ha a kés már nem vág elég jól, vagy
fordítsa meg vagy pattintsa a borítást az új vágófelületre.
Ha már mind a négy helyzetben sérült, ki kell cserélni.
MEGJEGYZÉS: Vigyázat a kés éles
1
F. A körkéses vágófej burkolatának a levételéhez lazítsa
meg a job oldalon lévő csavart (2) (1).
2
Vegye ki a körkéses vágófejet és a központi csavar
kivétele után hozzáfér a többfunkciós késhez (3) (4) (5).
Replace multiblade (5) with new multiblade.
3
Visszaszerelés fordított sorrendben.
Kiegészítők
Vágóalátét:
2 Vágóalátét, alkatrész azonosítószáma: 1756601 (A515pro)
2 Vágóalátét, alkatrész azonosítószáma: 1756602 (A525pro)
2 Vágóalátét, alkatrész azonosítószáma: 1756603 (A535pro)
Pengék:
1 Többfunkciós késtárcsa, alkatrész száma 1756606 ( A515pro/A525pro/A535pro)
Beszerzésért forduljon a helyi viszonteladóhoz.
Karbantartás
A javítással vagy szervízzel ne próbálkozzon saját maga.
Ha a trimmer még garanciális időn belül van, akkor
forduljon az eladójához és ott kérje a javítást. Ha a trimmer
még a visszacserélési időszakon belül van és javítást vagy
cserét igényel, akkor forduljon a szállítójához segítségért.
Jótállás
E berendezésre rendeltetésszerı használattal két év
jótállást vállalunk. A jótállási idŒszak alatt a GBC a saját
mérlegelése után díjtalanul megjavítja vagy kicseréli a
meghibásodott berendezést. A jótállás nem terjed ki a
nem rendeltetésszerı használat során bekövetkezett
hibákra. A jótállás érvényesítéséhez szükség van a
vásárlást igazoló számlára. A berendezésen végzett olyan
javítások vagy változtatások, amelyeket a GBC által nem
jóváhagyott személy végzett, érvénytelenítik a jótállást.
Célunk, hogy termékeink a megadott körülmények között
megfelelŒen mıködjenek. Ez a jótállás nem befolyásolja a
vásárlók jogi lehetŒségeit a kereskedelmi forgalomba
kerülŒ termékekre vonatkozó érvényes törvények alapján.
25
3in1 / A525pro 3in1 /
AccuCut A515pro
A535pro 3in1
Texece apaepc
M
A515pro 3in1
A525pro 3in1
A535pro 3in1
AC001230
AC001235
AC001240
80g/m2
30
30
30
380mm
457mm
609mm
A4, A5, A6 & A7
A3, A4, A5, A6 & A7
A3, A4, A5, A6 & A7
1-5 ctob
1-5 ctob
1-5 ctob
1-5 ctob
1-5 ctob
1-5 ctob
* !%
. ! 4, D.
'
" 4 .
!($"*&%(": 3,
4
'
&"" Cutting Edge Guide
*
$ " !($"*&%(": H
+
-
!($"*&%(": %
,
.
, 1
, .
2
A. .
3
B. ( 30 ) , .
4
C. , .
D. % . &, # %
, .
!"#$"%&'(): & !
"
" .
• , .. .
• !,
" ! ..
• , # .
• , .
26
• $ , .
• "" "
.
RUS
6
*
(2 ). * , . .
H
!($"*&%(": +
1
F. 6 , "" (2), (1).
2
""
(3),
% (4) (5).
3
.
.-
'
:
2 '
, 1756601 (A515pro)
2 '
, 1756602 (A525pro)
2 '
, 1756603 (A535pro)
/
:
1 5
, 1756606 ( A515pro/A525pro/A535pro)
' .
#c+
. 8
" , . 8
, , , , " "
.
5
$ " , . & GBC .
, "
%, .
. $ , %
, # GBC, . - , . " , %
,
" .
27
General Binding Corp
Northbrook
Illinois, 60062
U.S.A.
www.gbceurope.com