1
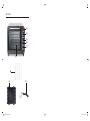
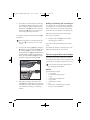
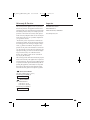
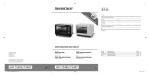
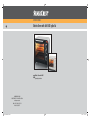
KITCHEN TOOLS Electric Oven with Grill SGB 1380 B2 6 Electric Oven with Grill Operating instructions KOMPERNASS GMBH BURGSTRASSE 21 · D-44867 BOCHUM www.kompernass.com ID-Nr.: SGB 1380 B2-02/11-V2 IAN: 63914/63915 CV_63914_SGB1380B2_LB6.indd 1-3 05.04.2011 16:04:12 Uhr SGB 1380 B2 1 2 3 4 5 6 7 8 CV_63914_SGB1380B2_LB6.indd 4-6 9 05.04.2011 16:04:13 Uhr IB_63914_SGB1380A1_LB6 06.04.2011 16:13 Uhr CONTENT Seite 1 PAGE Safety information 2 Intended use 3 Items supplied 3 Setup 3 Description 4 Preparation for use 4 Switching off and transportation 5 Switching off .....................................................................................................................................5 Transporting ......................................................................................................................................5 Operation 5 Grilling and baking ..........................................................................................................................5 Grilling and baking with circulating air .........................................................................................6 Tips for preparation and recipes 6 Muffins...............................................................................................................................................6 Hawaii toast ......................................................................................................................................7 Baking deep-frozen pizza ...............................................................................................................7 Biscuits ...............................................................................................................................................7 Rolls....................................................................................................................................................7 Meringue...........................................................................................................................................8 Changing the bulb 8 Cleaning 8 Technical data 9 Troubleshooting 9 Disposal 10 Warranty & Service 11 Importer 11 Read the operating instructions carefully before using the device for the first time and preserve this booklet for later reference. Pass this manual on to whoever might acquire the device at a future date. -1- IB_63914_SGB1380A1_LB6 06.04.2011 16:13 Uhr • Electric Oven with Grill Safety information • Important! Danger! • • • • • • Do not leave the appliance unattended when it is in use. This appliance is not intended for use by individuals (including children) with restricted physical, physiological or intellectual abilities or deficiences in experience and/or knowledge unless they are supervised by a person responsible for their safety or receive from this person instruction in how the appliance is to be used. Children should be supervised in order to make sure that they do not play with the device. You may not open the housing of the appliance or carry out any repairs. Should you do so, the safety concept of the device may be compromised and the warranty becomes void. Arrange for defects on the appliance to be repaired only by the dealer or authorised specialists. Arrange for defective power plugs and/or cables to be replaced at once by qualified technicians or our Customer Service Department. Ensure that fluids cannot permeate into the housing of the appliance. Do not expose the appliance to humidity and do not use it outdoors. Additionally, DO NOT place fluid-filled receptacles such as flower vases on the appliance. This would increase the risk of fire and of receiving an electric shock! Should liquids permeate into the housing, unplug the appliance immediately and arrange for it to be repaired by a qualified technician. Seite 2 When the appliance is in use ensure that there are no easily inflammable materials close to it (e.g. dishcloths, oven cloths, etc.). NEVER dry out textiles or other objects on or above the appliance. This would increase the risk of fire! NEVER touch the heating rods or the viewing window when the appliance is in use, or before it has cooled down completely. Do not reach in to the cooking area when the appliance is in use. Wait until the appliance has cooled down. Otherwise, you could be burnt. As the housing and the viewing window in the glass door become very hot during use, you must use an oven cloth or something similar to open the oven flap. Otherwise, you could be burnt. • • • • • • • • -2- After use, allow the appliance to cool down completely before transporting it. NEVER grasp the appliance, power cable or power plug with wet hands. There is the risk of receiving an electric shock. To disconnect, always pull out the plug itself out of the power socket, do not pull the power cable. Do not fold or crush the power cable. Lay the power cable in such a way that no one can tread on or trip over it. Do not use extension cables. If you do not intend to use the appliance for an extended period, you must disconnect it from the power source. The appliance is completely free of electrical power only when you unplug it. Do not use an external timing switch or a separate remote control system to operate the appliance. IB_63914_SGB1380A1_LB6 06.04.2011 16:13 Uhr Seite 3 Setup Clarification of the safety warnings In the operating instructions there are the following categories of safety warning: ³ Danger! A warning with the word DANGER refers to possible personal physical damage. Place the appliance on a firm, level and heat-resistant surface. Ensure there is sufficient ventilation around the appliance. Risk of fire! The distance between the appliance rear side and the wall should be at least 10 cm, with at least a clear 10 cm above the appliance and 5 cm to each side. For this reason the appliance may not be used, for example, in cupboards or similar. Should it be so used, there is likely to be insufficient ventilation for the appliance, increasing both the risk of fire or of it being damaged. Important! A warning with the word CAUTION refers to possible property or environmental damage. These warnings contain specific indications for the economic use of the appliance. Intended use Risk of fire! Ensure the appliance is placed on a firm, level and heat-resistant surface. Failure to do so increases the risk of fire or of it being damaged. The area under the base of the appliance could become discoloured and damaged. Additionally, if placed on a soft upper surface, the appliance could cause permanent damage to it due to pressure indentations. The Oven with Grill automat is intended for the heating, cooking and grilling of food. It is intended exclusively for these purposes and may only be used for them. The user is also required to pay heed to all of the information in these operating instructions, especially the safety instructions. All other uses are deemed to be improper and may result in property damage or even in personal injury. Kompernaß GmbH accepts no liability for damage caused by improper use of the appliance. Risk of electric shock! Do not place the appliance immediately adjacent to sources of water, e.g. sinks or basins, or in damp cellar areas. Otherwise, there is a risk of receiving an electric shock. Items supplied Do NOT support yourself on the glass door. Do NOT place objects on the glass door. This would cause damage to the hinges. The package contains • Electric Oven with Grill • a roasting grill • a baking tray • a handle for the roasting grills/baking tray • operating instructions -3- IB_63914_SGB1380A1_LB6 06.04.2011 16:13 Uhr Description ³ The Oven with Grill automat is intended for the heating, cooking and grilling of food. The air circulation system provides for an equable and rapid distribution of heat in the appliance. ³ ³ Operating Elements 1 Control lamp (Power) Glows during operation 2 Temperature regulator Stepless adjustment of the temperature from 100° C to 230° C 3 Function switch for OFF, Upper heat, Lower heat, Upper and lower heat 4 Rocker switch for air circulation 5 Timer switch Adjustment of the required baking/grilling time from 0 – 60 min. 6 Glass door with handle 7 Roasting grill 8 Baking tray 9 Handle for roasting grill/baking tray ³ Preparation for use ³ ³ ³ ³ ³ Seite 4 Before using the appliance for the first time, it and all of the accessories must be cleaned free of possible packaging residues. Clean the accessories with a handwarm and mild detergent solution and then dry them ab. Wipe the appliance housing with a cloth lightly moistened with water and then dry it carefully. When the appliance is completely dry inside and out, insert the plug into a suitable power socket (220 - 240 V~/50 Hz). Now switch the appliance on, without the accessories and without foodstuffs. Leave the appliance door completely open. Select the setting 230° C with the temperature regulator 2. Place the function switch 3 to upper and lower heat. Place the time switch 5 at 15 minutes. The appliance allows itself to be switched on with the time switch 5. As soon as the time switch 5 is set the control lamp 1 glows. As the heating elements are lightly greased, a slight smell may occur when first putting them into operation. This is harmless and stops after a short time. Open a window and provide for sufficient ventilation. Take the electrical Oven with Grill and all accessories from the packaging. ³ Risk of crush injuries! When opening and closing the door, do not place your fingers/hand between the door hinges. They could be crushed. -4- When the appliance has switched itself off automatically, place the function switch 3 to OFF . Remove the plug from the power socket and wait until the appliance has cooled itself down. Then clean the grill and baking area with a cloth lightly moistened with water and then dry it carefully. IB_63914_SGB1380A1_LB6 06.04.2011 16:13 Uhr Switching off and transportation Seite 5 If you wish to prepare food on the roasting grill 7 that drips excessively, then slide the baking tray 8 into the bottom rail. By doing this, drip- Switching off ³ ping fat for example will be caught and the appliance is then easier to clean. Place the function switch 3 and the time switch 5 at OFF. Unplug the power plug from the socket. The most uniform baking results are obtained when the baking tray 8 resp. the roasting grill 7 are placed on the central runner and the air circulation is switched on. Transporting ³ ³ ³ If you wish to transport the appliance, first allow it to cool down. Remove the plug from the power socket. Wrap the power cable around the retaining hooks on the rear of the appliance. ³ If you are cooking especially fatty foodstuffs, an increased smoke development can occur. In this case, do not close the glass door 6 completely, instead, allow it to be slightly open: If you carefully push the door to, it comes into this position shortly before closing. Operation Grilling and baking ³ ³ ³ Close the glass door 6 before starting the grill or baking process. Remove the roasting grill 7 and baking tray 8 from the appliance. If required, cover these with baking paper resp. smear the baking tray 8 with butter or oil. Allow the appliance to heat up for ca. 10 minutes (dependant on the setting) to the required temperature: - Select the required temperature with the temperature regulator 2. For grilling, you must always select the highest temperature setting (230° C). - Then, select with the function switch 3 either upper heat (e.g. for toppings), lower heat (e.g. for cakes) or upper and lower heat (e.g. for Pizza). If you want to grill, always select the setting upper heat with the function switch 3. - With the time switch 5 set the pre-heat time (ca. 10 minutes). - Close the glass door 6. When the warm-up period is finished, place the foodstuffs on the roasting grill 7 resp. the baking tray 8 and slide it in on one of the runners. Ensure that there is sufficient space between the foodstuffs and the inner walls/heating elements of the appliance. ³ Adjust the time switch 5 to the required grilling or baking time. The maximum grilling or baking time is 60 minutes. ³ If the cooking time for the foodstuff amounts to less than 25 minutes, first of all place the time switch 5 at 60 minutes and then turn it back to the required grilling or baking time. The control lamp 1 indicates that your Oven with Grill is switched on. The switch of the time switch 5 now rotates itself anti-clockwise towards OFF. When your Oven with Grill has reached the set temperature, the heating elements switch themselves off at intervals, to ensure that the temperature is maintained. -5- IB_63914_SGB1380A1_LB6 ³ 06.04.2011 16:13 Uhr Grilling and baking with circulating air The appliance switches itself off automatically on completion of the programmed time. If you wish to switch the appliance off prematurely, turn the time switch 5 back to OFF. Place the function switch 3 at the position OFF and remove the plug from the power socket. As a general rule, if you are baking or grilling with air circulation vou can dispense with a pre-heating of the cooking space. The cooking and browning results are more even with the use of circulating air. Take note of the instructions given in the recipes when using air circulation. You will hear a signal sound and the control lamp 1 extinguishes. ³ After the appliance has switched itself off, the time switch 5 can continue to run for a short period. ³ Seite 6 Press the rocker switch 4 for air circulation until it engages in position "-". The aerator in the grill and baking space starts to rotate. The methods of operation are then the same as for grilling and baking without air circulation. To remove the roasting grill 7 resp. baking tray 8, ALWAYS use the provided handle 9. To lift the roasting grill 7 out, you must engage the small hook of the handle 9 in the grill from above. To lift the baking tray 8 out of the appliance, the large hooks of the handle 9 must engage with the front edge of the baking tray 8. Tips for preparation and recipes In this chapter we provide you with various examples for the preparation of foods. These examples are recommendations. The preparation periods can vary. Take note of the preparation details given on the packaging of the foodstuff . Muffins ³ Ingredients for four people: • 1 Cup of flour • 1 Teaspoon of baking powder • 1 Egg • 1 Tablespoon of melted butter • 1 Cup of milk • 3 Tablespoons of sugar • Salt • for variations, additionally nuts, chopped bananas or chocolate flakes After grilling or baking, place the function switch 3 in the position OFF. Remove the plug from the power socket. Allow the appliance to cool down before cleaning it or switching it back on. -6- IB_63914_SGB1380A1_LB6 06.04.2011 16:13 Uhr Seite 7 Biscuits Preparation: ³ Mix together in a bowl, slowly and one after the other, the flour, baking powder, egg, milk, salt and sugar. ³ Melt the butter in a pan and mix it into the pastry. ³ Subject to taste, blend in the nuts, chocolate flakes or chopped bananas. ³ Place the mixture into typical muffin moulds and bake at 200° C with upper heat and air circulation for about 15 minutes. Ingredients: • 125 g butter • 125 g sugar • 1 Packet of vanilla sugar • 1 Pinch of salt • 1 Egg • 1 Egg white • 250 g Plain flour • 1 Teaspoon of baking powder • Scraped peel of half a lemon Hawaii toast Preparation: ³ Beat the butter until foamy. ³ Add the sugar, vanilla sugar, lemon peel and the eggs. ³ Mix together the flour, baking powder and salt, then blend them into the mixture with a mixing spoon. ³ Allow the pastry to stand for ca. 10 minutes. ³ Bring the pastry into the desired shape, e.g. with the assistance of a mincer, biscuit shaper or a shaping bag with nozzle. ³ Place the biscuits onto the baking tray 8, this being first covered with baking paper. ³ Bake the biscuits in a pre-heated oven at 180° C for ca. 10–15 minutes until golden brown. Ingredients for 4 toasts: • 4 Slices of toast • 1–2 Tablespoons of remoulade • 120 g cooked ham • 1/2 Tin of pineapples • 4 Slices of cheese for melting • Curry Preparation: ³ Toast the toast slices. ³ Spread the remoulade thinly over the toasts and lay the slices of cooked ham on them. ³ Lay one slice of pineapple on each of the garnished toasts. Spice with curry. ³ Then place a slice of cheese over each of the pineapple slices. ³ Lay the Hawaiian toasts on the grill 7 and then bake them for about 8 minutes on the middle level of the grill and baking machine, at approx. 180°C with upper heat and air circulation. The pastry volume is sufficient for several baking trays 8. Rolls Ingredients: • 300 g Flour (or wholemeal flour) • good 2 Teaspoons of baking powder • 200 g Linseeds • 1 Egg • 500 g Curds • 1 Teaspoon of salt Baking deep-frozen pizza Preparation: ³ Place the roasting grill 7 on the middle runner in the cooking area. ³ Lay the deep-frozen pizza without packaging onto the roasting grill 7. ³ Bake the pizza with upper and lower heating and switched on air circulation for ca.20 minutes. ³ Take heed of the details given on the packaging. -7- IB_63914_SGB1380A1_LB6 • 06.04.2011 16:13 Uhr Subject to taste, caraway seeds, onions, cubed bacon ... Seite 8 These recipes are provided without guarantee. All ingredients and preparation information are guiding values. Expand these recipe suggestions based on your personal experiences. We hope you enjoy the recipes and wish you "bon appetit". Preparation: ³ Knead everything together well and then shape it into small rolls. ³ Place the biscuits onto the baking tray 8 this being first covered with baking paper. ³ Bake at approx. 180°C for approx. 30 minutes. Changing the bulb Danger! The pastry volume is sufficient for several baking trays 8. Always wait until until the appliance has cooled down before changing the bulb. Otherwise, there is a risk of being burnt! Meringue Ingredients: • 1 Egg white • Salt • 45 g Sugar Replace the bulb only with a bulb of the same type (see chapter "Technical data "). ³ ³ Preparation: ³ Place the cooled egg white into a fat-free mixing bowl. It may not contain any egg yolk, otherwise the meringue will not be firm. ³ Beat the egg white at a slow speed, so that the bubbles formed in the meringue are not too large. ³ Add a pich of salt to taste. ³ Gradually add in a half of the sugar when the meringue starts to firm up. ³ Then beat it at the highest speed until stiff. ³ Add the remaining sugar. With this the meringue attains the required solidity. ³ Fill the meringue mixture into a squeezing bag with large star nozzles and, with a little space between them, shape rosettes, tongues and other designs on the backing tray, this being first covered with baking paper. ³ Pre-heat the Oven with Grill to ca. 100° C with air circulation. ³ Bake the meringues with air circulation at ca. 100° C for about 2 hours. ³ ³ Open the glass door 6. Unscrew the glass cover of the light bulb located at the right rear of the interior. Unscrew the defective bulb and replace it with the new bulb. Screw the glass cover back on hand-tight. Cleaning Risk of electric shock! Before you clean the Oven with Grill, you must always remove the plug from the power socket. There is a risk of receiving an electric shock! Risk of electric shock! When cleaning it, under no circumstances may the appliance be submersed in water. There is a risk of receiving an electric shock! -8- IB_63914_SGB1380A1_LB6 06.04.2011 16:13 Uhr Troubleshooting Important! Do not use household detergents or sharp/pointed objects to remove soiling. . They could damge the special coatings on the inner walls of the Oven with Grill. ³ ³ Seite 9 Possible cause and solution Symptom Should soiling occur, the Oven with Grill can be cleaned with a soft cloth lightly moistened with a mild soapy solution. For stubborn staining or baked-on soiling, place a cloth soaked with a mild detergent on the contamination. Wait until the contamination has softened and then remove it! Clean the baking tray 8 and the roasting grill 7 in a detergent solution. Allow stubborn soiling to be softened. Rinse them off with clear water. The appliance does not heat up. Risk of electric shock! The Oven with Grill must be completely dry before using it again after cleaning. Therefore, after cleaning leave the appliance door open. Technical data Mains voltage: Nominal power: Capacity: 220 - 240 V~/50 Hz 1380 W 15 Litres Bulb: 240 V, 15 W, E 14, 300°C It is not possible to switch the appliance off. -9- The time switch 5 is showing OFF. Adjust the time switch 5 to a time greater than 0 minutes (OFF) . A domestic fuse is defect. Check the domestic fuses and, if necessary, renew the defective one. The power socket is defective. Try another wall socket. The appliance is possibly defective. Arrange for the appliance to be checked by specialists. The function switch 3 is at the position OFF. An electronic component is defective. Remove the plug from the wall socket and arrange for the appliance to be checked by specialists. IB_63914_SGB1380A1_LB6 16:13 Uhr Possible cause and solution Symptom The aerator for the air circulation does not function. 06.04.2011 The switch for air circulation 4 is in the position "O". Move the rocker switch for air circulation to the position "-". The appliance is possibly defective. Arrange for the appliance to be checked by specialists. Seite 10 Disposal Do not dispose of the appliance in your normal domestic waste. This product is subject to the European guideline 2002/96/EC. Dispose of the appliance through an approved disposal centre or at your community waste facility. Observe the currently applicable regulations. In case of doubt, please contact your waste disposal centre. Dispose of all packaging materials in an environmentally responsible manner. The door glass is broken or showing crakks. Arrange for the appliance to be checked/repaired by specialists. Should a defect not allow itself to be eliminated, please contact your dealer or the manufacturer. - 10 - IB_63914_SGB1380A1_LB6 06.04.2011 16:13 Uhr Seite 11 Warranty & Service Importer The warranty for this appliance is for 3 years from the date of purchase. The appliance has been manufactured with care and meticulously examined before delivery. Please retain your receipt as proof of purchase. In the event of a warranty claim, please make contact by telephone with our Service Department. Only in this way can a post-free despatch for your goods be assured. The warranty covers only claims for material and maufacturing defects, but not for transport damage, for wearing parts or for damage to fragile components, e.g. buttons or batteries. This product is for private use only and is not intended for commercial use. The warranty is void in the case of abusive and improper handling, use of force and internal tampering not carried out by our authorized service branch. Your statutory rights are not restricted in any way by this warranty. The warranty period will not be extended by repairs made under warranty. This applies also to replaced and repaired parts. Any damage and defects extant on purchase must be reported immediately after unpacking the appliance, at the latest, two days after the purchase date. Repairs made after the expiration of the warranty period are subject to payment. KOMPERNASS GMBH BURGSTRASSE 21 44867 BOCHUM, GERMANY www.kompernass.com Service Great Britain Tel.: 0871 5000 720 (£ 0.10/Min.) E-Mail: [email protected] IAN 63914/63915 Service Ireland Tel.: 1890 930 034 (0,08 EUR/Min., (peak)) (0,06 EUR/Min., (off peak)) E-Mail: [email protected] IAN 63914/63915 - 11 -