1
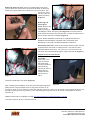
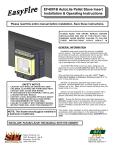
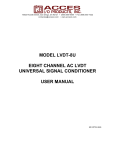
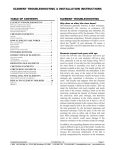
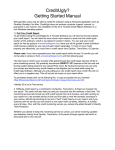
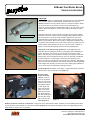
B Model Fan Motor Brush
Service Instruction
OVERVIEW
The EasyFire heater is equipped with a long life DC fan m otor (Figure
1). This m otor utilizes a special brush m aterial that m ay require
additional break in tim e to properly wear in or seat the brushes. W hen
the m otor is new the brush has a contoured end that allows for
m inim um contact initially to facilitate the break in. As this wears the full
width of the brush begins to contact the arm ature allowing for proper
operation.
Brush holder with access
Figure 1
W e have found that a sm all quantity of m otors have not im m ediately
seated the brushes causing a m otor fault light (Red Flashing LED) on
the control panel. The m otor fault condition requires the unit to be
powered down (unplugged) to clear. This condition m ay also be the
result of a feed jam b. The control system is designed to address both
inoperative fan and feed m otor in the sam e m anner to protect the user
and m inim ize further dam age to the unit. The fan m otor condition is
easily corrected by dressing the brushes and reinstalling them .
Testing for a fan motor brush problem is accom plished by two
m ethods. After recycling the heater by unplugging and reestablishing
power. Press the “Fan” switch only. If the fan runs push the Clean
button and allow the m otor speed to increase to full speed. If the “Red
Safety Light” does not light then the fan m otor is generally considered
in proper operation. If pressing the Off button then pressing a run
button such as Low provides a short period then a flashing “Red Safety
Light” the feed m ay be jam bed. This can be cleared by rem oving pellets
from hopper and rem oving access cover. If the safety light operates on
“fan or clean” then accom plish the following service.
Figure 2
Figure 3
Tools Required: #2 Phillips screw driver, m edium flat blade, sm all flat
blade, #200 or fine sand paper strip (Figure 2).
Accessing the
motor for brush
service: The fan
m otor is accessed
from the rear of the
heater by rem oving
the phillips screws
on the upper and
lower rear access
panels. Once the
panels are free tilt
the upper panel to
the rear allowing the
fan shroud to clear
the convection fan
blade (Figure 3)
Figure 4
Rem oving the w ire harness connections : Using care not to bend the fan blade, carefully use a flat blade screw driver
to help pry off the red and black m otor wire term inals (Figure 4). Note the brush holders have a corresponding red and
black base to confirm wire connections.
5061 Brooks St. Ste B Montclair, CA 91763
800-527-4790 Fax 1-909-399-3357
www.sierraproductsinc.net
P/N Fan Motor Brush Service 08 10/08
Removing the brush caps: Using a sm all flat blade screw driver
rem ove one brush cap at a tim e. Care should be taken as the brush
holder has a spring that forces to the brush onto the arm ature. This
spring m ay cause
the cap to pop out
unless held firm ly
(Figure 5).
Removing and
dressing the
brush: Rem ove the
brush from the
Figure 5
holder by lifting up
and sliding the brush and spring clear (Figure 5). Once the brush is
clear hold the brush base and carefully take a couple of swipes across
the brush face with fine sand paper (Figure 6).
Figure 6
NOTE: W HEN SANDING THE FACE OF THE BRUSH DO NOT
REMOVE ANY MATERIAL. W E ARE ONLY SCUFFING THE
SURFACE TO ALLOW FOR BETTER BRUSH CONTACT.
Reinstalling the brush: Insert the brush back into the holder. Hold the
term inal tab into the holder. Carefully insert the cap and turn with a
sm all flat bladed screw driver. Use care not to cross thread the cap.
Once the cap is threaded lightly tighten against term inal tab (Figure 7).
Repeat service on lower brush.
Figure 7
Assem bly:
Reconnect m otor
wires to red and
black term inals.
Check fan blade for
bent blades by
spinning by hand. If
blades are not
aligned carefully
bend back into
place.
Carefully reinstall upper rear panel (Figure 8).
Figure 8
After com pleting the installation of the rear panel and tightening all the
phillips screws. Plug the heater back into AC power and test run by
running fan m otor on “Fan” setting for 2 m inutes and then running on “Clean” for 30 seconds. Open hopper lid and run unit
through a beginning start up by pressing “Low” and allowing fan to ignitor and fan to start up. If all appears to activate
reinstall unit.
Additional inform ation is available on line@ www.sierraproductsinc.net/pages/custom er_service
Technical Custom er Service - 909-399-3355x14
5061 Brooks St. Ste B Montclair, CA 91763
800-527-4790 Fax 1-909-399-3357
www.sierraproductsinc.net
P/N Fan Motor Brush Service 08 10/08