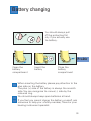
1
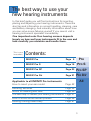
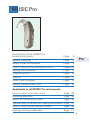
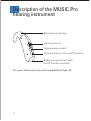
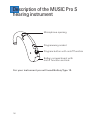
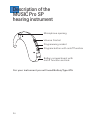
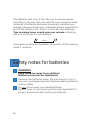
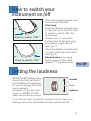
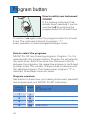
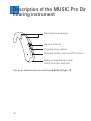
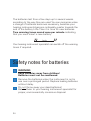
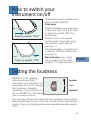
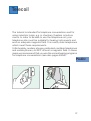
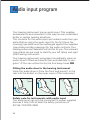
MUSIC Pro
User Guide
Behind-the-Ear Instruments
s
Siemens Hearing Solutions
A friendly guide to your
new Siemens
hearing instruments
Congratulations!
You have decided in favour of hearing instruments from
Siemens. You have taken an important step towards being
able to hear better.
From now on, your new hearing instruments will be your
constant companions. You will profit from our many years of
research and experience in microelectronics. Soon it will be
easy for you to hear again. Good hearing is an important
requirement for your physical well being. Your new hearing
instruments will help you actively participate with pleasure
in the world of language and music again.
And as with any constant companion, you’ll need some time
at first to get used to handling your hearing instruments.
With a little patience, we trust that your new hearing
experience will be all the more pleasant for you.
These user guide should help you build friendship quickly
with your new partners in matters relating to better hearing.
We want to help you to handle your hearing instruments
correctly, so that they will become an important part of your
life.
Wishing you much success,
Your Siemens team
2
The best way to use your
new hearing instruments
In this brief guide you will find instructions for inserting,
placing and adjusting your hearing instruments. There are
also tips and information on correct handling, cleaning, care
and battery changing. And naturally information about how
you can solve some failures yourself if you cannot visit a
hearing instrument specialist immediately.
One important note: Your hearing success depends
largely on how well your instruments fit in the ears and
how carefully you maintain and handle them.
This is your
Instrument
Contents:
MUSIC Pro
Page 5
Pro
MUSIC Pro S
Page 15
Pro S
MUSIC Pro SP
Page 23
Pro SP
MUSIC Pro Dir
Page 31
Pro Dir
All
Applicable to all INFINITI Pro instruments
How to insert your ear mould
Page 42
Handling batteries
Page 44
Notes for cleaning and care
Page 45
The best way to handle your hearing instruments Page 47
How to solve some failures yourself
Page 48
Hearing training made easy
Page 51
3
4
MUSIC Pro
Description of the MUSIC Pro
hearing instrument
Page
6
Battery changing
Page
7
Safety notes for batteries
Page
8
How to switch your instrument on/off
Page 9/10
Setting the loudness
Page
9
Program button
Page
10
Telecoil
Page
11
Audio input program
Page
12
Battery compartment lock
Page
13
Pro
Applicable to all MUSIC Pro instruments
How to insert your ear mould
Page 42
Handling Batteries
Page 44
Notes for cleaning and care
Page 45
The best way to handle your hearing instruments Page 47
How to solve some failures yourself
Page 48
Hearing training made easy
Page 51
5
Description of the MUSIC Pro
hearing instrument
Microphone opening
Volume Control
Programming socket
Program button with on/off function
Battery compartment with
on/off function and lock
For your instrument you will need Battery Type 13.
6
Battery changing
You should always pull
off the protective foil
only if you actually use
the battery.
Pro
Open the
battery
compartment
Insert the
battery
Close the
battery
compartment
When inserting the battery please pay attention to the
plus side on the battery.
The plus (+) side of the battery is always the smooth
side. You can recognise the minus (–) side by the
coloured ring.
You should always keep spare batteries at hand.
If you feel you cannot change the battery yourself, ask
someone to help you: a family member, friend or your
hearing instrument specialist.
7
The batteries last from a few days up to several weeks
according to the way they are used. You can recognise when
a change of batteries becomes necessary, because your
hearing instruments become noticeably quieter towards the
end of the battery’s life. Then it is time for new batteries.
Two warning tones sound once per minute indicating
that you must insert a new battery.
1 min.
Your hearing instrument specialist can switch off the warning
tones if required.
Safety notes for batteries
WARNING
Keep batteries away from children!
Batteries must not be swallowed.
Remove the batteries when the instrument is not in
use over a prolonged period. Replace leaking batteries
without delay.
Do not throw away your dead batteries!
Return them to your hearing instrument specialist for
proper, environmentally conscious disposal.
8
How to switch your
instrument on/off
fig. 1
Push to switch ”OFF”
fig. 2
Push to switch ”ON”
There are 2 ways to switch your
Instruments ON/OFF.
First way
Press the battery compartment
to the rear up to the first stop
in order to switch OFF the
instrument.
Please note: if you press
further than to the first stop,
the battery might fall out!
(see fig. 1)
Close the battery compartment
to switch ON the instrument
(see fig. 2)
Second way is by using
the program button. See
chapter “Program button”.
Setting the loudness
MUSIC Pro hearing instruments are fully automatic.
It is therefore not necessary
for you to change the loudness manually.
However, if you still wish
to do so, MUSIC Pro offers
you a volume control.
louder
2
turn
quieter
Your hearing instrument specialist can program the possible
adjustment range for you. If you do not want to use the volume
control, then your hearing instrument specialist can also switch
it off.
9
Pro
Program button
How to switch your instrument
ON/OFF
If the hearing instrument has
already been operated it can be
switched off by pressing the
program button for at least 2 sec.
To switch it on again press the program button for at least
2 sec. The instrument diverts to program “1”.
Every operation is acknowledged by beeps tones.
How to select the programs
MUSIC Pro has 4 hearing programs. Program 1 to 3 is
selected with the program button. Program 4 is activated by
the audio shoe. Each time when the instrument diverts
between the programs, the respective program is confirmed
by beep tones. The number of beep tones is identical with
the selected program. That means when program “3“ is
selected, three beep tones are heard.
Program overview
See below to check how your hearing instrument specialist
has programmed your MUSIC Pro instrument.
Hearing
program
beeps
your
MUSIC Pro
1
2
3
4
10
audio shoe
Telecoil
The telecoil is intended for telephone conversations and for
using induction loops, e.g. in churches, theaters or lecture
rooms. In order to be able to use the telephone coil, your
telephone also must be suitable for hearing instruments and
emit an adequate magnetic field. It is mostly older telephones
which meet these requirements.
Unfortunately, modern phones, particularly cordless telephones
and mobile phones, do NOT all emit a magnetic field. In these
cases we recommend that you use the normal hearing programs
for telephone conversations (see also pages 53/54).
Pro
11
Audio input program
Your hearing instrument has an audio input. This enables
accessories to be connected. In this way you can understand
better in certain hearing situations.
The contacts for the audio input are located under the type
plate. Before using the audio input for the first time the
covering type plate must be exchanged against the supplied
type plate providing openings for the audio contacts. Your
hearing instrument specialist will do this for you. The coloured
type plates can be used to identify your left (blue) and right
(red) hearing instrument.
Your hearing instrument recognises immediately when an
audio shoe is fitted and diverts then automatically to pro.
gram ”4”. You can notice this by the four beep tones
Fitting the audio shoe to the hearing instrument
Hook the audio shoe in from the front and press it to the
rear into the detent on the inner curve of the instrument.
1
2
3
Safety note for instruments with audio input
The audio input can only be connected to power supplied
devices if they fulfil at least the safety provisions of
IEC 65 / DIN VDE 0860.
12
Battery compartment lock
Your instruments are
equipped with a battery
compartment lock. This is
intended to prevent the
unintentional removal of
batteries from their compartment, such as by small
lock
children.
To lock the battery comunlock
partment open the battery
compartment up to the first stop. Push the slide in the
battery compartment to the right with a suitable tool.
To unlock the battery compartment again, open the
battery compartment up to the first stop. Push the slide
in the battery compartment to the left with a suitable tool.
If you feel you cannot do this yourself, your hearing instrument
specialist will be pleased to help you.
13
Pro
14
MUSIC Pro S
Description of the MUSIC Pro S
hearing instrument
Page
Battery changing
Page
17
Safety notes for batteries
Page
18
How to switch your instrument on/off
Page19/20
Battery compartment lock
Page
16
Pro S
19
Program button
Page
20
Telecoil
Page
21
Applicable to all INFINITI Pro instruments
How to insert your ear mould
Page 42
Handling Batteries
Page 44
Notes for cleaning and care
Page 45
The best way to handle your hearing instruments Page 47
How to solve some failures yourself
Page 48
Hearing training made easy
Page 51
15
Description of the MUSIC Pro S
hearing instrument
Microphone opening
Programming socket
Program button with on/off function
Battery compartment with
on/off function and lock
For your instrument you will need Battery Type 13.
16
Battery changing
You should always pull
off the protective foil
only if you actually use
the battery.
▼
Open the
battery
compartment
▼
▼
Insert the
battery
Pro S
Close the
battery
compartment
When inserting the battery please pay attention to
the plus side on the battery.
The plus (+) side of the battery is always the
smooth side. You can recognise the minus (–) side
by the coloured ring.
You should always keep spare batteries at hand.
If you feel you cannot change the battery yourself,
ask someone to help you: a family member, friend
or your hearing instrument specialist.
17
The batteries last from a few days up to several weeks
according to the way they are used. You can recognise when
a change of batteries becomes necessary, because your
hearing instruments become noticeably quieter towards the
end of the battery’s life. Then it is time for new batteries.
Two warning tones indicate that you must insert a new
battery.
1 min.
Your hearing instrument specialist can switch off the warning
tones if required.
Safety notes for batteries
WARNING
Keep batteries away from children!
Batteries must not be swallowed.
Remove the batteries when the instrument is not in
use over a prolonged period. Replace leaking batteries
without delay.
Do not throw away your dead batteries!
Return them to your hearing instrument specialist for
proper, environmentally conscious disposal.
18
How to switch your
instrument on/off
fig. 1
Push to switch ”OFF”
fig. 2
Push to switch ”ON”
There are 2 ways to switch your
Instruments ON/OFF.
First way
Press the battery compartment
to the rear up to the first stop
in order to switch OFF the
instrument.
Please note: if you press
further than to the first stop,
the battery might fall out!
(see fig. 1)
Close the battery compartment
to switch ON the instrument
(see fig. 2)
Second way is by using
the program button. See
chapter “Program button”
.
Pro S
Battery compartment lock
Your instruments are
equipped with a battery
compartment lock.
This is intended to prevent
the unintentional removal of
batteries from their compartment, such as by small
children.
lock
unlock
To lock the battery
compartment device open
the battery compartment up to the first stop. Push the slide
in the battery compartment to the right with a suitable tool.
19
To unlock the battery compartment again, open the
battery compartment up to the first stop. Push the slide
in the battery compartment to the left with a suitable tool.
If you feel you cannot do this yourself, your hearing instrument
specialist will be pleased to help you.
Program button
How to switch your instrument
ON/OFF
If the hearing instrument has
already been operated it can be
switched off by pressing the
program button for at least 2 sec.
To switch it on again press the
program button for at least 2 sec.
The instrument diverts to program “1”
. Every operation is
acknowledged by beeps tones.
How to select the programs
The MUSIC Pro S has 3 hearing programs which are selected
with a program button. Each time the button is pressed the
instrument diverts to the next program which is confirmed
with a beep tone. The number of beep tones is identical with
the selected program. That means when program “3“ is
selected 3 beep tones are heard.
Program overview
See below to check how your hearing instrument specialist
has programmed your INFINITI Pro S instrument.
Hearing
program
1
2
3
20
beeps
your
INFINITI Pro S
Telecoil
The telecoil is intended for telephone conversations and for
using induction loops, e.g. in churches, theaters or lecture
rooms. In order to be able to use the telephone coil, your
telephone also must be suitable for hearing instruments and
emit an adequate magnetic field. It is mostly older telephones
which meet these requirements.
Unfortunately, modern phones, particularly cordless telephones
and mobile phones, do NOT all emit a magnetic field. In these
cases we recommend that you use the normal hearing programs
for telephone conversations (see also pages 53/54).
Pro S
21
22
MUSIC Pro SP
Description of the INFINITI Pro SP
hearing instrument
Page
24
Battery changing
Page
25
Safety notes for batteries
Page
26
How to switch your instrument on/off
Page 27/28
Setting the loudness
Page
27
Program button
Page
28
Telecoil
Page
29
Audio input program
Page
29
Battery compartment lock
Page
30
Page
42
Handling Batteries
Page
44
Notes for cleaning and care
Page
45
Pro SP
Applicable to all MUSIC Pro instruments
How to insert your ear mould
The best way to handle your hearing instruments Page
47
How to solve some failures yourself
Page
48
Hearing training made easy
Page
51
23
Description of the
MUSIC Pro SP
hearing instrument
Microphone opening
Volume Control
Programming socket
Program button with on/off function
Battery compartment with
on/off function and lock
For your instrument you will need Battery Type 675.
24
Battery changing
You should always pull
off the protective foil
only if you actually use
the battery.
Pro SP
Open the
battery
compartment
Insert the
battery
Close the
battery
compartment
When inserting the battery please pay attention to the
plus side on the battery.
The plus (+) side of the battery is always the smooth
side. You can recognise the minus (–) side by the
coloured ring.
You should always keep spare batteries at hand.
If you feel you cannot change the battery yourself, ask
someone to help you: a family member, friend or your
hearing instrument specialist.
25
The batteries last from a few days up to several weeks
according to the way they are used. You can recognise when
a change of batteries becomes necessary, because your
hearing instruments become noticeably quieter towards the
end of the battery’s life. Then it is time for new batteries.
Two warning tones sound once per minute indicating
that you must insert a new battery.
1 min.
Your hearing instrument specialist can switch off the warning
tones if required.
Safety notes for batteries
WARNING
Keep batteries away from children!
Batteries must not be swallowed.
Remove the batteries when the instrument is not in
use over a prolonged period. Replace leaking batteries
without delay.
Do not throw away your dead batteries!
Return them to your hearing instrument specialist for
proper, environmentally conscious disposal.
26
How to switch your
instrument on/off
fig. 1
Push to switch ”OFF”
fig. 2
Push to switch ”ON”
There are 2 ways to switch your
Instruments ON/OFF.
First way
Press the battery compartment
to the rear up to the first stop
in order to switch OFF the
instrument.
Please note: if you press
further than to the first stop,
the battery might fall out!
(see fig. 1)
Close the battery compartment
to switch ON the instrument
(see fig. 2)
Second way is by using
the program button. See
chapter “Program button”.
Pro SP
Setting the loudness
MUSIC Pro SP hearing instruments are fully automatic.
It is therefore not necessary
for you to change the loudness manually.
However, if you still wish
to do so, MUSIC Pro SP
offers you a volume control.
louder
2
turn
quieter
If you do not want to use the volume control, then your
hearing instrument specialist can also switch this off.
27
Program button
How to switch your instrument
ON/OFF
If the hearing instrument has
already been operated it can be
switched off by pressing the
program button for at least 2 sec.
To switch it on again press the program button for at least
2 sec. The instrument diverts to program “1”
.
Every operation is acknowledged by beeps tones.
How to select the programs
MUSIC Pro SP has 4 hearing programs. Program 1 to 3 is
selected with the program button. Program 4 is activated by
the audio shoe. Each time when the instrument diverts
between the programs, the respective program is confirmed
by beep tones. The number of beep tones is identical with
the selected program. That means when program “3“ is
selected, three beep tones are heard.
Program overview
See below to check how your hearing instrument specialist
has programmed your MUSIC Pro SP instrument.
Hearing
program
beeps
your
MUSIC Pro SP
1
2
3
4
28
audio shoe
Telecoil
The telecoil is intended for telephone conversations and for
using induction loops, e.g. in churches, theaters or lecture
rooms. In order to be able to use the telephone coil, your
telephone also must be suitable for hearing instruments and
emit an adequate magnetic field. It is mostly older telephones
which meet these requirements.
Unfortunately, modern phones, particularly cordless telephones
and mobile phones, do NOT all emit a magnetic field. In these
cases we recommend that you use the normal hearing programs
for telephone conversations (see also pages 53/54).
Pro SP
Audio input program
Your hearing instruments are equipped with an audio input.
This enables the connection between hearing instrument
and accessories. It helps you to understand better in
certain hearing situations.
Your hearing instrument recognises immediately when an
audio shoe is fitted and diverts then automatically to pro.
gram ”4”. You can notice this by the four beep tones
Fitting an audio shoe
Open the battery compartment up
to the first stop, open the flap under
the push button, hook the audio
shoe in from the front and press it
to the rear into the detent on the
inner curved piece.
29
Switching off instrument with
audio shoe
Press the audio shoe to the
rear, up to the first stop.
Removing the audio shoe
Press the audio shoe to the
front, unhook the audio shoe
and close the flap again.
Safety instructions for hearing instruments with audio input
The audio input may be connected to line-operated
equipment only if this fulfils at least the safety
requirements of IEC 65 / DIN VDE 0860.
Battery compartment lock
Your instruments are equipped
with a battery compartment
lock. This is intended to prevent
the unintentional removal of
batteries from their compartment,
such as by small children.
To lock the battery compartment open the battery
compartment up to the first stop. Push the slide in the
battery compartment to the right with a suitable tool.
To unlock the battery compartment again, open the battery
compartment up to the first stop. Push the slide in the battery
compartment to the left with a suitable tool.
If you feel you cannot do this yourself, your hearing instrument
specialist will be pleased to help you.
30
MUSIC Pro Dir
Description of the MUSIC Pro Dir
hearing instrument
Page
32
Battery changing
Page
33
Safety notes for batteries
Page
34
How to switch your instrument on/off
Page 35/36
Setting the loudness
Page
35
Program button
Page
36
Telecoil
Page
37
Audio input program
Page
38
Battery compartment lock
Page
39
ProDir
Applicable to all MUSIC Pro Dir instruments
How to insert your ear mould
Page
42
Handling batteries
Page
44
Notes for cleaning and care
Page
45
The best way to handle your hearing instruments Page
47
How to solve some failures yourself
Page
48
Hearing training made easy
Page
51
31
Description of the MUSIC Pro Dir
hearing instrument
Microphone openings
Volume Control
Programming socket
Program button with on/off function
Battery compartment with
on/off function and lock
For your instrument you will need Battery Type 13.
32
Battery changing
You should always pull
off the protective foil
only if you actually use
the battery.
ProDir
Open the
battery
compartment
Insert the
battery
Close the
battery
compartment
When inserting the battery please pay attention to the
plus side on the battery.
The plus (+) side of the battery is always the smooth
side. You can recognise the minus (–) side by the
coloured ring.
You should always keep spare batteries at hand.
If you feel you cannot change the battery yourself, ask
someone to help you: a family member, friend or your
hearing instrument specialist.
33
The batteries last from a few days up to several weeks
according to the way they are used. You can recognise when
a change of batteries becomes necessary, because your
hearing instruments become noticeably quieter towards the
end of the battery’s life. Then it is time for new batteries.
Two warning tones sound once per minute indicating
that you must insert a new battery.
1 min.
Your hearing instrument specialist can switch off the warning
tones if required.
Safety notes for batteries
WARNING
Keep batteries away from children!
Batteries must not be swallowed.
Remove the batteries when the instrument is not in
use over a prolonged period. Replace leaking batteries
without delay.
Do not throw away your dead batteries!
Return them to your hearing instrument specialist for
proper, environmentally conscious disposal.
34
How to switch your
instrument on/off
fig. 1
Push to switch ”OFF”
fig. 2
Push to switch ”ON”
There are 2 ways to switch your
Instruments ON/OFF.
First way
Press the battery compartment
to the rear up to the first stop
in order to switch OFF the
instrument.
Please note: if you press
further than to the first stop,
the battery might fall out!
(see fig. 1)
Close the battery compartment
to switch ON the instrument
(see fig. 2)
Second way is by using
ProDir
the program button. See
chapter “Program button”
.
Setting the loudness
MUSIC Pro Dir hearing
instruments are fully
automatic. It is therefore not
necessary for you to change
the loudness manually.
However, if you still wish to
do so, MUSIC Pro Dir offers
you a volume control.
louder
2
turn
quieter
Your hearing instrument specialist can program the possible
adjustment range for you. If you do not want to use the volume
control, then your hearing instrument specialist can also switch
it off.
35
Program button
How to switch your instrument
ON/OFF
If the hearing instrument has
already been operated it can be
switched off by pressing the
program button for at least 2 sec.
To switch it on again press the program button for at least
2 sec. The instrument diverts to program “1”.
Every operation is acknowledged by beeps tones.
How to select the programs
MUSIC Pro Dir has 4 hearing programs. Program 1 to 3 is
selected with the program button. Program 4 is activated by
the audio shoe. Each time when the instrument diverts
between the programs, the respective program is confirmed
by beep tones. The number of beep tones is identical with
the selected program. That means when program “3“ is
selected, three beep tones are heard.
Program overview
See below to check how your hearing instrument specialist
has programmed your MUSIC Pro Dir instrument.
Hearing
program
beeps
your
MUSIC Pro Dir
1
2
3
4
36
audio shoe
Telecoil
The telecoil is intended for telephone conversations and for
using induction loops, e.g. in churches, theaters or lecture
rooms. In order to be able to use the telephone coil, your
telephone also must be suitable for hearing instruments and
emit an adequate magnetic field. It is mostly older telephones
which meet these requirements.
Unfortunately, modern phones, particularly cordless telephones
and mobile phones, do NOT all emit a magnetic field. In these
cases we recommend that you use the normal hearing programs
for telephone conversations (see also pages 53/54).
ProDir
37
Audio input program
Your hearing instrument has an audio input. This enables
accessories to be connected. In this way you can understand
better in certain hearing situations.
The contacts for the audio input are located under the type
plate. Before using the audio input for the first time the
covering type plate must be exchanged against the supplied
type plate providing openings for the audio contacts. Your
hearing instrument specialist will do this for you. The coloured
type plates can be used to identify your left (blue) and right
(red) hearing instrument.
Your hearing instrument recognises immediately when an
audio shoe is fitted and diverts then automatically to pro.
gram ”4”.You can notice this by the four beep tones
Fitting the audio shoe to the hearing instrument
Hook the audio shoe in from the front and press it to the
rear into the detent on the inner curve of the instrument.
1
2
3
Safety note for instruments with audio input
The audio input can only be connected to power supplied
devices if they fulfil at least the safety provisions of
IEC 65 / DIN VDE 0860.
38
Battery compartment lock
Your instruments are
equipped with a battery
compartment lock. This is
intended to prevent the
unintentional removal of
batteries from their compartment, such as by small
lock
children.
To lock the battery comunlock
partment open the battery
compartment up to the first stop. Push the slide in the
ProDir
battery compartment to the right with a suitable tool.
To unlock the battery compartment again, open the
battery compartment up to the first stop. Push the slide
in the battery compartment to the left with a suitable tool.
If you feel you cannot do this yourself, your hearing instrument
specialist will be pleased to help you.
39
40
Applicable to all
MUSIC Pro instruments
MUSIC Pro
MUSIC Pro S
MUSIC Pro SP
MUSIC Pro Dir
How to insert your ear mould
Page 42
Handling batteries
Page 44
Notes for cleaning and care
Page 45
All
The best way to handle your hearing instruments Page 47
How to solve some failures yourself
Page 48
Hearing training made easy
Page 51
41
How to insert your
ear mould
Make sure that your hearing
instrument is turned off. The
battery compartment must be
opened up to the stop. Grip the
ear mould between your thumb
and index finger and place the
tip carefully into your auditory
canal.
You may find it helpful to pull
your ear slightly upwards or to
the rear. You may want to push
the ear mould very gently
with your index finger.
Once inserted, you should
feel that the ear mould is
correctly placed.
Now place your hearing
instrument behind your ear
and switch it on. Close the
battery compartment fully.
42
Tip:
Practice inserting and removing your hearing
instruments correctly.
One easy way to practice is to sit down at a table.
Place a mirror in front of you and prop your elbows
on the table so you can guide your hands easily and
safely.This will help you stay relaxed and comfortable
while you practice.
All
43
Handling batteries
So-called zinc-air batteries are
used today almost exclusively
in hearing instruments to
minimize environmental
damage. These batteries
require oxygen for operation,
which they absorb from the
air. The battery is activated as
soon as the protective foil is pulled off and is used up even
if you do not use your hearing instrument.
You should always pull off the protective foil only if you
actually use the battery. Also, do not leave the batteries in
your hearing instruments if you do not use them over a
longer period of time. The batteries can leak and damage
the instruments.
Zinc-air batteries which are almost completely used up show
the following behaviour: After switching on the instruments
they function completely normally, but then rapidly become
quieter. The more the battery is used up, the faster the gain
falls off. You must then replace such batteries by new ones.
44
Notes for cleaning
and care
Ear wax accumulates on your ear mould. This can lead to
inflammation in your auditory canal if the instruments are
not cleaned regularly. Therefore:
1.
It is essential to detach the ear mould from your behindthe-ear instrument and place it in a cleaning bath for
at least 15 minutes.
Caution: The hearing
instrument itself cannot
tolerate any moisture.
All
2.
Bring your hearing instruments regularly to your
hearing instrument
specialist, on the schedule
that he or she recommends,
to have the hearing tube
changed and the instrument checked.
45
Two more tips:
You should place your hearing instruments in a
“dry bag“ with a special moisture-attracting capsule
overnight.The drying capsule draws damaging
moisture out of the instruments.
Your hearing instrument specialist stocks the special
care sets and dry bags you need to maintain your
hearing instruments and keep them in good
condition.
46
The best way to handle your
hearing instruments
Your new hearing instruments are highly sensitive
instruments.
This naturally requires some care in their handling.
They should then always give you good service.
All
Caution!
As with all electrical, non gas-encapsulated instruments,
the hearing instruments must not be operated in
explosion-endangered rooms.
47
How to solve failures
yourself
In selecting your MUSIC Pro hearing instruments you have
chosen extremely dependable devices. However, should a
fault occur, it can usually be corrected quickly.
Important tips:
If the instrument whistles
Test the instrument yourself by covering the sound
outlet opening with your fingertip.
If the whistling disappears, the instrument is in
order.
Check that the ear mould sits properly in your ear.
Also test the hearing tube for leaks.
If the whistling noise is still audible, only your
hearing instrument specialist can provide
assistance.
Sound
outlet opening
48
If the hearing instrument is too quiet
Most likely, you need to insert a new battery. If it is
still too quiet, clean the instrument or the ear mould
and hearing tube, following the directions in the
chapter “Notes for cleaning and care“
. If neither a
new battery nor cleaning helps, as a precaution
you should ask your hearing instrument specialist
to test your hearing again.
If the hearing instrument does not work at all
Is the instrument turned on? Is the battery
compartment completely closed? Is the battery
inserted correctly? Is it possible that the battery is
dead?
If none of these hints help, you should visit your
hearing instrument specialist.
All
49
Some useful tips:
Never expose your hearing instruments to
extreme temperatures or high humidity.
Never let them lie in the blazing sun. Do not
wear them when taking a shower or when using
hairspray.
In short-wave therapy or if you work or are
medically treated with strong magnetic or
high-frequency fields or X-rays, under no
circumstances may you wear the instruments
during the therapy.
Make sure to switch off the instruments when
not in use.This saves the batteries.
If you don’t wear your instruments for a longer
time, remove the batteries. Batteries can leak
out. Replace batteries that have leaked out
without delay.
50
Hearing training made easy
Hearing instruments reproduce an abundance of sounds
which frequently haven’t been experienced for many years.
Every person reacts differently the first time he or she wears
a hearing instrument. The familiarisation phase therefore
differs from person to person. There are people who are
quite happy to wear their hearing instruments the whole day
long right from the start. Others will regard it as a foreign
body at first. You’ll notice that even after a relatively short
time the positive new hearing experience prevails and you’ll
find your hearing instruments to be something quite normal.
Hearing training helps you here. You’ll become more and
more perfect, and naturally securer, step by step.
1st step
All
Discover simple sounds in your direct surroundings
Wear your instruments in different situations in different
rooms. Repeat this exercise and you’ll become more
and more familiar with the sounds.
2nd step
Experience sounds outdoors
First choose quiet surroundings for this. For instance, while
taking a stroll you’ll discover all sorts of sounds in the ”silence”
of the forest.
51
3rd step
Become familiar with your own voice
You’ve already made remarkable progress! You’ve become
much more familiar with the sounds in your daily environment.
As an exercise read out aloud and concentrate on your own
voice.
4th step
Learn to understand the voices of others
Wear the instrument when you speak with someone in your
family. Make a date with a friend. Explain your new situation
and ask the person you’re talking to to speak at a normal
conversational level.
Exercise: Have sentences read out to you and repeat these
sentences.
5th step
Get used to conversations in a group
Conversation in a group of people speaking among
themselves is one of the most difficult hearing situations.
Try to distinguish between the voices by noting their specific
tonal colour and their characteristic rhythm, and fit them to
the individual persons.
Don’t be discouraged and repeat the exercise – think about
your goal: to be able to take part in conversations again.
52
6th step
Visit public events
At lectures or in church find a place as close as possible to
the speaker. Also choose a place at the front in theaters and
concert halls. Avoid niches, boxes and places behind pillars.
7th step
Telephoning with your hearing instrument
There are two different methods for telephoning while
wearing your hearing instrument:
1. Using the normal hearing program: The sound from the
telephone receiver is absorbed directly by the microphone
of your hearing instrument. Hold the receiver approx. 1-2 cm
away from your ear. It is not necessary to change the
program.
2. Inductive telephoning by means
of the telecoil: This is only
possible if your hearing instrument is fitted with a telecoil
and program button.
If this is the case, then follow
these instructions:
Using the telecoil
In order to use the telecoil for telephone conversations
the telephone itself must emit an adequate magnetic field
for the hearing instrument. In most cases, it is the older
telephones which fulfil this requirement.
Press the program button to switch to the special telecoil
program. Then place the telephone receiver against your
ear and listen for the position with the loudest transmission.
Note: Most of the modern telephones, particularly cordless
telephones and mobile phones, do NOT emit a magnetic
field. When phoning from these appliances, you should use
the normal hearing programs.
53
All
Further benefit:
You can use the telecoil program in order to be able to hear
better in churches, theaters and lecture rooms which are
fitted with induction loops. If you have two hearing instruments, set them both to the telephone coil program.
Your hearing instruments fulfil the IEC 118-13 standard with
regard to electromagnetic compatibility (concerning for
example interference by radiotelephones which are used
close-by).
If you use a mobile telephone (GSM), there will be hardly
any interference, because of the high EMC stability.
If you should still experience some interference, even though
this may be unpleasant, there is no reason for concern. Your
hearing instruments are not defective.
You should discuss this problem with your hearing instrument
specialist.
8th step
Go on further voyages of discovery – undertake everything that gives you pleasure and experience the whole
wide world of hearing.
54
We’re happy that you
can hear well again!
Once good hearing returns to
your everyday life – and you can
enjoy both speech and music
again – then we at Siemens are
also satisfied.
Because we’ve put all our
knowledge and skill into developing
your hearing instruments!
55
Subject to change without prior notice.
Siemens
Audiologische Technik GmbH
Gebbertstraße 125
91058 Erlangen
Germany
www.hearing-siemens.com
Order-No.: A91100-M5100-B963-03-7600
Printed in Germany
052004.JK
77 84 650