1
s
Hicom cordless E
Convenience
mobile unit 2000C
for Hicom 300E
Operating
instructions
2
Contents
Safety notes
6
Notes on mobile unit use ........................................................................ 6
Notes on battery use .............................................................................. 6
Meaning of symbols: .............................................................................. 6
General
7
Operating elements, unit parts ............................................................... 7
Explanation of display, display keys ....................................................... 8
Hicom cordless E ................................................................................... 9
Features ................................................................................................. 9
Environmental conditions ..................................................................... 10
General notes on operation .................................................................. 10
Radio range .......................................................................................... 11
Leaving the radio network .................................................................... 11
Fitting the attachment clip .................................................................... 11
Cleaning your mobile unit .................................................................... 12
Lending/disposing ................................................................................ 12
User guidance, selecting functions ....................................................... 12
Putting into service
13
Inserting batteries in the mobile unit .................................................... 13
Charging the batteries .......................................................................... 14
Logging mobile units onto a telephone system .................................... 15
Activating/deactivating mobile units ..................................................... 15
Activating/deactivating keypad protection ............................................ 15
Telephone functions
16
Internal dialling ..................................................................................... 16
Dialling the Switchboard ....................................................................... 16
External dialling ................................................................................... 17
Answering calls .................................................................................... 18
Call Pickup ........................................................................................... 19
3
Contents
Second Call Waiting ............................................................................. 20
Timed Reminder .................................................................................. 21
Number redial - last 5 numbers ............................................................ 22
System Abbreviated Dialling ................................................................ 22
Night service ........................................................................................ 23
Switching functions
24
Automatic callback ............................................................................... 24
Transfer ................................................................................................ 24
Consultation during a call ..................................................................... 25
Toggle - switching between 2 users ...................................................... 25
Conference ........................................................................................... 26
Call forwarding ..................................................................................... 28
Service menu ....................................................................................... 30
Telephone book
31
Saving numbers ................................................................................... 31
Entering letters/characters and digits ................................................... 32
Dialling a number from the telephone book ......................................... 33
Storing numbers from redial ................................................................. 33
Deleting / Editing an entry .................................................................... 34
Deleting the telephone book ................................................................ 35
PIN Features
36
Electronic Telephone Lock ................................................................... 36
Mobile Class of Service ....................................................................... 37
Saving/modifying the mobile unit PIN .................................................. 38
Settings
39
Overview - settings .............................................................................. 39
Setting the language ............................................................................ 40
Settings - handset, tone ringing... ........................................................ 40
Setting the station ................................................................................ 42
4
Contents
Tones - keys, battery, range... .............................................................. 43
Overview - Tones ................................................................................. 44
Appendix
45
Fault clearance ..................................................................................... 45
Add-ons ................................................................................................ 46
5
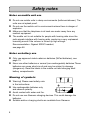
Safety notes
Notes on mobile unit use
l Do not use mobile units in damp environments (bathroom/shower). The
units are not splash proof.
l Do not use the mobile unit in environments where there is danger of
l
l
explosion.
Make sure that the telephone is at least one meter away from any
medical equipment.
The mobile unit is not suitable for people with hearing aids since the
radio signals interfere with hearing aids, producing a very unpleasant
humming sound if the volume is turned up high enough.
Recommendation: Gigaset 2000C headset,
see page 46.
Notes on battery use
l Only use approved nickel-cadmium batteries (NiCad batteries), see
l
page 13.
Never use other batteries or normal (non-rechargeable) batteries.These
batteries can cause short-circuit and may be subject to damage
(dangerous). Read the labels in the mobile unit and charging shell
battery compartments.
Meaning of symbols:
l Warning! Please read safety note
l
l
l
l
6
in the instructions.
Use rechargeable batteries only
and observe polarity.
Avoid contact with water and fire.
Do not use non-Siemens charging devices. This could damage the
batteries.
Suitable add-on charging shells are available from Siemens.
General
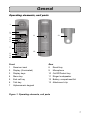
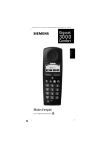
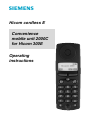
Operating elements, unit parts
1
2
3
11
13
4
5
6
7
12
8
9
10
Front
1 Receiver inset
2 Display (illuminated)
3 Display keys
4 Menu key
5 End call key
6 Talk key
7 Alphanumeric keypad
Rear
8 Recall key
9 Microphone
10 On/Off/Protect key
11 Ringer loudspeaker
12 Battery compartment/lid
13 Attachment clip
Figure 1: Operating elements, unit parts
7
General
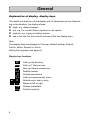
Explanation of display, display keys
The mobile unit features a 4-line display with 16 characters per line. Depending on the situation, the display shows:
l digits, e.g. dialled numbers
l text, e.g. the current station (system) or call options
l symbols, e.g. ringing or battery symbol
l and in the last line the current functions of the two display keys
Note:
The display texts are displayed in German (default setting), English,
French, Italian, Spanish or Dutch.
Setting the language, see page 40.
Display key functions
d
SVC
INT
z
{
W
YZ
< << > >>
X
OK
8
Calls up the directory
Calls up T-Net services
Sets up internal connections
Redials number
Cancels procedures
Calls up supplementary menu
Selects menu item or entry
Moves to left or right
Deletes characters
Confirms actions
General
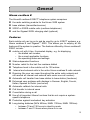
Hicom cordless E
The Hicom® cordless E DECT* telephone system comprises
l the radio switching module for the Hicom 300E system
l base stations (transmitter/receiver)
l 2000C or 2000S mobile units (cordless telephones)
l and the Gigaset 2000L charging shell (optional)
Features
Each mobile unit can log on to and be used by up to 4 DECT systems, e.g.
Hicom cordless E and Gigaset** 2000. This allows you to employ all the
features of the system in question. The features offered by Hicom cordless E
2000C include:
l mobile unit with 4-line, illuminated display, e.g. for displaying
– the dialled call number,
– the current applicable functions,
– the operating status and settings.
l Status-dependent functions
l Number redial for the last five numbers dialled
l Telephone book in the mobile unit for 100 entries
l Internal and external calls in the entire Hicom cordless E radio network
l Roaming (the user can roam throughout the entire radio network and
still receive all internal and external calls under one call number)
l Automatic call transfer from base station to base station (handover)
l Enhanced user guidance with displays in German, English, French,
Italian, Spanish or Dutch (can be set)
l Automatic callback for internal calls
l Call transfer to internal users
l Consultation during a call
l Use of all important Hicom functions that do not require a systemspecific telephone
l Protection against inadvertent key activation
l Long-lasting batteries:(NiCd 600ma, NiMH 1100ma, NiMH 1300ma)
– between 70 and 130 hours in stand-by mode
– between 7 and 13 hours when phone is in use
9
General
Environmental conditions
l Please read the safety notes on page 6.
l Make sure that the mobile unit is at least one meter away from medical
l
l
l
l
l
equipment, fire alarm equipment and other radio equipment (e.g. radio
telephones or radio pagers), otherwise its performance may be impaired, e.g. by interference.
The mobile unit and charging shell should not be placed near other
electronic devices, such as Hi-fi, office or microwave devices, as this
may adversely affect operation of your telephone and/or the electronic
equipment.
Do not expose the mobile unit or charging shell to direct sunlight or
other sources of heat.
Use the mobile unit at temperatures between 0°C and +45°C.
Do not expose the mobile unit to damp environments.
Avoid using the mobile unit and charging shell in rooms where there is
a lot of dust.
General notes on operation
l When operating the mobile unit a basic distinction is made between
l
l
l
l
l
l
l
10
– telephone/switching functions, e.g. when a call is in progress
and
– local functions, display when mobile unit is on.
An incoming call cancels the local functions.
Local functions can be cancelled before saving with the function key
. or the end call key.
Local functions can also be performed in the charging shell.
Display texts from the system are shown without muted vowels and
special characters.
The display of call charges at the mobile unit depends on the Hicom
setting.
Your telephone book entries, all settings and your PIN are not lost,
even if you remove the batteries.
The mobile unit can be used as a second executive telephone with
limited functions.
General
l The device offers a high level of privacy. No protection can be guaranteed against illegal bugging using other radio receivers.
Radio range
l Depending on the environment, the range in the open is up to 300 m.
l In buildings the range extends to up to 50 m (depending on the room
and building layout and construction).
l If you leave the system’s base station radio range during a call, you will
l
l
hear the range tone. The quality of the voice connection drops, especially if you move. For a better voice connection, move back into the
base station range.
The radio connection is lost if you exceed the range. This is identified
by the display Search station .
Please consult your system administrator in the case of on-going range
problems.
Leaving the radio network
l Integrated power saving function: if you leave the base station radio
l
l
l
range when the mobile unit is switched on, the interval between
synchronisation attempts gradually increases – this increases the
battery life in stand-by mode.
To ensure that the mobile unit can be used as soon as you return to the
radio network, you should immediately log it on again:
Press the On/Off key until the display is blank, press the On/Off key
again when the mobile unit is on.
If you intend to leave the radio network and take your mobile unit with
you, we recommend that you turn the mobile unit off in order to save
the batteries.
Fitting the attachment clip
An attachment clip is supplied with your mobile unit to facilitate portability.
To use this clip, simply attach it to the rear of the mobile unit.
Slot the protrusions on the attachment clip into the holes on the sides of the
mobile unit (at display level).
11
General
Cleaning your mobile unit
To clean the mobile unit and the charging shell, simply wipe them with a damp
or antistatic cloth. Never use a dry cloth (since this can generate electrostatic
charges and discharges) or abrasive cleaning agents.
Lending/disposing
l If you lend your mobile unit to someone else, please make sure you
l
include the operating instructions with it.
Please dispose of defective batteries, mobile units and charging shells
in accordance with legal requirements.
User guidance, selecting functions
The user-friendly display system guides the user quickly and effectively
through the entire range of features available with this telephone system.
For information on setting the language to German, English, French, Italian,
Spanish or Dutch, see page 40.
Different functions can be selected depending on the status of the mobile unit.
Only functions applicable to the relevant status are displayed.
12
Putting into service
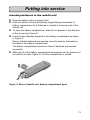
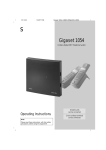
Inserting batteries in the mobile unit
l Read the safety notes on page 6 first!
l Hold the mobile unit with the dialling keypad facing downwards. A
l
l
l
battery compartment for 2 batteries is located in the lower part of the
mobile unit.
To open the battery compartment, slide the lid upwards in the direction
of the arrow (see Figure 2).
Insert the two batteries supplied in the battery compartment as shown
in Figure 2.
Ensure that the batteries are inserted correctly (polarity illustrated on
the label in the battery compartment).
The battery compartment cannot be closed if batteries are inserted
incorrectly.
Slide the lid of the battery compartment downwards into the grooves on
the mobile unit (see Figure 2) until the compartment is closed.
Figure 2: Rear of mobile unit, battery compartment open
13
Putting into service
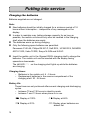
Charging the batteries
Batteries supplied are not charged.
Note:
l New batteries should be initially charged for a minimum period of 16
hours without interruption – irrespective of any messages on the
display.
l In order to maintain max. battery storage capacity for as long as
possible, the mobile unit should only ever be inserted in the charging
shell when the batteries are empty.
l The batteries warm up during charging.
l Only the following spare batteries are permitted:
Panasonic P-60 AA, Philips R6 NC-P, Saft RC6, UCAR RC6, DAIMON
ACCU 1000, Varta 751RS, Sanyo N-3UN and N-3UC.
l Insert the mobile unit in the Gigaset 2000L charging shell to charge the
batteries. The mobile unit can be inserted with the display facing
upwards or downwards.
The left LED Bon the charging shell lights up while the batteries
are charging.
Charging times:
– Batteries in the mobile unit: 4 - 5 hours
– Replacement batteries in the reserve compartment of the
charging shell: 20 - 24 hours
Battery life:
These times are only achieved after several charging and discharging
cycles.
– between 70 and 130 hours in stand-by mode
– between 7 and 13 hours when phone is in use.
14
U Display at 100%
V Display at 66%
e Display at 33%
= Display when batteries are
almost flat
Putting into service
Logging mobile units onto a telephone system
Your phone should be logged on and ready to use. If this is not the case then
contact your System Administrator.
Note:
l In the case of Hicom cordless E, the mobile units are not logged on to
stations (base stations), but rather to the Hicom 300E telephone
system. In this case, Station always means system.
Activating/deactivating mobile units
Activating the mobile unit:
h
Press the On/Off key - acknowledgement tone is heard.
Deactivating the mobile unit:
h
Press the On/Off key until the display is clear – you hear
the acknowledgement tone.
Activating/deactivating keypad protection
This allows you to protect your mobile unit against inadvertent key activation,
e.g. when carrying it in your bag. Call are signalled even if keypad protection
is on and can be answered as in the same way as when the telephone is
switched on.
Prerequisite: mobile unit is activated.
Activating keypad protection:
h
Keyboard
protected
Press the On/Off key for less than 1 second.
Display when keypad protection is on.
Deactivating keypad protection:
h
Press the On/Off key for less than 1 second.
15
Telephone functions
Internal dialling
o
c
Call
Dial an internal number
Also see Note:
Press the “Green” talk key.
Conduct the call – the number and the name of the user
are displayed.
You can now scroll through the functions offered with
the > display key and if necessary, execute a function.
Ending a call:
a
Press the “Red” end call key or place the mobile unit in
the charging shell.
Note:
l You can cancel the dialling operation by pressing DIA L A GA IN .
l The dialled number is automatically stored for number redial, see page
22.
l If the called party is busy or does not answer, you can store an automatic callback request by pressing CA LLB A C K , also see page 24.
Dialling the Switchboard
e.g. 9
Enter the "Switchboard code", e.g. "9"
c
Press the “Green” talk key.
Ending a call:
a
16
Press the “Red” end call key or place the mobile unit in
the charging shell.
Telephone functions
External dialling
External code
e.g. 0
Enter the "External code", e.g. "0"
o
Dial the external number – the digits entered are
zoomed at the beginning.
Also see Note:
Press the “Green” talk key.
c
Call
Conduct the call.
You can now scroll through the functions offered with
the > display key and if necessary, execute a function.
Ending a call:
a
Press the “Red” end call key or place the mobile unit in
the charging shell – the call charges are displayed
depending on the system settings.
Note:
l You can cancel the dialling operation by pressing DIA L A GA IN .
l Digit size is reduced in the case of longer numbers.
l Internal calls only can be conducted if No access rights is displayed.
l The dialled number automatically stored for number redial.
17
Telephone functions
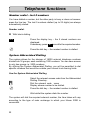
Answering calls
The mobile unit’s ringing tone is audible. Depending on the user (internal/
external), the number and the name of the caller is displayed.
l The mobile unit is in the charging shell:
Simply remove the mobile unit from the charging shell.
or
l The mobile unit is not in the charging shell:
c
Press the “Green” talk key.
Call
Conduct the call.
You can now scroll through the functions offered with
the display key and if necessary, execute a function.
Ending a call:
a
18
Press the “Red” end call key or place the mobile unit in
the charging shell.
Telephone functions
Call Pickup
The Call Pickup feature allows you to answer any ringing extension in your
pickup group from your telephone.
Activate Call Pickup
An extension within your pickup group is ringing
a ping ring will alert you to an incoming call
Display shows Source of call and Destination of
call
o
Dial ∗ 33
c
Press the “Green” talk key.
You have now answered the call
19
Telephone functions
Second Call Waiting
This feature allows a second call to camp on your extension when you are busy
on a call.
The caller will receive ringing tone instead of busy tone.
Activate Second Call Waiting
ü
>
S W ITCHE S
S E CO ND CA LL
A CTIV A TE
press the INT Key
Scroll to S W ITCHE S .
Press the display key.
Press the display key.
Display shows Camp-on is off
Press the display key.
Display shows Second call activated
Deactivate Second Call Waiting
ü
>
S W ITCHE S
S E CO ND CA LL
DE A CTIV A TE
20
press the INT Key
Scroll to S W ITCHE S .
Press the display key.
Press the display key.
Display shows Camp-on is on
Press the display key.
Display shows Second call deactivated
Telephone functions
Timed Reminder
Timed reminders or alarms can be programmed to remind you of meetings or
appointments.
Set Timed Reminder (e.g. 3:30 PM)
ü
RE M INDE R
press the INT Key
Scroll to RE M INDE R
Press the display key.
Display shows Nothing Stored
Press the display key.
o
enter 1530
S AVE
Press the display key to save the time – Reminder
Stored is displayed briefly.
>
RE M INDE R
Display Timed Reminder
ü
>
RE M INDE R
NE XT
press the INT Key
Scroll to RE M INDE R
Press the display key.
Display shows 15:30
Press to scroll for other timed reminders.
Cancel Timed Reminder
ü
>
RE M INDE R
>
DE LE TE
press the INT Key
Scroll to RE M INDE R
Press the display key.
Scroll to DE LE TE
Press the display key.
Display shows Deleted and New reminder
21
Telephone functions
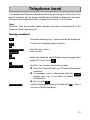
Number redial - last 5 numbers
You have dialled a number, but the other party is busy or does not answer:
press the line key. The last 5 numbers dialled (up to 22 digits) are always
automatically stored.
Number redial:
l With block dialling
z
Press the display key – the 5 stored numbers are
displayed.
If necessary, press Z to scroll to the required number.
c
Press the talk key – the marked number is dialled.
System Abbreviated Dialling
The system allows for the storage of 16000 external telephone numbers
divided into 16 groups, each containing 1000 numbers. You can have access
to only two groups i.e. 2000 numbers.
By utilising the System Abbreviated Dialling, you will be permitted to dial
specific numbers that would be outside your normal trunk barring limits.
Use the System Abbreviated Dialling
o
c
Select the relevant access code from the Abbreviated
Dialling Directory.
Dial the relevant code xxxxx
Display shows number to be dialled.
Press the talk key – the marked number is dialled.
Wait whilst the system dials the number
The system will dial the required external number, the time taken will vary
according to the type of main exchange to which your Hicom 300E is
connected.
22
Telephone functions
Night service
o
Dial ∗ 88
c
Press the talk key.
You are now connected to the caller
Check with System Administrator if any other type of Night Service is
operational.
23
Switching functions
Automatic callback
If a dialled internal user is busy or if your call is not answered, you can program
an automatic callback request:
CA LLB A C K
Press the display key – Will call back appears
briefly.
Note:
l The system calls you back
- when the user becomes free or
- when the user makes another call or
- executes the callback request stored in the mailbox.
l The callback is deleted if you do not answer the callback within 4 rings.
l The number of callback requests that can be stored depends on the
system setting, e.g. 5 callbacks.
l The callback requests stored cannot be deleted. Simply let the system
perform the callbacks.
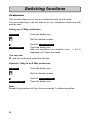
Transfer
You answered an external call and would like to transfer it to another user:
CO NS ULT
Press the display key –
Please dial is displayed.
o
Dial the number of the user.
a
Press the end call key.
Note:
Consultation can be cancelled while dialling or if the user is busy.
DIA L A G A IN
TO W A IT. CA LL
24
Press the display key.
Press the display key.
Switching functions
Consultation during a call
You are conducting an internal or external call and would like to obtain some
information from an internal or external user:
CO NS ULT
Press the display key.
o
Dial the number of the user you wish to consult and
conduct consultation call.
Ending consultation:
RE TURN
Press the display key.
Note:
Consultation can be cancelled while dialling or if the user is busy by scrolling
to and pressing TO W A IT. CA LL .
Toggle - switching between 2 users
You can toggle between two users during a consultation call:
>
TOG GLE
TOG GLE
Use the display key to scroll to
TOG GLE and press.
Press the display key to switch between the two users.
Ending toggle:
>
RE TURN
Use the display key to scroll to RE TURN
Press the display key.
25
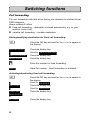
Switching functions
Conference
This function allows you to set up a conference with up to 8 users.
You are conducting a call and wish to set up a telephone conference with
another user:
Setting up a 3 Way conference
CO NS ULT
Press the display key.
o
Dial the desired number.
>
Scroll to CO NF E RE NCE
Press the display key.
After you announce your intention Conf. 1-2-3 is
displayed; all 3 users are linked.
CO NF E RE NCE
You can now
l end the conference: press the line key.
Expand a 3 Way to an 8 Way conference
CO NS ULT
Press the display key.
o
Dial the desired number.
>
Scroll to E XP A ND CO NF .
Press the display key.
E XP A ND CO NF.
Note:
Repeat the procedure until you have connected 7 conference parties.
26
Switching functions
Consultation during conference
Consult with an extension or external party when you are busy with a
conference.
CO NS ULT
Press the display key.
o
Dial extension or “0” and external number .
Consult with called party.
G O TO CO N F .
Press the display key to return to the conference.
Release conference party
o
RE LE A S E P A RTY
Dial 2/3/4/5/6/7/8 to select the conference partner you
wish to disconnect.
Press the display key.
Transfer conference
You have set up a conference and wish to transfer the conference to another
user:
CO NS ULT
Press the display key.
o
Dial number xxxx.
CO NF. TRA NS FE R
Press the display key.
You have transferred the conference and can now:l disconnect: press end call key
l make another call
27
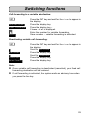
Switching functions
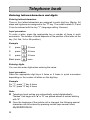
Call forwarding
You can forward all calls that arrive during your absence to another Hicom
300E telephone.
Hicom cordless E offers
l fixed call forwarding – destination is stored permanently, e.g. to your
mailbox (voice mail)
l variable call forwarding – variable destination.
Storing/modifying destination for fixed call forwarding:
ü
Press the INT key and wait for Service: to appear in
the display.
DE S TINA TIO NS
NE W E NTRY
Press the display key.
Scroll to F IXE D FO RW A RD .
Press the display key.
Press the display key.
o
Enter the number for fixed forwarding.
S AVE
Save the number – fixed forwarding is activated.
>
F IXE D FO RW A RD
Activating/deactivating fixed call forwarding:
ü
>
S W ITCHE S
>
F O R W A RD
Press the INT key and wait for Service: to appear in
the display.
Scroll to S W ITCHE S
Press the display key.
Scroll to F O R W A RD .
Press the display key.
DE A CTIV A TE
or
A CTIV A TE
28
Press the display key.
Switching functions
Call forwarding to a variable destination:
ü
DE S TINA TIO NS
V A RY FO RW A RD
o
S AVE
Press the INT key and wait for Service: to appear in
the display.
Press the display key.
Press the display key –
Please dial is displayed.
Enter the number for variable forwarding.
Save number – variable forwarding is activated.
Deactivating variable call forwarding:
ü
>
S W ITCHE S
>
F O R W A RD
DE A CTIV A TE
Press the INT key and wait for Service: to appear in
the display.
Scroll to S W ITCHE S
Press the display key.
Scroll to F O R W A RD .
Press the display key.
Press the display key.
Note:
l Once variable call forwarding is deactivated (cancelled), your fixed call
forwarding destination will be restored.
l If call forwarding is activated, the system emits an advisory tone when
you press the line key.
29
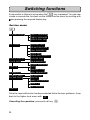
Switching functions
A connection to Hicom is set up when the ü key is pressed. You can now
invoke or execute the functions via the Hicom service menu by scrolling with
> and pressing the required display key.
Service menu
ü
DE S TINA TIO NS
V A RY FO RW A RD
F IXE D FO RW A RD
S P E E D DIA L NO
S W ITCHE S
S E CO ND CA LL
DO -NO T-DIS TURB
CA LL P ROTE CT
F O R W A RD
F O R W A RD N UM B E R
S P E E D DIA L NO
P LE A S E DIA L
V O ICE INFO
O W N M A ILB O X
O THE R M A ILB O X
P IN/CO S
P IN 1
CHA NG E CO S
RE M INDE R
NE W RE M IN DE R
O THE R FUNCT.
NO DIS P LA Y
P HONE TE S T
DIS P LA Y
B A S E S TA TIO N ID
A S S E T ID
S W V E RS IO N
CA N CE L
Once the required function has been selected follow the user guidance. Jump
back to the higher-level menu with {.
Cancelling the operation: press end call key a.
30
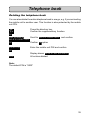
Telephone book
Your mobile unit features a telephone book for storing up to 100 entries. The
stored numbers can be simply dialled and modified or deleted at any time.
Access to the telephone book is locked if the mobile unit is locked.
Note:
Numbers from the number redial memory can also be transferred to the
telephone book, see page 33.
Saving numbers
d
Press the directory key – stored entries are displayed.
W
Confirm the Supplementary function.
OK
DIA L NUM B E R
New entry
Scroll to New entry
and confirm.
OK
NA M E
Enter the name by using Alphanumeric keypad. See
page 32. Correct with{.
OK
TE L.NUM B E R
S A V E E NTRY
Scroll to Tel.Number and enter number.
l Enter the "external code", e.g. "0" before the external
numbers.
l If necessary, enter a dial pause with the P A U S E
display key, e.g. in the case of certain foreign
connections.
l Correct with{.
Confirm the supplementary function with O K – Entry
stored is briefly displayed.
31
Telephone book
Entering letters/characters and digits
Entering letters/characters
Three or four letters/characters are assigned to each digit key. Blanks, full
stops and hyphens are assigned to the "0" key. The muted vowels Ä, Ö and
Ü can be entered with the key "1" (language setting: German).
Input procedure:
To enter a letter, press the appropriate key a number of times in quick
succession. The number of times depends on the position of the letter on the
key (1st, 2nd, 3rd or 4th position).
Example
C
press 2 3 times
S
press 7 4 times
Ü
press 1 3 times
Blank press 0 once
Entering digits
You can also enter digits when entering the name.
Input procedure:
Press the appropriate digit keys 4 times or 5 times in quick succession
depending on the number of letters on the digit key.
Example
For "1", press "1" key 4 times
For "9", press "9" key 5 times
Note:
l Telephone book entries are automatically sorted alphabetically.
∗ " or "#" are placed ahead of entries starting
"Names" that begin with "∗
with "A".
l Once the language of the mobile unit is changed, the following special
characters can be entered by pressing certain keys several times:
ÀÂÇÉÈÊÎÏÓÔÑÚÙÛ.
32
Telephone book
Dialling a number from the telephone book
d
E R AS E
or
e.g. 6
c
Press the display key – the first names (alphabetic
order) of the telephone book are displayed, the name
in the first line is selected (dimmed).
Scroll to the required name
or
enter the initial letters, see page 32.
Press the talk key – the number is dialled.
Storing numbers from redial
You can store the 5 numbers saved in the redial memory in the mobile unit’s
telephone book under a given name.
z
DIA L NUM B E R
NA M E
S A V E E NTRY
Press the redial key.
If necessary scroll to the next number.
Confirm the supplementary function.
If necessary, supplement or correct the number.
Scroll to C O P Y NUMB E R and confirm with O K
Enter name.
Confirm supplementary function
Confirm O K option.
33
Telephone book
Deleting / Editing an entry
You can delete the saved entries (numbers and/or names).
Deleting an entry
d
W
Press the directory key.
Scroll to the required name or enter the initial letters.
For entering letters see page 32.
Confirm the supplementary function.
OK
DIA L NUM B E R
Delete entry
Scroll to Delete entry
Confirm O K option.
Entry has been deleted is displayed.
Editing an entry
e.g.
M ILLE R
Scroll to E D IT E NTR Y
OK
{
OK
M ILLE R
W
S A V E E NTRY
34
Delete the number with the display key and enter it
again.
Confirm the modified or "old" number – the name
flashes.
If necessary, change the names.
Confirm supplementary function
Confirm O K option.
Telephone book
Deleting the telephone book
You can also delete the entire telephone book in one go, e.g. if you are lending
the mobile unit to another user. This function is also protected by the mobile
unit PIN.
d
W
Press the directory key.
Confirm the supplementary function.
OK
DIA L NUM B E R
Scroll to DE LE TE DIRE CTO RY
and confirm.
DE LE TE DIRE CTO RY
OK
Confirm O K option
E NTE R P IN
Enter the mobile unit PIN and confirm.
OK
YE S
Display shows DE LE TE A LL E NTRIE S ?
All entries deleted.
Note:
The default PIN is “0000”
35
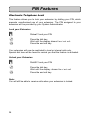
PIN Features
Electronic Telephone Lock
This feature allows you to lock your extension by dialling your PIN, which
prevents unauthorised use of your extension. The PIN assigned to your
extension will be provided by your System Administrator.
Lock your Extension
o
Dial ∗ 21 and your PIN
c
Press the talk key.
Wait until the display shows Carried out
Press the end call key.
a
Your extension will now be restricted to local or internal calls only.
Special dial tone will be heard to remind you that the feature is activated.
Unlock your Extension
o
Dial # 21 and your PIN
c
Press the talk key.
Wait until the display shows Carried out
Press the end call key.
a
Note:
You will still be able to receive calls when your extension is locked.
36
PIN Features
Mobile Class of Service
This feature allows you to activate your own Class of Service (barring level)
on any extension.
Activate Mobile Class of Service
o
Dial ∗ 25 and your PIN
c
Press the talk key.
Wait until the display shows Enter ID
Press the end call key.
a
Call will now register against your name on the Telephone Management
System
Cancel Mobile Class of Service
o
Dial # 25
c
Press the talk key.
Display shows Id deleted
Press the end call key.
a
Note:
Should you forget to cancel your PIN at the remote extension, contact
the extension and ask them to dial # 25. The PIN will however be
automatically cancelled if the extension is not used for a predetermined
time.
37
PIN Features
Saving/modifying the mobile unit PIN
The mobile unit PIN protects your mobile unit against misuse.
The mobile unit PIN is required for the following functions:
– saving/modifying the mobile unit PIN
– deleting the telephone book
Important:
l If you forget your mobile unit PIN, you will need a service technician to
access the device. Forgetting a PIN is just as serious as losing a key.
In this case, please consult your system administrator.
l Entry error is displayed if an incorrect mobile unit PIN is entered.
l Using the function key, these functions can be cancelled/terminated
before confirming save/delete.
l The functions "Lock/unlock mobile unit" and "Save/modify direct
number" do not apply to Hicom cordless E. The mobile unit can be
locked against unauthorised dialling by means of the "Change COS"
code function.
The default PIN is "0000".
This function allows you to save and modify your personal mobile unit PIN at
any time:
.
Press the Menu key.
Scroll to Settings and confirm.
OK
OK
OK
PIN, e.g.
0000
Scroll to Handset Settings and confirm.
Scroll to Change P IN and confirm.
Enter the current PIN and confirm.
The default PIN is "0000".
OK
Change P IN
Confirm Change PIN
OK
New PIN, e.g.
4321
Enter the "New" PIN (4-digit number) and confirm.
OK
Repeat new PIN:
S A V E E NTRY
38
Re-enter the "New" PIN carefully.
New PIN stored! is displayed briefly and beep tone.
Settings
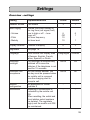
Overview - settings
Setting
Explanation/Notes
Levels
Default
Handset volume
Call volume
3
1
Tone ringing
– Pitch
– Melody
Volume, pitch and melody of
the ring tone (call signal, bell)
Low to high or off – tone
ringer off
Set tone frequency
Set tone level
6
Off
10
10
6
1
Display contrast
Contrast of display
6
3
Registrate
se e p a g e 1 8
-
-
Language
Local mobile unit display texts 6 languages
in German, English, French,
Italian, Spanish, or Dutch
On/Off
The backlight is automatically
switched off to save the
batteries if the telephone is not
used for 15 seconds.
On/Off
You can define whether the
line key must be pressed when
the mobile unit is removed
from the charging shell to
accept a call.
Not applicable to Hicom
cordless E
Resetting to initialisation is
protected by the mobile unit
PIN.
When resetting, the redial and
direct station select numbers
are deleted. The registrate
(login) and the mobile unit PIN
are maintained.
– Volume
Automatic
backlight
Automatic call
acceptance
Multicell
configuration
Initialisation
1
German
On
On
-
39
Settings
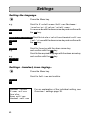
Setting the language
.
Press the Menu key.
e.g.
Scroll to Einstellungen/Settings/Rglages/
Impostazioni/Ajustes/Instellingen/
Programaco with the down arrow key and confirm with
the O K key.
E ins tellungen
OK
LOK A LE E INS TE LLUNG Scroll to Lokale einstellung/Handset settings
S prac he
OK
S prac he
e.g.
e.g.
Taal/Idioma with the down arrow key and confirm with
the O K key.
Scroll to Sprache with the down arrow key
and confirm with the O K key.
Scroll to the required language with the down arrow key
and confirm with the O K key.
E NG LIS H
OK
Settings - handset, tone ringing...
.
Press the Menu key.
Scroll to Settings and confirm.
S ettings
OK
Handset volume
Handset volume
Ringer options
Register
Base settings
Handset settings
40
For an explanation of the individual setting, see
Overview – settings page 39.
Settings
Example: setting the tone ringing volume
Scroll to Tone ringing and confirm.
NE XT
Tone ringing
OK
Tonering. volum e
OK
Confirm tone ringing volume – you hear tone at the
current setting (default: level 6), see display.
Symbol for tone ringing
Tonering, volume
NEXT
SAVE
Dark bars indicate the current setting
– level 3 in this case
Save current setting (save)
Change the setting
NE XT
Use the display key to set the required volume.
S AVE
Save the setting.
Note:
l You can cancel each new setting before saving it by pressing {.
You will then jump back to the higher-level display.
l The language setting only refers to the display texts stored in the
mobile unit. The system text language, e.g. when a call is in progress,
corresponds to the Hicom 300E system setting.
41
Settings
Setting the station
If your mobile unit is logged onto more than one station (systems ), you can
set it to a particular station or a "best station" (automatic station changeover).
Setting the station:
.
Press the menu key.
NE XT
OK
Scroll to Search Station and confirm – the current
setting is displayed in the top line, e.g. Station 1
(dimmed).
NE XT
If necessary, scroll to the required station and confirm.
S earc h s tation
e.g.
B es t s tation
OK
Activating/deactivating automatic searches:
If you have set the mobile unit permanently to a station, you can also activate/
deactivate Automatic Search.
If Automatic Search is activated (identified by a *, e.g. Station 1*), the
mobile unit searches for the default station for 30 seconds after switching it on
or leaving the radio range. If this station is not found, the mobile unit
automatically searches for another station.
Prerequisite:
You have selected a specific station as described above and confirmed with
O K . – The display shows:
Press O K to activate
Press NO to deactivate
42
Settings
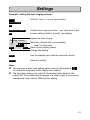
Tones - keys, battery, range...
.
Press the menu key.
NE XT
Scroll to Tones and confirm.
Key click
Batt.warningtone
Range tone
Ackowldgm. tone
Error tone
Synchr. tone
------------
Explanation of the individual tones, see Overview –
tones on page 44.
Example: activating/deactivating range tone
Scroll to Range tone and confirm.
NE XT
Range tones
OK
Type of tone
Symbol for "Tone deactivated"
Range tone
ON
ON
OFF
Confirm current settings
Display shows O N or O FF , depending on the current
setting
Press the appropriate display key.
or
O FF
S AVE
Save setting (store).
43
Settings
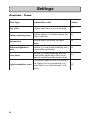
Overview - Tones
Tone type
Explanation, note
Key click
Audible each time a key is pressed
Battery w arning tone
Audible approx. 5 minutes before the
battery runs out
On
Range tone
Audible when you leave the radio
range
Off
Acknow ledgement
tone
Audible if a local function/setting was
successfully performed.
On
Audible if a function/setting was not
successfully performed. Also in the
case of errored/unauthorised entries.
The synchronisation tone is audible if
the mobile unit is reconnected to a
Synchronisation tone
base station (re-”synchronised” with
base).
Error tone
44
Default
On
On
Off
Appendix
Fault clearance
You should try to clear the fault yourself before resorting to your service
administrator
Fault
No display
Possible cause
Solution
Press the On/Off button.
Mobile unit not activated
Replace battery and/or
Battery flat
charge the battery
The display shows
Connection setup
when you press the line All cordless E lines are
key.
busy.
No dial tone; calling
cannot be setu up
Mobile unit outside the
Radio connection to the
the base station radio
base station cannot be
range; radio signals too
set up.
weak.
Search Station i s
Mobile unit not logged
flashing
on.
Station 1 is displayed,
for example, but no
outgoing or incoming
Mobile unit blocked.
calls are possible.
Activation/deactivation is
not possible.
Try to set up a
connection again later.
Move closer to the radio
range, change location.
Open and close the
battery compartment lid
(arrow). Then activate
the mobile unit with the
On/Off key.
45
Appendix
Add-ons
l Gigaset 2000H headset
l
Simply plug the headset into Gigaset 2000C using adapter provided.
Gigaset 2000L charging shell
For charging the mobile unit batteries and 2 spare batteries.
Further information available on request.
Please contact your nearest Siemens Sales office.
46
47
Siemens Telecommunications (Pty) Ltd. Private Bag X71 Halfway House 1685
48