1
Gigaset CL100 / HGK eng / A31008-A221-H100-1-7619 / cover_I.fm / 20.11.2003
s
Be inspired
Gigaset CL100 / HGK eng / A31008-A221-H100-1-7619 / cover_II.fm / 20.11.2003
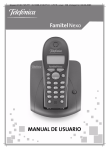
Brief overview
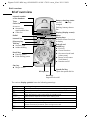
Brief overview
Internal number
of the handset
Time
Caller list
Access to
◆ Answering
machine/mail box
◆ Caller list
Redial
Battery charging status
U fully
charged
flashing: battery almost
flat
= flat
1
22-35
V
Þ Ü INT MENU
Display (display screen)
Menu
Display keys
Activate current functions
in display
Internal list
Directory key
Talk key
◆ Answer a call
◆ Initiate dialling
End call and
On/Off key
◆ End call
◆ Cancel function
◆ One menu level back
(short press)
◆ Return to idle state
(hold down)
◆ Handset on/off
Recall key
◆ Enquiry (flash)
◆ Enter dialling pause
Star key
◆ Ringer on/off
Microphone
Speed dial key
Open the speed dial list
Hash key
Keypad lock on/off
The various display symbols have the following meanings:
Display
Meaning when pressed
Last number redial opens a list of the last 5 numbers dialled (page 16).
[_______]
INT
[_______________]
MENU
Internal: Opens the list of internal phones.
Þ
Ü
t or s
u or v
ß
[_______]
OK
2
Mailbox symbol open caller list and network mailbox (page 16).
Menu: Activates the main menu when in standby mode.
Opens a status-dependent menu while making a call.
Scrolls up or down.
Moves cursor to the left or right.
Delete key: Delete input from right to left one character at a time.
Deletes character by character, from the right to the left.
Confirms menu function or confirms an input and store.
Gigaset CL100 / HGK eng / A31008-A221-H100-1-7619 / CL_100IVZ.fm / 20.11.2003
Contents
Contents
Brief overview . . . . . . . . . . . . . . . . . . . . . . . . . . . . . . . 2
Safety precautions . . . . . . . . . . . . . . . . . . . . . . . . . . . 5
Service making handset ready for service . . . . . . . 6
Installing the base . . . . . . . . . . . . . . . . . . . . . . . . . . . . . . . . . . . . . . . . . . . . . . . . . . . . .
Connecting the base station . . . . . . . . . . . . . . . . . . . . . . . . . . . . . . . . . . . . . . . . . . . . .
Making the handset ready for service . . . . . . . . . . . . . . . . . . . . . . . . . . . . . . . . . . . . . .
Registering the handset with the base station and charging the batteries . . . . . . . . .
Switching the handset on and off . . . . . . . . . . . . . . . . . . . . . . . . . . . . . . . . . . . . . . . . .
Activating/deactivating the keypad lock . . . . . . . . . . . . . . . . . . . . . . . . . . . . . . . . . . . .
6
6
7
8
8
8
Operating the telephone, menu guidance . . . . . . . 9
Display keys . . . . . . . . . . . . . . . . . . . . . . . . . . . . . . . . . . . . . . . . . . . . . . . . . . . . . . . . . . 9
Display in idle status . . . . . . . . . . . . . . . . . . . . . . . . . . . . . . . . . . . . . . . . . . . . . . . . . . . 9
Main menu . . . . . . . . . . . . . . . . . . . . . . . . . . . . . . . . . . . . . . . . . . . . . . . . . . . . . . . . . . 9
Date and Time . . . . . . . . . . . . . . . . . . . . . . . . . . . . . 10
Setting the date and the time . . . . . . . . . . . . . . . . . . . . . . . . . . . . . . . . . . . . . . . . . . . 10
Making calls . . . . . . . . . . . . . . . . . . . . . . . . . . . . . . 10
Making external calls and ending a call . . . . . . . . . . . . . . . . . . . . . . . . . . . . . . . . . . .
Answering a call . . . . . . . . . . . . . . . . . . . . . . . . . . . . . . . . . . . . . . . . . . . . . . . . . . . . .
Calling Line Identification . . . . . . . . . . . . . . . . . . . . . . . . . . . . . . . . . . . . . . . . . . . . . .
Muting the handset . . . . . . . . . . . . . . . . . . . . . . . . . . . . . . . . . . . . . . . . . . . . . . . . . . .
10
10
11
11
Network mailbox features . . . . . . . . . . . . . . . . . . . 11
Function that is set for the next call . . . . . . . . . . . . . . . . . . . . . . . . . . . . . . . . . . . . . .
Functions that are set for all subsequent calls . . . . . . . . . . . . . . . . . . . . . . . . . . . . . .
Functions during a call . . . . . . . . . . . . . . . . . . . . . . . . . . . . . . . . . . . . . . . . . . . . . . . .
Function that is set after the next call . . . . . . . . . . . . . . . . . . . . . . . . . . . . . . . . . . . . .
12
12
12
13
Using the network mailbox . . . . . . . . . . . . . . . . . . 13
Configuring the network mailbox for fast access . . . . . . . . . . . . . . . . . . . . . . . . . . . . 13
Viewing a message from the network mailbox . . . . . . . . . . . . . . . . . . . . . . . . . . . . . . 13
Using the directory and other lists . . . . . . . . . . . . 14
Directory and speed dial list . . . . . . . . . . . . . . . . . . . . . . . . . . . . . . . . . . . . . . . . . . . . 14
Last number redial list . . . . . . . . . . . . . . . . . . . . . . . . . . . . . . . . . . . . . . . . . . . . . . . . . 16
Caller list . . . . . . . . . . . . . . . . . . . . . . . . . . . . . . . . . . . . . . . . . . . . . . . . . . . . . . . . . . . 16
3
Gigaset CL100 / HGK eng / A31008-A221-H100-1-7619 / CL_100IVZ.fm / 20.11.2003
Contents
Registering and de-registering handsets . . . . . . . 17
Manual registration: Handset Gigaset CL 1 to Gigaset CL 100 . . . . . . . . . . . . . . . . . . 17
Registering other handsets . . . . . . . . . . . . . . . . . . . . . . . . . . . . . . . . . . . . . . . . . . . . . 17
De-registering handsets . . . . . . . . . . . . . . . . . . . . . . . . . . . . . . . . . . . . . . . . . . . . . . . . 17
Operating more than one handset . . . . . . . . . . . . 18
Internal calls, ending a call . . . . . . . . . . . . . . . . . . . . . . . . . . . . . . . . . . . . . . . . . . . . .
Forwarding a call to another handset . . . . . . . . . . . . . . . . . . . . . . . . . . . . . . . . . . . . .
Internal enquiry calls . . . . . . . . . . . . . . . . . . . . . . . . . . . . . . . . . . . . . . . . . . . . . . . . . .
Accepting/rejecting a waiting call during an internal call . . . . . . . . . . . . . . . . . . . . . .
Barging in on an external call . . . . . . . . . . . . . . . . . . . . . . . . . . . . . . . . . . . . . . . . . . .
Paging . . . . . . . . . . . . . . . . . . . . . . . . . . . . . . . . . . . . . . . . . . . . . . . . . . . . . . . . . . . . . .
18
18
18
18
18
19
Handset settings . . . . . . . . . . . . . . . . . . . . . . . . . . . 20
Changing display language . . . . . . . . . . . . . . . . . . . . . . . . . . . . . . . . . . . . . . . . . . . . .
Activating/deactivating Auto Answer . . . . . . . . . . . . . . . . . . . . . . . . . . . . . . . . . . . . .
Changing the volume and melody . . . . . . . . . . . . . . . . . . . . . . . . . . . . . . . . . . . . . . .
Activating/deactivating the ringer . . . . . . . . . . . . . . . . . . . . . . . . . . . . . . . . . . . . . . . .
Activating/deactivating the battery warning tone . . . . . . . . . . . . . . . . . . . . . . . . . . . .
Restoring the handset factory settings . . . . . . . . . . . . . . . . . . . . . . . . . . . . . . . . . . . .
20
20
20
20
20
21
Base station settings . . . . . . . . . . . . . . . . . . . . . . . . 21
Changing the system PIN . . . . . . . . . . . . . . . . . . . . . . . . . . . . . . . . . . . . . . . . . . . . . . . 21
Restoring base station to factory (default) settings . . . . . . . . . . . . . . . . . . . . . . . . . . 21
Appendix . . . . . . . . . . . . . . . . . . . . . . . . . . . . . . . . . 22
Questions and Answers . . . . . . . . . . . . . . . . . . . . . . . . . . . . . . . . . . . . . . . . . . . . . . . .
Care . . . . . . . . . . . . . . . . . . . . . . . . . . . . . . . . . . . . . . . . . . . . . . . . . . . . . . . . . . . . . . .
Contact with liquid . . . . . . . . . . . . . . . . . . . . . . . . . . . . . . . . . . . . . . . . . . . . . . . . . . . .
Operation with a PABX . . . . . . . . . . . . . . . . . . . . . . . . . . . . . . . . . . . . . . . . . . . . . . . . .
Other settings . . . . . . . . . . . . . . . . . . . . . . . . . . . . . . . . . . . . . . . . . . . . . . . . . . . . . . . .
Specifications . . . . . . . . . . . . . . . . . . . . . . . . . . . . . . . . . . . . . . . . . . . . . . . . . . . . . . . .
Service (Customer Care) . . . . . . . . . . . . . . . . . . . . . . . . . . . . . . . . . . . . . . . . . . . . . . .
22
23
23
23
24
25
27
Index . . . . . . . . . . . . . . . . . . . . . . . . . . . . . . . . . . . . . 29
4
Gigaset CL100 / HGK eng / A31008-A221-H100-1-7619 / starting.fm / 20.11.2003
Safety precautions
Safety precautions
$
!
Use only the power unit supplied, as indicated on the underside of the base
station.
Insert only approved rechargeable batteries of the same type (page 25)!
Never use ordinary (non-rechargeable) batteries as they may pose a health
hazard or cause injury.
‹
Œ
Make sure you insert rechargeable batteries the right way round and use the
battery type specified in this operating manual (as indicated in the handset
battery compartment).
The phone may affect medical equipment. Be aware of the technical
conditions within the particular environment (e.g. doctor's practice).
The handset may cause an intrusive "hum" in hearing aids. Do not hold the
handset against your ear while it is ringing (incoming call).
Do not install the phone in a bathroom or shower. The handset and base
station are not splash proof (page 23).
Do not operate the phone in places where there is a risk of explosion (such as
paint workshops).
ƒ
ƒ
If you give your Gigaset to someone else, make sure you also give them the
operating manual.
Dispose of the batteries and phone in accordance with environmental
regulations.
◆ Do not pollute the environment. Emergency numbers cannot be
i
dialled if the keypad lock (page 8) is activated!
◆ Not all of the functions described in these instructions are available in
all countries.
5
Gigaset CL100 / HGK eng / A31008-A221-H100-1-7619 / starting.fm / 20.11.2003
Service making handset ready for service
Service making handset ready for service
Installing the base
Hints on installing
The base is designed to be operated in enclosed, dry areas at temperatures ranging from
+5 °C to +45 °C. Install the base at a central location in your home, e.g., in the hall.
◆ Never expose the telephone to the following: heat sources, direct
W
sunlight or other electrical appliances.
◆ Protect your Gigaset from moisture, dust, corrosive liquids and
vapours.
Range
The range is dependent on the nature of the building and other local conditions.
Outdoors it is approx. 300 m. Indoors the range is up to 50 m.
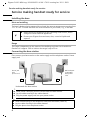
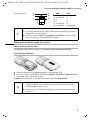
Connecting the base station
First connect your base station to the mains supply and the telephone socket. Power
supply unit
Phone jack
with
phone cord
Mains adapter
(110/220V)
with power
cord
2.
1.
Underneath the base station
1.
◆ Small power cable plug into the socket under the base station.
◆ Lay the cable correctly in the cable channel.
◆ Plug the power supply unit into your power outlet.
2.
◆ Small coloured plug on the telephone cable into the socket (clicks in).
◆ Lay the cable correctly in the cable channel.
◆ Plug the phone into the phone socket.
6
Gigaset CL100 / HGK eng / A31008-A221-H100-1-7619 / starting.fm / 20.11.2003
Service making handset ready for service
Pin assignment:
i
3
2
1
4
5
6
1
2
3
4
5
6
BRD
unassigned
unassigned
a
b
unassigned
unassigned
OES
unassigned
a2
a
b
b2
unassigned
◆ Use only the power supply unit supplied.
◆ If you buy another phone cable, ensure that it has the right connector
assignment for your country.
◆ Keep the power supply unit plugged in at all times to ensure your
phone is ready for use whenever you need it.
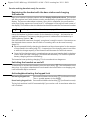
Making the handset ready for service
Remove the protective film
The display is protected by a plastic film. Please remove the protective film!
Inserting the batteries
◆ Insert the batteries the right way round – see illustration left.
◆ Place the cover on the battery compartment about 3 mm down from the latch and
push it up until it clicks into position.
To open the cover, press on the depression and push cover downwards.
◆ Insert only approved, rechargeable batteries of the same type
W
(page 25)! Never use normal batteries, since these could lead to a
health hazard or cause injury.
◆ Do not use a non-Siemens charging unit as this could damage the
batteries.
7
Gigaset CL100 / HGK eng / A31008-A221-H100-1-7619 / starting.fm / 20.11.2003
Service making handset ready for service
Registering the handset with the base station and charging
the batteries
Place your handset in the base station with the display visible at the front. The handset
will then register itself with the base station automatically, all symbols will flash in the
display. The process takes about a minute. Once this is completed, the confirmation
tone rings (rising sequence of tones) and "1" will appear in the top left-hand corner of
the display. This indicates that the handset has been allocated the first internal number.
i
◆ To register additional handsets, see page 17 onwards.
Leave the handset in the base station for the batteries to charge – the batteries are
supplied uncharged. The battery charging process is indicated on the handset by a
flashing battery symbol V.
Once the batteries have been charged, your phone is ready for service. You need to set
the date and time to ensure that the time of incoming calls can be noted correctly
(page 10).
◆ We recommend initially charging the batteries without interruption for the amount
of time listed in the table (page 25) – irrespective of the charging status icon! After
a while the charge capacity of the batteries will decrease for technical reasons.
◆ Once the first charging cycle is completed you can put your handset back in the base
station after each call. Charging is controlled electronically. This ensures optimum
battery charging without overloading.
The batteries heat up during charging. This is normal and not dangerous.
Switching the handset on and off
To deactivate or activate the handset, press the end call key a. The confirmation tone
then rings. If you place a handset that is activated in the base station or a charging unit,
it will automatically be activated.
Activating/deactivating the keypad lock
Press and hold down the hash key R (confirmation tone).
The Ø symbol appears in the display.
Deactivating keypad lock: Press and hold down the hash key R (confirmation tone).
The key lock switches itself off automatically if you receive a call. It reactivates when the
call is finished.
Activating keypad lock:
8
Gigaset CL100 / HGK eng / A31008-A221-H100-1-7619 / guidance.fm / 20.11.2003
Operating the telephone, menu guidance
Operating the telephone, menu guidance
Display keys
Display keys are the long keys directly below the display. Your handset has two display
keys. Each of these is operated as a rocker key, it can be pushed down on the left-hand
and the right-hand side. Depending on the current operating status and which side of
the key you press, you will call up a particular function. This function is shown directly
above the display key.
Þ
Ü
INT MENU
Display keys
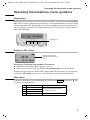
Display in idle status
1
Þ
22-35
V
Display in idle status
(date and time already
set)
Ü INT MENU
Reverting to idle status from anywhere in the menu
◆ Hold down call end key a for approx. 1 sec. or
◆ Press no key: After 60 secs. the display will automatically return to idle status.
Changes that you have not confirmed by pressing OK will be rejected. If you press the
call end key a briefly and just once, you will return to the previous menu level.
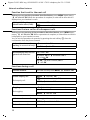
Main menu
To open the main menu, press the display key in idle status MENU and use the s key
to scroll to the desired entry.
1
2
3
4
5
SEL SERVICES
AUDIO SET
BASE SET
MAILBOX
REGISTER HS
The available
menu entries are dependent
on your base station.
9
Gigaset CL100 / HGK eng / A31008-A221-H100-1-7619 / telephony.fm / 20.11.2003
Date and Time
Date and Time
Setting the date and the time
Settings for date and time are needed to ensure that these are shown correctly for
incoming calls. You can choose between a 12-hour and 24-hour display (default
setting) to display the time.
Date
¢ BASE SET ¢ DATE/TIME ¢ DATE SET
¢ (enter day/month/year (example: Press keys 2 Q Q 5 Q I for
"20.05.2003") ¢ OK
MENU
Press a and hold (return to idle status).
Time
¢ BASE SET ¢ DATE/TIME ¢ CLOCK SET
¢ Enter hours/minutes (example: Press keys 1 O Q 5 for "19.05") ¢ OK
If the 12-hour display is set: ¢ Select a.m. or p.m. ¢ OK
MENU
Press a and hold (return to idle status).
set 12 or 24 hour display
MENU
¢ BASE SET ¢ DATE/TIME ¢ CLOCK MODE ¢ 12 H or select 24 H ¢ OK
Press a and hold (return to idle status).
Making calls
Making external calls and ending a call
External calls are calls using the public telephone network.
~ (enter the number), press c (talk key).
To end the call: Press a (end call key).
You can also first press the talk key c (you hear a dial tone) and then enter the phone
number. You can use the end call key a to cancel the dialling operation.
Answering a call
Your handset rings, and the call appears in the display.
Press the talk key c.
If the Auto Answer function is activated (page 20) you just need to lift the handset out
of the base station to take the call.
10
Gigaset CL100 / HGK eng / A31008-A221-H100-1-7619 / telephony.fm / 20.11.2003
Network mailbox features
Calling Line Identification
When you get a call, you will see the caller's number and/or name displayed on the
screen.
Preconditions:
1. You have requested that your network provider enable display of the caller's
number (CLIP) or name (CNIP) on your handset screen.
2. The caller has asked the network provider for his number to be identified (CLI).
i
You may have to pay a charge to use calling line identification. Please ask
your network provider for details.
CLIP/CLI: When you receive a call from a phone number for which you have stored an
entry in your handset directory (see page 14), the name in the directory will be shown
instead of the phone number, e. g. "Tom".
Screen display with CLIP/CLI
V
023031230
MENU
Phone
number or
name
Screen display with CNIP
V
Anna Lechner, Berlin
1234567890
MENU
Name and
town
Phone
number
If a phone number is not transferred, " << >>" will be displayed instead of the phone
number.
If the caller has not requested or has withdrawn phone number transfer, "WITHHELD"
will be shown instead of the phone number.
Muting the handset
Press INT. The call is "held" (wait melody).
To end the call: MENU ¢ GO BACK ¢ OK.
Network mailbox features
Network mailbox features are functions which your network provider offers. You can
only use these features if you have requested them from your network provider.
i
For more information on these functions, consult your network provider,
e.g. Deutsche Telekom (www.telekom.de). Your network provider will
assist you in questions about fees or any other problems that arise.
11
Gigaset CL100 / HGK eng / A31008-A221-H100-1-7619 / telephony.fm / 20.11.2003
Network mailbox features
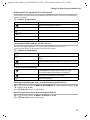
Function that is set for the next call
Before you carry out the procedure described below, press: MENU (open menu);
s SEL SERVICES OK. When the procedure is complete, a code will be sent which is
displayed on your handset's screen.
Withhold Calling Line
Identification once (CLIR):
WITHHOLD NO OK
~ (enter number) OK
Functions that are set for all subsequent calls
Before you carry out any of the procedures described below, press: MENU (open
menu); s SEL SERVICES OK. When a procedure is complete, a code will be sent which
is displayed on your handset's screen.
You can exit the procedure in question by pressing the end call key a after the
confirmation from the phone network.
Activate/deactivate call
s CALL WAITING OK
waiting (in external call only): ON OK or s OFF OK
Activate/deactivate and set
general call diversion:
CALL DIVERT OK
AUTOMATIC OK or sNO ANSWER OK or
s IF BUSY OK
ON OK; ~ (enter number) OK or
s OFF OK
Functions during a call
Initiate callback:
You hear the busy tone: MENU; s RINGBACK OK
Initiate enquiry call
MENU; s EXTN CALL OK
End enquiry call:
MENU; s END CALL OK
Toggling:
st (switching between two users)
End toggling:
MENU; s END CALL OK
Initiate conference call:
You toggle with two callers:
~ (enter number of user) OK
MENU; s CONFERENCE OK
End conference call:
12
Gigaset CL100 / HGK eng / A31008-A221-H100-1-7619 / telephony.fm / 20.11.2003
Using the network mailbox
With one caller:
MENU; s END CONF OK
s (switch to caller if necessary)
MENU; s END CALL OK
With both callers:
a
Accept waiting call:
MENU; ACCEPT OK
Reject call waiting:
MENU; sREJECT OK
Function that is set after the next call
Before you carry out the procedure, press: MENU; s SEL SERVICES OK.
Cancel callback:
s RINGBACK OFF OK
Using the network mailbox
The "T-NetBox" network mailbox is the answering machine in the network operated by
Deutsche Telekom ("T-Net").
You cannot use the network mailbox unless you have applied to Deutsche Telekom.
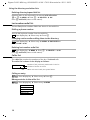
Configuring the network mailbox for fast access
You have the option of calling the network mailbox by pressing 1 (speed dial). To do
this, you must first enter the phone number of the network mailbox.
MENU ¢ MAILBOX ¢ SET KEY 1 ¢ Enter the phone number of the network mailbox
¢ OK
Press a and hold (return to idle status).
Calling the network mailbox
Press 1 and hold. This connects you directly to the network mailbox.
Viewing a message from the network mailbox
When a message arrives for you, you will receive a call from the network mailbox. If you
have requested Calling Line Identification, the display shows the number 0800 330
2424. If you accept the call, the new messages are played back. If you do not accept the
call, the number of the network- mailbox will be stored in the list of missed calls and the
letter symbol flashes (page 16).
13
Gigaset CL100 / HGK eng / A31008-A221-H100-1-7619 / Directories.fm / 20.11.2003
Using the directory and other lists
Using the directory and other lists
Directory and speed dial list
Both lists are used in the same way, except that the h key is pressed to open the
directory and the C key to open the speed dial list.
You can save up to 20 phone numbers and names in the directory h. This makes
dialling easier.
The speed dial list is a special directory in which you can store up to 10 particularly
important numbers, e.g. the prefixes of network providers ("call-by-call numbers").
Saving phone numbers in the directory/speed dial list
h or C ¢ MENU ¢ NEW ENTRY
[______]
OK
Enter and confirm phone number (directory
max. 22 digits, speed dial list max. 12 digits).
[______]
OK
Enter a name (up to 12 characters)
(text entry page 25) and confirm.
a
i
Long press (back to idle status).
If your phone is connected to a PABX that requires a prefix (e.g. "0") for an
outside line, then you must save this prefix number as the first digit in all
your directory entries.
Dialling with the directory
h
Open the directory.
Enter the first letter of the name. Example: with the
name Emma (first letter "E") press the I key twice.
The first name with "E" is displayed.
If there is more than one entry starting with "E",
select the name you want.
c
14
Press the talk key. The number is dialled.
Gigaset CL100 / HGK eng / A31008-A221-H100-1-7619 / Directories.fm / 20.11.2003
Using the directory and other lists
Dialling with the speed dial list (call-by-call)
This function can be used to put a network provider's prefix in front of the telephone
number ("linking").
C ¢ MENU ¢ EDIT ENTRY
either ...
Key in phone number:
Enter the telephone number.
or ...
Select a number from the directory:
h
Open the directory.
[__________] OK
[______]
Select phone number and confirm.
... then
c
Press the talk key. The number is dialled.
Saving speed dial numbers for fast access
You can save eight numbers (2-9) in the speed dial list for fast access.
First enter the digits for fast access, and then the names.
C ¢ MENU ¢ SHOW ENTRY
[___________]
OK
Confirm.
[___________]
u
Move the cursor to the first position in the name
field.
Enter speed dialling number, e.g. 2 (press 4 times)
[___________]
OK
Confirm.
In order to use speed dialling:
Hold down the speed dial number e.g. 2:
the saved speed dial number is displayed.
Enter phone number to be "linked".
c
Press the talk key.
Viewing and editing an entry in the directory/speed dial list
h or C ¢ Select entry ¢ MENU ¢ SHOW ENTRY ¢ Change phone number ¢ OK
¢ Change name ¢ OK
Press a and hold (return to idle status).
Delete single entry from directory/speed dial list
h or C ¢ Select entry ¢ MENU ¢ DELETE ? ¢ OK
Press a and hold (return to idle status).
15
Gigaset CL100 / HGK eng / A31008-A221-H100-1-7619 / Directories.fm / 20.11.2003
Using the directory and other lists
Deleting directory/speed dial list
Deletion refers to the selected list is selected with all entries.
h or C ¢ MENU ¢ Press L ¢ DELETE ? ¢ OK
Press a and hold (return to idle status).
Last number redial list
The last five phone numbers dialled are shown in the redial list.
Dialling a phone number
You can dial a phone number from the redial list.
Þ Press display key ¢ Select entry ¢ Press c
Changing entries and/or adding them to the directory
Þ Press display key ¢ Select entry ¢ MENU ¢ EDIT ENTRY or
COPY TO DIR
¢ OK
Deleting last number redial list
Þ Press display key ¢ MENU ¢ Press L
Press a and hold (return to idle status).
¢ DELETE ? ¢ OK
Caller list
The caller list contains the numbers of the last 10 missed calls.
The caller list is shown in the display as follows:
CALLS 02/08
Û
Number of old, previously read entries in the list
Number of entries in the list
When calls are missed, the symbol flashes
Calling an entry
Û /Û Press display key ¢ Select entry ¢ Press c
Manage entries in the caller list
Û /Û Press display key ¢ Select entry ¢ MENU
DELETE
COPY TO DIR
TIME
STATUS
DELETE LIST
16
Gigaset CL100 / HGK eng / A31008-A221-H100-1-7619 / registration.fm / 20.11.2003
Registering and de-registering handsets
Registering and de-registering handsets
You can register up to six handsets with your base station.
A Gigaset CL 1 handset that has not yet been registered with a base station is registered
automatically (see page 8). Handsets in the 1000 to 4000 Gigaset families, Gigaset
handsets A 2, C 1, C 2 and S 1, and handsets from other manufacturers must be
registered manually.
Manual registration: Handset Gigaset CL 1 to Gigaset CL 100
You must activate manual registration of the handset at both the handset and the base
station.
1. On the handset
¢ REGISTER HS ¢ OK ¢ Enter the system PIN for the base station
(default: 0000) ¢ OK
During the following registration process, all symbols will flash in the display.
MENU
2. On the base
Within 60 secs. after the system PIN is entered:
Press the registration/paging key on the front of the base station for
approx. 3 secs.
The registration process then starts.
When registration is successful, the handset is automatically assigned
the lowest unassigned number.
Registering other handsets
Handsets in the 1000 to 4000 Gigaset families, Gigaset handsets A 2, C 1, C 2 and S 1,
and other GAP capable handsets can be registered.
The base station is prepared as described above, please refer to the operating
instructions for the device to register the handsets.
De-registering handsets
You can de-register a different handset from any registered Gigaset CL 1 handset.
INT ¢ Select handset ¢ MENU ¢ DE-REG H/SET ¢ OK ¢ Enter system PIN for the
base station (default: 0000) ¢ OK ¢ DE-REGISTER? ¢ OK
The internal number disappears from the de-registered handset. Handsets that have not
been de-registered retain their internal numbers.
17
Gigaset CL100 / HGK eng / A31008-A221-H100-1-7619 / registration.fm / 20.11.2003
Operating more than one handset
Operating more than one handset
Internal calls, ending a call
Internal calls between handsets on the same base station are free of charge.
Calling a specific handset
INT ¢ Select handset ¢ Press talk c key or: INT 2 (example)
To end the call: Press the end call key a.
Calling all handsets (group call)
Press INT and P. To end the call: Press the end call key a.
Forwarding a call to another handset
INT ¢ Select handset ¢ Press talk key c
The internal user answers: Press end call key a.
Internal enquiry calls
You can make an internal call while an external call is in progress.
INT ¢ Select handset ¢ Press talk key c
To end the call: MENU ¢ GO BACK ¢ OK (back to the outside caller)
Accepting/rejecting a waiting call during an internal call
If you get an external call while conducting an internal call, you will hear the call
waiting tone (short tone).
To accept the call: MENU
¢
ACCEPT
(you speak to the outside caller).
To reject the call: MENU
¢
REJECT
¢ OK
¢ OK
(you speak to the internal caller).
The rejected call waiting tone can still be heard on other handsets.
Barging in on an external call
The BARGE IN function must be activated (default: deactivated).
An internal user conducts an external call. You can join this call uninvited and speak. The
barge-in is signalled to all participants in the call by a signal tone.
Activating/deactivating barge in
MENU
¢ BASE SET ¢ ADD FEATURES ¢ BARGE IN ¢ OK (‰ = On).
Press a and hold (return to idle status).
Barging in
LINE IN USE is shown on your handset display. Press the talk key c. All parties hear a
signal tone. Your handset display shows BARGE IN.
End barge in: Press end call key a (signal tone).
18
Gigaset CL100 / HGK eng / A31008-A221-H100-1-7619 / registration.fm / 20.11.2003
Operating more than one handset
Paging
Press the registration/paging key (page 17) on the front of the base station for no more
than 2 secs. All handsets will then ring at the same time ("Paging").
End paging: Press the registration/paging key again or talk key c on the handset.
If you press the registration/paging key for more than 2 seconds, the base station will
go into registration mode. The handsets will not ring.
19
Gigaset CL100 / HGK eng / A31008-A221-H100-1-7619 / settings_bs_hs.fm / 20.11.2003
Handset settings
Handset settings
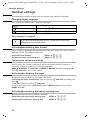
Your handset has default settings. You can change these settings individually.
Changing display language
You can view the display texts in different languages.
Press display key to open menu.
[_______________]
MENU
Using the keys O 2 call up the procedure.
Press keys Q 1 for German (default status).
Other languages: see page 25.
i
If you set the wrong language in error, use the above mentioned
procedure to set the correct one!
Activating/deactivating Auto Answer
For an incoming call simply take the handset off the base station; you do not need to
press the talk key c (default setting: On).
Deactivate Auto Answer:
MENU ¢ O 1 Q
Activate automatic call acceptance:
MENU ¢ O 1 1
Changing the volume and melody
You can adjust the handset volume to 3 levels, the ringer volume to 6 levels (6 is
increasing volume) and select from 10 ringer melodies.
MENU ¢ AUDIO SET ¢ H/SET VOL or RINGER or MELODY ¢ Select setting ¢ OK
Press a and hold (return to idle status).
Activating/deactivating the ringer
All handsets ring to indicate an incoming outside call.
Cancelling the ringer permanently: Press the star key P and hold, the display will
show Ú.
To activate: Press the star key P and hold.
To cancel the ringer for the current call, press the MENU display key and confirm
SILENT with OK.
Activating/deactivating the battery warning tone
Warning tone for low battery (default: activated).
Deactivating the low battery warning tone:
MENU ¢ O 4 Q
Activating the low battery warning tone:
MENU ¢ O 4 1
20
Gigaset CL100 / HGK eng / A31008-A221-H100-1-7619 / settings_bs_hs.fm / 20.11.2003
Base station settings
Restoring the handset factory settings
You can restore individual settings and changes to the original factory (default) settings
(for an overview of the handset default settings see page 24). Entries in the directory,
the caller list, the last number redial list, and the speed dial list as well as registration of
the handset with the base are retained.
MENU
¢ O I ¢ RESET ? ¢ OK
Press a and hold (return to idle status).
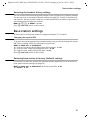
Base station settings
All base station settings are made via a registered Gigaset CL 1 handset.
Changing the system PIN
To protect the system settings from unauthorised access you should change the system
PIN (factory setting: 0000) to a PIN that only you know.
MENU
¢
¢
¢
¢ BASE SET ¢ SYSTEM PIN
Enter the currently valid 4-digit system PIN and press
Enter the new 4-digit system PIN and press ¢ OK.
Enter the new 4-digit system PIN again ¢ OK.
Press a and hold (return to idle status).
¢ OK.
Restoring base station to factory (default) settings
A reset does not alter the system PIN; handsets remain registered (for an overview of
base station default settings see page 24).
MENU ¢ BASE SET ¢ BASE RESET ¢ Enter system PIN ¢ OK
¢
RESET ?
¢ OK
21
Gigaset CL100 / HGK eng / A31008-A221-H100-1-7619 / appendix.fm / 20.11.2003
Appendix
Appendix
Questions and Answers
If you have questions on the use of your telephone, you can contact us round the clock
at
www.my-siemens.com/customercare. You will also find the most frequently asked
questions and answers below.
What happens if …
Possible cause
… the display is blank?
The handset is not switched
on.
The batteries are flat.
… the handset fails to respond The keypad lock is activated.
to a key press?
… all the icons are flashing in
the display and there is no
connection with the base
station?
Possible solution
Press the end call key a for
approx. 5 secs.
Charge or replace the batteries
(page 8).
Press the hash key
R for approx. 2 seconds to
deactivate the lock (page 8).
Move the handset nearer to the
base.
The handset is outside the
range of the base.
The handset is not registered.
Register the handset
The base is not switched on.
The cable has not been placed (page 17).
correctly in the bottom of the
base station.
Check the power connector at
the base (page 6).
Check cable placement
(page 6)
… (where multiple handsets
Charging in the base station
Use additional charger unit.
are in use) the handset in the only takes place when a phone
base station is not charging?
call is not being made at the
same time.
… the handset does not ring? The ringer is switched off.
Activate the ringer (page 20).
The ringer volume has been
Increase ringer volume
set to "0".
(page 20).
Call divert has been set to
Deactivate call divert
AUTOMATIC.
(page 12).
… the caller can't hear me?
You've pressed the INT key. As Activate the microphone again
a result the handset has been with MENU, BACK, OK
"muted".
(page 11).
… the incoming call number is Sending the phone number
The caller should request the
not displayed even though CLIP (CLI) has not been enabled.
network operator to enable the
is set?
transfer of his or her phone
number.
... … entries in the caller list
Date and time have not been
Set date and time (page 10)
don't show time or date?
set.
… I can't hear the ringer or
You have changed the phone When purchasing a new cord
dialling tone?
cable on your Gigaset.
ensure that it has the correct
pin connections (page 26).
… I can hear an error tone
The function has not worked or Repeat the process; watch the
(descending tone sequence)
the entry is incorrect.
display when doing so and if
when keying in?
necessary check the operating
manual.
22
Gigaset CL100 / HGK eng / A31008-A221-H100-1-7619 / appendix.fm / 20.11.2003
Appendix
Care
Wipe the base station and handset with a damp cloth or with an antistatic wipe. Never
use a dry cloth. This can cause static.
Contact with liquid !
If the handset should come into contact with liquid, on no account switch the device
on. Remove all batteries immediately.
Allow the liquid to drain out of the device, and then pat all parts of the device dry.
Keep the handset with the batteries removed in a warm, dry place for at least 72 hours.
In many cases, you will then be able to use it again.
Operation with a PABX
The following settings are only necessary if your PABX requires them, please refer to
the operating instructions for your PABX.
Changing the dialling procedure
You can set the dialling mode to tone dialling (DTMF) or pulse dialling (IWV).
MENU ¢ BASE SET ¢ ADD FEATURES ¢ DIAL MODE ¢ Select dialling mode ¢ OK
Press a and hold (return to idle status).
Temporary switch to tone dialling (DTMF):
If your PABX works with pulse dialling but you need tone dialling for a call (e.g. to listen
to an external mail box), you must switch to pulse dialling during the call.
MENU
¢ TEMP TONE
Setting the flash time
MENU
¢ BASE SET ¢ ADD FEATURES ¢ TBR ¢ Select flash time (80 ms, 100 ms,
120 ms, 180 ms, 250 ms, 300 ms or 600 ms)¢ OK
Press a and hold (return to idle status).
Changing pause after line seizure
Setting the length of the pause between pressing the talk key c and sending the
phone number (1 = 1 sec.; 2 = 3 secs.; 3 = 7 secs.; 4 = 2.5 secs., factory setting: 3 secs.).
MENU ¢ N O 1 L ¢ Display symbol: 916 SET, the number for the current
pause length flashes ¢ enter a new number ¢ OK
Changing pause after recall key (dialling pause)
Setting the length of the dialling pause (1 = 800 ms; 2 = 1600 ms; 3 = 3200 ms, see
operating instructions for the PABX).
MENU ¢ N O 1 2 ¢ Display symbol: 912 SET, the number for the current
pause length flashes¢enter a new number ¢ OK
i
To insert a dialling pause press the S key for 2 seconds after you have
entered the prefix. A "P" appears in the display. Then enter the phone
number.
23
Gigaset CL100 / HGK eng / A31008-A221-H100-1-7619 / appendix.fm / 20.11.2003
Appendix
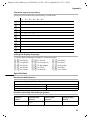
Other settings
Factory settings of the handset
Loudspeaker volume
Ringer volume
Ringer melody
Directory
Last number redial list
Caller list
Speed dial list
Auto answer
Battery warning tone
Display language
Default settings
Status after
reset
Description
1
5
1
empty
empty
empty
empty
activated
activated
country specific
1
5
1
unaffected
unaffected
unaffected
unaffected
activated
activated
country specific
page 20
page 20
page 20
page 14
page 16
page 16
page 14
page 20
page 20
page 20, page 25
Factory settings of base station
System PIN
Barge in
Pause after R key
Pause after line seizure
Dialling mode
Fast access
1
24
Default settings
Status after
reset
Description
0000
deactivated
800 ms
3s
MFV
Network mailbox
without phone
number
unaffected
deactivated
800 ms
3s
MFV
Network mailbox
without phone
number
page 21
page 18
page 23
page 23
page 23
page 13
Gigaset CL100 / HGK eng / A31008-A221-H100-1-7619 / appendix.fm / 20.11.2003
Appendix
Character map and text entry
Either press the relevant key several times, or hold down.
1
2
I
4
5
L
M
N
O
Q
P
1x
2x 3x 4x 5x 6x
Space
1
A
B
C
2
D
E
F
3
G
H
I
4
J
K
L
5
M
N
O
6
P
Q
R
S
T
U
V
8
W
X
Y
Z
9
+
0
-
|
?
*
/
(
)
,
7
_
Setting the display language.
To set the display language see page 20. Other languages:
Q 2 for English,
Q 5 for Spanish,
Q N for Danish,
1 1 for Finnish,
1 4 for Turkish,
Q I for French,
Q L for Portuguese,
Q O for Norwegian,
1 2 for Czech,
1 5 for Russian,
Q 4 for Italian,
Q M for Dutch,
1 Q for Swedish,
1 I for Polish,
1 L for Croatian.
Specifications
Recommended batteries
Nickel-metal-hydride (NiMH) – Type AAA
Sanyo Twicell 700 (700 mAh)
Sanyo Twicell 650 (650 mAh)
Panasonic 700 mAh "for Dect" (700 mAh)
GP 700 mAh (700 mAh)
Varta Phone Power AAA (700 mAh)
YDT AAA SUPER 700 (700 mAh)
Handset operating times/charging times
Capacity
(mAh)
Standby time
(hours)
Calling time
(hours)
Charging time
(hours)
700
up to 200 (approx. 8
days)
approx. 16
approx. 5
25
Gigaset CL100 / HGK eng / A31008-A221-H100-1-7619 / appendix.fm / 20.11.2003
Appendix
Power consumption
◆ In standby mode (without charging) approx. 1.9 watts.
◆ In standby mode while charging approx. 4.6 watts.
◆ During a call approx. 2.1 watts.
General technical data
Feature
Value
DECT standard
GAP standard
No. of channels
Radio frequency range
Duplex method
Channel grid
Bit rate
Modulation
Language code
Transmission power
Range
Power supply
Environmental conditions for operation
is supported
is supported
60 duplex channels
1880 – 1900 MHz
Time multiplex, 10 ms frame length
1728 kHz
1152 kbit/s
GFSK
32 kbit/s
10 mW, average power per channel
up to 300 m outdoors, up to 50 m indoors
Base station 220/230 V ~/50 Hz
+5 °C to +45 °C;
20% to 75% relative humidity
DTMF (tone dialling)/DP (dial pulsing)
250 ms
115 x 102 x 105 mm (W x L x H)
55 x 152 x 30 mm (W × L × H)
Base station 138 g; handset with batteries 117 g
Dialling mode
Flash time
Dimensions/Base station
Dimensions/Handset
Weight
26
Gigaset CL100 / HGK eng / A31008-A221-H100-1-7619 / appendix.fm / 20.11.2003
Appendix
Service (Customer Care)
You can get assistance easily when you have technical questions or questions about
how to use your device by using our online support service on the Internet at:
www.my-siemens.com/customercare
or by referring to the section entitled Questions and answers in this manual (page 22).
If the device needs to be repaired, please contact one of our Customer Care Centers:
Abu Dhabi. . . . . . . . . . . . . . . 0 26 42 38 00
Argentina . . . . . . . . . . . . 0 80 08 88 98 78
Australia . . . . . . . . . . . . . . . 18 00 62 24 14
Austria . . . . . . . . . . . . . . . . 05 17 07 50 04
Bahrain . . . . . . . . . . . . . . . . . . . . . 40 42 34
Bangladesh . . . . . . . . . . . . . . 0 17 52 74 47
Belgium . . . . . . . . . . . . . . . . 0 78 15 22 21
Bosnia Herzegovina . . . . . . . 0 33 27 66 49
Brazil . . . . . . . . . . . . . . . . 0 80 07 07 12 48
Brunei . . . . . . . . . . . . . . . . . . . 02 43 08 01
Bulgaria. . . . . . . . . . . . . . . . . . 02 73 94 88
Cambodia . . . . . . . . . . . . . . . . 12 80 05 00
Canada . . . . . . . . . . . . . . 1 88 87 77 02 11
China . . . . . . . . . . . . . . . 0 21 50 31 81 49
Croatia . . . . . . . . . . . . . . . . . 0 16 10 53 81
Czech Republic . . . . . . . . . . 02 33 03 27 27
Denmark . . . . . . . . . . . . . . . . . 35 25 86 00
Dubai . . . . . . . . . . . . . . . . . . 0 43 96 64 33
Egypt. . . . . . . . . . . . . . . . . . . 0 23 33 41 11
Estonia . . . . . . . . . . . . . . . . . . 06 30 47 97
Finland . . . . . . . . . . . . . . . . 09 22 94 37 00
France. . . . . . . . . . . . . . . . . 01 56 38 42 00
Germany . . . . . . . . . . . . . . .01805 333 222
Greece . . . . . . . . . . . . . . 0 80 11 11 11 16
Hong Kong . . . . . . . . . . . . . . . 28 61 11 18
Hungary . . . . . . . . . . . . . . . 06 14 71 24 44
Iceland . . . . . . . . . . . . . . . . . . . 5 11 30 00
India . . . . . . . . . . . . . . 01 13 73 85 89 - 98
Indonesia . . . . . . . . . . . . 0 21 46 82 60 81
Ireland . . . . . . . . . . . . . . . . 18 50 77 72 77
Italy. . . . . . . . . . . . . . . . . . . 02 66 76 44 00
Ivory Coast . . . . . . . . . . . . . . . 80 00 03 33
Jordan . . . . . . . . . . . . . . . . . . 0 64 39 86 42
Kenya . . . . . . . . . . . . . . . . . . . . 2 72 37 17
Kuwait . . . . . . . . . . . . . . . . . . . 2 45 41 78
Latvia . . . . . . . . . . . . . . . . . . . . 7 50 11 14
Lebanon . . . . . . . . . . . . . . . . . 01 44 30 43
Libya . . . . . . . . . . . . . . . . . . 02 13 50 28 82
Lithuania. . . . . . . . . . . . . . . . 8 22 74 20 10
Luxembourg . . . . . . . . . . . . . 43 84 33 99
Macedonia. . . . . . . . . . . . . . . . 02 13 14 84
Malaysia. . . . . . . . . . . . . . . 03 21 63 11 18
Malta . . . . . . . . . . . . 00 35 32 14 94 06 32
Mauritius . . . . . . . . . . . . . . . . . . 2 11 62 13
Mexico . . . . . . . . . . . . . .01 80 07 11 00 03
Morocco . . . . . . . . . . . . . . . . . 22 66 92 09
Netherlands . . . . . . . . . . . . 0900-3333102
New Zealand . . . . . . . . . . . 08 00 27 43 63
Norway . . . . . . . . . . . . . . . . . . 22 70 84 00
Oman. . . . . . . . . . . . . . . . . . . . . . 79 10 12
Pakistan . . . . . . . . . . . . . . . 02 15 66 22 00
Philippines . . . . . . . . . . . . . . 0 27 57 11 18
Poland . . . . . . . . . . . . . . . . 08 01 30 00 30
Portugal . . . . . . . . . . . . . . . . 8 00 85 32 04
Qatar . . . . . . . . . . . . . . . . . . . . 04 32 20 10
Romania . . . . . . . . . . . . . . 02 12 04 60 00
Russia. . . . . . . . . . . . . . . . (800) 200 10 10
Saudi Arabia . . . . . . . . . . . . 0 22 26 00 43
Serbia. . . . . . . . . . . . . . . . . 01 13 22 84 85
Singapore . . . . . . . . . . . . . . . . 62 27 11 18
Slovak Republic . . . . . . . . . 02 59 68 22 66
Slovenia . . . . . . . . . . . . . . . . 0 14 74 63 36
South Africa. . . . . . . . . . . . 08 60 10 11 57
Spain . . . . . . . . . . . . . . . . . . 9 02 11 50 61
Sweden . . . . . . . . . . . . . . . . 0 87 50 99 11
Switzerland . . . . . . . . . . . . 08 48 21 20 00
Taiwan . . . . . . . . . . . . . . . . 02 25 18 65 04
Thailand. . . . . . . . . . . . . . . . 0 22 68 11 18
Tunisia . . . . . . . . . . . . . . . . . 0 71 86 19 02
Turkey . . . . . . . . . . . . . . . 0 21 65 79 71 00
Ukraine . . . . . . . . . . . . . . 8 80 05 01 00 00
United Arab Emirates . . . . . 0 43 31 95 78
United Kingdom . . . . . . . 0 87 05 33 44 11
USA . . . . . . . . . . . . . . . . . 1 88 87 77 02 11
Vietnam . . . . . . . . . . . . . . . . . . 45 63 22 44
Replacement or repair services are not offered in countries where our product is not sold
by authorised dealers.
27
Gigaset CL100 / HGK eng / A31008-A221-H100-1-7619 / appendix.fm / 20.11.2003
Appendix
Your Gigaset is intended for operation in your country, as shown on the underside of
the base station. Country-specific features have been taken into account.
The CE mark certifies conformity of the device with the essential requirements of the
R&TTE directive.
Excerpt from the original declaration
"We, Siemens AG, declare that the above mentioned product is manufactured according to our Full
Quality Assurance System certified by CETECOM ICT Services GmbH in compliance with ANNEX V
of the R&TTE Directive 99/05/EC. The presumption of conformity with the essential requirements
regarding Council Directive 99/5/EC is ensured"
Senior Approvals Manager
The Declaration of Conformity (DoC) has been signed. In case of need, a copy of the original DoC
can be made available via the company hotline.
28
Gigaset CL100 / HGK eng / A31008-A221-H100-1-7619 / CL_100SIX.fm / 20.11.2003
Index
Index
A
Access protection . . . . . . . . . . . . . . . 21
Answering machine see
Network mailbox . . . . . . 13
Auto answer . . . . . . . . . . . . . . . . . . . 20
B
Base
preparing to use . . . . . . . . . . . . . . . 6
restoring factory settings . . . . . . . . 21
Batteries
charging . . . . . . . . . . . . . . . . . . . . . 8
inserting . . . . . . . . . . . . . . . . . . . . . 7
recommended . . . . . . . . . . . . . . . . 25
Battery warning tone . . . . . . . . . . . . 20
C
Call
ending . . . . . . . . . . . . . . . . . . . . . 10
transfer . . . . . . . . . . . . . . . . . . . . . 18
Call diversion . . . . . . . . . . . . . . . . . . 12
Callback . . . . . . . . . . . . . . . . . . . 12, 13
Call-by-Call . . . . . . . . . . . . . . . . . . . . 15
Caller list . . . . . . . . . . . . . . . . . . . 2, 16
Calling . . . . . . . . . . . . . . . . . . . . . . . 10
Care of the telephone . . . . . . . . . . . . 23
Changing the display language . . . . . 20
Character map . . . . . . . . . . . . . . . . . 25
Charging status display . . . . . . . . . . . . 8
Conference call . . . . . . . . . . . . . . . . . 12
Confirmation tone. . . . . . . . . . . . . . . . 8
Connect . . . . . . . . . . . . . . . . . . . . . . 18
Customer Care (Service) . . . . . . . . . . 27
Customer service . . . . . . . . . . . . . . . 27
D
Date and time . . . . . . . . . . . . . . . . . . 10
Date setting . . . . . . . . . . . . . . . . . . . 10
Default settings . . . . . . . . . . . . . 21, 24
Delete
directory . . . . . . . . . . . . . . . . . . . . 16
last number redial list. . . . . . . . . . . 16
speed dial list. . . . . . . . . . . . . . . . . 16
Dialling
with directory . . . . . . . . . . . . . . . . 14
with the speed dial list . . . . . . . . . . 15
Dialling mode . . . . . . . . . . . . . . . . . . 23
Dialling pause . . . . . . . . . . . . . . . . . . 23
Directory . . . . . . . . . . . . . . . . . . . . . . 14
delete single entry/all entries. . . . . . 16
saving phone number/entry . . . . . . 14
view and change entry . . . . . . . . . . 15
Display
changing display language . . . . . . . 20
in idle status . . . . . . . . . . . . . . . . . . . 9
E
Enquiry call (external) . . . . . . . . . . . . 12
Enquiry call (internal) . . . . . . . . . . . . . 18
Entry (directory)
clear . . . . . . . . . . . . . . . . . . . . . . . 15
display and edit . . . . . . . . . . . . . . . 15
displaying and editing . . . . . . . . . . . 15
F
Fast access
(network mail box) . . . . . . . . . . . . . 13
speed dial number . . . . . . . . . . . . . 15
Features . . . . . . . . . . . . . . . . . . . . . . 11
Flash time . . . . . . . . . . . . . . . . . . . . . 23
G
Group call . . . . . . . . . . . . . . . . . . . . . 18
H
Handset
activate/deactivate . . . . . . . . . . . . . . 8
de-registering . . . . . . . . . . . . . . . . . 17
locating . . . . . . . . . . . . . . . . . . . . . 19
muting . . . . . . . . . . . . . . . . . . . . . . 11
operating and charging times . . . . . 25
preparing to use . . . . . . . . . . . . . . . . 7
reset . . . . . . . . . . . . . . . . . . . . . . . 21
Handset access protection . . . . . . . . . 21
Handset charging times . . . . . . . . . . . 25
Hearing aids . . . . . . . . . . . . . . . . . . . . 5
I
Idle status (display) . . . . . . . . . . . . . . . 9
Internal
29
Gigaset CL100 / HGK eng / A31008-A221-H100-1-7619 / CL_100SIX.fm / 20.11.2003
Index
link up . . . . . . . . . . . . . . . . . . . . . . 18
telephone number . . . . . . . . . . . . . . 2
Internal consultation calls . . . . . . . . . 18
Internal dialling . . . . . . . . . . . . . . . . . 18
IWV (impulse dialling procedure) . . . . 23
K
Keys . . . . . . . . . . . . . . . . . . . . . . . . . 10
display keys . . . . . . . . . . . . . . . . . . . 9
lock . . . . . . . . . . . . . . . . . . . . . . . . . 8
of the handset . . . . . . . . . . . . . . . . . 9
L
Last number redial . . . . . . . . . . . . . . 16
Logging off handsets . . . . . . . . . . . . . 17
M
Mains adapter . . . . . . . . . . . . . . . . . 5, 6
Making calls . . . . . . . . . . . . . . . . . . . 18
answering a call . . . . . . . . . . . . . . . 11
external . . . . . . . . . . . . . . . . . . . . . 10
Menu . . . . . . . . . . . . . . . . . . . . . . . . . 9
symbol . . . . . . . . . . . . . . . . . . . . . . 2
Microphone . . . . . . . . . . . . . . . . . . . . 2
N
Network mailbox . . . . . . . . . . . . . . . . 13
Network mailbox features . . . . . . . . . 11
Number see Telephone number . . . . . 14
P
PABX. . . . . . . . . . . . . . . . . . . . . . . . . 23
setting dialling procedure . . . . . . . . 23
Paging . . . . . . . . . . . . . . . . . . . . . . . 19
Pause
after R key . . . . . . . . . . . . . . . . . . . 23
changing after obtaining line . . . . . 23
Phone cord . . . . . . . . . . . . . . . . . . . . . 6
Phone jack . . . . . . . . . . . . . . . . . . . . . 6
Power cord . . . . . . . . . . . . . . . . . . . . . 6
Q
Questions and answers . . . . . . . . . . . 22
R
Range . . . . . . . . . . . . . . . . . . . . . . . . . 6
Registration of handsets . . . . . . . . . . 17
Ringer
30
activate/deactivate . . . . . . . . . . . . . 20
S
Safety precautions . . . . . . . . . . . . . . . . 5
Service . . . . . . . . . . . . . . . . . . . . . . . 27
Set time by . . . . . . . . . . . . . . . . . . . . 10
Specifications. . . . . . . . . . . . . . . . . . . 25
Speed dial list. . . . . . . . . . . . . . . . . . . 14
System PIN. . . . . . . . . . . . . . . . . . . . . 21
T
Telephone number
copying from the caller list . . . . . . . 16
displaying caller’s (CLIP) . . . . . . . . . 11
enter number of network mailbox . . 13
saving . . . . . . . . . . . . . . . . . . . . . . 14
withhold display (CLIR) . . . . . . . . . . 12
Text entry . . . . . . . . . . . . . . . . . . . . . 25
Toggling . . . . . . . . . . . . . . . . . . . . . . 12
W
Wait melody. . . . . . . . . . . . . . . . . . . . 11
Gigaset CL100 / HGK eng / A31008-A221-H100-1-7619 / cover_IV.fm / 20.11.2003
A3 1 0 0 8 - A2 2 1 - H1 0 0 - 1 - 7 6 1 9
Issued by
Information and Communication Mobile
Schlavenhorst 88
D-46395 Bocholt
© Siemens AG 2003
All rights reserved. Subject to availability.
Right of modification reserved.
Printed in Germany .
Siemens Aktiengesellschaft
http://www.my-siemens.com
Order No.: A31008-A221-H100-1-7619