1
s
Issued by
Siemens Home and Office Communication Devices GmbH & Co. KG
Schlavenhorst 66
D-46395 Bocholt
2007
© Siemens Home and Office Communication Devices GmbH & Co. KG 2006
All rights reserved. Subject to availability.
Rights of modification reserved.
Gigaset C450 IP
www.siemens.com/gigaset
cyan magenta yellow black
Liebreich Medienproduktion
Gigaset C450 IP / Greek eng / A31008-M1713-T151-3-8U19 / overview.fm / 24.9.07
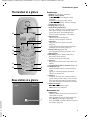
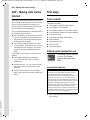
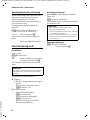
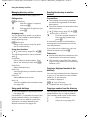
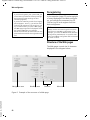
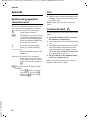
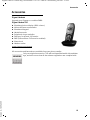
The handset at a glance
The handset at a glance
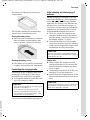
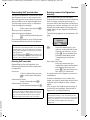
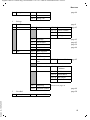
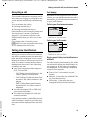
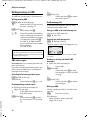
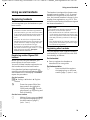
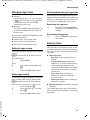
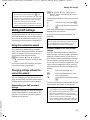
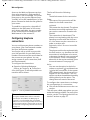
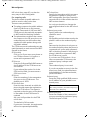
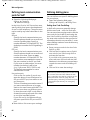
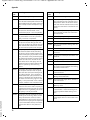
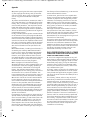
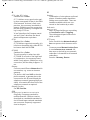
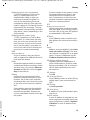
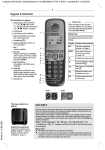
Handset keys
1
15
¨
11.03.06
§§§§§§INT§§§§§
V
11:56
§§§§Menu§
2
3
4
14
5
13
6
12
11
7
10
8
9
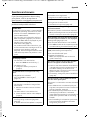
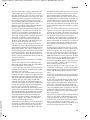
Base station at a glance
1 Display in idle status (example)
2 Battery charge status
e V U (1/3 charged to fully
charged)
= flashes: battery nearly empty
e V U flashes: battery charging
3 Control key (page 21)
4 Display keys (page 22)
5 End call key, On/Off key
End call, cancel function, go back one menu
level (press briefly), back to idle status
(press and hold), activate/deactivate
handset (press and hold in idle status)
6 Message key
Opens calls and message lists
Flashes: new message or new call
7 Hash key
Keypad lock on/off (press and hold,
page 21)
Toggle between upper/lower case letters
and digits for text entry (page 77)
8 Alarm clock key (page 44)
Activating/deactivating the alarm clock
9 Microphone
10 Recall key (not for VoIP connections)
Enter flash (press briefly)
Insert a pause (press and hold)
11 Star key
Ringer tones on/off (press and hold in idle
status)
12 Connection socket for headset (page 13)
13 Handsfree key
Switch between earpiece and handsfree
mode
Lights up: handsfree talking activated
Flashes: incoming call
14 Talk key
Accept a call, open last number redial list
(press briefly in idle status), select connection type and start dialling (press briefly/
press and hold after entering the number)
15 Signal strength
¦ § ¨ (low to high)
¥ flashes: no reception
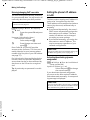
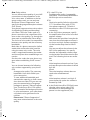
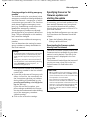
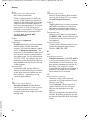
Base station key
Version 4, 16.09.2005
1
1 Paging key
Lights up: LAN connection active (phone is
connected to router)
Flashes: Data transfer to LAN connection
Press briefly: start paging (page 40)
Press and hold: set base station to registration mode (page 39)
1
Gigaset C450 IP / Greek eng / A31008-M1713-T151-3-8U19 / C450IP_laenderIVZ.fm / 12.3.07
Contents
Contents
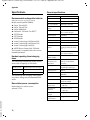
Network services – VoIP . . . . . . 27
The handset at a glance . . . . . . . . 1
Network services –
fixed network . . . . . . . . . . . . . . . 27
Settings for all calls . . . . . . . . . . . . . . . 27
Base station at a glance . . . . . . . . 1
Safety precautions . . . . . . . . . . . . 4
Making settings for all calls . . . . . . . . 27
Functions during a call . . . . . . . . . . . . 28
Gigaset C450 IP –
more than just making calls . . . . . 5
Using the directory and lists . . 29
VoIP – Making calls via the
Internet . . . . . . . . . . . . . . . . . . . . . 6
First steps . . . . . . . . . . . . . . . . . . . . 6
Pack contents . . . . . . . . . . . . . . . . . . . . 6
Setting up the handset for use . . . . . . . 6
Installing the base station . . . . . . . . . . 8
Connecting the base station . . . . . . . . 8
Making settings for VoIP telephony . . 10
Belt clip and headset . . . . . . . . . . . . . 13
Menu trees . . . . . . . . . . . . . . . . . . 14
Phone menu . . . . . . . . . . . . . . . . . . . . 14
Web configurator menu . . . . . . . . . . . 17
Making calls with VoIP and
the fixed network . . . . . . . . . . . . 18
Making an external call . . . . . . . . . . .
Ending a call . . . . . . . . . . . . . . . . . . . .
Accepting a call . . . . . . . . . . . . . . . . .
Calling Line Identification . . . . . . . . .
Handsfree talking . . . . . . . . . . . . . . . .
Muting the handset . . . . . . . . . . . . . .
Dialling the emergency number . . . .
18
18
19
19
20
21
21
Operating the handset . . . . . . . . 21
Switching the handset on/off . . . . . .
Activating/deactivating the
keypad lock . . . . . . . . . . . . . . . . . . . . .
Control key . . . . . . . . . . . . . . . . . . . .
Display keys . . . . . . . . . . . . . . . . . . . .
Returning to idle status . . . . . . . . . . .
Menu guidance . . . . . . . . . . . . . . . . .
Correcting incorrect entries . . . . . . . .
21
21
21
22
22
22
23
Version 4, 16.09.2005
VoIP telephony via the
Gigaset.net . . . . . . . . . . . . . . . . . 24
Search subscribers in
Gigaset.net directory . . . . . . . . . . . . . 24
Calling a Gigaset.net subscriber . . . . . 26
2
Directory . . . . . . . . . . . . . . . . . . . . . . . 29
Last number redial list . . . . . . . . . . . . 31
Opening lists with the
message key . . . . . . . . . . . . . . . . . . . . 31
Making cost-effective calls . . . . 32
Displaying the call duration . . . . . . . . 32
SMS (text messages) . . . . . . . . . 33
Registering for SMS using the
registration wizard . . . . . . . . . . . . . . .
Writing/sending an SMS . . . . . . . . . . .
Receiving an SMS . . . . . . . . . . . . . . . .
Setting SMS centre . . . . . . . . . . . . . . .
SMS on a PABX . . . . . . . . . . . . . . . . . .
Activating/deactivating the SMS
function . . . . . . . . . . . . . . . . . . . . . . . .
SMS troubleshooting . . . . . . . . . . . . .
33
34
35
36
36
36
37
Using the network mailbox . . . 38
Configuring the network mailbox
for fast access . . . . . . . . . . . . . . . . . . . 38
Viewing the network mailbox
message . . . . . . . . . . . . . . . . . . . . . . . 38
Using several handsets . . . . . . . 39
Registering handsets . . . . . . . . . . . . . .
De-registering handsets . . . . . . . . . . .
Changing a handset's internal
number . . . . . . . . . . . . . . . . . . . . . . . .
Changing the name of a handset . . . .
Locating a handset ("Paging") . . . . . . .
Making internal calls . . . . . . . . . . . . . .
39
40
40
40
40
41
Handset settings . . . . . . . . . . . . 42
Change display language . . . . . . . . . .
Setting the display . . . . . . . . . . . . . . .
Activating/deactivating auto-answer .
Adjusting the loudspeaker volume . . .
Changing ringer tones . . . . . . . . . . . .
Advisory tones . . . . . . . . . . . . . . . . . .
42
42
42
42
43
43
Gigaset C450 IP / Greek eng / A31008-M1713-T151-3-8U19 / C450IP_laenderIVZ.fm / 12.3.07
Contents
Using the handset as an
alarm clock . . . . . . . . . . . . . . . . . . . . . 44
Restoring the handset default
settings . . . . . . . . . . . . . . . . . . . . . . . . 44
Base station settings . . . . . . . . . . 45
Restoring the base station to
factory settings . . . . . . . . . . . . . . . . . .
Activating/deactivating repeater
mode . . . . . . . . . . . . . . . . . . . . . . . . .
Set default connection . . . . . . . . . . . .
Updating the base station firmware .
45
45
46
46
Making VoIP settings . . . . . . . . . 47
Using the connection wizard . . . . . . .
Changing settings without the
connection wizard . . . . . . . . . . . . . . .
Setting the phone's IP address
in LAN . . . . . . . . . . . . . . . . . . . . . . . . .
Activating/deactivating display
of VoIP status codes . . . . . . . . . . . . . .
Check the base station MAC
address . . . . . . . . . . . . . . . . . . . . . . . .
47
47
48
49
49
Operating the base station
on the PABX . . . . . . . . . . . . . . . . . 50
Changing the dialling mode . . . . . . . .
Setting the flash time . . . . . . . . . . . . .
Setting pauses . . . . . . . . . . . . . . . . . .
Switching temporarily to tone
dialling (DTMF) . . . . . . . . . . . . . . . . . .
64
64
65
66
66
67
Appendix . . . . . . . . . . . . . . . . . . 68
Symbols and typographical
conventions used . . . . . . . . . . . . . . . .
Care . . . . . . . . . . . . . . . . . . . . . . . . . . .
Contact with liquid . . . . . . . . . . . . . . .
Questions and answers . . . . . . . . . . . .
Voice quality and infrastructure . . . . .
Searching for service information . . .
Service (Customer Care) . . . . . . . . . . .
Authorisation . . . . . . . . . . . . . . . . . . .
Guarantee Certificate . . . . . . . . . . . . .
Specifications . . . . . . . . . . . . . . . . . . .
Writing and editing a text message . .
Gigaset C450 IP – Free software . . . . .
68
68
68
69
73
73
74
74
75
76
77
78
Accessories . . . . . . . . . . . . . . . . . 85
50
Glossary . . . . . . . . . . . . . . . . . . . 86
Web configurator . . . . . . . . . . . . 51
Index . . . . . . . . . . . . . . . . . . . . . . 96
Configuring the phone via your PC . .
Connecting your PC to the
Web configurator . . . . . . . . . . . . . . . .
Registering, setting the Web
configurator language . . . . . . . . . . . .
De-registering . . . . . . . . . . . . . . . . . . .
Structure of the Web pages . . . . . . . .
Opening Web pages . . . . . . . . . . . . . .
Setting phone with
Web configurator . . . . . . . . . . . . . . . .
IP Configuration . . . . . . . . . . . . . . . . .
Configuring telephone connections .
Setting DTMF signalling for VoIP . . . .
Version 4, 16.09.2005
50
50
50
Defining local communication
ports for VoIP . . . . . . . . . . . . . . . . . . .
Defining dialling plans . . . . . . . . . . . .
Specifying the server for
firmware updates and
starting the update . . . . . . . . . . . . . . .
Activating/deactivating the
automatic version check . . . . . . . . . . .
Activating VoIP status message
display . . . . . . . . . . . . . . . . . . . . . . . . .
Checking status information via
your phone . . . . . . . . . . . . . . . . . . . . .
51
51
51
52
52
54
54
54
56
63
3
Gigaset C450 IP / Greek eng / A31008-M1713-T151-3-8U19 / security.fm / 24.9.07
Safety precautions
Safety precautions
Caution:
Read the safety precautions and the user guide before use.
Explain their contents to your children, and the potential hazards associated with using the telephone.
$
Only use the mains adapter supplied, as indicated on the underside of the base station.
Fit only the recommended rechargeable batteries (page 76) of the same type! This
means: do not use any other battery type or non-rechargeable batteries as this could
result in significant health risks and personal injury.
‹
Œ
Insert rechargeable batteries with the correct polarity, and use them according to this user
guide (polarity symbols can be seen in the handset's battery compartment, page 6).
The operation of medical appliances may be affected. Be aware of the technical conditions
in your particular environment, e.g. doctor's surgery.
Do not hold the rear side of the handset to the ear when it rings or when you have activated on the handsfree function. Otherwise you risk serious and permanent damage to
your hearing.
The handset may cause an unpleasant humming noise in hearing aids.
Do not install the base station in bathrooms or shower rooms. The handset and base
station are not splashproof (page 68).
Do not use your phone in environments with a potential explosion hazard (e.g. paint
shops).
ƒ
If you give your Gigaset to someone else, make sure you also give them the user guide.
Version 4, 16.09.2005
All electrical and electronic products should be disposed of separately from the municipal
waste stream via designated collection facilities appointed by the government or the local
authorities.
This crossed-out wheeled bin symbol on the product means the product is covered by the
European Directive 2002/96/EC.
The correct disposal and separate collection of your old appliance will help prevent
potential negative consequences for the environment and human health. It is a
precondition for reuse and recycling of used electrical and electronic equipment.
For more detailed information about disposal of your old appliance, please contact your
city office, waste disposal service or the shop where you purchased the product.
Please note:
When the keypad lock is active you cannot even call emergency numbers!
Not all of the functions described in this user guide are available in all countries.
4
Gigaset C450 IP / Greek eng / A31008-M1713-T151-3-8U19 / starting.fm / 24.9.07
Gigaset C450 IP – more than just making calls
Gigaset C450 IP –
more than just making calls
Version 4, 16.09.2005
Your phone lets you make calls both via
the fixed network and (cost effectively) via
the Internet (VoIP) without using a PC.
And your phone can do much more
besides:
u Press a button each time you make a
call to indicate whether you want to
make a call via the fixed network or via
the Internet (page 18).
u Register up to six handsets on your
base station. Your base station allows
you to use one handset to make a call
via the fixed network and another to
make a call via the Internet at the same
time.
u Use the Gigaset.net for VoIP calls. Connect your phone to the power supply
and the Internet, and enjoy free phone
calls on the Gigaset.net – no need to
make any other settings (page 24).
u Configure the phone connection for
VoIP without a PC. Your phone's connection wizard downloads general data
about your VoIP provider from the
Internet and guides you through entering your personal data (account). This
makes it easy for you to start using VoIP
(page 10).
u If necessary, establish any further
VoIP settings on a PC. The phone has a
Web interface (Web configurator) that
can be accessed via your PC's Web
browser (page 51).
u Assign your own password (system
PIN) to protect your device and the Web
configurator from unauthorised access
(page 45).
u Send and receive SMS messages via the
fixed network (page 33).
u Save 100 phone numbers on your
handset (page 29).
u You can programme the keys of your
phone with important phone numbers.
The phone number is then dialled by
simply pressing the respective key
(page 30).
u Keep your hands free when making a
call. Use the handsfree function on
your handset (page 20) or use the convenient headset to make calls (accessory: not included in the scope of delivery).
u Make sure your phone is always up-todate. Keep yourself informed about
firmware updates on the Internet and
load them onto your phone (page 46).
u Use your handset as an alarm clock
(page 44).
Your Gigaset C450 IP has a protected operating
system that offers increased security against
viruses from the Internet.
Have fun using your new telephone!
5
Gigaset C450 IP / Greek eng / A31008-M1713-T151-3-8U19 / starting.fm / 24.9.07
VoIP – Making calls via the Internet
VoIP – Making calls via the
Internet
With VoIP (Voice over Internet Protocol),
your calls are not made via a fixed connection as in the telephone network, but
rather they are transmitted via the Internet in the form of data packets.
You can take advantage of all the benefits
of VoIP with your phone:
u You can make cost-effective calls with
high voice quality with subscribers on
the Internet, the fixed network or the
mobile phone network.
u Your SIP provider will give you a personal number, with which you can be
reached from the Internet, the fixed
network and any mobile phone network.
To be able to use VoIP, you need the following:
u A broadband Internet connection
(e.g. DSL) with flat rate or volumebased price.
u Internet access, i.e. you need a router
that will connect your phone to the
Internet.
u Access to the services of a VoIP provider. Open an account with a VoIP provider.
First steps
Pack contents
The pack contains:
u one Gigaset C450 IP base station
u one Gigaset C45 handset
u one mains adapter for the base station
u one charging cradle incl. mains adapter
u one phone cord
u one Ethernet cable (LAN cable)
u two batteries
u one battery cover
u one belt clip
u one quick guide
Setting up the handset for use
The display is protected with
a plastic film. Please
remove the protective
film!
Inserting the batteries
Caution:
Use only the rechargeable batteries recommended by Siemens Home and Office
Communication Devices GmbH & Co. KG on
page 76! This means: on no account may
conventional (non-rechargeable) batteries or
other battery types be used, otherwise serious
damage to health and property cannot be
ruled out, e.g. the outer casing of the batteries
could be destroyed or the batteries could
explode. The phone could also malfunction or
be damaged as a result of using batteries that
are not of the recommended type.
¤ Insert the batteries the right way round
Version 4, 16.09.2005
(see figure).
6
Gigaset C450 IP / Greek eng / A31008-M1713-T151-3-8U19 / starting.fm / 24.9.07
First steps
The polarity is indicated in the battery
compartment.
Initial charging and discharging of
batteries
The handset switches on automatically.
You will hear a confirmation tone.
Battery charging is indicated in the top
right of the display by a flashing battery
icon e, V or U. During handset
operation, the battery icon indicates the
charge status of the batteries (page 1).
The correct charge status can only be displayed when the batteries are first fully
charged and discharged through use.
¤ To do this, leave the handset in the
charging cradle without interruption
until the battery icon stops flashing in
the display (approx. 13 hours).
¤ Once the batteries are fully charged,
remove the handset from the charging
cradle and do not put it back again until
the batteries are fully discharged.
Closing the battery cover
¤ Place the cover on the battery compartment as shown in the diagram, then
push it up until it clicks into position.
Please note:
After the first battery charge and discharge,
you may replace your handset in the charging
cradle after every call.
Opening the battery cover
¤ Press down on the battery cover below
its upper end and slide the cover down.
Connecting the charging cradle
Connecting up the charging cradle and
mounting it on the wall (if required) is
described at the end of this user guide.
¤ To charge the batteries, leave the handset in the charging cradle.
Please note:
– Only place the handset in the charging cradle that is intended for it.
– If the handset has switched itself off
because the batteries are flat and if it is
then placed in the charging cradle, it will
switch itself on automatically.
Please note:
u Always repeat the charging and dis-
charging procedure if you remove the
batteries from the handset and insert
them in again.
u The batteries may warm up as they are
charging. This is not dangerous.
u After a while the charge capacity of the
batteries will decrease for technical reasons.
Please note:
You will find explanations for the symbols and
typographical conventions used in this user
guide in the appendix, page 68.
Version 4, 16.09.2005
For questions and problems see page 69.
7
Gigaset C450 IP / Greek eng / A31008-M1713-T151-3-8U19 / starting.fm / 24.9.07
First steps
Setting the date and time
Installing the base station
§Menu§
The base station is designed for use in
closed, dry rooms with a temperature
range of +5 °C to +45 °C.
¤ Place or hang the base station in a central position in your flat or house.
~
¢ Settings ¢ Date/Time
Enter the day, month and year
with 6 digits and press §OK§. Use
q to move between the fields.
~
Enter hours and minutes with
4 digits (e.g. 0 7 1 5 for 07.15
hrs) and press §OK§. Use q to
move between the fields.
The date and time are shown in the handset's idle display page 1.
Registering the handset to the base
station
Your handset is registered to the base station by default.
Instructions on how to register further
handsets to the base station are given on
page 39.
Please note:
u Never expose the telephone to heat
sources, direct sunlight, other electrical
appliances.
u Protect your Gigaset from moisture,
dust, corrosive liquids and vapours.
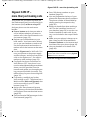
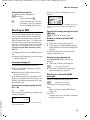
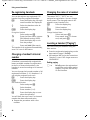
Connecting the base station
In order to be able to make calls with your
phone via the fixed network and via VoIP,
you must connect the base station to
the fixed network and the Internet, see
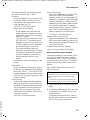
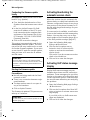
Figure 1.
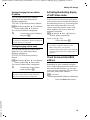
Internet
4
LAN
1
1
3
2
Fixed network
Version 4, 16.09.2005
Figure 1 Connecting the phone to the fixed network and the Internet
1 Internet connection:
Router with integrated modem or
router and modem
2 Gigaset C450 IP base station
3 Gigaset C45 handset
4 PC in LAN
8
Gigaset C450 IP / Greek eng / A31008-M1713-T151-3-8U19 / starting.fm / 24.9.07
First steps
Follow the steps in the order given below:
1. Connect the base station with the
phone connection
2. Connect the base station with the
mains power supply
3. Connect the base station with the
router
Connecting the base station with the
fixed network and the mains power
supply
You can now use your phone to make calls
via the fixed network and can be reached
at your fixed network number!
Connecting the base station with the
router
For Internet access you need a router,
connected to the Internet via a modem
(if necessary, this can be integrated in the
router).
¤ Please first connect the phone jack
and then the mains adapter, as shown
below.
3
1
3
3
1
2
2
1 Side view of the base station
2 Network plug (LAN) with network cable
3 Router network plug
As soon as the cable connecting the
phone and router is plugged in, the paging
key lights up on the front of the base
station.
1 Phone jack with phone cord
2 Underside of the base station
3 Mains adapter 230 V
Please note:
u Keep the mains adapter plugged in at
all times for operation, as the phone
does not work without mains connection.
u If you buy a replacement phone cord
from a retailer, ensure that the phone
jack is connected correctly.
You are now able to establish VoIP
connections within the Gigaset.net
(page 24).
Correct phone jack assignment
Version 4, 16.09.2005
3
2
1
4
5
6
1
2
3
4
5
6
unused
unused
a
b
unused
unused
9
Gigaset C450 IP / Greek eng / A31008-M1713-T151-3-8U19 / starting.fm / 24.9.07
First steps
Making settings for VoIP
telephony
Before you can use the Internet (VoIP) to
phone any other users on the Internet, the
fixed network or the mobile phone network, you need the services of a VoIP provider who supports the VoIP SIP standard.
Precondition: You have registered with a
VoIP provider (e.g.via your PC) and set up
an account. The provider must support
the VoIP SIP standard.
The following phone settings are necessary in order for you to use VoIP. You will
receive all information from your VoIP provider.
u Your user name with the VoIP provider,
if this is required by the VoIP provider
u Your registration name
u Your password with the VoIP provider
u VoIP provider general settings
The connection wizard will help you with
the settings.
Starting the connection wizard
Version 4, 16.09.2005
Precondition: The base station is connected to the mains power supply and a
router. Your router is connected to the
Internet.
Tip: If VoIP (IP) is activated as the default
connection for your phone (default setting see page 46), the phone will attempt
to make a direct connection to the server
belonging to your VoIP provider after the
connection assistant is closed. If incorrect/
incomplete information means that the
connection cannot be established, messages will be displayed (page 12).
10
Please note:
Your phone is preconfigured for dynamic
assignment of the IP address. In order for your
router to "recognise" the phone, dynamic IP
address assignment must also be activated on
the router, i.e. the router's DHCP server is activated. Turn to page 48 to find out how to
assign your phone a static IP address if necessary.
If the handset battery is sufficiently
charged, the message key f on the handset will flash (around 20 minutes after you
have put the handset in the charging cradle).
¤ Press the message key f.
You will see the following display:
Start VoIP
Connection
Assistant?
§§§§No§§§§
§§§§§Yes§§§§
Press the display key to start
the connection assistant.
~
Enter the system PIN of the
base station (the default is
0000) and press §OK§.
If you press §No§, the procedure that follows is described under "Entering
names in the Gigaset.net directory" on
page 11.
§Yes§
Please note:
The connection wizard will also start automatically if you try to establish a connection via
the Internet, before you have made the necessary settings.
You can also call up the connection wizard at
any time via the menu (page 47).
Gigaset C450 IP / Greek eng / A31008-M1713-T151-3-8U19 / starting.fm / 24.9.07
First steps
Downloading VoIP provider data
The phone establishes a connection with
the Siemens server on the Internet. Profiles with general access data for various
VoIP providers can be downloaded here.
The message Select country is displayed.
After changing the display:
q
Select country and press §OK§.
Select provider is displayed.
After changing the display:
q
Select VoIP provider and press
§OK§.
The necessary data for your VoIP provider
is downloaded and saved on the phone.
Entering names in the Gigaset.net
directory
With Gigaset.net you can call other
Gigaset.net users directly over the Internet
free of charge, without setting up an
account with a VoIP provider and without
making any further settings. You can find
Gigaset.net subscribers by carrying out a
name search in the Gigaset.net directory
(page 24).
The following appears in the handset's display:
Start
Gigaset.net
assistant?
§§§§No§§§§
Please note:
If the data for your VoIP provider is not offered
for download, you must make the necessary
settings with the Web configurator at a later
stage (page 57).
Press the display key §Back§. You can then conduct the following steps with the connection
assistant (see "Entering VoIP user data").
Entering VoIP user data
Depending on the VoIP provider, the
following information will be requested
in sequence:
Username:
If this is required by your provider, enter name and press
§OK§.
Authentication Name:
Enter name and press §OK§.
Authentication Password:
Enter password and press §OK§.
Please note:
Version 4, 16.09.2005
Please note when making these entries that
the VoIP user data is case sensitive. If necessary, press and hold the # key to switch
between upper and lower case and digits
§§§§§Yes§§§§
Press the display key if you
want to enter yourself in the
Gigaset.net directory. If you
press §No§, the procedure that
follows is described under
"Completing the VoIP settings".
Own Gigaset.net name:
Enter the name that you
would like to be listed under in
the Gigaset directory and
press §OK§. The name may contain up to 25 characters.
A connection to the Gigaset.net server is
established.
If there is already an entry under this
name, you receive a message to this effect
and you will be asked to enter a name
again.
If an entry in the Gigaset.net directory is
successful, the message "Name added to
Gigaset.net!" is displayed briefly.
§Yes§
If the attempt to create the entry fails (e.g.
because the phone is not connected to the
Internet), a message to this effect is displayed
briefly, see page 12. You can then create the
entry later via the Gigaset.net directory
(page 24).
11
Gigaset C450 IP / Greek eng / A31008-M1713-T151-3-8U19 / starting.fm / 24.9.07
First steps
Completing the VoIP settings
Once all the necessary entries have been
made, the handset reverts to idle status.
If all the settings are correct and if the
phone can establish a connection to the
VoIP server, then the internal name of the
handset will be displayed:
¨
V
INT 1
11:56
11.07.06
§§§§§§INT§§§§§
§§§§Menu§
You can now use your phone to make calls
via the fixed network and the Internet!
Callers can reach you on your fixed
network number and your VoIP number!
Please note:
To ensure that you can always be reached via
the Internet, the router should be permanently
connected to the Internet.
Version 4, 16.09.2005
No connection to the Internet/VoIP server
If one of the following messages is displayed instead of the internal name after
the connection assistant is closed, then
either a fault has occurred or your information was incomplete:
Server not accessible!
The phone has no connection to the Internet.
¤ Check the cable connection between
the base station and the router (the
LED on the base station must light up)
and the connection between the router
and the modem/Internet connection.
¤ Check whether the phone is connected
to the LAN.
– It may not have been possible to
dynamically assign an IP address to
the phone
or
– You have assigned a static IP address
to the phone that has either already
been assigned to another LAN sub-
12
scriber or does not belong to the
router's address block.
¤ Find the IP address using the handset menu:
§Menu§ ¢ Settings ¢ Base
¢ Local Network ¢ (enter system
PIN) ¢ IP Address
¤ Start the Web configurator with the
IP address (page 51).
¤ If no connection can be established:
change the settings on the router
(activate DHCP server) or the
phone's (static) IP address.
SIP registration failed!
u Your personal data for registering with
the VoIP provider may have been
entered incompletely or incorrectly.
¤ Check your entries for Username,
Authentication Name and Authentication Password. In particular, check
your use of upper and lower case.
To do this, open the following menu
on your handset:
§Menu§ ¢ Settings ¢ Base
¢ Telephony ¢ VoIP
u The server address for the VoIP server
has not yet been entered, or has been
entered incorrectly.
¤ Start the Web configurator.
¤ Open Settings ¢ Telephony
¢ VoIP Web page.
¤ Edit the server address where necessary.
Please note:
If port forwarding is activated on your router
for the ports that have been registered as the
SIP port (Standard 5060) and the RTP port
(Standard 5004), then it makes sense to switch
off DHCP and assign the phone a static IP
address (otherwise you may not be able to
hear the other party during VoIP calls), see
page 48.
Please note that the IP address and subnet
mask depend on the router's address block.
You must also enter the default gateway and
DNS server via the Web configurator
(page 54). The IP address for the router is generally entered here.
Gigaset C450 IP / Greek eng / A31008-M1713-T151-3-8U19 / starting.fm / 24.9.07
First steps
You will find other messages and possible
measures in the Questions and answers
section on page 69.
Belt clip and headset
By using a belt clip and headset (optional)
you can easily make your handset a constant companion both inside the building
and in its immediate vicinity.
Attaching the belt clip
There are notches for attaching the belt
clip on the side of the handset at approximately the same height as the display.
¤ Press the belt clip onto the back of the
handset so that the protrusions on the
belt clip engage with the notches.
The tongue of the belt clip must face the
battery compartment.
Connection socket for headset
Version 4, 16.09.2005
You can use headsets with jack connectors. The following models have been
tested and are therefore recommended:
HAMA Plantronics M40, MX100 and
MX150.
The transmission quality of other models
cannot be guaranteed.
13
Gigaset C450 IP / Greek eng / A31008-M1713-T151-3-8U19 / menuetree.fm / 24.9.07
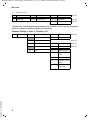
Menu trees
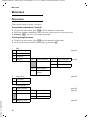
Menu trees
Phone menu
There are two ways to select a function:
Using number combinations ("shortcut")
¤ To open the main menu, press §Menu§ with the handset in idle status.
¤ Enter the number combination that is in front of the function in the menu tree.
¤ Example: §Menu§ 4 2 2 for "Set handset language".
Scrolling through the menus
¤ To open the main menu, press §Menu§ with the handset in idle status.
¤ Scroll to the function with the control key s and press §OK§.
1
SMS
1-1 Write Message
page 34
1-2 Incoming 00+00
1-3 Outgoing
1-6 Settings
1-6-1 Service Centres
1-6-1-1 Service Centre 1 page 36
…
[to]
1-6-1-4 Service Centre 4
1-6-2 Status Report
1-6-3 Register to Service
Centres
2
page 44
Alarm Clock
2-1 Activation
2-2 Wake up time
3
Audio Settings
3-1 Ringer Volume
3-2 Ringer Melody
page 43
3-2-1 External Calls
page 43
3-2-2 Internal Calls
Version 4, 16.09.2005
3-2-3 Alarm Clock
3-3 Advisory Tones
14
page 44
Gigaset C450 IP / Greek eng / A31008-M1713-T151-3-8U19 / menuetree.fm / 24.9.07
Menu trees
3-4 Battery Low
3-4-1 Off
page 44
3-4-2 On
3-4-3 During Call
4
Settings
4-1 Date/Time
4-2 Handset
page 8
4-2-1 Display
4-2-1-1 Screensaver
page 42
4-2-1-2 Colour Scheme
4-2-1-3 Contrast
4-2-1-4 Backlight
4-3 Base
4-2-2 Language
page 42
4-2-3 Auto Answer
page 42
4-2-4 Register Handset
page 39
4-2-5 Reset Handset
page 44
4-3-2 Music on hold
4-3-3 System PIN
4-3-4 Base Reset
4-3-5 Additional Features
4-3-5-1 Repeater Mode
4-3-6 Local Network
4-3-6-1 dynamic
IP address
page 45
4-3-6-2 IP Address
4-3-6-3 Subnet Mask
4-3-6-4 DNS Server
4-3-6-5 Default Gateway
4-3-7 Telephony
4-3-8 Firmware Update
5
Version 4, 16.09.2005
page 46
page 38
Voice Mail
5-1 Set Key 1
Submenu see page 16
5-1-1 Network Mailbox
15
Gigaset C450 IP / Greek eng / A31008-M1713-T151-3-8U19 / menuetree.fm / 24.9.07
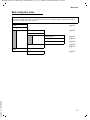
Menu trees
6
Select Services *
6-1 VoIP
6-1-6 For All Calls
6-1-6-1 Call Divert
page 27
6-2 Fixed line
6-2-6 For All Calls
6-2-6-1 Call Divert
page 27
6-2-6-3 Call Waiting
page 28
* Please note: Following a firmware update, the network services are only displayed
if you de-register and then reregister your handset.
Submenu "Settings ¢ Base ¢ Telephony" 4-3-7
4-3-7 Telephony
4-3-7-1 Default Line Type
4-3-7-1-1 IP
page 46
4-3-7-1-2 fixed line
4-3-7-2 Connection Assistant
4-3-7-6 Fixed line
4-3-7-7 VoIP
page 47
4-3-7-6-1 Dialling Mode
page 50
4-3-7-6-2 Recall
page 50
4-3-7-7-1 Status on HS
4-3-7-7-2 Select VoIP Provider
4-3-7-7-3 Username
4-3-7-7-4 Authentication
Name
Version 4, 16.09.2005
4-3-7-7-5 Authentication
Password
16
Gigaset C450 IP / Greek eng / A31008-M1713-T151-3-8U19 / menuetree.fm / 24.9.07
Menu trees
Web configurator menu
Please note:
For Gigaset C450IP base stations manufactured before June 2006, "VoIP" is displayed instead of
"Connections" after a firmware update.
page 51
Home
Settings
IP Configuration
page 54
Telephony
Connections
page 57
Dialing Plans
page 64
Advanced Settings
page 63
Miscellaneous
page 65,
page 66
Device
page 67
Version 4, 16.09.2005
Status
17
Gigaset C450 IP / Greek eng / A31008-M1713-T151-3-8U19 / telephony.fm / 24.9.07
Making calls with VoIP and the fixed network
Making calls with VoIP and
the fixed network
Cancelling the dialling operation
You can cancel the dialling operation with
the end call key a.
Entering an IP address
Making an external call
External calls are calls made via the public
telephone network (fixed network) or via
the Internet (VoIP). You can use the talk
key c when dialling to select what type of
connection you want to use (fixed network or VoIP). One particular connection
type is set as the default connection for
your phone. The default is VoIP (for how to
change the setting if required, see
page 46).
¤ Enter the required number/IP address
using the keypad.
¤ Press the talk key c briefly if you want
to make the call via the default connection.
Or:
¤ Press and hold the talk key c if you
want to make a phone call via the other
connection type (the non-default connection).
Version 4, 16.09.2005
Please note:
– If there are at least two handsets registered
to your base station, you can use one to
make a call via the fixed network and the
other to make a call via the Internet (VoIP)
at the same time.
– If you use a different GAP-compatible handset to the Gigaset C45, all calls will be made
via the default connection, even if you
press and hold the talk key c. If you want
to use the non-default connection to make
a call, enter a star (*) at the end of the
number.
– If you use VoIP to make a call to the fixed
network, you may also have to dial the area
code for local calls (depending on the VoIP
provider). You can avoid this by entering
the area code in the configuration of the
base station (via the Web configurator, see
page 64). It will then be inserted automatically for local calls.
18
If you are making a call via VoIP, you can
enter an IP address instead of a phone
number.
P
Press the star key to separate
the parts of the IP address
(e.g. 149*246*122*28).
#
If necessary, press the hash
key to attach the SIP port
number of the person you are
calling (page 93) to the IP
address (e.g.
149*246*122*28#5060).
Please note:
– Dialling with the directory (page 29) or last
number redial list (page 31) saves repeated
keying of phone numbers.
– You can assign a number from the directory
to a key for speed dialling (page 30).
– You can edit or add to any phone number
selected by means of quick dial or from the
directory and use it for the current call.
Ending a call
a
Press the end call key.
Gigaset C450 IP / Greek eng / A31008-M1713-T151-3-8U19 / telephony.fm / 24.9.07
Making calls with VoIP and the fixed network
Accepting a call
The handset indicates an incoming call in
three ways: by ringing, by a display on the
screen and by the flashing handsfree key
d.
You can answer the call by:
¤ Pressing the talk key c.
¤ Pressing the handsfree key d.
If the handset is in the charging cradle and
the Auto Answer function is activated
(page 42), the handset will take a call
automatically when you lift it out of the
cradle.
If the ringer tone is intrusive, press
§Menu§ Silent. You can accept the call so long
as it is displayed on the screen.
Version 4, 16.09.2005
Calling Line Identification
When you receive a call from the Internet,
the caller's number and/or the name they
have specified is displayed on the screen.
When you receive a call from the fixed network, the caller's number and/or name is
displayed on the screen if the following
conditions are met:
u Your fixed network provider supports
CLIP, CLI and CNIP:
– CLI (Calling Line Identification): the
caller's number is transmitted
– CLIP (Calling Line Identification Presentation): the caller's number is displayed
– CNIP (Calling Name Identification
Presentation): the caller's name is
displayed
u You have arranged CLIP or CNIP with
your network provider.
u The caller has arranged CLI with the
network provider.
If the phone number is identified and the
caller's number is saved in your directory,
the name will be displayed from the directory.
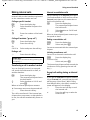
Call display
By means of the ringer tone icon on the
screen, you can decide whether the call is
directed to your fixed network number or
to your VoIP number.
Calls to your fixed network number
®
1234567890
1
2
Menu§
1 Ringer tone icon
2 Number or name of caller
Calls to your VoIP number
W
1
2
1234567890
Menu§
1 Ringer tone icon
2 Number or name of caller
Display when Calling Line Identification is
withheld
For calls from the fixed network, the caller
can withhold calling line identification or
not request it. In this case the number is
not displayed. The following is displayed
in place of the number:
u External Call, if no number is transmitted.
u Withheld, if the caller has withheld Calling Line Identification.
u Unavailable , if the caller has not
arranged Calling Line Identification.
19
Gigaset C450 IP / Greek eng / A31008-M1713-T151-3-8U19 / telephony.fm / 24.9.07
Making calls with VoIP and the fixed network
Handsfree talking
Display with CNIP
Precondition: Call from the fixed network.
If you have CNIP, then the name (town)
that is registered with your network provider for that calling number will also be
displayed. If the caller's number is saved in
your directory then the directory entry will
be shown.
1234567890
Anna Fielding,
London
1
IP
§Menu
2
1 Caller's number
2 Name and town (IP is displayed for calls
made via the Internet)
Version 4, 16.09.2005
The display shows:
u External Call, if no number is transmitted.
u Withheld, if the caller has withheld Calling Line Identification.
u Unavailable , if the caller has not
arranged Calling Line Identification.
20
In handsfree mode, instead of holding the
handset to your ear you can put it down,
e.g. on the table in front of you, to allow
others to participate in the call.
Activating/deactivating handsfree
mode
Activating while dialling
~d
¤
Enter number and press
briefly/press and hold the
handsfree key to select the
connection type (page 18).
You should inform your caller before
you use the handsfree function so that
they know someone else is listening.
Switching between earpiece and
handsfree mode
d
Press the handsfree key.
Switch handsfree on and off during a call.
If you wish to place the handset in the
charging cradle during a call:
¤ Press and hold the handsfree key d
while placing the handset in the charging cradle. If the handsfree key d does
not light up, press the key again.
For how to adjust the loudspeaker volume, see page 42.
Gigaset C450 IP / Greek eng / A31008-M1713-T151-3-8U19 / telephony.fm / 24.9.07
Operating the handset
Muting the handset
Operating the handset
You can deactivate the microphone in
your handset during an external call. The
other party hears a wait melody.
Switching the handset on/off
Muting the handset
a
§INT§
Press the display key.
Cancelling muting
§Back§
Press the display key.
Dialling the emergency number
You can store up to 5 emergency numbers
in your telephone.
The default setting for your phone is that
these numbers are automatically dialled
via the fixed network, irrespective of whether you press the talk key c briefly or
press and hold it.
You can deactivate this function via the
Web configurator (Dialing Plans, page 65),
e.g. if you use the phone without a fixed
network. Ask beforehand, however, whether your VoIP provider supports emergency numbers.
~c
Enter the emergency number
and press the talk key.
Emergency numbers may have been preset in your phone. You can use the Web
configurator to display these, enter more
emergency numbers or delete/edit emergency numbers (page 64).
Version 4, 16.09.2005
Please note:
– If you have used the Web configurator to
deactivate the Emergency calls always via
fixed line function and have entered an
automatic area code for VoIP calls
(page 64), the area code will also be prefixed to the emergency numbers when
they are dialled via VoIP.
– Even emergency numbers cannot be
dialled if the keypad lock is activated.
Before dialling, press and hold the hash
key #, to release the keypad lock.
Press and hold the end call
key.
You will hear the confirmation tone.
Activating/deactivating the
keypad lock
#
Press and hold the hash key.
You will hear the confirmation tone. The
Ø icon appears in the display when the
keypad lock is activated.
The keypad lock deactivates automatically
when you receive a call and activates
again after the call.
Please note:
The handset displays an advisory message if
you press a key by accident while the keypad
lock is on. To deactivate the keypad lock, press
and hold the hash key #.
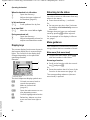
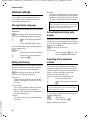
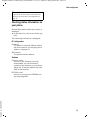
Control key
§§§§INT§§§
§§Menu
1
1 Control key
In this user guide, the side of the control
key that you must press in the given operating situation is shown in black (top, bottom). Example: t for "press the top of the
control key".
The control key has a number of different
functions:
21
Gigaset C450 IP / Greek eng / A31008-M1713-T151-3-8U19 / telephony.fm / 24.9.07
Operating the handset
When the handset is in idle status
s
t
Open the directory.
Adjust the ringer volume of
the handset (page 43).
In lists and menus
t/s
Scroll up/down line by line.
In an input field
t/s
Move the cursor left or right.
During an external call
s
t
Open the directory.
Adjust loudspeaker volume for
earpiece and handsfree mode.
Display keys
The current display functions are shown in
the bottom display line in reversed highlights. The function of the display keys
changes depending on the particular
operating situation.
Example:
§§§§INT§§§
§§Menu
1
2
1 Current display key functions
2 Display keys
The most important display symbols are:
§Back§
Go back one menu level or
cancel the operation.
§INT§
Make an internal call
(page 41).
§Menu§
§OK§
Version 4, 16.09.2005
˜
22
Open the main menu or a context-dependent menu.
Confirm highlighted selection.
Delete key: deletes one character at a time from right to
left.
Returning to idle status
You wish to return to idle status from anywhere in the menu:
¤ Press the end call key a and hold.
Or:
¤ Do not press any key: after 2 minutes
the display will automatically revert to
idle status.
Changes that you have not confirmed/
saved by pressing §OK§ will be rejected.
For an example of the display in idle status, page 1.
Menu guidance
Your telephone's functions are accessed
using a menu that has a number of levels.
Main menu (first menu level)
¤ To open the main menu, press §Menu§
with the handset in idle status.
Accessing a function
¤ Scroll to the function with the control
key q and press §OK§.
Or:
¤ Enter the number that is in front of the
function in the menu tree (page 14).
The corresponding submenu (the next
menu level) is opened.
Gigaset C450 IP / Greek eng / A31008-M1713-T151-3-8U19 / telephony.fm / 24.9.07
Operating the handset
Submenus
The functions in the submenus are displayed as lists.
To access a function:
¤ Scroll to the function with the control
key q and press §OK§.
Or:
¤ Enter the number combination that is
in front of the function in the menu
tree (page 14).
A short press on the end call key a returns
you to the previous menu level / cancels
the operation.
Correcting incorrect entries
u Navigate to the incorrect input with the
control key if û is displayed.
u Press ˜ to delete the character to the
left of the cursor.
u Insert new character to the left of the
cursor.
u When entering the time and date etc.,
edit the flashing character.
Version 4, 16.09.2005
You will find explanations for the symbols
and typographical conventions used in
this user guide in the appendix, page 68.
23
Gigaset C450 IP / Greek eng / A31008-M1713-T151-3-8U19 / giganet.fm / 24.9.07
VoIP telephony via the Gigaset.net
VoIP telephony via the
Gigaset.net
You can use the Gigaset.net to make free
phone calls via the Internet directly to
other Gigaset.net users, without having to
set up an account with a VoIP provider or
make any further settings! You simply
have to connect your phone to the power
supply and the Internet connection and, if
necessary, enter yourself in the Gigaset.net online directory under a name of
your choice (S. 11/S. 26).
The Gigaset Net is a VoIP service provided
by Siemens Home and Office Communication Devices GmbH und Co KG, which is
available to all users with a Gigaset VoIP
device.
You can call other subscribers to Gigaset.net free of charge, i.e. there are no
telephone charges other than the costs for
your Internet connection. Connections to/
from other networks are not possible.
Every Gigaset VoIP device is assigned a
Gigaset.net phone number by default
(S. 73).
All registered subscribers are included in
the Gigaset.net directory, which you are
able to access.
Exclusion of liability
Gigaset.net is a voluntary service provided by
Siemens Home and Office Communication
GmbH & Co KG with no liability or guarantee
for the availability of the network. This service
can be terminated at any time with a notice
period of three months.
24
Please note:
If you do not use your Gigaset.net connection
for six weeks, it is automatically deactivated.
You cannot be reached for calls from the
Gigaset.net.
The connection is reactivated:
– as soon as you start a search in the
Gigaset.net directory or
– make a call via the Gigaset.net (dial a
number with #9 at the end) or
– activate the connection via the
Web configurator (S. 63)
Search subscribers in
Gigaset.net directory
Your handset is in idle status. The VoIP
connection is free.
¤ Open the directory with the s button.
¤ Select the <Gigaset.net> entry and press
the talk key c.
Please note:
– Calls to the Gigaset.net directory are always
free of charge.
– If the <Gigaset.net> entry has been accidentally deleted from your handset directory,
dial 1188#9 (the Gigaset.net directory
phone number) and press the talk key c.
Or create a new directory entry with this
number.
Once the connection has been established, you will be asked to enter a name
that you want to search for.
Nickname: Enter the name or part of a
name (max. 25 characters).
§Menu§
Press the display key.
Start search
Select and press §OK§.
If the search has been successful, a hit list
will be displayed of all the names that
begin with the specified character string.
Gigaset C450 IP / Greek eng / A31008-M1713-T151-3-8U19 / giganet.fm / 24.9.07
VoIP telephony via the Gigaset.net
Example:
Please note:
2/50
Sand, Anna Magd
alena
§View§
U
1
2
§Menu
1. 2/50: Entry number/number of hits
2. Name of the entry, the name is displayed in
full, if necessary over several lines
You can scroll through the hit list with q.
If it has not been possible to find a matching entry, a corresponding message is
displayed. You have the following options:
¤ Press the display key §New§ to start a new
search.
Or
¤ Press the display key §Change§ to change
the search criteria. The previously entered name is copied and can be edited.
If there are too many matching entries
in the Gigaset.net directory, the message
Too many entries found! is displayed instead
of a hit list.
¤ Press the display key §Refine§ to start a
refined search. The previously entered
name is copied and can be edited/
expanded.
Calling subscribers
q
c
Select the subscriber from the
hit list.
Press the talk key.
Viewing the subscriber's number
q
Select the subscriber from the
hit list.
§View§
Press the display key.
The Gigaset.net number and name will be
shown in full, if necessary using more
than one line.
– Connections to Gigaset.net are always established via VoIP. Irrespective of which
default connection is set on your phone.
Pressing and holding c or pressing it
briefly and a "*" at the end of the number
have no effect.
– You can open the Gigaset.net directory and
establish connections, even if you have not
entered yourself in the Gigaset.net directory.
Using other functions
Precondition: The hit list is displayed.
q (Select entry) ¢ §Menu§
The following functions can be selected
with q:
Copy to Directory
Accept the number in the handset
directory. The number and name
(where appropriate abbreviated,
max. 16 characters) are accepted in the
directory.
¤ Edit and save entry where appropriate (S. 29).
The hit list is displayed again.
New search
Start a search with a new name (S. 24).
Refine search
You can use the refined search to limit
the number of hits for a previous
search. The name from the previous
search is copied and can be edited/
expanded.
Own information
See "Entering, editing and deleting
own entry"
Please note:
If you select a Gigaset.net number from the
handset directory, the connection is automatically established via VoIP.
25
Gigaset C450 IP / Greek eng / A31008-M1713-T151-3-8U19 / giganet.fm / 24.9.07
VoIP telephony via the Gigaset.net
Entering, editing and deleting own
entry
You have the following options:
u Edit the name of your entry in the
Gigaset.net directory
u Delete your entry from the directory
u If you did not enter a name when using
the phone for the first time (S. 11), specify a name and enter yourself in the
directory.
Viewing own entry
You are connected to the Gigaset.net
directory:
¤ Select §Menu§ ¢ Own information and
press §OK§.
Your Gigaset.net number and, where
applicable, your currently entered name
are displayed.
Entering/editing a name
Press the display key.
Edit name or enter new name
(max. 25 characters) and press
§OK§.
You can delete the name with
˜.
If there is not yet an entry with this name
in the Gigaset.net directory, the name is
saved. A message to this effect is displayed. The handset switches to idle status.
If there is already an entry with this name
or the entered name contains impermissible characters, you will be requested to
enter a different name.
§Edit§
~
Please note:
If you delete the name, your entry will be deleted from the directory. You are no longer
"visible" to other Gigaset.net subscribers. But
you can still be reached via your Gigaset.net
number. For information on how to display the
number, s. S. 73.
26
Calling a Gigaset.net subscriber
You can call a Gigaset.net subscriber
directly via the Gigaset.net directory (see
above) or via his/her Gigaset.net number:
~ /s
Enter the Gigaset.net number
(including the #9) or select
from the handset directory.
c
Press the talk key.
Every number ending with #9 is dialled via
Gigaset.net.
Gigaset C450 IP / Greek eng / A31008-M1713-T151-3-8U19 / netservices_SAG.fm / 24.9.07
Network services – VoIP
Network services – VoIP
You can use the following network services to make calls via the VoIP connection.
Settings for all calls
Call forwarding takes place locally in your
base station.
Please note that call forwarding may incur
additional costs. Ask your VoIP provider.
Setting up call forwarding
¢ Select Services ¢ VoIP ¢ For All
Calls ¢ Call Divert
All Calls / No Answer / When Busy
Select and press §OK§ (‰ = on).
On
Select and press §OK§.
~
If necessary, enter the number
to which the call is to be forwarded. You can enter a fixed
network, VoIP or mobile
number.
§OK§
Press the display key.
a
Press and hold (idle status).
Call forwarding is activated for the VoIP
phone number (receiving number). This
does not result in calls for your fixed network number being forwarded. For information on how to forward calls to your
fixed network number, see page 27.
§Menu§
Deactivating call forwarding
Press the display key.
Off
Select and press §OK§.
a
Press and hold (idle status).
Call forwarding is deactivated.
Version 4, 16.09.2005
§OK§
Network services –
fixed network
The following network services can only
be used for making calls via the fixed network.
Network services are functions that your
network provider makes available to you.
You have to request these services from
your network provider.
¤ If you require assistance, please contact your network provider.
Making settings for all calls
If you have completed one of the following procedures, a code is sent.
¤ After confirmation from the telephone
network, press the end call key a.
Setting up call diversion
¢ Select Services ¢ Fixed line
¢ For All Calls ¢ Call Divert
§Menu§
Setting up call forwarding
All Calls / No Answer / When Busy
Select and press §OK§.
On
Select and press §OK§.
~
Enter number and press §OK§.
After confirmation from the fixed network:
a
Press and hold (idle status).
Deactivating call forwarding
All Calls / No Answer / When Busy
Off
Select and press §OK§.
After confirmation from the fixed network:
a
Press and hold (idle status).
Call forwarding is deactivated.
27
Gigaset C450 IP / Greek eng / A31008-M1713-T151-3-8U19 / netservices_SAG.fm / 24.9.07
Network services – fixed network
Activating/deactivating call waiting
Accepting a waiting call
When call waiting is activated, the caller
will hear the ringing tone if you are
already making a call. This call is
announced acoustically and visually on
your handset screen.
Accepting/rejecting call waiting, see
page 28.
§Menu§ ¢ Select Services ¢ Fixed line
¢ For All Calls ¢ Call Waiting
On / Off
Select and press §OK§.
After confirmation from the fixed network:
a
Press and hold (idle status).
Precondition: Call waiting is activated
(page 28).
§Menu§ ¢ Accept Call Waiting
You have the option of toggling or holding
a conference call.
Functions during a call
§Menu§
Consultation
During a call:
§Menu§ ¢ External Call
~
Enter a number or copy it from
the directory and press §OK§.
The number is dialled via the fixed network.
Please note:
Version 4, 16.09.2005
After a few seconds, the number selected for a
consultation call is saved in the last number
redial list.
You have the following options:
u Toggling:
¤ Use q to toggle between the participants.
– End call with active participant:
§Menu§ End Active Call.
u Conference call:
– Talk to both participants:
§Menu§ Conference Call.
– End conference call (toggle):
§Menu§ End Conference.
– End call with both participants:
Press the end call key a.
28
Please note:
– Without CLIP a waiting call is only
announced with a beep.
– If the first call was an internal call, the internal connection is ended.
– An internal call waiting is shown on the display. You can neither accept the internal
call nor reject it.
Rejecting a waiting call
¢ Reject Call Waiting
Select and press §OK§.
Gigaset C450 IP / Greek eng / A31008-M1713-T151-3-8U19 / directories_charges.fm / 24.9.07
Using the directory and lists
Using the directory and lists
The options are:
u Directory
u Last number redial list
u SMS list
u Calls list
You can save 100 entries in the directory.
You can create a personalised directory for
your own individual handset. However,
you can send the list or individual entries
to other handsets (page 30).
Directory
In the directory you store numbers and
matching names.
¤ With the handset in idle status, open
the directory by pressing the s key.
Saving the first number in the
directory
s ¢ Directory empty New Entry?
~
Enter number and press §OK§.
~
Enter the name and press §OK§.
Please note:
– To find out how to enter IP addresses, turn
to page 18.
– If you enter an asterisk (*) at the end of the
number, the number is dialled via the nondefault connection (page 46), even if you
briefly press the talk key c or store this
number on a key for quick dial.
Saving a number in the directory
s ¢ §Menu§ ¢ New Entry
~
Enter number and press §OK§.
~
Enter the name and press §OK§.
Length of an entry
Selecting a directory entry
Number:
Name:
s
Open the directory.
You have the following options:
u Use q to scroll to the entry until the
required name is selected.
u Enter the first character of the name, or
scroll to the entry with q.
max. 32 digits
max. 16 characters
Please note:
– You may also have to enter the phone
number with the area code for local calls
when making VoIP calls to the fixed network (depending on the VoIP provider). You
should therefore always save phone numbers in the directory with the area code.
Alternatively, you can also use the Web
configurator to define an area code, which
is automatically prefixed to all numbers
that are dialled without an area code for
calls via VoIP (see Defining dialling plans,
page 64).
– You can assign a number from the directory
to a key for quick dial (page 30).
Dialling with the directory
s ¢ q (select entry; page 29)
c
Briefly press/press and hold
the talk key. The number is
dialled using the selected connection type (page 18).
Please note:
Version 4, 16.09.2005
You can only dial IP addresses via VoIP.
29
Gigaset C450 IP / Greek eng / A31008-M1713-T151-3-8U19 / directories_charges.fm / 24.9.07
Using the directory and lists
Managing directory entries
You have selected an entry (page 29).
Editing entries
§Menu§
~
~
¢ Edit Entry
Edit the number if required,
and press §OK§.
Edit the name if required, and
press §OK§.
Assigning a key
You can assign keys Q and 2 to O with a
number. The number is then dialled by
simply pressing a key.
§Menu§ ¢ Shortcut
Assign to the current entry for quick
dial to a selected key.
Using other functions
s ¢ s (select entry; page 29) ¢ §Menu§
The following functions can be selected
with q:
Use Number
Edit or add to a saved number. Then
dial or use other functions with §Menu§.
Delete Entry
Delete selected entry.
Send Entry
Send a single entry to another handset
(page 30).
Delete List
Delete all directory entries.
Send List
Send the complete list to another handset (page 30).
Using quick dial keys
Version 4, 16.09.2005
¤ Press and hold the required quick dial
key (page 30).
If an asterisk (*) is placed at the end of the
relevant phone number, the number is
dialled via the non-default connection;
otherwise it is always dialled via the
default connection set (page 46).
30
Sending the directory to another
handset
Preconditions:
u The sending and receiving handsets
must both be registered to the same
base station.
u The other handset can send and receive
directory entries.
s ¢ q (Select entry; page 29) ¢ §Menu§
¢ Send Entry / Send List
~
Enter the internal number of
the receiving handset and
press §OK§.
A successful transfer is confirmed by a
message and confirmation tone on the
receiving handset.
If you have sent a single entry, you can
transfer another entry with §OK§.
Please note:
u Entries with identical numbers are not
overwritten in the receiver handset.
u The transfer is cancelled if the phone
rings or if the memory of the receiving
handset is full.
Copying a displayed number to the
directory
You can copy numbers that are displayed
in a list, e.g. the calls list or last number
redial list, to the directory.
A number is displayed.
§Menu§ ¢ Copy to Directory
¤ Complete the entry (page 29).
Copying a number from the directory
You can open the directory in many operating situations e.g. to copy a number.
Your handset need not be in idle status.
s
Open the directory.
q
Select an entry (page 29).
Gigaset C450 IP / Greek eng / A31008-M1713-T151-3-8U19 / directories_charges.fm / 24.9.07
Using the directory and lists
Last number redial list
The last number redial list contains the ten
numbers last dialled with the handset
(max. 32 numbers). If one of the numbers
is in the directory, then the corresponding
name will be displayed.
Dialling from the last number redial list
c
q
c
Press the key briefly.
Select an entry.
Briefly press/press and hold
the talk key. The number is
dialled using the selected connection type (page 18).
Managing entries in the last number
redial list
c
q
Press the key briefly.
Select an entry.
§Menu§
Press the display key.
The following functions can be selected
with q:
Use Number
(as in the directory, page 30)
Copy to Directory
An entry is transferred to the directory
(page 30).
Delete Entry
(as in the directory, page 30)
Delete List
(as in the directory, page 30)
Opening lists with the
message key
You can use the message key f to open
the following lists:
u SMS list
u Network mailbox
If your network provider supports this
function and the network mailbox is
configured for fast access (page 38).
u Calls list
An advisory tone sounds as soon as a new
message arrives in a list. The message key
f flashes. A message appears in the display.
When you press the flashing key f, you
will see all the lists that contain new messages. If only one list contains new messages, this will be opened automatically.
Please note:
If calls are saved in the network answering
machine you will receive a message if the
appropriate settings have been made (see the
network mailbox instructions of your network
provider).
Calls list
Precondition: CLIP (page 19)
The numbers of the last 30 outgoing calls
are saved. Multiple calls from the same
number are only saved once (the last call).
The calls list is displayed as follows:
Calls List: 01+02
Number of new entries + number of old, read
entries
Version 4, 16.09.2005
Opening the calls list
f ¢ Calls List: 01+02
q
Select entry.
The last incoming call is displayed in the
calls list.
31
Gigaset C450 IP / Greek eng / A31008-M1713-T151-3-8U19 / directories_charges.fm / 24.9.07
Making cost-effective calls
List entry
Managing entries in the calls list
Example of a list entry:
New Call
1234567890
11.03.06
§Back§
U
01/02
19:27
§Menu
u Status of entry
In the calls list
New Call: new missed call
Old Call: entry already read
u Entry number
01/02 means e.g.: first of a total of two
entries.
u Number or name of caller
You can add the number of the caller to
the directory (page 30).
u Call date and time (if set, page 8).
Displaying CNIP information
If you have requested CNIP, you can view
the name and town that are registered for
this number with your network provider.
You have selected a list entry.
§Menu§ ¢ Show Name
If the name and town are not shown, it
means that the caller has not requested
Calling Line Identification or that Calling
Line Identification has been withheld.
§OK§
Press the display key to return
to the list.
Selecting from the calls list
Version 4, 16.09.2005
f ¢ Calls List: 01+02
q
Select entry.
c
Briefly press/press and hold
the talk key. The number is
dialled using the selected connection type (page 18).
32
f ¢ Calls List: 01+02
q
Select entry.
§Menu§
Press the display key.
The following functions can be selected
with q:
Copy to Directory
Accept number in the directory
(page 30).
Delete Entry (as in the directory, page 30)
Delete List (as in the directory, page 30)
Making cost-effective calls
Using the Internet (VoIP) is the preferred
cost-effective way of making calls. If you
make calls via the fixed network, select a
network provider who offers very low call
charges (call-by-call) or have the call
duration displayed on your handset after
the call.
Displaying the call duration
The duration of a call is displayed
u during the conversation,
u until about three seconds after the call
has ended if you do not replace the
handset in the charging cradle.
Please note:
The actual duration of the call can vary from
that shown by a few seconds.
Gigaset C450 IP / Greek eng / A31008-M1713-T151-3-8U19 / sms_neutral.fm / 24.9.07
SMS (text messages)
SMS (text messages)
You can only send and receive SMS messages via the fixed network.
When an SMS is sent, the base station
automatically establishes a connection via
the fixed network.
Your unit is supplied ready for you to send
SMS messages immediately.
Preconditions:
u Calling Line Identification (CLIP,
Version 4, 16.09.2005
page 19) is enabled for your phone
connection.
u Your network provider supports SMS in
the fixed network (information on this
can be obtained from your network
provider).
u You are registered with your service
provider to send and receive SMS.
SMS messages are exchanged between
SMS centres that are operated by service
providers. You must enter the SMS centre
in the phone through which you wish to
send and receive. You can receive SMS
from every SMS centre that is entered provided you have registered with your service provider. The registration wizard
(page 33) will help you to register.
Your text message is sent through the SMS
centre that is active. However, you can
activate any other SMS centre to send a
current message (page 36).
If no SMS centre has been entered, an
error message will be displayed as soon as
you try to send an SMS. Enter an SMS centre (page 36).
Please note:
u If your phone is connected to a PABX,
please read page 36.
u You must be registered with your serv-
ice provider to receive SMS messages.
u Each incoming SMS is signalled by a
single ring (ringer tone as for external
calls). If you accept such an SMS call on
the first ring, the SMS will be lost.
Registering for SMS using the
registration wizard
You can use the registration wizard to register with all service providers whose
number you have entered to send and
receive SMS messages.
Precondition:
u You must have saved a number for at
least one SMS centre.
When you call up the SMS menu for the
first time, the wizard automatically registers you with accessible SMS centres
whose number you have entered. You can
also use the registration wizard to register
with SMS centres at a later time.
§Menu§ ¢ SMS (on 1st call)
§Menu§ ¢ SMS ¢ Register to Service Centres
(later)
§Yes§
Press the soft key to confirm
the prompt.
You can now receive SMS messages from
any of the SMS centres whose number you
have entered (page 36).
33
Gigaset C450 IP / Greek eng / A31008-M1713-T151-3-8U19 / sms_neutral.fm / 24.9.07
SMS (text messages)
Writing/sending an SMS
An SMS may contain up to 160 characters.
Or:
§Menu§ Delete Entry
Select and press §OK§ to delete
the status report.
Writing/sending SMS
§Menu§
~
¢ SMS ¢ Write Message
Write an SMS. For how to enter
the text, see page 77.
§Menu§ Send Text
Select and press §OK§.
s/~
Enter the number with dialling
code (including your local area
code) from the directory or key
it in manually, and press §OK§.
For SMS to an SMS mailbox:
put the mailbox ID at the end
of the number.
The SMS is sent.
Please note:
Draft message list
In the draft message list, you can save,
edit later and send an SMS.
Saving an SMS in the draft message list
You write an SMS (page 34).
§Menu§ ¢ Save Text
Opening the draft message list
§Menu§ ¢ SMS ¢ Outgoing
The first entry in the list is displayed, e.g.:
Saved
01/02
11.03.06
19:27
If you are interrupted by an external call while
writing an SMS, the text is automatically saved
in the draft message list.
§Back§
U §Menu
01/02: Current number/total number of SMS
messages
SMS status report
Reading or deleting individual SMS
messages
Precondition: Your network provider supports this feature.
If you have activated the status report, you
will receive an SMS with a confirmation
message after sending.
¤ Open the draft message list.
q
Select and press §OK§ to read
the message. Scroll in the SMS
using q.
Activating/deactivating a status report
¢ SMS ¢ Settings
Status Report
Select and press §OK§ (‰ = on).
§Menu§
Reading/deleting a status report
Version 4, 16.09.2005
¤ Open the incoming message list
(page 35) and then:
q
Select SMS with the State OK or
State NOK status.
§Menu§ Read SMS
Select and press §OK§ to read
the status report. Scroll using
q.
34
Select SMS.
§Menu§ Read SMS
Or:
§Menu§ Delete Entry
Select and press §OK§ to delete
the message.
Writing an SMS
You are reading an SMS in the draft message list.
§Menu§
Press the soft key.
Write Message
Write and then send a new SMS
(page 34) or save.
Gigaset C450 IP / Greek eng / A31008-M1713-T151-3-8U19 / sms_neutral.fm / 24.9.07
SMS (text messages)
Deleting draft message list
¤ Open the draft message list.
§Menu§ Delete List
§OK§
a
Select and press §OK§.
Press the soft key to confirm
the delete. The list is cleared.
Press and hold (idle status).
Receiving an SMS
All received SMS messages are saved in
the incoming message list. Linked SMS
messages are separated into individual
SMS messages with max. 153 characters
and saved as such in the incoming message list. Since an SMS remains in the list
even after it has been read, you should
regularly delete SMS messages from
the list.
The display tells you if the SMS memory is
full.
¤ Deleting SMS messages you no longer
require (page 35).
Incoming message list
The incoming message list contains:
u All received SMS messages, starting
with the latest.
u Messages that could not be sent on
account of an error.
New SMS messages are signalled on all
Gigaset C45 handsets by a message in the
display, the flashing message key f and
an advisory tone.
Opening the incoming message list with
the f key
f
Press.
The incoming message list is displayed as
follows (example):
Version 4, 16.09.2005
SMS:
An entry in the list is displayed e.g. as
follows:
New
1234567890
11.03.06
§Back§
U
01/02
19:27
§Menu§
01/02: Current number of the SMS currently in
the display / total number of new SMS messages
Opening the incoming message list via the
SMS menu
§Menu§
¢ SMS ¢ Incoming 01+05
Reading or deleting individual SMS
messages
¤ Open the incoming message list.
¤ Continue as for reading/deleting indi-
vidual SMS from the draft message list,
page 34.
A new message which you have read
acquires the status Old.
Deleting incoming message list
All new and old SMS in the list are
deleted.
¤ Open the incoming message list.
§Menu§
Press the soft key.
¤ Continue as described at "Deleting
draft message list", page 35.
Replying to or forwarding SMS
messages
You are reading an SMS (page 35).
§Menu§
Press the soft key.
You have the following options:
Reply
Write and send a reply SMS directly
(page 34).
Send Text
Forward the text of an SMS to another
recipient (page 34).
01+05
01+05: The number of new + the number of
old, read messages
35
Gigaset C450 IP / Greek eng / A31008-M1713-T151-3-8U19 / sms_neutral.fm / 24.9.07
SMS (text messages)
Adding a number to the directory
Adding the sender's number
You are reading an SMS in the incoming
message list.
§Menu§
Press the soft key.
For further information, see page 30.
Please note:
You can create a special directory for SMS messages within your main directory by putting a
star (*) before the names.
An appended mailbox ID will be copied to the
directory.
Setting SMS centre
You can set up a maximum of four SMS
centres.
Entering/changing SMS centres
¤ You should find out about the services
Version 4, 16.09.2005
and special functions offered by your
service provider before you make a
new application and before you delete
preconfigured phone numbers.
§Menu§ ¢ SMS ¢ Settings ¢ Service
Centres
q
Select SMS centre (e.g. Service
Centre 1) and press §OK§.
You have the following options:
Active Send Serv. Centre
If the SMS messages are to be sent
through this SMS centre, press §OK§ to
activate the SMS centre (‰ = on). If a
different SMS centre was active previously, then this will be deactivated.
With SMS centres 2, 3 and 4, the setting only applies to the next SMS.
SMS
Enter the number of the SMS centre
and press §OK§.
36
Sending an SMS through another SMS
centre
¤ Activate the SMS centre (2 or 3) as the
active send service centre (page 36).
¤ Send the SMS.
This setting only applies to the next SMS
to be sent. After that, the setting returns
to Service Centre 1.
SMS on a PABX
u You can only receive an SMS when the
Calling Line Identification (page 19)
is forwarded to the extension of the
PABX (CLIP). The CLIP of the phone
number for the SMS centre is evaluated
in your Gigaset.
u Depending on your PABX, you may
have to add the access code (external
line prefix) before the number of the
SMS centre.
If in doubt, test your PABX e.g. by sending an SMS to your own phone number,
once with and once without the access
code.
u When you send SMS messages, your
sender number may be sent without
your extension number. In this case the
recipient cannot reply to you directly.
Sending and receiving SMS on ISDN
PABXs is only possible via the MSN
number assigned to your base station.
Activating/deactivating the SMS
function
When you switch off you cannot send or
receive any SMS messages with your
phone.
Settings which you have made for sending
and receiving SMS messages (the numbers of SMS centres) and any entries in the
incoming message and draft message lists
will be retained even after the function is
deactivated.
Gigaset C450 IP / Greek eng / A31008-M1713-T151-3-8U19 / sms_neutral.fm / 24.9.07
SMS (text messages)
§Menu§ 4 I O 2 L
~ Q §OK§
Or:
~ 1 §OK§
Deactivate the SMS function.
Activate the SMS function
(default settings).
SMS troubleshooting
Error codes when sending
If an SMS cannot be sent for a longer
period of time, it is moved to the
incoming message list and given the
status Error XX.
E0 Calling Line Identification permanently
withheld (CLIR) or Calling Line Identification not activated.
FE Error occurred during SMS transfer.
FD Connection to SMS centre failed, see selfhelp.
Self-help with errors
The following table lists error situations
and possible causes and provides notes on
troubleshooting.
You cannot send messages.
1. You have not requested the CLIP service
(Calling Line Identification Presentation,
page 19).
Ask your service provider to enable this
service.
The message is played back.
1. The "display call number" service is not activated.
Ask your service provider to activate this
function (chargeable).
¥
2. Mobile phone operator and network SMS
service provider have not agreed on a cooperation.
Obtain information from your network
SMS service provider.
¥
3. Your terminal is recorded by your SMS provider as having no fixed network SMS functionality, i.e. you are no longer registered
with the provider.
Register your terminal (again) for SMS
reception (page 33).
¥
SMS messages are only received as voice messages during the day.
The terminal is recorded in your SMS provider's database as having no fixed network
SMS functionality, i.e. you are no longer
registered with the provider.
Register your terminal (again) for SMS
reception (page 33).
¥
You cannot access the SMS functions on your
handset.
Another handset that is registered at the
same base station is currently using the
SMS functions.
Wait until there is no other handset
using the SMS functions.
¥
¥
2. SMS transmission has been interrupted
(e.g. by a call).
Re-send the SMS.
¥
3. Network provider does not support this feature.
4. No phone number or an invalid phone
number is entered for the SMS centre activated as the active send service centre.
Enter phone number (page 36).
¥
Version 4, 16.09.2005
You receive an incomplete SMS.
1. Your phone's memory is full.
Delete old SMS messages (page 35).
¥
2. The service provider has not yet sent the
rest of the SMS.
37
Gigaset C450 IP / Greek eng / A31008-M1713-T151-3-8U19 / T-NetBox_SAG-registration.fm / 24.9.07
Using the network mailbox
Using the network mailbox
Some fixed network providers and VoIP
providers offer answering machines on
the network – network mailboxes.
You can use the relevant network mailbox
if you have requested it from your fixed
network or VoIP provider.
The network mailbox only answers incoming calls made via the relevant line (fixed
network or VoIP). To record all calls, you
should therefore set up network mailboxes for both fixed network and VoIP.
Please note:
You can only set up fast access to one of the
network mailboxes.
You can assign the number for the second network mailbox a quick dial digit in the directory
(e.g. the 2 key) (page 30). The quick dial digit
must be assigned for each handset.
Tip: A fixed network answer machine
should always be controlled via the fixed
network connection. If VoIP is set as the
default connection on your phone, add an
asterisk (*) to the end of the number of
the network answer machine. The connection is then established via the fixed
network.
Enter the network mailbox
number and press §OK§.
The entry is saved.
a
Press and hold (idle status).
Fast access is automatically activated.
To deactivate fast access, you must delete
the number.
This setting is now valid for all registered
handsets.
Please note:
If no number has been entered: press and hold
1 to enter the number.
Calling the network mailbox
1
Press and hold. You are connected straight to the network
mailbox.
d
If necessary, press the handsfree key. You hear the network
mailbox announcement.
The number is dialled via the default connection.
Please note:
If you have set an automatic area code
(page 64), the area code is also prefixed to the
number of the network answer machine if it
does not start with 0 and is dialled via VoIP.
Configuring the network mailbox
for fast access
Viewing the network mailbox
message
With fast access you can dial a network
mailbox directly.
The network mailbox is preconfigured for
fast access. You only need to enter the
number of a network mailbox.
If a message arrives for you, you receive a
call from the network mailbox. If you have
requested Calling Line Identification, the
display shows the network mailbox
number. If you accept the call, the new
messages are played back. If you do not
accept the call, the network mailbox
number will be saved in the missed calls
list and the message key flashes
(page 31).
Configuring the network mailbox for fast
access and entering the network mailbox
number
§Menu§
Version 4, 16.09.2005
~
¢ Voice Mail ¢ Set Key 1
Network Mailbox
Select and press §OK§ (‰ = fast
access activated).
38
Gigaset C450 IP / Greek eng / A31008-M1713-T151-3-8U19 / T-NetBox_SAG-registration.fm / 24.9.07
Using several handsets
Using several handsets
Registering handsets
You can register up to six handsets to your
base station.
Please note:
– If there are several handsets registered to
your base station, you can use one to make
a call via the fixed network and the other to
make a call via the Internet at the same
time.
– As a rule, all calls from a registered GAP
handset are dialled via the connection type
(fixed network or VoIP, see page 46) that
has been set up as Default Line Type.
If you want to establish a connection via
the other connection type, enter a "*" (star)
after the phone number. Example:
0498912345671234567*.
Version 4, 16.09.2005
Registering another Gigaset C45
handset
Before you can use your handset, you
must register it to a base station.
You must initiate handset registration on
the handset and on the base station.
If the handset has been registered successfully you will see the display key §INT§ at
the bottom left of the display. Otherwise
repeat the procedure.
On the handset
Menu§ ¢ Settings ¢ Handset ¢ Register
Handset
~
Enter the system PIN of the
base station (the default is
0000) and press §OK§. The display shows e.g. Registering and
Base is flashing.
On the base station
÷
Within 60 secs. press and hold
the registration/paging key on
the base station (page 1)
(min. 1 sec.).
The handset is assigned the lowest unassigned internal number (1–6). If several
handsets are registered to the base station, the internal number is shown in the
display after registration, e.g. INT 2. This
means that the handset has been assigned
the internal number 2.
Please note:
If six handsets are already registered to the
base station, there are two options:
– The handset with the internal number 6 is
in idle status: the handset you wish to register is assigned the number 6. The handset
that was previously number 6 is de-registered.
– The handset with the internal number 6 is
being used: the handset you wish to register cannot be registered.
Registering other handsets
You can register other Gigaset handsets
and handsets for other devices with GAP
functionality as follows.
On the handset
¤ Start to register the handset as
described in its user guide.
On the base station
÷
Press and hold the registration/paging key on the base
station (page 1) (min. 1 sec.).
39
Gigaset C450 IP / Greek eng / A31008-M1713-T151-3-8U19 / T-NetBox_SAG-registration.fm / 24.9.07
Using several handsets
De-registering handsets
Changing the name of a handset
You can de-register any registered C45
handset from any registered handset.
§INT§
Press the display key. All registered handsets are displayed.
q
Select the handset to be deregistered.
§Menu§
Press the display key.
De-register Handset
Select and press §OK§.
~
Enter the base station system
PIN (default setting: 0000).
§OK§
Press the display key to confirm the prompt.
a
Press and hold (idle status).
The handset is de-registered immediately,
even if it is not in idle status.
The names "INT 1", "INT 2" etc. are
assigned at registration. You can change
these names. The changed name is displayed in every handset's list.
§INT§
Press the display key.
q
Select handset.
§Menu§
Press the display key.
Change Handset Name
Select and press §OK§.
~
Enter name (max. 10 characters) and press §OK§.
Version 4, 16.09.2005
Changing a handset's internal
number
A handset is automatically assigned the
lowest available number on registration.
In the list of internal subscribers, the
handset is sorted according to its internal
number.
You can change the internal number of all
registered handsets (1–6). Numbers 1–6
can only be assigned once each.
§INT§
Press the display key.
§Menu§
Press the display key.
Edit Handset Number
Select and press §OK§.
q
Select handset.
~
Enter number (1–6).
§OK§
Press the display key to complete the operation.
You will hear the error tone if an internal
number has been allocated twice.
¤ Repeat the procedure with a free
number.
40
Locating a handset ("Paging")
You can locate your handset using the
base station.
¤ Press the registration/paging key on the
base station (page 1) briefly.
¤ All handsets will ring at the same time
("paging"), even if the ringer tones are
switched off.
Ending paging
÷/c
Briefly press the registration/
paging key on the base station
(page 1) or press the talk key
on the handset.
Gigaset C450 IP / Greek eng / A31008-M1713-T151-3-8U19 / T-NetBox_SAG-registration.fm / 24.9.07
Using several handsets
Making internal calls
Internal calls to other handsets registered
on the same base station are free.
Calling a specific handset
§INT§
qc
Or:
~
Press the display key.
Select handset and press the
talk key.
Enter the number of the handset.
Calling all handsets ("group call")
§INT§
P
Or:
Call All c
Press the display key.
Press the star key.
Select and press the talk key.
Ending a call
a
Press the end call key.
Please note:
You can reject an internal call by pressing the
end call key a.
Transferring a call to another handset
Version 4, 16.09.2005
You can forward (connect) an external
call, made via fixed network or VoIP, to
another handset.
§INT§
Press the display key.
The external participant hears
the hold music.
q
Select handset or Call All and
press §OK§.
When an internal participant answers:
¤ If necessary announce the external call.
a
Press the end call key.
The call is transferred. If the internal participant does not answer, or their phone is
in use, the call will automatically return to
you.
Internal consultation calls
You are talking to an external participant
(via fixed network or VoIP) and can call an
internal participant at the same time to
hold a consultation call.
§INT§
Press the display key.
The external participant hears
the hold music.
q
Select handset or Call All and
press §OK§.
When an internal participant answers you
can speak to them.
Ending a consultation call
Press the display key.
Back
Select and press §OK§.
You are reconnected with the external participant.
§Menu§
Initiating a conference call
You are in an internal consultation call:
§Menu§
Press the display key.
Conference Call
Select and press §OK§.
The internal participant called can end the
conference call by pressing the end call
key a.
Accept call waiting during an internal
call
If you get an external call while conducting an internal call, you will hear the call
waiting tone (short tone). With Calling
Line Identification, the caller's number or
name will appear in the display.
a
Press the end call key to end
the internal call.
c
Press the talk key to take the
external call.
41
Gigaset C450 IP / Greek eng / A31008-M1713-T151-3-8U19 / settings_bs_hs_pabx.fm / 24.9.07
Handset settings
Handset settings
Your handset is preconfigured, but you
can change these settings to suit your
individual requirements.
Change display language
You can view the display texts in different
languages.
§Menu§ ¢ Settings ¢ Handset ¢ Language
The current language is indicated by ‰ .
q
Select a language and press
§OK§.
a
Press and hold (idle status).
If you accidentally choose a language you
do not understand:
§Menu§ 4 2 2
Press keys one after the other.
q
Select the correct language
and press §OK§.
Setting the display
Version 4, 16.09.2005
You have a choice of four colour schemes
and several different contrasts. You can
also set a screensaver and backlight.
§Menu§ ¢ Settings ¢ Handset ¢ Display
You have the following options:
Screensaver
There are four different screensavers
and the settings No Screensaver or Digital Clock.
Colour Scheme
Four colour schemes. When the backlight is switched off, the display is
shown in black and white regardless of
the selected setting.
Contrast
You have a choice of several different
contrasts.
42
Backlight
In Charger / Without Charger. Determines
whether the backlight stays on permanently or is switched off after a certain
time (‰ = permanently switched on).
Please note:
If the backlight is switched on outside the
charging cradle, the standby time for the
handset is considerably reduced!
Activating/deactivating autoanswer
When this function is activated, when a
call arrives you can simply lift the handset
out of the charging cradle without having
to press the talk key c.
§Menu§ ¢ Settings ¢ Handset
Auto Answer
Select and press §OK§ (‰ = on).
a
Press and hold (idle status).
Adjusting the loudspeaker
volume
You can set the loudspeaker volume for
handsfree talking to five different levels
and the earpiece volume to three different
levels. You can only adjust the loudspeaker volume during a call.
You are conducting an external call.
t
Press the control key.
q
Adjust the volume and press
§OK§.
Please note:
The handsfree volume can only be adjusted
when this function is set.
If t is assigned a different function e.g.
toggling (page 28):
§Menu§
Open menu.
Volume
Select and press §OK§.
Make settings (see above).
Gigaset C450 IP / Greek eng / A31008-M1713-T151-3-8U19 / settings_bs_hs_pabx.fm / 24.9.07
Handset settings
Changing ringer tones
Activating/deactivating the ringer tone
u Volume:
You can turn off the ringer tone on your
handset before you take a call or while the
phone is in idle status.You can take a call
so long as it is displayed on the screen.
Five volume levels (1–5; e.g. Volume 2
= ˆ) and "crescendo" ring ‰. With
"crescendo" ring, the volume gets
louder with every ring.
u Melody:
List of pre-loaded ringer melodies. The
first three melodies are the "classical"
ringer tones.
You can also set different melodies for the
following functions:
u External Calls: for external calls
u Internal Calls: for internal calls
u Alarm Clock: for the alarm clock
Setting the ringer volume
The ringer volume is the same for all types
of ring.
§Menu§ ¢ Audio Settings ¢ Ringer Volume
Or in idle status:
t
Press briefly.
Then:
q
Adjust the volume and press
§OK§.
a
Press and hold (idle status).
Setting ringer melody
Version 4, 16.09.2005
Set different ringer melodies for external
calls, internal calls and the alarm clock.
§Menu§ ¢ Audio Settings ¢ Ringer Melody
External Calls / Internal Calls / Alarm Clock
Select and press §OK§.
q
Select melody (‰ = on) and
press §OK§.
a
Press and hold (idle status).
Deactivating the ringer tone
P
Press the star key and hold,
until the Ú icon appears in the
display.
Re-activating the ringer tone
P
Press and hold the star key in
idle status.
Advisory tones
Your handset uses ‘advisory tones’ to tell
you about different activities and statuses.
You can activate or deactivate the following tones:
u Advisory tones:
– Key click: every key press is confirmed.
– Confirmation tone (rising tone
sequence): at end of entry/setting,
when replacing handset in the
charging cradle and when an SMS is
received or a new entry is made in
the calls list.
– Error tone (descending tone
sequence): when you make an
incorrect entry.
– Menu end tone: when scrolling at
the end of a menu.
u Battery low beep: the battery requires
charging.
You cannot deactivate the confirmation
tone for placing the handset in the charging cradle.
43
Gigaset C450 IP / Greek eng / A31008-M1713-T151-3-8U19 / settings_bs_hs_pabx.fm / 24.9.07
Handset settings
Activating/deactivating advisory tones
Setting the wake up time
§Menu§
§Menu§
¢ Audio Settings ¢ Advisory Tones
~
Setting the battery low beep
When the alarm clock rings…
§Menu§
Alarm repeat after 5 minutes
¢ Audio Settings ¢ Battery Low
On / Off / During Call
Select and press §OK§ (‰ = on).
The battery low beep is activated or deactivated or sounds
during a call.
Using the handset as an
alarm clock
Activating/deactivating the alarm
clock
§Menu§
¢ Alarm Clock ¢ Activation
(‰ = on)
Or:
g
Press the alarm clock key.
After you activate the alarm clock, the
menu for setting the wake up time opens
automatically (page 44).
If the alarm clock is set, the wake up time
appears with the l icon in the display
instead of the date.
Version 4, 16.09.2005
¢ Alarm Clock ¢ Wake up time
Select and press §OK§ (‰ = on).
All advisory tones are activated or deactivated.
44
Enter the wake up time in
hours and minutes, then press
§OK§.
Press the display key or any
key.
If you press §Snooze§ three times the alarm
clock switches off for 24 hours.
§Snooze§
Switching off the alarm clock for 24 hours
§Off§
Press the display key.
Restoring the handset default
settings
Each individual handset setting is reset, in
particular the language, display, volume,
ringer and alarm clock settings (see from
page 42). The last number redial list is
cleared.
§Menu§ ¢ Settings ¢ Handset
¢ Reset Handset
§OK§
Press the display key to confirm.
a
Press and hold (idle status).
Cancel the reset with a.
Gigaset C450 IP / Greek eng / A31008-M1713-T151-3-8U19 / settings_bs_hs_pabx.fm / 24.9.07
Base station settings
Base station settings
The base station settings are carried out
using a registered Gigaset C45 handset.
Changing the system PIN
You have to enter the system PIN when
registering a handset to the base station.
You can change the base station's 4-digit
default system PIN ("0000") to a 4-digit
PIN known only to yourself.
§Menu§ ¢ Settings ¢ Base ¢ System PIN
~
Enter current system PIN and
press §OK§.
~
Enter your new system PIN
and press §OK§.
~
Now re-enter the new system
PIN and press §OK§.
For security reasons, "****" is displayed
instead of the numbers entered.
a
Press and hold (idle status).
Version 4, 16.09.2005
Restoring the base station to
factory settings
Each individual setting is reset, in particular:
u VoIP settings such as VoIP provider and
account data and DTMF settings
(page 47, page 56, page 63)
u Settings for the local network
(page 48, page 54)
u Default connection (page 46)
u The names of the handsets (page 40)
u SMS settings (e.g.SMS centres,
page 33)
u Settings for the connection to the PABX
(page 50)
SMS lists and calls lists are deleted.
The date and time and the system PIN are
retained. The handsets are still registered.
§Menu§
§OK§
¢ Settings ¢ Base ¢ Base Reset
Press the display key to
confirm.
Resetting the base station using a key
on the base station
As with resetting the base station via the
menu, all individual settings are reset. The
system PIN will also be reset to "0000" and
all handsets registered above and
beyond the delivery scope are deregistered.
Please note:
For how to reregister the handsets after resetting if necessary, see page 39.
¤ Remove the cable connections from
¤
¤
¤
¤
¤
the base station to the router and fixed
network.
Remove the base station mains unit
from the socket.
Press and hold the registration/paging
key (page 1).
Plug the mains unit back into the power
socket.
Press and hold the registration/paging
key (at least 10 sec.).
Release the registration/paging key.
The base station has now been reset.
Activating/deactivating repeater
mode
With a repeater you can increase the range
and reception strength of your base station. You have to activate the repeater
mode for this. This will terminate any calls
being made via the base station at that
time.
Precondition: a repeater is registered.
§Menu§ ¢ Settings ¢ Base ¢ Additional
Features ¢ Repeater Mode
Select and press §OK§ (‰ = on).
45
Gigaset C450 IP / Greek eng / A31008-M1713-T151-3-8U19 / settings_bs_hs_pabx.fm / 24.9.07
Base station settings
Set default connection
Starting manual firmware update
You can make settings according to
whether you want to make calls via VoIP or
fixed network (fixed line) by default.
§Menu§ ¢ Settings ¢ Base ¢ Telephony
¢ Default Line Type
IP / fixed line
Select and press §OK§ (‰ = on).
§Menu§
When making calls:
¤ Briefly press the talk key c if you want
¤
to make a call via this default connection.
Press and hold the talk key c if you
want to make a call via the other connection type.
Updating the base station
firmware
If necessary, you can update your base station firmware.
The firmware update is downloaded
directly from the Internet by default. The
relevant website is preconfigured in your
phone.
As an alternative to uploading the
firmware via the Internet, it can also be
loaded from a local PC. You can specify the
PC via the Web configurator (page 65).
This setting applies only to the next
firmware update.
Precondition:
Version 4, 16.09.2005
The base station is in idle status, i.e.:
u No calls are being made via the fixed
network or VoIP.
u There is no connection between registered handsets.
u No other handset has opened the base
station menu.
46
¢ Settings ¢ Base ¢ Firmware
Update
~
Enter base station system PIN
(default setting: 0000).
The base station establishes a connection
to the Internet or to the local PC.
§Yes§
Press display button to start
the firmware update.
Please note:
– A firmware update can last up to 3 minutes.
During the update, the handset loses the
connection to the base station. When the
update has been successfully completed,
the handset re-establishes the connection
to the base station.
– If the update is carried out from the Internet, a check is made to ensure that there is
not a more recent version of the firmware
available. If this is not the case, the operation is terminated and a message is issued
to that effect.
– If an error occurs while firmware is being
updated from a local PC, the most recent
version of the firmware is automatically
downloaded from the Internet.
Automatic firmware update
Your phone will check daily whether a
newer firmware update is available via the
Internet on the Siemens configuration
server. If this is the case, when the handset is in idle status, the message New
firmware available! will be displayed and the
message key f flashes.
f
Press the message key.
§Yes§
Press the display key to confirm the prompt.
The firmware will be loaded onto your
phone.
Gigaset C450 IP / Greek eng / A31008-M1713-T151-3-8U19 / settings_bs_hs_pabx.fm / 24.9.07
Making VoIP settings
Please note:
– If you reply to the request with §No§, the
display will not be repeated. The message
New firmware available! will only be shown
again if a newer version of the firmware
than the one rejected is available.
– You can deactivate the automatic version
check via the Web configurator (page 66).
Making VoIP settings
In order to be able to use VoIP, you must
set a few parameters for your base station.
You can set all parameters easily via a PC
connected to your network (see page 51).
Using the connection wizard
The connection wizard starts automatically the first time your handset and base
station are used. You can also start the
connection wizard via the menu:
§Menu§ ¢ Settings ¢ Base ¢ Telephony
¢ Connection Assistant (enter system
PIN)
For how to enter VoIP settings using the
connection wizard, see page 11.
Changing settings without the
connection wizard
You can change your provider's VoIP settings and the VoIP user data via the menu
without starting the connection wizard.
Downloading your VoIP provider's
settings
Version 4, 16.09.2005
The general settings for various VoIP providers are available for download on the
Internet. The relevant website is preconfigured in your phone.
¢ Settings ¢ Base ¢ Telephony
¢ VoIP (enter system PIN) ¢ Select
§Menu§
VoIP Provider
The phone establishes a connection to the
Internet.
q
Select country and press §OK§.
q
Select VoIP provider and press
§OK§.
Your VoIP provider data is downloaded
and saved in your phone.
If errors occur during a download, see
page 69.
Please note:
You can make and adapt the general settings
for your VoIP provider manually via your
phone's Web configurator, see page 57.
Automatic update for the VoIP provider
settings
After the first download of the VoIP provider settings, your phone will check daily
whether a newer version of the file for
your VoIP provider is available via Internet
on the Siemens configuration server. If
this is the case, when the handset is in idle
status, the message New profile available!
will be displayed and the message key f
flashes.
f
Press the message key.
§Yes§
Press the display key to confirm the prompt.
~
Enter the system PIN and press
§OK§.
The new data for your VoIP provider will be
downloaded and saved on the phone.
Please note:
– If you reply to the request with §No§, the
display will not be repeated. The message
New profile available! will only be shown
again if a newer version of the VoIP settings
than the one rejected is available.
– You can deactivate the automatic version
check via the Web configurator (page 66).
47
Gigaset C450 IP / Greek eng / A31008-M1713-T151-3-8U19 / settings_bs_hs_pabx.fm / 24.9.07
Making VoIP settings
Entering/changing VoIP user data
The VoIP settings must also be extended
for your personal data. You will receive all
necessary data from your VoIP provider.
Please note:
To enter text see page 77.
¢ Settings ¢ Base ¢ Telephony
¢ VoIP
§Menu§
~
Enter the system PIN and press
§OK§.
Username / Authentication Name /
Authentication Password
Select and press §OK§.
~
Enter/change user data and
press §OK§.
Enter Caller ID for you VoIP provider
account as the Username. The Username is
mainly identical to your Internet phone
number (the first part of your SIP address
see page 57).
For Authentication Name and Authentication
Password enter the provider-dependent
access data that has to be transferred by
the phone to the SIP service at registration.
Tip: A previously set password is not displayed.
Setting the phone's IP address
in LAN
The base station requires an IP address in
order to be "recognised" by the LAN.
The IP address can be assigned to the base
station (by the router) automatically or
manually.
u If performed dynamically, the router's
DHCP server automatically assigns the
base station an IP address. The base
station's IP address can be changed
according to router settings.
u If performed manually, you assign the
base station a static IP address. This
may be necessary regardless of your
network configuration.
Please note:
For how to make the local network settings on
the Web configurator, turn to page 54.
Activating/deactivating dynamic
assignment
¢ Settings ¢ Base ¢ Local Network
(enter system PIN)
dynamic IP address (‰ = on)
Select and press §OK§ to change
the current settings.
If you deactivate dynamic assignment,
you must set the base station IP address
and subnet mask manually. A corresponding message is displayed.
§Menu§
Please note:
Version 4, 16.09.2005
To assign the IP address dynamically, the DHCP
server on the router must be activated. Please
also read the user guide for your router.
48
Gigaset C450 IP / Greek eng / A31008-M1713-T151-3-8U19 / settings_bs_hs_pabx.fm / 24.9.07
Making VoIP settings
Viewing/changing the base station
IP address
You can only change the IP address
(page 90) if you have deactivated
dynamic assignment.
192.168.2.2 has been preset by default.
§Menu§ ¢ Settings ¢ Base ¢ Local Network
(enter system PIN) ¢ IP Address
The current IP address is displayed.
~
If necessary, enter IP address
and press §OK§.
Please note:
For notes on the IP address, please see page 55
and the glossary on page 90.
Viewing/changing subnet mask
You can only change the subnet mask
(page 94) if you have deactivated
dynamic assignment.
255.255.255.0 has been preset by
default.
§Menu§ ¢ Settings ¢ Base ¢ Local Network
(enter system PIN) ¢ Subnet Mask
The current subnet mask is displayed.
~
If necessary, enter subnet
mask and press §OK§.
Please note:
Version 4, 16.09.2005
For notes on the subnet mask, please see
page 55 and the glossary on page 94.
Activating/deactivating display
of VoIP status codes
If the function is activated, a VoIP status
code for your service provider is displayed.
Activate the function e.g. if you have problems with VoIP connections. You will
receive a provider-specific status code,
which supports the service when the
problem is analysed.
§Menu§ ¢ Settings ¢ Base ¢ Telephony
¢ VoIP (enter system PIN)
Status on HS (‰ = on)
Select and press §OK§.
Please note:
– For how to make the setting on the
Web configurator, see page 67.
– A table with possible status codes and their
meaning can be found in the Appendix on
page 71.
Check the base station MAC
address
Depending on your network configuration, it may be that you have to enter your
base station MAC address e.g. into your
router's access control list. You can check
your base station MAC address:
§Menu§ 4 I O 2 Q
The base station MAC address is displayed.
a
Press and hold (idle status).
49
Gigaset C450 IP / Greek eng / A31008-M1713-T151-3-8U19 / settings_bs_hs_pabx.fm / 24.9.07
Operating the base station on the PABX
Operating the base station
on the PABX
Setting pauses
The following settings are only necessary
when your PABX requires them; see the
PABX User Guide. The settings only concern fixed network connections.
You cannot send or receive SMS messages
on PABXs that do not support Calling Line
Identification.
You can set the length of the pause
inserted between pressing the talk key c
and sending the phone number.
§Menu§ 4 I O 1 L
~
Enter digit for the pause
length (1 = 1 sec.; 2 = 3 sec.;
3 = 7 sec.) and press §OK§.
a
Press and hold (idle status).
Changing the dialling mode
You can set the dialling mode.
§Menu§ ¢ Settings ¢ Base ¢ Telephony
¢ Fixed line ¢ Dialling Mode
Tone / Pulse
Select and press §OK§ (‰ = on).
a
Press and hold (idle status).
Setting the flash time
Version 4, 16.09.2005
You can set the flashing time.
§Menu§ ¢ Settings ¢ Base ¢ Telephony
¢ Fixed line ¢ Recall
q
Select flashing time and press
§OK§.
The current setting is marked with ‰.
a
Press and hold (idle status).
50
Changing pause after line seizure
Changing the pause after the recall key
You can change the length of the pause if
your PABX requires this (refer to the user
guide for your PABX).
§Menu§ 4 I O 1 1
~
Enter a digit for the length of
the pause (1 = 1 sec.;
2 = 2 secs.; 3 = 3 secs.;
4 = 6 secs.) and press §OK§.
a
Press and hold (idle status).
Switching temporarily to tone
dialling (DTMF)
If your PABX still operates with dial pulsing
(DP), but you need touch tone dialling
(DTMF) for a connection (e.g. to listen to
the network mailbox) you must switch to
touch tone dialling for the call.
Precondition: You are currently conducting an external call via the fixed network
or you have dialled an external fixed network number or an external call is signalled.
§Menu§
Open menu.
Tone dialling
Select and press §OK§.
Touch tone dialling is now activated for
this call only.
Gigaset C450 IP / Greek eng / A31008-M1713-T151-3-8U19 / web_server.fm / 24.9.07
Web configurator
Web configurator
The Web configurator is the Web interface
for your handset. It allows you to make the
settings for your phone's base station via
your PC's Web browser.
Please note:
Depending on your VoIP provider, it is possible
that you will be unable to change individual
settings in the Web configurator.
Configuring the phone via your
PC
Preconditions:
u A standard Web browser is installed on
the PC, e.g. Internet Explorer version
6.0 or higher, or Firefox version 1.0.4 or
higher.
u The phone and PC are connected to
each other via a router.
Please note:
– The phone is not blocked while you make
your settings in the Web configurator. You
can also use your phone to make calls or
change base station or handset settings on
your handset at the same time.
– While you are connected to the Web configurator, it is blocked to other users. It cannot
be accessed by more than one user at any
time.
With the Web configurator on your phone
you have the following options:
Version 4, 16.09.2005
u Configure your phone access to the
local network (IP address, gateway to
the Internet).
u Configure your phone for VoIP.
u Set the data server for firmware
updates and load new firmware onto
the phone if necessary.
u Obtain information about your phone's
status (firmware version, MAC address
etc.)
Connecting your PC to the
Web configurator
¤ Launch the Web browser on your PC.
Precondition: The settings of an
available firewall on the PC allow the PC
and telephone to communicate with
each other.
¤ Enter the phone's IP address in the
address field of the Web browser,
e.g. http://192.168.1.10.
Your phone's IP address can change if
you have activated dynamic IP address
assignment (page 54).
You can check the phone's current
IP address on the handset (page 49).
¤ Press the return key.
A connection is established to the phone's
Web configurator.
Registering, setting the Web
configurator language
Once you have successfully established
the connection, the Web page Login will
be displayed in the Web browser.
You can select the language you want the
menus and Web configurator dialogs to be
displayed in. The language that is currently selected is displayed in the top field
of the Web page.
¤ If necessary, click on to open the list
of available languages.
¤ Select the language.
¤ In the bottom field of the Web page,
enter your phone's system PIN (default
setting: 0000) to access the Web configurator functions.
¤ Click on OK.
Once you have successfully registered, a
Home opens with general information on
the Web configurator.
51
Gigaset C450 IP / Greek eng / A31008-M1713-T151-3-8U19 / web_server.fm / 24.9.07
Web configurator
De-registering
Please note:
– If you have forgotten your system PIN, you
must restore your device's factory settings.
Ensure that all other settings are also
restored (page 45).
– If you do not make any entries for a lengthy
period (approx. 10 min.), you will be automatically de-registered. The next time you
try to make an entry or open a Web page,
the Web page Login will be displayed. Enter
the system PIN again to re-register.
– Entries that had not yet been saved on the
phone before automatic de-registration are
lost.
In the menu bar (page 53) at the top right
of every Web page in the Web configurator, you will see the command Log Off.
Click on Log Off to de-register from the
Web configurator.
Caution:
Always use the command Log Off to end the
connection to the Web configurator. If, for
example, you close the Web browser without
de-registering beforehand, it is possible that
access to the Web configurator will be blocked
for a few minutes.
Structure of the Web pages
The Web pages contain the UI elements
displayed in the diagram below.
Navigation area
Working area
Buttons
Version 4, 16.09.2005
Figure 2 Example of the structure of a Web page
52
Menu bar
Gigaset C450 IP / Greek eng / A31008-M1713-T151-3-8U19 / web_server.fm / 24.9.07
Web configurator
Menu bar
Working area
In the menu bar, the Web configurator
menus are given in the form of tab pages.
Depending on the function selected, information or dialog boxes are displayed in
the working area, which allow you to
make or change your phone settings.
The following menus are available:
u Home
The start screen is opened once you
have registered with the Web configurator. It contains information on the
Web configurator functions.
u Settings (page 54)
This menu allows you to make settings
on your phone.
u Status (page 67)
This menu gives you information about
your phone.
If you click on the Settings menu, a list with
this menu's functions is displayed in the
navigation area (see below).
You will find the Log Off function to the
right of the menu bar on every Web page
(page 52).
Please note:
You will find an overview of the Web configurator menu on page 17.
Navigation area
Version 4, 16.09.2005
In the navigation area, the functions of the
menu selected in the menu bar (page 53)
are listed.
If you click on a function, the associated
page opens in the working area with information and/or fields for your inputs.
If a function is assigned subfunctions,
these are displayed with the function as
soon as you click on the function. The relevant page for the first subfunction is displayed in the working area
Making changes
Make settings for entry fields, lists or
options.
u There may be restrictions regarding the
possible values for a field, e.g. entering
special characters or certain value
ranges.
u To open a list, click on
. You can
choose between default values.
u There are two kinds of options:
– Options in a list, from which you can
activate one or several options.
Active, i.e. selected options are highlighted with
, non-active options
with
. You can activate an option
by clicking on
. The status of the
other options on the list does not
change. You can deactivate an
option by clicking on
.
– Alternative options. The active
option on the list is highlighted with
, and the non-active with
.
You can activate an option by clicking on
. The previously activated
option is deactivated. You can only
deactivate an option by activating
another option.
53
Gigaset C450 IP / Greek eng / A31008-M1713-T151-3-8U19 / web_server.fm / 24.9.07
Web configurator
Applying changes
As soon as you have made your change on
a page, activate the new setting on the
phone by clicking on Set.
If your input in a field does not comply
with the rules for this field, an appropriate
error message will be displayed. You can
then repeat the input.
Caution:
Changes that have not been saved on your
phone are lost if you move to another Web
page or if the Web configurator is terminated,
e.g. due to the time limit (page 52).
Buttons
Buttons are displayed in the bottom section of the working area.
Set
Save entries on the phone
Cancel
Reject changes made on the Web page
and reload the settings that are currently saved on your phone to the Web
page.
Opening Web pages
A brief outline of the navigation to the
individual Web configurator functions is
given below.
Version 4, 16.09.2005
Example:
Setting DTMF signalling
Settings ¢ Telephony ¢ Advanced Settings
To open the Web page, carry out the
following steps after registration:
¤ Click on the Settings menu in the menu
bar.
¤ Click on the Telephony function in the
navigation area.
The subfunctions of Telephony are displayed in the navigation tree.
¤ Click on the Advanced Settings
subfunction.
The Web page from see Figure 2 will be
shown in the Web browser.
54
Setting phone with
Web configurator
You can make the following settings using
the Web configurator:
u Connecting your phone to the local
network (page 54)
u Configuring for the telephony
– VoIP provider settings (page 57)
– Name of the fixed network
– Activating/deactivating the
Gigaset.net connection
u User-specific dialling plans (page 64)
u Data server for firmware update downloads (page 65)
u Display of VoIP status codes on the
handset (page 66)
IP Configuration
Assign IP address
Make the necessary settings for operating
your phone in your local network and to
connect it to the Internet. For more
detailed explanations on the individual
components/terms, see the glossary
(page 86).
¤ Open Settings ¢ IP Configuration Web
page.
¤ In the Address Assignment area, select
the IP address type.
Select Obtained automatically if you want
your phone to be assigned a dynamic IP
address by a DHCP server in your local network. No further settings are necessary for
the local network.
Select Static if you would like to set up a
static IP address for your phone. A static IP
address is useful, for example, when Port
Forwarding or a DMZ is set up on the
router for the phone.
Gigaset C450 IP / Greek eng / A31008-M1713-T151-3-8U19 / web_server.fm / 24.9.07
Web configurator
Version 4, 16.09.2005
The following fields are displayed when
you select IP address type = Static:
IP address
Enter an IP address for you phone. This
IP address allows your phone to be
reached by other subscribers in your
local network (e.g. PC).
192.168.2.2 has been preset.
Please note the following:
– The IP address must be from the
address block for private use that is
used in the router. This is generally
block 192.168.0.1 –
192.168.255.254 with Subnet mask
255.255.255.0. The subnet mask
determines that the first three parts
of the IP address must be identical
for all subscribers in your LAN.
– The static IP address must not
belong to the address block (IP pool
range) that is reserved for the DHCP
server. In addition, it must not be
used by another device on the
router.
If necessary, check the settings on the
router.
Subnet mask
Enter the subnet mask for your device's
IP address. For addresses in the address
block 192.168.0.1 – 192.168.255.254.
The usual address for the subnet mask
255.255.255.0 is preconfigured in the
default settings.
Default gateway
Enter the IP address for the standard
gateway, by means of which the local
network is connected with the Internet.
This is generally the local (private) IP
address for your router. Your phone
requires this information to be able to
access the Internet.
192.168.2.1 has been preset.
Preferred DNS server
Enter the IP address for the preferred
DNS server. DNS (Domain Name
System) allows you to assign public IP
addresses to symbolic names. The DNS
server is required to convert the DNS
name into the IP address when connection is being established to a server.
You can specify your router's IP address
here. The router forwards phone
address requests to its DNS server.
192.168.2.1 has been preset.
Alternate DNS server (optional)
Enter the IP address for the alternative
DNS server that should be used in situations where the preferred DNS server
cannot be reached.
Click on Set to save the changes.
Click on Cancel to reject the changes.
Allow access from other networks
The default setting for you phone is that
you can only access your phone's Web
configurator via a PC that is in the same
local network as your phone. The subnet
mask of the PC must match that of the
phone.
You can also allow access from PCs in
other networks.
Warning:
Expansion of access entitlement to other networks increases the risk of unauthorised
access.
It is therefore recommended to deactivate
remote access again if you no longer need it.
¤ Open Settings ¢ IP Configuration Web
page.
¤ In the Remote Management area, activate
the option Yes to permit access from
other networks.
To deactivate remote access, click on
the No option. Access is then limited to
PCs in your own local network.
55
Gigaset C450 IP / Greek eng / A31008-M1713-T151-3-8U19 / web_server.fm / 24.9.07
Web configurator
Access to the Web configurator services
from other networks is only possible if
your router is set accordingly. The router
must pass on the service requests from
"outside" to Port 80 (standard port) of the
phone. Please also read the user guide for
your router.
To establish a connection, the public IP
address or the DNS name of the router
and, where applicable, the port number
on the router, must be indicated in the
Web browser of the remote PC.
Configuring telephone
connections
You can configure two phone numbers on
your phone: your fixed network number
and your VoIP phone number.
You need to set up a VoIP account with
your VoIP provider for your VoIP phone
number. You must save the access data for
the account on your phone. You can
assign a name to each connection (VoIP
and fixed network).
To configure the connections:
¤ Open the following Web page:
Settings ¢ Telephony ¢ Connections.
A list (see Figure 3) with all possible connections will be shown.
Figure 3
List of possible connections
Version 4, 16.09.2005
Please note:
For Gigaset C450IP base stations manufactured before June 2006, the Web page in
"Figure 3" is not displayed after a firmware
update. For how to configure VoIP connections
on these base stations, please refer to the section entitled "Configuring the VoIP connection"
on page 57.
56
The list will show the following:
Name
The default name for the connection
Status
The status of the connection will be
shown for the VoIP connection:
registered
The connection is activated. The phone
has been successfully registered. You
can use the connection to make calls.
Disabled
The connection is deactivated. The
phone is not registering with the corresponding account with the VoIP service. You cannot use the connection to
make or receive calls.
Registration failed / Server not accessible
(Examples)
The phone could not be registered with
the VoIP service, e.g. because the VoIP
access data is incomplete or incorrect,
or because the phone is not connected
to the Internet. There is information
about this in the section entitled "Questions and answers" from page 69.
Active
You can use the option in the Active
column to activate ( ) and deactivate
( ) the VoIP connection. If the connection is deactivated, the phone will not
register for this connection. The connection can be activated/deactivated by
clicking directly on the option. The
change does not need to be saved.
To configure the connection or to change
the configuration of a connection:
¤ Click on the Edit button next to the connection.
This will open a Web page where you can
make the settings needed. For more information, see the "Configuring the VoIP connection" section on page 57.
Gigaset C450 IP / Greek eng / A31008-M1713-T151-3-8U19 / web_server.fm / 24.9.07
Web configurator
Configuring the VoIP connection
Open the Web page:
¤ Open the following Web page:
Settings ¢ Telephony ¢ Connections.
¤ Click on the Edit button next to the VoIP
connection.
This will open a Web page where you can
make the settings that your phone needs
to access your provider's VoIP server.
The following areas are displayed:
1. IP Connection (page 57)
2. Personal Provider Data (page 57)
3. Call Forwarding (page 58)
4. General Provider Data (page 58)
5. Listen ports (page 59)
6. Network (page 59)
7. Voice codecs (page 61)
Please note:
You can use the Hide Advanced Settings button
to hide areas 3 to 7. This prevents you from,
e.g. making accidental changes to the data
after downloading the general data for your
VoIP provider.
You can use the Show Advanced Settings button
to show these general areas again at any time.
¤ Make the settings on the Web page.
¤ Save them in the phone, see page 62.
¤ Activate the connection if necessary,
see page 62.
Area: IP Connection
Version 4, 16.09.2005
Provider
The name of your VoIP provider will be
shown if you have already selected it.
If necessary, click on the Select VoIP Provider button to select a provider and to
start downloading the general data for
the VoIP provider from the Internet if
required. To find out how to do this,
please read "Selecting the VoIP provider
and downloading the VoIP provider
data" on page 62.
Please note:
– If you click on the Select VoIP Provider button, any changes that have been made to
the Web page will be saved and checked.
Values may need to be corrected before the
Select VoIP Provider operation is started.
– The downloaded VoIP provider data will be
entered in the General Provider Data
(page 58) and Network (page 59) areas, so
that, generally speaking, no further settings need to be made.
If the general data for your VoIP provider is
not available for download, you will need to
make these settings yourself as described
below.
Area: Personal Provider Data
Enter the configuration data that is necessary for accessing your VoIP provider's SIP
service. You will receive this data from
your VoIP provider.
Authentication Name
Specify the registration or authentication ID agreed with your VoIP provider.
The registration ID serves as the access
ID that your phone must specify when
registering with the SIP proxy/registrar
server. The Authentication Name is
mainly identical to the Username,
i.e. to your Internet phone number.
Authentication password
Enter the password that you have
agreed with your VoIP provider in the
Authentication password field. The phone
needs the password when registering
with the SIP proxy/registrar server.
Username
Enter the caller ID for your VoIP provider account. This ID is usually identical to the first part of your SIP address
(URI, your Internet phone number).
Example: If your SIP address is
"[email protected]", enter
"987654321" in Username.
57
Gigaset C450 IP / Greek eng / A31008-M1713-T151-3-8U19 / web_server.fm / 24.9.07
Web configurator
Display name (optional)
Enter any name that should be shown
in the other caller's display when you
call him via the Internet (example:
Anna Sand). All characters in the UTF8
character set (Unicode) are permitted.
The name must not exceed 32 characters.
If you do not enter a name, your Username VoIP phone number will be displayed.
Ask your VoIP provider if this feature is
supported.
Area: Call Forwarding
Version 4, 16.09.2005
You can also forward calls to this VoIP
number to another external number (VoIP,
fixed network or mobile phone). The forwarding is done via VoIP.
The Call Forwarding area is where you
define for the VoIP number whether and
when calls for this number should be forwarded to another number.
You can also use the handset to set the forwarding and activate/deactivate it, see
page 27.
Status
Use the On / Off option to activate or
deactivate the call forwarding.
When
Choose when an incoming call should
be forwarded: When busy / No reply /
Always.
Call number
Enter the phone number to which the
calls should be forwarded. Please note
that you may have to enter the area
code when forwarding to a fixed network number in the same area
(depending on your VoIP provider and
the setting for the automatic area
code, see page 64).
The settings only affect the selected VoIP
phone number.
58
Area: General Provider Data
If you have downloaded the general
settings for your VoIP provider from the
Siemens configuration server (page 62),
then the fields in this area will be preset
with the data from this download. Generally speaking you will not need to make
any settings in this area .
Domain
Specify the last part of your SIP address
(URI) here.
Example: For the SIP address
"[email protected]", enter
"provider.com" in Domain.
Proxy server address
The SIP proxy is your VoIP provider's
gateway server. Enter the IP address or
the (fully-qualified) DNS name of your
SIP proxy server.
Example: myprovider.com.
Proxy server port
Enter the number of the communication port that the SIP proxy uses to send
and receive signalling data (SIP port).
Port 5060 is used by most VoIP providers.
Registrar server
Enter the (fully-qualified) DNS name or
the IP address of the registrar server.
The registrar is needed when the
phone is registered. It assigns the public IP address/port number to your SIP
address (Username@Domain) that were
used by the phone at registration. With
most VoIP providers, the registrar
server is identical to the SIP server.
Example: reg.myprovider.com.
Registrar server port
Enter the communication port used in
the registrar. It is mainly port 5060 that
is used.
Gigaset C450 IP / Greek eng / A31008-M1713-T151-3-8U19 / web_server.fm / 24.9.07
Web configurator
Registration refresh time
Enter the time intervals at which the
phone should repeat the registration
with the VoIP server (SIP proxy)
(a request will be sent to establish a
session). The repeat is required so that
the entry of the phone in the tables of
the SIP proxy is retained and the phone
can therefore be reached.
The default is 180 seconds.
If you enter 0 seconds, the registration
will not be repeated periodically.
Area: Listen ports
Specify the phone's local ports for VoIP
telephony here. The ports must not be
used by any other subscriber in the LAN.
SIP port
Specify the local communication port
that the phone should use to send and
receive signalling data. Specify a
number between 1024 and 49152. The
default port number for SIP signalling is
5060.
Please note:
Ports 0 to 1023 should not be used,
because these are often used by standard
applications.
RTP port
Specify the local communication port
that the phone should use to send and
receive voice data. Enter an even
number between 1024 and 49152. The
port number must not be the same as
the port number in the SIP port field.
If you enter an odd number, the even
number just below it will be set
(e.g. if you enter 5003, 5002 is set).
The default port number for voice
transmission is 5004.
Version 4, 16.09.2005
Please note:
Ports 0 to 1023 should not be used,
because these are often used by standard
applications.
Use random ports
Click on the option Yes, if you do not
want the phone to use fixed ports for
SIP port and RTP port, but rather to use
any free ports.
The use of random ports makes sense if
you want several phones to be operated on the same router with NAT. The
phones must then use different ports
so that the router's NAT is only able to
forward incoming calls and voice data
to one (the intended) phone.
If you click on No, the phone will use
the ports specified in SIP port and RTP
port.
Area: Network
Please note:
If you have downloaded the general settings
for your VoIP provider from the Siemens
configuration server (page 62), then some
fields in this area will be preset with the data
from this download (e.g. the settings for the
STUN server and the outbound proxy).
If your phone is connected to a router with
NAT (Network Address Translation) and/or
Firewall, you must make a few settings in
this area so that your phone can be
reached from the Internet (i.e. can be
addressed).
Through NAT, the IP addresses of subscribers in the LAN are concealed behind the
public IP address of the router.
For incoming calls
If port forwarding is activated or a DMZ is
set up for the phone on the router, no special settings are required for incoming
calls.
If this is not the case, an entry in the NAT
routing table (in the router) is necessary in
order for the phone to be reached. This
entry is created when the phone is registered with the SIP service. In the interest
of security, this entry is automatically
deleted at certain intervals (session timeout). The phone must therefore confirm
its registration at certain intervals (see
59
Gigaset C450 IP / Greek eng / A31008-M1713-T151-3-8U19 / web_server.fm / 24.9.07
Web configurator
Version 4, 16.09.2005
NAT refresh time, page 60), so that the
entry stays in the routing table.
For outgoing calls
The phone needs its public address in
order to receive caller voice data.
There are two possibilities:
u The phone requests the public address
from a STUN server on the Internet
(Simple Transversal of UDP over NAT).
STUN can only be used with asymmetric NATs and non-blocking firewalls.
u The phone does not direct the connection request to the SIP proxy but to an
outbound proxy on the Internet that
supplies the data packets along with
the public address.
The STUN server and outbound proxy are
used alternately to work around the NAT/
firewall in the router.
STUN enabled
Click on Yes if you want your phone to
use STUN as soon as it is used on a
router with asymmetric NAT.
STUN server
Enter the (fully-qualified) DNS name or
the IP address of the STUN server on
the Internet.
If you selected the option Yes in the
STUN enabled field, you must enter a
STUN server here.
STUN port
Enter the number of the communication port on the STUN server. The
default port is 3478.
STUN refresh time
Enter the time intervals at which the
phone should repeat the registration
with the STUN server. The repeat is
required so that the entry of the phone
in the tables of the STUN server is
retained
Ask your VoIP provider for the STUN
refresh time.
The default is 240 seconds.
If you enter 0 seconds, the registration
will not be repeated periodically.
60
NAT refresh time
Specify the intervals at which you want
the phone to update its entry in the
NAT routing table. Specify an interval in
seconds that is a little smaller than the
NAT session timeout.
As a rule you should not change the
preconfigured value for the NAT refresh
time.
Outbound proxy mode
Specify when the outbound proxy
should be used.
Always
All signalling and voice data sent by the
phone is sent to the outbound proxy.
Auto
Data sent by the phone is only sent to
the outbound proxy when the phone is
connected to a router with symmetric
NAT or blocking firewall. If the phone is
phone is behind an asymmetric NAT,
the STUN server is used.
If you have set STUN enabled = No or
have not entered a STUN server, the
outbound proxy is always used.
Never
The outbound proxy is not used.
If you do not make an entry in the Outbound proxy field, the phone behaves
independently of the selected mode,
just as with Never.
Outbound proxy
Enter the (fully qualified) DNS name or
the IP address of your provider's outbound proxy.
Please note:
With many providers, the outbound proxy is
identical to the SIP proxy.
Outbound proxy port
Enter the number of the communication port used by the outbound proxy.
The default port is 5060.
Gigaset C450 IP / Greek eng / A31008-M1713-T151-3-8U19 / web_server.fm / 24.9.07
Web configurator
Version 4, 16.09.2005
Area: Voice codecs
You can influence the quality of your VoIP
connections via the parameters in the
Voice codecs area. In addition to the language codecs used, you can activate/
deactivate "Silence Suppression" and
specify the language and earpiece volume
(VoIP Volume).
Your phone supports various voice codecs
for digitalising (coding and decoding)
voice data. The voice codec used on a
phone connection has a significant influence on the voice quality, e.g. through the
time need to code/decode (voice delay).
The choice of voice codec is a compromise
between voice quality and the necessary
bandwidth.
Both sides of a phone connection (caller/
sender side and receiver side) must be
using the same voice codec. The voice
codec is negotiated between the sender
and the recipient when establishing a connection.
Set the voice codec that your phone suggests when establishing a VoIP connection.
You can choose between the following
voice codecs supported by your phone:
G729
Average voice quality. The necessary
bandwidth is less than 8 Kbit/s per
voice connection.
To save additional bandwidth and
transmission capacity, on VoIP connections that use codec G72 you can suppress the transmission of language
packages in pauses ("Silence Suppression", Enable Annex B for G729 option).
Then, instead of the background noises
in your environment, your caller hears
a synthetic noise generated in the
receiver.
Please note: "Silence Suppression"
may mean a deterioration in the voice
quality.
G711 a law/G711 µ law
Excellent voice quality (comparable
with ISDN). The necessary bandwidth is
64 Kbit/s per voice connection.
G726
Good voice quality (inferior to that with
G.711 but better than with G.729).
Your phone supports G.726 with a
transmission rate of 32 Kbit/s per voice
connection.
¤ In the VoIP Volume parameter, specify
the amplification level of the voice and
earpiece volume.
With some VoIP providers it may be the
case that the voice/earpiece volume is
too low or too high. Volume regulation
via the handset may then be insufficient.
You can pre-adjust the volume via the
VoIP Volume parameter. You specify
whether the adjustable volume range
on the handset should be raised or lowered. The following choices are available:
Low
Voice/earpiece volume is too low. If you
activate this option the volume is raised
by 6 dB.
Normal
The voice/earpiece volume does not
need to be raised/lowered.
High
Voice/earpiece volume is too high. If
you activate this option the volume is
lowered by 6 dB.
¤ In the Enable Annex B for G729 field, state
whether, when using codec G729,
transmission of data packages for
pauses is to be suppressed (Yes).
61
Gigaset C450 IP / Greek eng / A31008-M1713-T151-3-8U19 / web_server.fm / 24.9.07
Web configurator
¤ Add the voice codecs that your phone
suggests with outgoing calls to the
Selected codecs list.
Click in the Available codecs list on the
voice codec that you want to apply (you
can mark several entries using the Shift
key or the Ctrl key). Click on the <Add
button.
¤ Move the voice codecs that you do not
want the phone to use into the Available
codecs list.
Also select the voice codec in the Available codecs list (see above) and click on
the Remove> button.
¤ Sort the voice codecs in the Selected
codecs list into the order in which they
should be suggested to the receiver
when a connection is established. To
do this, use the Up and Down buttons.
When establishing a VoIP connection, the
phone suggests the 1st voice codec in the
Selected codecs list to the receiver to begin
with. If the receiver does not accept this
voice codec (e.g. because it does not support it), the 2nd voice codec in the list is
suggested etc.
If the receiver does not accept any of the
voice codecs in the Selected codecs list, the
connection is not established. An appropriate message will be displayed on the
handset.
Please note:
Version 4, 16.09.2005
– You should only deactivate codecs (put
them in the Available codecs list) if there is a
particular reason. The more codecs are
deactivated, the greater the danger that
calls will not be able to be established due
to unsuccessful codec negotiations.
– With incoming calls, all supported voice
codecs are always permitted.
62
Saving settings on phone
¤ Click on Set to save the changes.
The Connections list will be shown after
saving (see Figure 3 on page 56).
If you want to reject the changes that have
been made, click on Cancel. The Web page
is re-loaded with the data saved on the
phone.
Please note: If you do not make an entries
for a lengthy period, the connection to the
Web configurator is automatically terminated. Unsaved entries are lost. If necessary, implement temporary security measures. You can subsequently continue the
entry and make changes if necessary.
Activating a new connection
If you have configured a new VoIP connection, you must also activate it.
In the Connections list:
¤ Activate the relevant option in the
Active column ( = activated).
Your phone will register itself using the
relevant access data with the VoIP provider. If the registration is successful, after
a short period the Status column will show
registered for the connection. You can now
be reached on this VoIP phone number.
Selecting the VoIP provider and
downloading the VoIP provider data
Profile files with the general access data
for the most important VoIP providers are
available for download on the Siemens
server on the Internet. The address for the
server is stored in your phone (page 65).
Navigation:
¤ Open the following Web page:
Settings ¢ Telephony ¢ Connections.
¤ Click on the Edit button behind the first
VoIP connection.
¤ In the IP Connection area, click on the
Select VoIP Provider button.
This will display information on the download procedure.
Gigaset C450 IP / Greek eng / A31008-M1713-T151-3-8U19 / web_server.fm / 24.9.07
Web configurator
The phone establishes a connection with
the Siemens server on the Internet. The
download procedure has several steps:
¤ Click on Next.
¤ From the list, select the country for
which the list of VoIP providers is to be
loaded.
¤ Click on Next.
¤ Select a VoIP provider from the list. If
your provider is not included in the list,
select Other Provider. You will then have
to enter all the VoIP data manually
(page 57).
¤ Click on Finish.
The data for the provider selected will be
loaded onto your phone.
Activating/deactivating the
Gigaset.net connection
Version 4, 16.09.2005
Your phone is assigned a Gigaset.net
phone number on delivery. As soon as you
have connected your phone to the Internet, you can make calls using the
Gigaset.net and receive calls from other
Gigaset.net subscribers, provided that
your Gigaset.net connection has been
activated. You can deactivate the
Gigaset.net connection.
¤ Open the following Web page:
Settings ¢ Telephony ¢ Connections.
The list of connections will be displayed
(see Figure 3 on page 56).
¤ In the Gigaset.net area: use the option in
the Active column to activate ( ) or
deactivate ( ) the Gigaset.net connection.
Setting DTMF signalling for VoIP
DTMF signalling, for example is required
for playing and controlling some network
mailboxes via digit codes.
For VoIP specify how key codes are to be
converted and sent as DTMF signals: as
audible information in the voice channel
or as a "SIP Info" message.
Ask your VoIP provider which type of
DTMF transmission it supports.
¤ Open the following Web page:
Settings ¢ Telephony
¢ Advanced Settings.
In the DTMF over VoIP Connections area,
make the required settings for sending
DTMF signals. Bear in mind your provider's
guidelines.
¤ Activate Audio or RFC 2833 if DTMF signals are to be transmitted acoustically
(in voice packages).
¤ Activate SIP Info if DTMF signals are to
be transmitted as code.
¤ Now click on Set to save your settings.
63
Gigaset C450 IP / Greek eng / A31008-M1713-T151-3-8U19 / web_server.fm / 24.9.07
Web configurator
Defining local communication
ports for VoIP
Version 4, 16.09.2005
¤ Open the following Web page:
Settings ¢ Telephony
¢ Advanced Settings.
In the Listen Ports for VoIP Connections area,
specify which local ports the telephone is
to use for VoIP telephony. The ports must
not be used by any other subscriber in the
LAN.
SIP port
Specify the local communication port
that the phone should use to send and
receive signalling data. Specify a
number between 1024 and 49152. The
default port number for SIP signalling is
5060.
RTP port
Specify the local communication port
that the phone should use to send and
receive voice data. Enter an even
number between 1024 and 49152. The
port number must not be the same as
the port number in the SIP port field.
If you enter an odd number, the even
number just below it will be set
(e.g. if you enter 5003, 5002 is set).
The default port number for voice
transmission is 5004.
Use random ports
Click on the Yes option if you do not
want the phone to use fixed ports for
SIP port and RTP port, but rather to use
any free ports.
The use of random ports makes sense if
you want several phones to be operated on the same router with NAT. The
phones must then use different ports
so that the router's NAT is only able to
forward incoming calls and voice data
to one (the intended) phone.
If you click on No, the phone will use
the ports specified in SIP port and RTP
port.
¤ Now click on Set to save your settings.
64
Defining dialling plans
You can define user-specific dialling plans
for your phone.
¤ Open the following Web page:
Settings ¢ Telephony ¢ Dialing Plans.
Setting Area Code Predialling:
In VoIP calls you must generally always
dial the area code – even for local calls.
You can save the annoying need to dial the
area code for local calls by activating the
Area Code Predialling function. In VoIP calls,
the area code entered is then prefixed to
all numbers that do not start with 0 – even
when dialling numbers from the directory
and other lists.
¤ Enter your area code in the Area Code
field, e.g. 089.
¤ Click on the Yes option next to Predial
¤
area code for local calls through VoIP to
activate the function.
If you click on No you must enter the
area code even for local calls via VoIP.
Numbers in the directory must always
contain the area code for dialling via
VoIP.
Click on Set to save the settings.
Please note that if the option is activated, the
area code is prefixed to all phone numbers that
do not start with 0 and are dialled via VoIP.
This is especially the case for numbers of the
network answer machine (page 38) and,
if the Emergency calls always via fixed line option
is deactivated (see below), for emergency
numbers.
Gigaset C450 IP / Greek eng / A31008-M1713-T151-3-8U19 / web_server.fm / 24.9.07
Web configurator
Changing settings for dialling emergency
numbers
The default setting for your phone is that
emergency numbers are always dialled via
the fixed network – irrespective of which
connection type you select. The fixed network always supports emergency numbers (e.g. establishing connection to the
local police emergency number).
These emergency numbers are already
preconfigured in your phone's default settings. They are displayed on this website,
but cannot be changed.
You can enter an additional emergency
number.
You can deactivate the setting for emergency numbers to always be dialled via
the fixed network.
Warning:
– If you deactivate the Emergency calls always
via fixed line option, make sure that your
VoIP provider supports emergency numbers.
– Emergency numbers cannot be dialled if
the keypad lock is activated. Before dialling,
press and hold the hash key #, to
release the keypad lock.
¤ Enter a phone number as an additional
¤
Version 4, 16.09.2005
¤
emergency number in the User editable
number field.
If you click on No next to Emergency calls
always via fixed line, the connection via
the connection type that you indicate
during dialling is established (e.g. by
pressing and holding or briefly pressing the talk key).
If you click on the Yes option, your
phone always establishes the connection via the fixed network when dialling
one of the emergency numbers
(default setting).
Click on Set to save the settings.
Specifying the server for
firmware updates and
starting the update
If necessary, you can load updates of the
base station firmware onto your phone.
You can either download the updates
directly from the Internet or from a PC in
your local network.
Using the Web configurator you can specify from where the firmware should be
loaded.
¤ Open the following Web page:
Settings ¢ Miscellaneous.
Downloading the firmware update
directly from the Internet
The server on which Siemens makes new
firmware versions available for your base
station is set by default. The URL of the
Internet server is displayed in the Data
server field.
The firmware is loaded from the Internet if
you do not enter a local file in the User
defined firmware file field before this
update.
Please note:
– When updating from the Internet, checks
are made to ensure that no newer version
of the firmware exists. If this is not the case,
the operation is terminated.
– You should not change the URL for the
Internet server because this address is also
used to load provider information from the
Internet. If you have entered another URL,
you can re-activate the default URL by
restoring the base station default settings
(page 45).
65
Gigaset C450 IP / Greek eng / A31008-M1713-T151-3-8U19 / web_server.fm / 24.9.07
Web configurator
Conducting the firmware update
locally
Precondition: A Web server runs on the
local PC (e.g. Apache).
¤ First, load the desired version of the
firmware from the Internet onto a local
PC.
¤ In the User defined firmware file field
enter the IP address of the PC in your
local network and the complete path
and name of the firmware file on the
PC. Example: 192.168.2.105/C450IP/
Firmware_Datei.bin.
¤ Click on Set to save the changes.
This setting is automatically used for the
subsequent firmware update. The Internet server URL stays saved and is re-used
for further firmware updates. If you want
to use a local PC again for another update,
then you have to re-enter the IP address
and file name.
Please note:
If an error arises during a firmware update
from a local PC, the most recent version of the
firmware is automatically downloaded from
the Internet.
Starting the firmware update
Preconditions:
u No calls are being made via the fixed
network or VoIP.
u There is no connection between regis-
tered handsets.
u The base station menu is not open in
any of the handsets.
¤ Click on Update Firmware.
The firmware is updated. This process can
take up to 3 minutes.
Version 4, 16.09.2005
Please note:
You can also start the firmware update on the
handset (page 46).
66
Activating/deactivating the
automatic version check
When the version check is activated, the
phone checks on a daily basis whether the
Siemens configuration server is carrying a
new version of the phone firmware or of
the file with the general settings for your
VoIP provider.
If a new version is available, a notification
is sent to the handset and the message key
flashes. You can then carry out an automatic update of the firmware (page 46) or
of the VoIP provider settings (page 47).
¤ Open the following Web page:
Settings ¢ Miscellaneous.
¤ Click on the Yes option next to
¤
Automatic check for software/profile
updates to activate the automatic
version check.
Click on No if you do not want a version
check to be carried out.
Click on Set to save the changes.
Activating VoIP status message
display
Display VoIP status messages on your
handset when there are VoIP connection
problems. These messages give you information on the status of a connection and
contain a provider-specific code that helps
the service team when they are analysing
the problem.
¤ Open the following Web page: Settings
¢ Miscellaneous.
¤ Click on the Yes option after Show VoIP
¤
status on handset to activate status message display
If you click on No, no VoIP status messages are displayed.
Click on Set to save the changes.
Gigaset C450 IP / Greek eng / A31008-M1713-T151-3-8U19 / web_server.fm / 24.9.07
Web configurator
Please note:
A table with possible status codes and their
meaning can be found in the Appendix on
page 71.
Checking status information via
your phone
General information about your phone is
displayed.
¤ In the menu list, click on the Status register.
The following information is displayed:
IP Configuration
IP address
The phone's current IP address within
the local network. For assigning the IP
address, see page 54.
MAC address
The phone's device address.
Software
Version 4, 16.09.2005
Firmware version
Version of the firmware currently
downloaded. You can download
updates of the firmware on your phone
(page 46). Firmware updates are available on the Internet.
EEPROM version
Version of your phone's EEPROM storage chip (page 88).
67
Gigaset C450 IP / Greek eng / A31008-M1713-T151-3-8U19 / appendix.fm / 24.9.07
Appendix
Appendix
Care
Symbols and typographical
conventions used
a damp cloth (do not use solvent) or an
antistatic cloth.
Never use a dry cloth. This can cause
static.
Version 4, 16.09.2005
This section explains the meaning of certain symbols and typographical conventions that are used in this user guide.
~
Enter digits or letters.
§Menu§
The display functions currently
in the bottom display line are
shown in reversed highlights.
Press the relevant display key
to launch the function.
q
Press the control key up or
down, e.g. when scrolling.
c / Q / P etc.
Press the illustrated key on the
handset.
External Calls / Internal Calls (example)
Select one of the menu functions (External Calls or Internal
Calls) from the list and press
§OK§.
§Menu§ ¢ Audio Settings ¢ Ringer Melody
(example)
Press §Menu§. Select Audio Settings with q and press §OK§.
Select Ringer Melody with q
and press §OK§.
68
¤ Wipe the base station and handset with
Contact with liquid
!
If the handset has come into contact with
liquid:
¤ Switch the handset off and remove
the batteries immediately.
¤ Allow the liquid to drain from the handset.
¤ Pat all parts dry, then place the handset
with the battery compartment open
and the keypad facing down in a dry,
warm place for at least 72 hours (not
in a microwave, oven etc.).
¤ Do not switch on the handset again
until it is completely dry.
When it has fully dried out, you will normally be able to use it again.
Gigaset C450 IP / Greek eng / A31008-M1713-T151-3-8U19 / appendix.fm / 24.9.07
Appendix
Questions and answers
If you have any questions about using
your phone, visit us at any time at
www.siemens.com/gigasetcustomercare.
The table below contains a list of common
problems and possible solutions.
Please note:
To support the service team, it can be helpful if
you have the following information to hand:
– Version of firmware, EEPROM and your
phone's MAC address
You can check this information with the
Web configurator (page 67). For how to
check the MAC address displayed on your
handset, turn to page 49.
– VoIP status code (page 71)
For problems with VoIP connections, you
should set VoIP status messages to be displayed on your handset. (page 48,
page 66). These messages contain a status
code that helps when the problem is analysed.
The handset is not registered.
Register the handset (page 39).
¥
Handset does not ring.
The ringer tone is switched off.
Activate the ringer tone (page 43).
¥
You cannot hear a ring/dialling tone from
the fixed network.
Base station's phone cord has been replaced.
When purchasing a new cord, ensure that it
has the correct pin connections (page 9).
¥
When making calls from the fixed network,
the caller's phone number is not displayed
although CLIP (page 19) is set.
Phone number identification is not enabled.
The caller should ask his network provider
to enable Calling Line Identification (CLI).
¥
You hear an error tone when keying an
input (a descending tone sequence).
The display is blank.
Action has failed/invalid input.
Repeat the operation.
Watch the display and refer to the user
guide if necessary.
1. The handset is not switched on.
Press and hold the end call key a.
You cannot connect to the router and the
phone is assigned a static IP address.
¥
2. The battery is flat.
Charge the battery or replace it
(page 6).
¥
The handset does not respond to a key
press.
The keypad lock is activated.
Press and hold the hash key #
(page 21).
¥
Base flashes in the display.
1. The handset is outside the range of the
base station.
Move the handset closer to the base
station.
¥
2. The base station is not switched on.
Check the base station mains adapter
(page 8).
¥
Version 4, 16.09.2005
Please Register flashes in the display.
3. An update of the base station firmware is
currently being conducted (page 46/
page 65).
Please wait until the update is complete.
¥
¥
¥
¥
Check on the router whether the IP address
is already being used by another device in
the LAN or belongs to the block of IP
addresses that is reserved on the router for
dynamic address assignment.
If necessary, change the phone's IP address
(page 49).
You have made a call via VoIP but cannot
hear the other participant.
Your phone is connected to a router with NAT/
firewall.
Your STUN server or outbound proxy settings are incomplete or incorrect. Check the
settings (page 60, page 60).
No outbound proxy is entered or the outbound proxy mode Never is activated
(page 60) and your phone is connected to a
router with symmetric NAT or a blocking
firewall.
Port forwarding is activated on your router,
but no permanent IP address has been
assigned to your phone.
¥
¥
¥
69
Gigaset C450 IP / Greek eng / A31008-M1713-T151-3-8U19 / appendix.fm / 24.9.07
Appendix
You cannot make calls via VoIP. The display
shows Server not accessible!.
¥
First wait a few minutes. This is often a
short-term event that corrects itself after a
short time.
If the message is still displayed, proceed as follows:
Check whether your phone's Ethernet cable
is correctly connected to the router.
Check your router's cable connection to the
Internet.
Check whether the phone is connected to
the LAN. For example, set a ping command
on the phone (ping s <local IP address of
the phone>). It may be that no IP address
could be assigned to the phone or a permanently set IP address is already assigned to
another LAN subscriber. Check the settings
on the router, you may have to activate the
DHCP server.
¥
¥
¥
You cannot make calls via VoIP. The display
shows SIP registration failed!.
First wait a few minutes. This is often a
short-term event that corrects itself after a
short time.
The message may still be displayed for the following reasons:
¥
1. Your information for Username, Authentication Name and Authentication Password may
be incomplete or incorrect.
Check your information. In particular,
check your use of upper and lower case.
¥
2. The general settings for your VoIP provider
are incomplete or incorrect (incorrect
server address).
Start the Web configurator and check
the settings.
¥
You cannot establish a connection to the
phone with your PC's Web browser.
¥
Version 4, 16.09.2005
¥
¥
¥
70
When establishing a connection, check the
local phone IP address that has been
entered. You can check the IP address on
your handset (page 49).
Check the LAN connections for the PC and
phone.
Check that your phone can be reached.
Transmit a ping command to your phone,
e.g. from your PC.
You have tried to reach the phone via a
secure http (https://...). Try again with
http://....
You cannot be reached for calls from the
Internet.
¥
¥
¥
There is no entry for your phone in your
router's routing table. Check the settings
for the NAT refresh time (page 60).
Your phone is not registered with the SIP
service.
You have entered the wrong user ID or an
incorrect domain (page 57).
No firmware update or VoIP profile download
is carried out.
1. If Not possible! Try later! is displayed, the VoIP
line may be busy or a download/update is
already being carried out.
Repeat the process at a later time.
¥
2. If File corrupt! is displayed, the firmware or
profile file may be invalid.
Please use only firmware and downloads that are made available on the
preconfigured Siemens server
(page 65) or at www.siemens.com/
gigasetcustomercare.
¥
3. If Server not available! is displayed, the download server may not be accessible.
The server is currently not accessible.
Repeat the process at a later time.
You have changed the preconfigured
server address (page 65). Correct the
address. If necessary, reset the base station.
¥
¥
4. If Transmission error XXX is displayed, an
error occurred in the transmission of the
file. An HTTP error code is displayed for
XXX.
Repeat the process. If the error occurs
again, consult the Service department.
¥
5. If Please check IP settings! is displayed, your
phone may not be connected to the Internet.
Check the cable connections between
the phone and router and between the
router and the Internet.
Check whether the phone is connected
to the LAN, i.e. it can be reached at its IP
address.
¥
¥
Gigaset C450 IP / Greek eng / A31008-M1713-T151-3-8U19 / appendix.fm / 24.9.07
Appendix
VoIP status codes
If you have problems with your VoIP connections, activate the Status on HS function (page 49, page 66). You will then
receive a VoIP status code that will support you in problem analysis. Also enter
the code during problem analysis by the
Service department.
In the following tables you will find the
meanings of the most important status
codes and messages.
Status
code
Meaning
0x300
The called party can be reached
under several phone numbers. If the
VoIP provider supports this, a list of
the phone numbers is transmitted as
well as the status code. The caller can
select to which number he/she wants
to make the connection.
Meaning
0x403
The requested service is not supported by the VoIP provider.
0x404
Wrong phone number.
No subscriber to this number.
Example: In a local call you have not
dialled the area code although your
VoIP provider does not support local
calls
0x405
Method not permitted.
0x406
Not acceptable.
The requested service cannot be provided.
0x407
Proxy authentication required.
0x408
Calling partner cannot be reached
(e.g. account cancelled).
0x410
The requested service is not available
from the VoIP provider.
0x413
Message is too long.
0x414
URI is too long.
0x415
Query format is not supported.
0x416
URI is faulty.
0x420
Incorrect ending
0x421
Incorrect ending
Temporarily redirected.
The phone is informed that the called
party cannot be reached under the
number dialled. The duration of redirecting is time-limited. The phone is
also informed of the duration of redirecting.
0x423
The requested service is not supported by the VoIP provider.
0x480
The dialled number is temporarily
unavailable.
0x481
The recipient is not available.
0x482
Double service query
0x305
The query is redirected to another
"Proxy Server", e.g. to balance query
loads. The phone will make the same
query once again to another Proxy
Server. This is not a redirection of the
address per se.
0x483
0x380
Other service:
The query or the call could not be
made. But the phone is notified what
other options there are to be able to
connect the call.
Too many "hops":
The query was rejected because the
service server (proxy) has decided
that this query has already run
through too many service servers.
The maximum number was previously specified by the original sender
of the query.
0x484
Wrong number:
In most cases this response means
that you have simply omitted one or
more digits in the phone number.
0x485
The URI dialled is not unique and can
not be processed by the VoIP provider.
0x301
0x302
Version 4, 16.09.2005
Status
code
Permanently redirected.
The called party can no longer be
reached under this number. The new
number is transmitted to the phone
together with the status code, and
the phone then no longer accesses
the old number but dials the new
address immediately
0x400
Wrong call
0x401
Not authorised
71
Gigaset C450 IP / Greek eng / A31008-M1713-T151-3-8U19 / appendix.fm / 24.9.07
Appendix
Status
code
Meaning
Status
code
Meaning
0x486
The called party is busy.
0x504
Time limit at the gateway
0x487
General faults:
The call was interrupted before a call
was established. The status code confirms receipt of the interruption signal.
0x505
0x488
The server cannot process the query
because the data entered in the
media description is not compatible.
The server rejects the query because
the indicated version number of the
SIP protocol does not at least concur
with the version that the server or the
SIP device uses that is involved in this
query.
0x515
0x491
The server notifies that the query will
be processed as soon as a previous
query has been completed.
The server rejects the query because
the message exceeds the maximum
permitted size.
0x600
The called party is busy.
0x603
The called party has rejected the call.
0x493
The server rejects the query because
the phone cannot decrypt the message. The sender has used an encryption method that neither the server
nor the receiver phone can decrypt.
0x604
The called URI does not exist.
0x606
The communication settings are not
acceptable.
0x701
The called party has hung up.
0x703
Connection interrupted because of
time-out.
0x704
Connection interrupted because of a
SIP error
0x705
Wrong dialling tone
0x706
No connection established
0x751
Busy tone:
No codec match between the calling
and called subscribers.
0x810
General Socket Layer Error: User is
not authorised.
0x811
General Socket Layer Error:
Wrong Socket Number
0x812
General Socket Layer Error: Socket is
not connected.
0x813
General Socket Layer Error:
Memory error
0x814
General Socket Layer Error: Socket
not available - check IP settings/connection problem/VoIP setting incorrect
0x815
General Socket Layer Error:
Illegal application on the socket interface.
0x500
0x501
0x502
Version 4, 16.09.2005
0x503
72
The proxy or the receiving device has
discovered a fault while executing
the query, which makes further execution of the query impossible. In this
case, the caller or the phone displays
the fault and repeats the query after
a few seconds. The number of seconds after which the query can be
repeated may be transmitted to the
caller or phone by the receiving
device.
The query cannot be processed by
the recipient because the recipient
does not have the functionality that
the caller requires. If the recipient
understands the query but does not
process it because the sender does
not have the necessary rights or the
query is not permitted in the current
context, a 405 is sent instead of 501.
In this case, the receiving device that
transmits this error code is a proxy or
a gateway and has received an invalid
response from its gateway via which
this query is to be processed.
The query cannot currently be processed by the receiving device or the
proxy because the server is either
overloaded or is being serviced. If it is
possible for the query to be repeated
in the foreseeable future, the server
informs the caller or the phone of
this.
Gigaset C450 IP / Greek eng / A31008-M1713-T151-3-8U19 / appendix.fm / 24.9.07
Appendix
Voice quality and infrastructure
With your Gigaset C450 IP you have the
possibility of making calls with good voice
quality via VoIP.
However, your phone's performance with
VoIP – and therefore the voice quality –
also depends on the properties of the
entire infrastructure.
The following VoIP provider components
are just some of the things that can influence performance:
u Router
u DSLAM
u DSL transmission line and speed
u Connection paths over the Internet
u If necessary, other applications that
also use the DSL connection
In VoIP networks, the voice quality,
amongst other things, is influenced by the
"quality of service" (QoS). If the entire
infrastructure demonstrates QoS, voice
quality is better (fewer delays, less echoing, less crackling etc.).
If, for example, the router does not have
QoS, the voice quality is not as good.
Please see the specialist documentation
for further information.
Please note:
Version 4, 16.09.2005
You should observe the following for good
voice quality:
– When making calls using VoIP, avoid performing other Internet activities (e.g. surfing the net).
– Irrespective of the codec used and the network capacity utilisation, note that voice
delays can occur. Therefore, allow your
VoIP calling partner to finish speaking. Do
not interrupt him or her.
Searching for service
information
You may need the service information of
your phone (base station and handset) for
Customer Services.
Base station service information
Precondition: You are conducting an
external call. The connection has been
established for at least 8 sec.
§Menu§ ¢ Service Info
Confirm selection with §OK§.
The following information is displayed:
1: Serial number of the base station (RFPI)
2: Serial number of your handset (IPUI)
3: Informs the service employees of the
base station settings (in hex diagram),
e.g. the number of registered handsets,
repeater mode. The last 4 digits indicate
the number of operating hours (hexadecimal).
4: Variant, version of the firmware
(digits 3 to 5).
5: Gigaset.net number of your phone.
With this number you can call a service
employee over the Internet without needing to be registered with a VoIP provider.
This means that he/she can test online
connections and VoIP telephony irrespective of the VoIP provider.
Service information of the handset
In the handset idle status:
¤ Press §Menu§.
¤ Enter * # 0 6 #.
The following information is displayed via
the handset:
1: Serial number (IPUI)
2: Number of operating hours
3: Variant, version of handset software
73
Gigaset C450 IP / Greek eng / A31008-M1713-T151-3-8U19 / appendix.fm / 24.9.07
Appendix
Service (Customer Care)
Authorisation
We offer you support that is fast and tailored to your specific needs!
Our Online Support on the Internet can be
reached any time from anywhere.
http://www.siemens.com/gigasetcustomercare
It provides you with 24/7 support for all
our products. It also provides a list of FAQs
and answers plus user guides and current
software updates (if available for the product) for you to download.
You will also find frequently asked questions and answers in the appendix of this
user guide.
For fast and dependable assistance with
any repairs or guarantee/warranty claims,
contact our Customer Care Line.
Greece 801 11 11 11 6 (0,026 Euro)
Please have your proof of purchase ready
when calling.
Replacement or repair services are not
offered in countries where our product is
not sold by authorised dealers.
This device is designed for the analogic
telephone connection in the greek telephone net.
Voice over IP telephony is possible with an
additional modem via the LAN interface.
Siemens Home and Office Communication Devices GmbH & Co. KG hereby
declares that the phone described in this
user guide is in compliance with the
essential requirements and other relevant
provisions of European Directive 1999/5/
EC (R&TTE).
If you require a copy of the original, visit
the website:
http://www.siemens.com/gigasetdocs.
Version 4, 16.09.2005
Please address any questions about DSL
access and VoIP access to the respective
service provider.
74
Gigaset C450 IP / Greek eng / A31008-M1713-T151-3-8U19 / appendix.fm / 24.9.07
Appendix
Version 4, 16.09.2005
Guarantee Certificate
Without prejudice to any claim the user
(customer) may have in relation to the
dealer, the customer shall be granted a
manufacturer's Guarantee under the conditions set out below:
u In the case of new devices and their
components exhibiting defects resulting from manufacturing and/or material faults within 24 months of purchase, Siemens shall, at its own option
and free of charge, either replace the
device with another device reflecting
the current state of the art, or repair the
said device. In respect of parts subject
to wear and tear (e.g., batteries, keypads, casings), this warranty shall be
valid for six months from the date of
purchase.
u This Guarantee shall be invalid if the
equipment defect is attributable to
improper treatment and/or failure to
comply with information contained in
the user manuals.
u This Guarantee shall not extend to services performed by the authorised
dealer or the customer themselves
(e.g. installation, configuration, software downloads). User manuals and
any software supplied on a separate
data medium shall be excluded from
the Guarantee.
u The purchase receipt, together with the
date of purchase, shall be required as
evidence for invoking the Guarantee.
Claims under the Guarantee must be
submitted within two months of the
Guarantee default becoming evident.
u Ownership of devices or components
replaced by and returned to Siemens
shall vest in Siemens.
u This Guarantee shall apply to new
devices purchased in the European
Union. The Guarantee is issued by Siemens Home and Office Communication Devices GmbH & Co. KG, Schlavenhorst 66, D-46395 Bocholt, Germany.
u Any claims that differ from or extend
beyond these mentioned in this manufacturer’s warranty shall be excluded,
except from cases expressly specified in
the applicable law. (In no event shall
Siemens be liable for any loss of business, profits or data, additional software loaded by the customer or other
information. The customer shall also
bear the responsibility for the creation
of backup copies of their files. The limitation of liability shall not apply if and
to the extent liability is mandatory
under the applicable law, e.g. according to product liability law or in the
event of intentional misconduct, severe
negligence, personal injury, damage to
parts of the human body or to personal
health, or in case of violations of conventional obligations. However, the
claims for damages related to violation
of conventional obligations shall be
limited to predictable damages, representative of such conventions, as long
as there is no intention or severe negligence, personal injury, damage to
parts of the human body or to personal
health, according to the product liability law.)
u The duration of the Guarantee shall not
be extended by services rendered
under the terms of the Guarantee.
u Insofar as no Guarantee default exists,
Siemens reserves the right to charge
the customer for replacement or repair.
u The above provisions do not imply a
change in the burden of proof to the
detriment of the customer.
To invoke this Guarantee, please contact
the Siemens telephone service. The relevant number is to be found in the accompanying user guide.
75
Gigaset C450 IP / Greek eng / A31008-M1713-T151-3-8U19 / appendix.fm / 24.9.07
Appendix
Specifications
Recommended rechargeable batteries
(Valid at the time of going to press)
Nickel-metal-hydride (NiMH):
u Sanyo Twicell 650
u Sanyo Twicell 700
u Sanyo NiMH 800
u Panasonic 700 mAh "for DECT"
u GP 550mAh
u GP 700mAh
u GP 850mAh
u Yuasa Technology AAA Phone 600
u Yuasa Technology AAA Phone 700
u Yuasa Technology AAA 800
u VARTA Phone Power AAA 700mAh
The handset is supplied with two recommended batteries.
Handset operating times/charging
times
The following information relates to batteries with a capacity of 650 mAh.
General specifications
Interfaces
Fixed network, Ethernet
DECT standard
is supported
GAP standard
is supported
No. of channels
60 duplex channels
Radio frequency
range
1880–1900 MHz
Duplex method
Time multiplex,
10 ms frame length
Channel grid
1728 kHz
Bit rate
1152 kbit/s
Modulation
GFSK
Language code
32 kbit/s
Transmission
power
10 mW,
average power per channel
Range
up to 300 m outdoors,
up to 50 m indoors
Base station
power supply
230 V ~/50 Hz
Environmental
conditions for
operation
+5 °C to +45 °C;
20 % to 75 % relative
humidity
Dialling mode
DTMF (touch tone dialling)/DP (dial pulsing)
Standby time
around 125 hours (5 days)
Talktime
around 13 hours
Flashing time
250 ms
Charging time
around 7.5 hours
Codecs
G711, G726, G729AB with
VAD/CNG
The operating and charging times apply
only when using the recommended batteries.
Base station power consumption
Depending on current status,
around 2.5 W.
Quality of Service TOS, DiffServ
Protocols
DECT, SIP, RTP, DHCP, NAT
Traversal (STUN)
Base station
dimensions
105 x 132 x 46 mm
(L x W x D)
Dimensions,
handset
141 x 53 x 31mm
(L × W × H)
Base station
weight
130 g
Version 4, 16.09.2005
Weight of handset 116 g
with battery
76
Gigaset C450 IP / Greek eng / A31008-M1713-T151-3-8U19 / appendix.fm / 24.9.07
Appendix
Writing and editing a text
message
The following rules apply when writing a
text message:
u The cursor is controlled with t s.
u Characters are added to the left of the
cursor.
u Press the hash key # briefly to switch
from "Abc" mode to "123", from "123"
to "abc", and from "abc" to "Abc" (upper
case: 1st letter upper case, all others
lower case). Press the hash key #
before entering the letter.
u Press the hash key # 3 times: shows
the selection line of the characters
assigned to the hash key.
u The first letter of the name of directory
entries is automatically capitalised, followed by lower case letters.
Order of directory entries
The directory entries are usually sorted in
alphabetical order. Spaces and digits take
first priority. The sort order is as follows:
1. Space (shown here as s)
2. Digits (0–9)
3. Letters (alphabetical)
4. Other characters
To get round the alphabetical order of the
entries, insert a space or a digit in front of
the name. These entries will then move to
the beginning of the directory. Names
which you have preceded with an asterisk
will move to the end of the directory.
Entering special characters
Standard characters
1
Q
P
#
*)
**)
Editing text
1x
Space
Space
.
*
Abc-->
123
When you press a key and hold it, the
characters of that key appear in the bottom display line and are highlighted one
after the other. When you release the key
the highlighted character is inserted into
the input field. For how to enter special
characters, see page 77.
The display briefly shows whether upper
or lower case letters or digits are selected
when you switch from one mode to the
next: the bottom text line displays "abc ->
Abc", "Abc -> 123" or "123 -> abc".
2x
1
Â
,
/
123 -->
abc
3x
£
1
?
(
#
4x
$
â
!
)
@
5x
¥
£
0
<
\
6x
¤
$
+
=
&
7x
¥
-
>
§
8x
¤
:
%
9x
¿
10x
¡
11x
“
12x
‘
13x
;
14x
_
Version 4, 16.09.2005
*) Directory and other lists
**) When writing an SMS
77
Gigaset C450 IP / Greek eng / A31008-M1713-T151-3-8U19 / appendix.fm / 24.9.07
Appendix
Greek
1
Q
Version 4, 16.09.2005
#
*)
**)
1x
Space
Space
.
*
Abc-->
123
2x
1
Â
,
/
123 -->
abc
3x
£
1
?
(
#
4x
$
â
!
)
@
5x
£
0
<
\
6x
$
+
=
&
7x
-
>
§
8x
:
%
9x
“
10x
‘
11x
;
12x
_
*) Directory and other lists
**) When writing an SMS
78
P
Gigaset C450 IP – Free software
Your Gigaset C450 IP's firmware contains,
amongst other things, free software that
is licensed under the GNU Lesser General
Public License. This free software was
developed by a third party and is protected
by copyright. You will find the licence text
in its original English version on the pages
that follow.
The software is provided free of charge.
You are authorised to use this free software in accordance with the above-mentioned licence conditions. In the event of
contradictions between these licence conditions and the licence conditions that
apply for the software according to Siemens Home and Office Communication
Devices GmbH & Co. KG, the above-mentioned licence conditions shall take precedence for the free software.
The GNU Lesser General Public License
(LGPL) is supplied with this product. You
can also download the licence conditions
from the Internet:
u The LGPL is available on the Internet at:
http://www.gnu.org/copyleft/lesser.html
u The source text, including copyright
notices for free software, is currently
available on the Internet at:
http://www.siemens.com/developer/
c455ip
For more information and Internet links to
the source text of the free software, see
the Online Support pages on the Internet
at:
www.siemens.com/gigasetcustomercare
Gigaset C450 IP / Greek eng / A31008-M1713-T151-3-8U19 / appendix.fm / 24.9.07
Appendix
If it is not already supplied with the product, you can request the source text,
including copyright notices, from Siemens. There is a charge to cover the cost
of copying and postage. Please submit this
request by Email or fax to the following
address or fax number within 3 years of
purchasing this product. Please state the
exact device type plus the version number
of the installed device software.
Small Parts Dispatch Com Bocholt
Email:
[email protected]
Fax:
02871 / 91 30 29
Version 4, 16.09.2005
Use of the free software contained in this
product extending beyond the program
sequence intended by Siemens is at the
user's own risk – i.e. there shall be no
claims for liability for defects against Siemens Home and Office Communication
Devices GmbH & Co. KG. The GNU Lesser
General Public License contains notes
regarding the author's liability for defects
or other proprietors of the free software.
You shall have no right to assert a claim
against Siemens Home and Office Communication Devices GmbH & Co. KG based
on liability for defects, if a defect in the
product is or could be due to changes you
have made to the programs or their configuration. Furthermore, you shall have no
right to assert a claim against Siemens
Home and Office Communication Devices
GmbH & Co. KG based on liability for
defects if the free software violates the
copyright of third parties.
Siemens shall not provide technical support for the software, including the free
software included within it, if it has been
changed.
GNU LESSER GENERAL PUBLIC
LICENSE
Version 2.1, February 1999
Copyright (C) 1991, 1999 Free Software
Foundation, Inc., 59 Temple Place, Suite 330,
Boston, MA 02111-1307 USA
Everyone is permitted to copy and distribute
verbatim copies of this license document, but
changing it is not allowed.
[This is the first released version of the Lesser
GPL. It also counts as the successor of the GNU
Library Public License, version 2, hence the
version number 2.1.]
Preamble
The licenses for most software are designed to
take away your freedom to share and change it.
By contrast, the GNU General Public Licenses
are intended to guarantee your freedom to
share and change free software--to make sure
the software is free for all its users.
This license, the Lesser General Public License,
applies to some specially designated software
packages--typically libraries--of the Free Software Foundation and other authors who decide
to use it. You can use it too, but we suggest you
first think carefully about whether this license
or the ordinary General Public License is the
better strategy to use in any particular case,
based on the explanations below.
When we speak of free software, we are referring to freedom of use, not price. Our General
Public Licenses are designed to make sure that
you have the freedom to distribute copies of
free software (and charge for this service if you
wish); that you receive source code or can get it
if you want it; that you can change the software
and use pieces of it in new free programs; and
that you are informed that you can do these
things.
To protect your rights, we need to make restrictions that forbid distributors to deny you these
rights or to ask you to surrender these rights.
These restrictions translate to certain responsibilities for you if you distribute copies of the
library or if you modify it.
For example, if you distribute copies of the
library, whether gratis or for a fee, you must
give the recipients all the rights that we gave
you. You must make sure that they, too, receive
or can get the source code. If you link other
code with the library, you must provide complete object files to the recipients, so that they
can relink them with the library after making
changes to the library and recompiling it. And
you must show them these terms so they know
their rights.
79
Gigaset C450 IP / Greek eng / A31008-M1713-T151-3-8U19 / appendix.fm / 24.9.07
Version 4, 16.09.2005
Appendix
We protect your rights with a two-step method:
(1) we copyright the library, and (2) we offer
you this license, which gives you legal permission to copy, distribute and/or modify the
library.
To protect each distributor, we want to make it
very clear that there is no warranty for the free
library. Also, if the library is modified by someone else and passed on, the recipients should
know that what they have is not the original
version, so that the original author's reputation
will not be affected by problems that might be
introduced by others.
Finally, software patents pose a constant threat
to the existence of any free program. We wish
to make sure that a company cannot effectively
restrict the users of a free program by obtaining
a restrictive license from a patent holder. Therefore, we insist that any patent license obtained
for a version of the library must be consistent
with the full freedom of use specified in this
license.
Most GNU software, including some libraries, is
covered by the ordinary GNU General Public
License. This license, the GNU Lesser General
Public License, applies to certain designated
libraries, and is quite different from the ordinary General Public License. We use this license
for certain libraries in order to permit linking
those libraries into non-free programs.
When a program is linked with a library,
whether statically or using a shared library, the
combination of the two is legally speaking a
combined work, a derivative of the original
library. The ordinary General Public License
therefore permits such linking only if the entire
combination fits its criteria of freedom. The
Lesser General Public License permits more lax
criteria for linking other code with the library.
We call this license the "Lesser" General Public
License because it does Less to protect the
user's freedom than the ordinary General Public
License. It also provides other free software
developers Less of an advantage over competing non-free programs. These disadvantages
are the reason we use the ordinary General
Public License for many libraries. However, the
Lesser license provides advantages in certain
special circumstances.
For example, on rare occasions, there may be a
special need to encourage the widest possible
use of a certain library, so that it becomes a defacto standard. To achieve this, non-free programs must be allowed to use the library. A
more frequent case is that a free library does
the same job as widely used non-free libraries.
In this case, there is little to gain by limiting the
80
free library to free software only, so we use the
Lesser General Public License.
In other cases, permission to use a particular
library in non-free programs enables a greater
number of people to use a large body of free
software. For example, permission to use the
GNU C Library in non-free programs enables
many more people to use the whole GNU operating system, as well as its variant, the GNU/
Linux operating system.
Although the Lesser General Public License is
Less protective of the users' freedom, it does
ensure that the user of a program that is linked
with the Library has the freedom and the
wherewithal to run that program using a modified version of the Library.
The precise terms and conditions for copying,
distribution and modification follow. Pay close
attention to the difference between a "work
based on the library" and a "work that uses the
library". The former contains code derived from
the library, whereas the latter must be combined with the library in order to run.
GNU LESSER GENERAL PUBLIC LICENSE
TERMS AND CONDITIONS FOR COPYING, DISTRIBUTION AND MODIFICATION
0. This License Agreement applies to any software library or other program which contains a
notice placed by the copyright holder or other
authorized party saying it may be distributed
under the terms of this Lesser General Public
License (also called "this License"). Each licensee is addressed as "you".
A "library" means a collection of software functions and/or data prepared so as to be conveniently linked with application programs (which
use some of those functions and data) to form
executables.
The "Library", below, refers to any such software library or work which has been distributed
under these terms. A "work based on the
Library" means either the Library or any derivative work under copyright law: that is to say, a
work containing the Library or a portion of it,
either verbatim or with modifications and/or
translated straightforwardly into another language. (Hereinafter, translation is included
without limitation in the term "modification".)
"Source code" for a work means the preferred
form of the work for making modifications to it.
For a library, complete source code means all
the source code for all modules it contains, plus
any associated interface definition files, plus
the scripts used to control compilation and
installation of the library.
Gigaset C450 IP / Greek eng / A31008-M1713-T151-3-8U19 / appendix.fm / 24.9.07
Version 4, 16.09.2005
Appendix
Activities other than copying, distribution and
modification are not covered by this License;
they are outside its scope. The act of running a
program using the Library is not restricted, and
output from such a program is covered only if
its contents constitute a work based on the
Library (independent of the use of the Library in
a tool for writing it). Whether that is true
depends on what the Library does and what the
program that uses the Library does.
1. You may copy and distribute verbatim copies
of the Library's complete source code as you
receive it, in any medium, provided that you
conspicuously and appropriately publish on
each copy an appropriate copyright notice and
disclaimer of warranty; keep intact all the
notices that refer to this License and to the
absence of any warranty; and distribute a copy
of this License along with the Library.
You may charge a fee for the physical act of
transferring a copy, and you may at your option
offer warranty protection in exchange for a fee.
2. You may modify your copy or copies of the
Library or any portion of it, thus forming a work
based on the Library, and copy and distribute
such modifications or work under the terms of
Section 1 above, provided that you also meet all
of these conditions:
a) The modified work must itself be a software
library.
b) You must cause the files modified to carry
prominent notices stating that you changed the
files and the date of any change.
c) You must cause the whole of the work to be
licensed at no charge to all third parties under
the terms of this License.
d) If a facility in the modified Library refers to a
function or a table of data to be supplied by an
application program that uses the facility, other
than as an argument passed when the facility is
invoked, then you must make a good faith
effort to ensure that, in the event an application does not supply such function or table, the
facility still operates, and performs whatever
part of its purpose remains meaningful.
(For example, a function in a library to compute
square roots has a purpose that is entirely welldefined independent of the application. Therefore, Subsection 2d requires that any application-supplied function or table used by this
function must be optional: if the application
does not supply it, the square root function
must still compute square roots.)
These requirements apply to the modified work
as a whole. If identifiable sections of that work
are not derived from the Library, and can be
reasonably considered independent and sepa-
rate works in themselves, then this License, and
its terms, do not apply to those sections when
you distribute them as separate works. But
when you distribute the same sections as part
of a whole which is a work based on the Library,
the distribution of the whole must be on the
terms of this License, whose permissions for
other licensees extend to the entire whole, and
thus to each and every part regardless of who
wrote it.
Thus, it is not the intent of this section to claim
rights or contest your rights to work written
entirely by you; rather, the intent is to exercise
the right to control the distribution of derivative
or collective works based on the Library.
In addition, mere aggregation of another work
not based on the Library with the Library (or
with a work based on the Library) on a volume
of a storage or distribution medium does not
bring the other work under the scope of this
License.
3. You may opt to apply the terms of the ordinary GNU General Public License instead of this
License to a given copy of the Library. To do
this, you must alter all the notices that refer to
this License, so that they refer to the ordinary
GNU General Public License, version 2, instead
of to this License. (If a newer version than version 2 of the ordinary GNU General Public
License has appeared, then you can specify that
version instead if you wish.) Do not make any
other change in these notices.
Once this change is made in a given copy, it is
irreversible for that copy, so the ordinary GNU
General Public License applies to all subsequent
copies and derivative works made from that
copy.
This option is useful when you wish to copy part
of the code of the Library into a program that is
not a library.
4. You may copy and distribute the Library (or a
portion or derivative of it, under Section 2) in
object code or executable form under the terms
of Sections 1 and 2 above provided that you
accompany it with the complete corresponding
machine-readable source code, which must be
distributed under the terms of Sections 1 and 2
above on a medium customarily used for software interchange.
If distribution of object code is made by offering
access to copy from a designated place, then
offering equivalent access to copy the source
code from the same place satisfies the requirement to distribute the source code, even
though third parties are not compelled to copy
the source along with the object code.
81
Gigaset C450 IP / Greek eng / A31008-M1713-T151-3-8U19 / appendix.fm / 24.9.07
Version 4, 16.09.2005
Appendix
5. A program that contains no derivative of any
portion of the Library, but is designed to work
with the Library by being compiled or linked
with it, is called a "work that uses the Library".
Such a work, in isolation, is not a derivative
work of the Library, and therefore falls outside
the scope of this License.
However, linking a "work that uses the Library"
with the Library creates an executable that is a
derivative of the Library (because it contains
portions of the Library), rather than a "work
that uses the library". The executable is therefore covered by this License.
Section 6 states terms for distribution of such
executables.
When a "work that uses the Library" uses material from a header file that is part of the Library,
the object code for the work may be a derivative
work of the Library even though the source
code is not.
Whether this is true is especially significant if
the work can be linked without the Library, or if
the work is itself a library. The threshold for this
to be true is not precisely defined by law.
If such an object file uses only numerical
parameters, data structure layouts and accessors, and small macros and small inline functions (ten lines or less in length), then the use
of the object file is unrestricted, regardless of
whether it is legally a derivative work. (Executables containing this object code plus portions
of the Library will still fall under Section 6.)
Otherwise, if the work is a derivative of the
Library, you may distribute the object code for
the work under the terms of Section 6.
Any executables containing that work also fall
under Section 6, whether or not they are linked
directly with the Library itself.
6. As an exception to the Sections above, you
may also combine or link a "work that uses the
Library" with the Library to produce a work containing portions of the Library, and distribute
that work under terms of your choice, provided
that the terms permit modification of the work
for the customer's own use and reverse engineering for debugging such modifications.
You must give prominent notice with each copy
of the work that the Library is used in it and that
the Library and its use are covered by this
License. You must supply a copy of this License.
If the work during execution displays copyright
notices, you must include the copyright notice
for the Library among them, as well as a reference directing the user to the copy of this
License. Also, you must do one of these things:
a) Accompany the work with the complete corresponding machine-readable source code for
82
the Library including whatever changes were
used in the work (which must be distributed
under Sections 1 and 2 above); and, if the work
is an executable linked with the Library, with
the complete machine-readable "work that uses
the Library", as object code and/or source code,
so that the user can modify the Library and then
relink to produce a modified executable containing the modified Library. (It is understood
that the user who changes the contents of definitions files in the Library will not necessarily
be able to recompile the application to use the
modified definitions.)
b) Use a suitable shared library mechanism for
linking with the Library. A suitable mechanism
is one that (1) uses at run time a copy of the
library already present on the user's computer
system, rather than copying library functions
into the executable, and (2) will operate properly with a modified version of the library, if the
user installs one, as long as the modified version is interface-compatible with the version
that the work was made with.
c) Accompany the work with a written offer,
valid for at least three years, to give the same
user the materials specified in Subsection 6a,
above, for a charge no more than the cost of
performing this distribution.
d) If distribution of the work is made by offering
access to copy from a designated place, offer
equivalent access to copy the above specified
materials from the same place.
e) Verify that the user has already received a
copy of these materials or that you have already
sent this user a copy.
For an executable, the required form of the
"work that uses the Library" must include any
data and utility programs needed for reproducing the executable from it. However, as a special exception, the materials to be distributed
need not include anything that is normally distributed (in either source or binary form) with
the major components (compiler, kernel, and
so on) of the operating system on which the
executable runs, unless that component itself
accompanies the executable.
It may happen that this requirement contradicts
the license restrictions of other proprietary
libraries that do not normally accompany the
operating system. Such a contradiction means
you cannot use both them and the Library
together in an executable that you distribute.
7. You may place library facilities that are a
work based on the Library side-by-side in a single library together with other library facilities
not covered by this License, and distribute such
a combined library, provided that the separate
Gigaset C450 IP / Greek eng / A31008-M1713-T151-3-8U19 / appendix.fm / 24.9.07
Version 4, 16.09.2005
Appendix
distribution of the work based on the Library
and of the other library facilities is otherwise
permitted, and provided that you do these two
things:
a) Accompany the combined library with a copy
of the same work based on the Library, uncombined with any other library facilities. This must
be distributed under the terms of the Sections
above.
b) Give prominent notice with the combined
library of the fact that part of it is a work based
on the Library, and explaining where to find the
accompanying uncombined form of the same
work.
8. You may not copy, modify, sublicense, link
with, or distribute the Library except as
expressly provided under this License. Any
attempt otherwise to copy, modify, sublicense,
link with, or distribute the Library is void, and
will automatically terminate your rights under
this License. However, parties who have
received copies, or rights, from you under this
License will not have their licenses terminated
so long as such parties remain in full compliance.
9. You are not required to accept this License,
since you have not signed it. However, nothing
else grants you permission to modify or distribute the Library or its derivative works. These
actions are prohibited by law if you do not
accept this License. Therefore, by modifying or
distributing the Library (or any work based on
the Library), you indicate your acceptance of
this License to do so, and all its terms and conditions for copying, distributing or modifying
the Library or works based on it.
10. Each time you redistribute the Library (or
any work based on the Library), the recipient
automatically receives a license from the original licensor to copy, distribute, link with or
modify the Library subject to these terms and
conditions. You may not impose any further
restrictions on the recipients' exercise of the
rights granted herein.
You are not responsible for enforcing compliance by third parties with this License.
11. If, as a consequence of a court judgment or
allegation of patent infringement or for any
other reason (not limited to patent issues), conditions are imposed on you (whether by court
order, agreement or otherwise) that contradict
the conditions of this License, they do not
excuse you from the conditions of this License.
If you cannot distribute so as to satisfy simultaneously your obligations under this License and
any other pertinent obligations, then as a consequence you may not distribute the Library at
all. For example, if a patent license would not
permit royalty-free redistribution of the Library
by all those who receive copies directly or indirectly through you, then the only way you could
satisfy both it and this License would be to
refrain entirely from distribution of the Library.
If any portion of this section is held invalid or
unenforceable under any particular circumstance, the balance of the section is intended to
apply, and the section as a whole is intended to
apply in other circumstances.
It is not the purpose of this section to induce
you to infringe any patents or other property
right claims or to contest validity of any such
claims; this section has the sole purpose of protecting the integrity of the free software distribution system which is implemented by public
license practices. Many people have made generous contributions to the wide range of software distributed through that system in reliance on consistent application of that system; it
is up to the author/donor to decide if he or she
is willing to distribute software through any
other system and a licensee cannot impose that
choice.
This section is intended to make thoroughly
clear what is believed to be a consequence of
the rest of this License.
12. If the distribution and/or use of the Library
is restricted in certain countries either by patents or by copyrighted interfaces, the original
copyright holder who places the Library under
this License may add an explicit geographical
distribution limitation excluding those countries, so that distribution is permitted only in or
among countries not thus excluded. In such
case, this License incorporates the limitation as
if written in the body of this License.
13. The Free Software Foundation may publish
revised and/or new versions of the Lesser General Public License from time to time. Such new
versions will be similar in spirit to the present
version, but may differ in detail to address new
problems or concerns.
Each version is given a distinguishing version
number. If the Library specifies a version
number of this License which applies to it and
"any later version", you have the option of following the terms and conditions either of that
version or of any later version published by the
Free Software Foundation. If the Library does
not specify a license version number, you may
choose any version ever published by the Free
Software Foundation.
14. If you wish to incorporate parts of the
Library into other free programs whose distribution conditions are incompatible with these,
83
Gigaset C450 IP / Greek eng / A31008-M1713-T151-3-8U19 / appendix.fm / 24.9.07
Appendix
write to the author to ask for permission. For
software which is copyrighted by the Free Software Foundation, write to the Free Software
Foundation; we sometimes make exceptions
for this. Our decision will be guided by the two
goals of preserving the free status of all derivatives of our free software and of promoting the
sharing and reuse of software generally.
NO WARRANTY
15. BECAUSE THE LIBRARY IS LICENSED FREE OF
CHARGE, THERE IS NO WARRANTY FOR THE
LIBRARY, TO THE EXTENT PERMITTED BY APPLICABLE LAW.
EXCEPT WHEN OTHERWISE STATED IN WRITING
THE COPYRIGHT HOLDERS AND/OR OTHER PARTIES PROVIDE THE LIBRARY "AS IS" WITHOUT
WARRANTY OF ANY KIND, EITHER EXPRESSED
OR IMPLIED, INCLUDING, BUT NOT LIMITED TO,
THE IMPLIED WARRANTIES OF MERCHANTABILITY AND FITNESS FOR A PARTICULAR PURPOSE.
THE ENTIRE RISK AS TO THE QUALITY AND PERFORMANCE OF THE LIBRARY IS WITH YOU.
SHOULD THE LIBRARY PROVE DEFECTIVE, YOU
ASSUME THE COST OF ALL NECESSARY SERVICING, REPAIR OR CORRECTION.
16. IN NO EVENT UNLESS REQUIRED BY APPLICABLE LAW OR AGREED TO IN WRITING WILL
ANY COPYRIGHT HOLDER, OR ANY OTHER
PARTY WHO MAY MODIFY AND/OR REDISTRIBUTE THE LIBRARY AS PERMITTED ABOVE, BE LIABLE TO YOU FOR DAMAGES, INCLUDING ANY
GENERAL, SPECIAL, INCIDENTAL OR CONSEQUENTIAL DAMAGES ARISING OUT OF THE USE
OR INABILITY TO USE THE LIBRARY (INCLUDING
BUT NOT LIMITED TO LOSS OF DATA OR DATA
BEING RENDERED INACCURATE OR LOSSES SUSTAINED BY YOU OR THIRD PARTIES OR A FAILURE
OF THE LIBRARY TO OPERATE WITH ANY OTHER
SOFTWARE), EVEN IF SUCH HOLDER OR OTHER
PARTY HAS BEEN ADVISED OF THE POSSIBILITY
OF SUCH DAMAGES.
END OF TERMS AND CONDITIONS
How to Apply These Terms to Your New
Libraries
If you develop a new library, and you want it to
be of the greatest possible use to the public, we
recommend making it free software that everyone can redistribute and change. You can do so
by permitting redistribution under these terms
(or, alternatively, under the terms of the ordinary General Public License).
To apply these terms, attach the following
notices to the library. It is safest to attach them
to the start of each source file to most effectively convey the exclusion of warranty; and
each file should have at least the "copyright"
line and a pointer to where the full notice is
found.
<one line to give the library's name and a brief
idea of what it does.>
Copyright (C) <year> <name of author>
This library is free software; you can redistribute it and/or modify it under the terms of the
GNU Lesser General Public License as published by the Free Software Foundation; either
version 2.1 of the License, or (at your option)
any later version.
This library is distributed in the hope that it will
be useful, but WITHOUT ANY WARRANTY;
without even the implied warranty of MERCHANTABILITY or FITNESS FOR A PARTICULAR
PURPOSE. See the GNU Lesser General Public
License for more details.
You should have received a copy of the GNU
Lesser General Public License along with this
library; if not, write to the Free Software Foundation, Inc., 59 Temple Place, Suite 330, Boston, MA 02111-1307 USA
Also add information on how to contact you by
electronic and paper mail.
You should also get your employer (if you work
as a programmer) or your school, if any, to sign
a "copyright disclaimer" for the library, if necessary. Here is a sample; alter the names:
Version 4, 16.09.2005
Yoyodyne, Inc., hereby disclaims all copyright
interest in the library `Frob' (a library for
tweaking knobs) written by James Random
Hacker. <signature of Ty Coon>, 1 April 1990
Ty Coon, President of Vice
84
Gigaset C450 IP / Greek eng / A31008-M1713-T151-3-8U19 / accessories_SAG.fm / 12.3.07
Accessories
Accessories
Gigaset Handsets
Upgrade your Gigaset to a cordless PABX:
Gigaset Handset C45
u
u
u
u
u
u
u
u
u
Illuminated colour display (4096 colours)
Various different screensavers
Illuminated keypad
Handsfree mode
Polyphonic ringer melodies
Directory for around 100 entries
SMS (Precondition: CLIP must be enabled)
Alarm clock
Headset socket
www.siemens.com/gigaset
Version 4, 16.09.2005
All accessories and batteries are available from your phone retailer.
Only use original accessories. This will avoid possible health risks and damage, and also ensure that all the relevant regulations are complied with.
85
Gigaset C450 IP / Greek eng / A31008-M1713-T151-3-8U19 / glossary.fm / 24.9.07
Glossary
Glossary
A
ADSL
Asymmetric Digital Subscriber Line
Special form of DSL.
ALG
Application Layer Gateway
NAT control mechanism of a router.
Many routers with integrated NAT use
ALG. ALG lets the data packets in a VoIP
connection pass and adds the public IP
address of the secure private network.
The router's ALG should be deactivated
if the VoIP provider offers a STUN server
or an outbound proxy.
See also: Firewall, NAT, Outbound
proxy, STUN.
Authentication
Restriction of access to a network/service by use of a password to log in.
Automatic ringback
See Ringback when the number is
busy.
B
Block dialling
Enter the complete phone number, and
correct it if necessary. Then pick up the
receiver or press the handsfree key to
dial the phone number.
Broadband Internet access
See DSL.
C
Call forwarding
Version 4, 16.09.2005
CF
Automatic forwarding of a call to a different telephone number. There are
three kinds of call forwarding:
– CFU, Call Forwarding Unconditional
– CFB, Call Forwarding Busy
– CFNR, Call Forwarding No Reply
86
Call waiting
VoIP provider feature. A beep during a
call indicates that another caller is waiting. You can accept or reject the second
call. You can activate/deactivate the
feature.
CF
Call Forwarding
See Call forwarding.
Client
Application that requests a service
from a server.
Codec
Coder/decoder
Codec is a procedure that digitises and
compresses analogue voice before it is
sent via the Internet and decodes –
i.e.translates into analogue voice – digital data when voice packets are
received. There are different codecs
that vary, for instance, according to the
level of compression.
Both parties involved in the telephone
connection (caller/sender and recipient) must use the same codec. This is
negotiated between the sender and the
recipient when establishing a connection.
The choice of codec is a compromise
between voice quality, transmission
speed and the necessary bandwidth. A
high level of compression, for example,
means that the bandwidth required for
each voice connection is low. However,
it also means that the time needed to
compress/decompress the data is
greater, which increases execution
time for data in the network and thus
impairs voice quality. The time required
increases the delay between the sender
speaking and the recipient hearing
what has been said.
Gigaset C450 IP / Greek eng / A31008-M1713-T151-3-8U19 / glossary.fm / 24.9.07
Glossary
Consultation call
You are making a call. With a consultation call, you interrupt the conversation
briefly to establish a connection to
another participant. If you terminate
the connection to this participant
immediately, then this was an enquiry
call. If you switch to and fro between
the first and second participants, it is
called Toggling.
CW
See Call waiting.
DMZ (Demilitarised Zone)
DMZ describes a part of a network that
is outside the firewall.
A DMZ is set up, as it were, between a
network you want to protect (e.g. a
LAN) and a non-secure network (e.g.
the Internet). A DMZ permits unrestricted access from the Internet to only
one or a few network components,
while the other network components
remain secure behind the firewall.
DNS
D
Domain Name System
DHCP
Dynamic Host Configuration Protocol
Version 4, 16.09.2005
Internet protocol that regulates the
automatic assignment of IP addresses
to Network subscribers. The protocol
is made available in the network by a
server. A DHCP server can e.g. be a
router.
The phone contains a DHCP client. A
router that contains a DHCP server can
assign the IP addresses for the phone
automatically from a defined address
block. This dynamic assignment means
that several Network subscribers can
share one IP address, although they use
it alternately and not simultaneously.
With some routers you can specify that
the IP address for the phone is never
changed.
Displayed name
VoIP provider feature. You can specify
any name that is to be shown to the
other party call instead of your phone
number.
Hierarchical system that permits the
assignment of IP addresses to Domain
names that are easier to note. This
assignment has to be managed by a
local DNS server in each (W)LAN. The
local DNS server determines the IP
address, if necessary by enquiring of
superordinate DNS servers and other
local DNS servers in the Internet.
You can specify the IP address of the
primary/secondary DNS server.
See also: DynDNS.
Domain name
Name of one (or several) Web server(s)
on the Internet (e.g. Siemens-Home).
The domain name is assigned to the relevant IP address by DNS.
DSCP
Differentiated Service Code Point
See Quality of Service (QoS).
DSL
Digital Subscriber Line
Data transfer technology which allows
Internet access at e.g. 1.5 Mbps over
conventional phone lines. Preconditions: DSL modem and the appropriate
service offered by the Internet provider.
87
Gigaset C450 IP / Greek eng / A31008-M1713-T151-3-8U19 / glossary.fm / 24.9.07
Glossary
DSLAM
Digital Subscriber Line Access Multiplexer
The DSLAM is a switch cabinet in an
exchange at which all subscriber connectors converge.
DTMF
Dual Tone Multi-Frequency
Dynamic IP Address
A dynamic IP address is assigned to a
network component automatically via
DHCP. The dynamic IP address for a
network component can change every
time it registers or in certain time intervals.
See also: Static IP address
DynDNS
Dynamic DNS
DNS is used to assign domain names
and IP addresses. For Dynamic IP
Addresses this service is now
enhanced with "Dynamic DNS". This
permits the use of a PC with a changing
IP address as a Server on the Internet.
DynDNS ensures that a service in the
Internet can always be addressed under
the same Domain name irrespective of
the current IP address.
E
ECT
Explicit Call Transfer
Participant A calls Participant B. He puts
the connection on hold and calls Participant C. Rather than connect everyone
in a three-party conference, A now
transfers Participant B to C and hangs
up.
EEPROM
Version 4, 16.09.2005
Electrically Eraseable Programmable Read Only
Memory
Your phone's storage chip with fixed
data (e.g. user-specific device settings
made at the factory) and automatically
saved data (e.g. caller list entries).
Ethernet network
Wired LAN.
88
F
Firewall
You can use a firewall to protect your
network against unauthorised external
access. This involves combining various
measures and technologies (hard and/
or software) to control the flow of data
between a private network you wish to
protect and an unprotected network
(e.g. the Internet).
See also: NAT.
Firmware
Device software in which basic information is saved for the functioning of a
device. A new version of the firmware
can be loaded into the device's memory
(firmware update) to correct errors or
update the device software.
Flat rate
System of billing for an Internet connection. The Internet provider charges
a set monthly fee. There are no additional charges for the duration of the
connection or number of connections.
Fragmentation
Data packets that are too big are split
into smaller packets (fragments) before
they are transferred. They are put
together again when they reach the
recipient (defragmented).
Full duplex
Data transmission mode in which data
can be sent and received at the same
time.
Gigaset C450 IP / Greek eng / A31008-M1713-T151-3-8U19 / glossary.fm / 24.9.07
Glossary
G
H
G.711 a law, G.711 µ law
Standard for a Codec.
G.711 delivers a very good voice quality that corresponds to that in the ISDN
fixed network. As there is little compression, the necessary bandwidth is
approx. 64 Kbit/s per voice connection,
but the delay caused by coding/decoding is only 0.125 ms.
"a law" describes the European standard and "μ law" describes the North
American/Japanese equivalent.
G.726
Standard for a Codec.
G.726 delivers a good voice quality. It is
inferior to the quality with codec G.711
but better than with G.729.
G.729A/B
Standard for a Codec.
The voice quality is rather less with
G.729A/B. As a result of the high level
of compression, the necessary bandwidth is only approx. 8 Kbit/s per voice
connection, but the delay is approx. 15
ms.
Gateway
Connects two different Networks with
one another, e.g. router as Internet
gateway.
For phone calls from VoIP to the telephone network, a gateway has to be
connected to the IP network and the
telephone network (gateway/VoIP provider). It forwards calls from VoIP to the
telephone network as required.
Gateway Provider
See SIP Provider.
GSM
Headset
Combination of microphone and headphone. A headset makes handsfree
talking more comfortable. There are
headsets available which are connected to the handset by a cable.
Hold music
Music on hold
Music is played while you are making
a Consultation call or Toggling.
The waiting participant hears music
while on hold.
HTTP proxy
Sever via which the Network subscribers can process their Internet traffic.
Hub
Connects several Network subscribers
in one Infrastructure network. All
data sent to the hub by one network
subscriber is forwarded to all network
subscribers.
See also: Gateway, Router.
Version 4, 16.09.2005
Global System for Mobile Communication
Originally, European standard for
mobile networks. GSM can now be
described as a worldwide standard. In
the USA and Japan national standards
are now more frequently supported
than in the past.
89
Gigaset C450 IP / Greek eng / A31008-M1713-T151-3-8U19 / glossary.fm / 24.9.07
Glossary
I
IEEE
Institute of Electrical and Electronics Engineers
Version 4, 16.09.2005
International body that defines standards in electronics and electrotechnology, concerned in particular with the
standardisation of LAN technology,
transmission protocols, data transfer
rate and wiring.
Infrastructure network
Network with central structure:
all Network subscribers communicate
via a central Router.
Internet
Global WAN. A series of protocols have
been defined for exchanging data,
known by the name TCP/IP.
Every Network subscribers is identifiable via its IP address. DNS assigns a
Domain name to the IP address.
Important services on the Internet
include the World Wide Web (WWW),
Email, file transfer and discussion
forums.
Internet Service Provider
Enables access to the Internet for a fee.
IP (Internet Protocol)
TCP/IP protocol on the Internet. IP is
responsible for the addressing of subscribers in a Network using IP
addresses, and routes data from the
sender to the recipient. IP determines
the paths (routing) along which the
data packets travel.
IP address
A unique address for a network component within a network on the basis of
the TCP/IP protocols (e.g. LAN, Internet). On the Internet, domain names
are usually assigned instead of IP
addresses. DNS assigns the corresponding IP address to the domain
name.
90
The IP address consists of four parts
(decimal numbers between 0 and 255)
separated by points (e.g.
230.94.233.2).
The IP address is made up of the network number and the number of the
Network subscribers (e.g. phone).
Depending on the Subnet mask, the
front one, two or three parts make up
of the network number and the rest of
the IP address addresses the network
components. The network number of
all the components in any one network
must be identical.
IP addresses can be assigned automatically with DHCP (dynamic IP addresses)
or manually (static IP addresses).
See also: DHCP.
IP pool range
Range of IP addresses that the DHCP
server can use to assign dynamic IP
addresses.
L
LAN
Local Area Network
Network with a restricted physical
range. A LAN can be wireless (WLAN)
and/or wired.
Local IP Address
The local or private IP address is the
address for a network component in
the local network (LAN). The network
operator can assign any address he or
she wants. Devices that act as a link
from a local network to the Internet
(gateway or router) have a public and a
private IP address.
See also: IP address.
Local SIP Port
See SIP port/Local SIP port.
Gigaset C450 IP / Greek eng / A31008-M1713-T151-3-8U19 / glossary.fm / 24.9.07
Glossary
M
MAC address
Media Access Control Address
Hardware address by means of which
each network device (e.g. network
card, switch, phone) can be uniquely
identified worldwide. It is composed of
six parts (hexadecimal numbers), separated by a "-" (e.g. 00-90-65-44-00-3A).
The MAC address is assigned by the
manufacturer and cannot be changed.
Mbps
Million bits per second
Unit of the transmission speed in a network.
MRU
Maximum Receive Unit
Defines the maximum user data volume within a data packet.
MTU
Maximum Transmission Unit
Defines the maximum length of a data
packet that can be carried over the network at a time.
N
NAT
Version 4, 16.09.2005
Network Address Translation
Method for converting (private) IP
addresses to one or more (public)
IP addresses. NAT enables the IP
addresses of Network subscribers
(e.g. VoIP telephones) in a LAN to be
concealed behind a shared IP address
for the Router on the Internet.
VoIP telephones behind a NAT router
cannot be reached by VoIP servers (on
account of the private IP address). In
order to "get around" NAT, it is possible
to use (alternatively) ALG in the router,
STUN in the VoIP telephone, or for the
VoIP provider to use an Outbound
proxy.
If an outbound proxy is made available
you must allow for this in the VoIP settings for your phone.
Network
Group of devices. Devices can be connected in either wired or wireless
mode.
Networks can also differ in range and
structure:
– Range: local networks (LAN) or
wide-area networks (WAN)
– Structure: Infrastructure network
or Ad-hoc network
Network subscribers
Devices and computers that are connected to each other in a network, e.g.
servers, PCs and phones.
O
Outbound proxy
Alternative NAT control mechanism to
STUN and ALG.
Outbound proxies are implemented by
the VoIP provider in Firewall/NAT environments as an alternative to SIP Proxy
Server. They control data traffic
through the firewall.
Outbound proxy and STUN servers
should not be used simultaneously.
See also: STUN and NAT.
P
PIN
Personal Identification Number
Protects against unauthorised use.
When the PIN is activated a number
combination has to be entered in order
to access a protected area.
You can protect your base station configuration data with a system PIN (4digit number combination).
Port
Data is exchanged between two applications in a Network across a port.
91
Gigaset C450 IP / Greek eng / A31008-M1713-T151-3-8U19 / glossary.fm / 24.9.07
Glossary
Version 4, 16.09.2005
Port Forwarding
The Internet gateway (e.g. your router)
forwards data packets from the Internet that are directed to a certain Port
to the port concerned. This allows servers in the LAN to offer services on the
Internet without you needing a public
IP address.
Port Number
Indicates a specific application of a
Network subscribers. Depending on
the setting in the LAN, the port
number is permanently assigned or
else it is newly assigned with each
access.
The combination of IP address/Port
number identifies the recipient or
sender of a data packet within a network.
Pre-dialling
See Block dialling.
Private IP Address
See Public IP address.
Protocol
Describes the agreements for communicating within a Network. It contains
rules for opening, administering and
closing a connection, about data formats, time frames and possible error
handling.
Proxy/Proxy Server
Computer program that controls the
exchange of data between Client and
Server in computer networks. If the
phone sends a query to the VoIP server,
the proxy acts as a server towards the
phone and as a client towards the
server. A proxy is addressed via the
IP address/Domain name and Port.
92
Public IP address
The public IP address is the address for
a network component on the Internet.
It is assigned by the Internet Service
Provider. Devices that act as a link from
a local network to the Internet (gateway or router) have a public and a local
IP address.
See also: IP address, NAT
Q
Quality of Service (QoS)
Describes the Quality of Service in communication networks. Differentiations
are made between various Quality of
Service classes.
QoS influences the flow of data packets
on the Internet e.g. by prioritising data
packets, bandwidth reservation and
packet optimisation.
In VoIP networks, QoS influences the
voice quality. If the whole infrastructure (router, network server etc.) has
QoS, the voice quality is better, i.e.
fewer delays, less echoing, less crackling.
R
RAM
Random Access Memory
Memory in which you have reading and
storage rights. Such items as melodies
and screen pictures are saved in the
RAM after being loaded onto the phone
via the Web configurator.
Registrar
The registrar manages the Network
subscribers current IP addresses.
When you register with your VoIP provider, your current IP address is saved
on the registrar. This means you can
also be reached when on the move.
Gigaset C450 IP / Greek eng / A31008-M1713-T151-3-8U19 / glossary.fm / 24.9.07
Glossary
Ringback when the call is not answered
= CCNR (Completion of Calls on No
Reply). If a participant does not
respond when called, a caller can
arrange an automatic ringback. As
soon as the destination phone has
completed a call and is free again the
caller is rung back. This feature must be
supported by the exchange. The ringback request is automatically cancelled
after about 2 hours (depending on the
VoIP provider).
Ringback when the number is busy
= CCBS (Completion of Calls to Busy
Subscriber). If a caller hears the busy
tone, he or she can activate the ringback function. As soon as the connection is free the caller is rung back. As
soon as the caller lifts his receiver the
connection is made automatically.
ROM
Read Only Memory
Version 4, 16.09.2005
A type of memory that can only be
read, as opposed to RAM which can be
both read and written.
Router
Routes data packets within a network
and between different networks via the
quickest route. Can connect Ethernet
network and WLAN. Can be the gateway to the Internet.
Routing
Routing is the transmission of data
packets to another subscriber in your
network. On its way to the recipient,
the data packet is sent from one router
to the next until it reaches its destination.
If data packets were not forwarded in
this way, a network like the Internet
would not be possible. Routing connects the individual network to this global system.
A router is a part of this system; it transmits data packets both within a network and from one network to the
next. Transmission of data from one
network to another is performed on the
basis of a common protocol.
RTP
Realtime Transport Protocol
Global standard for transferring audio
and video data. Often used in conjunction with UDP. In this case, RTP packets
are embedded in UDP packets.
RTP port
(Local) Port by means of which voice
data packets are sent and received for
VoIP.
S
Server
Makes a service available to other Network subscribers (Clients). The term
can indicate a computer/PC or an application. A server is addressed via the
IP address/Domain name and Port.
SIP (Session Initiation Protocol)
Signalling protocol independent of
voice communication. Used for establishing and ending a call. It is also possible to define parameters for voice
transmission.
SIP Address
See URI.
SIP port/Local SIP port
(Local) Port by means of which SIP signalling data is sent and received for
VoIP.
SIP Provider
See VoIP provider.
SIP Proxy Server
IP address of your VoIP provider's gateway server.
Static IP address
A static IP address is assigned to a network component manually during network configuration. Unlike a Dynamic
IP Address, a static IP address never
changes.
93
Gigaset C450 IP / Greek eng / A31008-M1713-T151-3-8U19 / glossary.fm / 24.9.07
Glossary
STUN
TLS
Simple Transversal of UDP over NAT
Transport Layer Security
NAT control mechanism.
STUN is a data protocol for VoIP telephones. STUN replaces the private IP
address in the data packets of the VoIP
telephone with the public address of
the secure private network. To control
data transfer, a STUN server is also
required on the Internet. STUN cannot
be implemented by symmetric NATs.
See also: ALG, Firewall, NAT,
Outbound proxy.
Subnet
Segment of a Network.
Protocol for encrypting data transmissions on the Internet. TLS is a superordinated Transport Protocol.
Toggling
Toggling allows you to switch between
two callers or between a conference
call and an individual caller without
allowing the waiting caller to listen in.
Transmission rate
Speed at which data is transmitted in
the WAN or LAN. The transmission rate
is measured in data units per unit of
time (Mbit/s).
Transport Protocol
Controls data transport between communication partners (applications).
See also: UDP, TCP, TLS.
Subnet mask
IP addresses consist of a fixed network
number and a variable subscriber
number. The network number is identical for all Network subscribers. The
proportion of the IP address made up of
the network number is determined in
the subnet mask. For the subnet mask
255.255.255.0, for example, the first
three parts of the IP address are the network number and the last part the subscriber number.
Symmetric NAT
A symmetric NAT assigns different
external IP addresses and port numbers
to the same internal IP addresses and
port numbers – depending on the
external target address.
T
TCP
Transmission Control Protocol
Version 4, 16.09.2005
Transport Protocol. Session-based
transmission protocol: it sets up, monitors and terminates a connection
between sender and recipient for transporting data.
94
U
UDP
User Datagram Protocol
Transport Protocol. Unlike TCP, UDP is
a non session-based protocol. It does
not establish a fixed connection. The
data packets (datagrams) are sent as
Broadcast. The recipient is solely
responsible for making sure the data is
received. The sender is not notified
about whether it is received.
URI
Uniform Resource Identifier
Character string used to identify
resources (e.g. Email recipient, http://
siemens.com, files).
On the Internet URIs are used as a
unique identification for resources.
URIs are also described as an SIP
address.
URIs can be entered in the phone as a
number. By dialling a URI you can call
an Internet subscriber with VoIP equipment.
Gigaset C450 IP / Greek eng / A31008-M1713-T151-3-8U19 / glossary.fm / 24.9.07
Glossary
URL
Universal Resource Locator
Globally unique address of a domain on
the Internet.
A URL is a subtype of URI. URLs identify
a resource by its location) on the Internet. For historical reasons the term is
often used as a synonym for URI.
User ID
See User recognition.
User recognition
Name/number combination for access
e.g. to your VoIP account.
V
Voice codec
See Codec.
VoIP
Voice over Internet Protocol
Calls are no longer established and
transmitted via the telephone network,
but via the Internet (or other IP networks).
VoIP provider
A VoIP, SIP or Gateway Provider is an
Internet service provider that provides
a Gateway for Internet telephony. As
the phone works with the SIP standard,
your provider must support the SIP
standard.
The provider routes calls from VoIP to
the telephone network (analogue,
ISDN and mobile radio) and vice versa.
W
WAN
Wide Area Network
Version 4, 16.09.2005
Wide-area network that is unrestricted
in terms of area (e.g. Internet).
95
Gigaset C450 IP / Greek eng / A31008-M1713-T151-3-8U19 / C450IP_laenderSIX.fm / 12.3.07
Index
Index
Numerics
24 hours in advance (alarm clock) . . . 44
Version 4, 16.09.2005
A
Access to Web configurator
from other networks . . . . . . . . . . 55
Accessories . . . . . . . . . . . . . . . . . . . . 85
Activating
advisory tones . . . . . . . . . . . . . . . . 43
Annex B for G729 . . . . . . . . . . . . . . 61
call acceptance . . . . . . . . . . . . . . . . 42
handset . . . . . . . . . . . . . . . . . . . . . . 1
handsfree talking . . . . . . . . . . . . . . 20
keypad lock . . . . . . . . . . . . . . . . . . 21
SMS function . . . . . . . . . . . . . . . . . 36
Activating/deactivating repeater
operation . . . . . . . . . . . . . . . . . . 45
Activating/deactivating SMS
function . . . . . . . . . . . . . . . . . . . 36
ADSL . . . . . . . . . . . . . . . . . . . . . . . . . 86
Advisory tones . . . . . . . . . . . . . . . . . . 43
Alarm clock . . . . . . . . . . . . . . . . . . . . 44
key. . . . . . . . . . . . . . . . . . . . . . . . . . 1
setting . . . . . . . . . . . . . . . . . . . . . . 44
setting ringer tone . . . . . . . . . . . . . 43
snooze . . . . . . . . . . . . . . . . . . . . . . 44
Alarm repeat . . . . . . . . . . . . . . . . . . . 44
ALG . . . . . . . . . . . . . . . . . . . . . . . . . . 86
Alternative DNS server
(Web configurator) . . . . . . . . . . . 55
Answering machine, see also
Network mailbox
Application Layer Gateway (ALG) . . . . 86
Area code, dial automatically . . . . . . . 64
Asymmetric Digital Subscriber Line . . . 86
Audio
advisory tones . . . . . . . . . . . . . . . . 43
battery warning tone . . . . . . . . . . . 43
changing ringer tone . . . . . . . . . . . 43
Authentication . . . . . . . . . . . . . . . . . . 86
Authorisation . . . . . . . . . . . . . . . . . . . 74
Auto-answer . . . . . . . . . . . . . . . . 19, 42
Automatic area code
activating/deactivating . . . . . . . . . . 64
Automatic version check . . . . . . . . . . 66
Available codecs . . . . . . . . . . . . . . . . 62
96
B
Backlight . . . . . . . . . . . . . . . . . . . . . 42
Base station
changing system PIN . . . . . . . . . . . 45
connecting . . . . . . . . . . . . . . . . . . . 8
connecting with fixed network . . . . . 9
connecting with mains power
supply. . . . . . . . . . . . . . . . . . . . 9
connecting with router . . . . . . . . . . 9
installation . . . . . . . . . . . . . . . . . . . 8
operating on PABX . . . . . . . . . . . . . 50
power consumption . . . . . . . . . . . . 76
restoring to factory settings . . . . . . 45
searching for service information . . 73
setting . . . . . . . . . . . . . . . . . . . . . 45
setting default connection . . . . . . . 46
updating firmware . . . . . . . . . . . . . 46
Battery
charging . . . . . . . . . . . . . . . . . . 7, 10
display . . . . . . . . . . . . . . . . . . . . 1, 7
fitting . . . . . . . . . . . . . . . . . . . . . . . 6
icon . . . . . . . . . . . . . . . . . . . . . 7, 10
recommended batteries . . . . . . . . . 76
warning tone . . . . . . . . . . . . . . . . . 43
Belt clip . . . . . . . . . . . . . . . . . . . . . . 13
Block dialling . . . . . . . . . . . . . . . . . . 86
Broadband Internet access . . . . . . . . . 86
Buttons (Web configurator) . . . . . . . . 54
C
Call
acceptance . . . . . . . . . . . . . . . . . . 42
answering . . . . . . . . . . . . . . . . . . . 19
disconnecting (toggling) . . . . . . . . 28
duration . . . . . . . . . . . . . . . . . . . . 32
ending . . . . . . . . . . . . . . . . . . . . . 18
external. . . . . . . . . . . . . . . . . . . . . 19
internal . . . . . . . . . . . . . . . . . . . . . 41
making settings . . . . . . . . . . . . . . . 27
transferring (connect) . . . . . . . . . . 41
Call forwarding . . . . . . . . . . . . . . 27, 86
VoIP (handset) . . . . . . . . . . . . . . . . 27
VoIP (Web configurator) . . . . . . . . . 58
Call waiting . . . . . . . . . . . . . . . . 86, 87
accepting/rejecting . . . . . . . . . . . . 28
activating/deactivating . . . . . . . . . . 28
internal call . . . . . . . . . . . . . . . . . . 41
Caller list . . . . . . . . . . . . . . . . . . . . . 31
Gigaset C450 IP / Greek eng / A31008-M1713-T151-3-8U19 / C450IP_laenderSIX.fm / 12.3.07
Index
Version 4, 16.09.2005
Calling
entering IP address . . . . . . . . . . . . . 18
external . . . . . . . . . . . . . . . . . . . . . 18
selecting connection type . . . . . . . . 18
Calling Line Identification. . . . . . . . . . 19
Cancelling (operation) . . . . . . . . . . . . 23
Care of the telephone . . . . . . . . . . . . 68
CF . . . . . . . . . . . . . . . . . . . . . . . . . . . 86
CF (Call Forwarding) . . . . . . . . . . 27, 86
Changing PIN . . . . . . . . . . . . . . . . . . . 45
Changing system PIN . . . . . . . . . . . . . 45
Changing the dialling mode . . . . . . . . 50
Characters
deleting . . . . . . . . . . . . . . . . . . . . . 23
Charge status display . . . . . . . . . . . 7, 10
Charging status (battery) . . . . . . . . . 1, 7
Checking EEPROM version
(Web configurator) . . . . . . . . . . . 67
Checking firmware version
(Web configurator) . . . . . . . . . . . 67
CLI, CLIP . . . . . . . . . . . . . . . . . . . . . . 19
Client . . . . . . . . . . . . . . . . . . . . . . . . 86
CNIP . . . . . . . . . . . . . . . . . . . . . . 19, 32
Codec . . . . . . . . . . . . . . . . . . . . . . . . 86
selecting (Web configurator) . . . . . . 61
Colour scheme . . . . . . . . . . . . . . . . . . 42
Conference call . . . . . . . . . . . . . . . . . 28
Conferring (internal) . . . . . . . . . . . . . 41
Configuring
VoIP connection (Web configurator) 56
Configuring via your PC . . . . . . . . . . . 51
Confirmation tone . . . . . . . . . . . . . . . 43
Connecting
with Web configurator . . . . . . . . . . 51
Connecting PC with Web
configurator . . . . . . . . . . . . . . . . 51
Connecting the charging cradle . . . . . . 7
Connection
activate (VoIP) . . . . . . . . . . . . . . . . 62
name (Web configurator) . . . . . . . . 56
Connection socket for headset . . . . 1, 13
Contrast . . . . . . . . . . . . . . . . . . . . . . 42
Control key . . . . . . . . . . . . . . . . . . 1, 21
Correcting incorrect input . . . . . . . . . 23
Customer Care . . . . . . . . . . . . . . . . . . 74
CW . . . . . . . . . . . . . . . . . . . . . . . . . . 87
D
Data packets, fragmentation . . . . . . . 88
Data server
for download . . . . . . . . . . . . . . . . . 65
specifying for firmware update . . . . 65
Deactivating
advisory tones . . . . . . . . . . . . . . . . 43
call acceptance . . . . . . . . . . . . . . . 42
handset . . . . . . . . . . . . . . . . . . . . . . 1
handsfree talking . . . . . . . . . . . . . . 20
keypad lock . . . . . . . . . . . . . . . . . . 21
microphone . . . . . . . . . . . . . . . . . . 21
SMS function . . . . . . . . . . . . . . . . . 36
Default connection
selecting . . . . . . . . . . . . . . . . . . . . 18
setting . . . . . . . . . . . . . . . . . . . . . 46
Default gateway (Web
configurator) . . . . . . . . . . . . . . . 55
Defining dialling plans . . . . . . . . . . . . 64
Demilitarised Zone . . . . . . . . . . . . . . 87
De-registering
handset . . . . . . . . . . . . . . . . . . . . . 40
with Web configurator . . . . . . . . . . 52
DHCP . . . . . . . . . . . . . . . . . . . . . 87, 88
Dialling
directory . . . . . . . . . . . . . . . . . . . . 29
mode . . . . . . . . . . . . . . . . . . . . . . 50
with quick dial . . . . . . . . . . . . . . . . 30
Differentiated Service Code Point. . . . 87
Digital clock . . . . . . . . . . . . . . . . . . . 42
Digital Subscriber Line . . . . . . . . . . . . 87
Digital Subscriber Line
Access Multiplexer . . . . . . . . . . . 88
Directory . . . . . . . . . . . . . . . . . . . . . 29
opening . . . . . . . . . . . . . . . . . . . . 22
order of entries . . . . . . . . . . . . . . . 77
save entry . . . . . . . . . . . . . . . . . . . 29
saving the first number . . . . . . . . . 29
saving the sender’s number
(SMS) . . . . . . . . . . . . . . . . . . . 36
select an entry . . . . . . . . . . . . . . . . 29
send entry/list to handset . . . . . . . . 30
using to enter numbers . . . . . . . . . 30
Display
backlight . . . . . . . . . . . . . . . . . . . . 42
call duration . . . . . . . . . . . . . . . . . 32
changing display language . . . . . . . 42
97
Gigaset C450 IP / Greek eng / A31008-M1713-T151-3-8U19 / C450IP_laenderSIX.fm / 12.3.07
Index
colour scheme . . . . . . . . . . . . . . . . 42
contrast . . . . . . . . . . . . . . . . . . . . . 42
in idle status . . . . . . . . . . . . . . . . . . . 1
name (CNIP) . . . . . . . . . . . . . . . . . . 19
network mailbox message . . . . . . . . 38
number (CLI/CLIP) . . . . . . . . . . . . . . 19
screensaver . . . . . . . . . . . . . . . . . . 42
setting . . . . . . . . . . . . . . . . . . . . . . 42
Display keys . . . . . . . . . . . . . . . . . . 1, 22
Displayed name . . . . . . . . . . . . . . . . . 87
Displayed name (VoIP) . . . . . . . . . . . . 58
Displaying further settings . . . . . . . . . 57
DMZ . . . . . . . . . . . . . . . . . . . . . . . . . 87
DNS. . . . . . . . . . . . . . . . . . . . . . . . . . 87
DNS server
alternative (Web configurator) . . . . 55
preferred (Web configurator) . . . . . 55
Domain . . . . . . . . . . . . . . . . . . . . . . . 58
Domain name . . . . . . . . . . . . . . . . . . 87
Domain Name System . . . . . . . . . . . . 87
Download
data server . . . . . . . . . . . . . . . . . . . 65
VoIP provider data. . . . . . . . . . . 11, 47
DSCP . . . . . . . . . . . . . . . . . . . . . . . . . 87
DSL . . . . . . . . . . . . . . . . . . . . . . . . . . 87
DSLAM . . . . . . . . . . . . . . . . . . . . . . . 88
DTMF (tone dialling) . . . . . . . . . . . . . 50
DTMF signalling for VoIP . . . . . . . . . . . 63
Dynamic DNS . . . . . . . . . . . . . . . . . . . 88
Dynamic Host Configuration
Protocol . . . . . . . . . . . . . . . . . . . 87
Dynamic IP address . . . . . . . . . . . . . . 88
DynDNS . . . . . . . . . . . . . . . . . . . . . . . 88
Version 4, 16.09.2005
E
Earpiece mode . . . . . . . . . . . . . . . . . . 20
Earpiece volume . . . . . . . . . . . . . . . . 42
Emergency number
dialling . . . . . . . . . . . . . . . . . . . . . . 21
entering (Web configurator) . . . . . . 65
Emergency numbers
always dial via fixed network . . . . . . 65
End call key . . . . . . . . . . . . . . . . . . 1, 18
Ending, call . . . . . . . . . . . . . . . . . . . . 18
Enquiry call . . . . . . . . . . . . . . . . . 28, 87
Enter pause . . . . . . . . . . . . . . . . . . . . . 1
Error tone . . . . . . . . . . . . . . . . . . . . . 43
98
Ethernet network . . . . . . . . . . . . . . . 88
Explicit Call Transfer . . . . . . . . . . . . . 88
F
Fast access
directory entry . . . . . . . . . . . . . . . . 30
network mailbox . . . . . . . . . . . . . . 38
Firewall . . . . . . . . . . . . . . . . . . . . . . 88
Firmware . . . . . . . . . . . . . . . . . . . . . 88
automatic update . . . . . . . . . . 46, 66
Firmware update
direct from the Internet . . . . . . . . . 65
from local PC . . . . . . . . . . . . . . . . . 66
specifying data server . . . . . . . . . . 65
starting (handset) . . . . . . . . . . . . . 46
starting (Web configurator) . . . . . . 66
Fixed network connection
name (Web configurator) . . . . . . . . 56
Flash
entering . . . . . . . . . . . . . . . . . . . . . 1
Flat rate . . . . . . . . . . . . . . . . . . . . . . 88
Fragmentation of data packets . . . . . 88
Free software
licences . . . . . . . . . . . . . . . . . . . . . 78
Full duplex . . . . . . . . . . . . . . . . . . . . 88
G
G711 μ law . . . . . . . . . . . . . . . . . . . . 61
G711 a law . . . . . . . . . . . . . . . . . . . . 61
G726 . . . . . . . . . . . . . . . . . . . . . . . . 61
G729 . . . . . . . . . . . . . . . . . . . . . . . . 61
Gateway . . . . . . . . . . . . . . . . . . . . . . 89
Gateway Provider . . . . . . . . . . . . . . . 89
Gigaset.net . . . . . . . . . . . . . . . . . . . . 24
calling subscriber . . . . . . . . . . . 25, 26
displaying number . . . . . . . . . . . . . 25
entering number in directory . . . . . 25
searching for subscriber . . . . . . . . . 24
Gigaset.net directory
enter own name . . . . . . . . . . . . . . 11
searching for subscriber . . . . . . . . . 24
specifying/editing own name . . . . . 26
Global System for
Mobile Communication. . . . . . . . 89
GNU Lesser General Public Licence . . . 78
GSM . . . . . . . . . . . . . . . . . . . . . . . . . 89
Guarantee Certificate . . . . . . . . . . . . 75
Gigaset C450 IP / Greek eng / A31008-M1713-T151-3-8U19 / C450IP_laenderSIX.fm / 12.3.07
Index
H
Handset
activating/deactivating . . . . . . . . 1, 21
advisory tones . . . . . . . . . . . . . . . . 43
changing internal names. . . . . . . . . 40
changing internal number . . . . . . . . 40
charging times . . . . . . . . . . . . . . . . 76
contact with liquid . . . . . . . . . . . . . 68
de-registering . . . . . . . . . . . . . . . . . 40
display language. . . . . . . . . . . . . . . 42
idle status . . . . . . . . . . . . . . . . . . . 22
loudspeaker volume . . . . . . . . . 22, 42
muting . . . . . . . . . . . . . . . . . . . . . . 21
operating and charging times . . . . . 76
operating time . . . . . . . . . . . . . . . . 76
paging . . . . . . . . . . . . . . . . . . . . . . 40
registering . . . . . . . . . . . . . . . . . . . 39
restoring to factory settings . . . . . . 44
searching for service information . . 73
setting (individual) . . . . . . . . . . . . . 42
setup . . . . . . . . . . . . . . . . . . . . . . . . 6
transferring a call . . . . . . . . . . . . . . 41
using as an alarm . . . . . . . . . . . . . . 44
using several . . . . . . . . . . . . . . . . . 39
Handsfree key . . . . . . . . . . . . . . . . . . . 1
Handsfree talking. . . . . . . . . . . . . . . . 20
Hash key . . . . . . . . . . . . . . . . . . . . 1, 21
Headset . . . . . . . . . . . . . . . . . . 1, 13, 89
Hearing aids . . . . . . . . . . . . . . . . . . . . 4
Hiding further settings . . . . . . . . . . . . 57
Hold music . . . . . . . . . . . . . . . . . 21, 89
HTTP Proxy . . . . . . . . . . . . . . . . . . . . 89
Hub . . . . . . . . . . . . . . . . . . . . . . . . . . 89
I
Version 4, 16.09.2005
Idle status
back to . . . . . . . . . . . . . . . . . . . . . . 22
display . . . . . . . . . . . . . . . . . . . . . . . 1
IEEE. . . . . . . . . . . . . . . . . . . . . . . . . . 90
Incorrect input (correction) . . . . . . . . 23
Increasing/decreasing language/
earpiece volume for VoIP . . . . . . . 61
Infrastructure Network . . . . . . . . . . . . 90
Installation, base station . . . . . . . . . . . 8
Institute of Electrical and
Electronics Engineers . . . . . . . . . . 90
Interface language
Web configurator . . . . . . . . . . . . . . 51
Internal
conferring . . . . . . . . . . . . . . . . . . . 41
making calls . . . . . . . . . . . . . . . . . 41
Internal call . . . . . . . . . . . . . . . . . . . 41
call waiting . . . . . . . . . . . . . . . . . . 41
Internet . . . . . . . . . . . . . . . . . . . . . . 90
Internet access (broadband) . . . . . . . 86
Internet Protocol . . . . . . . . . . . . . . . . 90
Internet service provider . . . . . . . . . . 90
Introduction to VoIP . . . . . . . . . . . . . . 6
IP . . . . . . . . . . . . . . . . . . . . . . . . . . . 90
IP address . . . . . . . . . . . . . . . . . . . . . 90
assigning automatically/
manually (handset) . . . . . . . . . 48
assigning automatically/manually
(Web configurator) . . . . . . . . . 54
checking (Web configurator) . . . . . 67
dynamic . . . . . . . . . . . . . . . . . . . . 88
entering . . . . . . . . . . . . . . . . . . . . 18
local . . . . . . . . . . . . . . . . . . . . . . . 90
private . . . . . . . . . . . . . . . . . . . . . 92
public . . . . . . . . . . . . . . . . . . . . . . 92
specifying (web configurator). . . . . 55
static . . . . . . . . . . . . . . . . . . . . . . . 93
structure . . . . . . . . . . . . . . . . . . . . 90
IP address (Web configurator) . . . . . . 55
IP address type . . . . . . . . . . . . . . . . . 54
IP pool range . . . . . . . . . . . . . . . . . . 90
IPUI . . . . . . . . . . . . . . . . . . . . . . . . . 73
K
Key click . . . . . . . . . . . . . . . . . . . . . . 43
Keying in (instructions) . . . . . . . . . . . 68
Keypad lock . . . . . . . . . . . . . . . . . . . 21
Keys
alarm clock key . . . . . . . . . . . . . . . . 1
assigning directory entry . . . . . . . . 30
control key . . . . . . . . . . . . . . . . 1, 21
display keys . . . . . . . . . . . . . . . . 1, 22
end call key . . . . . . . . . . . . . 1, 18, 23
handsfree key . . . . . . . . . . . . . . . . . 1
hash key . . . . . . . . . . . . . . . . . . 1, 21
keypad lock . . . . . . . . . . . . . . . . . . 21
message key . . . . . . . . . . . . . . . 1, 31
on/off key . . . . . . . . . . . . . . . . . . . . 1
99
Gigaset C450 IP / Greek eng / A31008-M1713-T151-3-8U19 / C450IP_laenderSIX.fm / 12.3.07
Index
paging key . . . . . . . . . . . . . . . . . . . . 1
quick dial . . . . . . . . . . . . . . . . . . . . 30
recall key . . . . . . . . . . . . . . . . . . . . . 1
star key . . . . . . . . . . . . . . . . . . . 1, 43
talk key . . . . . . . . . . . . . . . . . . . . . . 1
L
LAN . . . . . . . . . . . . . . . . . . . . . . . . . . 90
Language
Web configurator . . . . . . . . . . . . . . 51
Language codec, see Codec
Last number redial . . . . . . . . . . . . . . . 31
LGPL . . . . . . . . . . . . . . . . . . . . . . . . . 78
Licences, free software. . . . . . . . . . . . 78
Liquid . . . . . . . . . . . . . . . . . . . . . . . . 68
List
caller list . . . . . . . . . . . . . . . . . . . . 31
draft message list (SMS) . . . . . . . . . 34
entry . . . . . . . . . . . . . . . . . . . . . . . 32
incoming message list (SMS) . . . . . . 35
last number redial list . . . . . . . . . . . 31
missed calls . . . . . . . . . . . . . . . . . . 32
Listen port . . . . . . . . . . . . . . . . . . . . . 59
Local Area Network . . . . . . . . . . . . . . 90
Local IP address . . . . . . . . . . . . . . . . . 90
Local Network . . . . . . . . . . . . . . . . . . 54
Local SIP port . . . . . . . . . . . . . . . . . . . 93
Lock (keypad lock) . . . . . . . . . . . . . . . 21
Loudspeaker volume . . . . . . . . . . 22, 42
Version 4, 16.09.2005
M
MAC address . . . . . . . . . . . . . . . . . . . 91
checking (Web configurator) . . . . . . 67
querying (handset) . . . . . . . . . . . . . 49
Mains adapter . . . . . . . . . . . . . . . . . . . 4
Making calls
accepting a call . . . . . . . . . . . . . 19, 20
external . . . . . . . . . . . . . . . . . . . . . 18
internal . . . . . . . . . . . . . . . . . . . . . 41
Making cost-effective calls . . . . . . . . . 32
Maximum Receive Unit. . . . . . . . . . . . 91
Maximum Transmission Unit. . . . . . . . 91
Mbps . . . . . . . . . . . . . . . . . . . . . . . . . 91
Media Access Control . . . . . . . . . . . . . 91
Medical appliances . . . . . . . . . . . . . . . . 4
Menu
end tone . . . . . . . . . . . . . . . . . . . . 43
go back one menu level . . . . . . . . . 23
menu guidance . . . . . . . . . . . . . . . 22
phone overview . . . . . . . . . . . . . . . 14
100
Web configurator overview . . . . . . 17
Menu bar (Web configurator) . . . . . . 53
Message key . . . . . . . . . . . . . . . . . . . . 1
opening lists . . . . . . . . . . . . . . 31, 35
Million bits per second . . . . . . . . . . . 91
Missed calls . . . . . . . . . . . . . . . . . . . 32
MRU . . . . . . . . . . . . . . . . . . . . . . . . . 91
MTU . . . . . . . . . . . . . . . . . . . . . . . . . 91
Music on hold . . . . . . . . . . . . . . . . . . 89
Muting the handset. . . . . . . . . . . . . . 21
N
Name
changing name of the handset . . . . 40
displayed (VoIP) . . . . . . . . . . . . . . . 87
displaying caller's name (CNIP) . . . . 19
NAT . . . . . . . . . . . . . . . . . . . . . . . . . 91
symmetric . . . . . . . . . . . . . . . . . . . 94
NAT refresh time . . . . . . . . . . . . . . . . 60
Navigation area
(Web configurator) . . . . . . . . . . . 53
Network . . . . . . . . . . . . . . . . . . . . . . 91
Ethernet . . . . . . . . . . . . . . . . . . . . 88
Network Address Translation . . . . . . . 91
Network area . . . . . . . . . . . . . . . . . . 59
Network mailbox. . . . . . . . . . . . . . . . 38
assigning key 1 . . . . . . . . . . . . . . . 38
Network services
settings during call . . . . . . . . . . . . 28
Network services (VoIP) . . . . . . . . . . . 27
call forwarding . . . . . . . . . . . . . . . 27
settings for all calls . . . . . . . . . . . . 27
Number
copying from directory . . . . . . . . . . 30
displaying caller's (CLIP) . . . . . . . . . 19
displaying Gigaset.net
subscriber's . . . . . . . . . . . . . . 25
entering network mailbox
number . . . . . . . . . . . . . . . . . 38
entering with directory . . . . . . . . . 30
saving in the directory . . . . . . . 29, 30
saving sender in the directory . . . . . 36
setting for SMS centre . . . . . . . . . . 36
O
On/Off key . . . . . . . . . . . . . . . . . . . . . 1
Online directory Gigaset.net . . . . . . . 24
Operation (preparing to use the
phone) . . . . . . . . . . . . . . . . . . . . . 6
Order in directory . . . . . . . . . . . . . . . 77
Gigaset C450 IP / Greek eng / A31008-M1713-T151-3-8U19 / C450IP_laenderSIX.fm / 12.3.07
Index
Outbound proxy. . . . . . . . . . . . . . 60, 91
Outbound proxy mode . . . . . . . . . . . . 60
P
PABX
operating base station on PABX . . . . 50
pauses . . . . . . . . . . . . . . . . . . . . . . 50
setting dialling mode . . . . . . . . . . . 50
setting flashing time . . . . . . . . . . . . 50
SMS . . . . . . . . . . . . . . . . . . . . . . . . 36
Pack contents . . . . . . . . . . . . . . . . . . . 6
Paging . . . . . . . . . . . . . . . . . . . . . . 1, 40
Pauses (PABX) . . . . . . . . . . . . . . . . . . 50
Personal Identification Number . . . . . 91
Personal provider data . . . . . . . . . . . . 57
Phone
configure via PC . . . . . . . . . . . . . . . 51
setting phone with Web
configurator . . . . . . . . . . . . . . . 54
Phone connection
configuring (Web configurator) . . . . 56
Phone jack assignment . . . . . . . . . . . . . 9
Phoning
internal . . . . . . . . . . . . . . . . . . . . . 41
PIN . . . . . . . . . . . . . . . . . . . . . . . . . . 91
changing . . . . . . . . . . . . . . . . . . . . 45
Port . . . . . . . . . . . . . . . . . . . . . . . . . . 91
Port forwarding . . . . . . . . . . . . . . . . . 92
Port number . . . . . . . . . . . . . . . . . . . 92
Power consumption (base station) . . . 76
Pre-dialling . . . . . . . . . . . . . . . . . . . . 92
Preferred DNS server
(Web configurator) . . . . . . . . . . . 55
Private IP address . . . . . . . . . . . . . . . . 92
Problems and solutions . . . . . . . . . . . 69
Protocol . . . . . . . . . . . . . . . . . . . . . . . 92
Proxy . . . . . . . . . . . . . . . . . . . . . . . . . 92
Proxy server . . . . . . . . . . . . . . . . . . . . 92
Proxy server address . . . . . . . . . . . . . 58
Public IP address . . . . . . . . . . . . . . . . 92
Q
Version 4, 16.09.2005
Quality of Service . . . . . . . . . . . . . . . . 92
Quality of the voice traffic (VoIP) . . . . 61
Questions and answers . . . . . . . . . . . 69
Quick dial . . . . . . . . . . . . . . . . . . . . . 30
R
RAM . . . . . . . . . . . . . . . . . . . . . . . . . 92
Random Access Memory . . . . . . . . . . 92
Read Only Memory . . . . . . . . . . . . . . 93
Recall key . . . . . . . . . . . . . . . . . . . . . . 1
Registering (handset) . . . . . . . . . . 8, 39
Registrar . . . . . . . . . . . . . . . . . . . . . . 92
Registration name
VoIP account . . . . . . . . . . . . . . . . . 57
Registration password
VoIP account . . . . . . . . . . . . . . . . . 57
Registration refresh time . . . . . . . . . . 59
Registration wizard (SMS) . . . . . . . . . 33
Remote access to Web
configurator . . . . . . . . . . . . . . . . 55
Remote management
(Web configurator) . . . . . . . . . . . 55
Restoring to factory settings
base station . . . . . . . . . . . . . . . . . . 45
handset . . . . . . . . . . . . . . . . . . . . . 44
RFC 2833 . . . . . . . . . . . . . . . . . . . . . 63
RFPI . . . . . . . . . . . . . . . . . . . . . . . . . 73
Ringback
when busy . . . . . . . . . . . . . . . . . . 93
when the call is not answered . . . . 93
Ringer tone
activating/deactivating . . . . . . . . . . 43
changing . . . . . . . . . . . . . . . . . . . . 43
setting melody . . . . . . . . . . . . . . . 43
setting volume . . . . . . . . . . . . 22, 43
ROM . . . . . . . . . . . . . . . . . . . . . . . . . 93
Router . . . . . . . . . . . . . . . . . . . . . . . 93
Routing . . . . . . . . . . . . . . . . . . . . . . 93
RTP . . . . . . . . . . . . . . . . . . . . . . . . . . 93
RTP mode . . . . . . . . . . . . . . . . . . . . . 63
RTP port . . . . . . . . . . . . . . . . 59, 64, 93
S
Safety precautions . . . . . . . . . . . . . . . 4
Screensaver . . . . . . . . . . . . . . . . . . . 42
Searching
handset . . . . . . . . . . . . . . . . . . . . . 40
in directory . . . . . . . . . . . . . . . . . . 29
Searching for service information . . . 73
Selected codecs . . . . . . . . . . . . . . . . 62
Selecting
choosing connection type . . . . . . . 18
IP address . . . . . . . . . . . . . . . . . . . 18
Sending
directory entry to handset . . . . . . . 30
SMS . . . . . . . . . . . . . . . . . . . . . . . 34
Server . . . . . . . . . . . . . . . . . . . . . . . 93
101
Gigaset C450 IP / Greek eng / A31008-M1713-T151-3-8U19 / C450IP_laenderSIX.fm / 12.3.07
Version 4, 16.09.2005
Index
Service . . . . . . . . . . . . . . . . . . . . . . . 74
Setting
base station . . . . . . . . . . . . . . . . . . 45
date/time . . . . . . . . . . . . . . . . . . . . . 8
flashing time (PABX) . . . . . . . . . . . . 50
handset . . . . . . . . . . . . . . . . . . . . . 42
melody (ringer tone) . . . . . . . . . . . . 43
wake-up time . . . . . . . . . . . . . . . . . 44
Setting loudspeaker volume
handset language . . . . . . . . . . . 22, 42
Setting volume
earpiece . . . . . . . . . . . . . . . . . . . . . 42
loudspeaker . . . . . . . . . . . . . . . . . . 42
ringer tone . . . . . . . . . . . . . . . . . . . 43
VoIP . . . . . . . . . . . . . . . . . . . . . . . . 61
Shortcut (digit combination) . . . . . . . 14
Signal strength . . . . . . . . . . . . . . . . . . 1
Simple Transversal of UDP over NAT . . 94
SIP . . . . . . . . . . . . . . . . . . . . . . . . . . 93
SIP address . . . . . . . . . . . . . . . . . . . . 93
SIP Info . . . . . . . . . . . . . . . . . . . . . . . 63
SIP port . . . . . . . . . . . . . . . . . 59, 64, 93
SIP provider . . . . . . . . . . . . . . . . . . . . 93
SIP proxy server . . . . . . . . . . . . . . . . . 93
SMS . . . . . . . . . . . . . . . . . . . . . . . . . 33
deleting . . . . . . . . . . . . . . . . . . . . . 34
draft message list . . . . . . . . . . . . . . 34
forwarding . . . . . . . . . . . . . . . . . . . 35
incoming message list. . . . . . . . . . . 35
reading . . . . . . . . . . . . . . . . . . . . . 34
receiving . . . . . . . . . . . . . . . . . . . . 35
registration wizard . . . . . . . . . . . . . 33
replying to and forwarding . . . . . . . 35
saving number . . . . . . . . . . . . . . . . 36
self help with error messages . . . . . 37
sending . . . . . . . . . . . . . . . . . . . . . 34
settings . . . . . . . . . . . . . . . . . . . . . 36
status report. . . . . . . . . . . . . . . . . . 34
to PABX . . . . . . . . . . . . . . . . . . . . . 36
troubleshooting . . . . . . . . . . . . . . . 37
writing . . . . . . . . . . . . . . . . . . . . . . 34
writing an SMS . . . . . . . . . . . . . . . . 77
SMS centre
changing number . . . . . . . . . . . . . . 36
setting . . . . . . . . . . . . . . . . . . . . . . 36
Snooze (alarm clock) . . . . . . . . . . . . . 44
Special characters . . . . . . . . . . . . . . . 77
Specifications . . . . . . . . . . . . . . . . . . 76
102
Specifying connection type . . . . . . . . 18
Star key . . . . . . . . . . . . . . . . . . . . 1, 43
Starting the connection assistant . 10, 47
Static IP address . . . . . . . . . . . . . . . . 93
Status
VoIP connection . . . . . . . . . . . . . . . 56
Status (Web configurator) . . . . . . . . . 67
Status codes
activating display (handset) . . . . . . 49
table . . . . . . . . . . . . . . . . . . . . . . . 71
Structure of IP address . . . . . . . . . . . . 90
STUN . . . . . . . . . . . . . . . . . . . . . . . . 94
STUN port . . . . . . . . . . . . . . . . . . . . . 60
STUN refresh time . . . . . . . . . . . . . . . 60
STUN server . . . . . . . . . . . . . . . . . . . 60
Subnet . . . . . . . . . . . . . . . . . . . . . . . 94
Subnet mask . . . . . . . . . . . . . . . . 49, 94
(Web configurator) . . . . . . . . . . . . 55
Suppressing
speech pauses . . . . . . . . . . . . . . . . 61
Suppressing silence . . . . . . . . . . . . . . 61
Suppressing speech pauses . . . . . . . . 61
Symbols (instructions) . . . . . . . . . . . . 68
Symmetric NAT . . . . . . . . . . . . . . . . . 94
T
Talk key . . . . . . . . . . . . . . . . . . . . . . . 1
TCP. . . . . . . . . . . . . . . . . . . . . . . . . . 94
Text message, see SMS
TLS . . . . . . . . . . . . . . . . . . . . . . . . . . 94
Toggling . . . . . . . . . . . . . . . . . . . 28, 94
Touch tone dialling . . . . . . . . . . . . . . 50
Transmission Control Protocol . . . . . . 94
Transmission rate . . . . . . . . . . . . . . . 94
Transport Layer Security . . . . . . . . . . 94
Transport protocol. . . . . . . . . . . . . . . 94
Troubleshooting . . . . . . . . . . . . . . . . 69
SMS . . . . . . . . . . . . . . . . . . . . . . . 37
U
UDP . . . . . . . . . . . . . . . . . . . . . . . . .
Uniform Resource Identifier . . . . . . . .
Universal Resource Locator . . . . . . . .
Unknown . . . . . . . . . . . . . . . . . . . . .
Unknown caller . . . . . . . . . . . . . . . . .
URI . . . . . . . . . . . . . . . . . . . . . . . . . .
URL . . . . . . . . . . . . . . . . . . . . . . . . .
for downloads . . . . . . . . . . . . . . . .
94
94
95
19
19
94
95
65
Gigaset C450 IP / Greek eng / A31008-M1713-T151-3-8U19 / C450IP_laenderSIX.fm / 12.3.07
Index
Use random ports . . . . . . . . . . . . . . . 64
User Datagram Protocol . . . . . . . . . . . 94
User ID . . . . . . . . . . . . . . . . . . . . . . . 95
User identification . . . . . . . . . . . . . . . 95
User name (VoIP account) . . . . . . . . . 57
V
Version 4, 16.09.2005
Version check, automatic . . . . . . . . . . 66
Viewing the network mailbox
message . . . . . . . . . . . . . . . . . . . 38
Voice over Internet Protocol . . . . . . . . 95
Voice quality . . . . . . . . . . . . . . . . . . . 61
Voice quality and infrastructure . . . . . 73
VoIP . . . . . . . . . . . . . . . . . . . . . . . . . 95
configuring account . . . . . . . . . . . . 57
introduction . . . . . . . . . . . . . . . . . . . 6
loading provider data . . . . . . . . . . . 62
requirement . . . . . . . . . . . . . . . . . . . 6
VoIP connection
activating/deactivating . . . . . . . 56, 62
configuring (Web configurator) . . . . 57
name (Web configurator) . . . . . . . . 56
VoIP provider . . . . . . . . . . . . . . . . . . . 95
download data . . . . . . . . . . . . . 11, 47
downloading data. . . . . . . . . . . . . . 62
selecting (Web configurator) . . . . . . 57
updating data automatically . . . . . . 66
VoIP settings
assigning IP address . . . . . . . . . 48, 54
download provider data . . . . . . 11, 47
entering user data . . . . . . . . . . . . . 48
making them on
the handset . . . . . . . . . . . . . . . 47
with connection assistant . . . . . 10, 47
without connection assistant . . . . . 47
VoIP status codes, table . . . . . . . . . . . 71
VoIP status messages
activating display (handset). . . . . . . 49
status codes table . . . . . . . . . . . . . . 71
VoIP telephony
settings (handset) . . . . . . . . . . . . . . 47
via Gigaset.net . . . . . . . . . . . . . . . . 24
VoIP user data
entering (Web configurator) . . . . . . 57
VoIP volume . . . . . . . . . . . . . . . . . . . 61
W
WAN . . . . . . . . . . . . . . . . . . . . . . . . .
Warning tone (battery) . . . . . . . . . . .
Web configurator . . . . . . . . . . . . . . .
activating VoIP connection . . . . . . .
alternative DNS server . . . . . . . . . .
checking EEPROM version . . . . . . .
checking firmware version . . . . . . .
checking MAC address . . . . . . . . . .
checking the phone's IP address . . .
conducting firmware update . . . . .
connecting with PC . . . . . . . . . . . .
deactivating VoIP connection . . . . .
default gateway . . . . . . . . . . . . . . .
de-registering . . . . . . . . . . . . . . . .
DTMF signalling for VoIP . . . . . . . . .
IP address . . . . . . . . . . . . . . . . . . .
IP address type . . . . . . . . . . . . . . .
language . . . . . . . . . . . . . . . . . . . .
local network. . . . . . . . . . . . . . . . .
menu overview . . . . . . . . . . . . . . .
name of a connection . . . . . . . . . .
opening Web page . . . . . . . . . . . . .
preferred DNS server . . . . . . . . . . .
remote access . . . . . . . . . . . . . . . .
setting phone . . . . . . . . . . . . . . . .
specifying dialling plans . . . . . . . . .
status . . . . . . . . . . . . . . . . . . . . . .
status of a VoIP connection . . . . . .
subnet mask . . . . . . . . . . . . . . . . .
Web page structure . . . . . . . . . . . .
Web interface, see Web configurator
Web page
opening . . . . . . . . . . . . . . . . . . . .
structure . . . . . . . . . . . . . . . . . . . .
Wide Area Network . . . . . . . . . . . . . .
Working area (Web configurator) . . . .
Writing, editing text . . . . . . . . . . . . .
95
43
51
56
55
67
67
67
67
66
51
56
55
52
63
55
54
51
54
17
56
54
55
55
54
64
67
56
55
52
54
52
95
53
77
103
Gigaset C450 IP / Greek eng / A31008-M1713-T151-3-8U19 / montage_charger_base.fm / 12.3.07
104
Gigaset C450 IP / Greek eng / A31008-M1713-T151-3-8U19 / montage_charger_base.fm / 12.3.07
105