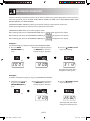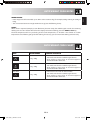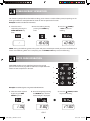
1
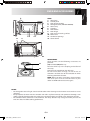
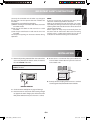
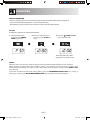
Svarīgi
Svarbu
Tähelepanu
Важно
Important
Увага
800 W (IEC 60705)
R-240_OM_00_FRONT_EAST.indd 1
LATVIEŠU
LIETUVIŠKAI
EESTI
БЪЛГАРСКИ
ROMÂNĂ
MICROWAVE OVEN - OPERATION MANUAL
ΦΟΥΡΝΟΣ ΜΙΚΡΟΚΥΜΑΤΩΝ - ΕΓΧΕΙΡΙΔΙΟ ΛΕΙΤΟΥΡΓΙΑΣ
MIKROVALOVNA PEČICA - NAVODILA ZA UPORABO
MIKROVLNNÁ TROUBA - NÁVOD K OBSLUZE
MIKROVLNNÁ RÚRA - NÁVOD NA POUŽITIE
MIKROHULLÁMÚ SÜTŐ - KEZELÉSI ÚTMUTATÓ
МІКРОХВИЛЬОВА ПІЧ - ІНСТРУКЦІЯ З ЕКСПЛУАТАЦІЇ
MIKROVIĻŅU KRĀSNS - LIETOŠANAS INSTRUKCIJA
MIKROBANGŲ KROSNELĖ - VALDYMO VADOVAS
MIKROLAINEAHI - KASUTUSJUHEND
МИКРОВЪЛНОВА ФУРНА - РЪКОВОДСТВО ЗА УПОТРЕБА
CUPTOR CU MICROUNDE - MANUAL DE UTILIZARE
МІКРАХВАЛЕВАЯ ПЕЧ - ІНСТРУКЦЫЯ ПА ЭКСПЛУАТАЦЫІ
БЕЛАРУСКАЯ
R-240
УКРАЇНСЬКА
MAGYAR
SLOVENSKY
ČESKY
SLOVENŠČINA
ΕΛΛΗΝΙΚΑ
ENGLISH
Important
Σημαντικό
Pomembno
Důležité
Dôležité
Fontos
Важлива
інформація
2011-03-18 20:48:33
GB
This operation manual contains important information which you should read carefully before using your microwave oven.
Important: There may be a serious risk to health if this operation manual is not followed or if the oven is modified so that it operates
with the door open.
GR
Αυτό το εγχειρίδιο λειτουργίας περιέχει σημαντικές πληροφορίες, τις οποίες θα πρέπει να διαβάσετε προσεκτικά πριν τη χρήση του
φούρνου μικροκυμάτων.
Σημαντικό: Ενδέχεται να υπάρξει σοβαρός κίνδυνος για την υγεία, αν δεν ακολουθήσετε αυτό το εγχειρίδιο λειτουργίας, ή αν
τροποποιηθεί ο φούρνος έτσι ώστε να λειτουργεί με την πόρτα ανοικτή.
SI
V teh navodilih za uporabo najdete pomembne informacije, ki jih pred uporabo pečice pozorno preberite.
Pomembno: Če teh navodil za uporabo ne upoštevate ali pečico predelate tako, da deluje z odprtimi vrati, lahko to resno škoduje
vašemu zdravju.
Tento návod k obsluze obsahuje důležité informace, které byste si měli pozorně přečíst před použitím této mikrovlnné trouby.
Důležité: Pokud se nebude postupovat podle tohoto návodu k obsluze nebo se mikrovlnná trouba upraví tak, že bude moci
pracovat s otevřenými dveřmi, může dojít k vážnému ohrožení zdraví.
Tento návod na obsluhu obsahuje dôležité informácie, ktoré by ste si mali pred použitím mikrovlnnej rúry pozorne prečítať.
Dôležité: Nedodržanie pokynov uvedených v tomto návode na použitie, ako aj akýkoľvek zásah, ktorý dovoľuje prevádzkovanie rúry s
otvorenými dvierkami, môže viesť k závažnému poškodeniu zdravia osôb.
A kezelési útmutató fontos információkat tartalmaz. Olvassa végig figyelmesen a mikrohullámú sütő használata előtt!
Fontos: A jelen kezelési útmutató előírásainak be nem tartásával, illetve a mikrohullámú sütő nyitott ajtajú működését lehetővé
tevő módosításával súlyos egészségkárosodási kockázatot vállal!
Ця інструкція з експлуатації містить важливу інформацію, яку Вам слід уважно прочитати, перш ніж розпочати
експлуатацію мікрохвильової печі.
Важливо: Наслідком недотримання вказівок, наведених у цій інструкції з експлуатації, а також модифікації печі з метою її експлуатації з
відчиненими дверцятами може бути серйозний ризик для здоров'я.
R-240_OM_00_FRONT_EAST.indd 2
2011-03-18 20:48:41
Šī lietošanas instrukcija ietver svarīgu informāciju, kuru pirms mikroviļņu krāsns lietošanas jums vajadzētu uzmanīgi izlasīt.
Svarīgi: Šīs lietošanas instrukcijas neievērošana vai krāsns pārveidošana tā, lai tā darbotos ar atvērtām durvīm, var nopietni
apdraudēt veselību.
Šiame valdymo vadove rasite svarbią informaciją, kurią, prieš naudodamiesi mikrobangų krosnele, turite atidžiai perskaityti.
Svarbu: Jūsų sveikatai gali kilti rimtas pavojus, jei nesivadovausite šiuo valdymo vadovu ar krosnelė veiks su atidarytomis
durelėmis.
Käesolev juhend sisaldab olulist teawvet, mis tuleks teil enne oma mikrolaineahju kasutamist tähelepanelikult läbi lugeda.
Tähtis: käesoleva juhendi eiramine või ahju muutmine selliselt, et see töötab ka avatud ukse korral, võib kujutada tervisele
tõsist ohtu.
Това ръководство за употреба съдържа информация, която трябва да прочетете внимателно, преди да започнете да
използвате Вашата микровълнова фурна.
Важно: може да има сериозен риск за здравето, ако не се спазва настоящата инструкция или фурната е преправена
така, че да работи и при отворена врата.
Acest manual de utilizare conţine informaţii importante, care trebuie citite cu atenţie înainte de utilizarea cuptorului cu
microunde.
Important: Nerespectarea instrucţiunilor descrise în acest manual sau modificarea cuptorului pentru a funcţiona cu uşa
deschisă poate duce la rănirea utilizatorului.
Гэтая інструкцыя па эксплуатацыі змяшчае важную інфармацыю, якую неабходна ўважліва прачытаць перад
выкарыстоўваннем мікрахвалевай печы.
Увага: Ваша здароўе можа падвергнуцца сур'ёзнай рызыцы, калі гэтая інструкцыя не выканоўваецца, або печ працуе з
адкрытымі дзвярыма.
R-240_OM_00_FRONT_EAST.indd 3
2011-03-18 20:48:41
GB
Dear Customer,
Congratulations on acquiring your new microwave oven, which from now on will make your kitchen chores
considerably easier.
You will be pleasantly surprised by the kinds of things you can do with a microwave. Not only can you use it for
rapid defrosting or heating up of food, you can also prepare whole meals.
There are so many advantages to having a microwave oven which we are sure you will find exciting:
● Food can be prepared directly in the serving dishes, leaving less to wash up.
● Shorter cooking times and the use of little water and fat ensure that many vitamins, minerals and
characteristic flavours are preserved.
We advise you to read the operating instructions carefully.
You will then easily understand how to use your oven.
Enjoy using your microwave oven and prepare your own favourite dishes in your microwave oven.
GB-1
R-240_OM_01_EN.indd Sek1:1
2011-03-18 21:04:06
ENGLISH
GB-2
R-240_OM_01_EN.indd Sek1:2
2011-03-18 21:04:11
CONTENTS
Operation manual
DEAR CUSTOMER ................................................................................................................................................. GB-1
INFORMATION ON PROPER DISPOSAL ............................................................................................................... GB-2
OVEN AND ACCESSORIES .................................................................................................................................... GB-4
CONTROL PANEL ................................................................................................................................................... GB-5
IMPORTANT SAFETY INSTRUCTIONS...............................................................................................................GB-6-8
INSTALLATION ....................................................................................................................................................... GB-8
BEFORE OPERATION ............................................................................................................................................. GB-9
MICROWAVE POWER LEVEL ................................................................................................................................. GB-9
MANUAL OPERATION........................................................................................................................................ GB-10
MICROWAVE COOKING ..................................................................................................................................... GB-10
DEFROSTING ....................................................................................................................................................... GB-11
OTHER CONVENIENT FUNCTIONS .............................................................................................................. GB-12-14
AUTOMATIC OPERATION .................................................................................................................................. GB-15
AUTO WEIGHT COOK NOTES............................................................................................................................ GB-16
AUTO WEIGHT COOK CHART ........................................................................................................................... GB-16
SPEED DEFROST OPERATION .......................................................................................................................... GB-17
AUTO COOK OPERATION ............................................................................................................................ GB-17-18
CARE AND CLEANING......................................................................................................................................... GB-19
SERVICE CALL CHECK ......................................................................................................................................... GB-19
WHAT ARE MICROWAVES ................................................................................................................................... GB-20
SUITABLE OVENWARE......................................................................................................................................... GB-21
TIPS AND ADVICE .......................................................................................................................................... GB-22-24
SPECIFICATIONS .................................................................................................................................................. GB-25
GB-3
R-240_OM_01_EN.indd Sek1:3
2011-03-18 21:04:11
OVEN AND ACCESSORIES
1
8
2
3
7
10
65
47
11
OVEN
1. Oven lamp
2. Control panel
3. Door opening button
4. Waveguide cover (DO NOT REMOVE)
5. Oven cavity
6. Coupling
7. Door latches
8. Door hinges
9. Door seals and sealing surfaces
10. Power cord
11. Ventilation openings
12. Outer cabinet
ENGLISH
9
12
13
14
ACCESSORIES:
Check to make sure the following accessories are
provided:
(13) Turntable (14) Roller stay
Place the roller stay in the coupling on the floor of
the cavity.
Then place the turntable on the roller stay.
To avoid turntable damage, ensure dishes or
containers are lifted clear of the turntable rim when
removing them from the oven.
NOTE: When you order accessories, please mention
two items: part name and model name to your
dealer or SHARP authorised service agent.
NOTES:
• The waveguide cover is fragile. Care should be taken when cleaning inside the oven to ensure that it is not
damaged.
• Always operate the oven with the turntable and roller stay fitted correctly. This promotes thorough, even
cooking. A badly fitted turntable may rattle, may not rotate properly and could cause damage to the oven.
• The turntable rotates clockwise or anti-clockwise. The rotary direction may change each time you start the
oven. This does not affect cooking performance.
GB-4
R-240_OM_01_EN.indd Sek1:4
2011-03-18 21:04:12
CONTROL PANEL
1.
DIGITAL DISPLAY
2.
TIME keys
3.
DEFROST & COOK keys
SPEED DEFROST
1
AUTO WEIGHT DEFROST
AUTO WEIGHT COOK
2
10
3
4.
LESS/MORE TIME keys
5.
POWER LEVEL key
6.
START/+1min key
7.
STOP key
8.
KITCHEN TIMER key
9.
WEIGHT keys
10.
AUTO COOK keys
Jacket Potato
Reheat tea/ Coffee
Rice, Pasta
9
4
Popcorn
8
5
Frozen Vegetables
7
6
Pizza
Fresh Vegetables
Frozen Meal
GB-5
R-240_OM_01_EN.indd Sek1:5
2011-03-18 21:04:13
IMPORTANT SAFETY INSTRUCTIONS
To avoid the danger of fire.
Th e m i c r ow ave ove n s h o u l d n o t b e l e f t
unattended during operation. Power levels
that are too high, or cooking times that are too
long, may overheat foods resulting in a fire.
This oven is designed to be used on a countertop
only. It is not designed to be built into a kitchen unit.
Do not place the oven in a cabinet.
The electrical outlet must be readily accessible so that
the unit can be unplugged easily in an emergency.
The AC power supply must be 230V, 50Hz, with a
minimum 10A distribution line fuse, or a minimum
10A distribution circuit breaker.
A separate circuit serving only this appliance should
be provided.
Do not place the oven in areas where heat is generated.
For example, close to a conventional oven.
Do not install the oven in an area of high humidity or
where moisture may collect.
Do not store or use the oven outdoors.
If smoke is observed, switch off or unplug the
oven and keep the door closed in order to stifle
any flames.
Use only microwave -safe containers and
utensils. See Page GB-21. Utensils should be
checked to ensure that they are suitable for use
in microwave ovens.
When heating food in plastic or paper
containers, keep an eye on the oven due to the
possibility of ignition.
Clean the waveguide cover, the oven cavity, the
turntable and roller stay after use. These must
be dry and free from grease. Built-up grease
may overheat and begin to smoke or catch fire.
Do not place flammable materials near the oven or
ventilation openings.
Do not block the ventilation openings.
Remove all metallic seals, wire twists, etc., from food
and food packages. Arcing on metallic surfaces may
cause a fire.
Do not use the microwave oven to heat oil for deep
frying. The temperature cannot be controlled and the
oil may catch fire.
To make popcorn, use only special microwave
popcorn makers.
Do not store food or any other items inside the oven.
Check the settings after you start the oven to ensure
the oven is operating as desired.
To avoid overheating and fire, special care must be
taken when cooking or reheating foods with a high
sugar or fat content, for example, Sausage rolls, Pies
or Christmas pudding.
See the corresponding hints in operation manual and
the cookery book section.
To avoid the possibility of injury
WARNING:
Do not operate the oven if it is damaged or
malfunctioning. Check the following before use:
a) The door; make sure the door closes properly
and ensure it is not misaligned or warped.
b) The hinges and safety door latches; check to
make sure they are not broken or loose.
c) The door seals and sealing surfaces; ensure that
they have not been damaged.
d) Inside the oven cavity or on the door; make sure
there are no dents.
e) The power supply cord and plug; ensure that
they are not damaged.
If the door or door seals are damaged, the oven
must not be operated until it has been repaired by
a competent person.
Never adjust , repair or modify the oven
yourself. It is hazardous for anyone other than
a competent person to carry out any service or
repair operation which involves the removal
of a cover which gives protection against
exposure to microwave energy.
Do not operate the oven with the door open or alter
the door safety latches in any way.
Do not operate the oven if there is an object between
the door seals and sealing surfaces.
Do not allow grease or dirt to build up on the
door seals and adjacent parts. Clean the oven
at regular intervals and remove any food
deposits. Follow the instructions for "Care and
Cleaning" on page GB-19. Failure to maintain
the oven in a clean condition could lead to
a deterioration of the surface that could
adversely affect the life of the appliance and
possibly result in a hazardous situation.
Individuals with PACEMAKERS should check with their
doctor or the manufacturer of the pacemaker for
precautions regarding microwave ovens.
To avoid the possibility of electric shock
Under no circumstances should you remove the outer
cabinet.
Never spill or insert any objects into the door lock
openings or ventilation openings. In the event of a
spill, turn off and unplug the oven immediately, and
call an authorised SHARP service agent.
Do not immerse the power supply cord or plug in
water or any other liquid.
Do not let the power supply cord hang over the edge
of a table or work surface.
ENGLISH
IMPORTANT SAFETY INSTRUCTIONS: READ CAREFULLY AND KEEP FOR FUTURE REFERENCE
GB-6
R-240_OM_01_EN.indd Sek1:6
2011-03-18 21:04:15
IMPORTANT SAFETY INSTRUCTIONS
Keep the power supply cord away from heated
surfaces, including the rear of the oven.
Do not attempt to replace the oven lamp yourself or
allow anyone who is not an electrician authorised by
SHARP to do so. If the oven lamp fails, please consult
your dealer or an authorised SHARP service agent.
If the power supply cord of this appliance is
damaged, it must be replaced with a special cord.
The exchange must be made by an authorised
SHARP service agent.
To avoid the possibility of explosion and sudden
boiling:
WARNING: Liquids and other foods must not
be heated in sealed containers since they are
liable to explode.
Microwave heating of beverages can result in
delayed eruptive boiling, therefore care must
be taken when handling the container.
Never use sealed containers. Remove seals and lids
before use. Sealed containers can explode due to a
build up of pressure even after the oven has been
turned off.
Take care when microwaving liquids. Use a widemouthed container to allow bubbles to escape.
Never heat liquids in narrow necked containers
such as baby bottles, as this may result in the
contents erupting from the container when
heated and cause burns.
To prevent sudden eruption of boiling liquid and
possible scalding:
1. Do not use excessive amount of time.
2. Stir liquid prior to heating/reheating.
3. It is advisable to insert a glass rod or similar utensil
(not metal) into the liquid whilst reheating.
4. Let liquid stand for at least 20 seconds in the oven
at the end of cooking time to prevent delayed
eruptive boiling.
Do not cook eggs in their shells, and whole
hard boiled eggs should not be heated in
microwave ovens since they may explode even
after microwave cooking has ended. To cook or
reheat eggs which have not been scrambled or
mixed, pierce the yolks and the whites, or the
eggs may explode. Shell and slice hard boiled
eggs before reheating them in the microwave
oven.
Pierce the skin of such foods as potatoes, sausages
and fruit before cooking, or they may explode.
To avoid the possibility of burns
WARNING: The contents of feeding bottles and
baby food jars must be stirred or shaken and
the temperature checked before consumption,
in order to avoid burns.
Use pot holders or oven gloves when removing food
from the oven to prevent burns.
Always open containers, popcorn makers, oven
cooking bags, etc., away from the face and hands to
avoid steam burns and eruption of boiling.
To avoid burns, always test food temperature
and stir before ser ving and pay special
attention to the temperature of food and drink
given to babies, children or the elderly.
Temperature of the container is not a true indication
of the temperature of the food or drink; always check
the food temperature.
Always stand back from the oven door when opening it
to avoid burns from escaping steam and heat.
Slice stuffed baked foods after heating to release
steam and avoid burns.
Keep children away from the door to prevent them
burning themselves.
To avoid misuse by children
WARNING: Only allow children to use the
oven without supervision when adequate
instructions have been given so that the
child is able to use the oven in a safe way
and understands the hazards of improper
use. This appliance is not intended for use
by persons (including children) with reduced
physical, sensory or mental capabilities, or
lack of experience and knowledge, unless they
have been given supervision or instruction
concerning use of the appliance by a person
responsible for their safety. Children should
be supervised to ensure that they do not play
with the appliance.
Do not lean or swing on the oven door. Do not play
with the oven or use it as a toy.
Children should be taught all important safety
instructions: use of pot holders, careful removal of
food coverings; paying special attention to packaging
(e.g. self-heating materials) designed to make food
crisp, as they may be extra hot.
Other warnings
Never modify the oven in any way.
Do not move the oven while it is in operation.
This oven is for home food preparation only and may
only be used for cooking food. It is not suitable for
commercial or laboratory use.
To promote trouble-free use of your oven and
avoid damage.
Never operate the oven when it is empty
When using a browning dish or self-heating material,
always place a heat-resistant insulator such as a
porcelain plate under it to prevent damage to the
turntable and roller stay due to heat stress. The
preheating time specified in the dishes instructions
must not be exceeded.
Do not use metal utensils, which reflect microwaves
and may cause electrical arcing. Do not put cans in
the oven.
GB-7
R-240_OM_01_EN.indd Sek1:7
2011-03-18 21:04:15
Use only the turntable and the roller stay designed
for this oven. Do not operate the oven without the
turntable.
To prevent the turntable from breaking:
(a) Before cleaning the turntable with water, leave the
turntable to cool.
(b) Do not put hot foods or hot utensils on a cold
turntable.
(c) Do not put cold foods or cold utensils on a hot
turntable.
Do not place anything on the outer cabinet during
operation.
NOTE:
If you are unsure how to connect your oven, please
consult an authorised, qualified electrician.
Neither the manufacturer nor the dealer can accept
any liability for damage to the oven or personal injury
resulting from failure to observe the correct electrical
connection procedure.
Water vapour or drops may occasionally form on
the oven walls or around the door seals and sealing
surfaces. This is a normal occurrence and is not an
indication of microwave leakage or a malfunction.
ENGLISH
IMPORTANT SAFETY INSTRUCTIONS
INSTALLATION
1. Remove all packing materials from the inside of the
oven cavity. Remove the feature sticker, if attached,
from the outside of the door.
4. Ensure there is a minimum free space above the
oven of 20cm. Allow 10cm of space at back and
5cm at both sides.
Do not remove the protective film attached to the
inside of the door.
20cm
✗
5. Securely connect the plug of the oven to a standard
earthed (grounded) household electrical outlet.
DO NOT REMOVE
2. Check the oven carefully for any signs of damage.
3. Place the oven on a flat, level surface strong enough
to support the oven’s weight plus the heaviest item
likely to be cooked. Do not place the oven in a cabinet.
GB-8
8
R-240_OM_01_EN.indd Sek1:8
2011-03-18 21:04:16
BEFORE OPERATION
Plug in the oven. The oven display will be blinking ":"
Note: Please note that this model does NOT have a clock function.
But it uses less than 0.5 W in stand by mode.
MICROWAVE POWER LEVEL
Power Level
HIGH
MEDIUM HIGH
MEDIUM
MEDIUM LOW
(Defrost)
LOW
(Defrost)
Press the POWER
LEVEL key
X1
X2
X3
X4
X5
X6
X7
X8
X9
X10
• Your oven has 10 power levels, as shown.
• To change the power level for cooking, press the
POWER LEVEL key until the display indicates the
desired level and then enter the required time.
Press the START/+1min key to start the oven.
Percentage
P100
P90
P80
P70
P60
P50
P40
P30
P20
P10
• Power level
The microwave power level is varied by the
microwave energy switching on and off.
When using power levels other than P100 you will
be able to hear the microwave energy pulsing on
and off as the food cooks or defrosts.
IMPORTANT: The microwave power level will
default to P100 unless you press the POWER LEVEL
key.
Generally the following recommendations apply:
• Check the power level
To check the microwave power level during
cooking, press the POWER LEVEL key. As long as
your finger is pressing the POWER LEVEL key the
power level will be displayed.
The oven continues to count down although the
display will show the power level.
P100/90 - (HIGH output = 800/720W ) used for
fast cooking or reheating e.g. for casseroles, hot
beverages, vegetables etc.
P60/50 - (MEDIUM output =480/400W) for dense
foods which require a long cooking time when
cooked conventionally, e.g. beef casserole, it is
advisable to use this power setting to ensure the
meat will be tender.
P80/70 - (MEDIUM HIGH output = 640/560W) used
for longer cooking of dense foods such as roast
joints, meat loaf and plated meals, also for sensitive
dishes such as sponge cakes. At this reduced setting,
the food will cook evenly without over cooking at the
sides.
P40/30 - (MEDIUM LOW output = 320/240W Defrost
setting) to defrost, select this power setting, to
ensure that the dish defrosts evenly. This setting is
also ideal for simmering rice, pasta, dumplings and
cooking egg custard.
P20/10 - (LOW output = 160/80W ) For gentle
defrosting, e.g. cream gateaux or pastry.
GB-9
R-240_OM_01_EN.indd Sek1:9
2011-03-18 21:04:16
MANUAL OPERATION
ENGLISH
Opening the door:
To open the oven door, push the door opening button.
Starting the oven:
Prepare and place food in a suitable container onto the turntable or place
directly onto the turntable. Close the door and press the START/+1min key after
selecting the desired cooking mode.
Use the STOP key to:
1. Erase a mistake during programming.
2. Stop the oven temporarily during cooking.
3. Cancel a programme during cooking, press the STOP key twice.
4. To set and to cancel the child lock (refer to page GB-14).
MICROWAVE COOKING
Your oven can be programmed for up 99 minutes 50 seconds (99.50).
MANUAL COOKING
• Enter the cooking time and use microwave power levels P10 to P100 to cook (refer to page GB-9).
• Stir or turn the food, where possible, 2 - 3 times during cooking.
• After cooking, cover the food and leave to stand, where recommended.
Example:
To cook 2 minutes and 30 seconds on P70 microwave power.
1. Input the power level
by pressing the POWER
LEVEL key 4 times for P70.
x4
2. Enter the cooking time by
pressing the 1 MIN key
twice and then the 10 SEC
key 3 times.
x2
x3
3. Press the (START)/+1min
key to start the timer.
x1
The display will count down
through the set cooking time.
GB-10
R-240_OM_01_EN.indd Sek1:10
2011-03-18 21:04:17
DEFROSTING
MANUAL DEFROSTING
• Enter the defrosting time and use microwave power levels P10 or P30 to defrost (refer to page GB-9).
• Stir or turn the food, where possible, 2 - 3 times during defrosting.
• After defrosting, cover the food in foil and leave to stand until thoroughly defrosted.
Example:
To defrost for 10 minutes on P30 microwave power.
1. Input the power level
by pressing the POWER
LEVEL key 8 times.
x8
2. Enter the defrosting time
by pressing the 10 MIN key
once.
x1
3. Press the (START)/+1min
key to start the timer.
x1
The display will count down
through the set cooking time.
NOTES:
When the oven starts, the oven lamp will light and the turntable will rotate clockwise or anti-clockwise.
When the door is opened during the cooking process, the cooking time on the digital display stops
automatically. The cooking time starts to count down again when the door is closed and the START/+1min
key is pressed.
If you wish to know the power level during cooking, press the MICROWAVE POWER LEVEL key. As long as
your finger is touching the MICROWAVE POWER LEVEL key, the power level will be displayed.
GB-11
R-240_OM_01_EN.indd Sek1:11
2011-03-18 21:04:19
OTHER CONVENIENT FUNCTIONS
STAGE 1
1. Input the power level by
pressing the POWER LEVEL
key once.
2. Enter the cooking time by
pressing the 1 MIN key 5
times.
x1
STAGE 2
3. Input the power level by
pressing the POWER LEVEL
key 8 times.
x8
ENGLISH
1. MULTIPLE SEQUENCE COOKING
A maximum of 2 sequences can be input, consisting of manual cooking time and mode.
Example:
To cook: 5 minutes on P100 power (Stage 1)
16 minutes on P30 power (Stage 2)
x5
4. Enter the cooking time by
pressing the 10 MIN key
once and then the 1 MIN
key 6 times.
x1
5. Press the (START)/
+1min button once to
begin cooking.
x6
x1
The oven will begin to cook for 5 minutes on P100 and then for 16 minutes on P30.
2. MINUTE PLUS FUNCTION
The START/+1min key allows you to operate the two following functions:
a. Direct start
You can directly start cooking on P100 microwave power level for 1
minute by pressing the START/+1min key.
NOTE: To avoid the misuse by children the START/+1min key can be used only within 3 minutes after
preceding operation, i.e., closing the door, pressing the STOP key or cooking completion.
b. Extend the cooking time
You can extend the cooking time during manual cooking for multiples of 1 minute if the START/+1min key
is pressed while the oven is in operation.
NOTE: The cooking time may be extended to a maximum of 99 minutes.
GB-12
R-240_OM_01_EN.indd Sek1:12
2011-03-18 21:04:20
OTHER CONVENIENT FUNCTIONS
3. LESS (▼) and MORE (▲) TIME:
The LESS (▼) TIME and MORE (▲) TIME keys enable you to:
• Decrease or increase cooking/defrosting time whilst the oven is in use (manual cooking only).
TO USE LESS AND MORE WITH MANUAL COOKING
Press the LESS (▼) or MORE (▲) TIME key to decrease or increase the cooking or defrosting time in multiples
of 1 minute whilst the oven is in use. The overall cooking time can be increased to a maximum of 99 minutes.
Example:
To cook on P50 for 10 minutes and then decrease the cooking time by 2 minutes:
1. Input the power level
by pressing the POWER
LEVEL key 6 times.
x6
4. Reduce the cooking
time by pressing the
LESS TIME key twice.
2. Enter the cooking time by
pressing the 10 MIN key
once.
3. Press the (START)/
+1min key to start the
timer.
x1
x1
Cooking time is reduced by 2 minutes and
continues to count down, for example:
x2
GB-13
R-240_OM_01_EN.indd Sek1:13
2011-03-18 21:04:22
4. KITCHEN TIMER FUNCTION :
You can use the kitchen timer for timing where microwave cooking is not involved for example to time boiled
eggs cooked on conventional hob or to monitor the standing time for cooked/defrosted food.
ENGLISH
OTHER CONVENIENT FUNCTIONS
Example:
To set the timer for 5 minutes.
1. Press the KITCHEN
TIMER key once.
x1
2. Enter the desired
time by pressing the
1 MIN key 5 times.
3. Press the
(START)/
+1min key to start
the timer.
x5
Check the display
x1
The display will count
down. When the display
reaches zero, the audible
signal will sound.
You can enter any time up to 99 minutes, 50 seconds. To cancel the KITCHEN TIMER whilst counting down,
simply press the STOP key.
NOTE: The KITCHEN TIMER function cannot be used whilst cooking.
5. CHILD LOCK:
Use to prevent unsupervised operation of the oven by little children. The CHILD LOCK indicator will show up on
display screen, and the oven can not be operated while the CHILD LOCK is set.
a. To set the CHILD LOCK:
Press and hold the STOP key for 3 seconds, a beep sounds and lock indicator lights.
b. To cancel the CHILD LOCK:
Press and hold the STOP key for 3 seconds until Lock indicator on display goes off.
GB-14
R-240_OM_01_EN.indd Sek1:14
2011-03-18 21:04:23
AUTOMATIC OPERATION
Automatic cooking and defrosting allows you to cook and defrost using preset programmes where the timing
have been preset for you, for example AUTO COOK or DEFROST & COOK menus (AUTO WEIGHT COOK, AUTO
WEIGHT DEFROST and SPEED DEFROST).
AUTO WEIGHT COOK / DEFROST enables you to cook or defrost pre-programmed meals listed.
Follow the example below for details on how to operate these functions.
AUTO WEIGHT COOK allows you to cook 3 popular menus.
When cooking beef, press the AUTO WEIGHT COOK key x1
will appear on the display.
When cooking lamb, press the AUTO WEIGHT COOK key x2
will appear on the display.
When cooking pork, press the AUTO WEIGHT COOK key x3
will appear on the display.
Example 1:
To cook beef weighing 1.2kg from chilled using AUTO WEIGHT COOK.
1. Press the AUTO
WEIGHT COOK key
once.
x1
2. Enter the weight by pressing
the WEIGHT keys until the
desired weight is displayed.
x12
3. Press the (START)/+1min
key to start cooking.
x1
G
The display will count down
through the cooking time.
Example 2:
To defrost a Meat joint weighing 1.2kg using AUTO WEIGHT DEFROST.
1. Select the menu required
by pressing the AUTO
WEIGHT DEFROST key
once.
x1
2. Enter the weight by pressing
the WEIGHT keys until the
desired weight is displayed.
x12
3. Press the (START)/+1min
key to start cooking.
x1
G
The display will count down
through the defrosting time.
GB-15
R-240_OM_01_EN.indd Sek1:15
2011-03-18 21:04:24
WEIGHT RANGE:
• Food weight should be rounded up or down to the nearest 0.1kg, for example, 0.65kg to 0.7kg or 0.34Kg to
0.3kg.
• You are restricted to enter a weight within the range (see the following charts).
ENGLISH
AUTO WEIGHT COOK NOTES
NOTES:
When action is required (example, to turn food over), the oven stops, the audible signals sound, the remaining
cooking time and an indicator will flash on the display. To continue cooking, press the START/+1min key.
The final temperature will vary according to the initial temperature, i.e. whether it was chilled or at room
temperature. Check food is piping hot after cooking. If necessary, you can extend the cooking time manually.
AUTO WEIGHT COOK CHART
MENU
Roast Beef
WEIGHT RANGE
COOKING PROCEDURE
0.1kg - 2.0kg
• Place meat in a flan dish on the turntable.
• Turn meat over when the audible signal sounds.
• After cooking, leave meat to stand wrapped in
aluminium foil for 10 minutes.
0.1kg - 2.0kg
• Place meat in a flan dish on the turntable.
• Turn meat over when the audible signal sounds.
• After cooking, leave meat to stand wrapped in
aluminium foil for 10 minutes.
0.1kg - 2.0kg
• Place meat in a flan dish on the turntable.
• Turn meat over when the audible signal sounds.
• After cooking, leave meat to stand wrapped in
aluminium foil for 10 minutes.
Roast Lamb
Roast Pork
GB-16
R-240_OM_01_EN.indd Sek1:16
2011-03-18 21:04:26
SPEED DEFROST OPERATION
This function quickly defrosts food while enabling you to choose a suitable defrost period, depending on the
food type. Follow the example below for details on how to operate this function.
Example: To defrost the food for 10 minutes.
1. Select the menu
required by pressing the
SPEED DEFROST key
once.
2. Enter the cooking time by
pressing the 10 MIN key
once.
x1
3. Press the (START)/
+1min key to start
cooking.
x1
x1
NOTE: During the defrosting process the system will pause and bleep to remind you to turn the food over to
ensure even defrosting. When this is complete, press the START/+1min key to resume defrosting.
AUTO COOK OPERATION
AUTO COOK enables you to cook foods listed on the control
panel and the chart on page GB-18. Follow the example below for
details on how to operate this function.
1
2
3
4
5
6
7
8
Example: To cook 0.3kg Rice using Auto Cook RICE PASTA.
1. Select the menu required
by pressing the RICE
PASTA key once.
2. Enter the weight by pressing
the WEIGHT keys until the
desired weight is displayed.
x1
x2
G
3. Press the (START)/+1min
key to start cooking.
x1
G
GB-17
R-240_OM_01_EN.indd Sek1:17
2011-03-18 21:04:29
ENGLISH
SELECTING MENU: You can select the Menu directly on the Key Sheet by pressing the relevant key.
Auto cook menus:
No
1
2
3
Food
Jaked Potato
(each 230g)
Reheat tea/Coffee (200ml/
cup)
Rice Pasta (g)
Weight range
1 - 3 pieces
1 - 3 cups
0.1 - 0.3kg
4
Popcorn
(default, 100g)
1
5
Frozen Vegetable (g)
0.2 - 0.6kg
6
Pizza (g)
0.15 - 0.45kg
7
Fresh Vegetable (g)
0.2 - 0.7kg
8
Frozen Meal (g)
0.2 - 0.6kg
NOTES:
1. For beverage and potatoes, parameters on display
are not weight but number of servings.
2. For Popcorn, press the POPCORN key once to
cook 100g popcorn, press the START/+1min
key to start; if the default cooking time for 100g
popcorn is not suitable, just press the POPCORN
key twice, and touch number pads to enter a
suitable cooking time, press the START/+1min
key to start:
3. For Rice Pasta and Frozen Meal, during cooking,
the system will pause and sound beeps to remind
user to take operation, then press the START/
+1min key to resume cooking.
WEIGHT RANGE:
• Food weight should be rounded up or down to the nearest 0.1kg, for example, 0.65kg to 0.7kg or 0.34kg to
0.3kg.
NOTES:
• If there is a requirement to stir the food during the auto cook process the oven will stop and the audio signal
will sound, at the same time the remaining cook time will show on the display. To continue cooking once the
food has been stirred press the START/+1min key.
• The final temperature will vary according to the initial food temperature. Check food is piping hot after
cooking. If necessary, you can extend the cooking manually.
• The results when using auto cook depend on variances such as the shape and size of the food and your
personal preference as regards cooking results. If you are not satisfied with the programmed result, please
adjust the cooking time to match your requirement.
GB-18
R-240_OM_01_EN.indd Sek1:18
2011-03-18 21:04:32
CARE AND CLEANING
CAUTION: DO NOT USE COMMERCIAL OVEN
CLEANERS, STEAM CLEANERS, ABR ASIVE,
HARSH CLEANERS, ANY THAT CONTAIN SODIUM
HYDROXIDE OR SCOURING PADS ON ANY PART
OF YOUR MICROWAVE OVEN.
CLEAN THE OVEN AT REGULAR INTERVALS AND
REMOVE ANY FOOD DEPOSITS - Keep the oven
clean, or the oven could lead to a deterioration
of the surface. This could adversely affect the
life of the appliance and possibly result in a
hazardous situation.
Oven exterior
The outside of your oven can be cleaned easily with
mild soap and water. Make sure the soap is wiped off
with a moist cloth, and dry the exterior with a soft
towel.
Control panel
Open the door before cleaning to de-activate the
control panel. Care should be taken in cleaning the
control panel. Using a cloth dampened with water
only, gently wipe the panel until it becomes clean.
Avoid using excessive amounts of water. Do not use
any sort of chemical or abrasive cleaner.
Oven Interior
1. For cleaning, wipe any splatters or spills with a
soft damp cloth or sponge after each use while
the oven is still warm. For heavier spills, use a mild
soap and wipe several times with a damp cloth
until all residues are removed. Do not remove the
waveguide cover.
2. Make sure that mild soap or water does not
penetrate the small vents in the walls which may
cause damage to the oven.
3. Do not use spray type cleaners on the oven
interior.
Keep the waveguide cover clean at all times.
The waveguide cover is constructed from a fragile
material and should be cleaned with care (follow the
cleaning instructions above).
NOTE: Excessive soaking may cause disintegration of
the waveguide cover.
The waveguide cover is a consumable part and
without regular cleaning, will need to be replaced.
Turntable and Roller stay
Remove the turntable and roller stay from the oven.
Wash the turntable and roller stay in mild soapy
water. Dry with a soft cloth. Both the turntable and
the roller stay are dishwasher safe.
Door
To remove all trace of dirt, regularly clean both sides of
the door, the door seals and adjacent parts with a soft,
damp cloth. Do not use abrasive cleaner.
NOTE: A steam cleaner should not be used.
SERVICE CALL CHECK
Please check the following before calling for service.
1. Power Supply
Check the power plug is properly connected to a suitable wall outlet.
Check the line fuse/circuit breaker is functioning properly.
2. Place a cup of water (approx. 150 ml) in the oven and close the door securely.
Programme the oven for one minute on P100 power and start the oven.
Does the oven lamp come on?
YES
Does the turntable rotate?
YES
NOTE: The turntable turns in either direction.
Does the ventilation work?
(Place your hand over the ventilation openings and check for air flow.)
YES
After 1 minute does the signal sound?
YES
Does cooking in progress indicator go off?
YES
Is the cup with water warm after the above operation?
YES
NO
NO
NO
NO
NO
NO
If you answer “No” to any of the above questions, call a Service Technician appointed by SHARP and report the results
of your check. See inside back cover for details of address.
NOTE: If you cook the food over the standard time with only P100 (800 W), the power of the oven will lower
automatically to avoid overheating. (The microwave power level will be reduced).
Cooking Mode
Microwave 100 P
Standard time
20 minutes
GB-19
R-240_OM_01_EN.indd Sek1:19
2011-03-18 21:04:32
Microwaves are energy waves, similar to those used
for TV and radio signals.
Electrical energy is converted into microwave
energy, which is directed into the oven cavity via a
waveguide. To prevent food and grease entering the
wave guide it is protected by the waveguide cover.
Microwaves cannot pass through metal, because of
this the oven cavity is made of metal and there is a
fine metal mesh on the door.
During cooking the microwaves bounce off the sides
of the oven cavity at random.
Microwaves will pass through certain materials, such
as glass and plastic, to heat the food.
(See "Suitable Cookware" on page GB-21).
Water, sugar and fat in food absorb microwaves
which cause them to vibrate. This creates heat by
friction, in the same way your hands get warm when
you rub them together.
ENGLISH
WHAT ARE MICROWAVES?
The outer areas of the food are heated by the
microwave energy, then the heat moves to the
centre by conduction, as it does in conventional
cooking. It is important to turn, rearrange or stir food
to ensure even heating.
Once cooking is complete, the oven automatically
stops producing microwaves.
Standing time is necessary after cooking, as it
enables the heat to disperse equally throughout the
food.
GB-20
R-240_OM_01_EN.indd Sek1:20
2011-03-18 21:04:34
SUITABLE OVENWARE
GLASS AND CERAMIC GLASS
METAL
Heat-resistant glass utensils are very
suitable. The cooking process can be
observed from all sides. They must not,
however, contain any metal (e.g. lead
crystal), nor have a metallic overlay (e.g.
gold edge, cobalt blue finish).
Generally speaking, metal should not be used,
since microwaves do not pass through metal and
therefore cannot reach the food. There are, however,
exceptions: small strips of aluminium foil may be
used to cover certain parts of the food, so that
these do not thaw too quickly or begin to cook (e.g.
chicken wings). Small metal skewers and aluminium
containers (e.g. of ready cooked meals) can be used.
They must, however, be small in relation to the
food, e.g. aluminium containers must be at least 2/3
to 3/4 filled with food. It is recommended that you
transfer the food into a dish suitable for use in the
microwave. When using aluminium containers or
other metal utensils there must be a gap of approx.
2 cms between them and the walls of the cooking
area, otherwise the walls could be damaged by
possible arcing.
CERAMICS
Generally very suitable. Ceramics must be glazed,
since with unglazed ceramics moisture can get into
the ceramic. Moisture causes the material to heat
up and may make it shatter. If you are not certain
whether your utensil is suitable for the microwave,
carry out the utensil suitability test.
PORCELAIN
Very suitable. Ensure that the porcelain does not
have a gold or silver overlay and that it does not
contain any metal.
PLASTIC AND PAPER UTENSILS
Heat resistant plastic utensils which are suitable
for use in the microwave can be used to thaw,
heat and cook food. Follow the manufacturer’s
recommendations.
Heat-resistant paper made for use in a microwave
oven is also suitable. Follow the manufacturer’s
recommendations.
MICROWAVE FOIL
T h i s, o r h e a t - re s i s t a n t fo i l, i s ve r y s u i t a b l e
for covering or wrapping. Please follow the
manufacturer’s recommendations.
NO UTENSIL SHOULD HAVE A METAL
OVERLAY - par ts such as screws, bands or
handles.
UTENSIL SUITABILITY TEST
If you are not sure whether your utensil
is suitable for use in your microwave
oven, carry out the following test: Place
the utensil into the oven. Place a glass
container filled with 150 ml of water on
or next to the utensil. Switch on the oven at 800 W
power for 1 to 2 minutes. If the utensil stays cool or
just warm to the touch, it is suitable. Do not use this
test on a plastic utensil. It could melt.
ROASTING BAGS
Can be used in a microwave oven. Metal clips are not
suitable for fastening them since the roasting bag
foil might melt. Fasten the roasting bag with string
and pierce it several times with a fork. Non heatresistant food wraps are not recommended for use in
a microwave oven.
BROWNING DISH
A special microwave dish made from ceramic glass
with a metal alloy base, which allows food to be
browned.
When using the browning dish a suitable insulator,
e.g. a porcelain plate, must be placed between the
turntable and the browning dish. Be careful to
adhere exactly to the pre-heating time given in the
manufacturer’s instructions. Excessive pre-heating
can damage the turntable and the turntable stand or
can trigger the safety-device which will switch off the
oven.
GB-21
R-240_OM_01_EN.indd Sek1:21
2011-03-18 21:04:35
TIME SETTINGS
DEEP AND SHALLOW CONTAINERS
In general the thawing, heating and cooking
times are significantly shorter than when using a
conventional cooker or oven. For this reason you
should adhere to the recommended times given in
this cookery book. It is better to set the times too
short, rather than too long. Test the food after it has
been cooked. It is better to have to cook something
for a little longer than to overcook it.
Both containers have the same capacity, but the
cooking time is longer for the deeper one. You
should therefore choose as flat a container as
possible with a large surface area. Only use deep
containers for dishes where there is a danger of
overcooking, e.g. for noodles, rice, milk etc..
INITIAL TEMPERATURES
Thawing, heating and cooking times are dependent
upon the initial temperature of the food. Deepfrozen food and food stored in a refrigerator, for
example, requires longer than food which has been
stored at room temperature.
Fo r h e a t i n g a n d co o k i n g, n o r m a l s to r a g e
temperatures are assumed (refrigerator temperature
approx. 5°C, room temperature approx. 20°C). For
thawing the temperature of the deep freeze is
assumed to be - 18°C.
COOKING TIMES
All the times given in this cooker y book are
guidelines, which can be varied according to the
initial temperature, weight and condition of the food
(water or fat content etc.).
SALT, SPICES AND HERBS
Food cooked in your microwave retains its individual
flavour better than it does when conventional
preparation methods are used. For this reason you
should use salt very sparingly and normally add it
only after cooking. Salt absorbs liquid and dries out
the outer layer of the food. Herbs and spices can be
used as normal.
ADDITION OF WATER
Vegetables and other foods with a high water
content can be cooked in their own juice or with
the addition of a little water. This ensures that many
vitamins and minerals are preserved.
ENGLISH
TIPS AND ADVICE
ROUND AND OVAL CONTAINERS
Food cooks more evenly in round or oval containers
than in containers with corners, since the microwave
energy concentrates in the corners and the food in
these areas could become overcooked.
COVERING
Covering the food retains the moisture within it and
shortens the cooking time. Use a lid, microwave foil
or a cover. Foods which are to be crispy, e.g. roasts or
chickens, should not be covered.
As a general rule, whatever would be covered in
a conventional oven should also be covered in a
microwave oven. Whatever would be uncovered
in an ordinary oven can also be left uncovered in a
microwave oven.
TURNING
Medium-sized items, such as hamburgers and steaks,
should be turned over once during cooking, in order
to shorten the cooking process. Large items, such as
roasts and chickens, must be turned, since the upper
side receives more microwave energy and could dry
out if not turned.
STANDING TIME
Keeping to the standing time is one of the most
impor tant rules with microwaves. Almost all
foods, which are thawed, heated or cooked in
the microwave, require a certain amount of time
to stand, during which temperature equalisation
takes place and the moisture in the food is evenly
distributed.
FOOD IN SKINS OR SHELLS
Food such as sausages, chickens, chicken legs, baked
potatoes, tomatoes, apples, egg yolks or such like
should be pricked or pierced with a fork or small
wooden skewer. This will enable the steam which forms
to dissipate without splitting the skin or shell.
LARGE AND SMALL QUANTITIES
Microwave times are directly dependent upon the
amount of food which you would like to thaw, heat
or cook. This means that small portions cook more
quickly than larger ones.
As a rule of thumb:
TWICE THE AMOUNT = ALMOST TWICE THE TIME
HALF THE AMOUNT = HALF THE TIME
GB-22
R-240_OM_01_EN.indd Sek1:22
2011-03-18 21:04:35
TIPS AND ADVICE
BROWNING AGENTS
After more than 15 minutes cooking time food
acquires a brownness, although this is not
comparable to the deep brownness and crispness
obtained through conventional cooking. In order
to obtain an appetising brown colour you can
use browning agents. For the most par t they
simultaneously act as seasoning agents.
In the following table you will find some suggestions
for substances you might use for browning and some
of the uses to which you might put them.
DISH
BROWNING AGENT
Melted butter and dried paprika
Poultry
Dried paprika
Oven baked dishes "Cheese
toasties"
Meat and poultry
Roasts, Rissoles, Small roasted
items
Oven baked dishes, toasted
items, soups, stews
Cakes and desserts
Soya sauce
Barbecue and Worcester sauce, Gravy
Rendered down bacon fat or dried onions
Cocoa, chocolate flakes, brown icing, honey
and marmalade
METHOD
Coat the poultry with the
butter/paprika mixture
Dust with paprika
Coat with the sauce
Coat with the sauce
Sprinkle pieces of bacon or
dried onions on top
Sprinkle pieces on top of cakes
and desserts or use to glaze
HEATING
BOXES AND CONTAINERS
● Ready-prepared meals in aluminium containers
Boxes and containers suitable for microwaves are
particularly good for thawing and heating food,
since they can withstand temperatures in a deep
freeze (down to approx. –40°C) as well as being heatresistant (up to approx. 220°C). You can therefore use
the same container to thaw, heat and even cook the
food, without having to transfer it.
●
●
●
●
●
●
●
should be removed from the aluminium container
and heated on a plate or in a dish.
Remove the lids from firmly closed containers.
Food should be covered with microwave foil, a
plate or cover (obtainable from stores), so that
the surface does not dry out. Drinks need not be
covered.
When boiling liquids such as water, coffee, tea or
milk, place a glass stirrer in the container.
If possible, stir large quantities from time to
time, to ensure that the temperature is evenly
distributed.
The times are for food at a room temperature
of 20°C. The heating time for food stored in a
refrigerator should be increased slightly.
After heating allow the food to stand for 1-2
minutes, so that the temperature inside the food
can be evenly distributed (standing time).
The times given are guidelines, which can be
varied according to the initial temperature,
weight, water content, fat content or the result
which you wish to achieve.
COVERING
Cover thin parts with small strips of aluminium
foil before thawing. Thawed or warm parts should
likewise be covered with aluminium strips during
thawing. This stops the thin parts becoming too hot
while thicker parts are still frozen.
CORRECT SETTING
It is better to choose a setting which is too low rather
than one which is too high. By so doing you will
ensure that the food thaws evenly.
If the microwave setting is too high, the surface of
the food will already have begun to cook while the
inside is still frozen.
THAWING
Your microwave is ideal for thawing. Thawing times
are usually considerably shorter than in traditional
methods of thawing.
Here are a few tips. Take the frozen item out of its
packaging and place on a plate for thawing.
GB-23
R-240_OM_01_EN.indd Sek1:23
2011-03-18 21:04:36
depend upon the weight, initial temperature and
condition of the type of vegetable in question.
The fresher the vegetables, the shorter the
cooking times.
TURNING/STIRRING
Almost all foods have to be turned or stirred from
time to time. As early as possible, separate parts
which are stuck together and rearrange them.
COOKING MEAT, FISH AND POULTRY
SMALL AMOUNTS
Thaw more quickly and evenly than larger ones. We
recommend that you freeze portions which are as
small as possible. By so doing you will be able to
prepare whole menus quickly and easily.
FOODS REQUIRING CAREFUL
HANDLING
Foods such as gateaux, cream, cheese and bread
should only be partially thawed and then left to
thaw completely at room temperature. By so doing
you will avoid the outer areas becoming too hot
while the inside is still frozen.
● When buying food items, try to ensure that, as far
●
●
●
●
STANDING TIME
This is particularly important after thawing food, as
the thawing process continues during this period. In
the thawing table you will find the standing times
for various foods. Thick, dense foods require a longer
standing time than thinner foods or food of a porous
nature. If the food has not thawed sufficiently, you
may continue thawing it in the microwave oven or
lengthen the standing time accordingly. At the end
of the standing time you should process the food as
soon as possible and not re-freeze it.
●
●
COOKING FRESH VEGETABLES
● When buying vegetables try to ensure that, as
●
●
●
●
●
●
●
ENGLISH
TIPS AND ADVICE
far as possible, they are of similar size. This is
particularly important when you want to cook the
vegetables whole (e.g. boiled potatoes).
Wash the vegetables before preparing them,
clean them and only then weigh the required
quantity for the recipe and chop them up.
Season them as you would normally, but as a rule
only add salt after cooking.
Add about 5 tbsps of water for 500g of
vegetables. Vegetables which are high in
fibre require a little more water. You will find
information about this in the table.
Vegetables are usually cooked in a dish with a lid.
Those with a high moisture content, e.g. onions or
boiled potatoes, can be cooked in microwave foil
without adding water.
After half the cooking time has elapsed
vegetables should be stirred or turned over.
After cooking allow the vegetables to stand
for approx. 2 minutes, so that the temperature
disperses evenly (standing time).
The cooking times given are guidelines and
as possible, they are of similar size. This will ensure
that they are cooked properly.
Before preparation wash meat, fish and poultry
thoroughly under cold running water and pat
them dry with kitchen paper. Then continue as
normal.
Beef should be well hung and have little gristle.
Even though the pieces may be of a similar size,
cooking results may vary. This is due, amongst
other things, to the kind of food, variations
in the fat and moisture content as well as the
temperature before cooking.
After the food has been cooking for 15 minutes
it acquires a natural brownness, which may be
enhanced by the use of a browning agent. If, in
addition, you would like the surface to be crisp
you should either use the browning dish or sear
the food on your cooker and finish cooking
it in your microwave. By doing this you will
simultaneously obtain a brown base for making a
sauce.
Turn large pieces of meat, fish or poultry half way
through the cooking time, so that they are cooked
evenly from all sides.
After cooking cover roasts with aluminium foil
and allow them to stand for approx. 10 minutes
(standing time). During this period the roast
carries on cooking and the liquid is evenly
distributed, so that when it is carved a minimum
amount of juice is lost.
THAWING AND COOKING
Deep-frozen dishes can be thawed and cooked at the
same time in one process in your microwave. You
will find some examples in the table. Do take note,
however, of the general advice given on “heating”
and “thawing” food. Please refer to the manufacturer’
s instructions on the packaging when preparing
deep frozen dishes. These usually contain precise
cooking times and offer advice on preparation.
GB-24
R-240_OM_01_EN.indd Sek1:24
2011-03-18 21:04:36
GB
SPECIFICATIONS
AC Line Voltage
Distribution line fuse/circuit breaker
AC Power required:
Microwave
Output power:
Microwave
Off Mode (Energy Save Mode)
Microwave Frequency
Outside Dimensions
Cavity Dimensions
Oven Capacity
Turntable
Weight
GB
: 230 V, 50 Hz single phase
: 10 A
: 1200 W
: 800 W (IEC 60705)
: less than 0.5 W
: 2450 MHz*(Group 2/Class B)
: 452 mm(W) x 262 mm(H) x 370 mm(D)
: 315 mm(W) x 210 mm(H) x 314 mm(D)**
: 20 litres**
: ø 245 mm
: approx. 12 kg
* This Product fulfils the requirement of the European standard EN55011.
In conformity with this standard, this product is classified as group 2 class B equipment.
Group 2 means that the equipment intentionally generates radio-frequency energy in the form of
electromagnetic radiation for the heat treatment of food.
Class B equipment means that the equipment is suitable to be used in domestic establishments.
** Internal capacity is calculated by measuring maximum width, depth and height. Actual capacity for holding
food is less.
AS PART OF A POLICY OF CONTINUOUS IMPROVEMENT, WE RESERVE THE RIGHT TO ALTER DESIGN AND
SPECIFICATIONS WITHOUT NOTICE.
GB-25
R-240_OM_01_EN.indd Sek1:25
2011-03-18 21:04:36
R-240_OM_01_EN.indd Sek1:26
2011-03-18 21:04:36
SHARP ELECTRONICS (EUROPE) GmbH.
Sonninstraße 3, D-20097 Hamburg
R-240_OM_XX_BACK_EAST.indd 1
Printed in China
Τυπώθηκε στην Κίνα
Natisnjeno na Kitajskem
Vytisknuto v Číně
Vytlačené v Číne
Kínában nyomtatva
Надруковано в Китаї
Iespiests Ķīnā
Atspausdinta Kinijoje
Trükitud Hiinas
Отпечатано в Китай
Tipărit în China
Надрукавана ў Кітае
2011-03-18 21:03:28