1
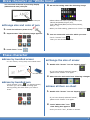
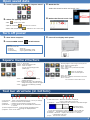
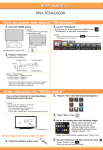
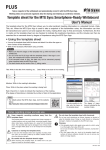
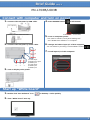
Brief Guide
ver1.1
PN-L703B/L603B
Connect with computer and turn on power
1. Connect with computer by USB cable.
4. Press POWER button
in left bottom.
Via computer
cable
[Notice]
You can connect from side.
POWER button / TOUCH MENU
5. Turn on Computer power.
*You need to install “Touch panel setting tool”
and “SHARP Pen software” to computer.
2. Connect with computer by Video cable.
6. Change and select input I/F of this computer.
You can select by touching “TOUCH MENU” button.
④
7. Touch input I/F of this computer.
⑤
⑥
①
②
③
①D-Sub input
②Display Port input
③HDMI input
④D-Sub input
⑤HDMI input
⑥HDMI input
3. Turn on display main power.
Start up “White board”
1. Double click “Pen Software” icon
on desktop. *twice quickly.
2. Then “White board” start up.
1
Draw character on “White board”
You can draw character by touching display
(White board area) with pen.
Bundled pen
●Change size and color of pen
1. Touch the indicator (menu icon) .
2. “Square menu” like following image appears.
4. Set on the setting menu like following image.
・Please select the kind of pen (Standard pen
/Brush pen/Marker/Figure pen),
Color (Black/Red/Blue/Green/Yellow/White),
Size(1~5).
・When you finish setting, please touch “Close” icon.
5. You can create size and color which you want .
・Touch “Custom” icon
,
Then you can set size and color.
3. Touch “Pen1” icon.
Erase character
●Erase by bundled eraser
・You can erase by moving softly with bundled eraser.
●Change the size of eraser
1. Double click “Eraser” icon on “Square menu”.
Bundled eraser
・If you have already selected “eraser”,
please touch “Eraser” icon again.
2. Select the size and touch from following 4 images.
●Erase by bundled pen
・Touch “Eraser” icon
on “Square menu”,
and then you can erase by touching (like
moving softly) the area which you want to
erase.
●Erase all item on sheet
1. Double click “Eraser” icon on “Square menu”.
・If you have already selected “eraser”,
please touch “Eraser” icon again.
2. Touch “Sheet clear” icon
,
then dialog box appears.
・Once you touch “Yes”, all item is cleared.
2
Add new sheet
・Touch “Add” icon
on “Tool bar” in bottom ,
then you can add new sheet.
●Change sheet by dragging display
・Touch “View” icon
on “Square menu”
and drag display to right or left (with keeping touch),
then you can change sheet.
・Touch ”Page” icon
,
then you can move sheet, previous and next.
Show sheet list of “White board”.
・Touch “Sheet list” icon
on “Tool bar” in bottom, then you can see thumbnail each sheet.
・If you touch once, you can see up to 8 sheets’ thumbnails at the bottom of screen like following (a) image.
If you touch again, you can see max. 48 sheets’ thumbnails like following (b) image
and you can move to the sheet where you touch.
(a)
(b)
Save the data
1. Touch “Save” icon
on “Square menu”.
2. Select the save method.
・Save as a new file:
・Save PDF:
3. Select the file save location and touch “OK”.
4. Touch “OK”.
・Save to the same file:
・Save image:
*”Save as a new file” and “Save to the same file”,
it save as SWSX format and you can build again.
*”Save image”, it save as BMP/JPEG/PNG format
so you can not build again.
[Notice]
Format of “Save as image” is set by “sheet” tab on setting
of “Tool bar” in bottom
[Notice]
When you want to change file name, software key board appear
by touching file name space and then you can change it
3
Open saved data
1. Touch “Open file” icon
on “Square menu”.
3. Read the file.
・Select the saved location and touch “OK”.
4. Select the file and touch “OK”.
2. Select file opening method.
・New
:Create a new sheet
・Open as a new file
:Open data as a new file
・Add to the current sheet
:Add data to the current sheet
Turn off power
1. Shut down computer.
3. Turn off on display main power.
2. Press POWER button
in left bottom.
[Notice]
Status of Power LED
・Green lit
: Power on
・Orange lit
: Power off (Standby mode)
・Green flashing
: Input signal standby mode
Square menu structure
・Pen1~3:Draw lines.
・Eraser:Erase hand-drawn lines.
・Select :Select an object.
You can move/enlarge/rotate
/delete/copy.
・Drawing Object:Draw a figure or line/arrow.
・Paste:Pastes a copied object.
・Open:Open a file.
・Text :Enter text by software key board.
・Insert image:
:Insert an image file.
:Insert Screen capture.
・Save:Save file.
・All function:Displays all functions in list view.
・Print:Print file.
You can select current sheet or all.
・Redo :Redo the immediately preceding
canceled operation.
・View :Enlarge the view of the whiteboard,
change the display position and pages.
・Undo :Cancel the immediately preceding
operation.
Tool bar structure (in bottom)
①
①
②
③
④
②
③
④
⑤
⑥
“Pin” button: Touch to switch between the pin / do not pin settings.
Sheet list : Shows the sheets as thumbnails.
Settings
: Displays the pen software settings screen.
Search box : You can search for text and handwritten characters
in the box.
⑤ Sheet navigation buttons:Touch the sheet navigation button
to change the displayed sheet.
⑥ Page No. of the current sheet:
⑦
⑧
⑨
⑩
⑪
⑦ Add sheet button:When the last sheet is displayed,
press to add a sheet at the end.
⑧ Board list: Touch to display the list of boards as thumbnail images.
:Add White board
:Add overlay board
*If you have already open overlay board, you can not add this.
⑨ Minimize : The software will be minimized in the task tray.
⑩ Window / Maximize : Displays the software in a window.
* Whiteboard mode only..
⑪ Quit : The software is exited.
4