1
SHARR
LIQUID CRYSTAL TELEVISION
LC=I 3SH6U/LC=I 5SH6 U/LC..20SH6U
Products 1hat have earned the ENERGY STAR_
ENHANCI_D
_3EFINITION
Tt_LEVISION
are designed to protect the environment through
superior energy efficiency
MONITOR
Model No :
Serial No:
IMPORTANT:
To aid reporting in case of loss or theft, please record the TV's model and serial numbers in the space
provided, The numbers are located at the rear of the TV
n PORTANT iNFORMATION
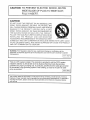
WARNING:
TO REDUCE THE RISK OF FIRE OR
ELECTRIC
PRODUCT
SHOCK, DO NOT EXPOSE THIS
TO RAIN OR MOISTURE.
The lightning flash with arrow-head
symbol, within an equilateral
triangle, is intended to alert the user
to the presence of uninsufated
"dangerous voltage" within the
product's enclosure that may be of
sufficient magnitude to constitute a
risk of electric shock to persons
RiSK OF ELECTRIC SHOCK
DO NOT OPEN
CAUTION:TO REDUCE THE RISK OF ELECTRIC
SHOCK,DO NOT REMOVE COVER (OR BACK)
NO USER-SERVICEABLEPARTS iNSIDE
REFER SERVICING TO QUALIFIEDSERVICE
PERSONNEL
,11,
,
ii1_1,,11,,I ,
,
'WUHL*'H
H,
The exclamation point within a
triangle is intended to alert the user
to the presence of important
operating and maintenance
(servicing) instructions in the
literature accompanying the product
Printed in China
TINS-C346WJZZ
06P03-CH-NF
,,,,,i ,i ,iN
CAUTION:
ii,i illl,.lll ii
ill
TO PREVENT ELECTRIC SHOCK, MATCH
WIDE BLADE OF PLUG TO WIDE SLOT,
FULLY INSERT.
CAUTION:
DO NOT PLACE THIS PRODUCT ON AN UNSTABLE CART,
STAND, TRIPOD, BRACKET, OR TABLE THE PRODUCT MAY
FALL CAUSING SERIOUS PERSONAL INJURY AND SERIOUS
DAMAGE TO THE PRODUCT
USE ONLY WITH A CART,
STAND, TRIPOD, BRACKET, OR TABLE RECOMMENDED BY
THE MANUFACTURER
OR SOLD WITH THE PRODUCT
FOLLOW THE MANUFACTURER'S
INSTRUCTIONS
WHEN
INSTALLING
THE PRODUCT
AND USE MOUNTING
ACCESSORIES RECOMMENDED
BY THE MANUFACTURER
A PRODUCT AND CART COMBINATION
SHOULD BE MOVED WITH CARE QUICK
STOPS, EXCESSIVE FORCE, AND UNEVEN SURFACES MAY CAUSE THE PRODUCT
AND CART COMBINATION TO OVERTURN
,,Nmnl,,,,mlllmll
ii
,t,
uH,,mmn
ul
ii
=,
,,
HI
WARNING: FCC Regulations state that any unauthorized changes or modifications to this
equipment not expressly approved by the manufacturer could void the user's authority to operate
this equipment
US A, ONLY t
E
i
,
, ml
"Note to CATV system installer: This reminder is provided to call the CATV system
installer's attention to Article 820-40 of the National Electrical Code that provides
guidelines for proper grounding and, in particular, specifies that the cable ground shall
be connected to the grounding system of the building, as dose to the point of cable
entry as practical°"
fu s A ONLY]
This product utilizes tin-lead solder, and fluorescent lamp containing a small amount of mercury.
Disposal of these materials may be regulated due to environmental considerations. For disposal or
recycling information, please contact your local authorities or the Electronic Industries Alliance;
www,eia org
DEAR
SHARP
CUSTOMER
Thank you for your purchase of the Sharp Liquid
of trouble-free
operation
of your product,
please
using this product.
Crystal Television°
read the Important
To ensure safety
Safety Precautions
and many
carefully
years
before
PORTANT SAFETY PRECAUTIONS
UUUlL
i
,,,,,H ..................
Electricity is used to pedorm many useful functions, but it can
handled This product has been engineered and manufactured
result in electric shock and!or fire In order to prevent potential
installing, operating and cleaning the product To ensure your
product, please read the following precautions carefully belore
also cause personal injuries and property damage if improperly
with the highest priority on safety However, improper use can
danger, please observe the fallowing instructions when
safety and prolong the service life of your LCD co,or TV
using the product
I_ Read instructions--All operating instructions must be read and understood before the product is operated.
I_ Keep thismanual in a sale place--These safety and operating instruclions must be kept in a sale place for future
relerence
I_! Observe warnings--Air warnings on the product and in the instructions must be observed closely
t
Follow instructions--All operating instructions must be followed
ta Attachments--Do not use attachments not recommended by the manufacturer Use of inadequate attachments can
result _naccidents
m Power source --This product must operate on a power source specified on the specification label if you are not sure of
the type of power supply used in your home, consult your dealer or local power company For units designed to operale
on batteries or another power source, refer to the operating instructions
AC cord protection --The AC cords must be routed propedy to prevent people from stepping on them or objects from
resting on them. Check the cords at the plugs and product
ml Overloading _ Do not oveMoad AC out_ets or extension cords
Overloading can cause fire or electric shock
I_1 Entering of objects and liquids--Never insert an object into the product through vents or openings High voltage flows in
the product, and inserting an object can cause electric shock and/or short internal parts For the same reason, do not
sptt_ water or liquid on the product.
m Servicing --Do not attempt to service the product yourseff Removing covers can expose you 1o high voltage and other
dangerous conditions. Request a qualified service person to perform servicing
I_1 Repair--If any of the following conditions occurs, unplug the AC cord from the AC outtet, and request a qualified service
person to perform repairs
a When the AC cord or plug is damaged
b When a liquid was spilled on the product or when objects have fallen into the product
c When the product has been exposed to rain or water
d When the product does not operate properly as described in the Operating instructions
Do not touch the controfs other than those described in the operating instructions Improper adjustment of controls not
described in the instructions can cause damage, which often requires extensive adjustment work by a qualified
technician
e When the product has been dropped or damaged
f When the product displays an abnormal condition Any noticeable abnormafity in the product indicates that the
product needs servicing
Rep_acement parts-_n c_se _hepr_duct needs rep__cement parts_ make sure th_t _he serv_ce person u_es rep_acement
parts specified by the manutacturer, or those with the same charactedstics and performance as the original parts Use of
unauthorized parts can resul! in fire, electric shock and/or other danger
m Safety_hecks-Up_nc_mp_et__n_{service_rrepa_rw_rk_request_heservice_echn_c_ant_ped_rmsafetycheckst_
ensure that the product is in proper operating condition
r_ Wa_ _r ce_ng m_unt_ng-When
m_unt_ng _he pr_du_t _n a waH _r ce_ng' be sur_ t_ _nsta_the pr_duct acc_rding _ the
method recommended by the manufacturer
_1 Polarization--This
AC cord may be equipped with a polarized alternating current line plug (a plug having one blade
wider than the other) This plug will lit into the power outlet onty one way. This is a safety feature II you are unable to
insert the plug fully into the outlet, try reversing the plug If the ptug should still fail to fit. contact your electrician to
replace your obsolete outlet
Do not defeat the safety purpose of the polarized plug
B Cleaning--Unplug
the AC cord from the AC outlet before cleaning the product Use a damp cloth to clean the product
Do not use liquid cleaners or aerosol cleaners
Water and moisture--Do
not use the product near water, such as bathtub, washbasin, kitchen sink and laundry tub,
swimming pool and in a wet basement
El Stand--Do not place the product on an unstable cart. stand, tripod or table Placing the product on an unstable base can
cause the product to fail, resulting in serious personal injuries as well as damage to the product Use only a cart, stand,
tripod, bracket or table recommended by the manufacturer or sold with the product When mounting the product on a
wall, be sure to Io}low the manufacturer's instructions Use onty the mounting hardware recommended by the
manufacturer
When
relocating
theproduct
placed
onacart,
itmust
bemoved
withutmost
careSudden
stops,
excessive
force
anduneven
floor surtace can cause the product Is lali from the cad
I_ Ventilation--The vents and other openings in the cabinet are designed for ventilation. Do not
cover or block these vents and openings since insufficient ventilation can cause overheating
and!or shorlen the fife of tile product Do not place the product on a bed, sofa, rug or other
similar surface, since they can block ventilation openings This product is not designed for
built-in installation; do not place the product in an enclosed place such as a bookcase or
rack, unless proper ventilation is provided or the manufacturer's instructions are followed
13 The Liquid Crystal panel used in this product is made of glass Therefore, it can break when
the product is dropped or applied with impact Be careful not to be injured by broken glass
pieces in case the Liquid Crystal panel breaks
W Heat sources_Keep the product away from heat sources such as radiators, hea_ers, stoves and other heat-generating
products (including amp]ifiers)
8t The Liquid Crysta! panel is a very high technology product with 921,600 thin film transistors, giving you fine picture
details
Occasiona]Iy, a few non-active pixels may appear on the screen as a fixed point of blue, green or red
P_ease note that this does not affect the pedermance of your product
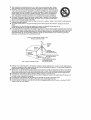
_I ]f an outside antenna is connected to the television equipment, be sure the antenna system is grounded so as to provide
some protection against voltage surges and built-up static charges Section 810 of the National Electrical Code provides
information with respecl to proper grounding of the mast and supporting structure, grounding of the lead-in wire to an
antenna discharge unit, size of grounding conductors, location of antenna-discharge unit, connection to grounding
electrodes, and requirements for the grounding electrode
EXAMPLE OF ANTENNA
GROUNDING
AS PER
NATIONAL
ELECTRICAL
CODE
_-_
....._. ANTENNA
t!
LEAD
/._._.
GROUND.,,.._y/
_ IX.&
j
/ /
/._._
CLAMP
__-_..,___
l
........
I
i_LC_L'r
L,_
[
_..//
_
.........
l[t
XN'_
_3_
_
I ,_/1
_L--I
L
_'_"_
_""'_"_-
I_
../
ANTENNA
DISCHARGE
ELECTRICAL
GROUNDING
l_
CODE
UNIT
(NEC SECTION
Y_
81S-20)
CONDUCTORS
(NEC SECT}ON810-21)
ELECTRODE
NEC--NATIONAL
IN
W,RE
{NEC
ART 250
SYSTEM
PART H)
I_ Lightning - For added protection !or this television equipment during a lightning storm, or when it is left unattended and
unused !or long period of time, unplug it from the wall outlet and disconnec! the antenna This will prevent damage to the
equipment due to lightning and power-line surges
I_1 Power Lines - An outside antenna system should not be located in the vicinity of overhead power lines or other electric
light or power circuits, or where [! can fall into such power lines or circuils When installing an outside antenna system,
extreme care should be taken to keep from touching such power lines or circuits as contact with them might be fatal
!_1 To prevent fire. never place any type of candle or flames on the top or near the TV set
I_1 To prevent fire or shock hazard, do not expose this product to dripping or splashing No objects filled with liquids, such
as vases, should be placed on the product.
m To prevent fire or shock hazard, do net place the AC cord under the TV set or ether heavy items
I_t 13onot display a still picture for a long time, as this could cause an alterimage to remain.
18I Install the product on the place where the AC cord can be unplugged easily from the AC outlet, or from the AC INPUT
terminal on the rear of the product
uppaied
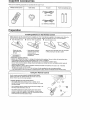
Make
Accessories
sure the to{lowing
accessories
are provided
W ,eieaS
remote
oo" ro
with the LCD TV set
Cabte
oi mP
:
Accord
° i=e
ha.cries
ix2
(LC-13SH6U)
(LCq 5SH6U/LC-20SH6U)
Preparation
,
:
: ::
Installing
lira
Batteries
i
i
,_.
in the Remote Control
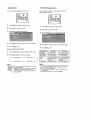
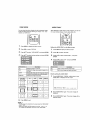
Before using the LCD TV set for the {irst time. install the two "AAA" size batteries (supplied) in the remole control. When the
batteries become dep{eted and the remote control fails to operate, replace the batteries with new "AAA" size balteries
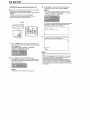
1
Open the battery
cover
• Detach the cover
while pressing the
(V) part
. Z_ CautionL_,
2
3
insert two "AAA" size batteries
- Place batteries wilh their
terminals corresponding
to the (+) and (-)
indications in the batter,/
close
the battery cover
o Align the tab on the battery cover [O) and place
it white pressing the tab (@)) to close it
compartment
Precautions
regarding
batteries
Improper use of batteries can result in a leakage of chemicals and/or explosion
Be sure to lol_ow the instructions below
* Place batteries with their terminals corresponding
to the (+) and (-) indications
- Different types of batteries have different characteristics
DO not mix batteries of different types
" Do not mix otd and new batteries Mixing old and new batteries can shorten the life of new batteries and/or cause old
batteries to leak chemicals
* Remove batteries as soon as they are depteted
Chemicals that leak from baltedee can cause a rash if chemical
leakage is Iound, wipe it oft with a cloth
• The batlertes supplied with the LCD TV set may have a shorter operating time due to storage conditions
• If the remote control is not to be used for an extended period of time, remove the batteries from the remote control
;
Us_n,, *_,_ C_emote ,..
..,_..,..
r'ontro ,_
Use the remote control by pointing it towards the remote sensor
window of the main unit Obiects between the remote controt and
sensor window may prevent proper operalion
Cautions regarding
use of the remote control
* Do not apply shock to the remote control In addition, do not
expose the remote control to Iiquids, and do not p_ace tt in an area
wlth high humMity
" Do not install or ptace the remote control under direct sunlight
heat may cause deformation of the unit
The
- The remote control may not work properly if the remote sensor
window is under direct sunlight or strong lighting tn such a case.
change the angle of the lighting or main unit. or operate the remote
control closer to the remote sensor window
../'
:
/r •
: '
.....
i
p. l:en n a Connection
--n':
The antenna requirements for good color television reception are more important than these for black & white lelevia[on
reception For th}a reason, a good quality ouldoor antenna ts strongly recommended
The following is a brieI exptanatien of the type o! connections that are p_'owided with the various antenna systems
_--
1 A 75-ohm system is generally a round cable with F-type connector that can easily
be attached to a te_'minalwithout lools (not eupp!ied)
F-type Connector
75-ohm coaxial cable 0*cued)
2 A 300-ohm eyslern is a fiat "twin4ead" ceb}e that can be attached to a 75-ohm
tm-minaJ through a 300/75-ohm adapter {not supplied)
300-ohm twin-!earl cable (flat)
6_e=
' Use one
A: Using
B: Using
• Connect
_" -'_
,_,
e_
of the fottowin_ lwo diagrams if you connecl an outdoor antenna
a VHF/UHF combination ot_t_oor antenna
separate VHF and/or UHF outdoor antennae
the outdoor antenna cable Jead-in to ANT (Antenna lerminal) on the rear of the main unit
A Combination VHFIUHF
Antenna
LJ
ANT (Anlenna
terminal)
B Sepai*ate VHF and!or
UHF Anlennas
300- h
UHF
8nlenna VHF
_
anlenna
Cembin_ ;
(e_I s_pp_ied)
/ 300-ohm
==J
twin-lead
_,
_
F-type connecIor
-ob_
F-type connector
I
or
should be finger-tightened only,
When connecting the RF cable to the LCD TV set, do not tighten F-type
connector with tools
If tools are used, it may cause damage to your LCD TV set
(The breaking of internal circuit, etc )
75-Dhm coaxial cane
J
• A 75-ohm coaxial cable connector is built into the set for easy hookup When connecting the 75-ohm Coaxial cable
to the set, screw the 75*ohm cable to the ANT terminal
. Some cable TV companies alter "premium pay channels" Since the signals of these premium pay channels are
scrambled, a cable TV converter/descrambler is generally provided to the subscriber by the cable TV company
This converter/descrambter is necessary tar normal viewing of the scrambled channeJs (Set your TV to channe_ 3
or 4, typically one of these channels is used it"this is unknown, consult your cable TV company ) For more
specific instructions on installing cable TV, consult your cable TV company. One possible method of utilizing the
conver_er/descrambler provided by your cable TV company is explained below
Please note'_An RF switch provided with two inputs (A and B) is required (not supplied)
_A" position on the RF switch (not supplled): You can v_ew all unscrambfed channels by using the TV's channel keys
_'B"position on the RF switch (not supplied): You can view the scrambled channels via the converterldescrambler by
using the converter's channel keys
RF switch
(not
supplied}
_
Cable
1
(nol
suppl}od}
TV Line
J
ConsulI your SHARP D-meieror Service Cenler for the lype of sptlller, RF swilch or combiner lhel mighl be required
:
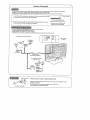
Connect
!o the
POWER
Power Connection
INPUT
terminal
of the
LCD
....
TV set using
the AC cord
(soppl}ed)
POWER
- AC INPUT terminal
(ACt20 V)
Household
power outlet
AC cord
• Unplug the AC ca_d!_remIhe power gutter when the LCD TV set is not to be used tot e long period of lime
:_ :''_
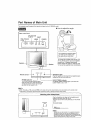
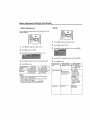
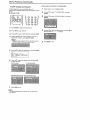
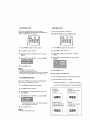
Part Names of Main Unit
The examples used throughout this manual are based on the LC-2OSHdU model
How
to adjust
the
angle
Upper control pane!
CH (Channel)
(v)/(,,,',)
VOL (Volume)
INPUT
MENU
(-)"+)
1--
"
POWER
1
_ithe display by holding !he oppOSer
r_ while securely hotding down
stand with your other hand
To change the vertical angle of the LCD
TV set, tilt the screen up to 2 5 degrees
forwards or 10 degrees backwards
Please adjust the angle so that the LCD
TV set can be watched most comfortably,
Speaker
POWER
Remote
sensor
POWER
SLEEP
_
indicator
_
_
1
@
......
L
Headphone
jack
Plug the headphone mini-plug in!o the headphone jack
located on the front of the main unit
SLEEP TIMER
The POWER indicator lights up green
when the power is on, and red when in the
standby mode (the indicator will not light
up when the main power is off)
l
/
indicator
The SLEEP TIMER indicator ][gh!sup red when Ihe
SLEEP TIMER is set to "ON"
• INPUT, CH (v)/(i'_). VOL (-)/(+) and MENUon the main unit have the same !unctions as the same buttons on the remotecontrol
Fundamentally, this operation manual provides a description based on operation usingtheremote control
Listening with HeadphOnes
Plug the headphone mini-plug into the headphone jack
located on lhe Hen! o! the LCD FV set
Adjust the sound volume using VOL (+}l(-) on the remote
control
Headphones
On-screen
display
V(ILI_5_
ZO lllllllnll ...........
_''"'_*'
i
0
\
POwS_
SL£E_
o
o
_
o Headphonesare not included in the supplied accessories
No sound is hea;d lrom themain unit speakers when a
headphone minFp_ugis connected into theheadphone jack
- Do not set the volume af a high level Hearing expeds edvis_
againstextended listening al high volume levets
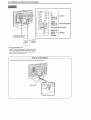
Part
Names
of Main
Unit (Continued)
H
I,I, I
P_
!--]_
P_
j _--_-AUDIO
Z
INPUT1
(L)I
r/t-l--A°°'°(")J
I_T_i_]_{_4_
_Jtltll,_.
AUDIO (L) _
"_f} _-- ANT., (Antenna
._____t_--_-_
IN PUT3IOUTPU]
terminal)
AUDIO (L) L-tNPUT2
VIDEO
|
S-VIDEO
_J
,,,,
,
,,,,,,,,,,,,,, ,,,
,,,
terminal
(AC t20 V)
• Using
the Kensington
Lock
o This LCD TV eel has a Kensington Security Standard stot tor
use wilh a Kensington M_ereSaver Security System Rater to
the information Ihet came with the system {or instruclions on
hew to use it to secure the LCD TV set
f
How to Fix the Cables
Be sure to secure the cabfes
and AC cord with the supplied
cable clamp
C
J
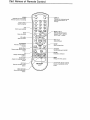
Part Names of Remote
Control
POWER
POWER
Swilches the Liquid Crystal
Tetevision pawer on or standby
DISPLAY
Displays the receiving channel
and the current, t_mefor 10
seconds
Channel Select
Sets 1hechannel
Setects audio settings
(v);(,",)
MUTE
Mutes the sound
VOL (÷)/(-)
Sets the volume
Switches the inpul source
between INPUT1, INPUT2,
INPUT3 and 'lW modes
CH[/,.);(v)
Selects channei
FLASHBACK
Returns to the previous
charmer
AUDIO ONLY
Outputs audio without screen
image
CO
Displays Closed Caption
subtitles
BACKLIGHT
Adjusts the brightness of the
screen
PtC, FLIF
Sets the orientation of the
picture
MENU RETURN
Returns to the previous
screen
Sets the sleep timer
AV MODE
Setecte preferred AV MODE
ENTER
Executes a command
MENU
Disptays the maeu screer_
._ [_'1 _ t _" (Cursor control)
Selects a desired item on the
screen
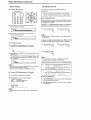
EZ SETUP
Press ENTER to access START EZ SETUP mode
Press ,&IV to select "YES", and press ENTER
EZ SETUP during the First Power On
_Whan you turn on the TV for the first time, it will automalieatly memorize the broadcasting channels
Please perform the following instructions before you press
POWER,
(1} Insert the batteries into the remote control
(2) Connect the antenna cable to the LCD TV set
(3) PJug in the AC cord to the wail outlet
• Ftyou want to step the EZ SETUPprocess once it has
started, press MENU and it will be canceled If you waet to
set up again, pleaeesee OH.SETTING
POWER
V
The tuner will automatically search for the broadcasting
and cable TV channels (The channel number wiFI
automatically increase when it appears)
11
PLEASE
iJt 5%
®M I
AUTO
4
1
Press POWER, located or=the upper side of the main
unit, to turn on the TV The SELECT LANGUAGE mode
will be displayed
Press ,&iV to select "ENGLISH", 'ESPANOL"
: (Spanish) or "FRANCA_S" (French)
2
Press ENTER to access CH-SETTfNG mode
Press ,&/'9' to select "ON" or "OFF" When you select
"ON", the LCD TV set will automaticatly memorize the
broadcasting channels
• _!you select _OFF*'.EZ SETUP wiltbe cenceted
WAfT
PROGRAMMING
Once EZ SETUP is completed, the lowest channel
number memorized will be displayed
_ST_REO
_AP
MONO
- Do not let lhe EZ SETUP screen remain unattended for a long
time.
• If EZ SETUPdoes not memorize all the channels in your region.
pleasesee CH-SETTtNG tot more information onmanually
memorizing the channels using CH-SETTING
. It may be difticult to preset when1he broadcasting
signals are
week. the channelcyctefrequency is incorrector the frequency
jamming
is occurring
around Ihe area Pleasesee CH-SETTING
tot more _nformatienon manue$1ymemorizing the channels using
CH-SE]-FING
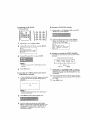
Basic
Operatnon
Turning On and Off the Main Power
Switching the Input Modes
(tN PUT1/IN P UT2/IN PUI'3/'rv)
(POWER)
1
Turn on the power of the connected video equipment
2
Press INPUT (v)/(A)
to select the applicable
input
source. The screen changes
in order of INPUT1,
{NPUT2, ]NPLtT3 and TV mode each time INPUT is
pressed
INPUT1 mode
I|_PUT1]
POWER Indicator
time I
O Press POWER The POWER indicator instantly changes
from red to green and the LCD TV set is turned on
INPUT2 mode
On-screen display
IttPUT2]
t
MOI¢O
tNPUT3 mode
• The On-screen display disappears
O
after a low seconds
To turn off the main power, press POWER
t_PUT3]
again
TV mode
Standby
To turn
Press
off the
POWER
LCD TV set
The POWER
indicator
wttt turn red
To turn the LCD TV set back on
Press POWER again The POWER indicator will turn green
INPUT1 :
Used for video equipmenl connected lo the COMPONENT input
terminals
INPUT2 :
Used :orvideo equipmentconnected to the INPUT2 lermlnel
The S-video input terminal is additionally provided lot the
INPUT2 If both the S_video lerminal and normat video
terminals are connected with cables, the S-video input
terminat takes pdodty
INPUT3 :
INPUT3 mode is Used to adjust the preset settings and IN or OUT
can be selected tNPUT3 Indication is not displayed when OUT is
setected
Basic Operation
..................
,
(Continued)
uul
,,,
, i
,,,uul,i
i
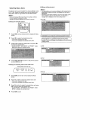
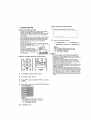
Sound Volume
Changing
l_ To adjust the volume
©
You can select channels using Channel Select or
CH (A)/(V)
O
" (1
This
to LCD
125)TV
To set
select
allows
a channel,
you fo select
enter a
up2-toor125
3-digil
channels
number
@@®
@®®
@®®
@@@
Channels
Using
Select
When selecting the channel using Channel Select, complete
input of the channel number by holding down the button for
the last digit for a moment
!.q?"°d
o
To select a 1_or 2*digit channel number (e..go,Channel 5):
Complete the following procedure within 4 seconds
@ Press VOL (+) to increase lhe sound volume
The bar indicator shills right
1
50 IItlIIIIlIIlIlIIIIIIIIIIIIlllIlIUlIIIIIIIIIIIIItl
VOLUME
Channel
Press the @ button
2
Press the _
button
.......... 1
0-
51
@ Press VOL (-) to decrease the sound volume
The bar indicator shifts left
When
VOLUME
tO Illtllllt| ..................................................
(_)
1
selecting
butlan
a l-dlgJt
channel
number,
do nol tail to press
the
first
To select a 3-digit channel number: (e.g°, Channel 115):
Complete the {oI{owing procedure within 4 seconds
1_To mute the sound
e
1
Press the @ button
3
Press the _') button
2
Press the C) button
Press MUTE to temporarily turn off the sound.
The MUTE mark u'_ is displayed for 4 seconds
O Press MUTE or VOL (+)t(-) io turn the sound back to the
previous level
The mute function is automatically turned off when any of
the following buttons are pressed: POWER, MUTE, VOL
(+)/(-) or MTS
[voLoME
f0 Inlll|lU ..................................................
]j
115 1
channel number can be selected only when the
receiving mode is sel Io CABLE in CH-SETTING
* The 3-digit
"Changing channels with CH (A)I(M)
on the remote control
Air:
* When VOL (÷}/(_) is pressed in lhe Mute mode,the sound turns
on and the vofume Indlcalor is dlspIayed
• The M_te function is canceled when POWER is pressed
m To select
MTS (Multichannel
PressCH(t-.) and[h8channelschangein Iheordershownbelow:
2 --_.3 ....
6B_69_2_3_
Press
CH(v)andthechannelschangeinlheardorshownbelow:
3_2_69_8B_
_3_2_
.
Cable:PressOH(..x)andlhechannelschangein theo_dershownbetow;
t_2_3.._
_125_1_2_3_
TV Sound)
1 : Press MTS to display the MTS screen
PressCH(v) andIhechannels
changein theordershownbelow:
k,
i
i:i
L _o_I_
, "ON AIF appears when a STEREO orSAP broadcast is being
aired
--3
._, 2 _ 1
Using FLASHBACK
2 :' Press MTS
to select the MTS settings
STEREO: stereoaudio
SAP:
secondary audio program
MONO: monophonic
audio
3_2_1_t25-_
@
Press FLASHBACK to switch the currently tuned channel
1othe previously tuned channel
O
Press FLASHBACK
tuned channel
again to switch back to the currently
Selecting Menu Items
The menus can be used to adjust the various settings of your
LCD TV set Select the desired menu item by following the
steps below See the right column for each Menu screen
- The items displayed differ depending on the selling conditions
• The item salecled is displayed in yellow
, Settings most recently adiusted wilt be saved in memory
Using
the remote
[] Menu setting
screens
+ The illustrations and on*screendisplays )n this manualare for
explanation purposes and may vary slightly from the actual
appearance,
• Depending an the setting condition, such as an input mode. il may
not be possible to adjusl or set some items. In such cases,a
messagewill be dispJayedon the menu setting screen
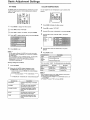
PICTURE
control
"_ Press MENU sn the remote contro_ to display the Menu
Screen
2
3
Press "_/1_to select the desired menu item
• The cursor moves left or right
° The cursor indicates the selected menu item
(The bar above ts an operational guide for the mmot_+_++-_
| control,.The bar will change in accordance with each menu +
[ setting screen
Press _/v
to select the desired item, and press _1/_"
to adjust the selected item
* For "AV MODE", "ADVANCED" and "RESET". press
ENTER to display the setting screen
AUDIO
SETUP
4
Press MENU RETURN to return to the previous screen.
or press MENU to exit
[] Using the control
panel of the main unit
Control panel of the main unit
OPTION
1
Press MENU on the main unit to display the Menu
Screen
2
•
Press VOL (-)1(+) to select the desired menu item
. The cursor moves telt or right
The cursor Indicates the selected menu item
:
Press CH (M)/(A) to select the desired item, and press
VOL (-)/(+) to adjust the selected item,
• For "AV MODE", "ADVANCED" and "RESET". press
INPUT to display the selting screen
3
4
Press MENU to exit
Basic Adjustment
Settings
AV MODE
COLOR TEMPERATURE
AV MODE gives you preset options 1o choose from, to best
match the image based on room-brightness and playback
software used
icc--
You can adjust
balance
the color temperature
i cc
!
I I!oo_o_]
to give a better white
I
I (too ojI'
I
1
Press MENU to display the Menu Screen
2
Press _IFP to select "PICTURE"
3
Press A/V
4
Press .'WV to setecl desired setting, and press ENTER
1
Press MENU
2
Press "_/1_ to setect
3
to display the Menu screen
"PICTURE"
Press .,&./'_"to select "ADVANCED',
and press ENTER
to select 'AV MODE", and press ENTER
4
Press AIV
ENTER
to select
COLOR
REe
_eMP_
el
GREEN
[
O t
"COLOR
TEMP
", and press
T
5
Press MENU to exit
You can seleel a dffferenI AV MODE item for each inpul mode,
(For example, selecl 'STANDARD" for TV input and "DYNAMIC"
tor VIDEO input )
- When 'AV MODE" is sol lo 'DYNAMIC (FIXED)", _NO PICTURE
ADJUSTMENTS AVAILABLE tN [DYNAMIC (FIXED)] _ is
displayed and the {terns in the PICTURE screen (except
"ADVANCED") cannot be set
Directly setting
1
2
Press
,
_
AV t,_BnEfr,!Ov|_J
t
_
Av f_esE Ie¥_z_,t,_J[; IFtXEO)I
Description
Changing
values.
DYNAMIC
For a c_ear*cut image emphasizing
high contrast for sports viewing,
DYNAMIC (FfXED)
Changing image settings to factor,/
preset values No adjustments are
allowed.
MOVIE
ConlroH[ng the contrasl to enable
easier viewing of dark images.
GAME
Controlling the brighlness of video
games and other images for eas_er
viewing,
andpress
to exit
ttem
Description
Can set your desired color"
HIGH
MIDDLE
White with
luish tone
| White wilh Reddish tone
you selecl
"USER",
the following
_1 button
ilems
'
are adjustable
_ button
RED
Weaker
red
jSlreoge;
re_'
I GREEN
[.B--W'E
Weaker green
Weaker blue
SL_._nger green
JStronger blue
- When resetting the items in the _USER" setting Io factory preset
values, perform the following procedures.
(_ Press ,&l'_" to ee_ec{ "RESET" _nthe ADVANCED screen, and
press ENTER
@, Press _/_
to select "YES". and press ENTER
^V,,_DSE
ISY,,*,,,,¢!-------]
STANDARD
toselectthedesireditem,
USER
I Selected item
_v r,,0n_IS,A,,SASef---------_
item
Press MENU
"When
Before the AV MODE display disappears,
press
AV MODE again and select your desired setting
* Each time you press AV MODE, the mode changes
as shown be_ew
Selected
6
LOW
the AV MODE
6M4EI
Press AIr
ENTER
Selected
AV MODE
_
5
"_
image settings to slandard
,-,
"1
]
BACKLIGHT
You can adjust
PICTURE Adjustments
the brightness
of the picture
You can adjust the picture to your preference
with the
following picture settings
1
Press MENU to display the Menu Screen
2
Press "_/1_ to select "PICTURE"
3
Press A/_"
Press
5
Press MENU
setting
Press MENU
to display
2
Press "_._
3
Press ._k/V
4
Press _/[_ to adjust the item to your desired position
5
Press MENU to exit
to select
the Menu
screen
"PICTURE"
to select "BACKLIGHT".
4
Directly
_/_
1
to adjust the item to your desired
to select
a specific
adiustment
item
position
to exit
the BACKUGHT
Setected
'1
Press BACKLIGHT
to disptay
2
Press
Io change
BACKLIGHT
O,_C_LtG.rI_s_m'I _
8_C_LI6HT
IVAnlAB_E]
_
the BACKLIGHT
screen
the setting
item
[DAR_¢t
• The BACKLtGHT screen eutomaticatJy disappears in 3 seconds
• [BRIGHT):
Maximum b_ighlnese
(NORMAL]:
Su_tabte for viewing in a we_!.til area Saves energy
JDARK]:
Sufficiently t_righl when v_ew_ng in dim areas
IVAR]ABLE]: The brightness can be adjusted to suit your preference using "_Y#"
,
_
_ button
The screen, dims
For less contrast
The Screen brigh,!e,ns
For more contrast
BRIGHTNESS
F0_ tes_ brtghlness
For more brightness
COLOR
TINT
For less corer intensily
Skin tones become
_urplish
FOr more corer intensity
Skin tones become
greenish
SHARPNESS
Fo_-less sharpness
For mote sharpness
_,_cKus,rp_snt,_u
_AC_LIGtif
,_ button
BACKLIGHT
CONTRAST
• When resetting elf adjustment i_ems (except for the ilems on the
AV MODE and ADVANCED menus) Io factory preset vatues,
perform the tollowing proced'Jres.
Press AI'_t Io select "RESET in the PtC FURE screen, and
press ENTER
_,_ Press ,,_/_t" to select "YES". and press ENTER
TM
Basic Adjustment
,,,,
Settings
,u,, 11 ,
,
, ,,, i
(Continued)
,
SETUP
AUDIO Adjustments
You can adjust the sound
following
:1
quality
to your preference
with the
settings
Press MENU
to display
1
Press
2
Press "_1/=1_
to select "SETUP"
MENU
Press _iIl_. to select
Press ,&IV
to seFect a specific
5
Press
"_PP to adjust
Press
MENU
screen
,&/',if
to setect desired
Item. and press
ENTER
"AUDIO"
adiustment
item
4
4
the Menu
the Menu screen
Press
2:
to display
the item to your desired
position
Press .,_./_' to change the setting, and press ENTER
Press
Seiected
to exit
MENU
item
MTS
seloot
d.em
__ .u,,o____.
I For weaker bass
*
IOecrease audio from
I the right speaker
to exit
Factory setting
STEREO] Stereo audio
"b''°e _ q
t For stronger bess
{ Decrease audio from |
] the teft speaker
J
INPUT3 SELECT
{IN]
INP UT3tOUTPUT
terminals selecled as
_nput terminals
• The items on 1he AUDIO menu cannot be set when "iNPUT3
SELECT" is set to "OUT I_ VAO"
When resetting al! adjustment items to factory preset values,
perform the fottowlng procedures.
_.) Press ,&IV to se!ect "RESET ", end press ENTER
C_ Press &/',ty to se{eel "YES _. and press ENTER
Setting options
[SAP}
Secondary
audio program
_MONO]Monophonic
audio
OUT_l FAO}
Line Output is
selected, Oolput
volume is fixed, Speaker oulputis
avatlabte.
OUT d_ VAOI
Line Output is
setecled, Output
volume is variable.
Speaker output i_
mute
ANGUAGE
{ENGLISH}
fESPANOLI
[FRANgAIS]
Useful Features
u,u,u i
El Saving broadcast
CH-SETTING
El
TV channels in the memory
EZ SETUP
/!°0
0®
When you move to an area with different
broadcasting
signals, you may have to sat the channel numbers and
the time with the EZ SETUP function
To activate
EZ
SETUP,
perform
the following
O®
procedures
(_) Press A/V to select "CH.SETTfNG" in the SETUP screen.
and press ENTER,
Press AIY to select "EZ SETUP", and press ENTER
@ Press ,,_/V to select "YES", and press ENTER
El Setting the AIR/CABLE
It is necessary to set the receiving mode to AIR or CABLE
channels to receive locally broadcast TV programs
0®
1
Press MENU to display the Menu screen
2
Press _/_ to select "SETUP"
3
Press .,A/V
ENTER
4
lII41sso dL!
0_@_
I
Press MENU to display the Menu screen
2
Press <1/_"to select "SETUP"
3
Press .,,_IV to select "CH-SETT]NG", and press ENTER
Press AIV
5
Press A/V
ENTER
AIR
OH
Z
H
to select "CH-SETTING",
,/
®I
®
®
@
and press
to select "CH SEARCH". and press
CABLE
EARCH
iETUP
MEMORY
Press ENTER The tuner will search through a_l
available channels in your area and add them to the TV
memory
to select 'AIR/CABLE". and press ENTER
Press ,Ar_- to select desired setting, and press ENTER
_T_REO
SAP
_ONO
- To interruptCH SEARCH, press MENU RETURN CH SEARCH will
stop at the current channel and wil]nol add any higher channels
Press MENU to exit
• Receivablechannelso! your LCDTV sel are:
AIR channels:
CABLE channels:
VHF: 2 through t3
1 (HRC and IRC}
UHF: 14 through 6g
2 through 125 (STD, HRC and iRC}
Adding weak or additional channels or erasing
unwanted channels from TV memory
Individua! settings of programs can be adiusted
1
In step 4 above, press .a,pF_t"to select "CH MEMORY",
and press ENTER
AIR
ett
H
CABLE
EARCH
l_!B MO R Y
2
Press _,I'_" to move lhe cursor to "CHANNEL", and use
_11_"or Channel Select to select each desired channel
to add or erase
3
Press ,_k/V to move the cursor to "SKIP". and use '(I/_
to se}ect "ON" or "OFF"
4
Press MENU to exit
tf CH SEARCH is performed again, the previeustymemorized
wil_be lest
channels
V-CHIP Settings
[]
V-CHIP
This i'unclion allows TV programs to be resldcted and TV usage to be controlled based on FCC data It prevents children Irom watching
violent or sexual scenes thai may be harmful
Restriction of TV programs includes two ratings thai contain information about the program: the MPAA {Motion Picture Association of
America) rating and the TV Parental Guidelines The MPAA rating is restricted by age TV Parental Guidelines are res#icted by age and
content
Since a TV program may use either the MPAA rating or the TV Guidelines. both should be adjusted for complete controt
MPAA
rating
RATING
age
based
G
GENERAL AUDIENCES, AI_ ages admitted,
PG
PARENTAL GUIDANCE
PG-!3
PAR ENTS STRONGLY CAUTIONED,
B
, ,
NC-17
RESTRICTED. Under 17 requires accompanying
NO ONE 17 AND UNDER ADMITTED,
X
X is an older rating that is unil_ed wilh NC-17 but may be encoded in the dale of elder movies,
SUGGESTED. Some material may n0! be suitable for children.
Some materiel may be inappropriate for children under i3,
parent or aduIt guardian,
MPAA rating
Example t:
PG-13 in lhe age-based rating is
blocked, this witi also
autemalicetty block the higher
ralings R. NC-t7 end X
1, User setting
Exampte 2:
R in the age-based rating is
blocked, this will also
automaticaIly
blockthe higher
ratings NC-17 and X
S 81ock table
I_ot to
h_d
i _
1. user setting
2, atock tabte
bI_ck
bl_¢k
_go
ba_d
_u _
hI_k
bI_¢k
_e¢1
blo_k
bto_k
• The MPAA rating is only age-based
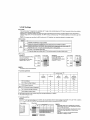
TV parental guidelines
conlent based ==_
FV
Rating
(Faniasy
(Violence)
S
(Sexual
Situation)
L
(Adult
Language)
[]
[]
Violence)
ft
TV-Y (All children)
®
[]
TV-Y7 (Direct to Older Children)
x
[]
T'v'_G (General Aud(ence)
age
_ased TV-PG (Parenlal Guidance Suggested)
S r .g,yCo.t!enea}
........................
TV.,MA (Mafure Audience Only}
D
(Sexually
Suggestive
Dialog)
[]
[]
[]
X
X
X
×
×, .
×
X
X
x
×
X
[]: The content raling can be set, but this rating is not normal_y broadcast by TV slattons
X : The content rating can be sel
TV parental
guidelines
Example:
When TV-Y7 in Ihe age-based rating is set to BLOCK, this will automatically block the higher ratings: TV-G, TV-PG. "['V-14 and TV-MA In addi_icn.
D- L, S. V and FV inBLOCK CONTENT are automatically blocked unless you manualty set BLOCK CONTENT
User setting
2 81ock table
content
_,V
rVPG
.....
BLOC_
b_sed
* Age-based ratings can be modified by the contentbased ratinga_ but onty in the combinations indicated
by _n X In the tabte above
, Choosing a _ower age-based rating b!ocks the higher
age-based ratings regardless el content rating
setl_ngs
o tf you set TV-Y and TV-Y7 to BLOCK. BLOCK
CONTENT wtfl disptay all items
Canadian
Rating
Systems
• The TV rating systems in Canada are based on the Canadian Radio-Television and Telecommunications
Commission
(CRTC) policy on violence in television programming
,, While violence is the most important content etement to be rated, the slructure developed
takes into consideration
other program content like language, nudity, sexuality and mature themes
o When setting the V-CHIP on the Canadian
system, you can choose either the Canadian English ratings or [he
Canadian French ratings
Canadian English ratings
rI
Age
C
Children: intended for younger children under the age of 8 years Pays carefu! attention to
themes that could threaten lheir sense of security and well-being
C8+
Children over 8 years old: Contains no portrayal of violence as the' pr'e{'erred, accepiable.
or only way to resolve conflict; nor encourage children to imitate dangerous acts which
they may see on the screen.
G
General: Considered acceptable for all age groups Appropriate viewing for the entire
family contains very little violence, physical, verbal or emotional
PG
Parental Guidance: Intended for a general audience, but may not be suitable for younger
chltdren (under the age of 8) because it could contain controversial themes or issues
14+
Over 14 Years: Could contain themes where violence is one of the dominant elements of
the storyline, but it must be integral to the development ol plot or characler Language
usage could be profane and nudity present within the context of the theme
18+
Adults: Intended for viewers 18 years and older and might contain depictions of violence.
which while related to the development of plot. character or themes, are intended Ior adult
viewing Could conlain graphic language and portrayals of sex and nudity
,i,,m,
Canadian
'
m ,
French ratings
in ,,,
>_:'://c;-,x-,-
;,.
: v ¸¸
:,
iii
;,
G
General: All ages and children, contains minimal direct violence, but may be integrated
into Ihe plot in a humorous or unrealistic manner
8ans +
General but tnadvisabte for young children: May be viewed by a wide public audience
COutd contain scenes disturbing to children under 8 who cannot distinguish between
imaginary and reaI situa!!.ons. Recommended for viewing with parent
Age
13ans +
Over 13 years: Could contain scenes of frequent violenl scenes and there{ore
recommended lot viewing with parent
16ans +
Over 16 years: Could contain frequent violent scenes and intense violence
18arts +
Over 18 years: Only for adult viewing
violence,
but
Could contain frequent violent scenes and extreme
i
Useful
Features
,
(Continued)
,J
i,i,iH
i
i
@ Setting BLOCK CONTENT (TV GUIDELINES)
V-CHIP Settings (Continued)
V-CHIP settings allow you to set MPAA rating, TV
GUIDELINES, Canadian English ratings and Canadian French
ratings
Setting V-CHIP
1
Press MENU to display the Menu screen
2
Press _1_ 1oselect "SETUP"
3
Press `&IV to select "V-CHIP BLOCK", and press ENTER
4
"INPUT SECRET NO" wilt be displayed Input the 4digit secret number by using Channel Select
Press`&/V
I
to select the desired item, and press ENTER
MPAA
TV
:
_CAN.
6
GUIDELINES
CAN.
TATUS
SNGLISH
FRENCHRATtNGS:
RATINGS
1
Press `&IV to select the desired item, and press _
to select 'BLOCK"
(MPAA rating)
(TV GU{DELINES)
(Canadian English ratings) (CanadianFrench ratings)
<BLOCK>
7
Repeat steps 1 to 4 of Setting V-CHIP
2
Press ,&IV to select 'TV GUIDELINES". and press
ENTER
3
Press `&iv
ENTER
4
' • When you Input the secret number Ior the first time. press
ENTER to register Otherwise.continue to step 5
5
1
Press MENU to exit
. The setting aulomaticaliyenters "BLOCK" tot any ratings below
your selection
to select "BLOCK CONTENT", and press
Press `&IV to select the desired item, and press _,'_" to
select "BLOCK" or '- ....
"(unblock)
<BLOCK
5
Press MENU to exit
[] Activating
V-CHIP
@ Setting STATUS
I_ Changing
BLOCK
@@@
@@®
@®®
@®@
'1
Repea_ steps I to 4 of Setting V-CHIP
2
Press A/V
V_CHIP BLOCK
settings
1
Repeat steps 1 to 3 of Setting V-CHIP. then "INPUT
SECRET NO "will be displayed
2
Input the 4-digit secret number by using Channel
Select; the V-CHIP select mode wilI be displayed
Set the V-CHIP BLOCK again
MPAA
TV
to select "STATUS", and press ENTER
GUIDELINES
NGLISH
RATINGS
STATS
CA,c,s.
FE_EeC. R^_t,as
IMPAA
:CAN,
ENGLiBH
tTV
IICAN_TATU
RATIN
GUIDELINES
SFRENCH
Press AIr
RAT
NeS
to select "ON", and press ENTER
I_1 Changing
or clearing the SECRET NUMBER
II you forget the secret number, clear the secret number
as fotIows
Upper conIrelpaeei of Ihe main unit
"
I| "STATUS
_ is set to _OFF".
V-CHIP
BLOCK
wilt not be
activated
4
VOL (+)
Press MENU to exit
IW Canceling the V-CHIP BLOCK screen whi|e VCHIP BLOCK is activated
1
"V_CRIP HAS BEEN ACTIVATED _ appears if you watch
a program with the same Program Rating data you
configured
_v
• "V-CHIP HAS BEEN ACTIVATED"wilt net be displayed if
'STATUS" is set to "OFF
2
3
Press MENU to display "INPUT SECRET NO"
Input the 4-digit secret number by using Channel
Select; V-CHIP BLOCK is temporarily canceled If you
:' input an incorrect secret number. "SECRET NO IS
INCORRECT" is displayed In this case, input the
correct secret number
MENU
Repeat steps 1 to 3 of Setting V-CHIP, or I and 2 of
Cance|ing the V-CHIP BLOCK screen while V-CHIP
BLOCK is activated, then "INPUT SECRET NO" will
be displayed
2
3
Press and hold both CH (,",) and VOL (+) on the main
unit simultaneously until the message "INPUT SECRET
NO " blinks
Press
MENU
to exit
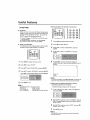
Directly setting the CLOSED CAPTION
CLOSED CAPTION
]_ Setting CLOSED CAPTION
" This LGD TV set is equipped wifh an infernal Cbsed Caption
decoder "Closed Caption" is a system which allows
conversations, narration, and sound effects in TV programs and
home videos to be viewed as captions on the TV screen (see
the illustration)
o Not all programs and videos wili offer closed captioning Please
look tot" the "_'_ symbol to ensure that capliona witl be shown
- The Closed Caplion broadcasts can be viewed in two modes:
CAPTION and TEXT For each mode. two channels are
available: OH1 and CH2
The CAPTION mode shows subscripts at dialogs and cammem
tades of TV dramas end news
programs while allowing a clear view
of lhe picture
The TEXT mode displays various
information over the picture {such as
TV program schedules and weather
forecasts, elc ) that is independent at
the TV programs
Setting the CLOSED CAPTION on the Menu screen
1
Press MENU to display the Menu screen
2
Press _/1_"to setect "SETUP"
3
4
Press ,&/_ to select "CLOSED CAPTION ", and press
ENTER
Press _,/V fo change the CLOSED CAPTION setting.
and press ENTER
• COl:
6C2:
T't:
T2:
5
CLOSED CAPTION
CLOSED CAPTION
TEXT mode for CH1
TEXT mode for CH2
Press MENU
to exit.
mode fur CHt dala
mode for CH2 data
data
date
1
Press CC to display the CO!TEXT screen
C¢/TEXtP{OFF
2
Press CC to change the setting
_
CC/TEXT[OFF]
*-CC/TEXT[CC1]----j
CC/TEXT{T2}*-- CC/TEXT[T1]_ CCfI'EXT[CC2],-J
• COl: CLOSED CAPTION
CC2: CLOSED CAPTION
TI: TEXT mode for CH1
T2: TEXT mode for CH2
mode for OH1 data
mode for CH2 data
data
data
- If a broadCaSt contains Closed Caption data and MUTE is
pressed, _he LCD TV sol enters CLOSED CAPTION mode
automatically Pressing MUTE again will return the LCD TV set
to ils previous condition
- Closed Caption may malfunction (white bJocks, strange
characters, etc ) if signal conditions are poor or {I there are
probtems a! the broadcast source This does not necessarily
indicale a problem with your LCD TV set
o if any button is pressed to call up the On-Screen Display whi_e
viewing a Closed Caption broadcast, the cbsed captions wil_
disappear momentarily
- If no TEXT bre,_dcasl ts being received while viewing in the
TEXT mode, the screen may become blank for some p_ograms
Shoutd this occur, switch the CLOSED CAPTION mode to OFF
* If you select "CCl", "CC2 _, "TI" or "T2" (or MUTE is pressed)
while _VIEW MODE" _s set to "ZOOM" or "STRETCH'*, then the
mode for "VIEW MODE" will be aulomaticaily changed to "4:3"
or "16:9"
VIEW MODE
AUDIO ONLY
You can setect the picture display size for the playback image
of the DVD player from the following four modes: "4:3". "16;9'L
_ZOOM" end "STRETCH"
1
Press
MENU
2
Press
_I_," to select
3
Press
APe'
to select
"VIEW
MODE".
and press
4
Press
,&/'V
to select
desired
setting,
and press
to display
the Menu
When listening to music from a music program, you can set
the Liquid Crystat display off and enjoy audio onty
screen
Setting
"OPTION"
the AUDIO
ONLY
on the Menu
to display
the Menu
screen
1
Press
MENU
screen
ENTER
2
Press
"_/l_" to select
ENTER
3
Press zk!v
ENTER
to select "AUDIO ONLY'] and press
4
Press Al"q
to select "ON". and press ENTER
"OPTION"
i
Selected item
4:3
Des.e[!p!!££,
Displays Ihe image in S 4i3 size,
Stretches the image herizontally
t6:9 size,
t6:9
_d
to display ii in a
ZOOM
Displays the cenIer part of the image by eniar_ing
it towards the hodzenlal and verl}cat directtens,
STRETCH
Stretches Ihe image horizontally
_mage type
(Fo_ an_mage
slrelched
vedicaIIy)
4:3
16:9
ZOOM
loO '
......................
righ{
1
STR_CH
{OFF
O_LY'
t
FOR
VtOEO
OFF
2
Press AUDIO ONLY again The screen image witl
disappear
3
Press AUDIO ONLY again The screen image will be
displayed again
(For a 4:3 tmage)
" The 4:3 image will be d_storted on the screen when lhe "VIEW MODE"
is set to "16:9".
" When lhe CLOSED CAPTION mode is sel le "CC1 '. 'CC2", 'T1-or
"T2". "ZOOM" and "STRETCH" cannot be set tot "VIEW MODE"
Press AUDtO ONLY 'PRESS"AUDIO ONLY" FOR
VIDEO OFF' is displayed on the screen
AUDIO
ON{,Y
PRF_S_AUO_O
_ides}
Press MENU to exit
ooo0.0,,oo
Audio is output wilhoutscreen image.
Beth Screen images and audio ar_0uoutput.
Directty setting the AUDIO ONLY
(For an image
s_retchedver_icalty
wi{h bat_dsat the_ett
and
Item
Useful Features
(Continued)
BLUE SCREEN
This function automatically turns the screen blue if no
broadcast signal is received
SLEEP TIMER
YOU
can
set
the SLEEP
TIMER
to automatically
turn off the
TV
v
PowE_
ms_,_Y
v
0_
g ®?
1
Press _1_ to select "OPTION"
3
5
QQ®
Press MENU to display the Menu screen
Press .,_./V to select "BLUE SCREEN". and press
ENTER
Setting the SLEEP TIMER on the Menu screen
1
Press MENLI to display the Menu screen
2
Press _(/_ to select "OPTION"
3
Press .,_/V to select "SLEEP TIMER", and press
ENTER
4
Press AIVI_/)_.to select "30MIN", _'60MIN", "90MtN",
"120M IN", "150MIN" or "OFF". and press ENTER
OFF
Press MENU to exit
. When receSvedsignals are weak or interfered with by some olher
signals,lho BLHE SCREEN function may be activated To wafeh
the TV under such conditions, set "BLUE SCREEN"to "OFF
. The BLUE SCREEN function is activated when iNPUT mode ls
selected wilh no signal being input
:
15OMIN
Press MEN[.)to exit
After you set theSLEEP TIMER. pressing POWER or, the main
unit or on the remotecontrol witlcancel the SLEEP TIMER
setting.
" 5 minutes before (he SLEEP TIMER turnseft the LCD TV,
"5 MIN REMAINING"is displayed on the screen for 4 seconds
The SLEEP TIMER ceuntsdown and shows a simitar 4-second
display(or each remaining mingle until the Itmer turnsof! the LCD
TV set
Directly setting the SLEEP TIMER
1
Press SLEEP todispfay the SLEEP TIMER screen
9LEEF
2
Tf_R
(OF_)
Press SLEEP to set the sleep timer (in minutes)
[0FF] _
50MIN) _
[30_11N|_
[1201YlIN]_
[80MINt
[001VilN].,---J
(minutes)
• The SLEEP TIMER screen aulomatically disappears in 3 seconds
NO SIGNAL OFF
PICTURE FLIP
Power control setting allows you to save energy
When set to "ENABLE", the power will automatically shut
down if no stgnai inputs for 5 minutes
You can set the orientation of the picture
Setting the PICTURE FLiP on the MENU screen
1
Press MENU to display the Menu screen
1
Press MENU to display the Menu screen
2
Press 4,"_ to select "OPTION"
2
Press _/'_ to select "OPTION"
3
Press ,A!V to select "NO SIGNAL OFF-, and press
ENTER
3
Press .&/V to select "PICTURE FLIP", and press
ENTER
4
Press /AI'_ to select "ENABLE". and press ENTER
4
Press A!v
ENTER
to setect the desired mode, and press
i
5
ROTATE:
Press MENU to exit
UPSIDE
• "DISABLE"is factory preset value
. This function can work only in TV mode
' Ir iotedered with by other broadcast or radiowaves, "NO SIGNAL
OFF" may not workpropedy even when the broadcasl is ave_"
NO OPERATION
OFF
5
DOWN
•
Press MENU to exit
Directly setting the PICTURE FLIP
1
Press PICoFLIP to display the PICTURE FLIP screen
2
Press PIC FLIP to change the setting
When set to "ENABLE", the power will automaticaJly shut
down if there is no operation for 3 hours
1
Press MENU to display the Menu screen
2:
Press "_1_ to select "OPTION"
3
Press .,&/V to setect "NO OPERATION OFF", and
press ENTER
• 5 minutes belore the power shuts down, remaining
time is displayed every minute
5
Press MENU to exit
. "DISABLE"is factory preset value
[NORMAL]
Normal image
orientation
[MIRROR]
To display mirror images
for speciat uses
UPSIDE DOWN]
To display upside down
images for special uses
[ROTATE]
TOdisplay rotated images
for special uses
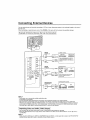
Connecting E×ternai Devices
You can enjoy picture
the main unit
When
connecting
Example
and sound
an external
of External
by connecting
device,
a VCR
or a home video game
turn off the POWER
system
of the main unit first to prevent
TO
c_bte
_
_t__.
t
_
___
_
_
0,o
_
I
any possible
tNPUT'_
¥
_
_=d_
F
ave
_a_t_
damage
!
letmJnal,
i
recomme_de_
o ,0o
_
me
et_j_|at 7v lui_et
COMPONENT
system
(you
connection
c,3r_ view
°l°°'
Cam¢c_tdor
,
A_ia_o
on the rear of
tetmln_[
_l_yer
is
_igh-q_11_y
VCR
......
,,oo10
TO IHPUT3]OUTPU'f
__________-J
located
3
Devices that can be Connected
_mpo_en
to the terminals
Vicfeo
Audio
ampltfler
termlnaJ
VaN
Fat the cable, usa a comrnercLaHy available aadioivideo cable
• PC aonneolion ts not possibte
Far more intormation about external device connections, see the operation manuals e_' your external devices,
• Make sure that the corresponding cables are connected to each term}hal Connecting other cables may result in a mallunctien
SNPUT2 has two terminals, VIDEO and S-VIDEO terminals I! your external device has an S-VIDEO terminal, S-VIDEO connection is
recommended. S-VtOEO provides a finer, more detailed piclare 1_both term}nals are connecled. S-VIDEO terminal takes a pfiorfty
Only when 4801 or 480P s_gnal is received through the ]NPUT'L picture can be d_splayed
Outputting
Video and Audio (Video Output)
i
You can output video and audio signals Irom lhe LeD TV set through the INPUT3/OUTPUT terminate,
When using INPUT3/OUTPUT as an output tet'minal, select "SETUP" in the Menu and set "INPUT3 SELECT" to =OUT _
"OUT ¢._ FAO _
FAO" or
* When using _he S-VtDEO iaput for INPUT2 or COMPONENT input for INPUT1, no video signal will be made to the INPUT3iOUTPUT
terminal, but audio signal wil be made for connection 1o external audio syslerns
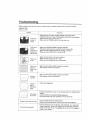
Troubleshooting
181
Before caffing for repair services, make the following checks !or possible remedies to the encountered symptoms
LCD TV set I
Problem
There
picture
sound
Check item
is no
or
There is no
picture,
There is no
picture from
INPUT1/2/3
_;
Make sure
Reception
Make sure
Make sure
the AC cord is propedy inserted in the power outlet
other than those of broadcasting
stations can be considered
the input mode is set to TV
the POWER switch of the main unit is on
•
•
*
,
Make sure the BRIGHTNESS
is properly adjusted
Fluorescent lamp may have reached the end of service Iife
Make sure the S-VIDEO terminal has nothing connected
Make sure the AUDIO ONLY is not set to ON
• Make sure the volume is not set to minimum
• Make sure the sound is not set to mute
There is no
4_:,_ _
*
•
•
-
o Make sure that headphones
sound,
picture or
are not connected
* Make sure the antenna cable is properly
. Bad reception could be the problem
connected
* Make sure the antenna cable is properly
. Bad reception could be the problem
connected
sound,
There isiust
no
noise
not clear
Picture is
• Check color adiustment
light or
improperly
Picture is
tinted.
• Press the BACKLiGHT
button, or set the BACKLIGHT or BRIGHTNESS
settings
• Check CONTRAST
and BRIGHTNESS
adjustment
•Ffuorescent
lamp may have reached the end Of service life
is too dark
The picture
l
Remote
control
does not work
• Check the batteries
of the remote
• Make sure the remote sensor
. External
Unit cannot
be operated
control
window
influences such as lightning,
is not under strong lighting
static electricity,
improper operation
In this case, operate
power off the LCD TV set, or unplugging
in after 1 or 2 minutes
etc,
may cause
the unit after first turning the
the AC cord and re-plugging
it
Troubleshooting
(Continued)
Antenna t
Problem
Check item
The picture is not sharp
The picture moves
,
°
•
•
The picture is doubled or tripted
, Make sure the antenna is facing the correct direction,
. There may be reflected electric waves from mountains or buildings.
There may be interference from automobiles, trains, high-voltage lines, neon lights,
etc
The picture is spotted
• There may be interference between the antenna cable and AC cord Try positioning
them further apart.
There are stripes on the screen
or colors fade
[] Cautions
The reception may be weak
The quality of the broadcast may also be bad.
Make sure the antenna is facing the correct direction
Make sure the outside antenna _sconnected.
is the unit receiving interference from other devices?
Transmission antennas of radio broadcasting stations, transmission antennas of
amateur radios and celiular phones may aiso cause interference
• Use the unit as far apart as possible from devices that may cause possible interference
regarding use in high and low temperature
environments
When the unit is used in a low temperature space (e.g. room office the picture may _eave trails or appear alightly delayed Th s s no
a malfunction, and the unit wilt recover when the temperature returns to normal
Do net reave the unit In a hot er co_d iocation Also. do not leave Ihe unit in a location exposed to direct sunlight or near a heater, as
this may cause the cabinet to deform and the LCD panel to matfunction
Storage temperature: -4"F to +t40"F {-20°C to ÷60_C)
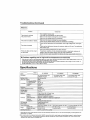
Specifications
LC-13SH6U
Items
LCD panel
13" Advanced Super View
& BLACK TFTLCD
Number of dots
Super view
i & BL_CK
TFr LCD
__
N,TSC
PLL 18t ch.
MTS+SAP
I25 ch,
430 cd/m _
Lamp life (Fluorescent
Viewing angles
60,000 hours"
H: 170 ° V: 170 °
Audio amplifier
lamp)
1.0w_'2 "
Speakers
I t:'l=ox 4V= in. (,42 _ 110 mm), 2 pcs
COMPONENT-IN,
AUDtO-iN
INPUT1
INPUT2
Terminals
VIDEOqN, S-VIDEO-IN, AUDIO-IN
VtDEOqN, AUDIO-IN I VtDEO-OUT, AUDIO-OUT
INPUT3/OUTPUT
Antenna
Headphone
OSD Ianguage
Power supply
Operating
,BLACK
T_ LC0
N358
TV Standard (CCIR),
TV Tuning System
STEREO
CATV
Brightness
Weight
LO-2OSH6U
J 20" Advanced
921,600 dots VGA
,Videocolorsyslems
TV function
LC-15SH6U
.....
i5_; Advanced Super View ......
F-Type
................
M_nt-jack for stereo (o3.5 ram) ........
Engt_shlSpanish/French
AC t20V, 60Hz
Oisplay only
Display with stand
temperature .................
• Typical time for power output decrease
temperature at 77°F/25°C
43 W (0_8 W standby): AC t20V
,8:0, _bs,f 3,6 kg
50 W !0.8 W standby): AC !2,0V,
9.1 ibs.f 4.1 kg
9.1 _bs.t 4.1 kg
+32_F to +I04°F
10.2 Ibs./4.6
kg
71 W (0.8 W standby): AC 120V
14,t IbsJ 6.4 kg ..................
......!.6:t ibsJ 7,3 kg
(O_C to +4O"C)
of about one-half assuming continuous use in a room with normal tighling, normat brightness
'
and
[] As a part et policy of continuous improvement. SHARP rese_es the right to make design and specification changes for product improvement without prior naltee The performance specilication figures indicated ate nominal values of production units There may be some
deviations from these vatues in individual units
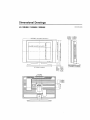
Dimensional
Drawings
LC-13SH6U / 15SH6U /20SH6U
Unit: inch (ram)
1_l,=(39 7} /
?8 "/_ (46t .7} / "_9 '_/= (497,7) t24 _1_ (611 7)
i
i
i
10 _A_(265) ! 12 %2 (307) / I_, _V_,(,101 3)
i
f2 _/,_ (319) 1 ! 7 =_t=(453 2)
51
3 tt_ (98.5) /
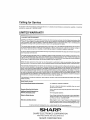
Calling for Service
For location of the nearest Sharp Authorized
assistance,
please cat! 1-800-BE-Sl--tARP
Service. or to obtain product
literature, accessories,
supplies,
or customer
LIMITED WARRANTY
CONSUMER
LiMiTED
WARRANTY
SHARP ELECTRONICS CORPORATION warrants to the first consumer
"Product")- when shipped in its original container, will be free item defeciive
will, at its option, either repair the defect or replace the defective Product
equivalent at no charge to the purchaser for parts or labor for the period(s)
purchaser that this Sharp brand product (the
workmanship and materials, and agrees Ihat it
or part thereof with a new or remanufactured
set forth below
This warranly does not apply to any appearance items of the Product nor to the additional excluded item(s) sei forth below
nor to any Product the exterior el which has been damaged or defaced, which has been subjected to improper voltage or
other misuse, abnormal service or handling, or which has been altered or modified in design or construction
In order to enforce the rights under thislimited warrant}; the purchaser should follow the steps set forth below and provide
proof of purchase to the servicer
The limited warranty described herein is in addition to whatever implied warranties may be granted to purchasers by law.
ALL IMPLIED WARRANTIES INCLUDING THE WARRANTIES OF MERCHANTABILITY AND FITNESS FOR USE ARE
LIMITED TO THE PERIOD(S) FROM THE DATE OF PURCHASE SET FORTH BELOW Some states do not allow limitations
on how long an implied warranty lasts, so _heabove limitation may not apply to you
Neither the sales personnel of the seller nor any other person is authorized to make any warranties other than those
described herein, or to extend the duration of any warranties beyond the time period described herein on behalf of Sharp
The warranties described herein shall be the sole and exclusive warranties granted by Sharp and shall be the sole and
exclusive remedy available to the purchaser. Correction ei defects, in the manner and for Ihe period of time described
herein, shall constitute complete fuItiilment el all flabilitiesand responsibilities of Sharp tO the purchaser with respect to the
Product, and shall constitute full satisfaction of all claims, whether based on contract, negligence, strict liability or otherwise,
In no event shall Sharp be liable, or in any way responsible, for any damages or defects in the Product which were caused
by repairs or attempted repairs performed by anyone other than an authorized servicer Nor shall Sharp be liable or in any
way responsible for any incidental or consequential economic or property damage Some states do not allow the exclusion
of incidental or consequential damages, so the above exclusion may not apply to you
THIS WARRANT'/GIVES
STATE TO STATE,
YOU SPECIFIC LEGAL RIGHTS YOU MAY ALSO HAVE OTHER RIGHTS WHICH VARY FROM
Model Specific Section
LC-13SH6U/LC-15SH6UILC-20SH6U
(Be sure to have this information
service for your Product )
]t_.rranty
Period for thi_ Prq_:
available when you need
One {t) year parts and ninety (90) days labor from the date of
purchase
yh_z_ c¢_v_r_&_ iLemvJ:
Non-rechargeable batteries
__:
From a Sharp Authorized Servicer located in the United States
To find the location of the nearest Sharp Authorized Servicer.
call Sharp tolI free al 1-800-BE-SHARR
w_Ja_i_:
Ship prepaid or carry in your Product to a Sharp Authorized
Servicer. Be sure to have Proof of Purchase available If you
ship the Product, be sure it is insured and packaged securely
TO OBTAIN PRODUCT INFORMATION,
CALL 1-800-BE-SHARP
OR VISIT www.shm-pusa corn
@
SHARP
ELECTRONICS
Sharp
Plaza, Mahwah,
SHARP
CORPORATION
New Jersey
07430-2135
CORPORATION
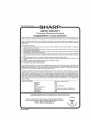
LIMITED WARRANTY
Consumer Electronics
Products
Congratulations
Sharp
Sharp
on your purchase!
Electronics of Canada Ltd (hareinaJtor called "Sharp _) gives the follow_ng express warranty
lo the first consumer
purchaser
brand product, when shipped _n _ls origine_ cenlalner and sold or distribuled
In Canada by Sharp or by an Authorized
Sharp
}or this
Deatar;
Sharp warranls that lhio producl
is free, under normal usa and main(seance,
from any defects in malerfal and workmanship
It any such
de}eels should be found in lhts product wilhin the applicable
warranty
pedod. Sharp shall, at ils option. _epalr or replace the prodocf as
specified herein
This warranly
shall noI apply to:
(a) Any defecto caused or repairs required
use as ca!lined in the owner's manuat
as a result
of abusive
adiusled
operation,
(b)
Any Sharp product tampered
wilh, modtlted
or Sharp's Authorized
Servicing Doalors
(c)
Damage caused or repairs required as a res:_lt of the use wilh Hems not speeit_ad
head cleaning tapes and chemical cleaning agenls
(d)
Any replacement
di accessories,
not limited to earphones,
remote
glassware,
consumable
controls
AC adaplers
or t'epalred
negligence,
accident
by any party olher
improper
Installation
than Sharp_ Sharp'a
Authorized
or approved
or peripheral
items _eqo_red through
batteries
tempe_alura
probe, stytus,
by Sharp.
or _nappropriale
Service
_nctuding
Cenlree
bal not limlfed
normat use of the product including
Irays fillers, bet_e ribbons_ sabres
Io
bur
and
paper
(e)
(f)
Any cosmelie damage
to the surface or extedor g_at has been defaced
Any damage caused by external or environmental
eondilIons
including
(g)
spillage
Any product
(h)
(J)
Any products used for rental or commercial
Any _nslaIlalion, setup and/or p_ogramming
received
wilhaat
appropriate
model,
aerial
number
or caused by normat wear and lear.
but not ]imiled _a transmission
lind/power
and CS/VcUL
Sonficing
or larger
Dealer
in home
and on any Sharp
service may be obtained upon _Jelivec/at
the Sharp product
slalement
to an Aulhorfzed
Sharp SerVice Cenfro or an
warranty
service may be provided
Over-the-Range
Microwave
Oven
at Sharp's
discretion
on any Sharp
This warranty
sonstilules the enlire express wantonly granled by Sharp and no other dealer, service centro
authorized
to exlend+ enlarge or Irene}or this warranty
on behalf of Sharp
To the exlen{ Iho law permits,
liability far direct or indirect damages or fossee or for any incidental
special
do;tact in maledaI or workmanship
relating to Ibe p_oducL including damages
liability
wilh
respect
to lhe product
and shall cons_ilute
lelev_sion
wilh
the
or lhetr aganl or employee
is
Sharp disclaims
any and eli
or consequontial
damages or loss of prattle teaseling from a
}or the toss o} lime or use of th_s Sharp product or Ibe loss
of tn}ormaflon
The purchaser
witl be responsible
for any romovaJ, re_slallalion,
transpodafien
and Insurance
delecls, in the manner and period of time described
herein, constitute
samplers
tu_fitlmen_ at eli ab_gations
lo lhe purchaser
or liquid
purposes
charges
Should this Sharp product fail to operate during the warranty
pedod, warranty
Iogelher
wHh preot o} purchase
and a copy at Ihis UMITED
WARRANTY
Aulborized
Sharp
screen slze of 2T
line vollage
markings
full satisfaction
ef all claims, whether
based
costs incurred.
Cerreclion
at
and respensibililies
of Sharp
or_ con_racl,
negligence,
slrlct
or otherwise
WARRANTY
PERIODS;
Audto Produals
Parts & Labour
1 year
Camcorder
1 year
DVD Products
Projector
_ year
f year
(}amp 90 days)
1 year
1 year
(magnetron
LGO & Plasma Display
Microwave
Oven
TV
Television Prodacls
VCR Products
t year (picture
t year
Vacuum
t year
Cleaner
(exceptions
noted)
component÷4
addillona$
Iube component-1
addHtenal
years}
year)
To obtain th_ _lam_ and address of the near_st Aulhodz¢_J Sha_ Scrvlc_ Cc'=llra or D_al==" please ¢o_lacr:
SHARP ELECTRONICS
OF CANADA
LTD 335 itri_,_nnia Road East Mis_iss_l'_l_a. Onlado L4Z ]W9
Formore information
on this
Warranty,Sharp ExtendedWarranty
Offers, Sharp
Canada Products, Accessory Sales, Dealer or Service
Locations, please calt (905) 568-7140
Visit our Web site: www_sharp_ca
Revision
04/22/03
.,
SHARP
,_
#
"_,_ S_RV}C_TC