1
Introduction
Before You Begin
This product is intended for use with the following
SHARP Organizers:
. YO-290
PC Interface Software
User’s Guide
02EGK(TINSE0562EHZZ) PRINTED IN CHINA
Minimum System
Requirements
PC Software enables you to use your PC to work
with the data on your Organizer.
Connect the standard 9-pin connector of the supplied
cable to one of the COM ports on your PC.
Data entries created or edited on your PC can be
transferred between your Organizer and PC, or
even deleted.
If the COM port of your PC is fitted with a 25-pin
connector, you will need to purchase an adapter.
Note:
Connecting to the Option
port of an Organizer.
Microsoft Windows XP / Me / 2000 Professional /
98SE / 98
. IBM PC or 100% PC compatible computer
. Pentium 200 MHz or higher for Windows Me /
2000 Professional / 98SE / 98
. Pentium / Celeron Family 300 MHz or higher for
Windows XP
. 64 MB RAM for Windows Me / 2000 Professional /
98SE /98
. 128 MB RAM for Windows XP
. 50 MB free hard disk space
. 3.5" disk drive
. One available serial port with a D-sub 9-pin
connector
. A mouse or other suitable pointing device
General Caution
. PC Software may not run reliably with certain
virus scanning programs enabled.
If you have problems with your Organizer while
transferring data, temporarily disable any virus
checking software you may be running.
. While you are backing up or restoring data, a
transfer error may occur with certain 3D screen
saver utility programs enabled. Before transferring
data, temporarily disable any 3D screen saver utility
programs you may be running.
. PC Software may not run reliably with certain
power management features enabled. If you have
problems with your Organizer while transferring
data, temporarily disable any power management
features you may have turned on.
. If you intend to transfer many entries, we
recommend you replace the batteries with new
ones before starting. Exchanging a lot of items
may take a long time.
. EL-6990
. The Select Program Folder screen enables you
to select the folder that you wish to place the
program icons under in the "Start" menu.
. The date/hour settings and the COM port
configuration at the time of installation can be
changed later under the PC Software’s Option
menu.
We recommend that you first turn off your PC and
Organizer before connecting or disconnecting the
supplied cable.
PC Software can also import and export data on
your PC using the CSV file format.
NOTICE
. The manufacturer cannot be held responsible and provides no
warranty against malfunction, damage, or any other problems
caused by misuse of this product and its accessories by you or a
third party.
. The specifications of this product and its accessories are subject
to change without notice.
. Company and product names mentioned in this manual are
trademarks or registered trademarks of their respective
owners.
. Some models described in this manual may not be available in
certain countries.
. ZQ-290
Connecting Your
Organizer to
Your PC
If you are using a notebook PC, an error message may
be displayed upon selecting "Auto Detect...". Check the
BIOS settings on your notebook PC and verify the serial
port configuration. Even with correct BIOS settings, you
may need to select an appropriate port manually.
Connect the PC Link cable to the "Option port" of
your Organizer, following the instructions in the
Operation manual for your Organizer.
Installing the PC
Software
1. Insert the PC Software disk into your PC's disk
drive.
2. Double click the My Computer icon on your PC.
3. Select your floppy disk drive by double clicking.
4. Double click Setup(.exe).
5. Follow the on-screen instructions to start the PC
Software.
. By default, the actual software will be installed at
the following location:
C:\Program Files\Sharp\EL6990_YOZQ290.
(It is not recommended to change the path name.)
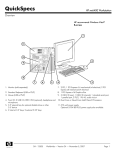
The User Interface
All PC Software operations can be accessed
via buttons or menu commands.
Click Windows [Start] - [Programs][Sharp EL-6990 YOZQ-290]-[EO Link Utility]
to launch PC Software.
The main screen will appear.
The PC Software Main Screen
Number of files
Index view
Detail view
Scroll bar
Delete button
Data download
button
Button
Function
Menu commands
Refer to "Menu commands" described below.
Selects the application
(Schedule, To Do, Anniversary, Telephone, Memo and Expense)
Application tabs
Data upload
Data download
Menu commands
Application tabs
Application name
Data upload button
The buttons perform the following functions:
Edit button
New button
Add one selected data button
Transfers entries in the selected application from the
organizer to the PC.
"Data upload" will OVERWRITE all entries in the
selected application in PC Software.
Transfers entries in the selected application from PC
Software to the organizer.
"Data download" will OVERWRITE all entries in the
selected application on the organizer.
Add one selected data
Appends a single selected entry from the PC to the organizer.
New
Creates a new entry
Edit
Modifies an entry
Delete
Deletes an entry
Note:
By default, created BKF or CSV files will be saved under:
C:\Program Files\Sharp\EL6990 YOZQ290\Data.
PC Software enables you to import data files created
using a CE-491W.
For information about importing data from a CE-491W,
refer to "import.html" in the installed folder.
EDIT Menu
New Entry Create a new entry in the selected application.
Edit Entry Modify the entry in the selected application.
Delete Entry Delete the entry in the selected application.
Find
Find within the selected application.
Search while distinguishing between
capital and small letters when Match
case in the File dialog box is checked.
Option Menu
Display Format
Select date and time format.
Expense Category Set the Expense Category.
Note:
Menu Commands
Unavailable buttons or commands will be shadowed
or not be displayed.
FILE Menu
Open
Open the created Organizer data file
(.bkf) in PC Software.
Save As Save all entries in Organizer as one
file(.bkf) on your PC.
Clear All Delete all entries in PC Software.
Import
Open a CSV format file in PC Software.
Export
Save all entries in PC Software by each
application in CSV-format file on your PC.
Exit
Exit PC Software.
COM port
Select a COM port(COM1—COM4).
Help Menu
Displays copyright and version information.
About
Creating and Editing Data on YourPC
Data can be prepared on your PC to be downloaded
to the Organaizer.
Creating a new
entry
Note:
Modifying an
entry
Deleting an
entry
1. Click the desired application tab on the PC Software
main screen.
2. Click the "New" button.
The screen for new entry will be displayed.
3. Enter the required items or select appropriate items.
4. Click the “Save” button to save the entry.
. To clear all entry fields, click the "Clear" button.
. To cancel the entry, click the “Cancel” button.
Transferring Entries Between your Organizer and your PC
Viewing details
of an entry
. The entry details will be displayed in the Detail
view when an entry is selected.
. The contents of each field can be viewed by
using the scroll bar of the Index view.
Other features
Sort function
Each column width can be changed by dragging
the label partition left or right.
Category filter function (Telephone)
1. Click the desired application tab on the PC Software
main screen.
2. Double click the entry you wish to modify, or click
the entry to select and then click the "Edit" button.
The screen for edit entry will be displayed.
3. Modify the entry as required.
4. Click the "Save" button to save the modifications.
. To save as another entry, click the "Save As New" button.
. To clear all entry fields, click the "Clear" button.
. To cancel the modification, click the “Cancel” button.
1. Click the desired application tab on the PC Software
main screen.
2. Click the entry you wish to delete, then click the
"Delete" button.
The confirmation dialog will be displayed.
3. Click the "YES" button to delete the entry.
. To cancel the deletion, click the “NO” button.
Category drop-down
list button
If the category (i.e., "Personal", "Business", or
"Others") is specified in each Telephone entry,
the list of entries can be sorted by a particular
category. Click on the Category drop-down list
button to select the category you wish to isolate
("Personal", in this example). Select “All” to display all
entries.
Restoring
entries from a
backup file(.bkf)
Note:
1. Upload all entries of each application to PC
Software using the Upload function.
2. On the PC Software main screen, select "Save As..."
from the File menu.
3. A dialog box appears to save the backup file.
The default name is decided based on the PC
calendar, in the format of yyyymmdd (.bkf).
Change the file name or the destination, if desired.
4. Click the “Save” button to save the backup file of entries.
1. On the PC Software main screen, select "Open..."
from the File menu.
2. A dialog box appears to select the backup file.
3. Select the backup file to open in PC Software
and click the "Open" button.
A confirmation dialog box will be displayed.
4. Click the "YES" button to open the file in PC Software.
The entries stored in the backup file will be displayed
in the index view of each application.
5. Restore desired data to your organizer per
application using the Download function.
For details on uploading or downloading, refer to
“Transferring Entries Between your Organizer and your
PC”above.
Caution:
When a backup file is opened, any entries in PC Software
will be overwritten and deleted by entries from the backup
file. If you wish to keep the current entries in PC Software,
first save in a backup file using “Save as” before
executing Open.
Add an
individually
selected entry to
your Organizer
from your PC
The maximum number of entries the PC Software can handle
is as follows:
YO/ZQ290: Tel: 290; other application: 2048 per application.
EL-6990: Tel: 290; other application: 920 per application.
Preparing for
transfer
1. Connect your Organizer to your PC as described
in "Before You Begin".
2. Make sure that your organizer is turned ON.
Uploading
entries from your
Organizer to your
PC
1. Click the desired application tab on the PC Software
main screen.
2. Click the "Data upload" button.
Except the Expense application, any individual
entry can be transferred (appended) from your
PC to your Organizer.
1. Click the desired application tab on the PC Software
main screen.
2. Click the desired entry in the Index view.
3. Click the "Add one selected data" button.
Follow the instructions in the dialog box to start
transfer.
Caution:
On both uploading and downloading, previous data will
be overwritten and deleted by the transferred data. This
includes the Expense Category.
Changing the column width
The entry will be transferred and appended to your
Organizer.
Note:
To cancel a transfer, click the "Abort" button in the Waiting
Organizer dialog box before start of transfer.
Follow the instructions in the dialog box to start
transfer.
All entries in the selected application in your
Organizer will be transferred to your PC.
Downloading
entries to your
Organizer from
your PC
1. Click the desired application tab on the PC Software
main screen.
2. Click the "Data download" button.
Follow the instructions in the dialog box to start
transfer.
All entries in the selected application in your PC will
be transferred to your Organizer.
Making and Restoring a backup file of entries
Making a backup
file (.bkf) of
entries
Note:
The Index view can be easily sorted by clicking the
label at the top of any of the columns. Sort order
will be changed to either ascending or descending
each time the label is clicked.
. For information on entry items, refer to the
operation manual for the Organizer.
. A Telephone application entry cannot be saved
unless one of the fields Home#, Office#, Fax# or
Mobile# has been completed.
The entries of all 6 applications can be saved as
one file and this can be restored per application
to your Organizer using the Download function.
All the entries created, modified, or deleted on
your PC can be transferred per application. Also,
singly selected entries can be appended to your
Organizer.
Importing and Exporting entries in CSV format
Making a CSV
file for export
A file in CSV format can be imported or exported
for each application.
On the occurrence of a communications
error, check the points below.
On
1. On the PC Software main screen, select "Export..."
from the File menu.
2. A dialog box appears to enter the file name.
The destination may be changed if desired.
3. Click the "Save" button to save the file.
A confirmation dialog box will be displayed.
4. Click the "OK" button.
It is likely that the size of data exceeds the memory capacity of the
Organizer.
Delete entries no longer required and try again.
If an error message is displayed, follow the Instructions
and try again from step 1.
Importing a CSV
file
Troubleshooting communication errors
1. On the PC Software main screen, select "Import..."
from the File menu.
2. A dialog box appears to select the import file in
your PC.
3. Enter the file name or click the "Browse" button
to select the file.
4. In the dialog box, select the application for the
CSV file to be imported.
5. Click the "OK" button.
A confirmation dialog box will be displayed.
6. Click the "OK" button.
Imported entries will be added in the Index view
of the selected application in PC Software.
If the error message indicates that memory is full:
If the wrong model has been selected:
Communication may take a long time even if no error occurs.
Re-install the PC Software, and select the proper model.
(Refer to "Installing the PC Software" in "Before You Begin".)
A 3D screen saver starts then stops:
While running PC Software minimized, if a 3D screen saver starts,
it will stop and the PC revert back to the Desktop.
Temporarily disable any 3D screen saver utility programs you may
be running.
FIFO settings may be incorrect:
Check the FIFO settings as follows:
<Windows98/Me>
[Start ] - [Settings ] - [Control Panel ] - [System] - [Device Manager]
- [Ports] - [Communications port (COMx) ] - [Properties] [Port Settings] - [Advanced]
<Windows2000 Professional>
[Start ] - [Settings ] - [Control Panel ] - [System] - [Hardware]
- [Device Manager] - [Ports] - [Communications port (COMx) ] [Properties] - [Port Settings] - [Advanced]
<WindowsXP>
Open the [Device Manager], then
[Ports] - [Communications port (COMx) ] - [Properties] [Port Settings] - [Advanced]
*Please refer the windows manual to open the [Device Manager].
A virus scanning program affects PC Software:
PC Software may not run reliably with certain virus scanning
programs enabled. If you have problems with your Organizer
transferring data, temporarily disable any virus checking software you
may be running.
Note:
Uninstalling PC Software
Power management features affect PC Software:
PC Software may not run reliably with certain power management
features enabled. If you have problems with your Organizer transferring
data,temporarily disable any power management features you may
have turned on.
Some PCs may then need to be restarted.
. For Windows 2000/XP; you must log in as system
administrator to check the FIFO setting.
. COMx refers to the COM Port selected in the software.
1. Open "Control Panel".
2. Select "Add/Remove Programs".
3. Select “PC Software for Sharp EL-6990 and YO/ZQ-290” and
click “Add/Remove” ("Change/Remove").
Note:
For Windows2000/XP, you must log in as system administrator to
uninstall the software.