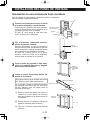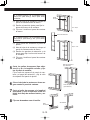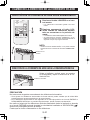
1
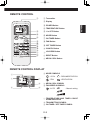
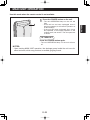
INSTALLATION AND OPERATION
MANUAL
MANUAL DE INSTALACIÓN
Y FUNCIONAMIENTO
CV-10NH
ESPAÑOL
ACONDICIONADOR DE AIRE
PARA HABITACIÓN TIPO
PORTÁTIL
ENGLISH
PORTABLE TYPE
ROOM AIR CONDITIONER
ENGLISH
This manual explains the proper use of your new air conditioner. Please
read this manual carefully before using the product. This manual should
be kept in a safe place for handy reference.
CONTENTS
E-1
ENGLISH
• FOR CUSTOMER ASSISTANCE ...........................................E-2
• CONSUMER LIMITED WARRANTY ......................................E-3
• PRECAUTIONS ......................................................................E-4
• LOCATION ...............................................................................E-7
• INCLUDED...............................................................................E-7
• PART NAMES ..........................................................................E-8
• INSTALL WINDOW PANEL......................................................E-10
• INSTALLATION AND REMOVAL OF EXHAUST HOSE .........E-14
• PRE-OPERATION CHECKS ...................................................E-16
• COOL MODE ...........................................................................E-18
• DEHUMIDIFICATION MODE ...................................................E-19
• FAN MODE ..............................................................................E-20
• VENTILATION MODE ..............................................................E-20
• TO CHANGE AIR FLOW DIRECTION .....................................E-21
• MEGA COOL OPERATION......................................................E-22
• ONE-HOUR OFF TIMER .........................................................E-22
• TIMER OPERATION ................................................................E-23
• MAIN UNIT OPERATION .........................................................E-25
• DRAINAGE ..............................................................................E-26
• MAINTENANCE .......................................................................E-27
• BEFORE CALLING FOR SERVICE ........................................E-28
FOR CUSTOMER ASSISTANCE (the United States)
To aid in answering questions if you call for service or for reporting loss or theft, please
record below the model and serial number located on the back side of the unit.
MODEL NUMBER
SERIAL NUMBER
DATE OF PURCHASE
Dealer Name
Address
City
State
Zip
Telephone
TO PHONE: Dial 1-800-BE-SHARP (237-4277) for:
SERVICE (for your nearest Sharp Authorized Servicer)
PARTS (for your Authorized Parts Distributor)
ACCESSORIES
ADDITIONAL CUSTOMER INFORMATION
TO WRITE: For service problems, warranty information, missing items and other assistance:
Sharp Electronics Corporation
Customer Assistance Center
1300 Naperville Drive
Romeoville, IL 60446-1091
TO ACCESS THE INTERNET: www.sharpusa.com
Please provide the following information when you write or call: model number, serial number,
date of purchase, your complete mailing address (including zip code), your daytime telephone
number (including area code) and description of the problem.
E-2
CONSUMER LIMITED WARRANTY
CONSUMER LIMITED WARRANTY FOR THE U.S. USERS
SHARP ELECTRONICS CORPORATION warrants to the first consumer purchaser that this Sharp brand product
(the “Product”), when shipped in its original container, will be free from defective workmanship and materials, and
agrees that it will, at its option, either repair the defect or replace the defective Product or part thereof with a new or
remanufactured equivalent at no charge to the purchaser for parts or labor for the period(s) set forth below.
In order to enforce the rights under this limited warranty, the purchaser should follow the steps set forth below and
provide proof of purchase to the servicer.
The limited warranty described herein is in addition to whatever implied warranties may be granted to purchasers by
law. ALL IMPLIED WARRANTIES INCLUDING THE WARRANTIES OF MERCHANTABILITY AND FITNESS FOR
USE ARE LIMITED TO THE PERIOD(S) FROM THE DATE OF PURCHASE SET FORTH BELOW. Some states do not
allow limitations on how long an implied warranty lasts, so the above limitation may not apply to you.
Neither the sales personnel of the seller nor any other person is authorized to make any warranties other than those
described herein, or to extend the duration of any warranties beyond the time period described herein on behalf of
Sharp.
The warranties described herein shall be the sole and exclusive warranties granted by Sharp and shall be the sole and
exclusive remedy available to the purchaser. Correction of defects, in the manner and for the period of time described
herein, shall constitute complete fulfillment of all liabilities and responsibilities of Sharp to the purchaser with respect
to the Product, and shall constitute full satisfaction of all claims, whether based on contract, negligence, strict liability
or otherwise. In no event shall Sharp be liable, or in any way responsible, for any damages or defects in the Product
which were caused by repairs or attempted repairs performed by anyone other than an authorized servicer. Nor shall
Sharp be liable or in any way responsible for any incidental or consequential economic or property damage. Some
states do not allow the exclusion of incidental or consequential damages, so the above exclusion may not apply to you.
THIS WARRANTY GIVES YOU SPECIFlC LEGAL RIGHTS. YOU MAY ALSO HAVE OTHER RIGHTS WHICH VARY
FROM STATE TO STATE.
Your Product Model Number & Description:
Warranty Period for this Product:
Additional Item(s) Excluded From Warranty
Coverage (If any):
Where to Obtain Service:
What to Do to Obtain Service:
CV-10NH
Portable Air Conditioner. Be sure to have this information available
when you need service for your Product.
One (1) year parts and labor from date of purchase. The warranty
period continues for a total of five (5) years from date of purchase
for the Sealed Cooling System parts; labor and service are not
provided free of change for this additional period.
Appearance items of the Product, filters, or accessories, or any
printed materials.
Product which has been used for rental and/or commercial
purposes.
From a Sharp Authorized Servicer located in the United States.
To find the location of the nearest Sharp Authorized Servicer, call
Sharp Toll Free at 1-800-BE-SHARP.
Contact your Sharp Authorized Servicer to obtain in-home service
for this Product.
The Servicer will come to your home, and if it is necessary to
remove the Product, the Servicer will reinstall it. Be sure to have
Proof of Purchase available.
TO OBTAIN SUPPLY, ACCESSORY OR PRODUCT INFORMATION, CALL 1-800-BE-SHARP, OR VISIT OUR WEBSITE AT
www.sharpusa.com
SHARP ELECTRONICS CORPORATION
Sharp Plaza, Mahwah, New Jersey 07430-2135
E-3
ENGLISH
This warranty does not apply to any appearance items of the Product nor to the additional excluded item(s) set forth
below nor to any Product the exterior of which has been damaged or defaced, which has been subjected to improper
voltage or other misuse, abnormal service or handling, or which has been altered or modified in design or construction.
PRECAUTIONS
Points to keep in mind when using your air conditioner.
WARNINGS FOR USE
• Install the air conditioner in accordance with the installation instructions in the latter section of this manual.
• Do not modify any part of this product.
• Do not insert anything into any part of the unit.
• Ensure the power supply used has an appropriate voltage rating.
Only use a three-pin grounded electrical AC socket rated 125V, 60Hz,
and 15 amps or more as shown on the right.
Use of a power supply with an improper voltage rating can result in
damage to the unit and possibly fire.
• Always use a fuse with the proper amp rating.
Do not, under any circumstances, use wire, pins or other objects in place of a proper
fuse.
• In the event of any abnormality with the air conditioner (ex. a burning smell), turn it
off immediately and disconnect the power supply.
WARNING FOR POWER SUPPLY CORD
• This air conditioner uses a plug with a built-in fuse.
Read the precautions on the plug before using the air conditioner.
• Always conduct a “Power Plug Check” (See Page 16) before use to confirm the
power plug functions normally.
• This power plug must only be plugged into an appropriate wall socket. Do not use
in conjunction with any extension cords.
• Push the power plug securely into the socket and make sure it is not loose.
• Do not pull, deform, or modify the power supply cord, or immerse it in water.
Pulling or misuse of the power supply cord can result in damage to the unit and cause
electrical shock.
• A damaged power supply cord must be replaced with a new power supply cord
obtained from the product manufacturer and not repaired. Replacement must be
performed by manufacture's service agent in order to avoid a hazard.
NOTE
Radio or TV Interference
If this room air conditioner should cause interference to radio or television reception, try to
correct the interference by one or more of the following measures:
• Reorient or relocate the receiving antenna.
• Increase the separation between the room air conditioner and radio/TV receiver.
• Connect the room air conditioner into an outlet on a circuit different from that to which the
radio/TV receiver is connected.
• Consult the dealer or an experienced radio/TV technician for help.
E-4
WARNING ABOUT GROUNDING
Grounding pin
3-Pin plug
3-Pin socket
3-Pin socket
Grounded
electrical box
Grounded
electrical box
3-Pin plug
Grounding pin
• Do not under any circumstances cut or
remove the round grounding pin from
this plug.
Consult a qualified electrician or serviceman
if the grounding instructions are not completely understood, or if in any doubt as to
whether the appliance is properly grounded.
If a grounding adapter is used, make sure
the electrical box is fully grounded.
Grounding adapter
Grounding wire
Screw
Tab for grounding
screw
Grounded electrical box
USAGE CAUTIONS
• Ventilate the room periodically during use, especially if using gas appliances.
• Be sure to turn the unit off and disconnect the power supply cord before performing any maintenance or cleaning.
• Do not splash or pour water directly onto the unit.
Water can cause electrical shock or equipment damage.
• Drainage should be performed whenever moving the air conditioner. (See Page 26)
If any water remains in the tank, it may spill out while being moved.
• Remove the window panel in the event of particularly adverse weather.
Extremely adverse weather may cause water to leak in through the openings.
• To ensure proper drainage, the drainage hose must have no kinks or be on a different level during dehumidification mode.
The drained water may spill out into the room.
• The temperature around the drainage hose must not be below freezing point when
used.
Drained water may freeze inside the hose, causing water inside the unit to overflow into
the room.
• Do not block the exhaust air outlet with obstacles.
Cooling performance may be reduced or stop completely.
E-5
ENGLISH
• Improper use of the grounding plug can result in the risk of electric shock.
This appliance must be grounded. In the event of an electrical short circuit, grounding
reduces the risk of an electric shock by providing a less resistant conduit for the electric
current.
This appliance is equipped with a cord that has a grounding wire connected to a grounding plug. The plug must be plugged into a socket that is properly installed and grounded.
PRECAUTIONS
NOTES ON OPERATION
• Allow 3 minutes for the compressor to restart cooling.
If you turn the air conditioner off and immediately restart it, allow three minutes for the compressor
to restart cooling. There is an electronic device in the unit that keeps the compressor turned off
for three minutes for safety.
• In the event of a power failure during use, allow 3 minutes before restarting the
unit.
After power is reinstated, restart the air conditioner. If the power was off for less than three minutes, be sure to wait at least three minutes before restarting the unit. If you restart the air conditioner within three minutes, a protective device in the unit may cause the compressor to shut off.
This protective device will prevent cooling for about 5 minutes. Any previous settings will be canceled and the unit will return to its initial settings.
• Low temperature operation: Is your unit freezing up?
Freezing may occur when the unit is set close to 64°F in low ambient temperature conditions, especially at night.
In these conditions, a further temperature drop may cause the unit to freeze.
Setting the unit to a higher temperature will prevent it from freezing.
• Dehumidification mode increases room temperature.
The unit generates heat during dehumidification mode and the room temperature will rise. Warm
air will be blown out from the Exhaust air outlet, but this is normal and does not indicate a problem
with the unit.
• This air conditioner blows the warm air generated by the unit outside the room via
the exhaust hose while in cool mode.
Accordingly, the same amount of air as that blown out will enter the room from outside through
any openings into the room.
• When cooling operation is performed at high humidity conditions, water tank inside
the unit may frequently become full.
When water tank inside the unit is full, the unit stops operating and TIMER, OPERATION and
MEGA COOL lamps will blink. In this case, perform drainage to drain out water within the unit. (See
page 26)
OPERATING CONDITIONS
• The air conditioner must be operated within the temperature range indicated below.
MODE
ROOM TEMPERATURE
COOL
64°F~95°F
Dehumidification 59°F~95°F
• A built-in safety device may cut off
operation if the temperature exceeds
these limits.
• When cooling operation is performed at
high room temperature, the fan may run
at a slower speed.
ENERGY EFFICIENCY TIPS
• Avoid direct sunlight.
Close blinds, drapes or shades to keep out direct sunlight while in cooling mode.
• Keep the filter clean.
Keeping the filter clean greatly aids efficient operation.
A dirty filter blocks the flow of air, making your air conditioner work harder and less efficiently.
See page 27 on how to clean the filter.
• Turn off unnecessary lights.
Your air conditioner must remove the heat produced by your lights or other heat-producing appliances. Turn off any lights or appliances that are not in use.
• Turn off the air conditioner when no one is home.
Use only when necessary. The less time the air conditioner is used, the lower the running costs.
E-6
LOCATION
MIN.12"
(30cm)
MIN.12"
(30cm)
INCLUDED
SUGGESTED TOOLS FOR WINDOW PANEL INSTALLATION
1. Screwdriver(medium size Phillips) 2. Tape measure or ruler 3. Knife or scissors
4. Saw (In the event that the window panel needs to be cut down in size because the
window is too narrow for direct installation.)
E-7
ENGLISH
• The air conditioner should be placed on a firm foundation to minimize noise and vibration. For safe and secure positioning, place the unit on a smooth, level floor
strong enough to support the unit.
• The unit has casters to aid placement, but it should
only be rolled on smooth, flat surfaces. Use caution
when rolling on carpet surfaces. Do not attempt to roll
the unit over objects.
• The unit must be placed within reach of a properly
rated grounded socket.
• Never place any obstacles around the air inlet or outlet
of the unit.
• Allow at least 12" (30cm) of space from the wall for efficient air-conditioning.
PART NAMES
FRONT VIEW
1
2
3
1 Air Outlet
2 Vertical louvers
3 Horizontal louvers
4
4 Remote control signal receiver
window
5
5 POWER Button
6
6 OPERATION Lamp (red)
7
8
9
9
7 TIMER Lamp (orange)
8 MEGA COOL Lamp (green)
9 Air inlet
9
REAR VIEW
0
0 Exhaust air outlet
q
q Window exhaust adapter
w
w Exhaust hose
e
r
t
y
e Remote control hook
r Air filters
t Drainage nozzle and stopcock
y Power supply cord hooks
u Drainpipe nozzle and stopcock
u
i
o
p
i Power supply cord
o Power plug
p Casters(4)
NOTE: Actual unit might vary slightly from above illustration.
E-8
REMOTE CONTROL
1
1 Transmitter
2 Display
ENGLISH
3 POWER Button
4 TEMPERATURE Button
2
3
4
5
6
7
8
9
0
q
w
e
5 1 hr OFF Button
6 MODE Button
7 ON TIMER Button
8 FAN Button
9 OFF TIMER Button
0 CANCEL Button
q LOUVERS Button
w RESET Button
e MEGA COOL Button
REMOTE CONTROL DISPLAY
r MODE SYMBOLS
r
t
u
i
y
o
: COOL
: DEHUMIDIFICATION
: FAN
: VENTILATION
t MEGA COOL SYMBOL
y FAN SPEED SYMBOLS
: AUTO
Quiet
: Manual setting
Low
High
u TEMPERATURE AND TIMER COUNT
DOWN INDICATOR
i TRANSMITTING SYMBOL
o ON TIMER / OFF TIMER SYMBOL
E-9
INSTALL WINDOW PANEL
Installation in a double-hung sash window
(See page 12 for installation in a sliding sash window. )
1
Connect the rain guards to the insect
guard net.
Insert all three projections on each rain
guard into the holes in the insect guard net.
Side “A” will now be at the top, as indicated
in the diagram.
Hole
"A"
Projection
Attach the guard combined above to the
panel
2 window
Push the insect guard net firmly to ensure
that its four projections fit into the holes in
the window panel.
Side “A” will now be at the top, as indicated
in the diagram.
Rain guard
Insect guard
net
Projection
Window panel
"A"
Cut the foam seal A (adhesive type) to
3 the
proper length and attach it to the
window stool.
Foam seal A
(adhesive type)
Attach the window panel to the window
4 stool.
If the inner width of the window is between 22" (559mm) and 24" (609mm)
inclusive.
Cut
The window panel cannot be installed in
windows less than 22" (559mm) wide,
as you will be unable to shut the exhaust
cover.
(1) Remove the adjustment panel from
the window panel, and cut the window
panel to the same width as the window.
(2) Open the window sash and place the
window panel on the window stool
(3) Secure the window panel to the window
stool with 2 screws.
E-10
Window panel
22"~ 24"
Window stool
If the inner width of the window is
between 24" (609mm) and 36.8"
(934mm) inclusive.
Adjustment panel
(1) Open the window sash and place the
window panel on the window stool.
ENGLISH
(2) Slide the adjustment panel to fit the
window frame width.
24"~36.8"
(3) Secure the window panel to the stool
with 3 screws.
If the inner width of the window is between 36.8" (934mm) and 48" (1219mm)
inclusive.
Extension panel
(1) Attach the extension panel to the
adjustment panel.
(2) Open the window sash and place the
window panel on the window stool.
(3) Slide the adjustment and extension
panels to fit the window frame width.
(4) Secure the window panel to the window
stool with 4 screws.
5
36.8"~48"
Foam seal A
(adhesive type)
Cut the foam seals (adhesive type) A
and B to the proper length and attach it
to the window panel.
Attach foam seal A to the window panel and
extension panel, and attach foam seal B to
the adjustment panel.
Foam seal B
(adhesive type)
Close the window sash securely against
Window panel.
6 the
the foam seal to an appropriate
length and seal the opening between the
7 Cut
top of the inner window sash and the
outer window sash.
8 Attach the bracket with a screw.
Foam seal
Bracket
E-11
INSTALL WINDOW PANEL
Installation in a sliding sash window
(See page 10 for installation in a double-hung window.)
1
Connect the rain guards to the insect
guard net.
Insert all three projections on each rain
guard into the holes in the insect guard
net.
Side “A” will now be at the top, as indicated
in the diagram.
"A"
Insect guard net
Hole
Rain guard
Projection
the guard combined above to the
2 Attach
window panel.
Push the insect guard net firmly to ensure
that its four projections fit into the holes in
the window panel.
Side “A” will now be at the top, as indicated
in the diagram, when it is installed in the
window.
Window panel
"A"
Projection
the foam seal A (adhesive type) to
the proper length and attach it to the
3 Cut
window frame.
Foam seal A
(adhesive type)
the window panel into the window
4 Install
frame.
If the inner height of the window is
between 22" (559mm) and 24" (609mm)
inclusive.
The window panel cannot be installed in
windows less than 22" (559mm) high, as
you will be unable to shut the exhaust
cover.
Cut
(1) Remove the adjustment panel from the
window panel, and cut the window panel to the same height as the window.
(2) Open the window sash and place the
window panel on the window frame.
Window
panel
22"~24"
(3) Secure the window panel to the window
frame with 2 screws.
E-12
If the inner height of the window is
between 24" (609mm) and 36.8"
(934mm) inclusive.
Adjustment
panel
(1) Open the window sash and place the
window panel on the window frame.
24"~36.8"
(3) Secure the window panel to the window
frame with 3 screws.
Extension panel
If the inner height of the window is between 36.8" (934mm) and 48" (1219mm)
inclusive.
(1) Attach the extension panel to the
adjustment panel.
36.8"~48"
(2) Open the window sash and place the
window panel on the window frame.
(3) Slide the adjustment and extension
panels to fit the window frame height.
(4) Secure the window panel to the window
frame with 4 screws.
5
Cut the foam seals (adhesive type) A and
B to the proper length and attach them
to the window panel.
Attach foam seal A to the window panel and
extension panel, and attach foam seal B to
the adjustment panel.
Foam seal B
(adhesive type)
the window sash securely against
the Window panel.
6 Close
Foam seal A
(adhesive type)
Cut the foam seal to an appropriate
7 length
and seal the opening between the
side of the inner window sash and the
outer window sash.
8 Attach the bracket with a screw.
Bracket
Foam seal
E-13
ENGLISH
(2) Slide the adjustment panel to fit the
window frame height.
INSTALLATION AND REMOVAL OF EXHAUST HOSE
The exhaust hose must be installed or removed in accordance with the usage mode.
MODE
EXHAUST HOSE
COOL, FAN, VENTILATION, DEHUMIDIFICATION with no container
Install
DEHUMIDIFICATION with container(minimum capacity 31/2 gallons)
Remove
Installation of the exhaust hose
the window exhaust adapter to
1 Attach
the exhaust hose.
Extend one end of the exhaust hose
and insert it into the window exhaust
adapter, and turn it (approx. three times)
until it stops.
Make sure they are securely attached.
2
Attach the exhaust hose adapter to
the unit.
Insert the two projections on the exhaust hose adapter into the two holes
on the unit, and firmly attach them to
each other.
Window exhaust adapter
Extend
Exhaust hose
Projection
and open the exhaust cover on
the window panel, and attach the win3 Slide
dow exhaust adapter.
Hole
Surface of window exhaust adapter
marked "TOP" should be at the top
when it is installed in a double-hung
sash window.
Surface of window exhaust adapter
marked "TOP" should be on the window
frame side when it is installed in a
sliding sash window.
"TOP"
The exhaust hose should be as short as possible for operational efficiency;
however, it must not be twisted or bent.
Unacceptable
Acceptable
E-14
Acceptable
ENGLISH
Removal of the exhaust hose
Remove the window exhaust adapter.
1 Pull
out and remove the window exhaust
adapter by pushing down two “PUSH”
markings, and slide and close the exhaust
cover in the window panel.
"PUSH"
Remove the exhaust hose adapter from
unit.
2 the
Lift up and remove the exhaust hose
adapter from the unit by pushing down on
the two projections.
Projection
E-15
PRE-OPERATION CHECKS
POWER PLUG CHECK
This air conditioner uses a fused power plug.
Always check the power plug before use.
Press the RESET button.
1 Insert
2 socket.the power plug into the wall
Press the TEST button.
3 You
will hear a CLICK if the circuit
breaker is functioning correctly.
the RESET button until you
4 Press
hear another CLICK.
RESET
TEST
TEST
RESET
The circuit breaker is activated, power
is supplied, and the air conditioner is
now ready for use.
Do not attempt to use the air conditioner if the above procedure
cannot be performed.
Disconnect the power plug and call for service.
LOADING BATTERIES Use two AAA (R03) batteries.
the battery cover at the
1 Remove
back of the remote control.
batteries into the com2 Insert
partment, making sure the ±
and — polarities are correctly
aligned.
• Lines will appear on the display
when batteries are properly installed.
3 Reattach the battery cover.
the RESET button using
4 Press
a thin pointed implement.
Battery cover
NOTES:
• The battery should last approximately one year under normal use.
• When replacing the batteries, always change both batteries at the same time,
and make sure they are the same type.
• If the remote control does not operate normally after replacing the batteries,
press the RESET button using a thin pointed implement.
• If you will not be using the unit for a prolonged period, remove the batteries from
the remote control.
E-16
HOW TO USE THE REMOTE CONTROL
ENGLISH
Point the remote control towards
the units signal receiver window
and press the desired button. A
beep will sound when the unit receives the signal.
• Make sure nothing, such as curtains,
blocks the signal receiver window.
• The remote control operates up to
23 feet (7 meters) away.
CAUTION
• Do not expose the signal receiver window to direct sunlight. This may adversely
affect its operation. If necessary, close the curtains to block out the sunlight.
• Use of a fluorescent lamp in the same room may interfere with transmission of the
signal.
• The unit may be affected by signals emitted from other remote controllers for televisions, VCRs or other equipment used in the same room.
• Do not leave the remote control exposed to direct sunlight or near a heater. Protect the remote control from moisture and shock which can discolor or damage it.
To prevent the remote control from
being misplaced, hook it to the unit
when not in use.
When attached, to remove the remote
control from the unit, lift the remote
control up slightly and pull it out.
Remote control hook
E-17
COOL MODE
Install the exhaust hose (See Page14), turn
the drainage nozzle to the CLOSE position,
"CLOSE" position and check the drainage nozzle is covered
with the stopcock.
Drainage nozzle
Stopcock
Stopcock
Ensure that the stopcock is securely inserted
into the lower drainpipe nozzle and that the
nozzle has not been damaged.
Drainpipe nozzle
Press the MODE button to select
1 COOL
mode.
COOL
DEHUM
FAN
VENT
Press the POWER button to start op2 eration.
2
3
• The red OPERATION lamp on the unit will
light.
Press the TEMPERATURE button to
3 set
the desired temperature.
• The temperature can be set within the
range of 64°F to 86°F.
1
4
Press the FAN button to set the de4 sired
fan speed.
AUTO
QUIET
LOW
HIGH
TO TURN OFF
Press the POWER button again.
• The red OPERATION lamp on the unit will
turn off.
E-18
DEHUMIDIFICATION MODE
In this mode, the air conditioner dehumidifies the room.
Ensure that the stopcock is securely inserted into the lower drainpipe nozzle and that the nozzle has not been
damaged.
Dehumidification with container
Drainage nozzle
Stopcock
• When the stopcock is removed, a small amount of water
may be discharged from the drainage nozzle.
• Always perform this procedure with the unit turned off.
Drain water will spout out if attempted during operation.
"OPEN" position
the drain grommet to a standard commer4 Attach
cially-available hose. (5/8" inner diameter, 7/8"
outer diameter)
the hose to the drainage nozzle, and se5 Attach
cure it with the hose band.
• Insert the hose securely into a container with a minimum
capacity of 31/2 gallons. Be sure to monitor the water
level in the container and empty as necessary. Do not
operate in dehumidify mode for more than 8 hours at a
time. Be sure to empty the water container whenever
dehumidify mode is started. Failure to empty the water
container can cause the container to overflow and cause
damage to underlying materials.
• Set the hose sloping downwards for easier drainage.
Moreover, do not bend the hose at any point, nor allow
the end to be submerged in water.
Drain grommet
Hose
Hose band
Dehumidification with no container
If draining of the water is not desirable, install the exhaust hose (See Page 14), turn the drainage nozzle to the
CLOSE position, and check that the drainage nozzle is covered with the stopcock. In this operation, the water
tank inside the unit may become full, the unit will stop operating and the TIMER, OPERATION and MEGA COOL
lamps will blink. In this case, drain out the water within the unit (See Page 26).
the MODE button to select DEHUMIDIFICATION mode.
1 Press
COOL
2
DEHUM
FAN
VENT
2 Press the power button to start operation.
• The red OPERATION lamp on the unit will light.
• The temperature cannot be set.
• The fan speed is preset to AUTO and cannot be
changed.
1
TO TURN OFF
Press the POWER button again.
• The red OPERATION lamp on the unit will turn off.
CAUTION
When operating dehumidification with container, the unit generates heat during dehumidification mode and the room temperature will rise. Operate dehumidification with no container
if you don't want the room temperature to rise. This will help to slightly drop the room temperature, but dehumidification performance will become less effective than when operating
dehumidification with container.
E-19
ENGLISH
1 Remove the exhaust hose (See Page 15)
2 Turn the drainage nozzle to the OPEN position.
3 Pull the stopcock out from the drainage nozzle.
FAN MODE
In this mode, the air conditioner simply circulates the air without cooling it.
Install the exhaust hose (See Page14), turn the drainage nozzle to the CLOSE
position, and check the drainage nozzle is covered with the stopcock.
Ensure that the stopcock is securely inserted into the lower drainpipe nozzle and
that the nozzle has not been damaged.
1 Press the MODE button to select FAN mode.
COOL
DEHUM
FAN
VENT
2
2 Press the POWER button to start operation.
Press the FAN button to set the desired fan
3
speed.
1
• The red OPERATION lamp on the unit will light.
• The temperature cannot be set.
QUIET
LOW
HIGH
3
TO TURN OFF
Press the POWER button again.
• The red OPERATION lamp on the unit will turn off.
VENTILATION MODE
In this mode, the air conditioner ventilates the air to outdoors.
Install the exhaust hose (See Page 14), turn the drainage nozzle to the CLOSE
position, and check the drainage nozzle is covered with the stopcock.
Ensure that the stopcock is securely inserted into the lower drainpipe nozzle and
that the nozzle has not been damaged.
1 Press the MODE button to select VENT mode.
COOL
DEHUM
FAN
VENT
the POWER button to start operation.
2 2 •Press
The red OPERATION lamp on the unit will light.
• The temperature cannot be set.
1
3
Press the FAN button to set the desired fan
3 speed.
• Although the louvers are closed and no air blows
out into the room, the external ventilation fan
speed changes.
QUIET
LOW
HIGH
TO TURN OFF
Press the POWER button again.
• The red OPERATION lamp on the unit will turn off.
E-20
TO CHANGE AIR FLOW DIRECTION
UP / DOWN AIR FLOW DIRECTION
Press the LOUVERS button on the re1 mote
control.
1
2
the LOUVERS button again when
the horizontal louvers are at the desired
2 Press
position.
• The horizontal louvers will stop moving.
• The adjusted position will be memorized and
the same position will be set automatically
when operated the next time.
NOTE
• During VENTILATION mode, UP/DOWN air flow
direction cannot be changed.
Horizontal louvers
LEFT / RIGHT AIR FLOW DIRECTION
Hold the vertical louver as shown in the diagram and adjust the air flow direction.
Vertical louvers
CAUTION
Never attempt to adjust the horizontal louvers manually.
• Manual adjustment of the horizontal louvers can cause the unit to malfunction when the remote
control is used for adjustment.
• When the horizontal louvers are positioned at the lowest position in the COOL or DEHUMIDIFICATION mode for an extended period of time, condensation may result.
Do not adjust the vertical louvers to the extreme left or right in the COOL mode with the
fan speed set to "QUIET ( )" for an extended period of time.
Condensation may form on the louvers.
E-21
ENGLISH
• The horizontal louvers will swing continuously.
MEGA COOL OPERATION
In this operation, the air conditioner fan works at extra high speed with a setting
temperature of 59°F.
Press the MEGA COOL button during cooling
1 mode.
• The remote control will display "
".
• The temperature display will go off.
• The green MEGA COOL lamp on the unit will light.
TO CANCEL
Press the MEGA COOL button again.
1
• MEGA COOL operation is also cancelled when the
mode is changed, or when the unit is turned off.
• The green MEGA COOL lamp on the unit will turn
off.
NOTES:
• You cannot set the temperature or fan speed during MEGA COOL operation.
• The fan returns to the HIGH speed setting after the unit has run for 30 minutes in MEGA
COOL mode.
• The extra high fan speed may automatically slow down to protect the unit.
ONE-HOUR OFF TIMER
When the ONE-HOUR OFF TIMER is set, the unit will automatically turn off after one
hour.
1
Press the 1hr OFF button.
• The remote control displays “
”.
• The orange TIMER lamp on the unit will light.
• The unit will stop operating after one hour.
TO CANCEL
Press the CANCEL button.
1
CANCEL
• The orange TIMER lamp on the unit will turn off.
Alternatively, turn the unit off by pressing the
POWER button.
• The red OPERATION lamp and the orange TIMER
lamp on the unit will turn off.
NOTES:
• The ONE-HOUR OFF TIMER operation has priority over ON TIMER and OFF TIMER
operations.
• If the ONE-HOUR OFF TIMER is set while the unit is not operating, the unit will operate
for an hour at the formerly set condition.
• If you wish to operate the unit for another hour before the ONE-HOUR OFF TIMER is
activated, press the 1hr OFF TIMER button again during operation.
E-22
TIMER OPERATION
ON TIMER
Point the remote control at the signal receiver window on the unit.
1 Press the ON TIMER button.
• The time setting will change as you press the button as follows.
0.5h
1
1.0h
1.5h
10h
11h
12h
Hold the button down to speed through the settings.
• The orange TIMER lamp on the unit will light.
• The unit will emit a beep when it receives the signal.
• The time setting will count down to show the remaining time.
Select the mode, temperature and fan speed setting as desired.
Display shown when you
set the unit to turn on 6.5
hours later.
• When the temperature is set with the ON TIMER,
the temperature will show in the display for 5 seconds and then return to the time display.
• If you do not change the setting, the unit will operate using the most recent setting.
TO CANCEL TIMER
Press the CANCEL button.
• The orange TIMER lamp on the unit will turn off.
E-23
ENGLISH
The unit will turn on automatically according to your setting.
Timer duration can be set from a minimum of half an hour (30 minutes) to a maximum of 12 hours.
Up to 9.5 hours, you can set in half-hour (30-minute) increments and from 10 to 12
hours, in 1-hour increments.
TIMER OPERATION
OFF TIMER
The unit will turn off automatically according to your setting.
Timer duration can be set from a minimum of half an hour (30 minutes) to a maximum of 12 hours.
Up to 9.5 hours, you can set in half-hour (30-minutes) increments and from 10 to
12 hours, in 1-hour increments.
Point the remote control at the signal receiver window on the unit.
Press the OFF TIMER button and set the
1 time
as desired.
• The time setting will change as you press the button as follows.
0.5h
1.0h
1.5h
10h
11h
12h
Hold the button down to speed through the settings.
1
• The orange TIMER lamp on the unit will light.
• The unit will emit a beep when it receives the signal.
• The time setting will count down to show the remaining time.
TO CANCEL TIMER
Press the CANCEL button.
• The orange TIMER lamp on the unit will turn off.
Display shown when you
set the unit to turn off 2.5
hours later.
NOTES ON TIMER SETTING AND OPERATION
• The latest time setting will be memorized and will appear on the remote control display the next
time you set the OFF TIMER or ON TIMER.
• The OFF TIMER and ON TIMER can not be set together.
Only the most recent TIMER setting will be valid.
• While the ONE-HOUR OFF TIMER is set, the OFF TIMER and ON TIMER is settings are unavailable.
• If the ONE-HOUR OFF TIMER is set while the OFF TIMER or ON TIMER activated, the ON
TIMER or OFF TIMER setting will be cancelled.
• If a power failure occurs while the OFF TIMER or ON TIMER is set, the TIMER setting will be cancelled and will not be retrieved even after the power is restored.
E-24
MAIN UNIT OPERATION
Use this mode when the remote control is not available.
1 Press the POWER button on the unit.
TO TURN OFF
Press the POWER button again.
• The red OPERATION lamp on the unit will turn
off.
NOTES:
• Upon starting MAIN UNIT operation, the drainage pump inside the unit runs for
about a minute, which may produce an audible gurgling sound.
E-25
ENGLISH
1
• The red OPERATION lamp on the unit will
light.
• If the unit has not been unplugged since it
was last operated, it will resume operation at
its last settings.
• If the unit has been unplugged since it was
last operated, it will resume operation in the
cooling mode, set at 68˚F. The fan speed set
to AUTO.
DRAINAGE
Prepare for drainage and drain out water within the unit in the following cases.
If the unit stops operating and the TIMER, OPERATION and MEGA COOL lamps are
blinking. (This indicates that the water tank inside the unit is full.)
sure to turn the unit off.
1 Make
the drainage nozzle to the OPEN position.
2 Turn
the stopcock out from the drainage nozzle.
3 Pull
• When the stopcock is removed, a small amount of
water may be discharged from the drainage noz-
4
5
6
7
8
9
Drainage nozzle
Stopcock
zle.
"OPEN" position
Attach the drain grommet to a standard commercially available hose. (5/8" inner diameter,
7/8" outer diameter)
Attach the hose to the drainage nozzle, and secure it with the hose band.
Drain grommet
• Prepare for draining, as drain water will come out
through the hose during operation.
Hose
Press the POWER button on the unit twice.
• The water will drain out through the drainage
hose. Maximum amount of water that may be
drained out is approximately 41/5 pints.
• The OPERATION, TIMER and MEGA COOL
lamps will be blinking.
When drainage water stops running out from
Hose band
the hose, turn the unit off by pressing POWER
button.
• This will take about one minute.
Remove the hose from the drainage nozzle, and replace the stopcock.
• Keep the hose band and drain grommet in case of re-used.
Turn the drainage nozzle to the CLOSE position.
Whenever the unit is moved (to prevent water within the unit from spilling).
When the unit is not used for a long time.
out the above procedures from 1 to 5.
1 Carry
the POWER button on the unit.
2 Press
• The water will drain out through the drainage hose.
Maximum amount of water that may be drained out is approximately 4
1/5
pints.
• The OPERATION lamps will light.
When drainage water stops running out from the hose, turn the unit off by pressing
POWER button.
• This will take about one minute.
Remove the hose from the drainage nozzle, and replace the stopcock.
• Keep the hose band and drain grommet in case of re-used.
3
4
5 Turn the drainage nozzle to the CLOSE position.
the stopcock from the drainpipe nozzle, and completely drain any water
6 Remove
within the unit.
• Always prepare a receptacle to collect the water
before draining. Maximum amount of water that
may be drained out is approximately 2/5 pints.
7 Replace the stopcock to the drainpipe nozzle.
E-26
Stopcock
Drainpipe nozzle
MAINTENANCE
Be sure to disconnect the power from the wall socket before performing any maintenance.
CLEANING THE FILTERS
THE FILTERS
1 REMOVE
• Gently pull the filter handle to the right and slide
the filter out of the unit.
THE FILTERS
2 CLEAN
• Use a vacuum cleaner to remove any dust. If
the filters are very dirty, wash them with deterFilters
gent and rinse carefully with clean water. Dry
the filters in the shade before reinstalling them.
THE FILTERS
3 REINSTALL
• Hold the filter handle and gently push the filter
back into place.
Never operate the unit without the filter. Doing
so may result in serious damage to the unit.
CLEANING THE UNIT AND THE REMOTE CONTROL
Wipe them with a soft, dry cloth or with a cloth moistened with a mild soap. Carefully remove
any residue by wiping with a damp cloth and dry completely.
Avoid splashing water onto the unit. Water can dangerously damage the electrical insulation.
Never use harsh chemicals or abrasive cleaners on any part of the unit. To avoid damaging
the unit, do not use hot water (120°F/50°C or hotter) when cleaning.
CLEANING THE INSECT GUARD NET
The cooling performance may be reduced or stop
completely if the insect guard net becomes clogged
with dust.
Periodically remove the window exhaust adapter from
the window panel and clean the insect guard net with
a vacuum cleaner.
Insect guard net
MAINTENANCE AFTER AIR CONDITIONER SEASON
drainage to drain out water within the unit. (See Page 26 "When the unit is not
used for a long time").
1 Perform
the unit in the FAN or VENTILATION mode for about half a day to thoroughy
dry inside the unit.
2 Operate
3 Clean the filters, then reinstall them.
E-27
ENGLISH
If the filter is clogged with dust, the airflow will be reduced, resulting in poor cooling performance. The filter should be cleaned every two weeks.
BEFORE CALLING FOR SERVICE
If the unit appears to be malfunctioning, check the following points before calling
for a service.
AIR CONDITIONER DOES NOT OPERATE AT ALL
• Is the unit plugged in or is the plug loose?
• Has the fuse blown or is the circuit breaker tripped?
• Did you restart the unit within 3 minutes of a power failure?
If the power was off for less than 3 minutes when, you restarted the air conditioner, a protective
device may cause the compressor to shut off, preventing cooling for about 5 minutes.
• Are the OPERATION, TIMER and MEGA COOL lamps blinking?
The water tank inside the unit is full. It must be drained. (See page26)
• Check the power plug. (See page16)
AIR CONDITIONER DOES NOT COOL PROPERLY
• Is it set to FAN, DEHUMIDIFICATION or VENTILATION mode?
Cooling does not take place in these modes. Change the MODE setting.
• Are the filters clogged with dust?
Clean and replace the filters.
• Is the cooling coil frozen?
No air will blow out if the cooling coil is frozen.
Run the air conditioner in FAN mode with the fan speed set to "HIGH" until all ice dissipates.
• Is the temperature set properly?
• Is the window exposed to direct sunlight?
Close the curtains or blinds to minimize solar energy heating the room.
• Is the exhaust hose too long?
For efficient operation, make the hose as short as possible. The exhaust hose must not be twisted
or bent.
SOUNDS
• The unit may seem rather loud for the first 2 to 3 minutes when the unit is turned on. This is the
sound of the compressor starting-up and is perfectly normal.
• A soft, swishing noise can be heard immediately after the unit is turned on or off, and also during
operation. This is the sound of the refrigerant flowing inside the unit.
• This air conditioner evaporates water condensed during cooling operation within the unit through
the exhaust air outlet. Although water flowing sound way be heard, this is normal.
• An audible gurgling sound may be heard for about a minute upon starting AUXILIARY mode. This
is sound of running drainage pump inside the unit.
• An audible gurgling sound may be heard when the unit is operated on a gently sloping
floor. Place the unit on a level floor.
TIMER DOES NOT WORK PROPERLY
• If a power failure occurs while the TIMER is set, the TIMER setting will be cancelled and will not
be retrieved even after the power is restored. This is normal for this unit.
THE UNIT FAILS TO REACT TO THE REMOTE CONTROL SIGNAL
• Check the batteries in the remote control. Replace if necessary.
• Try to send the signal again with the remote control pointed directly at the unit’s signal receiver
window.
• Check whether the remote control batteries are installed with the polarities properly aligned.
E-28
ESPAÑOL
Este manual explica cómo utilizar de forma correcta su nuevo acondicionador de aire. Antes de usar el producto lea el manual detenidamente. Este
manual debería de guardarse en un lugar seguro para futuras referencias.
ÍNDICE
S-1
ESPAÑOL
• SOLICITU DE SERVICIO AL CLIENTE ........................................... S-2
• GARANTÍA LIMITADA DEL CONSUMIDOR .................................... S-3
• PRECAUCIONES ............................................................................ S-4
• UBICACIÓN ...................................................................................... S-7
• PIEZAS INCLUIDAS ......................................................................... S-7
• DESIGNACIÓN DE LAS PIEZAS ..................................................... S-8
• INSTALACIÓN DEL PANEL DE VENTANA ...................................... S-10
• INSTALACIÓN Y DESMONTAJE DE LA MANGUERA
DE ESCAPE ..................................................................................... S-14
• REVISIONES ANTES DE INICIAR EL FUNCIONAMIENTO ............. S-16
• MODO ENFRIAR .............................................................................. S-18
• MODO DESHUMIDIFICACIÓN ........................................................ S-19
• MODO VENTILADOR....................................................................... S-20
• MODO VENTILACIÓN...................................................................... S-20
• CAMBIO DE LA DIRECCIÓN DE LA CORRIENTE
DE AIRE............................................................................................ S-21
• FUNCIONAMIENTO MEGA COOL................................................... S-22
• FUNCIÓN DE DESACTIVACIÓN AUTOMÁTICA
EN UNA HORA ................................................................................. S-22
• FUNCIONAMIENTO CON EL TEMPORIZADOR ............................. S-23
• FUNCIONAMIENTO DE LA UNIDAD PRINCIPAL ........................... S-25
• DRENAJE ......................................................................................... S-26
• MANTENIMIENTO............................................................................ S-27
• ANTES DE LLAMAR AL DEPARTAMENTO
DE SERVICIO TÉCNICO ................................................................. S-28
SOLICITU DE SERVICIO AL CLIENTE (Estados Unidos)
A manera de ayuda para responder a sus preguntas, si llama solicitando servicio o
reportando la perdida o robo, escriba en el formulario que sigue a continuación el número
del modelo y el número de serie, los cuales se encuentran en la parte posterior de la
unidad.
NÚMERO DEL MODELO
NÚMERO DE SERIE
FECHA DE COMPRA
Nombre del distribuidor
Dirección
Ciudad
Estado
Código postal
Teléfono
LLAMADAS: Marque el 1-800-BE-SHARP (237-4277) para:
SERVICIO (para su centro de servicio autorizado Sharp
más cercano)
PIEZAS (para su distribuidor autorizado de piezas)
ACCESORIOS
INFORMACIÓN ADICIONAL PARA LOS CLIENTES
CORRESPONDENCIA: Sobre problemas de servicio, información de garantía, ítems
perdidos y otras ayudas:
Sharp Electronics Corporation
Customer Assistance Center
1300 Naperville Drive
Romeoville, IL 60446-1091
ACCESO A INTERNET: www.sharpusa.com
Proporciónenos la información siguiente cuando nos escriba o nos llame: número del modelo,
número de serie, fecha de compra, su dirección completa para correspondencia (incluyendo
el código de área) y una descripción del problema.
S-2
GARANTÍA LIMITADAAL CONSUMIDOR
GARANTÍA LIMITADA DEL CONSUMIDOR PARA USUARIOS DE EE.UU.
SHARP ELECTRONICS CORPORATION garantiza al consumidor final, que este producto marca SHARP
(“el Producto”), estará libre de defectos de mano de obra y materiales, cuando este ha sido enviado en
su empaque original. Y accede a reparar o reemplazar el Producto defectuoso o la pieza, con uno nuevo
o un equivalente remanufacturado, sin cargo de las piezas o de mano de obra al consumidor final por el
periodo a continuación indicado.
Esta Garantía no se aplica para piezas estéticas o piezas adicionales excluidas ni para ningún Producto
que halla sido dañado por voltaje inapropiado u otro uso inapropiado, condiciones de servicio y de
embarque anormales o que haya sido alterado o modificado en su diseño o construcción.
Para hacer valida la garantía el consumidor deberá seguir los pasos a continuación enunciados y proveer
la prueba de compra al centro de servicio.
Ni el personal de ventas de la compañía vendedora ni ninguna otra persona están autorizados para
ofrecer otras garantías aparte de las aquí descritas,o para extender el período descrito a nombre de
Sharp.
La corrección de defectos, en el tiempo y forma aquí descritos, deberán constituir la completa satisfacción
de todas las responsabilidades legales de Sharp hacia el comprador con respecto al Producto, y deberán
constituir la total satisfacción de todos los reclamos, ya sean basados en un contrato, negligencia, marco
legal u otros. En ninguna circunstancia Sharp será responsable por cualquier daño o defectos en el
Producto, causados por reparaciones o intentos de reparaciones hechos por cualquier persona, excepto
los centros de sercicio autorizados por Sharp. En ninguna circunstancia Sharp será responsable por
daños incidentales o consecuentes, económicos o daño de propiedades. Algunos estados no permiten la
exclusion de daños incidentales o consecuentes, así que la la exclusión arriba descrita puede no aplicar
para usted.
ESTA GARANTÍA LE OTORGA DERECHOS LEGALES ESPECÍFICOS. USTED PUEDE TENER OTROS
DERECHOS, QUE VARIAN DE ESTADO A ESTADO.
Número de modelo de su producto
y descripción:
Período de garantía para este producto:
Artículo(s) adicionale(s) excluido(s) de la
cobertura de garantía (si aplica):
Donde obtener Servicio:
Qué hacer para obtener servicio:
CV-10NH
Acondicionador de aire portátil. Carrousel de uso doméstico
(asegúrese de tener ésta información a la mano cuando
necesite servicio de su producto).
Un (1) año en piezas y mano de obra. El período de garantía
continua por un período adicional de cuatro años hasta
completar un total de cinco (5) años desde la fecha de compra
para las piezas del sistema de refrigeración hermético; la
mando de obra y el servicio no son proporcionados sin cargo
en éste período adicional.
Piezas estéticas del Producto, filtros o accesorios, ni a ningún
material impreso.
Productos que han sido utilizados para renta o propósitos
comerciales.
De un proveedor de servicio autorizado localizado dentro de
los Estados Unidos de América. Para localizar al proveedor
de servicio autorizado, llame sin cargo al 1-800-BE-SHARP
(1-800-237-4277).
Flete prepagado,o lleve su producto a un proveedor de
servicio autorizado.
Asegúrese de tener a mano su prueba de compra. Si envía el
producto, asegúrese de que este empacado adecuadamente.
PARA OBTENER REFACCIONES, ACCESORIOS O INFORMACIÓN DE LOS PRODUCTOS, LLAME AL 1-800-BE-SHARP
O VISITE www.sharpusa.com
SHARP ELECTRONICS CORPORATION
Sharp Plaza, Mahwah, New Jersey 07430-2135
S-3
ESPAÑOL
La Garantía limitada aquí descrita es adicional a las garantías implicadas,que por ley le son concedidas
al consumidor final. TODAS LAS GARANTÍAS IMPLICADAS, INCLUYENDO LAS GARANTIAS
MERCANTÌLILES ESTÁN LIMITA-DAS A PERIODOS A PARTIR DE LA FECHA DE COMPRA. Algunos
estados no permiten limitaciones en los periodos de garantía, por lo que la limitante arriba descrita puede
no aplicar para usted.
PRECAUCIONES
Aspectos a tener en cuenta al utilizar el acondicionador de aire.
ADVERTENCIAS PARA EL USO
• Instale el acondicionador de aire de acuerdo a las instrucciones de instalación que
se describen más adelante en este manual.
• No modifique ninguna de las piezas de este producto.
• No introduzca nada en ninguna de las piezas de esta unidad.
• Asegúrese de que la el suministro de energía utilizada tiene un
voltaje nominal apropiado.
Sólo utilice una toma de corriente de CA con voltaje nominal de 125 V,
60 Hz y 15 amperios o más, como el que se muestra en el lado derecho.
La utilización de alimentación de energía con un voltaje nominal inadecuado
puede ocasionar daños de la unidad e incluso causar un incendio.
• Utilice siempre un fusible con el amperaje nominal adecuado.
No utilice, bajo ninguna circunstancia, alambre, alfileres u otros objetos en lugar de un fusible
adecuado.
• Si sucede algo anormal con el acondicionador de aire (por ej. se detecta olor a
quemado), apáguelo inmediatamente y desconecte el suministro de energía.
ADVERTENCIA PARA EL CABLE DE SUMINISTRO DE ENERGÍA
• Este acondicionador de aire utiliza una clavija con un fusible incorporado.
Lea las precauciones sobre la clavija de conexión antes de utilizar el acondicionador de aire.
• Antes de utilizar el producto, realice siempre una “Revisión de la clavija de toma
de corriente” (vea la página 16) para confirmar que la clavija de toma de corriente
funciona normalmente.
• Esta clavija de toma de corriente se debe de enchufar sólo en un enchufe de pared
apropiado. No utilizar en conjunción con cables de extensión.
• Introduzca la clavija de toma de corriente firmemente en el enchufe y asegúrese de
que no quede holgado.
• No tire del cable de suministro de energía, ni lo deforme o modifique, ni tampoco
lo sumerja en agua.
Tirar del cable de sumnistro de energía o utilizarlo mal puede ocasionar daños de la unidad y descargas eléctricas.
• Un cable de suministro de energía dañado debe ser reemplazado por uno nuevo,
obtenido por medio del fabricante del producto, dicho cable no debe ser reparado.
El reemplazo debe realizarlo el agente de servicio del fabricante con el fin de evitar
riesgo alguno.
NOTA
Interferencias de radio o televisión
Si este acondicionador de aire para habitación causa interferencias en la recepción de radio o televisión, intente corregir la interferencia, tomando una o más de las medidas siguientes:
• Reoriente o cambie la ubicación de la antena receptora.
• Aumente la separación entre el acondicionador de aire para habitación y el receptor de radio/televisión.
• Conecte el acondicionador de aire para habitación a una toma de corriente en un circuito diferente al cual está conectado el receptor de radio/televisión.
• Solicite ayuda al distribuidor o a un técnico de radio/televisión experimentado.
S-4
ADVERTENCIA ACERCA DE LA CONEXIÓN A TIERRA
• El uso inadecuado de la clavija de conexión a tierra puede provacar el riesgo de descargas
eléctricas.
Este aparato debe de ser conectado a tierra. En caso de que ocurra un cortocircuito, la conexión
a tierra reduce el riesgo de una descarga eléctrica, al proporcionar un conducto menos resistente
para la corriente eléctrica.
Este aparato está equipado con un cable que tiene un alambre de conexión a tierra conectado a
una clavija de conexión a tierra. La clavija se debe conectar a una toma de corriente que esté instalada y puesta a tierra correctamente.
Clavija
de 3 contactos
Contacto de tierra
Enchufe de 3 contactos
Enchufe de 3 contactos
Caja de conexión eléctrica
puesta
a tierra
Caja de conexión eléctrica
puesta
a tierra
Contacto de tierra
• Bajo ninguna circunstancia corte ni extraiga
de esta clavija el contacto redondeado de
a tierra.
Si no entiende completamente las instrucciones
de conexión a tierra, o en caso de alguna duda
sobre si su aparato está o no correctamente
conectado a tierra, consulte a un electricista o
técnico de servicio.
Si se utiliza un adaptador de tierra, asegúrese de
que la caja de conexión eléctrica esté puesta a
tierra completamente.
Adaptador de tierra
Alambre de conexión
a tierra
Tornillo
Gancho para el tornillo
de conexión a tierra
Caja de conexión
eléctrica puesta
a tierra
PRECAUCIONES PARA EL USO
• Ventilar la habitación periódicamente durante el uso, sobre todo si se usan aparatos que
funcionan con gas.
• Asegúrese de apagar la unidad y desconectar el cable de suministro de energía antes de
realizar cualquier mantenimiento o limpieza.
• No rocíe o derrame agua directamente sobre la unidad.
El agua puede causar descargas eléctricas o daños al equipo.
• Debe de realizarse el drenaje cada vez que mueva el acondicionador de aire. (Vea la página
26)
Si queda algo de agua en el depósito, podría derramarse al moverse.
• Retire el panel de ventana en caso de condiciones atmósfericas adversas.
Condiciones atmósfericas extremas pueden ocasionar la entrada de agua a través de las aperturas.
• Para asegurar un drenaje adecuado, la manguera de drenaje no debe de tener torceduras
o estar a un nivel diferente durante el modo deshumidificación.
El agua drenada podría derramarse fuera.
• La temperatura alrededor de la manguera de drenaje no debe ser inferior al punto de congelación cuando se utilice.
El agua drenada podría congelarse dentro de la manguera, causando que el agua que se encuentra dentro de la unidad se desborde.
• No bloquee el orificio de salida de aire del escape con obstáculos.
La capacidad de enfriamiento podría verse reducida o incluso detenerse por completo.
S-5
ESPAÑOL
Clavija
de 3 contactos
PRECAUCIONES
OBSERVACIONES SOBRE EL FUNCIONAMIENTO
• Deje que pasen 3 minutos para que el compresor reanude el enfriamiento.
Si apaga el acondicionador de aire y lo enciende inmediatamente después, deje que pasen tres
minutos para que el compresor reanude el enfriamiento. Hay un dispositivo electrónico de la unidad que mantiene el compresor desactivado durante tres minutos por seguridad.
• Si sucede un fallo de energía durante el uso, deje que pasen 3 minutos antes de reiniciar la
unidad.
Después de que se reinstale la energía, reinicie el acondicionador de aire. Si la energía ha estado desactivada durante menos de tres minutos, asegúrese de esperar por lo menos tres minutos antes de reiniciar la unidad. Si reinicia el acondicionador de aire en el plazo de tres minutos,
un dispositivo de protección de la unidad puede causar que se interrumpa el funcionamiento del
compresor. Este dispositivo de protección evitará el enfriamiento durante aproximadamente
5 minutos. Se anulará cualquier ajuste previo y la unidad volverá a los ajustes iniciales.
• Funcionamiento a temperatura baja: ¿Se está congelando la unidad?
La unidad puede llegar a congelarse cuando se ajuste entorno a los 64°F en condiciones de temperatura ambiente baja, especialmente por la noche.
En estas condiciones, si baja más la temperatura puede que se congele la unidad.
Si ajusta la unidad a una temperatura más alta evitará que se congele.
• El modo deshumidificación aumenta la temperatura ambiente.
Durante el modo deshumidificación la unidad genera calor y la temperatura ambiente aumenta.
Saldrá aire caliente del orificio de salida de aire de escape, pero esto es normal y no indica que
haya algún problema con la unidad.
• Este acondicionador de aire inyecta el aire caliente generado por la unidad fuera de la habitación a través de la manguera de escape cuando se encuentra en el modo enfriar.
Por consiguiente, la misma cantidad de aire inyectada hacia el exterior entrará en la habitación
desde el exterior a través de cualquier apertura en la habitación.
• Cuando la función de enfriamiento se lleva a cabo en condiciones de alta humedad, el
depósito de agua localizado dentro de la unidad puede llenarse frecuentemente.
Cuando se llene el déposito de agua del interior de la unidad, ésta se dejará de funcionar y las
lámparas TIMER, OPERATION y MEGA COOL parpadearán. En este caso, realice el drenaje
para sacar el agua que se encuentra dentro de la unidad. (Vea la página 26)
CONDICIONES DE FUNCIONAMIENTO
• El acondicionador de aire debe de funcionar dentro del margen de temperatura indicado a continuación.
dispositivo de seguridad incorMODO
TEMPERATURA DE LA HABITACIÓN • Un
porado puede desactivar el funcionamiento si la temperatura excede estos
ENFRIAR
64°F ~ 95°F
límites.
Deshumidificación 59°F ~ 95°F
• Cuando se está llevando a cabo
CONSEJOS PARA EL
RENDIMIENTO DE ENERGÍA
la función de enfriamiento a una
temperatura de habitación alta, el
ventilador podría funcionar ligera-mente
más despacio.
• Evite la luz solar directa.
Cerrar las persianas, cortinas para evitar la luz solar directa durante el modo de enfriamiento.
• Mantenga el filtro limpio.
Mantener el filtro limpio ayuda mucho a conseguir un funcionamiento eficaz.
Si el filtro está sucio bloquea la corriente de aire, haciendo que el acondicionador de aire trabaje
más duro y menos eficazmente. Vea la página 27 para saber cómo limpiar el filtro.
• Apague luces no necesarias.
El acondicionador de aire tiene que eliminar el calor producido por las luces u otros dispositivos
que producen calor. Apague las luces y dispositivos que no se utilicen.
• Apague el acondicionador de aire cuando no haya nadie en casa.
Utilizar sólo cuando sea necesario. Cuanto menos tiempo se utilice el acondicionador de
aire, menores son los costes de funcionamiento.
S-6
UBICACIÓN
MÍN.12"
(30 cm)
MÍN.12"
(30 cm)
ESPAÑOL
• El acondicionador de aire debería de colocarse en un lugar
firme para minimizar el ruido y la vibración. Para una colocación firme y segura, coloque la unidad sobre una superficie lisa, a nivel y lo suficientemente fuerte para sostener la
unidad.
• La unidad posee unas ruedecillas para facilitar la colocación,
pero debería de rodarse sólo en superficies lisas y planas.
Tenga cuidado al rodar sobre superficies con alfombra. No
trate de rodar la unidad sobre objetos.
• La unidad se debe de colocar en un lugar desde donde se
pueda llegar a un enchufe conectado a tierra con capacidad
nominal adecuada.
• No coloque nunca obstáculos alrededor del orificio de entrada o de salida de aire de la unidad.
• Deje un espacio de por lo menos 12" (30 cm) con respecto a
la pared para un acondicionamiento de aire eficaz.
PIEZAS INCLUIDAS
Manguera de escape (1)
Adaptador del escape
de la ventana (1)
Arandela de drenaje (1)
Cubierta del escape (1)
Abrazadera (1)
Panel de extensión (1)
Panel de ajuste (1)
Panel de ventana (1)
Protector contra Red de protección con-Sello de espuma (1) Sello de espuma (3) Sello de espuma (1)
tra insectos (1)
la lluvia (2)
(tipo adhesivo) A
(tipo adhesivo) B
(espesor: 1/5”)
Abrazadera de
manguera (1)
Tornillo (8)
Control remoto (1)
Pila (2)
(AAA.R03)
(espesor: 2/5")
Manual (1)
HERRAMIENTAS SUGERIDAS PARA LA INSTALACIÓN DEL PANEL DE VENTANA
1. Destornillador (Phillips tamaño mediano) 2. Cinta métrica o regla 3. Cuchillo o tijeras
4. Sierra (En el caso de que el panel de ventana necesite cortarse, debido a que la ventana
es demasiado angosta para realizar la instalación directa).
S-7
DESIGNACIÓN DE LAS PIEZAS
PARTE DELANTERA
1
2
3
1 Orificio de salida de aire
2 Deflectores verticales
3 Deflectores horizontales
4
4 Ventana receptora de señal del
control remoto
5
5 Botón POWER
6
6 Lámpara OPERATION (roja )
7
8
9
9
7 Lámpara TIMER (anaranjada )
8 Lámpara MEGA COOL(verde)
9 Orificio de entrada de aire
9
PARTE TRASERA
0
0 Orificio de salida de aire de escape
q
q Adaptador del escape
de la ventana
w
e
r
t
y
w Manguera de escape
e Gancho para el control remoto
r Filtros de aire
t Boquilla de drenaje y llave de paso
y Ganchos para el cable
de suministro de energía
u
u Boquilla del tubo de drenaje
y llave de paso
i
i Cable de suministro de energía
o
o Clavija de toma de corriente
p
p Ruedecillas (4)
NOTA: La unidad puede diferir ligeramente de la ilustración de arriba.
S-8
CONTROL REMOTO
1
1 Transmisor
2 Pantalla de visualización
3 Botón de alimentación (POWER)
4 Botón de temperatura (TEMP)
5 Botón de desactivación automática
en una hora (1 hr OFF)
3
6 Tecla de modo (MODE)
4
7 Botón de activación del temporizador
(ON TIMER)
5
6
7
8
9
0
q
w
e
8 Tecla de ventilación (FAN)
9 Botón de desactivación
del temporizador (OFF TIMER)
0 Botón de cancelación (CANCEL)
q Botón de deflectores (LOUVERS)
w Botón de reajuste (RESET)
e Botón de superenfriamiento
(MEGA COOL)
PANTALLA DE VISUALIZACIÓN
DEL CONTROL REMOTO
r SÍMBOLOS DE MODO
: ENFRIAR
: DESHUMIDIFICACIÓN
r
t
i
y
: VENTILADOR
u
: VENTILACIÓN
t SÍMBOLO DE SUPERENFRIAMIENTO
y SÍMBOLOS DE VELOCIDAD DEL VENTILADOR
: AUTOMÁTICO
o
SILENCIOSA
: Ajuste manual
BAJA
ALTA
u INDICADOR DE TEMPERATURA Y
CUENTA ATRÁS DEL TEMPORIZADOR
i SÍMBOLO DE TRANSMISIÓN
o SÍMBOLO DEL TEMPORIZADOR D