1
English
AM-300/400
QUICK SETUP GUIDE
1
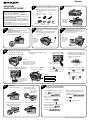
Drum
cartridge
Telephone line Toner
cartridge
cord (AM-400
only)
All company names and product names appearing in this
setup guide are the trademarks of their respective owners.
Output tray
4
Important:
Pull the scanner release toward you to
release the scanner lock.
Caution: Be sure to release the scanner lock
before plugging in the power cord.
Setup
Guide
Document
feeder tray
When the tray
stops, lift the
end slightly
and push in.
CD-ROM
5
Plug the power cord into a standard, earthed
power outlet.
Note: The power outlet must be installed
near the equipment and must be easily
accessible.
AM-400 only: Connect the phone line cord
to the TEL. LINE jack and a wall jack.
Italy: Use the provided adapter to connect the
line cord to the wall socket.
Note: The
shape of the
line cord plug
varies by
country.
Note: The
shape of the
power plug
varies by
country
6
Attach the trays.
Note: The shape of the line cord plug varies by
country. An adapter (not shown) is provided in
some countries.
For detailed instructions
on setting up and using the AM-300/400, see the
online guide on the CD-ROM.
To open the guide, double-click the Manual folder on
the CD-ROM, double-click English, and then doubleclick Online Manual.pdf.
(Note: Acrobat Reader 5.05 or higher is required to
view the manual.To install Version 5.05, double-click
Acrobat Reader, English, and then ar505enu.exe
on the CD-ROM.)
3
2
Make sure you have the following items. If any
are missing, contact your dealer or retailer.
TEL.
LINE
TEL.
SET
Install the toner cartridge and drum cartridge.
1. Press ➊. Open the side cover
➋ and then the front cover ➌.
3. Insert the drum cartridge,
sliding it along the guides.
2. Remove the drum cartridge from its
packaging.
1
3
2
Caution!
Do not touch the fusing unit
under the side cover after the
machine has been in operation,
as it may become very hot.
5. Insert the toner cartridge, sliding it along
the guides until it clicks into place.
4. Remove the toner cartridge from its
packaging. Shake the cartridge side
to side four or five times to distribute
the toner evenly within the
cartridge.
Grasp this handle to
push the cartridge in
6. Close the front cover ➊ and
then the side cover ➋.
to select “YES” and
7. Press
then press
. (This resets
8. Reset the drum cartridge counter:
MENU
a.Press
once and then
Z
or
the toner cartridge counter.)
A
Display:
display.
TONER EXCHANGED?
b. Press
and then
c. Press
repeatedly to exit.
2
Press on the arrow
mark to make sure
the cartridge clicks
into place
7
1
2. Insert a stack of paper
into the tray, print side up.
The stack should
not be higher
than this line
8
AM-400 only: Set the date and time
that appear in the fax mode display.
1. In the date and time display of fax mode
(press
FAX
mode), press
if needed to select fax
MENU
,
,
.
2. Enter a two-digit number for the day
("01" to "31").
Example: the 5th
3. Squeeze the sides of the paper
guide and slide it to the slot for
the length of paper loaded.
.
1:YES, 2:NO
Load paper.
1. Remove the output tray.
until “LIFE” appears in the
4. Replace the output tray.
• To clear a mistake press
5. Enter a two-digit number for the hour
(00 to 23) and a two-digit number for
the minute (00 to 59).
Example: 9:25
6. Press
7. Press
Z
ENTER
.
repeatedly to exit.
.
3. Enter a 2-digit number for the month.
Example: February
4. Enter the year (four digits)
Example:
PRINTED IN THAILAND (TCADH3785XHZZ)
English
9
Install the software on your computer. (The software
allows the machine to be used as a printer and scanner.)
1. Make sure that a USB cable is not connected
to the machine and your computer. (The cable
will be connected in Step 11.)
•
•
Note: A USB 2.0 or 1.1 cable is required to connect the
machine to your computer. Please purchase this separately.
If you installed the MFP drivers using a Custom installation
and did not install Sharpdesk, the following window will
appear. Click OK and go to Step 11.
If a cable is connected and a Plug and Play window appears, close
the window and disconnect the cable.
2. Insert the Sharp CD-ROM into your computer’s
CD-ROM drive.
3. Windows® XP: Click the start button, click My
Computer, and double-click the CD-ROM icon.
9. The following window will appear. Click Yes to restart
your computer.
Windows® Me/2000: Double click My Computer on
the desktop and double-click the CD-ROM icon.
4. Double-click the setup icon (
) in the CD-
ROM window.
5. If the Language Selection window appears,
select the language that you wish to use and click
Next (the language selections will vary depending
on your country or region).
•
Windows® Me: This completes the installation of the
software.
Note: In the power management settings in the Control
Panel, System stand by must be set to Never.
Completing the installation on Windows® XP
13. In Windows® XP, the Found New Hardware
Wizard will appear. Make sure that Install the
software automatically (Recommended) is
selected and click Next.
Note for Windows® XP SP2: The first window of the
wizard will ask you if the wizard can connect to Windows
Update. Select No, not this time and click Next.
10. The Search Setup Wizard will appear. Follow the
on-screen instructions to create an index
database for Sharpdesk.
6. Follow the on-screen instructions.
•
When the Setup Type Selection window appears, select
Standard to install all of the software components (this should
normally be selected). If you only wish to install certain
components, select Custom and then select the components
that you wish to install.
•
11. Make sure that the machine’s power cord is not
plugged in, and then connect the USB cable to the
USB port on the machine and on your computer.
If a warning message appears regarding the Windows
logo test, click Continue Anyway.
14. When the wizard finishes installing the software, click
Finish to close the wizard.
15. After a brief interval, the Found New Hardware
Wizard will appear again. Make sure that Install
the software automatically (Recommended) is
selected and click Next.
12. Plug in the machine’s power cord.
•
In Windows® 2000/XP, if a warning message appears at any time
regarding the Windows logo test or digital signature, be sure to click
Continue Anyway or Yes.
7. When the Finish window appears to indicate that the
selected packages have been installed, click Close.
8. If the installation was a Standard installation, the
following window will appear. Click OK.
10
•
Windows® XP: Follow Steps 13 through 16 to
complete the installation of the software.
•
Windows® 2000: This completes the installation of the
software.
Note: If a warning message regarding the Windows logo
test appears (the warning may appear twice), click Yes
each time the window appears. This will complete the
installation of the software.
If a warning message appears regarding the Windows
logo test, click Continue Anyway.
16. When the wizard finishes installing the software,
click Finish to close the wizard. This completes
the installation of the software on Windows® XP.
Configure Button Manager (one of the programs installed in the above step) as
the program on your computer that handles scanner events from the machine.
Windows® 2000
Windows® XP/Me
1. Click the start button, click Control Panel, and
double-click Scanners and Cameras.
•
•
If Scanners and Cameras does not appear in Windows
Me, click view all Control Panel options.
2. Right-click the SHARP AM-300/400 icon and
select Properties.
3. The SHARP AM-300/400 Properties appear.
Click on the Events tab.
4. Select SC1 from the Select an event list.
5. In the Actions field, select Start this program
and then select Sharp Button Manager I from the
list of programs. Click Apply.
1. Click the Start button, point to Settings, and
select Control Panel.
2. In the Control Panel, double-click Scanners and
Cameras.
3. Select SHARP AM-300/400 and click Properties.
4. Click the Events tab in the SHARP AM-300/400
Properties.
5. Select SC1 from the Scanner events list.
6. In Send to this application, select Sharp
Button Manager I.
•
6. Repeat Steps 4 and 5 for each of events SC2
through SC6. When finished, click the OK button.
If other applications appear in the list, make sure that
none are selected.
7. Click the Apply button.
8. Repeat Steps 5 through 7 for each of events SC2
through SC6. When finished, click the OK button.
AM-400 only:
This is a facsimile product operating in German, Austrian, Swiss, French,
Italian, Swedish, Finnish, Norwegian, Danish, Spanish, Portuguese,
Greek, Hungarian, Dutch and Belgian analogue public switched
telephone networks which follow the TBR21 Standard.
Dies ist ein Faxprodukt für den Betrieb in deutschen, österreichischen,
schweizerischen, französischen, finnischen, norwegischen, dänischen,
spanischen, portugiesischen, griechischen, ungarischen,
niederländischen und belgischen öffentlichen, analogen Telefonnetzen,
die den TBR21-Standard verwenden.
Ce télécopieur fonctionne sur les réseaux téléphoniques publiques
commutés et analogiques allemand, autrichien, suisse, français, italien,
suédois, finnois, norvégien, danois, espagnol, portugais, grec, hongrois,
hollandais et belge qui respectent la norme TBR21.
Questo apparecchio facsmile funziona sulle reti telefoniche commutate
pubbliche tedesche, svizzere, austriache, francesi, italiane, svedesi,
finlandesi, norvegesi, danesi, spagnole, portoghesi, greche, ungheresi,
olandesi e belghe che seguono lo standard TBR21.
Detta är en faxmaskin som fungerar tillsammans med tyska, österrikiska,
schweiziska, franska, italienska, svenska, finska, norska, danska,
spanska, portugisiska, grekiska, ungerska, holländska och belgiska
analoga kopplade telefonnätverk som följer TBR21-standarden.
Tämä on faksilaite, joka toimii analogisissa julkisissa yleisissä
valinnaisissa verkoissa, jotka noudattavat TBR21 standardia, seuraavissa
maissa: Saksa, Itävalta, Sveitsi, Ranska, Italia, Ruotsi, Suomi, Norja,
Tanska, Espanja, Portugali, Kreikka, Unkari, Alankomaat ja Belgia.
Dette er et faksprodukt som kan brukes i offentlige telenett som følger
TBR21-standarden i følgende land: Tyskland, Østerrike, Sveits, Frankrike,
Italia, Sverige, Finland, Norge, Danmark, Spania, Portugal, Hellas,
Ungarn, Nederland og Belgia.
Dette er et faxprodukt, der fungerer i tyske, østrigske, schweiziske,
franske, italienske, svenske, finske, norske, danske, spanske,
portugisiske, græske, ungarske, hollandske og belgiske analoge offentlig
tilsluttede telefonnetværker, som følger TBR21 Standarden.
Este producto es un fax que funciona en las redes telefónicas públicas
conmutadas (RTPC) analógicas de Alemania, Austria, Suiza, Francia,
Italia, Suecia, Finlandia, Noruega, Dinamarca, España, Portugal, Grecia,
Hungría, Países Bajos y Bélgica y que cumple la norma TBR21.
Este fax está em funcionamento em rede telefónicas fixas públicas
alemãs, austríacas, suíças, francesas, italianas, suecas, finlandesas,
norueguesas, dinamarquesas, espanholas, portuguesas, gregas,
húngaras, holandesas e belgas, que cumpram com a Norma TBR21.
Αυτή είναι µια συσκευή φαξ που λειτουργεί σύµφωνα µε τα Γερµανικά,
Αυστριακά, Ελβετικά, Γαλλικά, Ιταλικά, Σουηδικά, Φινλανδικά, Νορβηγικά,
∆ανικά, Ισπανικά, Πορτογαλικά, Ελληνικά, Ουγγρικά, Ολλανδικά και
Βελγικά αναλογικά δηµόσια τηλεφωνικά δίκτυα µεταγωγής που
ακολουθούν το Πρότυπο TBR21.
Ez egy fax termék, amely német, osztrák, svájci, francia, olasz, svéd, finn,
norvég, dán, spanyol, portugál, görög, magyar, holland és belga analóg
telefonhálózatokban muködtetheto, amelyek megfelelnek a TBR21
szabványnak.
Dit is een faxproduct dat werkt op het Duitse, Australische, Zwitserse,
Franse, Italiaanse, Zweedse, Finse, Noorse, Deense, Spaanse,
Portugese, Griekse, Hongaarse, Nederlandse en Belgische analoge
openbaar geschakelde netwerk volgens de TBR21-standaard.
The Declaration of Conformity can be viewed at the following URL address.
Die Konformitätserklärung kann unter folgender URL-Adresse eingesehen werden.
Vous pouvez consulter la Déclaration de conformité sur Internet, à l’adresse ci-dessous.
La Dichiarazione di conformità può essere consultata all‘indirizzo URL riportato di
seguito.
Överensstämmelsedeklarationen finns att läsa på följande URL-adress.
Yhdenmukaisuusvakuutus on nähtävissä seuraavassa URL-osoitteessa.
Samsvarserklæringen ("Declaration of Conformity") finner du på følgende URL-adresse.
Overensstemmelseserklæringen kan ses på følgende URL-adresse.
El documento de Declaración de conformidad puede consultarse en la siguiente dirección URL.
A Declaração de Conformidade pode ser visualizada no seguinte endereço URL.
Προβολή της ∆ήλωσης Συµµόρφωσης µπορεί να γίνει στην ακόλουθη διεύθυνση URL.
A Megfelelosségi nyilatkozat megtekinthetik az alábbi URL címen.
De Verklaring van Overeenstemming kan worden nagelezen op het volgende URLadres.
http://www.sharp.de/doc/AM-400.pdf
An explanation regarding WEEE (information
on disposal) is included in the online guide on
the CD-ROM. Please read this information.