1
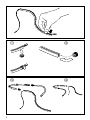
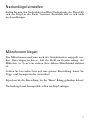
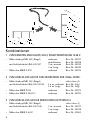
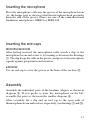
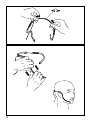
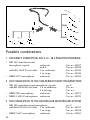
NB 2.fm Seite 1 Dienstag, 5. April 2005 10:07 10
NB 2
Bedienungsanleitung
Instructions for use
Notice d‘emploi
Istruzioni per l‘uso
Instrucciones para el uso
Gebruiksaanwijzing
Gebrauchsanleitung .......................................................................................... 3
Instructions for use ........................................................................................... 9
Notice d‘emploi ............................................................................................... 15
Istruzioni per l‘uso .......................................................................................... 21
Instrucciones para el uso ................................................................................ 27
gebruiksaanwijzing .......................................................................................... 33
NB 2
Sie haben die richtige Wahl getroffen!
Dieses Sennheiser-Produkt wird Sie lange Jahre durch Zuverlässigkeit,
Wirtschaftlichkeit und einfache Bedienung überzeugen. Dafür garantiert
Sennheiser mit seinem guten Namen und seiner in mehr als 50 Jahren
erworbenen Kompetenz als Hersteller hochwertiger Produkte „Made in
Germany“.
Nehmen Sie sich nun ein paar Minuten Zeit, um diese Anleitung zu lesen. Wir
möchten, daß Sie einfach und schnell in den Genuß dieser Technik kommen.
3
4
Einlegen des Mikrofons
Das Mikrofonkabel wird in die Rille im Bügel eingedrückt. Der
Mikrofonkopf ragt vorn aus der Rille heraus. Verwenden Sie
Sennheiser-Mikrofone mit Kugelcharakteristik der Baureihen MKE 2
und MKE 102.
Endkappen aufstecken
LANGER BÜGEL - MIKROFONBÜGEL:
Auf das vordere Ende des Mikrofonbügel wird nach dem Einlegen
des Mikrofonkabels ein Clip aufgesteckt und durch Drehen gesichert. Er fixiert das Kabel und schützt die Mikrofonkapsel vor Schweiß
und Feuchtigkeit.
KURZER BÜGEL - OHRBÜGEL:
Mit der Endkappe wird das vordere Ende des Ohrbügels verschlossen.
Zusammenbau
Stecken Sie die Einzelteile - wie in Abbildung gezeigt - zusammen.
Wollen Sie das Mikrofon lieber links tragen, werden die Profile andersherum zusammengesteckt .
Ist die Montage abgeschlossen, werden noch Halteklip und Endkappe
(wie in Abbildung und ) auch hinten auf die Bügel aufgesteckt.
5
6
Nackenbügel einstellen
Stellen Sie nun den Nackenbügel auf Ihre Nackenbreite ein. Dazu läßt
sich der Bügel in der Breite variieren. Zusätzlich läßt er sich auch
noch nachbiegen.
Mikrofonarm biegen
Der Mikrofonarm muß nun noch der Gesichtskontur angepaßt werden. Dazu biegen sie ihn so, daß das Profil am Gesicht anliegt, das
Mikrofon ca. 2 cm vom rechten (bzw. linken) Mundwinkel entfernt
ist.
Achten Sie besonders hier auf eine genaue Einstellung, damit Sie
Popp- und Atemgeräusche vermeiden!
Erproben Sie die Einstellung, bis Sie "Ihren" Klang gefunden haben!
Nackenbügel und Seitenprofile sollen am Kopf anliegen.
7
Kombinationen
1 ZUM DIREKTEN ANSCHLUSS, XLR-3, PHANTOMSPEISUNG 12-48 V:
•
Mikrofonkopf ME 102 (Kugel)
mit Stahladerkabel KA 100 S-P
•
Mikrofon MKE 2-P-C
anthrazit
nickelfarben
3 m, antrazit
3 m, beige
anthrazit
Best.Nr. 04227
Best.Nr. 04228
Best.Nr. 04241
Best.Nr. 04242
Best.Nr. 04224
2 ZUM ANSCHLUSS AN DIE TASCHENSENDER DER 1000er-SERIE:
•
•
•
Mikrofonkopf ME 102 (Kugel)
mit Stahladerkabel KA 100 S-1053
Mikrofon MKE 2032
Mikrofon MKE 2-1053-C
1,6 m, anthrazit
1,6 m, beige
anthrazit
anthrazit
siehe oben (1)
Best.Nr. folgt
Best.Nr. folgt
Best.Nr. 03871
Best.Nr. 04223
3 ZUM ANSCHLUSS AN DAS MIKRO-MODULSYSTEM K 6
•
•
8
Mikrofonkopf ME 102 (Kugel)
mit Stahladerkabel KA 100 S-60
Mikrofon MKE 2-60-C
3 m, antrazit
3 m, beige
anthrazit
siehe oben (1)
Best.Nr. 04237
Best.Nr. 04238
Best.Nr. 03863
NB 2
Thank you for choosing Sennheiser!
You have made an excellent choice. This product will give you reliable
operation for many years. All of Sennheiser’s professional expertise
and more than fifty years of experience have gone into the creation of
this state-of-the-art product.
9
10
Inserting the microphone
Press the microphone cable into the groove of the microphone boom
(i.e. the longer part) as shown so that the microphone head protrudes
from the end of the groove. Please use one of the omni-directional
Sennheiser microphones, MKE 2 or MKE 102.
Inserting the end caps
MICROPHONE BOOM
After having inserted the microphone cable attach a clip to the
microphone boom and secure it, by turning as shown in the drawings
. The clip keeps the cable in the groove and protects the microphone
capsule against perspiration and moisture.
EAR-BOW
Use an end cap to cover the groove at the front of the ear-bow .
Assembly
Assemble the individual parts of the headmic adaptor as shown in
diagram . If you prefer to wear the microphone on the left,
assemble the parts as shown in the smaller diagram .
After assembly, fix a clip and an end cap to the open ends of
themicrophone boom and ear-bow, respectively (see drawings and ).
11
12
Adjusting the headmic adaptor
Adjust the width of the headmic adaptor to fit your neck as shown in
the drawing. You can also bend the adaptor as required.
Adjusting the microphone boom
Now bend the microphone boom to fit the contour of your face, with
a distance of approx. 2 cm between the microphone and the corner of
your mouth.
Take care to adjust the microphone boom carefully thus avoiding pop
and wind noise during use.
Test the headmic adaptor until it is optimally adjusted.
The headmic adaptor should comfortably fit your head.
13
Possible combinations
1 FOR DIRECT CONNECTION, XLR-3, 12 – 48 V PHANTOM POWERING
•
•
ME 102 omni-directional
microphone capsule
anthracite
nickel
with KA 100 S-P steel cable, 3 m, anthracite
3 m, beige
MKE 2-P-C microphone
anthracite
Cat. no. 04227
Cat. no. 04228
Cat. no. 04241
Cat. no. 04242
Cat. no. 04224
2 FOR CONNECTION TO THE 1000 SERIES POCKET TRANSMITTERS
•
•
•
ME 102 omni-directional microphone capsule
with KA 100 S-1053 steel cable, 1.6 m anthracite
1,6 m beige
MKE 2032 microphone
anthracite
MKE 2-1053-C microphone anthracite
(see 1)
Cat. no. - Cat. no. - Cat. no. 03871
Cat. no. 04223
3 FOR CONNECTION TO THE K6 MODULAR MICROPHONE SYSTEM
•
•
14
ME 102 omni-directional microphone
with KA 100 S-60 steel cable, 3 m, anthracite
3 m, beige
MKE 2-60-C microphone
anthracite
(see 1)
Cat. no. 04237
Cat. no. 04238
Cat. no. 03863
NB 2
Vous avez fait le bon choix !
Ce produit Sennheiser vous convaincra par sa fiabilité et sa simplicité
d’utilisation. Cela, Sennheiser vous le garantit à travers sa renommée
et sa compétence aquise depuis plus de 50 ans en tant que fabricant de
produits électroacoustiques de haute qualité “Made in Germany”.
15
16
Inserer le microphone dans le support serre-tete
Insérez le câble du micro-cravate dans la fente du bras du support plus
long comme montré. La tête du microphone doit sortir de la fente du
support. Veuillez utiliser des microphones Sennheiser omni-directionels
de la série MKE 2 ou MKE 102.
Inserer les bouchons en bout du support
Après avoir inséré le câble, attachez un clip en plastique à l’avant du
bras du support et fixez le clip en le tournant . Le clip sert à garder
le câble dans la fente et protège la capsule de microphone contre la
transpiration et l’humidité.
Puis, insérez un bouchon dans l‘autre partie (la partie plus courte) du
support serre-tête Assembler le support serre-tete
Assemblez les éléments du support serre-tête comme le montre le
diagramme . Si vous préférez porter le microphone à gauche,
assemblez les parties comme montré dans le petit diagramme .
Après l’assemblage, attachez un clip et un bouchon, respectivement, à
l’arrière des bouts des supports (voir diagrammes et ).
17
18
Ajuster le support serre-tete
Ajustez le support serre-tête à la largeur de votre nuque comme montré.
Vous pouvez aussi couder le support.
Ajuster le bras du support
Ajustez le bras du support de telle façon qu‘il s‘adapte au contour de
votre visage. Le microphone doit se situer à approx. 2 cm du coin de
votre bouche.
Veuillez ajuster le bras avec beaucoup de soin afin d’éviter les bruits
de vent et de plosives pendant l’usage.
Essayez l’ajustement jusqu’à ce que vous ayez trouvé la position et la
sonorité optimales.
Assurez-vous que le support serre-tête épouse partout votre tête.
19
Combinaisons possibles
1 POUR CONNEXION DIRECTE, XLR-3, ALIMENTATION FANTOME
•
•
Capsule de microphone
omnidirectionnelle ME 102
anthracite
nickel
avec câble acier KA 100 S-P, 3 m, anthracite
3 m, beige
Microphone MKE 2-P-C
anthracite
N° Réf. 04227
N° Réf. 04228
N° Réf. 04241
N° Réf. 04242
N° Réf. 04224
2 POUR CONNEXION AUX EMETTEURS DE POCHE DE LA SERIE 1000
•
•
Capsule de microphone omni-directionnelle ME 102
avec câble acier KA 100 S-1053 1,6 m anthracite
1,6 m beige
Microphone MKE 2-1053-C anthracite
(voir 1)
N° Réf. - N° Réf. - N° Réf. 04223
3 POUR CONNEXION AU SYSTEME DE MICROPHONES MODULAIRE K 6
•
•
20
Capsule de microphone omnidirectionnelle ME 102
avec câble acier KA 100 S-60 3 m anthracite
Microphone MKE 2-60-C
anthracite
(voir 1)
N° Réf. 04237
N° Réf. 03863
NB 2
Avete fatto una buona scelta!
Questo prodotto Sennheiser vi convincerà per molti anni con la sua
affidabilità, economicità e semplicità di impiego. Tali caratteristice sono
garantite dal nome Sennheiser e dalla sua competenza, acquisita in
oltre 50 anni, di construttore di pregiati prodotti e1ettroaacustici “Made
in Germany”.
Concedetevi a1cuni minuti di tempo per leggere queste istruzioni. Noi
vorremmo che possiate godere semplicemente e rapidamente il piacere
offerto da questa tecnica.
21
22
Inserimento del microfono
Il cavo del microfono viene premuto nella scanalatura della staffa. La
testa del microfono sporge davanti dalla scanalatura. Impiegare i
microfoni Sennheiser con caratteristica onnidirezionale della serie MKE
2 e MKE 102
Innesto dei cappucci terminali
STAFFA LUNGA - STAFFA MICROFONO:
Sull’estremità anteriore della staffa del microfono, dopo l’inserimento
del cavo del microfono viene innestata una clip , che viene bloccata
mediante rotazione. Essa fissa il cavo e protegge la capsula del
microfono contro il sudore e l’umidità.
STAFFA CORTA - STAFFA PER ORECCHIO:
Con il cappuccio terminale viene chiusa l’estremità anteriore della
staffa per orecchio.
Ricomposizione
Assemblare le singole parti - come illustrato nella figura . Se si
preferisce portare il microfono a sinistra, i profili vengono uniti in
direzione opposta .
Terminato il montaggio, la clip di fissaggio e il cappuccio terminale
vengono ancora innestati anche posteriormente sulle staffe (come
illustrato nelle figure e ).
23
24
Regolazione della staffa della nuca
Regolare ora la staffa della nuca alla larghezza della propria nuca. A
tale scopo la staffa può essere variata in larghezza e anche piegata.
Piegatura del braccio del microfono
Il braccio del microfono deve ora essere ancora adattato al profilo del
viso. Piegarlo in modo che il profilo poggi sul viso e il microfono sia
distante ca. 2 cm dall’angolo destro (o sinistro) della bocca.
Far particolare attenzione ad una regolazione precisa, per evitare i
rumori „pop“ e i rumori di respirazione!
Provare la regolazione fino a trovare il „proprio“ suono!
La staffa della nuca e i profili laterali devono poggiare sulla testa.
25
Combinazioni
1 PER IL COLLEGAMENTO DIRETTO, XLR-3, ALIMENTAZIONE VIRTUALE 12-48 V:
•
Testa microfono ME 102 (sfera)
antracite
colori nichel
con cavo in filo di acciaio KA 100 S-P 3m, antracite
3m, beige
N. ord. 04227
N. ord. 04228
N. ord. 04241
N. ord. 04242
•
Microfono MKE 2-P-C
N. ord. 04224
antracite
2 PER IL COLLEGAMENTO AL TRASMETTITORE TASCABILE DELLA SERIE 1000:
·
Testa microfono ME 102 (sfera)
vedi sopra (1)
con cavo in filo di acciaio KA 100 S-1053 1,6 m, antracite N. ord. segue
1,6 m, beige
N. ord. segue
·
Microfono MKE 2032
antracite
N. ord. 03871
·
Microfono MKE 2-1053-C
antracite
N. ord. 04223
3 PER IL COLLEGAMENTO AL SISTEMA MODULARE MICROFONO K 6
·
·
26
Testa microfono ME 102 (sfera)
con cavo in filo di acciaio KA 100 S-60
Microfono MKE 2-60-C
3 m, antracite
3 m, beige
antracite
vedi sopra (1)
N. ord. 04237
N. ord. 04238
N. ord. 03863
NB 2
¡Ha hecho Vd. una elección perfecta!
Este producto Sennheiser le convencerá durante largos años por su
fiabilidad, su rentabilidad y su manejo sencillísimo. Se lo garantiza
Sennheiser con su excelente renombre y la experiencia adquirida en
más de 50 años como fabricante de magníficos productos electroacústicos „Made in Germany“.
Tómese algunos minutos para leer estas instrucciones de manejo.
Deseamos que Vd. pueda disfrutar fácil y rápidamente de esta magnífica
técnica.
27
28
Forma de colocar el micrófono
El cable del micrófono se inserta en la ranura que hay en el aro. El
cabezal del micrófono sobresale del extremo delantero de la ranura.
Utilice micrófonos Sennheiser con característica esférica de las series
MKE 2 y MKE 102.
Calar los tapones en los extremos
ARO MÁS LARGO - ARO DEL MICRÓFONO
En el extremo delantero del aro del micrófono, después de haber
colocado el cable del micrófono se colocará una grapa , girándola
para fijarla. Ésta sujeta el cable y protege la cápsula del micrófono
contra el sudor y la humedad.
ARO MÁS CORTO - ARO PARA EL PABELLÓN DE LA OREJA
El extremo delantero del aro para el pabellón de la oreja se cerrará
con el tapón .
Montaje
Montar las diferentes piezas tal como se indica en la figura . Si se
desea usar el micrófono a la izquierda, los perfiles deberán insertarse
según se indica en la figura .
Una vez terminado el montaje, se calarán la grapa y el tapón final (tal
como se indica en las figuras y ) también en la parte posterior de
los aros.
29
30
Ajustar el soporte cervical
Ajustar el soporte cervical según el ancho del cuello. El soporte puede
ajustarse a lo ancho. También puede cerrarse un poco.
Forma de llevar el micrófono con soporte cervical
El soporte cervical y los perfiles laterales deben quedar ajustados en la
cabeza. Tener cuidado de no hablar directamente, a fin de evitar las
perturbaciones ocasionadas por el viento y la respiración.
Es importante el ajuste correcto, a fin de evitar perturbaciones y ruidos
ocasionados por la respiración.
Ensaye varias veces el ajuste, hasta que obtenga „su“ sonido perfecto.
Ahora será necesario adaptar el brazo del micrófono según el contorno
del rostro.
31
Diferentes combinaciones
1 PARA CONEXIÓN DIRECTA, XLR-3, ALIMENTACIÓN FANTASMA 12-48 V
•
Cabezal de micrófono ME 102 (esfera)
con cable de acero KA 100 S-P
•
Micrófono MKE 2-P-C
antracita
color níquel
3 m, antracita
beige
Art. no. 04227
Art. no. 04228
Art. no. 04241
Art. no. 04242
antracita
Art. no. 04224
2 PARA CONEXIÓN A TRANSMISORES DE BOLSILLO DE LA SERIE 1000:
•
Cabezal de micrófono ME 102 (esfera)
con cable de acero KA 100 S-1053
ver arriba (1)
1,6 m, antracita Art. no. sigue
1,6 m, beige
Art. no. sigue
•
Micrófono MKE 2032
antracita
Art. no. 03871
•
Micrófono MKE 2-1053-C
antracita
Art. no. 04223
3 PARA CONEXIÓN AL SISTEMA MODULAR DE MICRÓFONO K6
•
Cabezal de micrófono ME 102 (esfera)
con cable de acero KA 100 100 S-60 3 m, antracita
3 m, beige
ver arriba (1)
Art. no. 04237
Art. no. 04238
•
Micrófono MKE 2-60-C
Art. no. 03863
32
antracita
NB 2
U heeft de juiste keuze gemaakt!
Dit Sennheiser-produkt zal u gedurende vele jaren overtuigen door
middel van betrouwbaarheid, spaarzaamheid en de eenvoudige
bediening. Daarvoor staat Sennheiser garant, met zijn goede naam en
met de in meer dan 50 jaar verworven vakkennis als fabrikant van
hoogwaardige elekto-akoestische produkten „Made in Germany“.
Neem nu een paar minuten tijd om deze gebruiksaanwijzing te lezen.
Wij willen graag dat u eenvoudig en snel van deze techniek kunt
genieten.
33
34
Inleggen van de microfoon
Het microfoonsnoer wordt in de groef in de beugel gedrukt. De
microfoonkop steekt aan de voorzijde uit de groef. Gebruik Sennheisermicrofoons met kogelkarakteristiek van de series MKE 2 en MKE 102.
Eindkappen opsteken
LANGE BEUGEL - MICROFOON BEUGEL:
Na het inleggen van het microfoonsnoer wordt een clip op het
voorste einde van de microfoonbeugel gestoken, die wordt geborgd
door eraan te draaien. De clip fixeert het snoer en beschermt de
microfoonomhulling tegen zweet en vocht.
KORTE BEUGEL - OORBEUGEL:
Het voorste einde van de oorbeugel wordt met de eindkap afgesloten.
Montage
Steek de afzonderlijke delen - zoals in afbeelding wordt weergegeven
- in elkaar. Wanneer u de microfoon liever links wilt dragen worden
de profielen omgekeerd in elkaar gestoken .
Wanneer de montage beëindigd is worden ook de bevestigingsclip en
de eindkap achter op de beugel gestoken (zie afbeelding en ).
35
36
Nekbeugel instellen
Stel nu de nekbeugel in op uw nekbreedte. Daartoe kan de beugel in
de breedte gevarieerd worden. Bovendien kan de beugel ook nog
bijgegoten worden.
Microfoonarm buigen
De microfoonarm moet nu nog aan het contour van het gezicht
aangepast worden. Daartoe buigt u deze zó, dat het profiel tegen het
gezicht aan ligt, de microfoon ca. 2 cm van de rechter (c.q. linker)
mondhoek verwijderd is.
Let hier vooral op een nauwkeurige instelling, zodat pop- en
ademgeluiden worden vermeden!
Probeer de instelling uit totdat u uw ”klank” heeft gevonden!
Nekbeugel en zijprofielen moeten tegen het hoofd aan liggen.
37
Combinaties
1 VOOR DE DIREKTE AANSLUITING, XLR-3, FANTOOMVOEDING 12-48 V:
•
Microfoonkop ME 102 (kogel)
met staaladerkabel KA 100 S-P
•
Microfoon MKE 2-P-C
antraciet
nikkelkleur
3 m, antraciet
3 m, beige
Bestelnr. 04227
Bestelnr. 04228
Bestelnr. 04241
Bestelnr. 04242
antraciet
Bestelnr. 04224
2 VOOR DE AANSLUITING AAN DE POCKETZENDER VAN DE SERIE 1000
•
Microfoonkop ME 102 (kogel)
met staaladerkabel KA 100 S-1053
zie boven (1)
1,6 m, antraciet Bestelnr. volgt
1,6 m, beige
Bestelnr. volgt
•
Microfoon MKE 2032
antraciet
Bestelnr. 03871
.
Microfoon MKE 2-1053-C
antraciet
Bestelnr. 04223
3. VOOR DE AANSLUITING AAN HET MICRO-MODUULSYSTEEM K6
•
•
38
Microfoonkop ME 102 (kogel)
met staaladerkabel KA 100 S-60
Microfoon MKE 2-60-C
3 m, antraciet
3 m, beige
zie boven (1)
Bestelnr. 04237
Bestelnr. 04238
antraciet
Bestelnr. 03863
NB 2.fm Seite 2 Dienstag, 5. April 2005 10:07 10
Sennheiser electronic GmbH & Co. KG
30900 Wedemark, Germany
Phone +49 (5130) 600 0
Fax +49 (5130) 600 300
www.sennheiser.com
Printed in Germany
Publ. 12/04
58873/A05