1
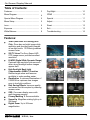
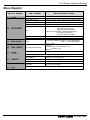
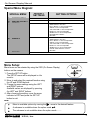
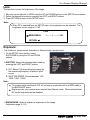
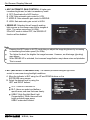
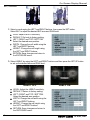
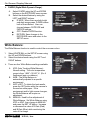
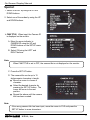
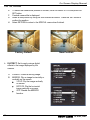
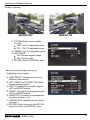
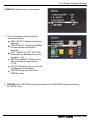
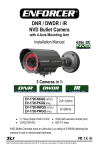
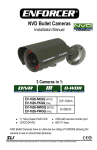
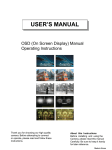
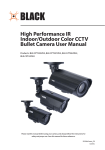
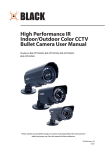
NVD Bullet Cameras On-Screen Display Manual 3 Cameras in 1: Model # EV-1626-NKGQ EV-1626-NWGQ 1 /3 ” Sony Super HAD CCD 12VDC/24VAC Lens Size 2.8~12mm 6~50mm OSD with service monitor port 550 TV lines NVD Bullet Cameras have an ultra-low lux rating of 0.000006 allowing the camera to see in almost total darkness. Note: Products with model numbers that end with “Q” or that have a round green “Q” sticker are RoHS compliant. On-Screen Display Manual Precautions: PLEASE READ THIS MANUAL THOROUGHLY BEFORE USING THE CAMERA TO BECOME FAMILIAR WITH THE CORRECT OPERATIONAL PROCEDURES. Precautions While Camera is in Use: Do not open the camera body or touch any electrical parts. Electric shock may occur. Do not disconnect the power cord from the camera before disconnecting from the wall outlet. Do not insert objects into the camera body. Doing so may cause fire or electric shock. Always disconnect the power by removing the plug from the wall outlet. If the camera emits a burning smell, immediately disconnect it from the power source and report the problem to your distributor. Do not touch the camera with wet hands. Electric shock may occur. Precautions When Installing: Do not install the camera where it might be exposed to extreme temperature conditions. Only use the camera in conditions where temperatures are between 14°~122° F (-10°~50° C). Make sure the area is well ventilated when operating in high temperatures. Do not install near any cooling or heating equipment. Do not drop the camera or subject it to physical shocks. Malfunctions may occur. Do not install or use the camera in an area where humidity is high. Do not install the camera in dusty environments. Do not expose the camera to rain or other liquids. If the camera gets wet, wipe it dry immediately. Liquids may contain chemicals that corrode the electronic components. Do not install the camera under unstable lighting conditions. Severe lighting change or flickering can cause the camera to work improperly. If the camera is exposed to a spotlight or an object reflecting strong light, smear or blooming may occur. Do not touch the front lens. This is one of the most important parts of the camera. Be careful not to leave fingerprints on the lens cover. Do not expose the camera to radioactivity. If exposed to radioactivity, the CCD will fail. 2 Never keep the camera pointed directly at strong light. Continuous exposure to intense light may damage the CCD. Only apply power after the installation of the product. Please check that the power satisfies the normal specifications before connecting the camera. SECO-LARM U.S.A., Inc. On-Screen Display Manual Table of Contents: Features..................................................... 3 Day/Night ................................................... 10 Menu Diagram ........................................... 4 3DNR ........................................................ 10 Special Menu Diagram .............................. 5 Special ...................................................... 11 Menu Setup ............................................... 5 Adjust ........................................................ 15 Lens ........................................................... 6 Reset ......................................................... 15 Exposure.................................................... 6 Exit............................................................. 15 White Balance ........................................... 9 Troubleshooting ........................................ 16 Features: 3DNR (DNR with 3D Filtering) DSP Chip Gives day and night images high resolution and provides quality images at low-light levels. 3D Filtering reduces camera noise. 550 TV Lines The Sony Super HAD CCD image sensor provides excellent resolution. D-WDR (Digital Wide Dynamic Range) Captures high-resolution pictures even when strong backlight makes images appear dark. High Spotlight Back Light Compensation (HSBLC) Function Defines target areas and removes spotlights to make reading easier. Illumination A minimum illumination of 0.000006-lux captures clear images even in low-light conditions. Disk Saving Effects Improves quality and saves hard drive space by reducing camera noise. OSD On-screen display menu with multi-language support. Privacy Masking 8 Zones available. Sense-Up Magnifies existing light up to 258 times. Digital Zoom Up to 36 times magnification. SECO-LARM U.S.A., Inc. 3DNR OFF 3DNR ON Standard Camera 550 TV Lines D-WDR OFF D-WDR ON Normal BLC HSBLC Standard Image Minimum Illumination 3 On-Screen Display Manual Menu Diagram: SETUP MENU 1) 2) LENS SETTINGS DC/MANUAL Range: 0~100 Level Adjustable SHUTTER (seconds) BRIGHTNESS AGC SENSE-UP FLK, 1/60, 1/250, 1/500, 1/2000, 1/5000, 1/10000, 1/100000 Range: 0~100 Level Adjustable OFF / LOW / MIDDLE / HIGH Range: x2~x258 Level Adjustable OFF / BLC (GAIN: LOW, MIDDLE, HIGH/DEFAULT: LEFT/RIGHT, WIDTH, TOP / BOTTOM, HEIGHT, RETURN) HSBLC: (LEVEL: RANGE 1~8 Selectable/DEFAULT: LEFT/RIGHT, WIDTH,TOP / BOTTOM, HEIGHT, RETURN) OFF / INDOOR / OUTDOOR RETURN ATW / AWB / MANUAL (R Gain : 0~100 Level Selectable, B Gain : 0~100 Level Selectable) AWC SET COLOR AUTO: DELAY (0~63) / S-LEVEL(0~100) / E-LEVEL(0~100) RESET EXPOSURE BLC D-WDR RETURN 3) WHITE BAL. ATWL 4) DAY / NIGHT AUTO/ B/W/ COLOR/ EXT 5) 6) 3DNR SPECIAL ON 7) ADJUST 8) 9) 4 RESET EXIT SETTING OPTIONS ON (Range : 0~100 Level Adjustable) / OFF Reference page 5 SHARPNESS Range: 0~31 Level Adjustable BLUE Range: 0~100 Level Adjustable RED Range: 0~100 Level Adjustable FACTORY Reset to factory settings Save the SETUP Menu and exit SECO-LARM U.S.A., Inc. On-Screen Display Manual Special Menu Diagram: SPECIAL MENU 1) 2) 3) CAMERA TITLE DIGITAL–EFFECT MOTION 4) PRIVACY 5) RETURN DEFAULT SETTINGS SETTING OPTIONS OFF ON / OFF OFF FREEZE / MIRROR / D-ZOOM / GAMMA / NEG. IMAGE ON AREA SELEC: AREA 1~4 AREA DISPLAY: ON / OFF LEFT / RIGHT: 0~100 Level Adjustable WIDTH: 0~100 Level Adjustable TOP / BOTTOM: 0~100 Level Adjustable HEIGHT: 0~100 Level Adjustable SENSITIVITY: 0~40 Level Adjustable MOTION VIEW: ON/OFF RETURN ON AREA SELECT: AREA 1~8 AREA DISPLAY: ON / OFF LEFT / RIGHT: 0~100 Level Adjustable WIDTH: 0~100 Level Adjustable TOP / BOTTOM: 0~100 Level Adjustable HEIGHT: 0~100 Level Adjustable SENSITIVITY: 0~40 Level Adjustable COLOR: Select between 15 colors. RETURN Save the SPECIAL menu and exit Menu Setup: Menu items can be selected by using the OSD (On Screen Display) buttons on the camera. 1. Press the SET UP button. The SETUP menu will be displayed on the monitor. 2. Move to and select the required function using the UP and DOWN buttons. 3. Change the menu settings using the LEFT and RIGHT buttons. Available values are displayed by pressing the LEFT and RIGHT buttons. 4. After choosing the setting, move the arrow indicator to EXIT and press the SET UP button to exit. Note: Move to available options by moving the arrow to the desired feature. A submenu is available where the option reads . The submenu is not available where the option reads - - - -. SECO-LARM U.S.A., Inc. 5 On-Screen Display Manual Lens: This function controls the brightness of the image. 1. Move the arrow indicator to LENS using the UP and DOWN buttons on the SETUP menu screen. 2. Select the desired lens type by pressing the LEFT and RIGHT buttons. 3. Press RETURN to return to the SETUP menu. Note: When DC is selected from the SETUP menu, the brightness can be adjusted. The brightness control range is 1~100. Lens BRIGHTNESS I………I………I 100 RETURN Exposure: This function is used to select Automatic or Manual shutter-speed control. 1. On the SETUP menu screen, select EXPOSURE by using the UP and DOWN buttons. SHUTTER: Select the desired shutter mode by pressing the LEFT and RIGHT buttons. A. FLK: Select FLK when flickering caused by the unmatched frequency of electric lights occurs. B. SHUTTER SPEED: Choose between 1/60, 1/250, 1/500, 1/2000 Note: To produce better results with FLK, do not use in conjunction with the WDR mode in the BACKLIGHT menu. Brightness can only operate when selected from Manual mode. When selected from DC mode, brightness will be disabled. BRIGHTNESS: Select to adjust the brightness of the image. Adjustable range: 0~100 6 SECO-LARM U.S.A., Inc. On-Screen Display Manual AGC (AUTOMATIC GAIN CONTROL): A higher gain increases brightness, but also increases any noise. A. OFF: Deactivates the AGC function. B. LOW: Sets automatic gain control to LOW. C. MIDDLE: Sets automatic gain control to MIDDLE. D. HIGH: Sets automatic gain control to HIGH. SENSE-UP: Selecting this will magnify existing light sources so the camera can pick up images at night. The values range from 2x~258x. If the AGC mode is turned OFF, the SENSE-UP function will be disabled. SENSE-UP SENSE-UP Note: Pressing the SET button in AUTO mode lets you adjust the image brightness by increasing or decreasing the shutter speed (2x~258x). The higher the level, the brighter the image becomes. However, an afterimage (ghosting) may appear. When SENSE-UP is activated, the increased magnification may induce noise and pixelation. This is normal. BLC (BACKLIGHT COMPENSATION): This camera provides intelligent light-level control to overcome strong backlight conditions. A. Move the indicator to BLC using the UP and DOWN buttons on the EXPOSURE menu screen. B. Select the desired level by using the LEFT and RIGHT buttons. OFF: Turns BLC function off. BLC: Users can select and define a specific area, and view that area clearly. HSBLC (High Spotlight Back Light Compensation): When there are both bright and dark image areas, HSBLC makes both distinct. SECO-LARM U.S.A., Inc. SENSE-UP 7 On-Screen Display Manual BLC, continued BLC OFF BLC ON C. Select a mode using the LEFT and RIGHT buttons, then press the SET button. Select BLC to adjust the desired BLC area and GAIN level. GAIN: Adjust the BLC sensitivity. DEFAULT: Go back to factory setting. LEFT / RIGHT and TOP / BOTTOM: Select the desired area position. WIDTH: Change the cell width using the LEFT and RIGHT buttons. HEIGHT: Change the cell height using the LEFT and RIGHT buttons. RETURN: Save changes and return to the EXPOSURE menu. D. Select HSBLC by using the LEFT and RIGHT buttons and then press the SET UP button to set up the desired area and GAIN level. HSBLC OFF HSBLC ON LEVEL: Adjust the HSBLC sensitivity. DEFAULT: Return to factory setting. LEFT / RIGHT and TOP / BOTTOM: Select the desired area position. WIDTH: Change the cell width using the LEFT and RIGHT buttons. HEIGHT: Change the cell height using the LEFT and RIGHT buttons. RETURN: Save changes and return to the EXPOSURE menu. 8 SECO-LARM U.S.A., Inc. On-Screen Display Manual D-WDR (Digital Wide Dynamic Range): A. B. Select D-WDR using the UP and DOWN buttons on the EXPOSURE menu screen. Select the desired feature by using the LEFT and RIGHT buttons. D-WDR : When there are both bright and dark image areas, D-WDR makes both of them distinct. User can choose between OUTDOOR and INDOOR settings. OFF: Disable D-WDR function. RETURN: Save changes in the EXPOSURE menu and return to the SETUP menu. SENSE-UP White Balance: The White Balance function is used to control the on-screen colors. 1. 2. Select WHITE BAL on the SETUP screen using the UP and DOWN buttons. Select the desired mode using the LEFT and RIGHT buttons. There are four White Balance settings available: A. ATW (Auto Tracking White Balance): Normal setting. The color temperature range is from 1,800°~10,500° K. (Ex: A fluorescent lamp or outdoors.) B. AWB : The White Balance is automatically adjusted to a specific environment. C. AWCSET: To obtain the best results, press the SET button while the camera is focused on white paper. If the environment and/or light source changes, the White Balance will require readjustment. D. MANUAL: Used for fine adjustment of White Balance. Set White Balance using ATW or AWC, then change to MANUAL and press the SET UP button. Increase or decrease the value of R-Gain (Red) and B-Gain (Blue) while monitoring the color of the image. SECO-LARM U.S.A., Inc. 9 On-Screen Display Manual Day / Night: 1. Select DAY / NIGHT using the UP and DOWN buttons on the SETUP menu screen. 2. Select the desired mode using the LEFT and RIGHT buttons. COLOR: The picture is always displayed in color. B / W: The picture is always displayed in black and white. AUTO: The mode automatically switches to COLOR in normal situations and B / W when ambient light is low. To set the time and speed in AUTO mode, press the SET button. A. DELAY: Set the delay before switching to NIGHT mode. Adjustable range: 1~63 seconds. B. S-LEVEL (start level): Define light level to trigger B/W mode. Adjustable range: 0~100. C. E-LEVEL (end level): Define the light level to trigger COLOR mode. Adjustable range: 0~100. 3DNR (DNR with 3D filtering): 1. Select 3DNR using the UP and DOWN buttons. Configure the settings to filter background noise in low-light environments. 2. Activate 3DNR by using the LEFT and RIGHT buttons. ON: Activate 3DNR. Digital noise ratio can be adjusted between 0~100. OFF: Deactivate 3DNR. Noise is not reduced. 3. Select RETURN by using the UP and DOWN buttons to return to the SETUP menu. 10 SECO-LARM U.S.A., Inc. On-Screen Display Manual Special: 1. Select SPECIAL by using the UP and DOWN buttons. 2. Select one of the modes by using the UP and DOWN buttons. CAM TITLE: When input, the Camera ID is displayed on the monitor. A. Move the arrow indicator to CAMERA ID using the UP and DOWN buttons on the SETUP menu screen. B. Select ON using the LEFT and RIGHT buttons. Note: When CAM TITLE is set to OFF, the camera title is not displayed on the monitor. C. Press the SET UP button. D. The camera title can be up to 15 alphanumeric characters in length. Move the cursor to choose a character. Select the desired character by pressing the SET UP button. The cursor will move to the next position. Repeat the above until the camera title has been created. Note: If the wrong camera title has been input, move the cursor to CLR and press the SET UP button to erase characters. SECO-LARM U.S.A., Inc. 11 On-Screen Display Manual Cam Title, continued E. To select the camera title position on screen, move the cursor to POS and press the SET button. F. Created camera title is displayed. G. Select a new position by using the four directional buttons. Press the SET button to confirm the position. H. Select RETURN to return to the SPECIAL menu when finished. Factory Default D-EFFECT: Set to apply various digital effects to the image displayed by the camera. A. B. 12 New Position FREEZE: Freeze a moving image. MIRROR: Flip an image horizontally or vertically on the screen. V-FLIP: Flip the image vertically on screen. ROTATE: Flip the horizontal image vertically on screen. OFF: Disable the MIRROR function. SECO-LARM U.S.A., Inc. On-Screen Display Manual D-Effect, continued MIRROR OFF MIRROR ON C. D-ZOOM: Digital zoom available. (1x~32x) PAN: -100~100 adjustable range. TILT: -100~100 adjustable range. D. GAMMA: 0.05~1.00 adjustable range. E. NEG. IMAGE: ON: Activates negative image. OFF: Normal image. F. RETURN: Return to SPECIAL menu. MOTION: Select to apply settings for highlighting moving objects. A. AREA SELECT: Determines the motion detection area selected. B. LEFT / RIGHT and TOP/BOTTOM: Select the desired area position. C. WIDTH: Changes the cell width using the LEFT and RIGHT buttons. D. HEIGHT: Changes the cell height using the LEFT and RIGHT buttons. E. SENSITIVITY: Increases or decreases the sensitivity between 0~40. F. VIEW MOTION: Highlights moving objects on screen. G. RETURN: Saves changes in the MOTION menu and return to the SPECIAL menu. SECO-LARM U.S.A., Inc. 13 On-Screen Display Manual PRIVACY: Hides desired on-screen area. A. Set up the area mode using the four directional buttons. AREA SELECT: Determines the area selected. AREA DISPLAY: Determines whether the area display is activated or disabled. LEFT / RIGHT and TOP / BOTTOM: Determines the desired area position between 0~100. WIDTH and HEIGHT: Determine the size of the desired area between 0~100. COLOR: Determine color or area cells. 15 different colors available. RETURN: Bring user back to the SPECIAL menu. 14 RETURN: Select RETURN to save the changes in the EXPOSURE menu and return to the SETUP menu. SECO-LARM U.S.A., Inc. On-Screen Display Manual Adjust: 1. When the SETUP menu screen is displayed, select ADJUST using the UP and DOWN buttons. 2. Select the desired mode by using the UP and DOWN buttons. SHARPNESS: Improves image clarity. Setting the level too high can distort the image or cause noise. 1~100 adjustable range. BLUE: Increases or decreases the value of B-Gain while monitoring the color of the image. 1~100 adjustable range. RED: Increases or decreases the value of R-Gain while monitoring the color of the image. 1~100 adjustable range. RETURN: Select RETURN to save changes in the EXPOSURE menu and return to the SETUP menu. Reset: Select to reset the camera settings to factory defaults. Exit: Select to save current settings and exit the SETUP menu. SECO-LARM U.S.A., Inc. 15 On-Screen Display Manual Troubleshooting: The screen is blank. Check that the camera is powered up. Check that the power supply’s polarity is correct. Check that the monitor is powered up. Check that the video cable connecting the camera to the monitor is connected properly. The screen image is dim. Clean the lens using a soft, clean cloth. Check that the light source is adequate. The screen image has poor contrast. Adjust the monitor’s contrast knob. Change the position of the camera. The screen image flickers. Change the position of the camera. The screen image is distorted. Change the position of the camera. Motion detection is not activated. The SENSE-UP does not work. Activate MOTION DET at the SETUP menu. Properly define the MD area. Check that the AGC setting in the EXPOSURE menu is not set to OFF. Check the EXPOSURE menu and make sure the SHUTTER is set to 1/60. IMPORTANT Users and installers of this product are responsible for ensuring this product complies with all national, state, and local laws and statutes related to monitoring and recording audio and video signals. SECO-LARM will not be held responsible for the use of this product in violation of any current laws or statutes. WARNING Stop using the camera if you see a malfunction such as smoke or unusual heat, as it could cause fire or electric shock. Do not open the case of this device, as there are no field-serviceable components inside. FCC COMPLIANCE STATEMENT Information to the user: This equipment has been tested and found to comply with the limits for a class B digital device, pursuant to part 15 of the FCC rules. These limits are designed to provide reasonable protection against harmful interference when the equipment is operated in a commercial environment. This equipment generates, uses, and can radiate radio frequency energy and, if not installed and used in accordance with the instruction manual, may cause harmful interference to radio communications. Operation of this equipment in a residential area is likely to cause harmful interference in which case the user will be required to correct the interference at his own expense. WARRANTY: This SECO-LARM product is warranted against defects in material and workmanship while used in normal service for a period of one (1) year from the date of sale to the original consumer customer. SECO-LARM’s obligation is limited to the repair or replacement of any defective part if the unit is returned, transportation prepaid, to SECO-LARM. This Warranty is void if damage is caused by or attributed to acts of God, physical or electrical misuse or abuse, neglect, repair, or alteration, improper or abnormal usage, or faulty installation, or if for any other reason SECO-LARM determines that such equipment is not operating properly as a result of causes other than defects in material and workmanship. The sole obligation of SECO-LARM, and the purchaser’s exclusive remedy, shall be limited to replacement or repair only, at SECO-LARM’s option. In no event shall SECO-LARM be liable for any special, collateral, incidental, or consequential personal or property damages of any kind to the purchaser or anyone else. NOTICE The information and specifications printed in this manual are current at the time of publication. However, the SECO-LARM policy is one of continual development and improvement. For this reason, SECO-LARM reserves the right to change specifications without notice. SECO-LARM is also not responsible for misprints or typographical errors. Copyright © 2009 SECO-LARM U.S.A., Inc. All rights reserved. This material may not be reproduced or copied, in whole or in part, without the written permission of SECO-LARM. U.S.A., Inc. 16842 Millikan Avenue, Irvine, CA 92606 Tel: 800-662-0800 / 949-261-2999 Fax: 949-261-7326 16 Website: www.seco-larm.com E-mail: [email protected] PIKHR1 mi-EV-1626_OSD.docx Made in Korea SECO-LARM U.S.A., Inc.