1
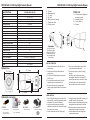
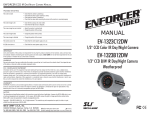
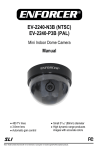
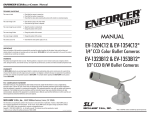
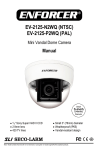
ENFORCER CCD IR Day/Night Camera Manual
®
TROUBLE SHOOTING
The screen is blank
Check that the camera is powered up.
Check that the power supply’s polarity is correct.
Check that the monitor is powered up.
Check that the video cable connecting the camera to the monitor is connected properly.
The screen image is dim
Clean the lens (using a soft, clean cloth).
Check that the light source is adequate.
The screen image has poor contrast Adjust the monitor’s contrast knob.
Change the position of the camera.
The screen image flickers
Change the position of the camera.
MANUAL
The screen image is distorted
Change the position of the camera.
1/3" Sony CCD Color IR Day/Night Cameras
The camera case is hot
Check that the correct power supply is in use.
4.3mm Lens, 78o Viewing Angle, up to 60’ IR Range
IR LEDs do not turn on
Check that the correct power supply is in use.
EV-1006-N4BQ - Black Case
EV-1006-N4SQ - Silver Case
EV-1006-N4WQ - White Case
IMPORTANT
Users and installers of this product are responsible for ensuring this product complies with all national, state, and local
laws and statutes related to monitoring and recording audio and video signals. SECO-LARM will not be held
responsible for the use of this product in violation of any current laws or statutes.
WARNING
Stop using the camera if you see a malfunction like smoke or unusual heat, as it could cause fire or electric shock. Do not
open the case of this device, as there are no field-serviceable components inside.
FCC COMPLIANCE STATEMENT
Information to the user: This equipment has been tested and found to comply with the limits for a class a digital device,
pursuant to part 15 of the FCC rules. These limits are designed to provide reasonable protection against harmful
interference when the equipment is operated in a commercial environment. This equipment generates, uses and can
radiate radio frequency energy and, if not installed and used in accordance with the instruction manual, may cause
harmful interference to radio communications. Operation of this equipment in a residential area is likely to cause harmful
interference in which case the user will be required to correct the interference at his own expense.
WARRANTY
ENFORCER IR Cameras are warranted against defects in material and workmanship while used in normal service
for a period of one (1) year from the date of sale to the original customer. Our obligation is limited to the repair or
replacement of any defective part if the unit is returned, transportation pre-paid, to SECO-LARM.
NOTICE
The information and specifications printed in this manual are current at the time of publication. However, the SECO-LARM
policy is one of continual development and improvement. For this reason, SECO-LARM reserves the right to change
specifications without notice. SECO-LARM is also not responsible for misprints or typographical errors.
Copyright © 2008 SECO-LARM U.S.A., Inc. All rights reserved. This material may not be reproduced or copied, in whole
or in part, without the written permission of SECO-LARM.
SECO-LARM® U.S.A., Inc.
16842 Millikan Avenue, Irvine, CA 92606
Website: www.seco-larm.com
Tel: 800-662-0800 / 949-261-2999 Fax: 949-261-7326 E-mail: [email protected]
®
PITMW2
IMU_EV-1006-N4xQ.PMD
Weatherproof
ENFORCER CCD IR Day/Night Camera Manual
Specifications
ENFORCER CCD IR Day/Night Camera Manual
A.
B.
C.
D.
E.
F.
G.
EV-1006-N4BQ/SQ/WQ
Type
Color camera
Chip
1/3” CCD, Sony
420 TV lines
Resolution
Pickup elements
510 x 492 pixels (NTSC / EIA)
Scanning system
2:1 interlace
Camera
Mounting base
12” cord
DC jack*
BNC connector (female)
Adjustment collar
Locking screw
Parts List
1 x IR camera with integrated
mounting bracket
3 x Mounting screws
3 x Screw anchors
1 x Manual
Internal
Sync
1Vp-p composite output, 75 ohms
Video output
4.3mm, F2.0 fixed
Lens
D*
0.4 lux (LED off), 0.0 lux (LED on)
Minimum illumination
F
B
0.45
Gamma correction
>50dB (AGC off)
S/N ratio
Auto Electronic Shutter (AES) 1/60~1/100,000 sec. (NTSC)
Shutter control
E
On
Backlight compensation
Auto
Automatic gain control (AGC)
Do not cut DC jack.
Use SECO-LARM’s
optional EVA-F5521-3
Pigtail Connector for
easy installation and
serviceability.
18
# of infrared LEDs
Up to 60 ft. (18m)
Max. LED range
12VDC±10%
Power source
100mA (IR off), 280mA (IR on)
Power consumption
G
*Important:
IP66 weatherproof
Enclosure
C
A
14°~122° F (-10°~50° C)
Operating temperature
61/4”(L) x 215/16”(D) (158 x 74 mm)
Dimensions
BEFORE STARTING
13.6 oz. (386g)
Weight
Dimensions:
215/16” (74mm)
ENFORCER
27/16” (62mm)
61/4” (158mm)
215/16” (74mm)
®
21/16” (52mm)
1. Please read this manual carefully and keep it for
future reference.
2. Use the camera within given temperature and
electricity limits.
3. Do not aim the LED light directly at the eyes when
the LEDs are on.
4. Do not point the camera at the sun. Heat could
damage the camera, even when not in use.
5. Do not mount the camera in areas exposed to
radiation, strong magnetic fields, or strong electrical
signals.*
6. Do not open or disassemble the camera. There
are no user-serviceable parts inside.
7. Do not drop the camera or subject it to strong
vibrations.
* Note: Many video monitors produce strong
electromagnetic fields close to the display CRT,
especially when the monitor is turned on or during
de-Gaussing, which occurs automatically with
many monitors when the monitor is turned on.
3
3 /4” (95mm)
Optional Accessories:
EVT-PB1Q
EVP-1SD4P9UL
Passive Video Baluns.
O
Up to 2,000 ft. range
over CAT5e UTP cables.
O
O
O
CCTV power supplies.
4, 9, 16 outputs available.
VG-1C12AQ
Ground loop isolator.
O
ST-UV12-S0.5Q
Full line of plug-in adapters.
O
INSTALLATION
1. Run a 12VDC power supply wire and a video cable
with a male BNC connector through the wall to where
the camera is to be mounted (if necessary).
2. Using the mounting screws and screw anchors,
attach the mounting base to the wall or ceiling where
the camera is to be mounted.
3. Connect the camera to the 12VDC power supply.
4. Connect the camera’s female BNC connector to the
male BNC connector of the video cable.
5. Attach the camera to the mounting base by twisting
the adjustment collar and securing it to the plate.
6. Adjust the camera so the picture on the monitor
clearly displays the image from the camera.
7. Using the adjustment collar and locking screw,
secure the camera in place.