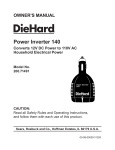
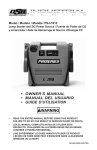
1
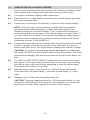
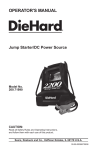
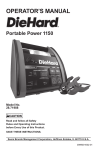
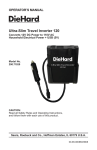
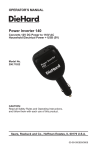
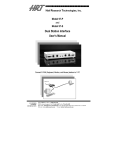
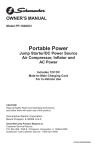
OPERATOR’S MANUAL
®
Portable Power 1150
Jump Starter/DC Power Source
Air Compressor, Inflator and AC Power
Model No.
200.71988
CAUTION:
Read all Safety Rules and Operating Instructions,
and follow them with each use of this product.
Sears, Roebuck and Co., Hoffman Estates, IL 60179 U.S.A.
00-99-000865/0808
Table of Contents
SECTION
Page
1. IMPORTANT SAFETY INSTRUCTIONS
1
2. product features
2
3. charging the internal battery 3
4. jump-starting a vehicle engine
4
5. digital display functions
5
6. powering a 12v dc device 5
7. using the USb port 6
8. using the built-in light
6
9. internal battery replacement
7
10. using the air compressor
7
11. using the inflator 8
12. estimated time for inflating 8
13. using the deflator 8
14. before using the inverter
9
15. using the inverter
9
16. powering the 110v ac device
10
17. example run-time chart
10
18. storage and maintenance
11
19. specifications
12
20. ac power specifications
12
21. replacement parts
12
DieHard One-year Full Warranty
When operated and maintained according to all supplied instructions, if this DieHard
product fails due to a defect in material or workmanship within one year from the
date of purchase, return it to any Sears store or other DieHard outlet in the United
States for free replacement.
This warranty does not include light bulbs, or the inflator hose and adapters, which
are expendable parts. This warranty gives you specific legal rights, and you may
also have other rights which vary from state to state.
Sears, Roebuck and Co., Hoffman Estates, IL 60179
For customer assistance or replacement parts,
call toll-free between 7 am to 4:30 pm CT
Monday through Friday: 1-800-SEARS-64 (1-800-732-7764)
CONTAINS SEALED NON-SPILLABLE LEAD-ACID
BATTERY. MUST BE DISPOSED OF PROPERLY.
WARNING: Possible explosion hazard. Contact with
battery acid may cause severe burns and blindness.
Keep out of reach of children.
IMPORTANT: CHARGE IMMEDIATELY AFTER PURCHASE
important: read and save this safety and instruction manual.
1.
IMPORTANT SAFETY INSTRUCTIONS
1.1
Charge the 1150’s internal battery immediately upon purchase, every 30
days and after every use.
1.2
Use in a well ventilated space.
1.3
Contains a sealed, non-spillable lead-acid battery. Must be disposed of
properly.
1.4
WARNING: Possible explosion hazard. Contact with battery acid may
cause severe burns and blindness. Keep out of reach of children.
1.5
WARNING: Pursuant to California Proposition 65, this product contains
chemicals known to the State of California to cause cancer and birth defects or other reproductive harm.
1.6
Warning: Failure to follow instructions may cause damage or an explosion. Read entire instruction manual before use. Always wear safety glasses to protect your eyes during use.
•1•
2.
diehard portable power 1150
jump-starter/dc power source
44
1. JUMP START ON/OFF Switch.
Turn on to activate clamps and
USB.
5
5
11
66
99
2
33
88
77
10
18
16 17
21 15
20
22
19
13
14
11
12
23
•2•
2. Inverter/Compressor switch. This
switch turns the inverter or air
compressor on and off.
3. Digital Display – indicates internal
and vehicle’s battery percentage of
charge and displays a code when
improperly connected to battery.
The display also shows power out
when using the inverter.
4. Plastic lens cover
5. Two, light bulbs
6. Two, 12V DC power outlets
7. Two, 110V AC household power
outlets.
8. USB port
9. Power Switch (Light/Display). This
switch turns on the light or the internal battery status digital display.
10. Air compressor gauge
11. Air compressor hose
12. Air compressor accessory bag
13. Air compressor ball inflation
adapter
14. Two, air compressor miscellaneous inflation adapters
15. ON/Off inflator/deflator switch
16. High-flow inflator outlet
17. Inflator/deflator hose end adapter
18. High-flow deflator outlet
19. Inflator/deflator hose
20. Two cables with clamps
21. Male-to-male accessory 12V
charging connector
22. Three inflator/deflator hose device
adapters.
23. Wall Charger
3.
charging the internal battery
important:
• charge immediately after purchase
• keep fully charged.
This Portable Power 1150 comes with a sealed, non-spillable DieHard
maintenance-free lead-acid battery. This internal battery is specifically
designed to deliver high power jump-starting as well as repetitive deep
cycling performance.
To charge the Portable Power 1150’s internal battery:
3.1
Check the internal battery’s charge level by pressing the switch marked
DISPLAY. The Digital Display will show the battery’s percentage. Charge if
under 100%
Note: Internal battery’s percentage is most accurate when the Portable
Power 1150 has been disconnected from all devices and charging sources
for 1 - 24 hours.
3.2
To charge, plug the (external) wall charger cord into the socket on the
back of the 1150. Then, plug the wall charger into a 120V AC source.
CAUTION: Operating the Portable Power 1150 while the internal battery is
being charged may cause permanent damage to the unit.
3.3
While the 1150 is charging, the battery’s percentage of charge will be
displayed. When the internal battery is fully charged, the display will show
100. Complete charging may take up to 48 hours. The 1150 is then ready
to use.
3.4
Once the battery is fully charged, the internal charging circuitry automatically switches to float-mode monitoring, which keeps the battery fully
charged without overcharging.
The internal battery may also be charged while you drive using the maleto-male accessory cable (available separately, see “Accessories and Replacement Parts” section of this manual). Insert one end of the accessory
cable into the 12V DC power outlet and the other end into the vehicle’s
accessory outlet (lighter socket). Completely disconnect the accessory
cable when the engine is not running.
•3•
4.
jump-starting a vehicle engine
Use in a well-ventilated area. Keep hands, hair, clothing and jewelry clear
of fan blades, belts, pulleys and other parts that may cause injury.
4.1
Turn ignition off before making cable connections.
4.2
Place the 1150 on a flat, stable surface near the vehicle battery and away
from moving engine parts.
4.3
Connect the red clamp to the positive (+) terminal of the vehicle battery.
NOTE: In the rare case of jump-starting a vehicle that has a positivegrounded vehicle electrical system, connect the black clamp to the
negative terminal of the vehicle battery. Then connect the red clamp to
an unpainted and unmoving part of the vehicle chassis or engine block. If
you are unsure of the nature of the vehicle’s electrical grounding system,
check the owner’s manual of the vehicle or call the Customer Technical
Assistance number: 1-800-SEARS-64.
4.4
Connect the black clamp to an unpainted and unmoving part of the vehicle
chassis or engine block. Do not connect to the carburetor, fuel lines or
sheet-metal body parts. The Digital Display displays the vehicle’s voltage.
CAUTION: If you have connected the clamps backwards, an audio alarm
will sound. DO NOT turn the ON/OFF switch to the ON position. This could
cause serious damage. Reverse the connections and the audio alarm will
stop.
4.5
Turn ON the Jump Start on/off switch and then turn key and crank
the engine. If the engine does not start within 5-8 seconds, stop cranking
and wait at least one minute before attempting to start the vehicle again.
This permits the battery to cool down.
4.6
After the engine starts, make sure to turn OFF the Jump Start switch.
Then disconnect the black clamp (-) and then the red clamp (+) in that
order.
4.7
Recharge the 1150 as soon as possible after use.
CAUTION: To prevent sparking while the 1150 jump-start switch is in the
ON position, NEVER allow the clamps to touch together or to contact the
same piece of metal. Never attempt to charge a frozen battery.
•4•
5.
digital display functions
5.1
To check the 1150’s internal battery’s status, push the power switch on
the front of the 1150 to the DISPLAY position. The display will show the
charge percentage of the internal battery.
5.2
When connected to the vehicle, the display shows the vehicle’s battery
voltage. When connected and in the ON position, the display shows the
equalized voltage between the vehicle’s battery and internal battery. If
the display button is pressed, the battery percentage is shown (instead of
voltage).
5.3
When the inverter is turned on and being used, the display will show the
total wattage used by the device being powered by the inverter.
6.
powering a 12v dc device
The Portable Power 1150 is a power source for all 12 volt DC accessories
that are equipped with a 12V accessory plug. The DC accessory outlet
has a 15-amp automatic overload protection circuit breaker. The breaker
will automatically reset after an overload occurs.
6.1
To Operate a 12V DC Device:
• Open the protective cover of the DC power outlet on the front panel of the
Portable Power 1150.
• Plug the 12V DC device into the DC power outlet, and turn the 12V DC
device “ON” (if required).
• If the 12V DC device draws more than 15A, the internal circuit breaker
of the Portable Power 1150 will momentarily disconnect power to the
device. If this occurs, unplug the device and the circuit breaker will automatically reset after several seconds.
• The DC power outlet is internally wired directly to the internal battery.
Extended operation of a 12V DC device may result in excessive battery
drain. Recharge immediately after unplugging the device.
•5•
6.2
12V DC Electrical Device Example Run-Time Chart
Appliance Type
Estimated Power
Estimated
Time*
Fluorescent Lights, Cellular Phones
4 Watts
50 Hours
Radios, Depth Finders, Fans
9 Watts
25 Hours
Camcorders, DVD Players, Spotlights
15 Watts
13 Hours
Electrical Tools, Bilge Pumps
24 Watts
7.3 Hours
Electric Coolers
48 Watts
4.5 Hours
Air Compressors, Car Vacuums
80 Watts
2 Hour
*NOTE: Estimated run-times. Actual time may vary. Times are based on
the internal battery being new, fully charged and operating at room temperature.
7.
using the usb port
The USB port on the 1150 provides up to 500mA at 5VDC.
7.1
Turn the JUMP START ON/OFF switch to the ON position.
7.2
Plug the device into the USB port on the front panel of the 1150.
7.3
Turn USB device ON.
7.4
Reverse these steps when finished using the USB port.
8.
using the built-in light
8.1
Position the 1150 on a flat, stable surface near the intended work area.
8.2
Push the power switch to the LIGHT position. The light will turn on and
illuminate your work area.
NOTE: With a fully charged internal battery, the built-in light should provide 18 to 30 hours of continuous, useful light.
8.3
Push power switch to the OFF position when work is completed.
8.4
Charge the 1150 as soon as possible after using the built-in light.
NOTE: With a fully charged internal battery, the built-in light should
provide 18 to 26 hours of continuous useful light, depending on ambient
conditions.
•6•
9.
internal battery replacement
The 1150 is equipped with a built in door, located on the back of the unit,
to make replacing the internal battery easy and efficient.
To order a replacement battery, call: 1-800-SEARS-64.
9.1
Be sure that all switches are in the OFF position.
9.2
Remove clamps from storage pegs on the back of the 1150.
9.3
Remove eight screws from the door.
9.4
Slide door out.
9.5
Remove the negative (first) and positive nuts and bolts securing the cable
to the battery.
9.6
Push cables to the side and carefully slide battery out of the 1150.
9.7
Reverse steps for assembly. Make sure that the nuts and bolts securing
the cables are tight.
10. using the air compressor
CAUTION: Read instructions of the product being inflated before using
the compressor. Avoid over inflation, do not exceed the manufacturer’s
recommended pressures. Do not leave the air compressor unattended
during use.
10.1 Remove the air compressor hose from the storage compartment in the
back of the Portable Power 1150. Install adapters as necessary.
10.2 Attach the air compressor hose to the product or accessory to be inflated
by flipping down the lever.
10.3 Place the Inverter/Compressor Switch in the compressor position and
inflate product.
10.4 When the product is inflated to the proper air pressure (using the air compressor gauge) place the Inverter/Compressor Switch in the OFF position
and remove the hose.
10.5 Do not run for more than 10 minutes maximum at a time. Allow the 1150 to
cool down for 10 minutes before using again.
NOTE: If the compressor overheats, the built-in thermal protection will turn
the unit off. Wait a few minutes and it will automatically restart.
NOTE: The air compressor is rated for 150 PSI.
10.6 Estimated Time for Inflating
Vehicle Tires 13” to 16”
6 to 24 minutes
Bike Tire
1 to 3 minutes
Sports Balls
30 seconds
Use the air compressor gauge to ensure the proper pressure has been
reached. Do not over inflate.
•7•
11.
using the inflator
CAUTION: Read instructions of the product being inflated before using
the inflator. Avoid over inflation, do not exceed the manufacturer’s recommended pressures. Do not leave the inflator unattended during use.
11.1 Attach the corrugated hose with end adapter to the high-flow inflator outlet
located directly above the inflator ON / OFF switch on the back of
the 1150.
11.2 The main accessory adapter attached to the corrugated hose accommodates up to 4 sizes. If another size is needed an additional adapter can be
attached to the end of the main accessory adapter.
11.3 Insert the adapter into the product to be inflated.
11.4 Push the inflator switch to the ON position and inflate product.
11.5 When product is inflated to the desired level, push the inflator switch to the
OFF position and remove the adapter.
12. estimated time for inflating
24” Beach Ball
1 to 3 minutes
Pool Raft
4 to 6 minutes
Queen-size Air Mattress
4 to 8 minutes
2 Person Boat
8 to 10 minutes
*Times may vary depending on size and product features.
13. using the deflator
13.1 Attach the corrugated hose with the end adapter to the high-flow deflator
outlet which is located on the right side of the 1150.
13.2 The main accessory adapter attached to the corrugated hose accommodates up to 4 sizes. If another size is needed, an additional adapter can be
attached to the end of the main accessory adapter.
13.3 Insert the adapter into the item to be deflated.
13.4 Push the inflator switch to the ON position and deflate item.
13.5 When product is deflated to the desired level, push the inflator switch to
the OFF position and remove the adapter.
•8•
14. before using the inverter
Important Safety Instructions:
14.1 Keep the 1150 well ventilated in order to properly disperse heat generated
while it is in use. Make sure there are several inches of clearance around
the top and sides and do not block the vents on the back of the 1150.
14.2 Make sure the 1150 is not close to any potential source of flammable
fumes, gases or clothing.
14.3 Keep the 1150 dry.
14.4 DO NOT allow the 1150 to come into contact with rain or moisture.
14.5 DO NOT operate the 1150 if you, the 1150, the device being operated or
any other surfaces that may come in contact with any power source are
wet. Water and many other liquids can conduct electricity, which may lead
to serious injury.
14.6 Do not place the 1150 on or near heating vents, radiators or other sources
of heat.
14.7 Do not place the 1150 in direct sunlight. The ideal air temperature for
operation is between 50° and 80°F.
14.8 Do not use inverter near open engine compartment where fumes or gases
may accumulate.
14.9 Do not modify the AC receptacles in any way.
15. using the inverter
It is important to know the continuous wattage of the device you plan to
use with the inverter. The Portable Power 1150 must be used with devices
drawing 400 watts or less. If the wattage is not marked on the device, use
only devices that draw less than 4 Amps of AC.
Devices like TVs, fans or electric motors require additional power to start
(commonly known as the “starting or peak power”). The Portable Power
1150 can supply a momentary surge in wattage; however even devices
rated less than the maximum 400 watts can exceed the inverters surge
capability and cause an automatic overload shutdown.
Make sure the device you are using is compatible with a modified sine
wave inverter.
CAUTION: Always run a test to establish whether the inverter will operate
a particular piece of equipment or device.
NOTE: In the event of a power overload, the inverter is designed to automatically shut down. This safety feature prevents damaging the inverter
while testing devices and equipment with the 400-watt range.
Note: If powering more than one device, start one device at a time to
avoid a power surge and/or inverter overload. The surge load of each device should not exceed the inverter’s Continuous Operation wattage rate.
•9•
16. powering a 110v ac device
To operate a 110V AC device:
16.1 Open the protective cover of the AC power outlet on the front panel of the
Portable Power 1150.
16.2 Plug the 110V AC device into the AC power outlet, and place the Inverter/
Compressor Switch in the inverter position.
16.3 If the device does not operate properly when first connected to the inverter, push the inverter rocker switch ON (I), OFF (0), and ON (I) again
in quick succession. If this procedure is not successful, it is likely that the
1150 inverter does not have the required capacity to operate the device
intended.
16.4 Charge the Portable Power 1150 as soon as possible after each use.
CAUTION: Incorrect operation of your inverter may result in damage and
personal injury. The inverter output is 110V AC and can shock or electrocute the same as any ordinary household AC wall outlet.
17.
110v ac electrical device example run-time chart
Estimated
Power
Appliance Type
Estimated
Time*
Spotlights, Sump Pumps, DVD Players
100 Watts
1.5 Hours
Faxes, TVs, Small Power Tools
150 Watts
1.25 Hours
Computer Printer, Medium Power Tools, Blenders
200 Watts
55 Minutes
The maximum continuous load is 400 watts.
*NOTE: Estimated run-times. Actual time may vary. Times are based on
the internal battery being new, fully charged and operated at room temperature.
• 10 •
18. storage and maintenance
important:
• charge immediately after purchase
• keep fully charged.
Charge the 1150 internal battery immediately upon purchase, every 30
days and after every use.
All batteries are affected by temperature. The ideal storage temperature is
between 40 and 70 degrees Fahrenheit. The internal battery will gradually
self-discharge (lose power) over time and more quickly in warm environments. Leaving the battery in a discharged state may result in permanent
battery damage. To ensure satisfactory performance and avoid permanent
damage, charge the internal battery every month.
When the JUMP START ON/OFF switch is ON, the clamps are live and
will produce arcing or sparking if they come in contact with each other. To
prevent accidental arcing, always keep the clamps on the storage holders
and the JUMP START ON/OFF switch in the OFF position when not using
it to jump start a vehicle.
18.1 Replacing the built-in light
To replace the built-in light bulb:
1. Turn the light off.
2. Insert a standard (flat blade) screwdriver into one of the two slots along
the bottom of the plastic lens and GENTLY pop the lens out. Repeat for
the other side.
3. Gently grasp the bulb and twist counter-clockwise one quarter-turn to
unscrew the bulb.
4. Insert a replacement bulb of the same type and rating, and twist clockwise one quarter-turn to screw in the new bulb.
5. Replace the lens cover.
6. Test the light by switching the light on and off.
18.2 Customer Technical Assistance
Customer technical assistance is available Monday-Friday, 7 am to 4:30
pm Central Time by phoning 1-800-SEARS-64.
• 11 •
19. specifications
Internal Battery Type
DieHard Maintenance-free AGM Lead-acid
Nominal Voltage
12v DC
Capacity
22 Ah
DC Power Outlet (Max. Continuous Load)
15A per outlet
Built-in Light Bulb (Replaceable)
5w/12v Dc (Base type BA9S)
Jumper Cables
4-gauge awg, 24 Inches
Dimensions (H x W x D)
12 H x 11.5 x 10.5 Inches
Product Weight
24.5 lbs.
20. ac power specifications
Maximum Continuous Power
400 Watts
Surge Capacity (Peak Power)
800 Watts
No Load Current Draw
<0.4 Amps
Wave Form
Modified Sine Wave
Input Voltage Range
10.5 - 15.5V DC
AC Outlets
Two, 110V AC 3-Prong Grounded
21. replacement parts
Parts and customer technical assistance are available Monday-Friday, 7
am to 4:30 pm Central Time at 1-800-SEARS-64.
Air Compressor Accessory Kit: (3 Hose Adaptors)
00-99-000599
Inflator Accessory Kit: (Inflator / Deflator Hose, Unit End
and 3 Hose Adaptors) 00-99-000598
Male-to-Male Accessory Cable: 38-99-000834
Replacement Light Bulb: 00-00-000722
Lens Cover: 37-99-00382-0
Wall Charger: 93026681
Replacement Battery Kit: 2299001766
• 12 •
• 13 •