1
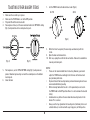
INSTRUCTION MANUAL
TOASTER OVEN
SK-7S
SK-7W
Table of Contents
Thank you for purchasing a SANYO TOASTER
OVEN/SNACK MAKER. Please read these instructions carefully before using the unit, and keep them
for future reference.
Important Safeguards
Names of Oven Parts
Unpacking and Installation
General Directions
Oven Selector Settings
How to Use:
Toasting Bagels
Toasting Other Bakery Items
Cooking and Reheating
Cooking Containers
Cooking Guide
Cleaning and Storage
Specifications
Warranty
2
3
4
5
5
6
7
8
9
9
10
11
11
12
IMPORTANT SAFEGUARDS
13.
14.
15.
When using electrical appliances, basic safety precautions should always be
followed, including the following:
1. Read all instructions.
2. Do not touch hot surfaces. Use handles or knobs.
3. To protect against electrical shock, do not immerse cord, plugs, or body
in water or other liquid.
4. Close supervision is necessary when any appliance is used by or near
children.
5. Unplug from outlet when not in use and before cleaning. Allow to cool
before putting on or taking off parts.
6. Do not operate if the appliance has been damaged in any manner. Return
appliance to the nearest authorized service facility for examination,
repair, or adjustment.
7. The use of accessory attachments not recommended by the appliance
manufacturer. Will risk damaging the appliance and may cause injuries.
8. Do not use outdoors.
9. Do not let cord hang over edge of table or counter, or touch hot surfaces.
10. A short power-supply cord is provided to reduce the risk resulting from
becoming entangled in or tripping over a longer cord.
11. Longer extension cords may be used if care is exercised in their use.
12. A longer extension cord may be used only if: (1) the marked electrical
rating of the cord set or extension cord is equal to or greater than the
electrical rating of the appliance and (2) the longer cord is arranged so
that it will not drape over the countertop or tabletop where it can be
pulled on by children or tripped over unintentionally.
16.
17.
18.
19.
Do not operate with a damaged cord or plug.
Do not place on or near a hot gas or electric burner, or in a heated oven.
Make sure the TIMER switch is set to the OFF position before inserting or
removing plug from the wall outlet.
Oversized foods or utensils must not be inserted in the toaster/snack
maker as they may create a fire or electrical shock.
A fire may occur if the toaster/snack maker is covered or touching flammable material, including curtains, draperies, walls, and the like, when in
operation.
Do not clean with metal scouring pads. Metal pieces can break off the
pad and touch electrical parts involving a risk of electrical shock.
Do not use appliance for other than intended use. This product is
designed for household use only.
SAVE THESE INSTRUCTIONS
Note: "This appliance has a polarized plug (one blade is wider than the other is). As a safety feature, this plug will fit in a polarized outlet only one way. If the plug does not fit fully in the
outlet, reverse the plug. If it still does not fit, contact a qualified electrician. Do not attempt
to defeat this safety feature".
3
NAMES OF OVEN PARTS
4
UNPACKING AND INSTALLATION:
GENERAL DIRECTIONS
1.
2.
3.
4.
1.
Remove contents from the carton.
Read all instructions carefully.
When using the trays, place trays on top of racks.
Make sure that the removable crumb tray (located in the bottom of the
unit) is inserted properly and pushed in until it locks.
2.
3.
4.
5.
6.
7.
8.
9.
10.
11.
12.
13.
5
Each toasting rack must securely be held in place by the rack holding
rods all the time.
When using trays, always position trays on top of toasting racks. Do not
use trays unless toasting racks are in the toaster/snack maker.
Do not overcrowd trays, as food will not cook evenly or completely.
Trays may warp due to excess weight.
Trays may be lined with aluminum foil for quick and easy cleanup. This
will also help prevent the food from discoloring or staining the trays.
Food residues left on the trays and toasting racks may burn. Be sure to
wash the trays and racks after use.
The timer knob should be set in the OFF position when food is placed in
the toaster/snack maker.
When using only one toasting rack, set the oven selector knob to the TOP
RACK position and place the food on the top toasting rack.
When using both toasting racks, set the oven selector knob to the TOP &
BOTTOM position and place food on both toasting racks.
The crumb tray must be kept clean.
The automatic thermostat will maintain the correct temperature by turning the heating elements on and off. The elements will change from
white to bright red when in use.
To prevent overcooking of foods, do not leave the appliance unattended.
Do not place anything on top of the unit.
Do not use paper, cardboard, plastic or Styrofoam in the oven.
OVEN SELECTOR SETTINGS
Bagel Best:
Only the middle element is operating in Bagel Best mode.
Best for toasting bagels and English muffins.
Top & Bottom:
All three elements are operating in this mode.
Best for toasting, cooking and reheating using both racks.
Bottom Rack:
Only the bottom rack is operating in this mode.
Best for warming foods.
Top Rack:
The top and middle elements are operating in this mode.
Best for toasting, cooking and reheating using TOP RACK.
Note:
The middle element may turn red when the toaster is in operation. The bottom element may not be as vibrant in color, while the top element may remain white. Variation in color of the
heating elements is not a malfunction.
6
HOW TO USE:
8.
TOASTING BAGELS
For SK-7W, set the TIMER knob to the BAGEL BEST position. (Fig. 2)
For SK-7S, set the TIMER knob for approximately 41/2 minutes. (Fig. 3)
SK-7W
SK-7S
The BAGEL BEST feature of the Sanyo toaster oven is perfect for toasting
bagels. Bagels are toasted crisp on the cut side, while the outside stays
soft and warm.
To use this Feature:
1. Make sure the crumb tray is in place.
2. Make sure the TIMER knob is set to the OFF position.
3. Plug into 120-volt AC electrical outlet.
4. Place one half of the sliced bagel on the bottom toasting rack, cut side
FACING UP.
5. Place the other half of the bagel on the top toasting rack, cut side
FACING DOWN.
6. Close the door.
7. Set the oven selector knob to the BAGEL BEST position. (Fig. 1)
(Fig. 2)
(Fig. 3)
9. When the timer has expired, the oven stops automatically with the chime.
10. Open the door and remove the toasted bagels.
11. After use, unplug the cord from the wall outlet. Allow unit to cool before
cleaning and storing unit.
NOTES:
•
The BAGEL BEST setting on the TIMER is the recommended time to toast
bagels. The unit will toast faster if it has been in use and is still hot. You
should adjust the TIMER knob accordingly to your personal preference.
•
You can stop the oven any time by simply turning the timer knob to the
OFF position.
•
To prevent overtoasting, do not leave oven unattended while it is in
operation.
•
The BAGEL BEST feature is also excellent for toasting English muffins,
crumpets, hot dog buns, and hamburger buns.
(Fig. 1)
7
TOASTING OTHER BAKERY ITEMS
7.
Set the TIMER knob to the desired toast color (Fig. 6).
SK-7W
1.
2.
3.
4.
SK-7S
Make sure the crumb tray is in place.
Make sure the TIMER knob is set to the OFF position.
Plug into 120-volt AC electrical outlet.
For one piece of toast, set the oven selector knob to the TOP RACK setting
(Fig. 4) and place bread slice on top toasting rack.
(Fig. 6)
8.
(Fig. 4)
5.
6.
When the timer has expired, the oven stops automatically with the
chime.
9. Open the door and remove items.
10. After use, unplug the cord from the wall outlet. Allow unit to cool before
cleaning and storing unit.
(Fig. 5)
NOTES:
•
These are the recommended times for toasting. However, you should
adjust the TIMER knob accordingly to the thickness of the bread and
your personal preference.
•
To prevent bread from toasting too long and over-browning, do not leave
oven unattended during toasting.
•
When removing food while the unit is still in operation, be sure to turn
the TIMER knob to the OFF postition. Now it is safe to remove the toasted
item(s).
•
Condensation may form on the oven door when toasting moist or fresh
breads. This is normal.
•
Always use the trays (placed on the toasting racks) for bakery items such
as buttered toast, raisin bread with sugar icing glaze, or filled pastries.
For two pieces, use the TOP & BOTTOM setting (Fig. 5) and place one
piece of bread on top toasting rack and the second piece on the bottom
toasting rack.
Close the door.
8
COOKING AND REHEATING
COOKING CONTAINERS
•
1.
2.
Make sure the crumb tray is in place.
Use the trays (placed on racks) when cooking or reheating foods that
contain a sauce that may spill or bubble over, such as creamed chicken
or macaroni and cheese.
3. Make sure the TIMER knob is set to the OFF position.
4. Plug into 120-volt AC electrical outlet.
5. Set the oven selector knob to the position suited to your cooking needs.
6. When warming or reheating food, the oven selector knob should be set to
the BOTTOM RACK position. Place food on the bottom rack or tray.
NOTE: When using the chart on page 10, the oven selector knob may be
set to the TOP RACK position or the TOP & BOTTOM position, depending
on the type and amount of food being cooked.
7. Place the food to be cooked or reheated in the toaster/snack maker.
8. Close the door.
9. Set the TIMER knob for the proper cooking time.
10. A chime will sound when the time has elapsed. Open the door and
remove the cooked food from the toaster/snack maker.
• When removing food while the unit is still in operation, be sure to turn
the TIMER knob or the oven selector knob to the OFF position. Now it is
safe to remove the cooked food.
11. After use, unplug the cord from the wall outlet. Allow unit to cool before
cleaning and storing unit.
•
•
•
•
•
Metal, ovenproof glass or glass ceramic bakeware may be used in this
toaster/snack maker.
The top edges of ovenproof glass or glass ceramic bakeware should be
at least 1" below the upper heating element.
Always check instructions of prepackaged convenience foods to make
sure they are suitable for use in a toaster oven or range oven.
Some prepackaged foods in paper or cardboard dishes are suitable for
both the microwave and the range oven. Check instructions to make
sure it is recommended for both.
Always remove plastic wrap or paperboard covers that are suitable for
microwave use only. Replace with aluminum foil, making sure the foil
does not touch the heating element.
Place food containers on the oven trays when cooking or reheating.
Items that should not be used in the toaster oven:
•
Airtight packages such as sealed pouches or unopened cans.
•
Plastic wrap or paperboard covers. Replace with foil.
•
Containers, which barely fit inside the oven and touch the sides of the
oven, interfering with air circulation inside the oven.
•
Any containers that have specific warnings against use in a range or
toaster oven.
9
COOKING GUIDE
•
•
TYPE OF FOOD
OVEN SELECTOR
COOKING TIME
REMARKS
Toast/Waffles
TOP RACK or TOP
& BOTTOM
2 - 4 min.
Use racks.
English muffins
BAGEL BEST
Approximately
2 min.
Use racks.
Grilled cheese
Tuna melt sandwich
TOP RACK or TOP
& BOTTOM
Approximately
2 - 4 min.
Use trays
Use trays.
Bagels
BAGEL BEST
3 - 5 min.
Use racks.
Pizza slice
TOP RACK or TOP
& BOTTOM
6 - 8 min.
Use trays and cover
with aluminum foil.
•
Hot dogs
TOP RACK or TOP
& BOTTOM
9 - 12 min.
Use trays and cover
with aluminum foil.
Hamburgers
TOP RACK or TOP
& BOTTOM
10 - 13 min.
Use trays and cover
with aluminum foil.
French fries
Frozen fish sticks
Frozen chicken nuggets
Frozen hash browns
Patties
TOP RACK or TOP
& BOTTOM
10 - 15 min.
Use trays and cover
with aluminum foil.
•
•
•
10
Watch carefully as overheating may cause the food to burn.
After turning food or checking on cooking progress, do not reset the
timer longer than indicated in the recipe to prevent smoking or burning
of foods.
When reheating foods that may 'splatter', place a piece of aluminum
foil on the rack and over the food to prevent juices from hitting the hot
element, and creating smoke.
When baking or reheating packaged convenience foods, follow the
recommended time on package directions. Since toaster ovens will vary
in temperatures, you may need to adjust the time and temperature to
achieve your personal preference.
Frozen or slightly frozen foods will require longer cooking times than
foods which are thawed. If the food is in a dish, the top may be loosely
covered with aluminum foil. Make sure foil does not touch the top heating
elements. Remove the foil the last 5-10 minutes of cooking to achieve top
browning.
The thickness and temperature of bread products will determine the
cooking time. For example, frozen bread takes longer to cook. Use the
lowest time setting when reheating foods, such as pastries.
CLEANING AND STORAGE
SPECIFICATIONS
It is important to keep the toaster oven clean. Food residues inside the unit
can impair the unit's ability to cook foods properly.
1. Before cleaning the outside or inside of the oven, make sure the unit is
turned off, unplugged and sufficiently cooled.
2. DO NOT IMMERSE APPLIANCE IN WATER.
3. Oven trays and racks should be washed in hot, sudsy water or in the
dishwasher.
4. When breadcrumbs have accumulated on the bottom of the unit, pull the
crumb tray and clean the inside with a wet cloth.
5. The crumb tray may also be washed in hot, sudsy water or in the
dishwasher.
6. Use a sponge-scrubber designed for non-stick surfaces to remove
stubborn spots on the racks, oven trays or crumb tray.
7. The glass door should be cleaned often with a damp, sudsy cloth.
Stubborn spots can be removed using a sponge-scrubber. Wipe again
with a damp cloth, and dry thoroughly.
8. The painted metal body of the appliance should be wiped after each use
with a soft, damp, sudsy cloth. Rinse off with damp cloth or sponge and
dry thoroughly. This will prevent build up of food residue and help prevent
the discoloration of paint.
9. DO NOT USE ABRASIVE CLEANSERS ON ANY PART OF THE OVEN.
A paste made from baking soda and a small amount of water can be
helpful in removing persistent spots.
10. Do not place any parts of the toaster oven in a self-cleaning oven.
11. Clean oven before storage.
Power source
Power consumption
120V AC
950 W Total
250 W Top element
420 W Middle element
280 W Bottom element
Outer dimensions (WxDxH)
235 mm x 214 mm x 327 mm
(9 1/4" x 8 7/16" x 12 7/8 ")
Net weight
3.4 kg (7 lbs 8 oz)
21605 Plummer Street
Chatsworth, CA 91311, USA
www.sanyousa.com
0700
11
Printed in China
EXCLUSIONS
SANYO TOASTER OVEN / SNACK MAKER
SK-7S, SK-7W LIMITED WARRANTY
This warranty does not cover (A) the adjustment of customer-operated controls as explained
in the appropriate model's instruction manual, or (B) the repair of any product whose serial
number has been altered, defaced or removed.
This warranty shall not apply to setup, installation, removal or the product for repair or
reinstallation of the product after repair.
This warranty does not apply to repairs or replacements necessitated by any cause beyond
the control of SFC including, but not limited to, any malfunction, defect or failure caused by or
resulting from unauthorized service or parts, improper maintenance, operation contrary to
furnished instructions, shipping or transit accidents, modification or repair by the user, abuse,
misuse, neglect, accident, incorrect power line voltage, fire, flood or other Acts of God, or
normal wear and tear.
The foregoing is in lieu of all other expressed warranties and SFC does not assume or authorize
any party to assume for it any other obligation or liability.
THE DURATION OF ANY WARRANTIES WHICH MAY BE IMPLIED BY LAW (INCLUDING THE
WARRANTIES OF MERCHANTABILITY AND FITNESS) IS LIMITED TO THE TERM OF THIS WARRANTY. IN NO EVENT SHALL SFC BE LIABLE FOR SPECIAL, INCIDENTAL OR CONSEQUENTIAL
DAMAGES ARISING FROM OWNERSHIP OR USE OF THIS PRODUCT, OR FOR ANY DELAY IN
THE PERFORMANCE OF ITS OBLIGATIONS UNDER THIS WARRANTY DUE TO CAUSES
BEYOND ITS CONTROL. SOME STATES DO NOT ALLOW LIMITATIONS ON HOW LONG AN
IMPLIED WARRANTY LASTS AND/OR DO NOT ALLOW THE EXCLUSION OR LIMITATION OF
CONSEQUENTIAL DAMAGES, SO THE ABOVE LIMITATIONS AND EXCLUSIONS MAY NOT
APPLY TO YOU.
THIS WARRANTY GIVES YOU SPECIFIC LEGAL RIGHTS. YOU MAY HAVE OTHER RIGHTS,
WHICH VARY FROM STATE TO STATE.
For your protection in the event of theft or loss of this product, please fill in the information
below for your own personal records.
OBLIGATIONS
In order to obtain factory warranty service, call the toll-free number below. The unit must be
packed in the original carton or a well padded sturdy carton in order to avoid shipping damage.
Note: Do not return this unit to the retail store for service.
To obtain factory warranty service, product operation information or for problem resolution,
call
1-800-421-6382
Weekdays 8:00 AM - 5:00 PM Pacific Time
Or visit our web site at www.sanyoservice.com
THIS WARRANTY IS VALID ONLY ON SANYO PRODUCTS PURCHASED AND USED IN THE
UNITED STATES OF AMERICA.
THIS WARRANTY APPLIES ONLY TO THE ORIGINAL RETAIL USER AND DOES NOT APPLY TO
PRODUCTS USED FOR ANY INDUSTRIAL, PROFESSIONAL OR COMMERCIAL PURPOSE. THE
ORIGINAL DATED BILL OF SALE OR SALES SLIP MUST BE SUBMITTED TO THE AUTHORIZED
SANYO SERVICE CENTER AT THE TIME WARRANTY SERVICE IS REQUESTED.
Subject to the OBLIGATIONS above and EXCLUSIONS below, SANYO FISHER COMPANY (SFC)
warrants this SANYO product against defects in materials and workmanship for the periods of
LABOR and PARTS specified below. SFC will repair or replace (at its option) the product and
any of its parts which fail to conform to this warranty. The warranty period commences on the
date the product was first purchased at retail.
Model No.
Serial No.
(Located on back or bottom side of unit)
LABOR
PARTS
Date of Purchase
1 YEAR
1 YEAR
Where Purchased
12
Purchase Price
MANUAL DE INSTRUCCIONES
HORNO TOSTADOR
SK-7S
SK-7W
Contenido
Importantes reglas de seguridad
Nombres de las partes del horno
Como ensamblar
Direcciones generales
Como trabaja su Horno Tostador
Como usarlo:
Tostando Bagels
Tostando Otros Tipos de Comidas
Cocinando y Recalentando
Cocinando en contenedores
Guía de cocinado
Limpieza y almacenaje
Especificaciones
Garantía
Gracias por comprar un HORNO TOSTADOR
SANYO. Por favor lea cuidadosamente este
instructivo antes de usar la unidad y guárdelo
para consultas futuras.
2
3
4
5
5
6
7
8
9
9
10
11
11
12
IMPORTANTES REGLAS DE SEGURIDAD
13.
14.
Cuando se utilizan aparatos eléctricos deben de seguirse siempre ciertas precauciones de seguridad, incluyendo las siguientes.
1. Lea todas la instrucciones.
2. No toque las superficies calientes. Use las manijas o asas.
3. Para protegerse contra descargas eléctricas no sumerja el cable, el
enchufe o el tostador dentro del agua u otro líquido.
4. Se requiere supervisión extrema cuando la unidad es utilizada por niños o
en su presencia.
5. Desconecte la unidad del enchufe eléctrico cuando no esté en uso y
antes de limpiarla. Permita que la unidad se enfríe por completo antes de
armarla o desarmarla.
6. No opere la unidad si ha sido dañada en alguna parte. Regrésela al centro
de servicio más cercano para examinarla, repararla o ajustarla.
7. El uso de accesorios no recomendados por el fabricante de la unidad,
pudiera dañarla y causar accidentes.
8. No la use en exteriores.
9. No permita que el cable cuelgue fuera de la superficie de la mesa o toque
superficies calientes.
10. Un cable pequeño se proveé, para reducir el riesgo de enredarse o
tropezarse como con un cable largo.
11. Se puede usar una extensión si se toman las debidas precauciones.
12. La extensión larga puede usarse sólo sí: 1) La extensión eléctrica es de
igual o mayor voltage que el de la unidad; 2) la extensión se pone de tal
forma que no cuelgue fuera de la mesa o donde puedan jalarla los niños
o tropezarse accidentalmente.
15.
16.
17.
18.
19.
No opere la unidad cuando el cable o enchufe estén dañados.
No coloque la unidad sobre o cerca de un calentador eléctrico, una
hornilla de gas caliente o sobre el horno.
Asegúrese que el control de tiempo “ TIMER” esté indicando la posición
de apagado “OFF” antes de conectar o desconectar el enchufe del
tomacorriente.
Alimentos o utensilios de gran tamaño no deben ponerse dentro del
tostador ya que pueden causar un incendio o descarga eléctrica.
Un fuego pudiera ocurrir si el tostador se cubre o toca material flamable,
incluyendo cortinas, paredes, o cualquier otra cosa mientras está
operando.
No limpie o talle con fibra de metal la unidad. La piezas de metal pudieran romperse y la fibra al tocar la envoltura de la partes eléctricas
pudiera causar una descarga eléctrica.
No utilize la unidad para otros usos. Esta unidad está diseñada para uso
doméstico exclusivamente.
GUARDE ESTAS INSTRUCCIONES
Nota: El Cable tiene un unchufe polarizado lo que significa que una hoja es más ancha que la otra.
Esta es una función de seguridad que permite conectarlo en cualquier tomacorriente polarizado de una sola forma. Si el enchufe no embona al tomacorrirnte, póngalo al revés. Si aún
así no embona, llame a un electricista calificado. No intente alterar esta función de seguridad
modificando el enchufe de cualquier forma.
3
NOMBRES DE LAS PARTES
DEL HORNO
Parrilas Tostadoras
Calentadores de Cuarzo
Sujetadores de Parrillas
Plato Protectos
Perilla de Selección
de Horneado
Perilla de Tiempo
Charolas (2)
Cable y Enchufe
Puerta de Vidrio
Manija de Puerta
Charola de Migajas
4
DESEMPAQUE E INSTALACION:
DIRECCIONES GENERALES
1.
2.
3.
4.
1.
2.
Remueva el contenido del empaque.
Lea todas las instrucciones cuidadosamente.
Cuando use las charolas, colóquelas encima de las parrillas.
Asegúrese que la charola de migajas removible ( localizada en la parte
inferior de la unidad ) esté insertada adecuadamente y presiónela hasta
que se asegure.
3.
4.
5.
6.
7.
8.
9.
10.
11.
12.
13.
5
Cada parrilla debe estar bien sujeta y en su lugar todo el tiempo.
Cuando use las caharolas, siempre colóquelas sobre las parrillas. No use
las charolas si las parrillas no están en el horno tostador.
No sobrepase la cantidad de comida en las charolas, ya que no se cocerá
por completo. Las Charolas pueden deformarse debido al exceso de
peso.
Las charolas pueden cubrirse con papel aluminio para limpiarse rápida y
fácilment.e. Esto también ayuda a prevenir el decoloramiento de la comida
o manchar las charolas.
Los residuos de comida en las charolas, así como en las parrillas pueden
quemarse. Asegúrese de lavar las charolas y parrillas después de
usarse.
La perilla del tiempo debe de estar situada en la posición de apagado
“ OFF” cuando se ponga la comida dentro del tostador.
Cuando se utilice solamente una parrilla, ponga el selector del horno en la
posición “TOP RACK ONLY “ y ponga la comida en la parrilla superior.
Cuando se usen ambas parrillas, colóque el selector del horno en la
posición”TOP & BOTTON RACKS” y colóque la comida en ambas parrillas.
La charola de migajas debe mantenerse limpia.
El termostato automático mantendrá la temperatura correcta al encender
y apagar los calentadores. Los calentadores cambiarán de blanco a rojo
intenso cuando estén en uso.
Par prevenir el sobrecociando de las comidas, no deje la unidad desatendida.
No coloque nada encima de la unidad.
No use papel, cartón o plásticos dentro del horno.
COMO TRABAJA SU HORNO TOSTADOR
Bagel Best:
Sólo el calentador de en Medio está operando de la modalidad de “Bagel Best”.
Esta modalidad es la mejor para tostar Bagels y Muffins
Parilla Superior e Inferior
Los tres calentadores están operando en esta modalidad.
Esta modalidad es la mejor para tostar, cocinar y recalentar.
Parrilla Inferior Solamente:
Sólo el calentador Inferior está operando en esta modalidad.
Esta modalidad es la mejor para calentar comidas.
Parrilla Superior Solamente:
El calentador Superior y el de en Medio están operando en esta modalidad.
Esta modalidad es la mejor para tostar, cocinar y recalentar.
Nota:
El calentador en medio puede ponerse rojo cuando se opera el tostador. Puede que el calentador inferior no sea tan vibrante de color, mientras el calentador superior puede
quedarse blanco. La variación de colores de los calentadores no es un defecto.
6
COMO USARLO:
8.
TOSTANDO BAGELS
Para SK-7W, ponga la perilla de tiempo “TIMER” por la posición
BAGEL BEST. (Fig. 2)
Para SK-7S, ponga la perilla de tiempo ”TIMER “ por aproximadamente
4 1/2 minutos. (Fig. 3)
SK-7W
La función de “BAGEL BEST” del horno tostador de Sanyo es perfecta para
dorar bagels. Estos salen bien doraditos por un lado, y bien calientitos y
suaves por el otro.
Como usar esta función:
1. Asegúrese que las parrillas y la charola de migajas estén en su lugar.
2. Asegúrese que la perilla de tiempo ”TIMER” esté en la posición “ OFF”.
3. Enchúfelo dentro del tomacorriente de 120 volts de AC.
4. Coloque una mita de bagel en la parrilla inferior, con el lado del corte
HACIA ARRIBA.
5. Coloque la otra mita de la parrilla superior, con el lado del corte HACIA
ABAJO .
6. Cierre la puerta.
7. Ponga la perilla en la posición “BAGEL BEST “ (Fig. 1)
(Fig. 2)
SK-7S
(Fig. 3)
9.
Cuando el tiempo se cumple, el horno se para automáticamente y da una
campanda.
10. Abra la puerta y remueva los bagels dorados.
11. Después de usarse, desconecte el cable del tomacorriente. Permita que
la unidad se enfríe antes de limpiarla y guardala.
NOTAS:
•
La posición de “BAGEL BEST” en el “TIMER” es el tiempo recomendado
para dorar los bagels. La unidad dorará más rápido si ha estado en uso o
si todavía esta caliente. Usted debe ajustar el tiempo “TIMER “ de acuerdo
a su preferencia personal.
•
Usted puede parar el horno en cualquier momento con simplemente girar
la perilla “TIMER” hacia la posición “OFF”.
•
Para prevenir el sobrecalentado, no deje la unidad desatendida mientras
está en operación.
•
La función “BAGEL BEST” es excelente también para dorar “English
Muffins”, pan para hamburguesas y “ hot dog”, y muchos panes más.
(Fig. 1)
7
TOSTANDO OTROS TIPOS DE COMIDAS
7.
Ponga la perilla de “TIMER” para el color de tostado deseado (Fig. 6).
SK-7W
1.
2.
3.
4.
SK-7S
Asegúrese que las parrillas y la charola de migajas estén en su lugar.
Asegúrese que la perilla de “TIMER” esté en la posición “OFF”.
Enchúfelo dentro de un tomacorriente de 120 volts de AC.
Para tostar una pieza, ponga la perilla de selección de horneado en la posición de “TOP RACK” (Fig. 4) y coloque la rebanada de pan en la parrilla de
arriba.
(Fig. 6)
8.
Cuando el tiempo se cumple, el horno se para automáticamente y da una
campanada.
9. Abra la puerta y remueva los bocadillos.
10. Después de usarse, desconecte el cable del tomacorriente. Permita que la
unidad se enfríe antes de limpiarla y guardarla.
(Fig. 4)
5.
6.
(Fig. 5)
NOTAS:
•
Estos son tiempos recomendados para tostar. Sin embargo, debe adjustar
la perilla de “TIMER” de acuerdo al grosor del pan y a su gusto personal.
•
Para prevenir que el pan se dore demasiado y se queme, no deje el horno
desatendido mientras está en operación.
•
Cuando remueva la comida mientras la unidad está todavia en operación,
asegúrese de poner la perilla de “TIMER” en la posición “OFF”. Ahora si
es seguro, remover los bocadillos dorados.
•
La condensación puede formar vapor en la puerta del horno cuando se
está tostando algo húmedo o pan fresco. Esto es normal.
•
Siempre use las charolas (colóquelas sobre las parrillas) para hornear
panes con mantequilla, pan de arroz con azucar glass o bocadillos rellenos.
Para dos piezas, use la posición de “TOP & BOTTOM” (Fig. 5) y coloque una
pieza de pan el la parrilla superior y la otra en la parrilla inferior.
Cierre la puerta.
8
COCINADO Y RECALENTADO
COCINANDO EN CONTENEDORES
•
1.
2.
Asegúrese que las parrillas y la charola de migajas estén en su lugar.
Use las charolas (sobre las parrillas) cuando cocine o recaliente comidas
que contengan una salsa que pueda derramarse o burbujear, como la
crema de pollo, o el macarrón con queso.
3. Asegúrese que la perilla de tiempo “TIMER” esté en la posición “OFF”.
4. Enchúfelo dentro de un tomacorriente de 120 volts de AC.
5. Ponga la perilla del horno seleccionador en la posición adecuada a sus
necesidades de cocinado ( Fig.2)
6. Cuando caliente o recaliene comida, la perilla del horno selccionador
debe ponerse en la posición “BOTTOM RACK”. Coloque la comida en la
parrilla o charola inferior.
Nota: Cuando se use la gráfica de la página 10 la perilla puede colocarse
en la posición “TOP RACK” o en “TOP BOTTOM” dependiendo del tipo y
la cantidad de comida que se va a cocinar.
7. Coloque la comida para ser cocinada o recalentada dentro del horno tostador.
8. Cierre la puerta.
9. Ponga la perilla del tiempo “TIMER” para el cocinado apropiado.
10. Una campanada sonará cuando el tiempo programado termine. Abra la
puerta y remueva la comida cocinada del horno tostador.
• Cuando remueva la comida mientras la unidad está todavía en
operación, asegúrese de poner la perilla de “TIMER” en la posición de
“OFF”. Ahora si es seguro remover la comida cocinada.
11. Después de usarse, desconecte el cable del tomacorriente. Permita que
la unidad se enfríe antes de limpiarla y guardarla.
•
•
•
•
•
Contenedores de metal, vidrio aprobado o cerámica pueden ser usados
en este horno tostador.
El borde del contenedor de vidrio o cerámica debe estar al menos 1 pulgada
por debajo de los calentadores.
Siempre revise las instrucciones de las comidas empaquetadas para
asegurarse que son adeuadas para el uso de este tostador.
Algunas comidas empaquetadas en platos de papel o cartón son seguras
para ambos hornos estos y los microondas. Revise las instrucciones para
asegurarse que son recomendables para ambos.
Siempre remueva las cubiertas de plásticos o de papel que son para uso
exclusivo del horno microondas. Remplácelas con papel alumnio,
asegúrese que el papel no toque los calentadores.
Coloque los contenedores de comida sobre las parrillas cuando cocine o
recaliente.
Esto no debe de ser usado en el horno tostador:
•
Comidas empacadas al alto vacío en bolas o latas selladas.
•
Cubierta plásticas o de papel. Remplácelas con papel aluminio.
•
Contenedores que apenas caben dentro del horno y tocan los lados,
interfiriendo con la circulación del aire dentro del horno.
•
Cualquier contenedor que tengan avisos específicos contra el uso de
estos en los hornos tostadores.
9
GUIA DE COCINADO
•
TIPO DE COMIDAS
SELECCION DE HORNEADOS TIEMPO DE COCINADO
USO
Toast/Waffles
2 - 4 min.
Use parrillas
Pan Tostado
TOP RACK o
TOP & BOTTOM
BAGEL BEST
Aproximadamente
2 min.
Use parrillas
Queso fundido
Sandwich de Atún
TOP RACK o
TOP & BOTTOM
Aproximadamente
2 - 4 min.
Use charolas
Use charolas
Bagels
BAGEL BEST
3 - 5 min.
Use parrillas
Porción de Pizza
TOP RACK o
TOP & BOTTOM
6 - 8 min.
Use charolas y cubra
con papel aluminio
Hot dogs
TOP RACK o
TOP & BOTTOM
9 - 12 min.
Use charolas y cubra
con papel aluminio
Hamburgesas
TOP RACK o
TOP & BOTTOM
10 - 13 min.
Use charolas y cubra
con papel aluminio
Papas francesas
TOP RACK o
Pescado en filetes congelado TOP & BOTTOM
Pedacitos de pollo congelado
Papa rayada congelada
Patties
10 - 15 min.
Use charolas y cubra
con papel aluminio
•
•
•
•
•
10
Observe el horno cuidadosamente ya que el sobre cocinado puede
quemar la comida.
Después de voltear la comida o revisar el progreso de cocinado, no
ponga más del tiempo indicado en la receta para prevenir el ahumado
o quemado de la comida.
Cuando recaliente las comidas esta pueden salpicar, ponga un pedazo
de papel aluminio sobre la parrilla y sobre la comida para prevenir que
los jugos salpiquen el calentador y se cree humo.
Cuando se cocine o recaliente la comida empacada, siga las
recomendaciones del tiempo en la etiqueta, ya que el horno tostador
varía en la temperatura.
Usted necesitará ajustar el tiempo y la temperatura para lograr el
gusto personal.
Comidas congeladas o semicongeladas requerirán un mayor tiempo de
cocinado que las normales. Si la comida está en un plato, la cubierta
puede cubrirse con papel aluminio. Asegúrese que el papel no toque el
calentador.
Remueva el papel en los últimos 5 a 10 minutos de cociando para
segurar un buen cociando.
El grosor y la temperatura del pan determinará el tiempo de cocinado.
Por ejemplo, el pan tomará más tiempo. Use el tiempo de cocinando
más bajo cuando se recalienten como los bocadillos.
LIMPIEZA Y ALMACENAJE
ESPECIFICACIONES
Es importante mantener el Horno Tostador limpio. Residuos de comida dentro
de la unidad pueden impedir la habilidad de la unidad para cocinar la comida
apropiadamente.
1. Antes de limpiar el exterior e interior del horno, asegúrese que la unidad
este apagada, desenchufe y déjela enfriar lo suficiente.
2. NO SUMERJA LA UNIDAD EN EL AGUA.
3. Las charolas y parrillas deben lavarse en agua caliente con jabón o en el
lavaplatos.
4. Cuando las migajas se hayan acumulado en el fondo de la unida, saque la
charola de las migajas y limpie el interior con un trapo mojado.
5. La charola de las migajas también se puede lavar en agua calientecon
jabón o en el lavaplatos.
6. Use una esponja paa tallar diseñada para superficies no pegajosas y
remueva la suciedad en las parrillas, charolas y charola de migajas.
7. La puerta de vidrio debe limpiarse frecuenemente con un trapo húmedo,
secándola también completamente.
8. El cuerpo de metal pintado de la unidad debe limpiarse después de cada
uso con un trapo suave y húmedo. Enjuague con una esponja o trapo y
seque completamente.
9. NO USE LIMPIADORES CORROSIVOS EN NINGUNA PARTE DEL HORNO.
Una pasta hecha de bicarbonato de sodio y una pequeña cantidad de
agua pueden ayudar a remover las manchas persistentes.
10. No ponga ninguna de las partes del horno tostador en un horno de auto
limpieza.
11. Limpie el horno antes de guardarlo.
Fuente de energía
Consumo de energía
120V AC
950 W Total
250 W Calentador superior
420 W Calentador de en Medio
280 W Calentador inferior
Dimensiones exteriores (WxDxH)
235 mm x 214 mm x 327 mm
(9 1/4" x 8 7/16" x 12 7/8 ")
Peso neto
3.4 kg (7 lbs 8 oz)
21605 Plummer Street
Chatsworth, CA 91311, USA
www.sanyousa.com
0700
11
Impreso en China
EXCL US IO NES
HORNO TOSTADOR SANYO
SK-7S/SK-7W GARANTIA LIMITADA
Esta garantía no cubre (A) el ajuste de los controles operados por el cliente, como se explica en en
manual de intrucciones apropiado del modelo, o (B) la reparación de cualquier producto cuyo
número de serie ha sido alterado, borrado o removido.
Esta garantía no aplica para el gabinete o las partes cosméticas, batería o el mantenimiento de rutina.
Esta garantía no se aplica en el ajuste, instalación, movimiento del producto, para reparación o
re-instalación después de ser reparado.
Esta garantía no se aplica en reparaciones o reemplazos necesitados por cualquier causa, más allá
del control de SFC, incluyendo, pero no limitando a, cualquier funcionamiento inadecuado, defecto o
falla causada por, o resultante de servicio o partes no autorizados, manteni-miento impropio,
operación contraria a las instrucciones suministradas, accidentes de envío o transporte,
modificación o reparación por el usuario, abuso, maltrato, negligencia, accidentes, línea de voltaje
incorrecta, fuego, caidas y otros Actos de Dios, o el uso y desgaste normal.
Lo anterior sustituye todas las demás garantías expresadas y SFC no asume o autoriza ninguna otra
parte o asume por ello cualquier otra obligación o responsabilidad.
LA DURACION DE CUALQUIER GARANTIA QUE PUEDE SER IMPLEMENTADA POR LEY (INCLUYENDO
LAS GARANTIAS DE MERCADEO Y PROPIEDAD) ESTAN LIMITADAS EN LOS TERMINOS DE ESTA
GARANTIA. EN NINGUN CASO SFC SERA RESPONSABLE POR DAÑOS ESPECIFICOS, INCIDENTALES O
CONSECUENCIALES DERIVADOS DE LA PROPIEDAD O USO DEL PRODUCTO, O POR CUALQUIER RETRASO
EN EL CUMPLIMIENTO DE LAS OBLIGACIONES BAJO ESTA GARANTIA, DEBIDO A CAUSAS FUERA DE
SU CONTROL. ALGUNOS ESTADOS NO PERMITEN LIMITACIONES EN QUE TANTO UNA GARANTIA
IMPLICADA PREVALECE Y/O NO PERMITEN LA EXCLUSION O LIMITACION DE DAÑOS CONSECUENCIALES, POR LO QUE LAS LIMITACIONES Y EXCLUSIONES AQUI DESCRITAS PUDIERAN NO APLICARSE
A USTED.
OBLIGACIONES
Para obtener servicio de garantía, el aparato debe ser entregado y recogido de un
Centro Autorizado de Servicio de Sanyo, a costo del usuario, a menos que sea especificado de otra manera en esta garantía. Los nombres y los domicilios de los Centros
Autorizados de Servicio por Sanyo, pueden obtenerse llamando al número gratuito aquí
mostrado:
Para operación del producto, centro de referencia de servicio autorizado, servicio de asistencia
o solución de problemas llame: 1-800-421-6382
Días entre semana 8:30 AM - 5:00 PM Hora del Pacífico
O visite nuestra página de internet: www.sanyoservice.com
ESTA GARANTIA ES VALIDA UNICAMENTE EN LOS PRODUCTOS SANYO COMPRADOS O RENTADOS EN LOS
ESTADOS UNIDOS DE AMERICA, (EXCLUYENDO TODOS LOS TERRITORIOS O PROTECTORADOS.) ESTA GARANTIA SE CONCEDE SOLO AL DETALLISTA O COMPRADOR ORIGINAL. LA FACTURA ORIGINAL FECHADA, EL RECIBO
DE VENTA O EL CONTRATO DE ARRENDAMIENTO, DEBEN SER PRESENTADOS AL MOMENTO EN QUE EL SERVICIO DE GARANTIA SEA REQUERIDO.
Sujetándose a las OBLIGACIONES anteriores y a las EXCLUSIONES abajo descritas, SANYO-FISHER COMPANY (SFC),
garantiza este producto SANYO contra defectos en los materiales y la mano de obra, por los períodos de LABOR y
PARTES abajo especificados. SFC reparará o reemplazará (a su opción) el producto y cualquiera de las partes que
pudieran fallar, conforme a esta garantía. El período de garantía comienza en la fecha en que el producto fue originalmente comprado al menudeo.
ATE N C ION
Para su protección en caso de robo o pérdida de este producto, por favor complete la información
de abajo para su archivo personal.
Modelo No.
LABOR
PARTES
1 AÑO
1 AÑO
No.de Serie
(Localizado abajo o detrás de la unidad)
Fecha de Compra
Donde se compró
12
Precio de Compra