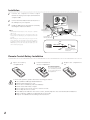
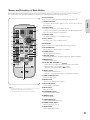
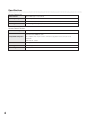
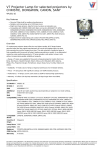
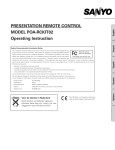
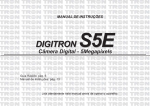
1
Model Number
Trade Name
Responsible party
Address
Telephone No.
: POA-RCKIT04
: Sanyo
: SANYO FISHER COMPANY
: 21605 Plummer Street, Chatsworth, California 91311
: (818)998-7322
English
Français
This equipment has been tested and found to comply with the limits for a Class B
Tested To Comply
digital device, pursuant to part 15 of the FCC Rules. These limits are designed to
With FCC Standards
provide reasonable protection against harmful interference in a residential installation.
This equipment generates, uses and can radiate radio frequency energy and, if not
FOR HOME OR OFFICE USE
installed and used in accordance with the instructions, may cause harmful interference
to radio communications. However, there is no guarantee that interference will not occur in a particular installation. If this
equipment does cause harmful interference to radio or television reception, which can be determined by turning the
equipment off and on, the user is encouraged to try to correct the interference by one or more of the following measures:
– Reorient or relocate the receiving antenna.
– Increase the separation between the equipment and receiver.
– Connect the equipment into an outlet on a circuit different from that to which the receiver is connected.
– Consult the dealer or an experienced radio/TV technician for help.
The use of shielded cable is required to comply with class B limits in Subpart B of Part 15 of FCC Rules. Do not make any
changes or modifications to the equipment unless otherwise specified in the instructions. If such changes or
modifications should be made, you could be required to stop operation of the equipment.
Español
Federal Communication Commission Notice
Deutsch
PRESENTATION REMOTE CONTROL
MODEL POA-RCKIT04
Operating Instruction
Your SANYO product is designed and manufactured with high quality materials and components
which can be recycled and reused.
This symbol means that electrical and electronic equipment, at their end-of-life, should be disposed
of separately from your household waste.
Please dispose of this equipment at your local community waste collection/recycling centre.
In the European Union there are separate collection systems for used electrical and electronic
products.
Please help us to conserve the environment we live in!
Voor de klanten in Nederland
NL
Bij dit produkt zijn batterijen geleverd.
Wanneer deze leeg zijn, moet u ze niet
weggooien maar inleveren als KCA.
The CE Mark is a Directive conformity
mark of the European Community (EC).
Italiano
NOTE: This symbol mark and recycle system are applied only to EU countries and not applied to the countries in the other area of the world.
Installation
1
Connect the computer's monitor output
terminal to the projector's input terminal with a
computer cable.
2
Connect the Presentation Remote Receiver to
the USB port of your computer.
3
Install the batteries into the Remote Control by
following the instructions below.
Presentation
Remote Control
✔Note:
• The Presentation Remote Receiver can be connected to a standard
USB port only.
• Some computer settings may have to be changed in order for the
mouse function to be used. Refer to your computer's owner's manual
for details.
• When switching the remote control code of the projector and the
remote control, that of the presentation remote control also needs to
be switched. To switch the code, press and hold both the MENU and
IMAGE buttons for more than 10 seconds. (For details, refer to the
owner's manual of the projector.)
Computer cable
Presentation
Remote Receiver
30°
16.4’ (5 m)
Presentation Remote
Receiver and Projector’s
IR Receiver.
30°
Remote Control Battery Installation
1
Open the battery
compartment lid.
2
Install new batteries
into the compartment.
3
Replace the compartment
lid.
Two AAA size batteries
For correct polarity (+ and
–), be sure battery terminals
are in contact with pins in
the compartment.
To insure safe operation, please observe the following precautions:
● Use (2) AAA or LR03 type alkaline batteries.
● Always replace batteries in sets.
● Do not use a new battery with a used battery.
● Avoid contact with water or liquid.
● Do not expose the remote control to moisture or heat.
● Do not drop the remote control.
● If the battery has leaked on the remote control, carefully wipe the case clean and install new batteries.
● Risk of explosion if battery is replaced by an incorrect type.
● Dispose of used batteries according to the instructions.
2
Names and Functions of Each Button
Presentation Remote Control performs the function of a wireless mouse to control the mouse cursor on the computer.
For convenience while giving presentations, some buttons controlling the projector are also provided.
For Presentation
Aim the remote control at the Presentation Remote Receiver.
e
q
L-CLICK
PAGE
R-CLICK
For Projector
ON - OFF
r
!8
COMPUTER
OMPUTER VIDEO
!7
t
!6
FREEZE
NO SHOW P - TIMER
y
!4
w L-CLICK button
Act as the left button on a computer mouse.
To drag a selected item, press and hold the L-CLICK button and
move the cursor with the Cursor button.
e R-CLICK button
Act as the right button on a computer mouse.
!9
!5
English
w
For Presentation
q PAGE ed buttons
Scroll back and forth the pages on the screen when giving
presentations.
D.ZOOM MUTE
IMAGE AUTO PC
u
i
o
KEYSTONE
!3
MENU VOLUME-
SELECT VOLUME+
r Cursor button
Act as the cursor on a computer mouse.
For Projector
Aim the remote control at the IR Receiver of the projector.
t NO SHOW button
Temporarily turn off the image on the screen.
y P-TIMER button
Operate the P-timer function.
u AUTO PC button
Automatically adjust the computer image to its optimum settings.
i IMAGE button
Select the image level.
!2
LAMP CONTROL
!1
CXTZ
o Point ed 7 8 ( VOLUME + / – ) buttons
– Select an item or adjust the value in the On-Screen Menu.
– Pan the image in the Digital zoom + mode.
– Adjust the volume level. (Point 7 8 buttons)
!0 SELECT button
– Execute the selected item.
– Expand or compress the image in the Digital zoom mode.
!1 LAMP CONTROL button
Select the lamp mode.
!0
!2 MENU button
Open or close the On-Screen Menu.
!3 KEYSTONE button
Correct keystone distortion.
✔Note:
• The LAMP CONTROL button is not applicable to the model PLCSW30/PLC-SW35 and PLC-XU41/PLC-XU47/PLC-XU48.
• For detailed operations, refer to the projector’s owner’s manual.
!4 MUTE button
Mute the sound.
!5 D.ZOOM ed buttons
Zoom in and out the images.
!6 FREEZE button
Freeze the picture.
!7 COMPUTER button
Select COMPUTER input source.
!8 POWER ON-OFF button
Turn the projector on or off.
!9 VIDEO button
Select VIDEO input source.
3
Specifications
Remote Control Unit
Power Source
AAA or LR03 type x 2 (included)
Operating Range
16.4’ (5 m) / ±30˚
Dimensions
2.0”(W) x 0.91”(H) x 4.8”(D) (51.5 mm x 23.2 mm x 123 mm)
Net Weight
2.54 oz (72 g) (including batteries)
Remote Control Receiver
Transmission Signals
Infrared
Windows
• Windows 98 / 2000/ Me / XP
Compatible Computers
✽ Compatible with only full versions of Windows. (Upgraded version cannot be used.)
Macintosh
• Mac OS 9.1 or later.
4
Connector
USB Type B
Net Weight
1.6 oz (45 g)
Cable Length
3.3’ (1 m)