1
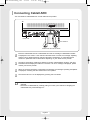
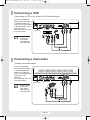
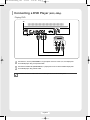
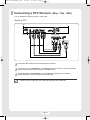
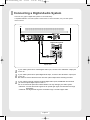
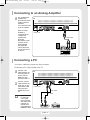
BN68-00766E-00Eng_0214 2/14/05 1:48 PM Page 1 List of Parts Accessories Owner’s Instructions Once you have unpacked your TV, check to make sure that you have all the parts shown here. If any piece is missing or broken, call your dealer. Remote Control (BN59-00462A) / AAA Batteries Power Cord (3903-000144) Anynet Cable (BN39-00518A) BN68-00766E-00 English-1 BN68-00766E-00Eng_0214 2/14/05 1:48 PM Page 2 Connecting VHF and UHF Antennas Antennas with 75-ohm Round Leads If your antenna looks like this: 1 it has 75-ohm round leads. Plug the antenna lead into the ANT 2 IN (AIR IN) on the TV. Use the antenna cable, an accessory included in the product package. Connecting Cable TV You can connect different cable systems to your TV, including cable without a Cable box, and cable with a Cable box that descrambles some or all channels. Cable without a Cable Box 1 Plug the incoming cable into the ANT 1 IN (CABLE IN) on the TV. Use the antenna cable, an accessory included in the product package. Cable with a Cable Box that Descrambles All Channels 1 Find the cable connected to the ANTENNA OUT terminal on your Cable box. This terminal might be labeled “ANT OUT”, “VHF OUT” or simply “OUT”. 2 Connect the cable to the ANT 1 IN (CABLE IN) on the TV. Use the antenna cable, an accessory included in the product package. English-2 BN68-00766E-00Eng_0214 2/14/05 1:48 PM Page 3 Cable with a Cable Box that Descrambles Some (But Not All) Channels To complete this connection you will need a two-way splitter, an RF (A/B) switch, and four coaxial cables (which you can buy from your Samsung dealer or any electronics store). 1 Find and disconnect the cable that is connected to the ANTENNA IN terminal of your Cable box. This terminal might be labeled “ANT IN”, “VHF IN” or simply, “IN”. Connect this cable to a two-way splitter. 2 Connect a coaxial cable between an OUT terminal of the splitter and the IN terminal of the Cable box. 3 Connect a coaxial cable between the ANTENNA OUT terminal of the Cable box and the B-IN terminal of the RF (A/B) switch. 4 Connect a coaxial cable between the other OUT terminal of the Cable box and the A-IN terminal of the RF (A/B) switch. 5 Connect the last coaxial cable between the OUT terminal of the RF (A/B) switch and the ANT 1 IN (CABLE IN) on the TV. After you've made this connection, set the A/B switch to the “A” position for normal viewing. Set the A/B switch to the “B” position to view scrambled channels. (When you set the A/B switch to “B”, you will need to tune your Set-Top Box to the Cable box's output channel, which is usually channel 3 or 4.) English-3 BN68-00766E-00Eng_0214 2/14/05 1:48 PM Page 4 Connecting CableCARD You must obtain a CableCARD from a local cable service provider. TV Power cord From cable TV Please insert the card as shown. 1 Insert the CableCARD into the “CableCARD” slot and the message “CableCARD Inserted” is displayed on the screen. If the channel information does not exist, the message “Updating Channel List” is displayed during channel information configuration. It could take several minutes to update the channel information depending on your cable service provider. 2 The pairing information containing a telephone number, CableCARD ID, Host ID, and other information will be displayed in about 2~3 minutes. If an error message is displayed, please contact your service provider. 3 When the channel information configuration has finished, the message “Updating Completed” is displayed, indicating that the channel list is now updated. 4 The Channel list can now be displayed by pressing CH LIST button. • Once the channel list has been updated, only the channels on the channel list can be selected. • Remove the CableCARD by carefully pulling it out with your hands since dropping the CableCARD may cause damage to it. English-4 BN68-00766E-00Eng_0214 2/14/05 1:48 PM Page 5 Connecting a VCR Connecting a VCR to the Video or S-Video/Audio jack Connect the Video/Audio cables between the VIDEO or S-VIDEO/AUDIO input jacks on the TV and VIDEO or S-VIDEO/AUDIO output jacks on the VCR. (Note: For better video, use an S-Video cable.) TV Power cord VCR • Please be sure to match the color coded input terminals and cable jacks. Audio cable Video cable S-Video cable Connecting a Camcorder Viewing camcorder tapes Connect a Video/Audio cable between the VIDEO or S-VIDEO/AUDIO input jacks on the TV and the VIDEO or S-VIDEO/AUDIO output jacks on the camcorder. (Note: For better video, use an S-VIDEO cable.) TV Power cord Camcorder • Please be sure to match the color coded input terminals and cable jacks. Audio cable Video cable S-Video cable English-5 BN68-00766E-00Eng_0214 2/14/05 1:48 PM Page 6 Connecting a DVD Player (480i, 480p) Playing DVD TV DVD Player Power cord Component cable Audio cable 1 Connect the Y, PB, PR (COMPONENT1, 2) input jacks on the TV to the Y, PB, PR output jacks on the DVD player using a component cable. 2 Connect the AUDIO L/R (COMPONENT1, 2) input jacks on the TV to the AUDIO output jacks on the DVD player using a audio cable. • Please be sure to match the color coded input terminals and cable jacks. English-6 BN68-00766E-00Eng_0214 2/14/05 1:48 PM Page 7 Connecting a DTV Receiver (480p, 720p, 1080i) This TV displays the optimum picture in 720p mode. Watching DTV TV DTV Receiver Power cord Component cable Audio cable HDMI/DVI cable 1 Connect the cable or antenna to the antenna input jack on the DTV. 2 Connect the Y, PB, PR (COMPONENT1, 2) or HDMI input jack on the TV to the Y, PB, PR or DVI output jacks on the DTV receiver using a component or HDMI/DVI cable. 3 Connect the AUDIO L/R (COMPONENT1, 2 or DVI AUDIO IN) input jacks on the TV with the AUDIO output jacks on the DTV receiver using an audio cable. • Please be sure to match the color coded input terminals and cable jacks. English-7 BN68-00766E-00Eng_0214 2/14/05 1:48 PM Page 8 Connecting to HDMI (High Definition Multimedia Interface) (480p, 720p, 1080i) Watching DTV 1 Connect the cable or antenna to the antenna input jack on the DTV. 2 Connect the HDMI input jack on the TV with the HDMI output jack on the DTV Set-Top Box using an HDMI cable. TV Power cord HDMI cable DTV Set-Top Box • Please make sure the HDMI source’s power is on before selecting HDMI from the “Source List” on the TV. Connecting a Digital TV Set-Top Box (480p, 720p, 1080i) By inputting a high-bandwidth digital content protection High-Definition picture source to the HDMI input jack on the TV, High-Definition pictures can be displayed on the screen in their digital form. Connecting to HDMI (High Definition Multimedia Interface)/DVI Compatible 1 Connect the DVI AUDIO (L, R) input jacks on the TV with the AUDIO output jacks on the Set-Top Box using an audio cable. 2 Connect the HDMI input jack on the TV and the VIDEO output jack on the Set-Top Box using an HDMI/DVI cable. TV DTV Set-Top Box Power cord HDMI/DVI cable Audio cable English-8 From cable or Antenna BN68-00766E-00Eng_0214 2/14/05 1:48 PM Page 9 Connecting a Digital Audio System There are many types of digital audio systems on the market today. A simplified illustration of an audio system is shown below. For more information, see your audio system owner’s manual. TV Power cord Digital Audio System Coaxial cable Optical cable 1 If your audio system has a coaxial digital audio input, connect to the “COAXIAL” output jack on the TV. 2 If your audio system has a optical digital audio input, connect to the “OPTICAL“ output jack on the TV. Be certain to remove the black cover from the optical output before inserting the cable. 3 If your system has both coaxial and optical digital audio inputs, SAMSUNG recommends you use the optical digital output on the TV. Do not connect both optical and coaxial cables. This may damage your audio system. OPTICAL: converts the electric signal into an optical light signal, and transmits it through glass fibers. COAXIAL: The digital audio signal is received through a coaxial copper cable. ● ● English-9 BN68-00766E-00Eng_0214 2/14/05 1:48 PM Page 10 Connecting to an Analog Amplifier 1 The “AUDIO OUT (AUDIO L/R)” terminals cannot be used for external speakers. You must hook them up to an amplifier. When an audio amplifier is connected to the “AUDIO OUT (AUDIO L/R)” terminals: Decrease the gain (volume) of the audio amplifier, and adjust the volume level with the volume control on the TV. TV Power cord Audio cable Analog Amplifier Connecting a PC Connection to a Macintosh computer may require an adapter. Connecting a PC (15p D-SUB) to the TV 1 Connect a PC cable between the PC Output jack on the PC and the RGB input jack (PC IN) on the TV. 2 Connect a Audio cable between the Audio jack on the PC and the Audio input jacks (PC AUDIO IN) on the TV. TV Power cord Audio cable PC cable • Please be sure to match the color coded input terminals and cable jacks. • A PC will not operate when connected with a HDMI/DVI cable. PC English-10 BN68-00766E-00Eng_0214 2/14/05 1:48 PM Page 11 Remote Control Buttons Remote Control Œ POWER button Turns the TV on and off. ´ GUIDE button Press to display the on-screen Electronic Program Guide (EPG). ˇ ANTENNA button Press to select “Air” or “Cable”. ¨ Number buttons ˆ - button Press to select additional channels (digital and analog) being broadcast by the same station. For example, to select channel “54-3”, press “54”, then press “-” and “3”. Ø MUTE button Press to mute the TV sound. ∏ VOL (Volume) buttons Use it to adjust volume. ” Anynet button Runs the Anynet view functions and sets up Anynet devices. ’ MENU button Displays the main on-screen menu. ˝ ENTER button Confirms a selection. Ô FAV.CH button Press to switch to your favorite channels. CH LIST button Displays the channel list. Ò MODE button Selects a target device to be controlled by the Samsung remote control (i.e., TV, STB, VCR, CABLE, or DVD). Ú PRE-CH button Tunes to the previous channel. Æ SOURCE button Press to display all of the available video sources (TV, AV, S-VIDEO, COMPONENT1, COMPONENT2, PC, and HDMI). ¿ P.MODE button Adjust the TV picture by selecting one of the preset factory settings (or select your personal, customized picture settings). ¸ S.MODE button Select Sound effect. ˛ E.SAVING button Press to adjust screen brightness according to surrounding environment. ◊ P.SIZE button Select Picture size. ± DNIe button Activates DNIe (Digital Natural Image engine). ≠ MTS button Press to choose stereo, mono or Separate Audio Program (SAP broadcast). – SET button Used during set up of this Samsung remote control, so that it will work compatibly with other devices (VCR, Cable Box and DVD). — PIP button Activates picture in picture. ÷ PIP control buttons CH , : Displays the available channels in sequence. (These buttons change channels in the PIP window only.) ® CAPTION button Controls the caption decoder. ∑ VCR, DVD control buttons Controls VCR tape or DVD disc functions: Stop, Rewind, Play/Pause, and Fast Forward. µ RESET button If your remote control is not functioning properly, take out the batteries and press the reset button for about 2~3 seconds. Re-insert the batteries and try using the remote control again. ı CH (Channel) buttons Use it to switch channels. ˜ INFO button Press to display information on the TV screen. ¯ EXIT button Press to exit the menu. ˘ Up/Down/Left/Right buttons Control the cursor in the menu. English-11 BN68-00766E-00Eng_0214 2/14/05 1:48 PM Page 12 Turning the TV On and Off Press the POWER button on the remote control. The TV will be turned on and you will be able to use its features. You can also use the Power button on the front of the TV. • If your TV isn’t turned on when the power button is pressed: Press the MODE button to check if the TV mode has been chosen. Viewing the Menus and Displays Your TV has a simple, easy-to-use menu system that appears on the TV screen. This system makes it convenient and fast to use features on the TV. Your TV also lets you display the status of many of your TV’s features. Viewing the Menus 1 With the power on, press the MENU button on the remote control. The main menu appears on the screen. The Input menu is selected. TV Input Source List Edit Name Anynet : TV Move 2 Press the ▲ or ▼ button to move to items in the menu. Press the œ/√/ENTER buttons to display, change, or use the selected items. Press the ENTER ( ) button to enter items in the menu. On screen menus disappear from the screen automatically after about two minutes or you can press the MENU or EXIT button on your remote control to exit the menu. Displaying Status Information Press the INFO button on the remote control. The TV will display the mode, Sound mode, MTS, V-Chip, and Current Time. AIR 28 Mono Mode : Dynamic Sound Mode : Custom MTS : Stereo V-Chip : Off 12 : 00 am English-12 √ √ √ Enter Return BN68-00766E-00Eng_0214 2/14/05 1:48 PM Page 13 Memorizing the Channels Your TV can memorize and store all of the available channels for both “off-air” (antenna) and cable channels. After the available channels are memorized, use the CH and CH buttons to scan through the channels. This eliminates the need to change channels by entering the channel digits. There are three steps for memorizing channels: selecting a broadcast source, memorizing the channels (automatic) and adding and deleting channels (manual). Selecting a broadcast source Before your television can begin memorizing the available channels, you must specify the type of signal source that is connected to the TV (i.e., an antenna or a cable system). 1 Press the MENU button. Press the ▲ or ▼ button to select “Channel”, then press the ENTER button. TV Channel Antenna Auto Program Add / Delete Favorite Channels Name Fine Tune † More Move 2 Press the ▲ or ▼ button to select “Auto Program”, then press the ENTER button. Press the ▲ or ▼ button to select the antenna connection, then press the ENTER button. √ √ √ √ √ Return Channel Antenna Auto Program Add / Delete Favorite Channels Name Fine Tune † More TV : Air √ √ √ √ √ √ Enter Return Auto Program Select the antennas to memorize Notes • Air : “Air” antenna signal. • Cable : “Cable” antenna signal. • Air + Cable : “Air” and “Cable” antenna signals. If the CableCARD is inserted into the “CableCARD” slot on the rear panel, “Cable” and “Air + Cable” are not available. √ Enter TV Move 3 : Air Air Cable Air + Cable Move TV Start Start Start Enter Return Auto Program Select the antennas to memorize Start Start Start Air Cable Air + Cable Move English-13 Enter Return BN68-00766E-00Eng_0214 2/14/05 1:48 PM Page 14 When selecting Cable TV system : Press the ▲ or ▼ button to select “Cable” or “Air + Cable”, then press the ENTER button. TV Auto Program Select the cable system. Digital Channel Analog Channel Start : STD : STD Move Press the ▲ or ▼ button to select “Digital Channel”, then press the ENTER button. Press the ▲ or ▼ button to select “STD”, “HRC”, or “IRC”, press the ENTER button. TV Enter Select the cable system. STD : STD : STD HRC IRC Digital Channel Analog Channel Start TV Enter Return Auto Program Select the cable system. STD : STD : STD HRC IRC Digital Channel Analog Channel Start Move Press the ▲ or ▼ button to select “Start”, then press the ENTER button to memorize the channels. Return Auto Program Move Press the ▲ or ▼ button to select “Analog Channel”, then press the ENTER button. Press the ▲ or ▼ button to select “STD”, “HRC”, or “IRC”, press the ENTER button. √ √ TV Enter Return Auto Program Select the cable system. Digital Channel Analog Channel Start : STD : STD Move Enter √ √ Return Auto Program Auto Program in Progress. CABLE Channel 67 Stop • STD, HRC, and IRC identify various types of cable TV systems. Contact your local cable company to identify the type of cable system that exists in your particular area. At this point the signal source has been selected. Proceed to “Storing Channels in Memory” on page 43 of the instruction manual. English-14 Enter Return BN68-00766E-00Eng_0214 2/14/05 1:48 PM Page 15 Storing Channels in Memory 4 Press the ▲ or ▼ button to select the antennas to memorize. Press the ENTER button to select “Start”. TV Auto Program Select the antennas to memorize Air Cable Air + Cable Start Start Start Move 5 In Air, press the ENTER button to start the auto program. In Cable or Air + Cable, press the ENTER button to select the cable system. Press the ▲ or ▼ button to select “Digital Channel or Analog Channel”, then select the cable system. Press the ▲ or ▼ button to select “Start” and press the ENTER button to start the auto program. TV Enter Auto Program Select the cable system. Digital Channel Analog Channel Start : STD : STD Move 6 The TV begins memorizing all available stations. Press the ENTER button at any time to interrupt the memorization process. Press the EXIT button to exit. Return Enter √ √ Return Auto Program Auto Program in Progress. Note • The TV must be connected to an antenna in order to receive digital TV signals. Even if a particular channel is deleted from the memory, you can always tune to that channel directly by using the number buttons on the remote control. AIR Channel 67 Stop Enter Return • All available DTV and analog channels are automatically stored in memory when channels are selected by directly accessing channels. • It takes approximately 3 to 10 minutes to memorize channels. Viewing an External Signal Source Use the remote control to switch between viewing signals from connected equipment, such as VCR, DVD, Set-Top Box, and the TV source (broadcast or cable). Setting the Signal Source 1 Press the MENU button. Press the ENTER button to select “Input”. ➤ TV Input Source List Edit Name Anynet Quick way to access viewing an external signal source : Just press the “SOURCE” button on the remote control. Move 2 Press the ENTER button to select “Source List”. TV √ √ √ Enter Return Source List TV AV S-Video Component 1 Component 2 PC HDMI Move English-15 : TV : ---: ---: ---: ---: ---: ---Enter Return BN68-00766E-00Eng_0214 3 4 2/14/05 5:28 PM Page 16 Press the ▲ or ▼ button to select signal source, then press the ENTER button. TV Source List TV AV S-Video Component 1 Component 2 PC HDMI Press the MENU button to exit. Move : ---: ---: ---: ---: ---: ---Enter Return • When you connect equipment to the TV, you can choose between the following sets of jacks: AV, S-VIDEO, COMPONENT 1, COMPONENT 2, PC, or HDMI on the TV’s rear panel. • HDMI input can only be selected when the external device is turned on. Troubleshooting If the TV seems to have a problem, first try this list of possible problems and solutions. If none of these troubleshooting tips apply, then call your nearest service center. Possible Solution Problem Poor picture. Check all wire connections. No picture or sound. Try another channel. Press the SOURCE button. Make sure the TV is plugged in. Check the antenna connections. Poor sound quality. Try another channel. Adjust the volume. Your remote control does not operate the TV. Press the “MODE” button to put your remote control in the “TV” mode. The TV won’t turn on. Check if the power plug is connected. There is no screen image. Check to see that both the TV and the source are plugged in and turned on. The image is too light or too dark. Adjust the Brightness or Contrast settings. The image is too large or too small. Adjust the Size settings. Digital broadcasting screen problem. Please check the digital signal strength and input antenna. Screen is black and power indicator light blinks steadily. On your computer check; Power, Signal Cable. The TV is using its power management system. Move the computer’s mouse or press any key on the keyboard. On your equipment check (STB, DVD, etc) ; Power, Signal Cable. The TV is using its power management system. Press the Source button on the panel or remote control. Turn the TV off and on. English-16