1
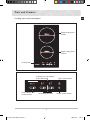
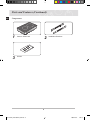
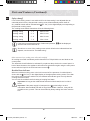
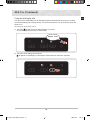
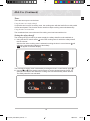
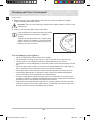
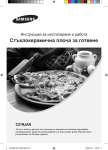
Installation and Operating Instructions
Ceramic Glass Hob
C21RJAN series
To avoid the risk of accidents or damage to the hob, read all instructions before
installing or using the appliance. Keep this manual for future reference.
C21RJAN_XSA-00144A_EN.indd 1
2008-10-07
5:01:11
C21RJAN_XSA-00144A_EN.indd 2
2008-10-07
5:01:11
Contents
Using This Manual . . . . . . . . . . . . . . . . . . . . . . . . . . . . . . . . . . . . . . . 2
Safety . . . . . . . . . . .
Electrical safety . . . .
Child safety . . . . . .
Safety during use . . .
Safety when cleaning .
.
.
.
.
.
.
.
.
.
.
.
.
.
.
.
.
.
.
.
.
.
.
.
.
.
.
.
.
.
.
.
.
.
.
.
.
.
.
.
.
.
.
.
.
.
.
.
.
.
.
.
.
.
.
.
.
.
.
.
.
.
.
.
.
.
.
.
.
.
.
.
.
.
.
.
.
.
.
.
.
.
.
.
.
.
.
.
.
.
.
.
.
.
.
.
.
.
.
.
.
.
.
.
.
.
.
.
.
.
.
.
.
.
.
.
.
.
.
.
.
.
.
.
.
.
.
.
.
.
.
.
.
.
.
.
.
.
.
.
.
.
.
.
.
.
.
.
.
.
.
.
.
.
.
.
.
.
.
.
.
.
.
.
.
.
.
.
.
.
.
.
.
.
.
.
3
3
3
4
4
EN
Disposal Instructions . . . . . . . . . . . . . . . . . . . . . . . . . . . . . . . . . . . . . 4
Installing the Hob . . . . . . . . . . . . . . . . . . . . . . . . . . . . . . . . . . . . . . .
Regulations and compliance . . . . . . . . . . . . . . . . . . . . . . . . . . . . . . . .
Safety instructions for the installer . . . . . . . . . . . . . . . . . . . . . . . . . . . . .
Connecting to the outlet . . . . . . . . . . . . . . . . . . . . . . . . . . . . . . . . . . .
Installing into the countertop . . . . . . . . . . . . . . . . . . . . . . . . . . . . . . . .
Parts and Features . . . . . . . . . . . . . . . . . . . . . . . . . . . . . . . . . . . . . .
Cooking zones and control panel . . . . . . . . . . . . . . . . . . . . . . . . . . . . .
Components . . . . . . . . . . . . . . . . . . . . . . . . . . . . . . . . . . . . . . . .
The key features of your appliance . . . . . . . . . . . . . . . . . . . . . . . . . . . .
Safety shutoff . . . . . . . . . . . . . . . . . . . . . . . . . . . . . . . . . . . . . . .
Residual heat indicator . . . . . . . . . . . . . . . . . . . . . . . . . . . . . . . . . .
5
5
5
6
6
. 7
. 7
. 8
. 9
10
10
Before You Begin . . . . . . . . . . . . . . . . . . . . . . . . . . . . . . . . . . . . . . . 11
Initial cleaning . . . . . . . . . . . . . . . . . . . . . . . . . . . . . . . . . . . . . . . 11
Hob Use . . . . . . . . . . . . . . . . . . . . . . . . . . . . . . . . . . . . . . . . . . . .
Using suitable cookware . . . . . . . . . . . . . . . . . . . . . . . . . . . . . . . . .
Using the touch control sensors . . . . . . . . . . . . . . . . . . . . . . . . . . . . . .
Switching the appliance on . . . . . . . . . . . . . . . . . . . . . . . . . . . . . . . .
Temperature control . . . . . . . . . . . . . . . . . . . . . . . . . . . . . . . . . . . .
Switching the appliance off . . . . . . . . . . . . . . . . . . . . . . . . . . . . . . . .
Switching a cooking zone off . . . . . . . . . . . . . . . . . . . . . . . . . . . . . . .
Using the child safety lock . . . . . . . . . . . . . . . . . . . . . . . . . . . . . . . . .
Locking and unlocking the control panel . . . . . . . . . . . . . . . . . . . . . . . . .
Timer . . . . . . . . . . . . . . . . . . . . . . . . . . . . . . . . . . . . . . . . . . .
Setting the safety shutoff . . . . . . . . . . . . . . . . . . . . . . . . . . . . . . . . .
Countdown timer . . . . . . . . . . . . . . . . . . . . . . . . . . . . . . . . . . . . .
11
11
12
13
13
14
14
15
16
17
17
18
Cleaning and Care . . . . . . . . . . . . . . . . . . . . . . . . . . . . . . . . . . . . . . 19
Hob . . . . . . . . . . . . . . . . . . . . . . . . . . . . . . . . . . . . . . . . . . . . 19
To avoid damaging your appliance . . . . . . . . . . . . . . . . . . . . . . . . . . . . 20
Warranty and Service . . . . . . . . . . . . . . . . . . . . . . . . . . . . . . . . . . . . 21
FAQs and troubleshooting . . . . . . . . . . . . . . . . . . . . . . . . . . . . . . . . . 21
Service . . . . . . . . . . . . . . . . . . . . . . . . . . . . . . . . . . . . . . . . . . 22
Technical Data . . . . . . . . . . . . . . . . . . . . . . . . . . . . . . . . . . . . . . . . 23
C21RJAN_XSA-00144A_EN.indd 1
2008-10-07
5:01:11
Using This Manual
EN
Please take the time to read this owner’s manual, paying particular attention to the safety
information contained in the following section, before using your appliance. Keep this manual
for future reference. If transferring ownership of the appliance, please remember to pass the
manual on to the new owner.
The following symbols are used in the text
This is the safety alert symbol.
Warning indicates information concerning your personal safety.
Important indicates information on avoiding damage to the appliance.
This symbol indicates useful information and practical tips.
This symbol refers to measures that can be taken to help protect the environment.
1. Numbers like these indicate step - by - step instructions for using the appliance.
2. ...
3. ...
This manual contains information on steps you can take yourself to diagnose and resolve
problems that may arise. Refer to the section “Troubleshooting.”
C21RJAN_XSA-00144A_EN.indd 2
2008-10-07
5:01:12
Safety
The safety aspects of this appliance comply with accepted technical standards and
the German Appliance Safety Law. However, as manufacturers we also believe it is
our responsibility to familiarise you with the following safety instructions.
EN
Electrical safety
• Be sure the appliance is properly installed and grounded by a qualified technician.
• The appliance should be serviced only by qualified service personnel. Repairs carried
out by unqualified individuals may cause injury or serious malfunction. If your appliance
is in need of repair, contact your local service centre. Failure to follow these instructions
may result in damage and void the warranty.
• Flush - mounted appliances may be operated only after they have been installed in
cabinets and workplaces that conform to the relevant standards. This ensures sufficient
protection against contact for electrical units as required by the TÜV [Technical
Inspection Association].
• If your appliance malfunctions or if fractures, cracks or splits appear:
- switch off all cooking zones;
- disconnect the hob from the mains supply and contact your local service centre.
• If the hob cracks, turn the appliance off to avoid the possibility of electric shock. Do not
use your hob until the glass surface has been replaced.
• Do not use the hob to heat aluminium foil, products wrapped in aluminium foil or frozen
foods packaged in aluminium cookware.
Child safety
This appliance is not intended for use by young children or infirm persons without the
adequate supervision of a responsible adult.
Young children should be supervised to ensure that they do not play with the appliance.
The cooking zones will become hot when you cook. Always keep small children away
from the appliance.
C21RJAN_XSA-00144A_EN.indd 3
2008-10-07
5:01:12
Safety (continued)
EN
Safety during use
• This appliance is to be used only for normal cooking and frying in the home. It is not
designed for commercial or industrial use.
• Never use the hob for heating the room.
• Take care when plugging electrical appliances into mains sockets near the hob. Mains
leads must not come into contact with the hob.
• Overheated fat and oil can catch fire quickly. Never leave surface units unattended
when preparing foods in fat or oil, for example, when cooking chips.
• Turn the cooking zones off after use.
• Always keep the control panels clean and dry.
• Never place combustible items on the hob. It may cause fire.
• The appliance is not intended for use by persons (including children) with reduced
physical, sensory or mental capabilities, or lack of experience and knowledge, unless
they have been given supervision or instruction concerning use of the appliance by a
person responsible for their safety.
Safety when cleaning
• Always turn the appliance off before cleaning.
• For safety reasons do not clean the appliance with a steam jet or high - pressure
cleaner.
• Clean the hob in accordance with the cleaning and care instructions contained in this
manual.
Disposal Instructions
Disposing of the packaging material
• All materials used to package the appliance are fully recyclable. Sheet and hard foam
parts are appropriately marked. Please dispose of packaging materials and old
appliances with due regard to safety and the environment.
Proper disposal of your old appliance
Warning: Before disposing of your old appliance, make it inoperable so that it cannot be a
source of danger.
To do this, have a qualified technician disconnect the appliance from the mains supply and
remove the mains lead.
• The appliance may not be disposed of in the household rubbish.
• Information about collection dates and public refuse disposal sites is available from your
local refuse department or council.
C21RJAN_XSA-00144A_EN.indd 4
2008-10-07
5:01:12
Installing the Hob
Important: Be sure the new appliance is installed and grounded only by qualified
personnel.
Please observe this instruction. The warranty will not cover any damage that may
occur as a result of improper installation.
Technical data is provided at the end of this manual.
EN
Regulations and compliance
This appliance meets the following standards:
• EN 60 335 - 1 and EN 60 335 - 2 - 6, relating to the safety of electrical appliances for
household use and similar purposes;
• EN 60350, or DIN 44546 / 44547 / 44548, relating to the operating features of electric
cookers, hobs, ovens, and grills for household use;
• EN 55014 - 2;
• EN 55014;
• EN 61000 - 3 - 2; and
• EN 61000 - 3 - 3, relating to basic requirements for electromagnetic compatibility (EMC).
This appliance complies with the following EU Directives:
• 73 / 23 / EWG dated 19.02.1973 (Low Voltage Directive);
• 89 / 336 / EWG dated 03.05.1989 (EMC Directive including Amending Directive
92 / 31 / EWG); and
• 93 / 68 / EWG CE Labeling Directive.
Safety instructions for the installer
• With respect to fire protection, this appliance corresponds to EN 60 335 - 2 - 6. This type of
appliance may be installed with a high cupboard or wall on one side.
• Drawers may not be fitted underneath the hob.
• The installation must guarantee shock protection.
• The kitchen unit in which the appliance is fitted must satisfy the stability requirements of
DIN 68930.
• For protection against moisture, all cut surfaces are to be sealed with a suitable sealant.
• On tiled work surfaces, the joints in the area where the hob sits must be completely filled
with grout.
• On natural, artificial stone, or ceramic tops, the snap action springs must be bonded in
place with a suitable artificial resin or mixed adhesive.
• Ensure that the seal is correctly seated against the work surface without any gaps.
Additional silicon sealant must not be applied; this would make removal more difficult when
servicing.
• The hob must be pressed out from below when removed.
• A board is to be installed underneath the hob.
C21RJAN_XSA-00144A_EN.indd 5
2008-10-07
5:01:13
Installing the Hob (Continued)
EN
Connecting to the outlet
Before connecting, check that the nominal voltage of the appliance, that is, the voltage stated
on the rating plate, corresponds to the available supply voltage. The rating plate is located on
the lower casing of the hob.
The heating element voltage is AC240 V~. This appliance is equipped with a cord that includes
a grounding wire and a grounding plug. The plug must be plugged into an outlet that is
properly installed and grounded.
Once the hob is connected to the mains supply, check that all cooking zones are
ready for use by briefly switching each on in turn at the maximum setting.
When the hob is powered on for the first time, all displays light and the child safety
lock is activated.
Installing into the countertop
Make a note of the serial number on the appliance rating plate prior to installation.
This number will be required in the case of requests for service and is no longer
accessible after installation, as it is on the original rating plate on the underside of the
appliance.
Pay special attention to the minimum space and clearance requirements.
Secure the brackets at both sides with the provided screws before mounting the hob
onto the brackets.
x4
min. 50mm
R3
273 +1
min. 20
490+1
600
50
90 x4
2
100
=
490
+1
100
=
C21RJAN_XSA-00144A_EN.indd 6
2008-10-07
5:01:14
Parts and Features
Cooking zones and control panel
EN
Single cooking zone
1950W
Single cooking zone
1300 W
Control panel
Indicators for heat settings
and residual heat
Timer indicator and
control sensors
Heat setting selectors
“Lock” control sensor
“On/Off” control sensor
C21RJAN_XSA-00144A_EN.indd 7
2008-10-07
5:01:15
Parts and Features (Continued)
EN
Components
1
3
2
Ceramic Glass Hob
Installation Brackets
Screws
C21RJAN_XSA-00144A_EN.indd 8
2008-10-07
5:01:15
Parts and Features (Continued)
The key features of your appliance
EN
• Ceramic glass cooking surface: The appliance has a ceramic glass cooking surface
and four rapid - response cooking zones. The hob’s powerful radiant heater elements
significantly shorten the amount of time required for the zones to heat up.
• Touch control sensors: Your appliance is operated using touch control sensors.
• Easy cleaning: The advantage of the ceramic glass cooking surface and the control
sensors is their accessibility for cleaning. The smooth, flat surface is easy to clean.
• On / Off sensor: The “On / Off” control sensor provides the appliance with a separate
mains switch. Touching this sensor switches the power supply on or off completely.
• Control and function indicators: Digital displays and indicator lights provide information
about settings and activated functions, as well as the presence of residual heat in the
various cooking zones.
• Safety shutoff: A safety shutoff ensures that all cooking zones switch off automatically
after a period of time if the setting has not been changed.
• Residual heat indicator: An icon for residual heat appears in the display if the cooking
zone is so hot that there is a risk of burning.
Digital displays: The four display fields are assigned to the four cooking zones.
They show the following information:
the appliance has been switched on,
-
to selected heat settings,
-
residual heat,
-
the child lock is activated; and
-
error message, the sensor has been touched for longer than 10 seconds.
-
error message, when the Hob is overheated because of abnormal operation.
-
C21RJAN_XSA-00144A_EN.indd 9
2008-10-07
5:01:16
Parts and Features (Continued)
EN
Safety shutoff
If one of the cooking zones is not switched off or the heat setting is not adjusted after an
extended period of time, that particular cooking zone will automatically switch itself off.
Any residual warmth will be indicated with (for “hot”) in the digital displays corresponding to
the particular cooking zones.
The cooking zones switch themselves off at the following times.
Cooking setting
1-2
After 6 hours
Cooking setting
3-4
After 5 hours
Cooking setting
5-6
After 3 hours
Cooking setting
7-9
After 1 hour
If the Hob is overheated because of abnormal operation,
And the Hob will be switched off.
will be displayed.
Should one or more of the cooking zones switch off before the indicated time has
elapsed, see the section “Troubleshooting.”
Other reasons why a cooking zone will switch itself off
All cooking zones will immediately switch themselves off if liquid boils over and lands on the
control panel.
The automatic shutoff will also be activated if you place a damp cloth on the control panel. In
both of these instances, the appliance will need to be switched on again using the main power
sensor after the liquid or the cloth has been removed .
Residual heat indicator
When an individual cooking zone or the hob is turned off, the presence of residual heat is
shown with an (for “hot”) in the digital display of the appropriate cooking zones. Even after
the cooking zone has been switched off, the residual heat indicator goes out only after the
cooking zone has cooled.
You can use the residual heat for thawing or keeping food warm.
Important: As long as the residual heat indicator is illuminated, there is a risk of
burns.
Important: If the power supply is interrupted, the symbol will go out and
information about residual heat will no longer be available. However, it may still be
possible to burn yourself. This can be avoided by always taking care when near the
hob.
10
C21RJAN_XSA-00144A_EN.indd 10
2008-10-07
5:01:17
Before You Begin
Initial cleaning
EN
Wipe the ceramic glass surface with a damp cloth and ceramic hob glass cleaner.
Important: Do not use caustic or abrasive cleaners. The surface could be damaged.
Hob Use
Using suitable cookware
Better pans produce better results.
• You can recognise good pans by their bases. The base should be as thick and flat as
possible.
• When buying new pans, pay particular attention to the diameter of the base.
Manufacturers often give only the diameter of the upper rim.
• Pots with aluminium or copper bases can cause metallic discolouration on the ceramic
glass surface. The discolouration is very difficult or impossible to remove.
• Do not use pans made of cast iron or which have damaged bases with rough edges or
burrs. Permanent scratching can occur if these pan are slid across the surface.
• When cold, pan bases are normally bowed slightly inwards (concave). They should
never be bowed outwards (convex).
• If you wish to use a special type of pan, for example, a pressure cooker, a simmering
pan, or a wok, please observe the manufacturer’s instructions.
Energy saving tips
You can save valuable energy by observing the following points.
Right!
Wrong!
11
C21RJAN_XSA-00144A_EN.indd 11
2008-10-07
5:01:17
Hob Use (Continued)
•
•
•
•
EN
Always position pots and pans before switching on the cooking zone.
Dirty cooking zones and pan bases increase power consumption.
When possible, position the lids firmly on the pots and pans to cover completely.
Switch the cooking zones off before the end of the cooking time to use the residual heat
for keeping foods warm or for thawing.
• The base of the pan should be the same size as the cooking zone.
• Using a pressure cooker reduces cooking times by up to 50 %
Using the touch control sensors
To operate the touch control sensors, touch the desired panel with the tip of your pointed
finger until the relevant displays illuminate or go out, or until the desired function is
activated.
Ensure that you are touching only one sensor panel when operating the appliance. If your
finger is too flat on the panel, an adjacent sensor may be actuated as well.
12
C21RJAN_XSA-00144A_EN.indd 12
2008-10-07
5:01:17
Hob Use (Continued)
Switching the appliance on
EN
Touch the “Lock ” sensor for approximately 3 seconds.
The appliance is switched on using the “On / Off ” control sensor.
Touch the “On / Off ” sensor.
The digital displays will show .
After the “On / Off ” sensor has been actuated to switch on your appliance, a heat
setting must be selected within approximately 10 seconds. Otherwise, the appliance
will switch itself off for safety reasons.
Temperature control
For setting and adjusting the power level ( to ) for cooking, touch the corresponding
cooking zone’s
,
keys.
The first time
is pressed, the heat level is set to .
The first time
is pressed, the heat level is set to .
Use the
key to increase the heat setting and the
key to decrease.
13
C21RJAN_XSA-00144A_EN.indd 13
2008-10-07
5:01:18
Hob Use (Continued)
EN
Switching the appliance off
To completely switch off the appliance, use the “On / Off
Touch the “On / Off ” sensor.
” control sensor.
After switching off a single cooking zone or the entire cooking surface, the presence
of residual heat will be indicated in the digital displays of the corresponding cooking
zones in the form of an (for “hot”).
If the heat setting is at and you want to turn the
burner off, the sensor can be
touched one additional time, and the heat setting will go to zero.
For faster adjustment, keep your finger on the
or
sensor until the required value
is obtained.
If more than one sensor is pressed for longer than 10 seconds,
will show in the
heat setting display. To reset, touch the “On / Off ” sensor.
Switching a cooking zone off
To switch off a cooking zone, return the setting to
and touch sensors
or
.
by using the control panel’s heat setting
14
C21RJAN_XSA-00144A_EN.indd 14
2008-10-07
5:01:19
Hob Use (Continued)
Using the child safety lock
EN
You can use the child safety lock to safeguard against unintentionally turning on a cooking
zone and activating the cooking surface. The lock control sensor can be used only when the
power is on.
Switching the child safety lock on
1. Touch the
control sensor for approximately 3 seconds.
An acoustic signal will sound as confirmation.
approx. 3 sec.
2. Touch any heat setting control sensor.
will appear in the displays, indicating the child safety lock has been activated.
15
C21RJAN_XSA-00144A_EN.indd 15
2008-10-07
5:01:19
Hob Use (Continued)
EN
Switching the child safety lock off
1. Touch the control sensor for approximately 3 seconds.
An acoustic signal will sound as confirmation.
approx. 3 sec.
Locking and unlocking the control panel
At any stage during the cooking process, the control panel, with the exception of the “On
/ Off ” control sensor, can be locked in order to prevent the settings from being changed
unintentionally, for example, by wiping over the panel with a cloth.
1. Touch the lock control sensor for approximately 3 seconds.
The indicator light in the lock control sensor will illuminate. The control sensors are now
locked.
2. To unlock the control sensor, touch the lock control sensor again for approximately 3
seconds. The indicator light in the lock control sensor will extinguish.
approx. 3 sec.
16
C21RJAN_XSA-00144A_EN.indd 16
2008-10-07
5:01:20
Hob Use (Continued)
Timer
EN
There are two ways to use the timer:
Using the timer as a safety shutoff
If a specific time is set for a cooking zone, the cooking zone will shut itself off once this period
of time has elapsed. This function can be used for multiple cooking zones simultaneously.
Using the timer to count down
The countdown timer cannot be used if a cooking zone has been switched on.
Setting the safety shutoff
The cooking zone(s) for which you want to apply the safety shutoff must be switched on.
1. Using the timer’s control sensor , select the cooking zone for which the safety shutoff
time is to be set.
After the first active cooking zone is selected, touching the timer’s control sensor will
cause the corresponding indicator to flash slowly.
will appear in the timer display.
The next active cooking zone is selected by touching the timer’s control sensor again .
or
timer setting control sensors to set the desired amount of time, for
2. Use the
example, 15 minutes, after which the cooking zone will automatically switch itself off.
The safety shutoff is now activated.
17
C21RJAN_XSA-00144A_EN.indd 17
2008-10-07
5:01:20
Hob Use (Continued)
EN
To display the time remaining for any of the cooking zones, use the timer’s control sensor .
The corresponding control indicator will begin to blink slowly.
The settings are reset using the
or
timer setting control sensors. After the set period of
time has elapsed, the cooking zone automatically switches itself off, an acoustic signal sounds
as confirmation and the timer display indicates.
To make the settings more quickly, touch any of the
or
timer setting control
sensors until the desired value is reached.
If the
timer setting control sensor is touched first, the time setting will begin at 99
minutes; if the
timer setting control sensor is touched first, the time setting will
begin at 1 minute.
Countdown timer
For the countdown timer to be used, the appliance must be switched on but all the cooking
zones must be switched off.
1. Touch the timer’s control sensor .
will appear in the timer display.
or
timer setting control sensors.
2. Set the desired period of time using the
The countdown timer function is now activated and the remaining time appears in the timer
display.
To adjust the remaining time, touch the timer’s control sensor and change the setting using
the
or
timer setting control sensors .
Suggested settings for cooking specific foods
The figures in the table below are guidelines. The heat settings required for various cooking
methods depend on a number of variables, including the quality of the cookware being used
and the type and amount of food being cooked.
Switch Setting
Cookingmethod
9
Warming
Sautéing
Frying
Warming large amounts of liquid, boiling noodles,
searing meat, (browning goulash,braising meat)
7
Intensive
Frying
Steak, sirloin, hash browns, sausages, pancakes /
griddle cakes
6
Frying
Schnitzel / chops, liver, fish, rissoles, fried eggs
Boiling
Cooking up to 1.5 l liquid, potatoes, vegetables
8
5
4
3
2
Steaming
Stewing
Boiling
1
Melting
Examples for Use
Steaming and stewing of small amounts of
vegetables, boiling rice and milk dishes
Melting butter, dissolving gelatine, melting chocolate
Note
• The heat settings indicated in the table above are provided only as guidelines for your
reference.
• You will need to adjust the heat settings according to specific cookware and foods.
18
C21RJAN_XSA-00144A_EN.indd 18
2008-10-07
5:01:21
Cleaning and Care
Hob
EN
Important: Cleaning agents must not come into contact with a heated ceramic glass
surface: All cleaning agents must be removed with adequate amounts of clean water
after cleaning because they can have a caustic effect when the surface becomes hot.
Do not use any aggressive cleaners such as grill or oven sprays, scouring pads or
abrasive pan cleaners.
Clean the ceramic glass surface after each use when it is still warm to the touch.
This will prevent spillage from becoming burnt onto the surface. Remove scales,
watermarks, fat drippings and metallic discolouration with the use of a commercially
available ceramic glass or stainless steel cleaner.
Light Soiling
1. Wipe the ceramic glass surface with a damp cloth.
2. Rub dry with a clean cloth. Remnants of cleaning agent must not be left on the surface.
3. Thoroughly clean the entire ceramic glass cooking surface once a week with a
commercially available ceramic glass or stainless steel cleaner.
4. Wipe the ceramic glass surface using adequate amounts of clean water and rub dry with a
clean lint - free cloth.
Stubborn Soiling
1. To remove food that has boiled over and stubborn splashes, use a glass scraper.
2. Place the glass scraper at an angle to the ceramic glass surface.
3. Remove soiling by scraping with the blade.
Glass scrapers and ceramic glass cleaners are available from specialty retailers.
19
C21RJAN_XSA-00144A_EN.indd 19
2008-10-07
5:01:21
Cleaning and Care (Continued)
EN
Problem Dirt
1. Remove burnt-on sugar, melted plastic, aluminium foil or other materials with a glass
scraper immediately and while still hot.
Important: There is a risk of burning yourself when the glass scraper is used on a hot
cooking zone:
2. Clean the hob as normal when it has cooled down.
If the cooking zone on which something has melted
has been allowed to cool, warm it up again for
cleaning.
Scratches or dark blemishes on the ceramic glass
surface, caused, for example, by a pan with sharp
edges, cannot be removed. However, they do not
impair the function of the hob.
To avoid damaging your appliance
• Do not use the hob as a work surface or for storage.
• Do not operate a cooking zone if there is no pan on the hob or if the pan is empty.
• Ceramic glass is very tough and resistant to temperature shock, but it is not
unbreakable. It can be damaged by a particularly sharp or hard object dropping onto the
hob.
• Do not use pans made of cast iron or which have damaged bases with rough edges or
burrs. Scratching may occur if these pans are slid across the surface.
• Do not place pans on the hob frame. Scratching and damage to the finish may occur.
• Avoid spilling acidic liquids, for example, vinegar, lemon juice and descaling agents,
onto the hob frame, since such liquids can cause dull spots.
• If sugar or a preparation containing sugar comes into contact with a hot cooking zone
and melts, it should be cleaned off immediately with a kitchen scraper while it is still hot.
If allowed to cool, it may damage the surface when removed.
• Keep all items and materials that could melt, for example, plastics, aluminium foil and
oven foils, away from the ceramic glass surface. If something of this nature melts onto
the hob, it must be removed immediately with a scraper.
20
C21RJAN_XSA-00144A_EN.indd 20
2008-10-07
5:01:21
Warranty and Service
FAQs and troubleshooting
EN
A fault may result from a minor error that you can correct yourself with the help of the following
instructions. Do not attempt any further repairs if the following instructions do not help in each
specific case.
Warning: Repairs to the appliance are to be performed only by a qualified service
technician. Improperly effected repairs may result in considerable risk to the user. If
your appliance needs repair, please contact your customer service centre.
What should I do if the cooking zones are not functioning?
Check for the following possibilities:
• The fuse in the house wiring (fuse box) is intact. If the fuses trip a number of times, call an
authorised electrician.
• The appliance is properly switched on.
• The control indicators in the control panel are illuminated.
• The cooking zone is switched on.
• The cooking zones are set at the desired heat settings.
What should I do if the cooking zones will not switch on?
Check for the following possibilities:
• A period of more than 10 seconds has elapsed between when the On / Off button was
actuated and the desired cooking zone switches on (see the section “Switching the
appliance on”).
• The control panel is partially covered by a damp cloth or liquid.
What should I do if the display except for
suddenly disappears?
the residual warmth indicator
This could be a result of one of two possibilities:
• The On / Off sensor was accidentally actuated.
• The control panel is partially covered by a damp cloth or liquid.
What should I do if, after the cooking zones have been switched off, residual
warmth is not indicated in the display?
Check for the following possibility:
• The cooking zone was only briefly used and therefore did not become hot enough. If the
cooking zone is hot, please call the customer service centre.
What should I do if the cooking zone will not switch on or off?
This could be due to one of the following possibilities:
• The control panel is partially covered by a damp cloth or liquid.
• The child safety lock is on.
What should I do if the
display is illuminated?
Check for the following:
• The control panel is partially covered by a damp cloth or liquid. To reset, press the “On /
Off” control sensor.
21
C21RJAN_XSA-00144A_EN.indd 21
2008-10-07
5:01:21
Warranty and Service (Continued)
EN
What does it mean when the burner does not glow red?
• The selected temperature of the cooking zone is maintained by a sensor that cycles the
zone on and off, so the surface cooking area will not always glow red. If you select a low
heat setting, the heat will cycle on and off more frequently than at higher settings. The heat
also cycles on and off at the highest setting.
If you request a service call because of an error made in operating the appliance, the visit from
the customer service technician may incur a charge even during the warranty period.
Service
Before calling for assistance or service, please check the section “Troubleshooting.”
If you still need help, follow the instructions below.
Is it a technical fault?
If so, please contact your customer service centre.
Always prepare in advance for the discussion. This will ease the process of diagnosing the
problem and also make it easier to decide if a customer service visit is necessary.
Please take note of the following information.
• What form does the problem take?
• Under what circumstances does the problem occur?
When calling, please know the model and serial number of your appliance. This information is
provided on the rating plate as follows:
• Model description
• S / N code (10 digits)
We recommend that you record the information here for easy reference.
Model:
Serial number:
When do you incur costs even during the warranty period?
• if you could have remedied the problem yourself by applying one of the solutions provided
in the section “Troubleshooting,”
• if the customer service technician has to make several service calls because he was not
provided with all of the relevant information before his visit and as a result, for example,
has to make additional trips for parts. Preparing for your phone call as described above will
save you the cost of these trips.
22
C21RJAN_XSA-00144A_EN.indd 22
2008-10-07
5:01:21
Technical Data
Appliance dimensions
Width
288 mm
Depth
505 mm
Height
50 mm
EN
Worktop cut - out dimensions
Width
273 mm
Depth
490 mm
Corner radius
3 mm
Cooking rings
Position
Diameter
Power
Front
148 mm
1,300 W
Rear
183 mm
1,950 W
Connection voltage
240 V ~ 50 Hz
Maximum connected load power
3.25 kW
Weight :
Net
4.3 kg
Gross
6.0 kg
23
C21RJAN_XSA-00144A_EN.indd 23
2008-10-07
5:01:21
Note
EN
24
C21RJAN_XSA-00144A_EN.indd 24
2008-10-07
5:01:21
Note
EN
25
C21RJAN_XSA-00144A_EN.indd 25
2008-10-07
5:01:22
Code No.:DG68- 00144A-01
C21RJAN_XSA-00144A_EN.indd 26
2008-10-07
5:01:22