1
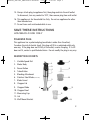
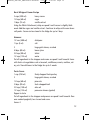
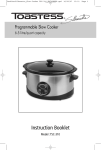
Booklet_HB-1094_ENG:Salton Booklet
7/24/08
1:25 PM
Page 1
®
stainless steel
hand blender
Instruction Booklet
Model: HB-1094
Booklet_HB-1094_ENG:Salton Booklet
7/24/08
1:25 PM
Page 2
IMPORTANT SAFEGUARDS
When using electrical appliances, basic safety precautions should always be
followed including the following:
1. Read all instructions.
2. To protect against electrical hazards, do not immerse motor body, cord,
plugs, or the appliance in water or other liquid.
3. Close supervision is necessary when any appliance is used by or near
children.
4. Unplug from outlet when not in use before putting on or taking off parts
and before cleaning.
5. Do not operate any appliance with a damaged cord or plug or after the
appliance malfunctions, or is dropped or damaged in any manner. Return
appliance to SALTON for examination, repair or electrical or mechanical
adjustment. See Warranty section.
6. Avoid contacting moving parts.
7. Keep hands and utensils out of container while blending to reduce the risk
of severe injury to persons or damage to the unit. A scraper may be used
but must be used only when the unit is not running.
8. Blades are sharp. Handle carefully.
9. When mixing liquids, especially hot liquids, use a tall container or make
small quantities at a time to reduce spillage, splattering and possibility of
injury from burning.
10. Be certain that the chopper lid is securely locked in place before operating
appliance.
11. The use of accessories or attachments, not recommended or sold by SALTON
may cause fire, electric shock or injury.
12. Do not use outdoors.
13. Do not let cord hang over edge of table or counter, or touch hot surfaces.
14. Do not place on or near a hot gas or electric burner, or in a heated oven.
2
Booklet_HB-1094_ENG:Salton Booklet
7/24/08
1:25 PM
Page 3
15. Always attach plug to appliance first, then plug cord into the wall outlet.
To disconnect, turn any control to ‘OFF’, then remove plug from wall outlet.
16. This appliance is for Household Use Only. Do not use appliance for other
than intended use.
17. Do not leave unit unattended while in use.
SAVE THESE INSTRUCTIONS
HOUSEHOLD USE ONLY
POLARIZED PLUG
This appliance has a polarized plug (one blade is wider than the other).
To reduce the risk of electric shock, this plug will fit in a polarized outlet only
one way. If the plug does not fit fully in the outlet, reverse the plug. If it still
does not fit, contact a qualified electrician. Do not modify the plug in any way.
DESCRIPTION OF PARTS
1.
2.
3.
4.
5.
6.
7.
8.
9.
10.
11.
12.
13.
Variable Speed Dial
Motor Body
Power Button
Turbo Button
Blending Attachment
Stainless Steel Blade (not shown)
Blade Guard
Chopper Lid
Chopper Blade
6
Chopper Bowl
Measuring Cup
Lid
Wall Mount Bracket
8
1
3
9
4
2
10
5
7
12
11
13
3
Booklet_HB-1094_ENG:Salton Booklet
7/24/08
1:25 PM
Page 4
BEFORE FIRST USE
1. Read all instructions carefully and keep them for future reference.
2. Remove all packaging.
3. Wash the Blending Attachment, Chopper Lid, Chopper Blade,
Chopper Bowl, Measuring Cup and Lid in warm soapy water.
NOTE: Be careful when handling the Chopper Blade and Stainless Steel
Blade on Blending Attachment, the blades are sharp.
4. Rinse and dry thoroughly.
5. Wipe the Motor Body with a damp cloth. DO NOT IMMERSE THE MOTOR
BODY IN WATER OR ANY OTHER LIQUID.
HOW TO USE
IMPORTANT
•
Make sure that the hand blender is unplugged from the wall outlet before
assembling or removing attachments.
•
Do not operate the hand blender continuously for more than 1 minute.
Let the motor rest for 1 minute between each use.
•
Do not operate the hand blender for more than 30 seconds when mixing
dry, thick or heavy mixtures. Let the motor rest for 1 minute between
each use.
How to use the Blending Attachment
The Blending Attachment is designed for stirring, mixing, pureeing and blending
foods, milkshakes and other beverages.
1. Align the arrow on the Motor Body with the lock symbol on the Blending
Attachment. Push the Motor Body down into the Blending Attachment until
it locks into place.
NOTE: Make sure the Blending Attachment is thoroughly dry and there is no
water left inside before attaching.
2. Place food to be processed in the measuring cup and place the Blending
Attachment as deeply as possible into the measuring cup.
3. Plug the unit into the wall outlet.
4. Turn the Variable Speed Dial at the top of the Motor Body to the
desired speed between 1 to 5 and press the Power Button.
4
Booklet_HB-1094_ENG:Salton Booklet
7/24/08
1:25 PM
Page 5
Speed 1 on the Variable Speed Dial is the slowest and speed 5 is the
highest.
NOTE: The Power Button must be kept depressed for the duration of use.
5. Move the hand blender gently in an up and down motion, until the
mixture is at the desired consistency. If an extra boost of power is
required when blending, push the Turbo Button.
NOTE: The Power Button must be released when selecting the Turbo
Button.
6. Once ingredients have reached the desired consistency, release the Power
or Boost Button and turn the Variable Speed Dial at the top of the Motor
Body to ‘1’.
7. Wait until the motor has completely stopped before lifting the hand
blender out of the measuring cup.
8. Unplug from the wall outlet.
9. To detach the Blending Attachment, hold the Motor Body with one hand.
Using your thumb and finger, push the button on either side of the Motor
Body while holding the Blending Attachment with the other hand. Pull
the Motor Body away from the Blending Attachment until the two pieces
separate.
NOTE: If food gets lodged around the Blade or the Blade Guard, unplug
the unit from the wall outlet and use a spatula to dislodge the food. The
Blade is very sharp. DO NOT use your fingers.
IMPORTANT: NEVER immerse the hand blender past the length of the
Blending Attachment. DO NOT immerse beyond the seam of the Blending
Attachment. NEVER immerse the Motor Body into any liquid or mixture.
HELPFUL HINTS
•
To use the Blending Attachment in a saucepan, be sure to remove the
pan from the stove as the Blending Attachment is not designed for use
over a heat source.
•
When blending in non-stick cookware, be careful not to scratch the
coating with the blade.
5
Booklet_HB-1094_ENG:Salton Booklet
7/24/08
1:25 PM
Page 6
•
When blending or pureeing, cut food into uniform sizes for best
results.
•
This appliance is not designed to chop ice. Add ice to beverages after
blending.
•
To achieve best results, use deep, tall pots or containers
•
For easy cleanup, rinse Blending Attachment immediately after use.
How to use the Chopper
The Chopper is designed for chopping cheese, onions, herbs & spices, garlic,
carrots, nuts and more.
1. Place the Chopper Blade onto the metal pin in the center base of the
Chopper Bowl.
2. Place food to be processed in the Chopper Bowl. Do not fill above the
(MAX) marking.
3. Align the pins on either side of the Chopper Lid with the groves on the
Chopper Bowl. Push down and turn clockwise until the Chopper Lid locks
into place.
4. Align the arrow on the Motor Body with the lock symbol on the open
head of the Chopper Lid. Push the Motor Body into the open head of the
Chopper Lid until it locks into place.
NOTE: Make sure the Chopper Lid is thoroughly dry and there is no water
left inside before attaching.
5. Plug the unit into the wall outlet.
6. Turn the Variable Speed Dial at the top of the Motor Body to the desired
speed between 1 to 5 and press the Power Button. Speed 1 on the
Variable Speed Dial is the slowest and speed 5 is the highest.
NOTE: The Power Button must be kept depressed for the duration of use.
7. If an extra boost of power is required when chopping, push the Turbo
Button.
NOTE: The Power Button must be released when selecting the Turbo
Button.
8. Although the Chopper has rubberized feet on the bottom of the Chopper
Bowl, keep one hand on the Motor Body and the other hand on the
6
Booklet_HB-1094_ENG:Salton Booklet
7/24/08
1:25 PM
Page 7
Chopper Bowl to stabilize the unit while in use.
9. Once ingredients have reached the desired consistency or texture, release
the Power or Boost Button and turn the Variable Speed Dial at the top of
the Motor Body to ‘1’.
10. Wait until the motor has completely stopped before opening the Chopper
Lid.
11. Unplug from the wall outlet.
12. Remove the Chopper Blade and use a spatula to remove any food stuck
to the Chopper Blade and around the walls of the Chopper Bowl.
NOTE: The Chopper Blade is very sharp. DO NOT use your fingers to
remove food stuck to the Chopper Blade.
13. To detach the Chopper Lid, hold the Motor Body with one hand. Using
your thumb and finger, push the button on either side of the Motor Body
while holding the Chopper Lid with the other hand. Pull the Motor
Body away from the Chopper Lid until the two pieces separate.
HELPFUL HINTS
•
When chopping, cut food into uniform sizes for best results.
•
Do not process hard foods such as coffee, nutmeg, ice cubes or chunks of
hard chocolate. This may damage the Chopper Blade.
•
Never process hot or boiling foods in the Chopper Bowl.
Wall Mount Bracket
The wall mount bracket is designed to provide convenient storage for your
hand blender so that it’s always at your fingertips.
CARE AND CLEANING
1. Make sure the unit is unplugged from the wall unit before removing
attachments from the Motor Body.
2. Wipe the Motor Body with a damp cloth. . If necessary, you can use a
little mild detergent. DO NOT IMMERSE IN WATER OR ANY OTHER
LIQUID.
7
Booklet_HB-1094_ENG:Salton Booklet
7/24/08
1:25 PM
Page 8
3. Wash the Blending Attachment, Chopper Lid, Chopper Blade, Chopper
Bowl, Measuring Cup and Lid in warm soapy water.
NOTE: Be careful when handling the Chopper Blade and Stainless Steel
Blade on Blending Attachment, the blades are sharp.
4. Rinse and dry thoroughly.
RECIPES
Eggnog Milkshake
1 cup (250 ml) store bought ready eggnog
1/4 tsp. (1 ml) vanilla
1 scoop
vanilla ice cream
Pinch
nutmeg
Using the Blending Attachment, blend the first 3 ingredients on speed 2 until
mixture is smooth and creamy. Sprinkle with nutmeg.
Serves 1
Vanilla or Chocolate Milkshake
3 scoops
vanilla or chocolate ice cream
1-1/2 cups (375 ml)
milk
1 tbsp. (15 ml)
vanilla extract
Using the Blending Attachment, blend all ingredients on speed 2 until mixture
is smooth and creamy.
Serves 2
Strawberry Milkshake
3 scoops
vanilla or chocolate ice cream
1-1/2 cups (375 ml)
milk
Handful of fresh strawberries cut in pieces
Using the Blending Attachment, blend all ingredients on speed 3 until mixture
is smooth and creamy.
Serves 2
8
Booklet_HB-1094_ENG:Salton Booklet
7/24/08
1:25 PM
Page 9
Fruit Smoothie Recipe
Vanilla yogurt
Frozen banana
Frozen strawberries
Frozen blueberries
Honey
Milk
Using the Blending Attachment, blend all ingredients on speed 5 until desired
consistency. This recipe does not have any measurements. Mix and match different yogurts and frozen fruit to your create own unique smoothie.
Creamy Broccoli Soup
2 tsp. (10 ml)
olive oil
1
small onion, chopped
1 bunch
fresh broccoli
1-1/2 cups (375 ml) chicken broth
1/4 tsp. (1 ml) oregano
Pinch
cayenne pepper
1 cup (250 ml) milk
Heat oil in a large pot over medium heat. Add onions and sauté until tender.
Add broccoli, chicken broth, oregano and cayenne pepper. Reduce heat to
medium low and simmer until broccoli is tender. Remove pot from heat and
milk and stir to blend and let cool down. Using the Blending Attachment,
immerse hand blender directly into pot and blend on speed 5 until creamy.
Reheat and serve.
Serves 4
9
Booklet_HB-1094_ENG:Salton Booklet
7/24/08
1:25 PM
Page 10
Sweet Potato Soup
1/2 cup (125 ml) butter
1/2 cup (125 ml) onions, chopped
1 cup (250 ml) celery, chopped
2
large sweet potatoes, peeled and diced
3 cups (750 ml) chicken broth
1 cup (250 ml) milk
1/2 tsp. (2.5 ml) ground cloves
Salt to taste
Pepper to taste
Heat butter in a large pot over medium heat. Add onions and celery and sauté
for 10 minutes. Add sweet potatoes and chicken broth. Bring to a boil and
reduce heat to medium low and simmer until sweet potatoes are tender.
Remove pot from heat and let cool down. Using the Blending Attachment,
immerse hand blender directly into pot and blend on speed 5 until creamy. Stir
in the milk and cloves. Season with salt and pepper to taste. Reheat and serve.
Serves 6
Greek Salad Dressing
1/2 cup (125 ml)
extra virgin olive oil
2 tbsp. (30 ml)
red wine vinegar
1 tbsp. (15 ml)
lemon juice
1 tsp. (5 ml)
garlic powder
1/4 tsp. (1 ml)
pepper
2 tbsp. (30 ml)
dried oregano, crushed
3/4 tsp.(3.75 ml)
salt
1 tsp. (5 ml)
dijon mustard
Pinch
thyme
Using the Whisk Attachment, blend all ingredients on speed 2 until
ingredients all well combined. Store in fridge for up to 3 weeks.
10
Booklet_HB-1094_ENG:Salton Booklet
7/24/08
1:25 PM
Page 11
Ceasar Salad Dressing
1/2 cup (125 ml)
freshly grated Parmesan
1/4 cup (60 ml)
olive oil
1/4 cup (60 ml)
vegetable oil
1/4 cup (60 ml)
lemon juice
2
garlic cloves
1 tsp. (5 ml)
worcestershire sauce
Salt to taste
Pepper to taste
Using the Whisk Attachment, blend all ingredients on speed 2 until smooth.
Seaosn with salt and pepper to taste. Store in fridge for up to 2 days.
Crepe Batter
1 cup (250 ml)
self-rising flour
1/2 tsp. (2.5 ml)
salt
2 tsp. (10 ml)
sugar
1 tsp. (5 ml)
vanilla extract
1/2 cup (125 ml)
milk
1/2 cup (125 ml)
water
2 tbsp. (30 ml)
melted butter
4
eggs
Using the Whisk Attachment, blend all ingredients except flour on speed 3.
Add flour last and slowly until well blended and smooth.
Pour 1/4 cup (60ml) of mixture in an preheated and lightly oiled frypan. Turn
and cook other side when edges begin to curl and have a nice golden colour.
Remove keep warm and repeat with remaining mixture.
11
Booklet_HB-1094_ENG:Salton Booklet
7/24/08
1:25 PM
Page 12
Basic Whipped Cream Recipe
2 cups (500 ml)
heavy cream
1/4 cup (60 ml)
sugar
1 tbsp. (15 ml)
vanilla extract
Using the Whisk Attachment, whip on speed 5 until cream is slightly thickened. Add the sugar and vanilla extract. Continue to whip until cream forms
soft peaks. Cream can be stored in the fridge for up to 2 days.
Hummus
1/2 can (400 ml)
chickpeas
1 tsp. (5 ml)
salt
2
large garlic cloves, crushed
4 tbsp. (60 ml)
lemon juice
3/4 cup (80 ml)
tahini
1/2 cup (125 ml)
water
Put all ingredients in the chopper and cream on speed 5 until smooth. Serve
with fresh cut vegetables such as broccoli, cauliflower, carrots, radishes, celery, etc. Store leftovers in the fridge for up to 2 weeks.
Pesto Sauce
1 cup (250 ml)
finely chopped fresh parsley
2
large garlic cloves, crushed
1/4 cup (60 ml)
pine nuts
2 tbsp. (30 ml)
fresh chopped basil
2/3 cup (150 ml)
olive oil
1/2 cup (125 ml)
parmesan cheese (grated)
Pepper to taste
Put all ingredients in the chopper and process on speed 5 until smooth. Pour
over cooked spaghetti, toss to coat and serve.
Serves 4
12
Booklet_HB-1094_ENG:Salton Booklet
7/24/08
1:25 PM
Page 13
Peanut Butter
1 cup (250 ml)
roasted peanuts
1 tbsp. (15 ml)
peanut oil
1/2 tsp. (5 ml)
salt
Put all ingredients in the chopper and blend on speed 5 stopping every 30
seconds to scrape down sides of bowl. Blend until desired consistency is
reached. Store in the fridge for up to 2 weeks.
Chocolate or Graham Crumbs
1-1/2 cup (375 ml)
chocolate or graham cookies (without filling)
Using the chopper, process on speed 2 until fine crumbs. For use as base in
cheesecake recipes.
13
Booklet_HB-1094_ENG:Salton Booklet
7/24/08
1:25 PM
Page 14
A short supply cord is provided to reduce the hazards of becoming entangled
in or tripping over a long cord. Extension cords may be used if care is
exercised in their use. If an extension cord is used, the marked electrical rating
of the detachable power-supply cord or extension cord should be at least as
great as the electrical rating of the appliance. If the appliance is of the
grounded type, the extension cord should be a grounded 3-wire cord. The
extension cord should be arranged so that it will not drape over the counter
top or table top, where it can be pulled on by children or tripped over.
LIMITED WARRANTY
Salton Canada warrants that this appliance shall be free from defects in material and
workmanship for a period of one year from the date of purchase. During this
‘in-warranty’ period, defective products will be repaired or replaced at the discretion
of the retailer and/or Salton Canada. This warranty covers normal domestic usage
and does not cover damage which occurs in shipment or failure which results from
alteration, accident, misuse, abuse, glass breakage, neglect, commercial use or
improper maintenance.
A defective product should be returned to the original place of purchase within the
retailer’s stipulated return/exchange period*. If you are unable to have a defective
product replaced under warranty by the retailer, please check our website at
“www.salton.com” for the service centre nearest you. You may also contact us for
assistance by mail, e-mail, fax or telephone as listed below.
To ensure prompt ‘in-warranty’ service securely package and return the product to us
prepaid. Be sure to include the original proof of purchase and a description of the
defect along with your address and postal code.
For repairs not covered by the warranty, please contact us for assistance.
SALTON CANADA
Customer Service Department
81A Brunswick,
Dollard-des-Ormeaux,
Quebec, Canada H9B 2J5
website: www.salton.com
E-mail: [email protected]
Fax: 514-685-8300
Tel: 514-685-3660
* Return/exchange policies at each retailer vary and may differ from the SALTON Canada 1 year limited
warranty period.
14