1
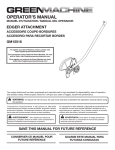
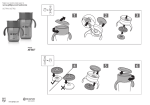
OPERATOR’S MANUAL MANUEL D’UTILISATION MANUAL DEL OPERADOR BRUSHCUTTER ATTACHMENT ACCESSOIRE DE DÉBROUSSAILLEUSE ACCESORIO PARA DESBROZADORA RY15702 Your brushcutter attachment has been engineered and manufactured to our high standard for dependability, ease of operation, and operator safety. When properly cared for, it will give you years of rugged, trouble-free performance. WARNING: To reduce the risk of injury, the user must read and understand the operator’s manual before using this product. Thank you for your purchase. SAVE THIS MANUAL FOR FUTURE REFERENCE Votre accessoire de débroussailleuse a été conçu et fabriqué conformément aux strictes normes de fiabilité, simplicité d’emploi et sécurité d’utilisation. Correctement entretenu, il vous donnera des années de fonctionnement robuste et sans problème. AVERTISSEMENT : Pour réduire les risques de blessures, l’utilisateur doit lire et veiller à bien comprendre le manuel d’utilisation avant d’employer ce produit. Su nuevo accesorio para desbrozadora ha sido diseñado y fabricado de conformidad con estrictas normas de calidad para brindar fiabilidad, facilidad de uso y seguridad para el operador. Con el debido cuidado, le brindará muchos años de sólido y eficiente funcionamiento. ADVERTENCIA: Para reducir el riesgo de lesiones, el usuario debe leer y comprender el manual del operador antes de usar este producto. Merci de votre achat. Le agradecemos su compra. CONSERVER CE MANUEL POUR FUTURE RÉFÉRENCE GUARDE ESTE MANUAL PARA FUTURAS CONSULTAS TABLE OF CONTENTS TABLE DES MATIÈRES / ÍNDICE DE CONTENIDO Introduction....................................................................................................................................................................... 2 Introduction / Introducción General Safety Rules......................................................................................................................................................... 3 Règles de sécurité générales / Reglas de seguridad generales Specific Safety Rules......................................................................................................................................................3-4 Règles de sécurité particulières / Reglas de seguridad específicas Symbols..........................................................................................................................................................................4-5 Symboles / Símbolos Features............................................................................................................................................................................. 6 Caractéristiques / Características Assembly........................................................................................................................................................................6-7 Assemblage / Armado Operation........................................................................................................................................................................7-8 Utilisation / Funcionamiento Maintenance...................................................................................................................................................................8-9 Entretien / Mantenimiento Warranty.......................................................................................................................................................................... 10 Garantie / Garantía Exploded View and Parts List.....................................................................................................................................12-13 Vue éclatée et liste des pièces / Vista desarrollada y lista de piezas Parts Ordering and Service................................................................................................................................Back Page Commande de pièces et réparation / Pedidos de piezas y servicio.......................................................... Page arrière / Pág. posterior INTRODUCTION INTRODUCTION / INTRODUCCIÓN This product has many features for making its use more pleasant and enjoyable. Safety, performance, and dependability have been given top priority in the design of this product making it easy to maintain and operate. *** Ce produit offre de nombreuses fonctions destinées à rendre son utilisation plus plaisante et satisfaisante. Lors de la conception de ce produit, l’accent a été mis sur la sécurité, les performances et la fiabilité, afin d’en faire un outil facile à utiliser et à entretenir. *** Este producto ofrece numerosas características para hacer más agradable y placentero su uso. En el diseño de este producto se ha conferido prioridad a la seguridad, el desempeño y la fiabilidad, por lo cual se facilita su manejo y mantenimiento. 2 GENERAL SAFETY RULES edication. A moment of inattention while operating m power tools may result in serious personal injury. WARNING: Read and understand all instructions. Failure to follow all instructions listed below, may result in electric shock, fire, and/or serious personal injury. SAVE THESE INSTRUCTIONS Do not operate in poor lighting. Do not overreach. Keep proper footing and balance at all times. Proper footing and balance enables better control of the tool in unexpected situations. Keep all parts of your body away from any moving part. Read these instructions and the instructions for the power head thoroughly before using the attachment. Know the tool. Read and understand the operator’s manual and observe the warnings and instruction labels affixed to the tool. Do not touch areas around the muffler or cylinder of the power head. These parts get hot from operation. Failure to heed this warning could result in possible serious personal injury. Do not allow children or untrained individuals to use this unit. Always stop the engine and remove the spark plug wire before making any adjustments or repairs except for carburetor adjustments. Wear safety glasses or goggles that are marked to comply with ANSI Z87.1 standard and hearing protection when operating this unit. Inspect unit before each use for loose fasteners and damaged or missing parts. Correct before using the attachment. Failure to do so can cause serious injury. Wear heavy long pants, a long-sleeved shirt, boots, and gloves. Do not wear loose fitting clothing, short pants, jewelry of any kind, or go barefoot. Use only original manufacturer’s replacement parts. Failure to do so may cause poor performance, possible injury, and will void your warranty. Secure long hair so it is above shoulder level to prevent entanglement in any moving parts. Do not, under any circumstance, use any attachment or accessory on this product, which was not provided with the product, or identified as appropriate for use with this product in the operator’s manual. Keep all bystanders, children, and pets at least 50 ft. away. Bystanders should be encouraged to wear eye protection. Stay alert, watch what you are doing, and use common sense when operating a power tool. Do not use tool while tired or under the influence of drugs, alcohol, or Avoid dangerous environments. Do not use the attachment in damp or wet locations. Do not use in rain. Use the right attachment. Do not use attachment for any job except that for which it is intended. SPECIFIC SAFETY RULES Ensure handle is mounted in accordance with the assembly instructions in this manual. Do not attach blade without proper installation of all required parts. Failure to use proper parts can cause the blade to fly off and seriously injure the operator and/or bystanders. Always use a blade in good condition. A worn blade is more likely to snag and thrust. After engine stops, keep rotating blade in thicker weeds or pulpy stalks until it stops. Do not operate the brushcutter unless the brushcutter guard is firmly secured in place and in good condition. Use heavy gloves when operating the brushcutter and when installing or removing blades. Always stop the engine and remove the spark plug wire before attempting to remove any obstruction caught or jammed in the blade or before removing and installing the blade. Do not attempt to touch or stop blade when it is rotating. A coasting blade can cause injury while it continues to spin after the engine is stopped or throttle trigger released. Maintain proper control until the blade has completely stopped rotating. Replace any blade that has been bent, warped, cracked, chipped, or damaged. Always make sure blade is installed correctly and securely fastened before each use. Failure to do so can cause serious injury. Use only the manufacturer’s replacement TRI-ARC® blade intended for use on this brushcutter. Do not use any other blade. To install any other brand blade or cutting head to this brushcutter can result in serious personal injury. The TRI-ARC® blade is suited for cutting thicker weeds or pulpy stalks only. Do not use for any other purpose. Never use the TRI-ARC® blade to cut woody brush. 3 — English SPECIFIC SAFETY RULES Exercise extreme caution when using the blade with this unit. Blade thrust is the reaction that may occur when the spinning blade contacts anything it cannot cut. This contact may cause the blade to stop for an instant, and suddenly “thrust” the unit away from the object that was hit. This reaction can be violent enough to cause the operator to lose control of the unit. Blade thrust can occur without warning if the blade snags, stalls, or binds. This is more likely to occur in areas where it is difficult to see the material being cut. For cutting ease and safety, approach the weeds being cut from the right to the left. In the event an unexpected object or woody stock is encountered, this approach could minimize the blade thrust reaction. Never cut any material over 1/2 in. diameter. Always wear the shoulder harness when using the brushcutter and adjust to a comfortable operating position. Maintain a firm grip on both handles while cutting with a blade. Keep the blade away from body and below waist level. Never use the brushcutter with the blade located 30 in. or more above the ground level. To prevent electrical shock or serious personal injury, do not use this product with any electric power head. Save these instructions. Refer to them frequently and use them to instruct others who may use this product. If you loan someone this product, loan them these instructions also to prevent misuse of the product and possible injury. SYMBOLS Some of the following symbols may be used on this product. Please study them and learn their meaning. Proper interpretation of these symbols will allow you to operate the product better and safer. SYMBOL NAME EXPLANATION Safety Alert Symbol Precautions that involve your safety. Read the Operator’s Manual To reduce the risk of injury, user must read and understand operator’s manual before using this product. Eye and Hearing Protection Wear eye protection which is marked to comply with ANSI Z87.1 as well as hearing protection when operating this equipment. Keep Bystanders Away Keep all bystanders at least 50 ft. away. Ricochet Thrown objects can ricochet and result in personal injury or property damage. Blade Thrust Beware of blade thrust. Products authorized for blade use will display this symbol to warn of blade thrust. 4 — English SYMBOLS The following signal words and meanings are intended to explain the levels of risk associated with this product. SYMBOL SIGNAL MEANING DANGER: Indicates an imminently hazardous situation, which, if not avoided, will result in death or serious injury. WARNING: Indicates a potentially hazardous situation, which, if not avoided, could result in death or serious injury. CAUTION: Indicates a potentially hazardous situation, which, if not avoided, may result in minor or moderate injury. CAUTION: (Without Safety Alert Symbol) Indicates a situation that may result in property damage. SERVICE Servicing requires extreme care and knowledge and should be performed only by a qualified service technician. For service we suggest you return the product to your nearest AUTHORIZED SERVICE CENTER for repair. When servicing, use only identical replacement parts. WARNING: To avoid serious personal injury, do not attempt to use this product until you read thoroughly and understand completely the operator’s manual. If you do not understand the warnings and instructions in the operator’s manual, do not use this product. Call Ryobi customer service for assistance. WARNING: The operation of any power tool can result in foreign objects being thrown into your eyes, which can result in severe eye damage. Before beginning power tool operation, always wear safety goggles or safety glasses with side shields and, when needed, a full face shield. We recommend Wide Vision Safety Mask for use over eyeglasses or standard safety glasses with side shields. Always use eye protection which is marked to comply with ANSI Z87.1. SAVE THESE INSTRUCTIONS 5 — English FEATURES PRODUCT SPECIFICATIONS Blade Cutting Width...................................................... 8 in. Weight.................................................................... 3.25 lbs. KNOW YOUR BRUSHCUTTER ATTACHMENT See Figure 1. The safe use of this product requires an understanding of the information on the product and in this operator’s manual as well as a knowledge of the project you are attempting. Before use of this product, familiarize yourself with all operating features and safety rules. ASSEMBLY UNPACKING This product requires assembly. n Carefully remove the items from the box. Make sure that all items listed in the packing list are included. n Inspect the product carefully to make sure no breakage or damage occurred during shipping. n Do not discard the packing material until you have carefully inspected and satisfactorily operated the product. n If any parts are damaged or missing, please call 1-800-860-4050 for assistance. PACKING LIST Ryobi® Expand-It™ Brushcutter Attachment J-Handle Assembly Shoulder Harness Assembly Hardware Bag Gear Head Locking Tool Operator’s Manual WARNING: If any parts are damaged or missing do not operate this product until the parts are replaced. Failure to heed this warning could result in serious personal injury. WARNING: Do not attempt to modify this product or create accessories not recommended for use with this product. Any such alteration or modification is misuse and could result in a hazardous condition leading to possible serious personal injury. WARNING: ATTACHING THE BRUSHCUTTER ATTACHMENT TO THE POWER HEAD See Figure 2. WARNING: Never attach or adjust any attachment while power head is running. Failure to stop the engine may cause serious personal injury. The brushcutter attachment connects to the power head by means of a coupler device. Remove the hanger cap from the attachment. Loosen the knob on the coupler of the power head shaft. Push in the button located on the brushcutter attachment. Align the button with the guide recess on the extension shaft coupler and slide the two shafts together. Rotate attachment until button locks into the positioning hole. Tighten the knob securely. NOTE: If the buttons do not release completely in the positioning holes, the shafts are not locked into place. Slightly rotate from side to side until the button is locked into place. NOTE: Use only the specified positioning hole for this attachment. WARNING: Be certain the knob is fully tightened before operating equipment. Check it periodically for tightness during use to avoid serious injury. REMOVING THE ATTACHMENT FROM THE POWER HEAD For removing or changing the attachment: Stop the engine. Loosen the knob. Push in the button and twist the shafts to remove and separate ends. 6 — English Do not connect to power head until assembly is complete. Failure to comply could result in accidental starting and possible serious personal injury. ASSEMBLY ATTACHING THE “J” HANDLE See Figure 3. The “J” handle must be used to ensure the best control and maximize operator safety when using the brushcutter. Hold the top and bottom clamp snugly in position on the shaft housing so that handle will be located to the operator’s left. INSTALLING THE SHOULDER HARNESS AND STRAP HANGER See Figure 4. Pull apart the ends of the shoulder harness hanger to expand slightly. Slide the hanger over the power head shaft immediately behind the “J” handle. Insert the end of the handle between the clamps. Squeeze hanger ends together to retighten. Align the bolt holes and push the long bolt (1/4-20 x 1-1/2 in.) through the handle side. Place short bolt (1/4-20 x 1 in.) through opposite side of clamp. Install the bolt, lock washer, and lock nut to secure. Install flat washers, lock washers, and hex nuts to hold the assembly in place. Connect the latch on the shoulder harness to the strap hanger. After assembly is complete, adjust the position of the handle for best balance and comfort. Tighten the long bolt, then the short bolt. OPERATION OPERATING THE BRUSHCUTTER WARNING: Do not allow familiarity with this product to make you careless. Remember that a careless fraction of a second is sufficient to inflict serious injury. WARNING: Always wear safety goggles or safety glasses with side shields when operating power tools. Failure to do so could result in objects being thrown into your eyes resulting in possible serious injury. WARNING: Do not use any attachments or accessories not recommended by the manufacturer of this product. The use of attachments or accessories not recommended can result in serious personal injury. APPLICATIONS You may use this product for the purpose listed below: Cutting thicker weeds and pulpy stalks only WARNING: To avoid burns from hot surfaces, never operate unit with the bottom of the engine above waist level. See Figures 5 - 6. Hold the brushcutter with your right hand on the rear handle and your left hand on the “J” handle. Keep a firm grip with both hands while in operation. Brushcutter should be held at a comfortable position with the trigger handle about hip height. Maintain your grip and balance on both feet. Position yourself so that you will not be drawn off balance by the kickback reaction of the cutting blade. Adjust the shoulder harness to position the brushcutter at a comfortable operating position and to ensure that the shoulder harness will reduce the risk of operator contact with the blade. Ensure the blade has come to a complete stop before setting the brushcutter down. BLADE THRUST Exercise extreme caution when using the blade with this unit. Blade thrust is the reaction that may occur when the spinning blade contacts anything it cannot cut. This contact may cause the blade to stop for an instant and suddenly “thrust” the unit away from the object that was hit. This reaction can be violent enough to cause the operator to lose control of the unit. Blade thrust can occur without warning if the blade snags, stalls, or binds. This is more likely to occur in areas where it is difficult to see the material being cut. For cutting ease and safety, approach the weeds being cut with the brushcutter from the right to the left. In the event an unexpected object or woody stock is encountered, this practice could minimize the blade thrust reaction. 7 — English OPERATION TRI-ARC® BLADE The TRI-ARC blade is suited only for thicker weeds and pulpy stalks. When the blade becomes dull, it can be turned over to extend the life of the blade. Do not sharpen the TRIARC® blade. Use only TRI-ARC® blade, part number 06297, available at your service center. ® CUTTING TECHNIQUE - BLADE Inspect and clear the area of any hidden objects such as glass, rocks, concrete, fencing, wire, wood, metal, etc., which can be thrown or entangled in the blade. Never use blades near sidewalks, fencing, posts, buildings or other immovable objects. Never use a blade after hitting a hard object without first inspecting it for damage. Do not use if any damage is detected. The unit is used for cutting from the right to the left in a broad sweeping action from side to side. WARNING: Extreme care must be taken when using blades to ensure safe operation. For safe operation when using the blade, refer to Specific Safety Rules earlier in this manual. Use only the TRI-ARC® blade. To install any other brand blade or cutting head to this brushcutter could result in serious personal injury. Always hold brushcutter on your right side with both hands when operating. Use a firm grip on both handles. Maintain your grip and balance on both feet. Position yourself so that you will not be drawn off balance by the kickback reaction of the cutting blade. MAINTENANCE GENERAL MAINTENANCE WARNING: When servicing, use only identical replacement parts. Use of any other parts may create a hazard or cause product damage. Avoid using solvents when cleaning plastic parts. Most plastics are susceptible to damage from various types of commercial solvents and may be damaged by their use. Use clean cloths to remove dirt, dust, oil, grease, etc. WARNING: WARNING: Always wear safety goggles or safety glasses with side shields during power tool operation or when blowing dust. If operation is dusty, also wear a dust mask. WARNING: Before inspecting, cleaning, or servicing the machine, shut off engine, wait for all moving parts to stop, and disconnect spark plug wire and move it away from spark plug. Failure to follow these instructions can result in serious personal injury or property damage. Do not at any time let brake fluids, gasoline, petroleumbased products, penetrating oils, etc., come in contact with plastic parts. Chemicals can damage, weaken, or destroy plastic, which may result in serious personal injury. Only the parts shown on the parts list are intended to be repaired or replaced by the customer. All other parts should be replaced at an authorized service center. REPLACING THE TRI-ARC® BLADE See Figures 7 - 8. To remove blade: Align the slot in the flanged washer with the slot in the gear head. Place the gear head locking tool through the slot in the flanged washer and gear head. Remove the blade nut by turning it clockwise (left-handed threads). 8 — English MAINTENANCE Remove the cupped washer and the blade. To install blade: Place flanged washer over the gear shaft with the hollow side toward the brushcutter guard. Center the blade on the flanged washer, making sure the blade fits flat and the raised hub goes through the hole in the blade. Install the cupped washer with the raised center away from the blade. Place the blade nut onto the gear shaft. Insert the head locking tool through the flanged washer and gear head. Install the blade nut by turning it counterclockwise (lefthanded threads). Tighten the blade nut and torque to 120 in.lb. minimum (finger tight plus 1/2 turn). ATTACHING THE STORAGE HANGER See Figure 9. There are two ways to hang the attachment for storage. To use the hanger cap, push in the button and place the hanger cap over the end of the attachment shaft. Slightly rotate the cap from side to side until the button locks into place. The secondary hole in the attachment shaft can be used for hanging purposes as well. STORING THE ATTACHMENT Clean the attachment thoroughly and lubricate before storing. Store the attachment in a dry, well-ventilated place that is inaccessible to children. Keep away from corrosive agents such as garden chemicals and de-icing salts. MAKE THE MOST OF YOUR PURCHASE! Go to www.ryobitools.com and register your new tool on-line. Your product has been fully tested prior to shipment to ensure your complete satisfaction. For any questions about operating or maintaining your product, call the Ryobi Help Line! To register your Ryobi product by regular mail, please print the following information on a 3 in. x 5 in. card or standard postcard: your name, mailing address, phone numbers, email address, Ryobi product(s) purchased with item number from package, and serial number for each product. Mail the card to: Techtronic Industries North America, Inc., Attn. Ryobi Registration, 1428 Pearman Dairy Road, Anderson, SC 29625.To receive information on our company and products, please include the following statement on your registration card: “Send me information on your products and company using the contact information I am providing with this product registration.” 9 — English WARRANTY LIMITED WARRANTY STATEMENT Techtronic Industries North America, Inc., warrants to the original retail purchaser that this RYOBI® brand outdoor product is free from defect in material and workmanship and agrees to repair or replace, at Techtronic Industries North America, Inc.’s, discretion, any defective product free of charge within these time periods from the date of purchase. Three years if the product is used for personal, family or household use; 90 days, if used for any other purpose, such as commercial or rental. This warranty extends to the original retail purchaser only and commences on the date of the original retail purchase. Any part of this product found in the reasonable judgment of Techtronic Industries North America, Inc. to be defective in material or workmanship will be repaired or replaced without charge for parts and labor by an authorized service center for RYOBI® brand outdoor products (Authorized Ryobi Service Center). The product, including any defective part, must be returned to an authorized Ryobi service center within the warranty period. The expense of delivering the product to the service center for warranty work and the expense of returning it back to the owner after repair or replacement will be paid by the owner. Techtronic Industries North America, Inc.’s, responsibility in respect to claims is limited to making the required repairs or replacements and no claim of breach of warranty shall be cause for cancellation or rescission of the contract of sale of any RYOBI® brand outdoor product. Proof of purchase will be required by the dealer to substantiate any warranty claim. All warranty work must be performed by an authorized service dealer. This warranty is limited to ninety (90) days from the date of original retail purchase for any RYOBI® brand outdoor product that is used for rental or commercial purposes, or any other income-producing purpose. This warranty does not cover any product that has been subject to misuse, neglect, negligence, or accident, or that has been operated in any way contrary to the operating instructions as specified in this operator’s manual. This warranty does not apply to any damage to the product that is the result of improper maintenance or to any product that has been altered or modified. The warranty does not extend to repairs made necessary by normal wear or by the use of parts or accessories which are either incompatible with the RYOBI® brand outdoor product or adversely affect its operation, performance, or durability. In addition, this warranty does not cover: A.Tune-ups – Spark Plugs, Carburetor, Carburetor Adjustments, Ignition, Filters B. Wear items – Bump Knobs, Outer Spools, Cutting Lines, Inner Reels, Starter Pulleys, Starter Ropes, Drive Belts, Tines, Felt Washers, Hitch Pins, Mulching Blades, Blower Fans, Blower and Vacuum Tubes, Vacuum Bag and Straps, Guide Bars, Saw Chains Techtronic Industries North America, Inc., reserves the right to change or improve the design of any RYOBI® brand outdoor product without assuming any obligation to modify any product previously manufactured. ALL IMPLIED WARRANTIES ARE LIMITED IN DURATION TO THE STATED WARRANTY PERIOD. ACCORDINGLY, ANY SUCH IMPLIED WARRANTIES INCLUDING MERCHANTABILITY, FITNESS FOR A PARTICULAR PURPOSE, OR OTHERWISE, ARE DISCLAIMED IN THEIR ENTIRETY AFTER THE EXPIRATION OF THE APPROPRIATE TWO-YEAR, ONE-YEAR, OR NINETYDAY WARRANTY PERIOD. TECHTRONIC INDUSTRIES NORTH AMERICA, INC.’S, OBLIGATION UNDER THIS WARRANTY IS STRICTLY AND EXCLUSIVELY LIMITED TO THE REPAIR OR REPLACEMENT OF DEFECTIVE PARTS AND TECHTRONIC INDUSTRIES NORTH AMERICA, INC., DOES NOT ASSUME OR AUTHORIZE ANYONE TO ASSUME FOR THEM ANY OTHER OBLIGATION. SOME STATES DO NOT ALLOW LIMITATIONS ON HOW LONG AN IMPLIED WARRANTY LASTS, SO THE ABOVE LIMITATION MAY NOT APPLY TO YOU. TECHTRONIC INDUSTRIES NORTH AMERICA, INC., ASSUMES NO RESPONSIBILITY FOR INCIDENTAL, CONSEQUENTIAL, OR OTHER DAMAGES INCLUDING, BUT NOT LIMITED TO, EXPENSE OF RETURNING THE PRODUCT TO AN AUTHORIZED RYOBI SERVICE CENTER AND EXPENSE OF DELIVERING IT BACK TO THE OWNER, MECHANIC’S TRAVEL TIME, TELEPHONE OR TELEGRAM CHARGES, RENTAL OF A LIKE PRODUCT DURING THE TIME WARRANTY SERVICE IS BEING PERFORMED, TRAVEL, LOSS OR DAMAGE TO PERSONAL PROPERTY, LOSS OF REVENUE, LOSS OF USE OF THE PRODUCT, LOSS OF TIME, OR INCONVENIENCE. SOME STATES DO NOT ALLOW THE EXCLUSION OR LIMITATION OF INCIDENTAL OR CONSEQUENTIAL DAMAGES, SO THE ABOVE LIMITATION OR EXCLUSION MAY NOT APPLY TO YOU. This warranty gives you specific legal rights, and you may also have other rights which vary from state to state. This warranty applies to all RYOBI® brand outdoor products manufactured by or for Techtronic Industries North America, Inc., and sold in the United States and Canada. To locate your nearest Authorized Ryobi Service Center, dial 1-800-860-4050. 10 — English NOTES 11 — English EXPLODED VIEW AND PARTS LIST VUE ÉCLATÉE ET LISTE DES PIÈCES VISTA DESARROLLADA Y LISTA DE PIEZAS 11 12 25 17 10 8 19 9 20 7 6 18 22 24 23 5 16 13 4 3 15 21 15 14 1 2 12 21 EXPLODED VIEW AND PARTS LIST VUE ÉCLATÉE ET LISTE DES PIÈCES VISTA DESARROLLADA Y LISTA DE PIEZAS KEY NO. Pièce Num. Núm. Ref. PART NO. DESCRIPTION Num. Réf. Núm. Pieza DESCRIPTION DESCRIPCIÓN QTY. Qté. Cant. 1 678018001 Blade Nut, Left-handed Threads (M8) Écrou de lame, filetage à gauche (M8) Tuerca de la cuchilla, rosca izquierda (M8) 1 2 638017001 Cupped Washer Rondelle bombée Rondelle bombée 1 3 638006004 Blade (Tri-Arc®) Lame (Tri-Arc®) Hoja (Tri-Arc®) 1 4 678011001 Flanged Washer Rondelle à épaulement Arandela de brida 1 Tornillo (10-24 x 1/2 pulg., de cabeza hexagona con arandela de disco) 3 5 660737001 Screw (10-24 x 1/2 in. Hex Head w/Dish Washer) Vis (10-24 x 1/2 po, à tête hexagonale avec rondelle) 6 638120004 Brushcutter Guard Pare-débris de la débroussailleuse Protección de la desbrozadora 1 7 308210001 Gear Head Assembly Ensemble carter d’engrenages Conjunto de cabezal de engranajes 1 8 660641001 Screw (10-24 x 5/8 in.) Vis (10-24 x 5/8 po) Tornillo (10-24 x 5/8 pulg.) 1 9 660642001 Screw (1/4 in.-20 x 1-1/4 in., Hex Head) Vis (1/4 po-20 x 1-1/4 po, tête hexagonale) Tornillo (1/4 pulg.-20 x 1-1/4 pulg., cabeza hexagonal) 1 10 120530012 Boom Assembly (Includes Key No. 12 and 25) Perche (incl. pièces no. 12 et 25) Conjunto del brazo (incl. pzas. núms. ref. 12 y 25) 1 11 518019002 Hanger Cap Capuchon de suspension Tapa de suspensión 1 12 940657027 Warning Label Étiquette d’avertissement Etiqueta de advertencia 1 13 638014001 Handle Bar Clamp Collier de poignée Abrazadera del mango 2 14 678016001 Hex Nut (1/4 in.-20) Écrou hexagonal (1/4 po-20) Conjunto del perno (M6 x 40 mm) 2 15 678013001 Washer Rondelle Conjunto del perno (M6 x 25 mm) 2 Mango “J” y empuñadura 1 16 308046001 J-Handle and Grip Poignée en « J » et poignée rembourrée 17 308224001 Strap Hanger Dispositif d’accrochage Colgador de abrazadera 1 18 308487001 Shoulder Harness Assembly Bandoulière Correa para el hombro 1 19 678020001 Head Locking Tool Outil de blocage de tête de coupe Herramienta de fijación del cabezal de engranajes 1 20 518367001 Spacer Entretoise Espaciador 1 21 678012001 Lock Washer (1/4 in.) Rondelle de blocage (1/4 po) Arandela de seguridad (1/4 pulg.) 2 22 660643002 Bolt (1/4 in.-20 x 1 in.) Boulon (1/4 po-20 x 1 po) Perno (1/4 pulg.-20 x 1 pulg.) 1 23 660643001 Bolt (1/4 in.-20 x 1-1/2 in.) Boulon (1/4 po-20 x 1-1/2 po) Perno (1/4 pulg.-20 x 1-1/2 pulg.) 1 24 940705021 Logo Label Étiquette de logo Etiqueta logotipo 1 25 940726013 Logo Label Étiquette de logo Etiqueta logotipo 1 987000382 Operator’s Manual Manual d’utilization Manual del oprerador 13 OPERATOR’S MANUAL MANUEL D’UTILISATION / MANUAL DEL OPERADOR BRUSHCUTTER ATTACHMENT ACCESSOIRE DE DÉBROUSSAILLEUSE / ACCESORIO PARA DESBROZADORA RY15702 WARNING: The engine exhaust from this product contains chemicals known to the State of California to cause cancer, birth defects, or other reproductive harm. CALIFORNIA PROPOSITION 65 AVERTISSEMENT : Les gaz d’échappement de ce produit contiennent des produits chimiques identifiés par l’état de Californie comme causes de cancer, de malformations congénitales et d’autres troubles de l’appareil reproducteur. PROPOSITION 65 DE L’ÉTAT DE CALIFORNIE ADVERTENCIA: Las emanaciones provenientes del escape del motor de este producto contienen sustancias químicas reconocidas por el estado de California como causantes de cáncer, defectos congénitos y otras afecciones del aparato reproductor. CALIFORNIA - PROPUESTA DE LEY NÚM. 65 • PARTS AND SERVICE Prior to requesting service or purchasing replacement parts, please obtain your model and serial number from the product data plate. RY15702 • MODEL NO._______________________SERIAL NO.___________________________ • HOW TO OBTAIN REPLACEMENT PARTS: Replacement parts can be purchased online at www.ryobitools.com or by calling 1-800-860-4050. Replacement parts can also be obtained at one of our Authorized Service Centers. • HOW TO LOCATE AN AUTHORIZED SERVICE CENTER: Authorized Service Centers can be located online at www.ryobitools.com or by calling 1-800-860-4050. • HOW TO OBTAIN CUSTOMER OR TECHNICAL SUPPORT: To obtain Customer or Technical Support please contact us at 1-800-860-4050. • PIÈCES ET SERVICE Avant de faire la demande de service ou l’achat de pièces de remplacement, veuillez obtenir le numéro de série du modèle à partir de la plaque de données du produit. RY15702 • NUMÉRO DE MODÈLE_____________NUMÉRO DE SÉRIE____________________ • COMMENT OBTENIR LES PIÈCES DE REMPLACEMENT : Les pièces de remplacement peuvent être achetées en ligne sur le site www.ryobitools.com ou par téléphone au 1-800-860-4050. Les pièces de remplacement peuvent être obtenues à un de nos centres de service autorisés. • COMMENT TROUVER UN CENTRE DE SERVICE AUTORISÉ : Les centres de service autorisés peuvent être localisés en ligne au www.ryobitools. com ou en téléphonant au 1-800-860-4050. • COMMENT OBTENIR DE L’AIDE EN CONTACTANT LE SERVICE À LA CLIENTÈLE : Pour contacter le service à la clientèle pour une question technique ou pour tout autre renseignement, veuillez nous téléphoner au 1-800-860-4050. • PIEZAS DE REPUESTO Y SERVICIO Antes de solicitar servicio técnico o comprar piezas de repuesto, obtenga su modelo y número de serie de la placa de datos del producto. RY15702 • NÚMERO DE MODELO_____________NÚMERO DE SERIE____________________ Ryobi® is a registered trademark of Ryobi Limited used under license. Ryobi® est une marque déposée de Ryobi Limited utilisée sous licence. • CÓMO OBTENER PIEZAS DE REPUESTO: Las piezas de repuesto se pueden comprar en nuestro sitio en la red mundial, en la dirección www.ryobitools.com o llamando al 1-800-860-4050. Las piezas de repuesto también se pueden obtener en uno de nuestros Centros de Servicio Autorizados. Ryobi® es una marca comercial registrada de Ryobi Limited y es empleada mediante autorización. • CÓMO LOCALIZAR UN CENTRO DE SERVICIO AUTORIZADO: Puede encontrar los Centros de Servicio Autorizados visitando nuestro sitio en la red mundial, en la dirección www.ryobitools.com or by calling 1-800-860-4050. • CÓMO OBTENER SERVICIO O ASISTENCIA TÉCNICA AL CONSUMIDOR: Para obtener Servicio o Asistencia Técnica al Consumidor, sírvase comunicarse con nosotros llamando al 1-800-860-4050. TECHTRONIC INDUSTRIES NORTH AMERICA, INC. 987000-382 7-26-10 (REV:02) 1428 Pearman Dairy Road, Anderson, SC 29625 USA 1-800-860-4050 • www.ryobitools.com