1
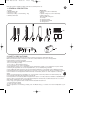
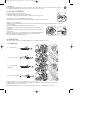
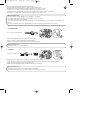
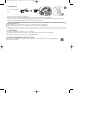
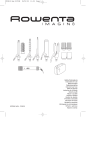
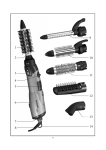
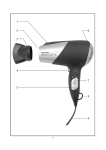
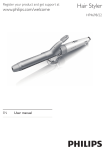
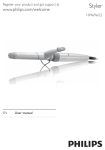
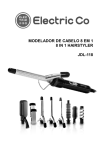
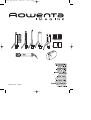
CF4010 Row 037038
25/01/05
037038-14/04 - CF4010
11:39
Page 1
CF4010 Row 037038
25/01/05
11:39
Page 2
CF4010 Row 037038
25/01/05
11:39
Page 7
Read the instruction leaflet and safety instructions carefully before use.
GB
1. GENERAL DESCRIPTION
1. Handle
2. On/Off switch (1-0)
3. “Power on” light
4. Accessory locking – and unlocking – ring
5. Swivel power lead
Accessories:
6. Styling iron (16 mm diameter)
7. Brush
8. Spiral curling iron (14 mm diameter)
9. Flat curling iron
10. Extra-wide curling iron
11. Crimper
12. Crimping plates
13. Straightening plates
14. Storage case
12
6
7
8
9
10
11
13
14
4
3
2
1
5
2. SAFETY PRECAUTIONS
• The appliance’s accessories become very hot during use. Avoid contact with the skin.
Make sure that the supply cord never comes into contact with the hot parts of the appliance.
• The appliance must be unplugged:
- before cleaning and maintenance procedures.
- if it is not working correctly
- as soon as you have finished using it
- if you leave the room, even momentarily.
• Check that the voltage of your electricity supply matches the voltage of your appliance. Any error when
connecting the appliance can cause irreparable harm, not covered by the guarantee.
• As an additional safety measure, we recommend the installation of a residual current difference device
in the electrical circuit supplying the bathroom, acting at not more than 30 mA. Ask your installer for advice.
• Caution: Never use the appliance with wet hands or near baths, basins or other recipients containing
water.
• When using the appliance in the bathroom, unplug it after use as the presence of water nearby may
pose a danger even when the appliance is turned off.
• Close supervision is necessary when the appliance is used on or in the presence of children or disabled people.
• If the power cord is damaged, it must be replaced by the manufacturer, its after-sales service or a person
with similar qualifications, to avoid all danger.
• Stop using your appliance and contact an Authorised Service Centre if:
- your appliance has fallen
- it does not work correctly.
• If your appliance is not working correctly, see "Troubleshooting", or contact our Customer Helpdesk or your
dealer.
CF4010 Row 037038
25/01/05
11:39
Page 8
GUARANTEE
Your appliance is designed for use in the home only. It should not be used for professional purposes.
The guarantee becomes null and void in the case of improper usage.
3. GETTING STARTED
Attaching and removing accessories:
1. Slot the required accessory into the handle.
2. Turn the locking ring on the handle to lock the accessory in place.
All the accessories are attached in the same way.
To remove an accessory, simply follow the above procedure in reverse order.
Plugging in your hair styler:
• When you have attached an accessory to the handle, place the appliance in a stable position on its rest,
on a flat surface.
• Plug it in and set the On/Off switch to On (position 1).
The 'Power on' light will come on and the accessory will begin
to heat up.
• Wait a few minutes to allow your hair styler to reach its working
temperature
(2-4 min. for the "iron" accessories; 13 min. for the crimping plates).
When removing accessories, always hold them by the plastic
part – the metal parts will be very hot.
4. OPERATION
Use this product on clean, untangled, DRY hair (to avoid damaging your hair).
1 - STYLING IRONS
6 - For tight curls
10 - For loose curls
8 - For spiral curls
(ringlets)
9 - For crimped curls
- Gather a small section of hair (approx. 2 to 3 cm across).
- Press the lever to open the tong, then slip the tips of the hair between the roller and the tong.
- Release the lever to close the tong.
Check that all the hair tips are correctly wound under the tong, in the direction of the curl.
GB
CF4010 Row 037038
25/01/05
11:39
Page 9
- Hold the insulated plastic end with the other hand.
- Turn the styler to wind the section of hair around the accessory.
Wind the hair, working towards the scalp. Take care not to burn yourself.
- Keep the iron in place for around 20 seconds (longer for tighter curls).
- Unwind the iron halfway, then open the tong and allow the section of hair to slide free.
- Repeat the procedure with different sections of hair to form more curls.
GB
PROFESSIONAL TIPS
• To create extra volume: divide your curls using your fingers.
• To obtain really tight curls: wind small sections of hair at a time.
• For softer curls: wind on more hair.
• To prevent flyaway ends: check that the hair tips are trapped under the tong and lying in the direction of
the curl.
• For a more natural, wavy look: lightly brush or comb your hair once the curls have cooled.
2- STYLING BRUSH
7 - For soft curls and waves
- Fit the styling brush onto the curling iron while cold.
- Form a section of hair and wind it around the brush.
- Hold it in place for around 20 seconds, then gently unwind it.
PROFESSIONAL TIPS
• Allow your hair to cool before styling.
3 - CRIMPER
12 - For crimped hair
-
Gather a section of hair approximately 5 cm across, starting at the root of the hair.
Press the lever to open the crimper attachment, and place the hair between the crimping plates.
Close the crimping plates for around 10 seconds.
Release the hair and start again just below the wave just formed.
PROFESSIONAL TIPS
• Always work from the roots towards the tips of the hair.
• To enhance the effect, you can apply styling mousse before crimping.
CF4010 Row 037038
25/01/05
11:39
Page 10
4- STRAIGHTENER
GB
13 - For straightened
hair
- Your hair should be dry and tangle-free.
- Gather a section of hair approximately 5 cm across, starting at the root of the hair.
- Press the lever to open the straightening attachment, and place the hair between the straightening plates.
- Slide the appliance slowly down from the root to the tip of the hair.
PROFESSIONAL TIPS
• To avoid kinks in long sections of hair, use a fluid, continuous movement.
• To enhance the effect, you can apply styling mousse before straightening.
5. CLEANING
• Unplug your styler and leave to cool on its stand.
• Clean accessories when fully cooled. To clean the handle, wipe with a soft, damp cloth.
• Never allow water or any other liquid to enter the handle.
6. ENVIRONMENTAL PROTECTION
When your product reaches the end of its service life, you should dispose of it at a designated
waste disposal centre.