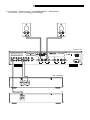
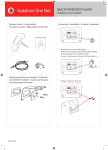
1
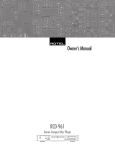
Owner’s manual
Manuel de l’utilisateur
Bedienungsanleitung
Manuale di istruzioni
Manual de instrucciones
Gebruiksaanwijzing
RA-1060
Stereo Integrated Amplifier
Amplificateur intégré stéréophonique
Stereo-Vollverstärker
L’Amplificatore di Controllo Stereo
Amplificador Integrado Estereofónico
Geïntegreerde Stereo Versterker
STEREO INTEGRATED AMPLIFIER
POWER
RA-1060
VOLUME
RECORDING
OFF
SPEAKERS
CONTOUR
A
OFF
PHONES
OFF
B
L-1
A+B
L-2
TUNER
TAPE 1
H
LISTENING
TUNER
CD
TAPE 1
CD
AUX 1
AUX1
AUX 1
LH
TAPE 2
AUX 2
AUX2
AUX 2
English
Français
Deutsch
Italiano
Español
Nederlands
8
13
18
23
28
34
Cautions
Précautions d’utilisation
WARNING: There are no user serviceable parts inside. Refer
all servicing to qualified service personnel.
L’éclair dans un triangle équilatéral indique la présence interne de tensions
électriques élevées susceptibles de présenter des risques graves d’électrocution.
WARNING: To reduce the risk of fire or electric shock, do not
expose the unit to moisture or water. Do not allow foreign
objects to get into the enclosure. If the unit is exposed to moisture,
or a foreign object gets into the enclosure, immediately disconnect the power cord from the wall. Take the unit to a qualified
service person for inspection and necessary repairs.
ATTENTION: Pour réduire le risque d’électrocution, ne pas retirer
le capot. Il n’y a à l’intérieur aucune pièce susceptible d’être
modifiée par l’utilisateur. En cas de problème, adressez-vous
à un réparateur agréé.
Read all the instructions before connecting or operating the component.
Keep this manual so you can refer to these safety instructions.
Heed all warnings and safety information in these instructions and on the
product itself. Follow all operating instructions.
Clean the enclosure only with a dry cloth or a vacuum cleaner.
You must allow 10 cm or 4 inches of unobstructed clearance around the
unit. Do not place the unit on a bed, sofa, rug, or similar surface that could
block the ventilation openings. If the unit is placed in a bookcase or cabinet, there must be ventilation of the cabinet to allow proper cooling.
Keep the component away from radiators, heat registers, stoves, or any
other appliance that produces heat.
The unit must be connected to a power supply only of the type and voltage
specified on the rear panel. (USA: 115 V/60Hz, EC: 230V/50Hz)
Connect the component to the power outlet only with the supplied power
supply cable or an exact equivalent. Do not modify the supplied cable. Do
not defeat grounding and/or polarization provisions. The cable should be
connected to a 2-pin polarized wall outlet, matching the wide blade of the
plug to the wide slot of the receptacle. Do not use extension cords.
Do not route the power cord where it will be crushed, pinched, bent, exposed to heat, or damaged in any way. Pay particular attention to the power
cord at the plug and where it exits the back of the unit.
The power cord should be unplugged from the wall outlet if the unit is to be
left unused for a long period of time.
Immediately stop using the component and have it inspected and/or serviced by a qualified service agency if:
• The power supply cord or plug has been damaged.
• Objects have fallen or liquid has been spilled into the unit.
• The unit has been exposed to rain.
• The unit shows signs of improper operation
• The unit has been dropped or damaged in any way
Le point d’exclamation dans un triangle équilatéral indique
à l’utilisateur la présence de conseils et d’informations
importantes dans le manuel d’utilisation accompagnant
l’appareil. Leur lecture est impérative.
ATTENTION: Il n’y a à l’intérieur aucune pièce susceptible d’être
modifiée par l’utilisateur. Adressez-vous impérativement à une
personne qualifiée.
Prenez garde à ce qu’aucun objet ou liquide ne tombe à
l’intérieur de l’appareil par ses orifices de ventilation; Si
l’appareil est exposé à l’humidité ou si un objet tombe à
l’intérieur, couper immédiatement l’alimentation secteur de tous
les appareils. Débrancher l’appareil des autres maillons, et
adressez-vous immédiatement et uniquement à une personne
qualifiée et agréée.
Tous les conseils de sécurité et d’installation doivent être lus avant de faire
fonctionner l’appareil. Conservez soigneusement ce livret — Vous devez
pouvoir le consulter à nouveau pour de futures références.
Tous les conseils de sécurité doivent être soigneusement respectés. Suivez
les instructions. Respectez les procédures d’installation et de fonctionnement
indiquées dans ce manuel.
L’appareil doit être nettoyé uniquement avec un chiffon sec ou un aspirateur.
L’appareil doit être placé de telle manière que sa propre ventilation puisse
fonctionner, avec un espace minimum de 10 cm autour de lui. Par exemple,
il ne doit pas être posé sur un fauteuil, un canapé, une couverture ou tout
autre surface susceptible de boucher ses ouïes d’aération; ou placé dans
un meuble empêchant la bonne circulation d’air autour des orifices d’aération.
Cet appareil doit être placé loin de toute source de chaleur, tels que radiateurs,
chaudières, bouches de chaleur ou d’autres appareils (y compris amplificateurs
de puissance) produisant de la chaleur.
Cet appareil doit être branché sur une prise d’alimentation secteur, d’une
tension et d’un type conformes à ceux qui sont indiqués sur la face arrière
de l’appareil. En Europe, 230 V/50 Hz.
Brancher l’appareil uniquement grâce au cordon secteur fourni, ou à un
modèle équivalent. Ne pas tenter de modifier ou changer la prise. Notamment,
ne pas tenter de supprimer la prise de terre si celle-ci est présente. Ne pas
utiliser de cordon-rallonge. L’appareil doit être branché sur une prise murale
deux broches.
Prendre garde à ce que ce cordon d’alimentation ne soit pas pincé, écrasé
ou détérioré sur tout son trajet, à ce qu’il ne soit pas mis en contact avec
une source de chaleur. Vérifier soigneusement la bonne qualité des contacts, à l’arrière de l’appareil comme dans la prise murale.
Si l’appareil ne doit pas être utilisé pendant une longue période, la prise
secteur sera débranchée.
L’appareil doit être immédiatement éteint, débranché puis retourné au service après-vente agréé dans les cas suivants:
• Un objet est tombé, ou du liquide a coulé à l’intérieur de l’appareil.
• L’appareil a été exposé à la pluie.
• L’appareil ne fonctionne pas normalement, ou ses performances sont
anormalement limitées.
• L’appareil est tombé, ou le coffret est endommagé.
Placer l’appareil sur une surface plane, solide et rigide. Ne jamais
placer l’appareil sur une surface ou un support mobile pouvant basculer.
Sicherheits- und Warnhinweise
Cautele
Bitte lesen Sie sich die Bedienungsanleitung vor Gebrauch des Gerätes genau
durch. Sie enthält wichtige Sicherheitsvorschriften, die unbedingt zu beachten
sind! Bewahren Sie die Bedienungsanleitung so auf, daß sie jederzeit
zugänglich ist.
ATTENZIONE: rischio di scossa elettrica, non aprire.
WARNUNG: Außer den in der Bedienungsanleitung beschriebenen
Handgriffen sollten vom Bediener keine Arbeiten am Gerät
vorgenommen werden. Das Gerät ist ausschließlich von einem
qualifizierten Fachmann zu öffnen und zu reparieren.
WARNUNG: Dieses Gerät darf nur in trockenen Räumen betrieben
werden. Um die Gefahr von Feuer oder eines elektrischen Schlags
auszuschließen, dürfen keine Flüssigkeiten oder Fremdkörper
in das Gerät gelangen. Sollte dieser Fall trotzdem einmal eintreten,
trennen Sie das Gerät sofort vom Netz ab. Lassen Sie es von
einem Fachmann prüfen und die notwendigen Reparaturarbeiten
durchführen.
Befolgen Sie alle Warn- und Sicherheitshinweise in der Bedienungsanleitung
und auf dem Gerät.
Dieses Gerät sollte, wie andere Elektrogeräte auch, nicht unbeaufsichtigt
betrieben werden.
Ist das Gerät z.B. während des Transports über längere Zeit Kälte ausgesetzt
worden, so warten Sie mit der Inbetriebnahme, bis es sich auf Raumtemperatur
erwärmt hat und das Kondenswasser verdunstet ist.
Um das Gerät sollte ein Freiraum von 10 cm vorhanden sein. Stellen Sie es
daher weder auf ein Bett, Sofa, Teppich oder ähnliche Oberflächen. Ferner
sollte es nicht an einem Ort aufgestellt werden, an dem keine ausreichende
Luftzufuhr gegeben ist, zum Beispiel in einem engen Regalfach oder in einem
Einbauschrank.
Stellen Sie das Gerät nicht in die Nähe von Wärmequellen (Heizkörper,
Wärmespeicher, Öfen oder sonstige wärmeerzeugende Geräte).
Bevor Sie das Gerät in Betrieb nehmen, prüfen Sie, ob die Betriebsspannung
mit der örtlichen Netzspannung übereinstimmt. Die Betriebsspannung ist
an der Rückseite des Gerätes angegeben.
Schließen Sie das Gerät nur mit dem dazugehörigen zweipoligen Netzkabel
an die Wandsteckdose an. Modifizieren Sie das Netzkabel auf keinen Fall.
Versuchen Sie nicht, die Erdungs- und/oder Polarisationsvorschriften zu
umgehen. Das Netzkabel sollte an eine zweipolige Wandsteckdose
angeschlossen werden. Verwenden Sie keine Verlängerungskabel.
Netzkabel sind so zu verlegen, daß sie nicht beschädigt werden können (z.B.
durch Trittbelastung, Möbelstücke oder Erwärmung). Besondere Vorsicht ist
dabei an den Steckern, Verteilern und den Anschlußstellen des Gerätes geboten.
Sollten Sie das Gerät für eine längere Zeit nicht in Betrieb nehmen, ziehen
Sie den Netzstecker aus der Steckdose.
Schalten Sie das Gerät sofort aus und ziehen Sie geschultes Fachpersonal
zu Rate, wenn:
• das Netzkabel oder der Stecker beschädigt sind,
• Gegenstände bzw. Flüssigkeit in das Gerät gelangt sind,
• das Gerät Regen ausgesetzt war,
• das Gerät nicht ordnungsgemäß funktioniert bzw. eine deutliche
Leistungsminderung aufweist,
• das Gerät hingefallen ist bzw. beschädigt wurde.
Ziehen Sie den Netzstecker aus der Steckdose, bevor Sie mit der Reinigung
des Gerätes beginnen. Reinigen Sie die Oberflächen des Gerätes nur mit
einem weichen, trockenen Tuch. Verwenden Sie keine scharfen Reinigungsoder Lösungsmittel. Vor der erneuten Inbetriebnahme des Gerätes ist
sicherzustellen, daß an den Anschlußstellen keine Kurzschlüsse bestehen
und alle Anschlüsse ordnungsgemäß sind.
Stellen Sie das Gerät waagerecht auf eine feste, ebene Unterlage. Es sollte
weder auf beweglichen Unterlagen noch Wagen oder fahrbaren Untergestellen
transportiert werden.
AVVERTENZA: per ridurre il rischio di scossa, non togliete il
coperchio del cabinet. Non contiene parti utili per l'utente. Per
l'assistenza fate riferimento a personale qualificato.
SPIEGAZIONE DEI SIMBOLI GRAFICI:
Il fulmine inserito in un triangolo vi avverte della presenza di materiale non
isolato a "voltaggio elevato" all'interno del prodotto che può essere
abbastanza potente da costituire pericolo di folgorazione.
Il punto esclamativo entro un triangolo equilatero vi avverte della presenza
di istruzioni importanti per l'utilizzo e la manutenzione nel manuale che
accompagna l'apparecchiatura.
ATTENZIONE: Non vi sono parti interne riparabili dall’utilizzatore.
Per l’assistenza fate riferimento a personale qualificato.
ATTENZIONE: Per ridurre il rischio di incendio o di folgorazione,
non esporre all’umidità o all’acqua. Evitare che oggetti estranei
cadano all’interno del cabinet. Se l’apparecchio è stato esposto
all’umidità o un oggetto estraneo è caduto all’interno del cabinet,
staccare il cordone di alimentazione dalla presa di rete. Portare
l’apparecchio ad un centro di assistenza qualificato per i necessari
controlli e riparazioni.
Leggere attentamente tutte le istruzioni prima di collegare l’apparecchio
alla rete di alimentazione. Conservate questo manuale per ogni riferimento
futuro alle istruzioni di sicurezza.
Seguire attentamente tutte le avvertenze e le operazioni per il funzionamento.
Pulire l’unità solamente con un panno asciutto o con un piccolo aspirapolvere.
Lasciate uno spazio libero di 10cm intorno all’unità. L’apparecchiatura non
dovrebbe essere posta su un letto, divano, tappeto, o posti che possano
bloccare le aperture di ventilazione. Se l’apparecchio è posizionato in una
libreria o in un cabinet, fate in modo che ci sia abbastanza spazio attorno
all’unità per consentire un’adeguata ventilazione e raffreddamento.
L’unità dovrebbe essere posta lontano da fonti di calore come caloriferi,
termostati, stufe, o altri apparecchi che producano calore
L’apparecchiatura dovrebbe essere collegata solamente a una sorgente
elettrica del tipo descritto nelle istruzioni o indicato sul pannello posteriore
dell’apparecchiatura.
Collegate l’unità alla presa di alimentazione solo con il cavo a due poli
polarizzato che viene fornito o con un equivalente. Non cercate di eliminare
la massa o di manomettere le polarizzazioni. Il cavo dovrebbe essere collegato
ad un’uscita a muro polarizzata a due poli collegando la lamella piatta
della spina nella fessura più ampia. Non usate prolunghe
Non far passare il cavo di alimentazione dove potrebbe essere schiacciato,
pizzicato, piegato ad angoli acuti, esposto al calore o danneggiato in alcun
modo. Fate particolare attenzione al cavo di alimentazione all’altezza della
spina e nel punto in cui esce dalla parte posteriore dell’apparecchio.
Il cordone di alimentazione dovrebbe essere scollegato quando
l’apparecchiatura è inutilizzata per un periodo piuttosto lungo.
L’apparecchiatura dovrebbe essere subito disattivata e data a personale
qualificato quando:
• Il cavo di alimentazione o la spina sono stati danneggiati
• Oggetti sono caduti, o del liquido è stato versato nell’apparecchio
• L’apparecchiatura è stata esposta alla pioggia
• L’apparecchiatura non sembra funzionare in modo normale
• L’apparecchiatura è caduta, o è stata in qualche modo danneggiata
Posizionate l’unità su una superficie piana abbastanza resistente da sopportare
il suo peso. Non posizionatela su un carrello che potrebbe ribaltarsi.
Precaución
Para reducir el riesgo de recibir una descarga eléctrica, no quitar la cubierta
superior. No hay componentes manipulables por el usuario en el interior del
aparato. Cualquier operación de mantenimiento debe ser llevada a cabo por
personal cualificado.
Este símbolo es para alertar al usuario sobre la presencia de tensiones
peligrosas no aisladas en el interior del aparato susceptibles de constituir un
riesgo de electrocución.
Este símbolo es para alertar al usuario sobre la presencia de instrucciones
importantes relacionadas con el funcionamiento y el mantenimiento (servicio)
tanto en este manual como en la literatura que acompaña al producto.
ADVERTENCIA: No hay componentes manipulables por el usuario
en el interior del aparato. Cualquier operación de mantenimiento
debe ser llevada a cabo por personal cualificado.
ADVERTENCIA: Para reducir el riesgo de que se produzca un
incendio o una descarga eléctrica, no exponga el RA-1060 al
agua o la humedad. No permita que ningún objeto extraño penetre
en el interior del aparato. Si el aparato está expuesto a la humedad
o algún objeto extraño penetra en su interior, desconecte
inmediatamente el cable de alimentación de la red eléctrica. En
caso de que fuera necesario, envíe el aparato a un especialista
cualificado para su inspección y posterior reparación.
Para reducir el riesgo de que se produzca un incendio o una descarga eléctrica,
no exponga el RA-1060 al agua o la humedad. No permita que ningún objeto
extraño penetre en el interior del aparato. Si el aparato está expuesto a la humedad
o algún objeto extraño penetra en su interior, desconecte inmediatamente el cable
de alimentación de la red eléctrica. En caso de que fuera necesario, envíe el
aparato a un especialista cualificado para su inspección y posterior reparación.
Lea todas las instrucciones del presente manual antes de conectar o hacer funcionar
el RA-1060. Conserve este manual cerca de usted para el caso de que necesite
revisar las instrucciones de seguridad que se indican a continuación.
Tenga siempre en mente las advertencias y la información relativa a seguridad
que figuran tanto en estas instrucciones como en el propio aparato. Siga al pie
de letra todas las instrucciones relacionadas con el funcionamiento del mismo.
Limpie el RA-1060 únicamente con una gamuza seca o un aspirador.
Mantenga siempre despejadas las ranuras destinadas a la ventilación del aparato.
Por ejemplo, no coloque nunca el RA-1060 en una cama, un sofá, una alfombra
o una superficie similar susceptible de bloquear las ranuras de ventilación. Si
el RA-1060 está ubicado en la estantería de una librería o un mueble, debe
haber suficiente espacio a su alrededor y ventilación en el mueble para permitir
una refrigeración adecuada.
Mantenga el RA-1060 alejado de radiadores, estufas, cocinas o de cualquier
otra instalación que produzca calor.
El RA-1060 debe ser conectado únicamente a una fuente de alimentación del
tipo y la tensión especificados en su panel posterior (115 V/60 Hz para EE.UU.
y 230 V/50 Hz para la Comunidad Europea).
Desconecte inmediatamente el RA-1060 y envíelo a un servicio técnico cualificado
para su inspección/reparación si:
•
•
•
•
•
El cable de alimentación o alguna clavija del mismo ha sido dañado.
Han caído objetos o se ha derramado líquido en el interior del aparato.
El aparato ha sido expuesto a la lluvia.
El aparato muestra signos de funcionamiento inadecuado.
El aparato ha sido golpeado o dañado de algún modo.
Nederlands
WAARSCHUWING: Om het risico op elektrische schokken of brand te
vermijden: zorg dat het apparaat niet nat wordt. Verwijder de kast niet: er
bevinden zich in het apparaat geen bedieningsorganen. Indien nodig
waarschuw een bevoegd technicus!
EEN LAATSTE WAARSCHUWING: Om het risico op elektrische schokken
te voorkomen: laat het apparaat gesloten. Iedere reparatie dient door een
gekwalificeerde technicus verricht te worden.
Lees de gehele gebruiksaanwijzing. Voordat u met het apparaat gaat werken
is het van groot belang dat u weet hoe u ermee om moet gaan en dat zo
veilig mogelijk. Bewaar deze gebruiksaanwijzing op een plek, die u zich
na verloop van tijd nog weet te herinneren.
De waarschuwingen op het apparaat en in de gebruiksaanwijzing zijn
belangrijk, sla ze niet in de wind.
Als het apparaat vuil wordt, stof het dan af met een zachte droge doek, of
maak gebruik van een stofzuiger. Gebruik nooit een oplosmiddel van welke
soort dan ook.
Het apparaat moet dusdanig gebruikt worden, dat een behoorlijke koeling
niet in het gedrang komt. Voorbeeldjes: Gebruik het apparaat niet op: bed,
sofa, plaid of andere onregelmatige oppervlakken, waardoor de
ventilatiegaten geblokkeerd zouden kunnen worden. Ook het inbouwen
in een te kleine ruimte kan een voldoende koeling in de weg staan.
Het apparaat moet verre gehouden worden van warmtebronnen zoals:
radiatoren en kachels, maar ook versterkers.
Het apparaat mag alleen aangesloten worden op het voltage zoals
aangegeven op de achterkant, in dit geval 220 - 240 Volts 50 Hz.
Het apparaat dient alleen aangesloten te worden met de bijgeleverde netkabel,
of een soortgelijke.
Maatregelen dienen genomen te worden, die de aarding en polarisatie
van het apparaat niet te niet doen. Gebruik vooral geen verlengsnoeren.
De lichtnetkabel dient zo neergelegd te worden, dat er niet op getrapt kan
worden of geklemd kan worden door scherpe voorwerpen. Vooral de
aansluitpunten zijn belangrijk: de aansluiting in de wandcontactdoos en
daar waar de kabel het apparaat binnengaat.
Wanneer het apparaat voor langere tijd niet in gebruik is, dient de lichtnetkabel
uit het lichtnet verwijderd te zijn.
Conecte el RA-1060 a una toma de corriente eléctrica únicamente a través
del cable de alimentación de dos clavijas polarizado suministrado de serie o
un equivalente exacto del mismo. No modifique de ningún modo dicho cable.
No intente desactivar los terminales destinados a la conexión a tierra o
polarización. El cable debería ser conectado a una toma de corriente eléctrica
de dos terminales que se adapten perfectamente a las clavijas del cable de
alimentación del RA-1060. No utilice ningún tipo de cable de extensión.
Het apparaat zal in service gegeven moeten worden wanneer één van de
volgende situaties zich voordoet:
No coloque el cable de alimentación en lugares en que pueda ser aplastado,
pinchado, doblado en ángulos críticos, expuesto al calor o dañado de algún
modo. Preste particular atención al punto de unión entre el cable y la toma de
corriente y también a la ubicación de esta última en el panel posterior del aparato.
• Als het apparaat niet normaal functioneert of een duidelijk afwijkend
gedrag vertoont..
El cable de alimentación debería desconectarse de la red eléctrica cuando el
aparato no vaya a ser utilizado durante un largo período de tiempo (como
por ejemplo durante las vacaciones de verano).
• Wanneer het netsnoer en/of steker beschadigd zijn.
• Wanneer er toch voorwerpen/vloeistof in het apparaat terecht zijn
gekomen.
• Als het apparaat in de regen heeft gestaan.
• Wanneer het apparaat gevallen is en/of de kast beschadigd is.
Plaats het apparaat op een vaste, vlakke en stevige ondergrond. Plaats
hem niet op een verrijdbare wagen die gemakkelijk om kan vallen.
RA-1060 Stereo Integrated Amplifier
6
1: Controls and Connections • Commandes et branchements • Bedienelemente und Anschlüsse •
Controlli e collegamenti • Controles y Conexiones • De bedieningsorganen en aansluitpunten
S T E RE O I NT E G RAT E D A MP LI F I E R
POWER
RA - 1060
RECORDING
VOLUME
LISTENING
TUNER
OFF
PHONES
OFF
A
TUNER
CONTOUR
SPEAKERS
B
L-1
L-2
A+B
OFF
CD
TAPE 1
H
CD
TAPE 1
AUX 1
AUX 1
LH
TAPE 2
AUX 2
AUX 2
1
2
3
4
5
6
7
8
A OR B – 4 OHMS PER SPEAKER
A AND B – 8 OHMS PER SPEAKER
THIS EQUIPMENT TO RAIN OR MOISTURE.
TUNER
AUX 1
AUX 2
SWITCHED 200W MAX
12V TRIGGER
WARNING:TO REDUCE THE RISK OF FIRE
OR ELECTRICAL SHOCK, DO NOT EXPOSE
CD
9
TAPE 1
TAPE 2
INTEGRATED AMPLIFIER
MODEL NO. RA-1060
POWER CONSUMPTION: 300W
WARNING: SHOCK HAZARD – DO NOT OPEN
AVIS: RISQUE DE CHOC ELECTRIQUE–NE PAS OUVRIR
RA-1060
OUT
PRE OUT
LEFT
RIGHT
IN
OUT
IN
OUT
RIGHT
LEFT
RIGHT
SPEAKER A
10
11
12
13
C
14
POWER
MUTE
A
B
LEFT
SPEAKER B
D
1
2
3
4
5
6
7
8
9
0
+10
BAND
PTY
TA
TP
DISPLAY
PHONO
CD
TUNER
TUNE
/PRESET
AUX 1
AUX 2
TAPE 1
TAPE 2
VOLUME
E
TUNING
F
PLAY
STOP
G
PAUSE
RANDOM
RR-AT92
15
16
7
2: Connections • Branchements • Anschlußdiagramm • Collegamenti
Conexiones • De in- en uitgangsverbindingen
ROTEL RA-1060
12V TRIGGER
WARNING:TO REDUCE THE RISK OF FIRE
OR ELECTRICAL SHOCK, DO NOT EXPOSE
A OR B – 4 OHMS PER SPEAKER
A AND B – 8 OHMS PER SPEAKER
THIS EQUIPMENT TO RAIN OR MOISTURE.
CD
TUNER
AUX 1
AUX 2
TAPE 1
TAPE 2
WARNING: SHOCK HAZARD – DO NOT OPEN
AVIS: RISQUE DE CHOC ELECTRIQUE–NE PAS OUVRIR
INTEGRATED AMPLIFIER
MODEL NO. RA-1060
POWER CONSUMPTION: 300W
RA-1060
OUT
PRE OUT
LEFT
RIGHT
IN
OUT
IN
OUT
RIGHT
LEFT
SPEAKER A
RIGHT
LEFT
SPEAKER B
TAPE • GRABADOR
CD
SWITCHED 200W MAX
RA-1060 Stereo Integrated Amplifier
8
Contents
About Rotel
Boxed numbers refer to RA-1060 illustration.
Boxed letters refer to RR-AT92 illustration.
A family whose passionate interest in music
led them to manufacture high fidelity components of uncompromising quality founded Rotel
40 years ago. Through the years that passion
has remained undiminished and the family goal
of providing exceptional value for audiophiles
and music lovers regardless of their budget,
is shared by all Rotel employees.
1: Controls and Connections
6
AC Power and Control .......................... 10
2: Connections
7
AC Power Input
10
About Rotel ........................................... 8
POWER Button
Power Indicator
11
Getting Started ...................................... 8
9
Auxiliary Power Outlet
(North American version)
11
Placement
9
12V TRIGGER Connection
11
Cables
9
Audio Controls ..................................... 11
Unpacking
Remote Control ...................................... 9
VOLUME Control
11
Audio Controls
9
CONTOUR Selector
11
CD Functions
9
LISTENING Selector
11
DVD Functions
9
RECORDING Selector
11
Tuner Functions
9
MUTE Button
11
Remote Sensor
9
PHONES Output
11
Remote Control Batteries
9
SPEAKERS Selector
12
Speaker Outputs .................................. 10
Protection Circuit .................................. 12
Speaker Impedance
10
Troubleshooting .................................... 12
Speaker Wire
10
Power Indicator Is Not Lit
12
Polarity and Phasing
10
Fuse Replacement
12
Speaker Connections
10
No Sound
12
Signal Connections ................................ 10
Line Level Inputs
10
Recorder Connections
10
Preamp Outputs
10
Specifications ....................................... 12
The engineers work as a close team, listening to, and fine tuning each new product until
it reaches their exacting musical standards.
They are free to choose components from
around the world in order to make that product the best they can. You are likely to find
capacitors from the United Kingdom and
Germany, semi conductors from Japan or the
United States, while toroidal power transformers
are manufactured in Rotel’s own factory.
Rotel’s reputation for excellence has been
earned through hundreds of good reviews and
awards from the most respected reviewers in
the industry, who listen to music every day.
Their comments keep the company true to its
goal - the pursuit of equipment that is musical, reliable and affordable.
All of us at Rotel, thank you for buying this
product and hope it will bring you many years
of enjoyment.
Getting Started
Thank you for purchasing the Rotel RA-1060
Stereo Integrated Amplifier. When used in a
high-quality music audio system, it will provide
years of musical enjoyment.
The RA-1060 is a full featured, high performance component. All aspects of the design
have been optimized to retain the full dynamic
range and subtle nuances of your music. The
RA-1060 has a highly regulated power supply incorporating a Rotel custom-designed
toroidal power transformer and custom-made
slit foil capacitors. This low impedance power
supply has ample power reserves, which
enables the RA-1060 to easily reproduce the
most demanding audio signals. This type of
design is more expensive to manufacture, but
it is better for the music.
The printed circuit boards are designed with
Symmetrical Circuit Traces. This insures that
the precise timing of the music is maintained
English
9
and faithfully recreated. The RA-1060 circuitry
uses metal film resistors and polystyrene or
polypropylene capacitors in important signal
paths. All aspects of this design have been
examined to ensure the most faithful music
reproduction.
In addition the RA-1060 has independent input signal selectors for listening and recording. They allow you to listen to one signal source
while recording another.
The main functions of the RA-1060 are easy
to install and use. If you have experience with
other stereo systems, you shouldn’t find anything perplexing. Simply plug in the associated components and enjoy.
Unpacking
Carefully remove the RA-1060, the remote
control, and accessories from the shipping
carton. Save the shipping carton and all enclosed packing material for future use. Shipping or moving the unit in anything other than
the original packing material may result in severe damage.
Keep the original sales receipt. It is your best
record of the date of purchase, which you will
need in the event warranty service is ever
required.
Placement
Like all audio components that handle low-level
signals, the RA-1060 can be affected by its
environment. Avoid placing the RA-1060 on
top of other components. Also avoid routing
audio signal cables near power cords. This
will minimize the chance it will pick up hum
or interference.
The RA-1060 generates heat as part of its normal operation. The heat sinks and ventilation
openings in the amplifier are designed to dissipate this heat. The ventilation slots in the top
cover must be open. There should be 10 cm
(4 inches) of clearance around the chassis,
and reasonable airflow through the installation location, to prevent the amplifier from
overheating.
Remember the weight of the amplifier when
you select an installation location. Make sure
that the shelf or cabinet can support it. We
recommend installing the RA-1060 in furniture
designed to house audio components. Such
furniture is designed to reduce or suppress
vibration which can adversely affect sound
quality. Ask your authorized Rotel dealer for
advice about component furniture and proper
installation of audio components.
The RA-1060 is supplied with an RR-AT92
remote control and must be placed where the
infrared signal from the remote can reach the
front panel Remote Sensor.
Cables
Keep power cords, digital cables, and audio
cables away from each other. This will minimize the chance of the audio signal cables
picking up noise or interference from the power
cords or digital cables. Using high quality,
shielded cables will also help to prevent noise
or interference. If you have any questions see
your authorized Rotel dealer for advice about
the best cable to use with your system.
Remote Control
The RA-1060 includes an RR-AT92 remote control that operates many of the controls of the
RA-1060. In addition, the remote operates
basic features of some Rotel CD players, DVD
players, and AM/FM tuners.
Audio Controls
The RR-AT92 duplicates the basic audio functions of the RA-1060 front panel. When a
function is available on both the front panel
and the remote, a number (see front panel
illustration) and a letter (see remote control
illustration) are shown in the instructions. For
example, to change the volume level, you can
on the front panel
either turn the control
on the remote. When
or use the buttons
only one identifier appears, that control is available only on the front panel or the remote, but
not both.
CD Functions
The PLAY, STOP, PAUSE, TRACK +/–, RANDOM buttons, and NUMERIC keys (0-10)
operate many Rotel CD players after the CD
button on the remote has been pressed.
DVD Functions
The PLAY, STOP, PAUSE, and TRACK +/–,
buttons operate Rotel DVD players, after the
AUX1 button on the remote has been pressed.
Tuner Functions
The BAND, TUNING, and additional tuning
feature buttons operate Rotel tuners, after the
TUNER button on the remote has been pressed.
By default, the RR-AT92 operates the Rotel
RT-955 tuner. Alternatively, the remote can be
reprogrammed to operate the RT-940AX tuner.
This programming only needs to be done once:
To program for the RT-940AX: press the
POWER button and the 2 button simultaneously.
To program for the RT-955: press the
POWER button and the 1 button simultaneously.
Remote Sensor
The remote sensor receives infrared signals
from the remote control. Do not cover or block
the sensor. It must be unobstructed or the remote control will not work properly.
The operation of the remote sensor can also
be affected if it is exposed to bright sunlight
or certain types of lighting (such as halogen
lights) that emit infrared light. In addition remote control functions may not work reliably
if the batteries in the RR-AT92 are weak.
NOTE:
To use the remote, aim it at the remote
sensor on the front panel of the RA-1060.
Remote Control Batteries
Two UM-4/AAA size batteries (supplied) must
be installed before the remote control can be
used. To install the batteries, remove the cover
on the back of the RR-AT92. Install the batteries as shown in the illustration in the battery
well. Test the control for proper operation, then
replace the cover. When the batteries become
weak the remote control won’t operate the
RA-1060 consistently. Installing fresh batteries
should eliminate the problem.
NOTE:
Remove the batteries from the remote
if it will not be used for a long period of time.
Do not leave run down batteries in the remote control; they can leak corrosive chemicals which will damage the unit.
RA-1060 Stereo Integrated Amplifier
Speaker Outputs
See Figure 2
The RA-1060 has two sets of speaker outputs,
labeled SPEAKER A and SPEAKER B. The
speaker outputs are controlled by the switch
on the front panel.
Speaker Impedance
If only one set of speakers will be used at any
given time, the speakers may have an impedance as low as 4 ohms. If there are times when
both the A and B speakers will be used, all
the speakers should have an impedance of 8
ohms or more. Speaker impedance ratings are
less than precise. In practice, very few loudspeakers will present any problems for the
RA-1060. See your authorized Rotel dealer
if you have any questions.
Speaker Wire
Use insulated two-conductor stranded wire to
connect the RA-1060 to the speakers. The size
and quality of the wire can have an audible
effect on the performance of the system. Standard speaker wire will work, but can result
in lower output or diminished bass response,
particularly over longer distances. In general,
heavier wire will improve the sound. For best
performance, you may want to consider special high-quality speaker cables. Your authorized Rotel dealer can help in the selection of
cables for your system.
Polarity and Phasing
The polarity – the positive/negative orientation of the connections – for every speaker and
amplifier connection must be consistent so all
the speakers will be in phase. If the polarity
of one connection is reversed, bass output will
be very weak and stereo imaging degraded.
All wire is marked so you can identify the two
conductors. There may be ribs or a stripe on
the insulation of one conductor. The wire may
have clear insulation with different color conductors (copper and silver). There may be
polarity indications printed on the insulation.
Identify the positive and negative conductors
and be consistent with every speaker and
amplifier connection.
10
Speaker Connections
Turn off all the components in the system before connecting the speakers. The RA-1060
has color-coded speaker connectors on the
back panel. These connectors accept bare wire,
or connector lugs. (In non-EC markets, the connectors also accept dual banana plugs.)
Route the wire from the RA-1060 to the speakers. Give yourself enough slack so you can
move the components to allow access to the
speaker connectors. If you are using dual
banana plugs, connect them to the wires and
then plug into the backs of the binding posts.
The thumbscrews of the binding posts should
be screwed in all the way (clockwise).
If you are using terminal lugs, connect them
to the wires. If you are attaching bare wires
directly to the binding posts, separate the wire
conductors and strip the insulation from the
end of each conductor. Be careful not to cut
into the wire strands. Unscrew (turn counterclockwise) the binding post thumbscrews. Place
the connector lug or wire around the binding
post shaft. Turn the thumbscrews clockwise to
clamp the connector lug or wire firmly in place.
NOTE: Be sure there are no loose wire strands
that could touch adjacent wires or connectors.
Signal Connections
The RA-1060 has line level inputs for source
components, connections for audio tape decks,
and preamp output connections to send signals to an external power amplifier.
NOTE: To prevent loud, potentially damaging,
noises, make sure the system is turned off
when you make any signal connections.
nectors are red. Use high quality RCA cables
for connecting input source components to the
RA-1060. Ask your authorized Rotel dealer
for advice about cables.
Recorder Connections
See Figure 2
Tape inputs and outputs can be connected to
any record/playback device that accepts standard line level analog input and output signals. Typically that will be a conventional tape
recorder. There are two sets of tape connections on the back panel, labelled TAPE 1 and
TAPE 2.
When connecting a recorder to the RA-1060,
the outputs of the recorder must be connected
to the tape inputs of the RA-1060. Similarly
the tape outputs of the RA-1060 must be connected to the inputs of the recorder. Be sure
to connect the left and right channels of each
device to the proper channels on the associated components. Use high quality connecting cables to prevent loss of sound quality.
NOTE: The tape inputs can also be used for
standard playback-only source components,
omitting the output connections.
Preamp Outputs
The RA-1060 has a pair of preamp outputs
that can send a variable gain signal to an external power amp or signal processor. The
preamp outputs are standard RCA-type output connectors, compatible with the inputs of
most power amplifiers. Use high quality cables
and be sure to connect the left and right channel
outputs of the RA-1060 to the correct channels of the amplifier.
AC Power and Control
Line Level Inputs
See Figure 2
The RA-1060 has four pair of conventional RCA
input connectors for line level components such
as CD players, video cassette recorders, tuners, Laser Disc players, or DVD players. These
inputs are labeled CD, TUNER, AUX 1, and
AUX 2.
The left and right channels are clearly labeled
and should be connected to the corresponding channels of the source component. The
left RCA connectors are white, the right con-
AC Power Input
Because of its relatively high power rating, the
RA-1060 can draw considerable current. Therefore, it should be plugged directly into a 2pin polarized wall outlet. Do not use an extension cord. A heavy duty multi-tap power
outlet strip may be used if it (and the wall outlet)
is rated to handle the current demanded by
the RA-1060 and all the other components
connected to it.
English
11
Your RA-1060 is configured at the factory for
the proper AC line voltage in the country where
you purchased it (USA: 115 volts/60Hz AC
or CE: 230 volts/50 Hz AC ). The AC line
configuration is noted on a decal on the back
panel. Plug the supplied cord into the AC INPUT
receptacle on the back of the unit.
NOTE:
Should you move your RA-1060 to another country, it is possible to reconfigure your
amplifier for use on a different line voltage.
Do not attempt to perform this conversion yourself. Opening the enclosure of the RA-1060
exposes you to dangerous voltages. Consult
a qualified service person or the Rotel factory service department for information.
If you are going to be away from home for
an extended period of time such as a monthlong vacation, it is a sensible precaution to
unplug your audio and video components while
you are away.
POWER Button
Power Indicator
Press the front panel POWER button, to turn
the RA-1060 on. The power indicator light is
illuminated when the RA-1060 is on. Press
POWER button again to turn the RA-1060 off.
Once the RA-1060 has been turned on with
the front panel button, it can be switched between normal operating mode and standby
mode with the POWER button on the RR-AT92
remote control.
Auxiliary Power Outlet
(North American version)
The RA-1060 has a switched outlet on the back
panel. Power is available from this outlet when
the RA-1060 is turned on. This outlet can provide up to 200 watts and is appropriate for
supplying power to signal sources, such as CD
players, tuners, or tape decks. It should not
be used for power amplifiers. Connecting components that will draw more than 200 watts
to these outputs could damage the RA-1060.
NOTE:
Do not connect a power amplifier to
the auxiliary power outlet on the RA-1060.
Power amplifiers often draw more power than
this outlet can provide.
12V TRIGGER Connection
RECORDING Selector
Several Rotel amplifiers can be turned on and
off using a 12 volt signal, provided by the 12V
TRIGGER connection. When the RA-1060 is
activated, a 12 volt DC signal appears at this
connector and will turn on an amplifier. When
the RA-1060 is turned off, the trigger signal
is interrupted and the external amplifier will
be turned off.
The RA-1060 can record from any input source
(except TAPE 2) to a recorder connected to
TAPE 1 or TAPE 2 outputs. To select an input
source for recording, turn the RECORDING
control on the front-panel to the desired source.
Audio Controls
The following controls are used to operate the
RA-1060.
VOLUME Control
Turn the front panel VOLUME control clockwise to increase the volume, or counterclockwise to decrease the volume. Alternatively, press
the VOL buttons on the remote control to adjust the volume up or down
CONTOUR Selector
Instead of conventional tone controls, the
RA-1060 has a front-panel CONTOUR control which selects one of five available settings.
Each setting provides a fixed frequency contour as follows:
OFF: the tone contour circuits are bypassed
to ensure the purest possible sound.
L-1: moderate increase in bass frequencies
(typically +3dB @ 100Hz).
L-2: more increase in bass frequencies (typically +4dB @ 100Hz).
H: moderate increase in high frequencies
(+3dB @ 10kHz).
LH: combination of L-2 bass and H high frequency increases.
LISTENING Selector
The setting of the LISTENING selector controls
which of the input signals goes to the main
outputs and onto the power amplifier – or, more
simply, which source is heard. Turn the front
panel control to the source you want to hear,
or press the corresponding button on the
RR-AT92 remote.
This selection is independent of the source
selected for listening. While recording, you
may still select a different source using the
LISTENING selector.
If you have a three-head recorder or a DAT
recorder that allows simultaneous read and
write operation, you can monitor your recording
by setting the LISTENING switch to the TAPE
1 or TAPE 2 position.
NOTE: If you select TAPE 1 with the RECORDING control, the recording signal will only
be available at the TAPE 2 recording outputs,
not the TAPE 1 outputs. To dub a tape, select
TAPE 1 and record to the tape deck connected
to the TAPE 2 outputs.
MUTE Button
To temporarily mute the sound of the system
press the MUTE button on the RR-AT92 remote.
Press the button again to return the sound
volume to the original level. The LED in the
volume control will flash when the unit is muted.
PHONES Output
The PHONES output allows you to connect
headphones for private listening. This output
accepts standard stereo phone (1/4”) plugs.
If your headphones have another type of plug,
such as a 1/8” mini-plug, you will need an
adapter plug. Contact your authorized Rotel
dealer, to get the correct adapter plug.
NOTE:
Plugging in headphones does not cut
off the signal to the speakers. If desired, use
the SPEAKERS selector to turn off the signal
to the speakers for private listening.
RA-1060 Stereo Integrated Amplifier
12
SPEAKERS Selector
Fuse Replacement
A four-position rotary switch on the front panel
determines which set of speakers, if any, is
active. Set the SPEAKER selector as follows:
If another electrical device works when plugged
into the power outlet, but the power indicator still will not light when the RA-1060 is
plugged into the wall outlet, it indicates that
the internal power fuse may have blown. If
you believe this has happened, contact your
authorized Rotel dealer to get the fuse replaced.
OFF: No speakers will be heard. Use this
position when listening to headphones.
A: The speakers connected to the SPEAKER
A terminals will be heard.
B: The speakers connected to the SPEAKER
B terminals will be heard.
A+B: The speakers connected to both the
SPEAKER A and SPEAKER B terminals will be
heard.
Protection Circuit
A thermal protection circuit protects the amplifier against potential damage in the event
of extreme or faulty operating conditions. Unlike
many designs, the RA-1060’s protection circuit is independent of the audio signal and
has no impact on sonic performance. Instead,
the protection circuit monitors the temperature
of the output devices and shuts down the amplifier if temperatures exceed safe limits.
Should a faulty condition arise, the amplifier
will stop playing. If this happens, turn the
amplifier off, let it cool down for several minutes, and attempt to identify and correct the
problem. When you turn the amplifier back
on, the protection circuit will automatically reset.
Troubleshooting
Most difficulties in audio systems are the result of incorrect connections, or improper control
settings. If you encounter problems, isolate the
area of the difficulty, check the control settings,
determine the cause of the fault and make the
necessary changes. If you are unable to get
sound from the RA-1060 refer to the suggestions for the following conditions:
Power Indicator Is Not Lit
The power indicator should be lit whenever
the RA-1060 is plugged into the wall power
outlet and the POWER switch is pushed in. If
it does not light, test the power outlet with another electrical device, such as a lamp. Be sure
the power outlet being used is not controlled
by a switch that has been turned off.
No Sound
Check the signal source to see if it is functioning properly. Make sure the cables from the
signal source to the RA-1060 inputs are connected properly. Be sure the LISTENING selector is set to the proper input. Be sure the
SPEAKERS selector is set to the proper position. Check the wiring between the RA-1060
and the speakers.
Specifications
Continuous Power Output
60 watts/channel (20-20 kHz, < 0.03%, 8 ohms)
Total Harmonic Distortion (20Hz-20kHz)
< 0.03% at rated power, 1/2 power, or 1 watt
Intermodulation Distortion
(60 Hz : 7 kHz, 4:1)
< 0.03% at rated power, 1/2 power or 1 watt
Frequency Response (all inputs)
10Hz-100kHz, +1, –3dB
Damping Factor (20-20,000 Hz, 8 ohms)
150
Input Sensitivity / Impedance
160 mV / 33 kOhms
Input Overload
5V
Preamplifier Output / Impedance
1V / 470 ohms
Signal to Noise Ratio (IHF “A” weighted)
>95 dB
Power Requirements
USA: 115 Volts, 60 Hz
EC: 230 Volts, 50 Hz
Power Consumption
300 Watts
Dimensions (W x H x D)
430 x 92 x 355 mm
17 x 55/8 x 14 inches
Weight (net)
7.8 kg, 17.2 lbs.
All specifications are accurate at the time of
printing.
Rotel reserves the right to make improvements
without notice.
Rotel and the Rotel HiFi logo are registered
trademarks of The Rotel Co, Ltd., Tokyo, Japan.