1
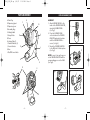
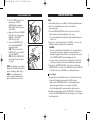
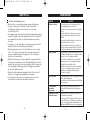
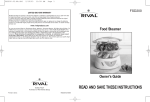
IC500_ICM_IB.qx
6/8/07
11:22 AM
Page 24
SERVICE INSTRUCTIONS
1. Do NOT attempt to repair or adjust any electrical or mechanical functions on this unit. Doing so will void the Warranty.
2. If you need to exchange the unit, please return it in its original carton, with a sales receipt, to the store where
you purchased it. If you are returning the unit more than 30 days after the date of purchase, please see the
enclosed Warranty.
3. If you have any questions or comments regarding this unit’s operation or believe any repair is necessary,
please write to our Consumer Service Department or visit our website at www.rivalproducts.com.
1-YEAR LIMITED WARRANTY
Sunbeam Products, Inc. doing business as Jarden Consumer Solutions, or if in Canada, Sunbeam Corporation
(Canada) Limited doing business as Jarden Consumer Solutions (collectively “JCS”) warrants that for a period of
one year from the date of purchase, this product will be free from defects in material and workmanship. JCS, at
its option, will repair or replace this product or any component of the product found to be defective during the
warranty period. Replacement will be made with a new or remanufactured product or component. If the product
is no longer available, replacement may be made with a similar product of equal or greater value. This is your
exclusive warranty.
This warranty is valid for the original retail purchaser from the date of initial retail purchase and is not transferable.
Keep the original sales receipt. Proof of purchase is required to obtain warranty performance. JCS dealers, service
centers, or retail stores selling JCS products do not have the right to alter, modify or any way change the terms
and conditions of this warranty.
This warranty does not cover normal wear of parts or damage resulting from any of the following: negligent use
or misuse of the product, use on improper voltage or current, use contrary to the operating instructions,
disassembly, repair or alteration by anyone other than JCS or an authorized JCS service center. Further,
the warranty does not cover: Acts of God, such as fire, flood, hurricanes and tornadoes.
What are the limits on JCS’s Liability?
JCS shall not be liable for any incidental or consequential damages caused by the breach of any express, implied
or statutory warranty or condition.
Except to the extent prohibited by applicable law, any implied warranty or condition of merchantability or fitness
for a particular purpose is limited in duration to the duration of the above warranty.
JCS disclaims all other warranties, conditions or representations, express, implied, statutory or otherwise.
JCS shall not be liable for any damages of any kind resulting from the purchase, use or misuse of,or inability to
use the product including incidental, special, consequential or similar damages or loss of profits, or for any
breach of contract, fundamental or otherwise, or for any claim brought against purchaser by any other party.
Some provinces, states or jurisdictions do not allow the exclusion or limitation of incidental or consequential
damages or limitations on how long an implied warranty lasts, so the above limitations or exclusion may
not apply to you.
This warranty gives you specific legal rights, and you may also have other rights that vary from province
to province, state to state or jurisdiction to jurisdiction.
How To Obtain Warranty Service
In the U.S.A.
If you have any question regarding this warranty or would like to obtain warranty service,
please call 1-800-557-4825 and a convenient service center address will be provided to you.
In Canada
If you have any question regarding this warranty or would like to obtain warranty service,
please call 1-800-557-4825 and a convenient service center address will be provided to you.
In the U.S.A., this warranty is offered by Sunbeam Products, Inc. doing business as Jarden Consumer Solutions
located in Boca Raton, Florida 33431. In Canada, this warranty is offered by Sunbeam Corporation (Canada)
Limited doing business as Jarden Consumer Solutions located at 20 B Hereford Street, Brampton, Ontario L6Y 0M1.
PLEASE DO NOT RETURN THIS PRODUCT TO ANY OF THESE ADDRESSES
OR TO THE PLACE OF PURCHASE.
©2007 Sunbeam Products, Inc. doing business as Jarden Consumer Solutions. All Rights Reserved.
Distributed by Sunbeam Products, Inc. doing business as Jarden Consumer Solutions, Boca Raton, Florida 33431.
Printed in China
SPR042707
K500/9100200000581
Icey Cream Machine
IC500
Owner’s Guide
READ AND SAVE THESE INSTRUCTIONS
IC500_ICM_IB.qx
6/8/07
11:22 AM
Page 2
IMPORTANT SAFEGUARDS
When using electrical appliances, basic safety precautions should
always be followed, including the following:
1. Read all instructions before using.
2. To protect against risk of electrical shock, fire and personal injury,
do not immerse appliance, its cord, plug, or motor unit in water
or other liquid.
3. Close supervision is necessary when any appliance is used by or
near children.
4. Unplug from outlet when not in use, before putting on or taking off
parts, and before cleaning.
5. Avoid contact with moving parts. Keep hands, hair, clothing, as well
as spatulas and other utensils away during operation to reduce the
risk of injury to persons and/or damage to the appliance. DO NOT
USE SHARP OBJECTS OR UTENSILS INSIDE THE FREEZER CANISTER.
Sharp objects will scratch and damage the inside of the Freezer Ring
and Freezer Bowl. A rubber spatula or wooden spoon may be used
when the appliance is in the OFF position.
6. Do not operate any appliance with a damaged cord or plug, after
the appliance malfunctions, or is dropped or damaged in any manner.
See warranty to return for examination, repair, or electrical or
mechanical adjustment.
7. The use of accessory attachments not recommended or sold by the
appliance manufacturer may cause fire, electric shock or injury.
8. Do not use outdoors.
9. Do not let cord hang over edge of table or counter.
10. Do not let cord contact hot surfaces, including the stove.
11. Do not expose the Freezer Canister to temperatures
above 105°F / 41°C.
12. Do not place Freezer Canister in the dishwasher.
SAVE THESE INSTRUCTIONS
This appliance is for HOUSEHOLD USE ONLY.
No user-serviceable parts inside. Do not attempt to service this product.
POLARIZED PLUG
This appliance has a polarized plug (one blade is wider
than the other). To reduce the risk of electric shock,
this plug is intended to fit into a polarized outlet
only one way. If the plug does not fit fully into the
outlet, reverse the plug. If it still does not fit,
contact a qualified electrician.
Do not attempt to modify the plug in any way. If the plug fits
loosely into the AC outlet or if the AC outlet feels warm do not use
that outlet.
NOTE: The Rival® Icey Cream Machine must be on a level surface to
function properly.
–2–
–3–
IC500_ICM_IB.qx
6/8/07
11:22 AM
Page 4
INTRODUCTION
BEFORE FIRST AND EACH USE
Make delicious frozen drinks, soft serve ice cream and slushes in minutes
with the Rival® Icey Cream Machine. The 32 oz. freezer canister with
dispensing spout lets you create frozen treats the whole family will enjoy.
From ice cream and slushes for the kids to frozen drinks for the adults,
the Rival® Icey Cream Machine makes it easy.
1. Wash and dry all parts except BASE (see Cleaning and Maintenance).
2. Prepare the FREEZER CANISTER
When making frozen drinks and ice cream, it is important to start with a
fully frozen FREEZER CANISTER. Your Rival® Icey Cream Machine features
a double insulated FREEZER CANISTER that requires thorough freezing.
For best results, wrap the FREEZER CANISTER in a plastic bag and place
upright in the back of your freezer, where the temperature is the
coldest. Wrapping your FREEZER CANISTER in a plastic bag will guard
against freezer burn.
• For optimal freezing results, we recommend a minimum freezing
period of 24 hours.
• Storing the FREEZER CANISTER in the freezer will ensure you are
ready to make frozen drinks and soft serve ice cream on short notice.
We combine both the freezing and serving steps into one convenient,
easy-to-clean product. Simply pour your drink or ice cream mixture into
the recipe chute and watch as a tasty frozen treat is created for your
enjoyment. The dispensing lever and spout make it easy to serve directly
from the Rival® Icey Cream Machine with virtually no mess.
The Rival® Icey Cream Machine allows you to create 32 oz. of frozen
drinks or 1 quart of fresh, delicious soft serve ice cream.
Questions or Comments?
800-557-4825 or visit us at www.rivalproducts.com
–4–
NOTE: Prepare the frozen drink or ice cream mixture before you remove
the FREEZER CANISTER from the freezer. Use the freezer canister
IMMEDIATELY after you remove it from the freezer, or it will begin to
thaw, which will affect the frozen drink or ice cream making process.
–5–
IC500_ICM_IB.qx
6/8/07
11:22 AM
Page 6
PARTS AND ASSEMBLY
H
A. Drink Tray
F
B. Dispensing Spout
C. Dispensing Lever
D. Assembly Ring
E. Mixing Paddle
C
F. Recipe Chute
G. Cover
H. Locking Clips (3)
I. Canister Brackets (3)
B
J. Freezer Canister
K. Base
L. On/Off Power Switch
PARTS AND ASSEMBLY (CONT.)
I
G
J
L
A
K
D
ASSEMBLY
1. Attach MIXING PADDLE to the
inside of the FREEZER CANISTER,
using the ASSEMBLY RING.
(See Fig.1)
2. Place the ASSEMBLY RING
on the bottom of the FREEZER
CANISTER and rotate clockwise
until the MIXING PADDLE is
secure. (See Fig.2)
3. Mount the FREEZER CANISTER
to the BASE until it clicks in place.
(See Fig.3)
Fig.1
E
Fig.2
D
NOTE: Be sure to line up the groove
on the FREEZER CANISTER with the
corresponding groove on the BASE.
(See Fig.4)
E
Fig.3
Fig.4
H
B
–6–
–7–
J
IC500_ICM_IB.qx
6/8/07
11:22 AM
Page 8
OPERATING INSTRUCTIONS
PARTS AND ASSEMBLY (CONT.)
4. Place the COVER over the front
opening of the FREEZER
CANISTER while keeping the
RECIPE CHUTE at the top center
of the COVER.
5. Align each of the three LOCKING
CLIPS with each corresponding
BRACKET on the FREEZER
CANISTER. (See Fig.5)
6. Secure each LOCKING CLIP to
the corresponding BRACKET
and snap into place.
STEP 1: Place the end of the
LOCKING CLIP over the farthest
end of the BRACKET.
STEP 2: Pull the LOCKING CLIP
forward until it locks into place.
(See Fig.6)
NOTE: If preferred, the cover may be
attached to the CANISTER (step 4-6)
prior to attaching to BASE (step 3)
NOTE: Do not add liquid until
product is fully assembled and the
power switch has been turned on.
–8–
Fig.5
Fig.6
H
Step 2
Step 1
NOTE:
• Wash and dry all parts, except BASE (See Cleaning and Maintenance).
• Rival® Icey Cream Machine must be on a level surface to
function properly.
1. Place the FREEZER CANISTER in the freezer for at least 24 hours.
• Wash and dry canister thoroughly prior to freezing.
• Do not add ingredients until product is fully assembled and power
switch is on.
2. Prepare one of the included recipes (See RECIPES), or use your own.
Chilling the mixture beforehand is recommended.
CAUTION:
• Do not use the Rival® Icey Cream Machine to freeze liquids without
any sugar (such as water or sugar-free beverages) as this may
damage the appliance. Water will freeze very quickly to the interior
of the FREEZER CANISTER and could damage the unit.
• Pour any alcohol desired into the unit during the last 3-5 minutes
of freezing or dispense the drink first and add alcohol afterwards.
3. Take the frozen FREEZER CANISTER out of the freezer. Attach the
MIXING PADDLE to the inside of the CANISTER, attach the CANISTER
to the BASE, and secure the COVER (see assembly instructions).
I . Frozen Drinks
1. Plug the Rival® Icey Cream Machine into an electrical outlet and start
the motor by turning the power switch to the ON position.
• Make sure the DISPENSING LEVER is in a fully upright position
before turning the machine on or pouring in any liquid.
• Do not add liquid until the power switch has been turned on.
2. Carefully pour drink mixture into the RECIPE CHUTE. The liquid will
flow into the FREEZER CANISTER and you will begin to see it rotating
and freezing inside.
–9–
IC500_ICM_IB.qx
6/8/07
11:22 AM
Page 10
OPERATING INSTRUCTIONS (CONT.)
NOTE: The minimum amount required for proper operation is 16 oz.
and the maximum capacity of the machine is 1 quart (4 cups or 32 oz.)
of liquid. Do not fill the canister to more than 1" (2.5cm) below the
recipe chute opening. Do not overfill, as leakage may occur.
3. Allow the unit to run for approximately 10 minutes, or until the
desired consistency is reached (freezing times may vary depending on
ingredients used).
4. Once the frozen drink is ready to serve, place your cup onto the
DRINK TRAY and pull down the DISPENSING LEVER.
• The DISPENSING LEVER will dispense the frozen drink into the cup
until you return the DISPENSING LEVER to an upright position.
• Keep the unit on until all contents are dispensed.
OPERATING INSTRUCTIONS (CONT.)
3. Run the Ice Cream Maker for 20 – 30 minutes or until the mixture
reaches the desired consistency.
• DO NOT turn the appliance off during use, as the mixture may
freeze and prevent movement of the MIXING PADDLE.
• To add ingredients or alcohol during the freezing process, gently
add through the RECIPE CHUTE during the last 5 minutes of
operation. Make sure all mix-ins such as candy, nuts or cookies
are finely chopped.
4. To dispense the ice cream, keep the unit on, place the ice cream cone
or cup under the SPOUT, and pull down the DISPENSING LEVER.
• Use an airtight container for long-term freezing or storage.
NOTE: FREEZER CANISTER must be placed back in the freezer for
24 hours before second use.
II . Soft Serve Ice Cream
1. Plug the Rival Icey Cream Machine into an electrical outlet and start
the motor by turning the power switch to the ON position.
• Make sure the DISPENSING LEVER is in a fully upright position
before turning the machine on or pouring in any liquid.
• Do not add ingredients until the power switch has been turned on.
2. Carefully pour the RECIPE mixture into the RECIPE CHUTE.
The mixture will flow into the FREEZER CANISTER and you will
begin to see it rotating and freezing inside.
®
NOTE: Unit must be operating before you add ice cream mixture, as ice
cream will begin to freeze and prevent movement of the Mixing Paddle.
– 10 –
– 11 –
IC500_ICM_IB.qx
6/8/07
11:22 AM
Page 12
CLEANING AND MAINTENANCE
QUICK TIPS (CONT.)
Before cleaning, always turn off and unplug the Rival® Icey Cream Machine
from the outlet.
After each use, take apart the FREEZER CANISTER, ASSEMBLY RING,
MIXING PADDLE, and COVER and clean using warm water and mild
detergent. Dry thoroughly.
• Never place the FREEZER CANISTER in freezer if it is still wet.
• Do not use sharp utensils, scouring pads or abrasive cleaners when
cleaning the FREEZER CANISTER.
• Clean the outside of the BASE (motor assembly) with a damp cloth.
CAUTION:
• Never immerse the BASE (motor assembly) in water or other liquid.
• DO NOT place the FREEZER CANISTER in dishwasher!
• DO NOT place the MIXING PADDLE, or any parts other than the
FREEZER CANISTER, in the freezer.
• If creating alcoholic frozen drinks, add the alcohol at the end of the
freezing process (about 3-5 minutes before dispensing), as alcohol
does not freeze and will alter results if added to initial mixture.
• Gradually incorporate the alcohol into the frozen mixture by pouring
slowly into recipe chute and allowing the paddle to mix the liquid
into the frozen mixture at intervals.
• Additional freezing time may be required when alcohol is poured
directly into the frozen drink maker. Run the unit until peaks form or
the desired consistency is reached.
• To provide more options, prepare the drink mixture without alcohol
and let your guests add alcohol as desired to their frozen drink after it
is dispensed from the frozen drink maker.
• Drink mixtures with higher sugar content will reach desired
consistency more quickly than mixtures with lower sugar content or
that include milk.
• When using fresh fruit in your drink mixture, puree all ingredients first
for optimal results. Also, as natural fruit sugars lessen in taste when
frozen, you may want to add more sweeteners to the mixture.
• Do not store frozen drinks in the freezer or refrigerator; consume
immediately or discard.
QUICK TIPS
I . Frozen Drink Tips
• We recommend chilling most drink mixtures in the refrigerator or
freezer before pouring into the Rival® Icey Cream Machine to speed up
the freezing process.
• Carbonated drinks (such as cola, root beer, cream soda, etc.) can be
used to make frozen drinks.
NOTE: Carbonated diet drinks are not recommended, as they will not freeze.
See point 2 of operating instructions.
• Smoothies can easily be made in the Rival® Icey Cream Machine.
Smoothie recipes are typically thick and less freezing time may be
required to achieve the desired consistency.
– 12 –
II . Soft Serve Ice Cream Tips
• To make hard ice cream, transfer ice cream to an airtight container
and store in freezer for 2 to 4 hours.
• Do not use conventional hard ice cream recipes, as they may damage
the unit. Make sure all mix-ins such as nuts, chocolate chips, etc. are
finely chopped.
– 13 –
IC500_ICM_IB.qx
6/8/07
11:22 AM
Page 14
QUICK TIPS (CONT.)
II . Soft Serve Ice Cream Tips (cont.)
• Most soft serve ice cream recipes combine cream, milk and sugar.
The type of cream you use will affect the flavor and texture.
The higher percentage of fat, the richer the ice cream and
the softer the texture.
• For example, heavy cream has at least 36% fat, followed by whipping
cream (30%), light cream (18%) and half & half (10%). You may use
any combination, but make sure the liquid measurement remains
the same.
• For example, you can make lighter ice creams by using more half &
half than cream, or by eliminating cream altogether.
• When pouring mixture into the Freezer Canister, be sure to stop at
least 1" (2.5 cm) below the recipe chute opening, as mixture will
increase in volume during the freezing process. Do not add more
than 3 cups of liquid mixture.
• Artificial sweeteners can be used as a substitute for sugar. Heat affects
the sweetness of artificial sweeteners. Only add artificial sweeteners to
mixtures that are cold or have cooled completely. When a recipe calls
for heating liquid to dilute sugar, omit the heating process and stir in
the sweetener until it dissolves.
• Mixture should be liquid when preparation starts. Do not use stiff
mixtures (i.e. whipped cream, partially frozen mixture).
• To prevent freezer burn, do not store prepared ice cream in the
Freezer Canister for more than 30 minutes uncovered .
– 14 –
TROUBLESHOOTING
PROBLEM
SOLUTION
Mixture does not freeze
The Freezer Canister was not cold enough; start over by
cleaning, drying and placing back into freezer.
The mixture was too warm; place mixture in the refrigerator
or freezer.
The mixture did not have enough sugar; do not use diet
beverages or liquids without any sugar (such as water)
in the unit.
The proportion of ingredients was incorrect; make a new
mixture and follow the recipe carefully.
Alcohol was added to the mixture too early. Start process
over with a new mixture and wait until the last 3-5 minutes
of freezing before adding alcohol or until after dispensing.
Paddle gets jammed
Mixture was added before the power was turned on, or too
much mixture was added. Start over by cleaning the canister
(may need to re-freeze) & making a new mixture.
Too much mixture was added; start over by cleaning the
canister (may need to refreeze) & making a new mixture.
Check that the unit is assembled correctly.
Ingredients such as candy, nuts or cookies were added too
soon or were not chopped enough; start over, make sure
ingredients are finely chopped and added during the
last 5 minutes of operation.
Motor does not work
Unit is not plugged in; make sure unit is plugged in and start
the motor before adding mixture.
Power switch is not turned on; turn power switch to ON and
then pour in mixture.
Icey Cream Machine
stops suddenly
during operation.
The motor may have overheated; turn power switch to
OFF and wait at least 30 minutes before turning the unit
on again.
Frozen drinks or ice cream
are difficult to dispense.
The power was not on. Keep the power on until all of the
frozen drink has been dispensed.
The consistency of the frozen drink is too thick to dispense.
Pour about 2 tablespoons of the liquid recipe (or water) into
the recipe chute. If needed, add more liquid until the frozen
drink dispenses. NOTE: Keep the power on while dispensing.
– 15 –
IC500_ICM_IB.qx
6/8/07
11:22 AM
Page 16
FROZEN DRINK RECIPES
NOTE:
• Each recipe yields 1 quart (4 cups or 32 oz.); which is the maximum
capacity of the Rival® Icey Cream Machine. All recipes may be halved
for flexible serving options.
• Combine and chill all ingredients, except alcohol (chill separately),
before pouring into recipe chute.
• Alcohol does not freeze and should be added during the last
3-5 minutes of freezing or after the frozen drink is dispensed.
• Gradually incorporate the alcohol into the frozen mixture by
pouring slowly into recipe chute and allowing the paddle to
mix the liquid into the frozen mixture at intervals.
• Additional freezing time may be required when alcohol is poured
directly into the frozen drink maker. Run the unit until peaks
form or the desired consistency is reached.
• For recipes containing fruit, first puree the fruit or place
the fruit and remaining recipe ingredients in a blender and
blend until smooth.
• For thick recipes such as smoothies, less freezing time may be
required. NOTE: If the frozen drink is thick and difficult to
dispense from the unit, pour additional liquid into recipe chute
to thin the mixture and aid in dispensing.
FROZEN DRINK RECIPES (CONT.)
RECIPES WITHOUT ALCOHOL:
CHOCOLATE CHERRY SLUSH
11/2 cups cherry cola
11/2 cups orange juice
1/2 cup chocolate sauce
1/2 cup brewed coffee
BLUE BLIZZARD COOLER
3 cups blue sports drink
1 cup grape juice
FROZEN LEMONADE
4 cups sweetened, chilled lemonade
-orHomemade version:
11/3 cups water
11/3 cups sugar
11/3 cups fresh squeezed lemon juice
SUNNY CITRUS COOLER
11/4 cups limeade
11/2 cups lemonade
11/4 cups grapefruit juice
ORANGE CREAMSICLE
2 cups orange juice
2 cups milk
1/2 cup sugar
1 teaspoon vanilla extract
– 16 –
– 17 –
IC500_ICM_IB.qx
6/8/07
11:22 AM
Page 18
FROZEN DRINK RECIPES (CONT.)
FROZEN DRINK RECIPES (CONT.)
RECIPES WITH ALCOHOL:
RECIPES WITH ALCOHOL:
FROZEN STRAWBERRY DAQUIRI
FROZEN SPARKLING STRAWBERRY MIMOSA
1 cup light rum
1/2 cup strawberry liqueur
1 cup lime juice
1/2 cup sugar
1 cup frozen (defrosted) or fresh pureed strawberries
1 cup frozen (defrosted) or fresh strawberries, pureed
1 cup orange juice
2 cups champagne
NOTE: Add rum during last 3-5 minutes of freezing or after frozen
drink is dispensed.
FROZEN PINA COLADA
1 cup coconut milk
2 cups pineapple, pureed
1/2 cup water
1/2 cup light rum
NOTE: Add rum during last 3-5 minutes of freezing or after frozen
drink is dispensed.
NOTE: Add alcohol during last 3-5 minutes of freezing or after frozen
drink is dispensed.
FROZEN MUDSLIDE
2 cups milk
1 cup half and half
1/4 cup chocolate sauce
1/4 cup vanilla vodka
1/2 cup coffee liqueur
NOTE: Add alcohol during last 3-5 minutes of freezing or after frozen
drink is dispensed.
FROZEN STRAWBERRY MARGARITA
21/2 cups margarita mix
1 cup frozen (defrosted) or fresh pureed strawberries
1/2 cup tequila
NOTE: Add tequila during last 3-5 minutes of freezing or after frozen
drink is dispensed.
FROZEN MARGARITA
31/4 cups limeaid
1/2 cup tequila
1/4 cup triple sec
– 18 –
– 19 –
IC500_ICM_IB.qx
6/8/07
11:22 AM
Page 20
SOFT SERVE ICE CREAM
DELICIOUS HOMEMADE ICE CREAM
SOFT SERVE ICE CREAM
MINT SOFT SERVE
For great tasting homemade ice cream, use Rival Quick and Easy Soft
Serve Ice Cream Mix to create your favorite recipes. It’s fast, easy, and
tastes great!
13/4 cups whole milk
1/4 cup heavy cream
1/2 cup sugar
EASY VANILLA SOFT SERVE
Combine all ingredients, turn on the Rival® Icey Cream Machine
and pour into recipe chute. Dispense mixture after about 25 minutes
or until mixture has thickened
™
13/4 cups whole milk
1/4 cup heavy cream
1/2
cup sugar
2 tsp vanilla
1/2
teaspoon mint extract
3-5 drops green food coloring
Combine all ingredients, turn on the Rival® Icey Cream Machine and
pour into recipe chute. Dispense mixture after about 25 minutes
or until mixture has thickened.
COFFEE SOFT SERVE
CHOCOLATE SOFT SERVE
Combine all ingredients, turn on the Rival® Icey Cream Machine
and pour into recipe chute. Dispense mixture after about 25 minutes
or until mixture has thickened.
13/4 cups whole milk
1/4 cup heavy cream
1/2
1/4
cup sugar
cup chocolate sauce
Combine all ingredients, turn on the Rival® Icey Cream Machine
and pour into recipe chute. Dispense mixture after about 25 minutes
or until mixture has thickened.
STRAWBERRY SOFT SERVE
13/4 cups whole milk
1/4 cup heavy cream
1/2
cup sugar
8 large strawberries, hulled
13/4 cups whole milk
1/4 cup heavy cream
1/2
cup sugar
2 tablespoons instant espresso granules
HARD SHELL CHOCOLATE DIP
6 ounces semi-chocolate chips
1/4 cup butter
1/4 cup canola oil
Place all ingredients in a saucepan set over low heat. Stir gently to
incorporate. Spoon onto cones filled with soft serve ice cream.
Combine all ingredients and pour into blender or food processor.
Puree, mix and strain out the seeds and pulp. Turn on the
Rival® Icey Cream Machine and pour into recipe chute. Dispense
mixture after about 25 minutes or until mixture has thickened.
– 20 –
– 21 –
IC500_ICM_IB.qx
6/8/07
11:22 AM
Page 22
NOTES
NOTES
– 22 –
– 23 –