1
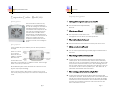
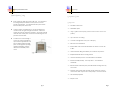
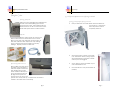
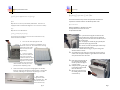
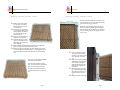
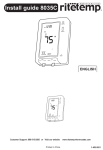
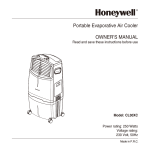
RiteTemp
Evaporative Cooler
Information Brochure (internal)
RiteTemp
Cool-Air 5051
Introduction to use of Evaporative Cooler
RiteTemp
Benefits of Unit
Basic Operation and Maintenance
Frequently Asked Questions
Atlanta, Ga
Phone: 888-515-2585
E-mail: [email protected]
Date: 03/30/05
RiteTemp Internal Document
RiteTemp
Notes
Page 2
Page 15
RiteTemp Internal Document
RiteTemp
Frequently asked Questions continued
Table of Contents
For best cooling what speed should I run the fan?
Bases of Operation
4
Basic Components
4
Unit Benefits
5
Filling the Cooler
6
Yes, you can do this by turning just the fan switch and leaving the
pump switch in off.
Replacing Evaporative Cooler Filter
7
End of Season Maintenance and Storage
10
Refill water light continues to blink, even though Water Tanks are full?
Hints for Better Cooling
12
Frequently asked Questions
13
The unit should be run in low for best possible cooling.
Can the unit be used as a fan only?
The water may not be flowing into the Base unit. Check side
tanks to make sure they are seated properly. When seated properly you should be able to hear water flowing into base unit.
Cooler Pad does not get wet after several minutes of operation.
Make sure that fan is running and that pump switch is in the on
position. It that is the case then the Water Distribution Holes may
be clogged. Turn Fan and Pump switches to off. Unplug unit from
wall. Remove filter assembly (see filter replacement section) Locate the drip tub clear the holes located on the bottom of the
tub and use a paper clip to clean them out.
Cooler Fan does not operate.
Make sure unit is fully
plugged into the outlet. Check
outlet to see if there is power
coming to it. If all looks good,
then the fan thermal overload
breaker may have activated;
unplug unit and wait 30 minutes
and try again.
Page 14
Page 3
RiteTemp Internal Document
RiteTemp
Evaporative Cooler - Model 5051
Frequently asked Questions
Bases of Operation
How long will the evaporative cooler cool on a water fill?
The cool-air fan is used in hot dry
climates to cool and humidify the
air. The air coming out of the 5051 is
normally 3-5 degrees cooler then
the ambient room temperature. The
unit works by pumping water from
the main tank to the filter which
looks similar to a cardboard honeycomb. The filter is wet and as the air
passes over the filter the water
evaporates which lowers the temperature of the air, thus cooling the
room.
The unit will cool for approximately
20 hours.
What size room will it cool?
The evaporative cooler will cool an
average size room of about 170 to 200 square feet.
What is the best location for the cool?
The best location for the cooler is the hottest part off the room.
Basic Components
A 6 or 10 blade fan (most will be 6). The fan has 2 speeds low
and high.
Will the unit work with a GFI outlet?
Yes, the unit is supplied with a grounded plug that will work with a
GFI outlet.
Quiet 110 v Motor
to run the fan
which has the capability to circulate
650 CFM of air.
What should you do if the unit develops mold?
2 removable water
tanks with a total capacity of 7 gallons of water. This is enough
water to cool for up to 20 hours.
Removable filter (Most cases should last for a seasons of cooling, but may require cleaning).
Pump to pump water to filter (there is a switch on the unit to
turn on the pump) if the pump is not turned on it will operate as
a fan.
Page 4
In most cases the unit should not develop any mold since it is a
closed system. But if it does develop mold it can be cleaned by
using 1/8 of a cup of Clorox bleach in each side tank. (Note: make
sure you have a new filter ready to put in after cleaning). Run the
unit for 15 min and then turn it off and let it sit for 24 hours. Then run
it for another 15 min to clear any build up out. Next drain unit, replace filter and refill with clean cold water.
Water is leaking out of the back of the unit by the filter?
In most cases this is caused by the filter panel not being seated
correctly into the base. Remove filter panel. Once removed check
that all of the tubs located at the bottom of the panel are straight
and that there are no obstructions. Next re-insert filter panel make
sure that you have lined up all of the water return tubs into the
holes at the base of the unit.
Page 13
RiteTemp Internal Document
RiteTemp
Hints for Better Cooling
♦
♦
♦
Evaporative Cooler
Start cooler fan while the room is still cool. You may leave
it running all day and still save money due to the low
power consumption. You will find that this system works
best and keeps the room cool.
Can be used as a supplement to an air conditioner for
rooms that do not get enough cool air flow. Place the
cooler fan near the entrance doorway. The cooler fan will
draw air from cooler parts of the house and bring the temperature down further.
Unit Benefits
Durable construction
Affordable price
Large 7 gallon water capacity ( 3 times more then most of the competition)
Up to 20 hour of cooling
To assist the room receiving a
current of cool air throughout,
open a door opposite the unit.
The cooled air will eventually,
pass out through this opening,
thereby keeping a comfortable level of humidity in the
room.
Cools an average size room (170 – 200 sq ft.)
650 CFM of air circulation
Removable water reservoirs eliminates the need to move unit
to fill it.
Universal water filling hose allow you to fill from any faucet.
Replaceable filter last a cooling season
Uses less electricity then a conventional Air conditioner
Environmentally friendly - uses only water – no hazardous
chemicals
Built in wheels and heavy-duty handles make moving unit easy
even if full.
Features 2 speed fan and separate pump switch for water so
unit can be used as just a fan or with pump to cool even more.
No Assembly required
Simple to use
Page 12
Page 5
RiteTemp Internal Document
RiteTemp
Filling the Cooler
End of Season Maintenance and Storage continued
Removing Side Tanks
Make sure unit is unplugged from wall. Remove
the side water tanks by lifting up and then
away from the cooler. Take tanks and faucet
attachment hose to sink or other water source.
Stand tanks upside down on stable surface.
Getting Cooler Ready for Storage continued
Next put base unit on its side wheels down and allow water to drain out. Leave base
unit in this position until it is
completely dried out.
Fill Tanks
With the water turned off, connect the
white funnel end of the attachment hose to faucet.
Remove the tank’s cap and insert the clear tube. Fill
tank with cold water then replace the cap making
sure it is seated correctly and is tight to avoid any
leakage. Repeat process for other tank.
This is a good time to clean out the drip
tub. This can be done by using a paper
clip and inserting it in the holes to make
sure they are not clogged.
Reconnecting tanks to main unit
Remove filler hose from faucet
and take water tank back to
main unit. Replace each side
tank. Making sure that the
water nozzle sets directly into
the cooler base and the top
lip aligns securely with the
notches at the top of the unit.
(*Please note it may take up to 5 minutes for the water to
transfer to the main tank on the first fill)
Page 6
Once all of the pieces are dried out you
can reassemble the unit.
Store unit indoor in a dry environment till
needed.
Page 11
RiteTemp Internal Document
RiteTemp
End of Season Maintenance and Storage
Replacing Evaporative Cooler Filter
Motor
This document outlines the procedure and precautions involved in the
replacement of the filter media for the 5051 Evaporative cooler.
Requires no oil, as it is permanently lubricated. The motor is
equipped with a thermal 130 degrees C cut off fuse for safety.
Materials needed:
Medium blade Philips or flat blade screw driver
A sturdy flat work area about 3 X 3 foot.
A replacement filter P/N:
Pump
Requires no oil or lubrication.
Getting Cooler Ready for Storage
If you have been using the unit, run unit in fan mode to dry
excess moisture from filter.
Turn unit off and unplug from wall.
Take unit to a place that will allow you to
drain the water out. Be careful when moving
unit if full so that water
does not leak out during moving.
Once in a place
that you can drain the
unit remove the side
tanks and remove valve
caps and drain remaining water out of them.
Place them open part
down and let them dry out completely before replacing caps.
Next remove filter cover (see changing filter for details).
Remove and ether discard and replace filter or clean filter
carefully, allowing it to dry before replacing it in to filter
tray.
If you have been using the unit make sure the
pump has been off for at least one hour with the fan
running to drain out the water from the filter area and
dry out the media.
Completely turn off the unit (pump and fan) and
remove the power plug from the wall.
Find an area with a flat workspace at least 3 ft by
3 ft. and cover it with a towel.
Turn the unit so that the back is facing you; as you are facing it the
wheels should be to the left.
You will find two screws at the top, remove each screw by turning it
counter clock wise (either a Philips or regular blade screw driver will
work) and set them some where safe.
Now slowly and gently rock the
top of the filter assembly back
towards you about 20 degrees
or about 7 inches.
Gently lift up with a gentle right
to left rocking motion and the
filter unit will lift off.
Set unit on to the towel with
the outside grill down and the
metal retainer up.
With a damp
sponge clean main
unit, and filter tray. Also
clean return tubs at
bottom of filter tray.
Page 10
Page 7
RiteTemp Internal Document
RiteTemp
Replacing Evaporative Cooler Filter continued
Replacing Evaporative Cooler Filter continued
Make sure the water outlets
are away from you and the
tabs that the screws were in
are towards you.
Starting on your right closest
to you with your thumb gently
push the plastic case out and
with your left hand pop the
metal retainer out.
Repeat for the remaining two
positions on the right side.
Note that the top two retaining pins are angled down and
the bottom one furthest from
you is angled up.
Lift the retaining assembly slightly up and pull to your right with a
gentle rocking motion, when removed set it aside.
Note the orientation of the filter the plastic webbing goes around
from left to right. Also note that there is a 1/2 inch gap from the top
(area closest you) to the top of the filter, this is for the water drip
rod.
Lift up on the top of the filter and slide it
out towards you and discard.
Clean the inside of the filter housing
with a 10 percent solution of bleach and
water on a clean sponge and let dry.
This is also a good time to make sure
that all of the drain tubes are clean and
clear.
Page 8
Insert the new filter making sure you have it in the
same orientation as the one you removed and that
you have the 1/2-inch gap at the top.
Replace the metal retaining grid with the pin furthest you is angled up, start by gently working the
three left pins in, then working from the bottom up
with your thumb gently put the right pins in place
one at a time.
Now is a good time to clean
drip rod and make sure that
the holes on the under side are
clear, Also wipe out the fan
area.
Next replace the filter housing
assembly with the drain tubes
down at about a 20 degree
angle and align the tubes and
holes then rock right to left
until seated.
Finally replace the two retaining screws turning them clockwise making sure not to over
tighten then only snug them
up.
Plug the unit back in and enjoy.
Page 9