1
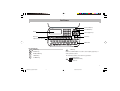
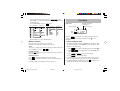
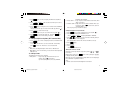
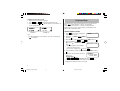
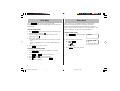
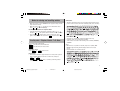
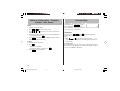
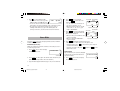
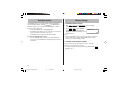
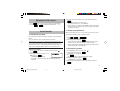
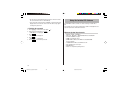
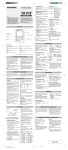
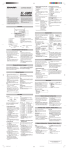
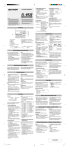
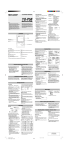
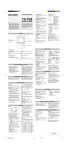
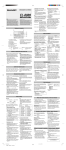
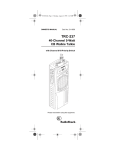
PERSONAL ORGANIZER
OWNER’S MANUAL
MODEL
EL-6991
CONTENTS
Part Names .......................................................................................... 1
Using the Organizer for the First Time ............................................... 2
Entering Characters ............................................................................ 2
Clock Mode .......................................................................................... 3
Telephone Mode .................................................................................. 6
Schedule Mode ................................................................................... 7
To Do Mode ......................................................................................... 8
Memo Mode ......................................................................................... 8
Notes for storing and recalling entries ................................................ 9
Recalling entries .................................................................................. 9
Editing or deleting entries ................................................................. 10
EL6991en_cvr0630.pm65
1
Calculator Mode ................................................................................ 10
Currency/Unit Conversion Mode ....................................................... 11
Game Mode ....................................................................................... 12
Word Translator Mode ....................................................................... 13
Backlight function .............................................................................. 14
Memory Storage ................................................................................ 14
Adjusting the LCD contrast ............................................................... 15
Secret Function ................................................................................. 15
Using the Included PC Software ....................................................... 16
Battery Replacement ......................................................................... 18
Specifications .................................................................................... 20
06/30/2003, 15:32
NOTICE
• RadioShack Corporation strongly recommends that separate permanent written records be kept of all important data. Data may be lost or altered
in virtually any electronic memory product under certain circumstances. Therefore, RadioShack Corporation assumes no responsibility for data
lost or otherwise rendered unusable whether as a result of improper use, repairs, defects, battery replacement, use after the specified battery life
has expired, or any other cause.
• RadioShack Corporation assumes no responsibility, directly or indirectly, for financial losses or claims from third persons resulting from the use of
this product and any of its functions, such as stolen credit card numbers, the loss of or alteration of stored data, etc.
• The information provided in this manual is subject to change without notice.
CAUTIONS
•
•
•
•
Do not carry the Organizer in the back pocket of slacks or trousers.
Do not drop the Organizer or apply excessive force to it.
Do not subject the Organizer to extreme temperatures.
Since this product is not waterproof, do not use it or store it where fluids can splash onto it. Raindrops, water spray, juice, coffee, steam,
perspiration, etc. will also cause malfunction.
• Clean only with a soft, dry cloth.
• Use only a RadioShack Corporation approved service facility.
NOTES
• All company and/or product names are trademarks and/or registered trademarks of their respective manufactures.
EL6991en_cvr0630.pm65
2
06/30/2003, 15:32
Part Names
Clear/Clear Entry key
Power ON/OFF key
Display
Cursor navigation keys
MEMO/TO DO
Mode keys
Search keys
MENU
Option port (3-pin option jack)
RESET switch
Key Assignments
ENTER
: ENTER key
DEL
: DELETE key
BS
: BACK SPACE key
Functions as CAPS LOCK. It is used to select capital (uppercase) or
small (lowercase) letters.
INS
: INSERT key
The following notations are used for key operations.
SMBL
CAPS
: SYMBOL key
CM
U
: CAPS key
: Clear memory
(in Calculator mode)
U : Letter “U”
CM
1
EL6991en_bdy0630.pm65
1
06/30/2003, 16:59
Using the Organizer for the First Time
Be sure to perform the following operations before using the Organizer
for the first time.
1. Remove the isolating film that is
affixed to the battery holder on the
back of the unit.
2. Press the RESET switch with a ballpoint pen or similar object.
“RESET?” is displayed.
M–
M+
3. Press SHIFT x to initialize the
Organizer after “RESET!” is displayed. You
,
:
have now cleared the memory contents.
RESET
The Select Language screen then appears.
Guidance messages can be displayed in ten
languages – English, Italian, German,
French, Spanish, Portuguese, Hungarian,
Czech, Polish, and Greek. After initializing the Organizer, the default
setting is English.
4. Select the desired language using PREV or NEXT , then press
x.
Home clock is displayed. (See “Clock Mode”.)
• To minimize battery consumption, the Organizer is designed to
automatically turn off when no key has been pressed for approximately five minutes.
• The key touch tone is turned on and off by pressing SHIFT MENU ,
select “KEY TONE?” using PREV or NEXT , and press x.
Select on/off using PREV or NEXT , then press x. When
the tone is activated, “ ” will appear.
Entering Characters
• Alphanumeric letters, symbols, and “+ – × ÷ .” can be entered into
the dot display area (the first line).
• Numbers and some characters (only space, –, F, and P in Telephone
mode) can be entered into the number display area (the second and
the third lines).
• Letters are entered in capital letters by default (“CAPS” is turned on).
To enter lowercase letters, press CAPS to turn “CAPS” off.
Entering symbols and letters with an accent mark
• To enter a symbol, press SMBL repeatedly until the desired symbol
appears:
@#$£¥
( )~’: / \_&<>ß!? ¡¿æµ¢
NOTES
• If the Organizer is subject to strong, extraneous electrical noises or
shocks during use, an abnormal condition may occur in which no
OFF
keys (including ON ) will respond. Press the RESET switch and
press SHIFT x to delete all the memory contents.
2
EL6991en_bdy0630.pm65
2
< REVISED >
06/30/2003, 16:59
• To enter a letter with an accent mark, press SHIFT SHIFT to turn
“SHIFT LOCK” on, and press the appropriate key repeatedly (Refer to
the following list).
• To turn “SHIFT LOCK” off, press SHIFT again.
(Key) (CAPS ON)
(CAPS OFF)
(Key) (CAPS ON)
(CAPS OFF)
Clock Mode
Daylight saving time
set ( with “#”)
Home clock
Home city (with “
”)
Day of the week
CAPS
NYC
# THU
1– 1–2004
A1 2 – 0 0 – 0 0
Date
Time
• Activate “CAPS” on to enter capitalized letters.
Each time CLOCK is pressed, the clock switches between the Home
clock and the World clock mode. (For World clock, “ ” is not
displayed.)
Making corrections
1. Before setting the clock
Move the cursor to the character to be corrected.
Enter the correct character to replace the previous one.
Cursor
The cursor (_) indicates the position for entering a character. Move the
cursor with the cursor keys (
).
• The default setting for the date is “MM/DD/YYYY” (month-day-year).
To change the setting to “YYYY/MM/DD” (year-month-day) or “DD/
MM/YYYY” (day-month-year):
Inserting characters
Each time INS is pressed, a space is inserted at the cursor position to
allow character entry.
Deleting characters
Press DEL to delete the character at the cursor position.
Press C•CE to clear all the characters you have entered and yet to be
stored.
Press b to delete the character at the left of the cursor.
1. Press
CLOCK
once or twice to display the Home clock (with “
”).
2. Press SHIFT MENU , select “DATE SET?” by using k or m , and
press x.
3. Press
4. Press
PREV
ENTER
or
NEXT
to select the desired type.
to store the new setting.
• To change the 12-hour clock to the 24-hour clock, press Z (“A”
or “P” is cleared). Each time Z is pressed, the clock switches.
• For daylight saving time/summer time, press DST in advance (“#” is
displayed on the left side of the day of the week).
3
EL6991en_bdy0630.pm65
3
< REVISED >
06/30/2003, 16:59
2. Setting the clock
1. Press CLOCK once or twice to display the Home clock (with “
2. Press SHIFT e to start setting.
The cursor starts to flash on the city name.
”).
3. Press PREV or NEXT to select the desired city. (Refer to the
table of cities on this page.)
• Enter the city name, if needed (six characters or under). Only one
name can be stored for Home clock.
4. Press
to move the cursor to the date.
5. Enter the month, the day, and the year (four digits ).
• The built-in calendar extends from January 1, 1901, to December
31, 2098.
6. Press AM/PM to select “A” (morning) or “P” (afternoon) for the
12-hour clock.
7. Enter the time (hours and minutes).
Note: P12-00: noon, A12-00: midnight
8. Press
ENTER
. The clock starts from “00” seconds.
Notes
• To enter a single-digit date or time, enter “0” and the digit (e.g.
“02”).
• If you enter an invalid date or time, “ERROR!” appears briefly. Enter
the correct date and time and press ENTER .
Display
City
Display
City
LON
LIS
PAR
BER
ROM
AMS
BCN
HEL
CAI
MOW
RUH
THR
DXB
KBL
KHI
DEL
DAC
RGN
BKK
BEI
HKG
SIN
LONDON
LISBON
PARIS
BERLIN
ROME
AMSTERDAM
BARCELONA
HELSINKI
CAIRO
MOSCOW
RIYADH
TEHRAN
DUBAI
KABUL
KARACHI
DELHI
DHAKA
YANGON
BANGKOK
BEIJING
HONG KONG
SINGAPORE
TYO
ADL
SYD
GUM
NOU
WLG
AKL
TNG
MID
HNL
ANC
LAX
DEN
CHI
NYC
YYZ
CCS
RIO
MAT
–2H
AZO
TOKYO
ADELAIDE
SYDNEY
GUAM
NOUMEA
WELLINGTON
AUCKLAND
TONGA
MIDWAY
HONOLULU
ANCHORAGE
LOS ANGELES
DENVER
CHICAGO
NEW YORK
TORONTO
CARACAS
RIO DE JANEIRO
MID ATLANTIC
2hrs behind LON
AZORES ISLANDS
3. Using World clock
1. Press
2. Press
CLOCK
PREV
once or twice to display the World clock (without “
or
NEXT
”).
to select the desired city.
4. Changing the cities between Home and World
clocks
You can change the home city for a city in another time zone without
adjusting the stored correct time.
4
EL6991en_bdy0630.pm65
4
06/30/2003, 16:59
1. Press CLOCK once or twice to display the World clock (without
“ ”).
2. Press PREV or NEXT
the new home city.
and select the desired city to be set as
3. Press SHIFT e to change the cities between Home and World
clocks.
• The previous home city is now set as the world city (without “ ”).
ALARM2, and ALARM3).
2. Hourly alarm ...... beeps every hour when minutes reach “00”, when
“
” is turned on.
3. Schedule alarm .. beeps at the time for all the schedule entries (for
one minute), when “
” is turned on. (Refer to
“Schedule Mode”.)
Press any key to stop the alarm beeping.
Setting/Changing the daily alarm time
4. Press CLOCK to check the home city.
• The selected city in step 2 is set as the home city (with “
”).
1. Press
5. Press
or
2. Press A to display the ALARM1 screen.
• Press PREV or NEXT to display ALARM2 or ALARM3.
NEXT
to recheck the world city, and press
to select the new world city, if needed.
CLOCK
PREV
5. Setting daylight saving time (DST: summer time)
1. Press
CLOCK
once or twice to display the Home or the World clock.
once or twice to display Home clock (with “
CLOCK
3. Press or
to display the screen is turned on the daily alarm, if
the daily alarm time is not displayed.
(The display differs between the 12-hour and 24-hour clock.)
4. Press
SHIFT
e.
2. Press DST .
“#” is displayed. The time is set one hour ahead. To clear DST,
press DST to clear “#”. The time is set one hour behind.
5. Enter the time.
Notes
• DST can be set independently in either Home or World clock.
• When DST is set for one world city, it is used for all cities displayed
in World clock.
Turning the alarms on and off
6. Setting alarms
The Organizer has three types of alarms:
1. Daily alarm ........ beeps every day at the alarm time (for one
minute), when “ ” is turned on.
Up to three daily alarms can be set (ALARM1,
”).
6. Press ENTER .
• The daily alarm time is set.
, or
)
An alarm sounds only when the respective symbol ( ,
is turned on.
Display Home clock (press CLOCK once or twice) and press A
to display the daily alarm screen.
Each time you press A while the daily alarm screen is displayed,
the combination of symbols switches.
Note
• Alarms sound even when the Organizer is turned off.
5
EL6991en_bdy0630.pm65
5
06/30/2003, 16:59
Turning the daily alarm on and off
1. Display Home clock and press A.
2. Press PREV or NEXT to display the daily alarm screen.
3. Each time you press or , the daily alarm you selected turns on
or off. e.g. daily alarm1.
ALARM on
ALARM off
Note
• The daily alarm which is turned off does not beep even though the
“ ” is displayed.
Telephone Mode
Telephone mode is composed of two directories of storage memory.
Press TEL to toggle between “1” and “2” on the display.
Use these files for convenience, e.g. business and private files.
A telephone entry consists of name, address, E-mail address, web
address (URL) and number fields.
Storing telephone entries
1. Press TEL once or twice to display the
Telephone mode screen.
2. Enter name, e.g. SMITH
and press .
3. Enter address, e.g. 18
SPACE
SPACE
1
CAPS
NAME ?
ROBERT,
EAST
SPACE
ROAD, and press
.
4. Enter E-mail address, e.g. SROB SMBL
E-mail
1
l (to enter “ @ ”) SHARPSEC.COM, and
h a r p s e c . c om –
press .
• The E-mail address is automatically
entered in lowercase letters.
• To enter “ @ ”, simply press @ instead of SMBL .
5. Enter web address (URL), e.g. WWW.SHARPUSA.COM , and press
.
1
CAPS
NUMBER ?
6. Enter phone number, and fax number if
2–3456–7890
needed, e.g.
3456–7891–
012-3456-7890
F SPACE SPACE SPACE 3456-7891, and press ENTER .
• “STORED!” appears briefly, then the Telephone mode screen is
displayed. The telephone entry is now stored.
6
EL6991en_bdy0630.pm65
6
06/30/2003, 16:59
Field
Number of
characters
The first line:
Name,
E-mail address,
web address (URL)
36 characters or
under
address
The second and
the third lines:
Phone number
Alphabetic letters, numbers,
symbols, “+ – × ÷ .”, space
Schedule mode is used for storing schedule details (36 characters or
under), date and time (year, month, day, hour, and minute).
In the first line the same characters are allowable as in Telephone mode.
1. Storing schedule entries
72 characters or
under
36 characters or
under
Schedule Mode
Allowable characters
Numbers, space, –,
F (Fax),
P (Pager)
Notes
• The symbol “NAME”, “ADDRESS”, “E-mail”, or “URL” is turned on
while entering in each field.
• To skip entry of an address, E-mail address, web address (URL), or
number, press when “ADDRESS?”, “E-MAIL?”, “URL?”, or
“NUMBER?” is displayed. However, entry must be made at the
"NAME?" field.
1. Press
to display the Schedule mode screen.
2. Enter the details and press
.
SCHEDULE?
3. Enter the date and time.
• The types of date and time are the same
as the types set for the clock.
• To enter a single-digit date or time, enter “0” and the digit (e.g.
“02”).
4. Press ENTER to store in the memory.
Notes
• Schedules for the following dates can be stored: January 1901 to
December 2098.
• If an attempt is made to store an entry without a date or time, or
with an invalid date or time, “ERROR!” appears briefly. Enter the
correct date and time and press ENTER .
2. Alarm for Schedule mode
When the schedule alarm (“
”) is turned on, it is set for all the
schedule entries. Beeping sounds for one minute when the time for a
schedule entry is reached. Press any key to stop the alarm. The
schedule alarm cannot be set for an individual entry.
7
EL6991en_bdy0630.pm65
7
06/30/2003, 16:59
To Do Mode
Memo Mode
Press MEMO/ TO DO once or twice to select To Do mode.
Each time the key is pressed, the display switches between To Do and
Memo modes.
Storing To Do entries
1. Press
MEMO/ TO DO
once or twice to display the To Do mode screen.
2. Enter the description and press
.
3. Select the Priority number from 1(High) to 9(Low) enter the
number, then press .
4. Enter the date and time.
• The types of date and time are the same as the types set for the
clock.
• To enter a single-digit date or time, enter “0” and the digit (e.g.
“O2”).
5. Press
to store in the memory.
ENTER
Notes or other pieces of information that are not appropriate for
Telephone or Schedule mode can be entered for convenience.
In the first line the same characters are allowable as in Telephone
mode. In the second and the third lines you can enter numbers, –, and
space. (36 characters or under can be entered in each line.)
Storing memo entries
1. Press MEMO/ TO DO to display the Memo
mode screen.
MEMO?
2. Enter the memo item and numbers.
E.g. UNION SPACE
BANK
01
272-0011223
UN I ON BANK
01
272–0011223–
3. Press
ENTER
to store in the memory.
Changing Completion Status
1. Press MEMO/ TO DO once or twice to display the To Do mode
screen.
2. Press
3. Press
PREV
SHIFT
or
e
NEXT
to select the To Do items.
to enter the status field.
4. Press to select “D” (Done), then press
• “P” stands for “pending”.
ENTER
.
8
EL6991en_bdy0630.pm65
8
06/30/2003, 16:59
CAPS
CAPS
Notes for storing and recalling entries
• When the memory is full, “MEMORY FULL!” appears briefly, and the
entry cannot be stored.
• When the symbol “ ” or “ ” appears, more information exists.
Press or to switch the display.
Sorting order
• Telephone and memo entries are stored by the first character of the
person’s name or memo item in the following order (case sensitive):
Checking details of entries in Telephone mode
• To display each field on the first line, follow the symbol “ ” or “ ”
and press or . (The symbol above the first line shows each field.)
• Press and hold to start the auto scroll on the first line. Press
again to stop or restart the scroll. Press C•CE to quit the auto scroll.
Recalling entries – Telephone, Schedule, To Do, Memo –
Press the desired mode key first.
: Recalls entries in forward order
NEXT
PREV
Notes
• When there is no (further or relevant) entry to be recalled, “NOT
FOUND!” appears briefly, and the display returns to the mode
screen.
• Greek characters are sorted as follows:
: Recalls entries in reverse order
Sequential search
Press NEXT or
PREV
• “Ch” and “ch” are available in Czech language mode only.
• Schedule entries are stored by date and time.
• To Do entries are stored in the following order : STATUS, PRIORITY,
and DATE.
in each mode.
Direct search
• Enter the first characters (eight characters or under) of the person’s
name, schedule details, To Do item or memo item, and press
or PREV .
NEXT
Press NEXT or PREV then, to continue performing a direct
search.
9
EL6991en_bdy0630.pm65
9
< REVISED >
06/30/2003, 16:59
Editing or deleting entries – Telephone,
Schedule, To Do, Memo –
The Organizer can calculate numbers of up
to ten digits. Press CALC/CONV several
times to display the Calculator mode
screen (Calculator → Currency conversion
→ Unit conversion → Calculator...).
Editing
1. Recall the entry to be edited.
2. Press
SHIFT
3. Press ,
edited.
EDIT
,
. The cursor starts to flash.
, or
to move the cursor to the position to be
4. Enter, insert, or delete characters (refer to “Entering Characters”).
• To cancel editing, press C•CE .
5. Press ENTER several times (until “STORED!” appears briefly) to
finish editing and to store the entry.
Deleting
1. Recall the entry to be deleted.
2. Press
DEL
.
• “DELETE?” is displayed.
• To cancel the deletion operation, press
3. Press
ENTER
C•CE
Calculator Mode
.
Calculation
Be sure to press C•CE , C•CE , and CM to clear the display and
memory before performing a calculation.
Note
• When , , , or is pressed, the respective symbol, +, –, ×, or
÷ is displayed. (In the examples in this manual, these symbols are
not described.)
If an error occurs
If the calculation result or the integer section in the numerical value in
the memory exceeds 10 digits or if a number is divided by zero (0), an
error occurs (“ERROR” is displayed).
to delete the entry.
10
EL6991en_bdy0630.pm65
10
0.
06/30/2003, 16:59
Calculation examples
Example
Operation
(–24+2)÷4=–5.5
24
C•CE
34+57=91
34
45+57=102
45
68×25=1700
68
Currency/Unit Conversion Mode
Display
2
–5.5
4
91.
57
102.
(The addend becomes a constant.)
68×40=2720
25
1700.
40
2720.
(The multiplicand becomes a constant.)
20.
1. Setting a currency rate
1. Press CALC/CONV several times to
display the currency conversion mode
screen (refer to “Calculator mode”).
Example: 1 CAD (Canada dollars)
= 0.66 USD (US dollars)
2. Press
to change the display and press
NEXT
NEXT
e. The initial character of “CAD” starts to flash.
200
9÷36=25%
9
200+(200×10%)=220
200
10 %
500–(500×20%)=400
500
20 %
46=(43)2=4096
4
4096.
3. Press
1/8=0.125
8
0.125
4. Enter the rate (up to ten digits).
25.
36 %
220.
400.
25
5 M+
M
–) 84÷3=28
84
3 M–
M
28.
+) 68+17=85
68
17 M+
M
85.
RM
M
182.
25×5=125
CM
182
앀앙앙
25–9=4
25
1234567890×145
1234567890
9
앀앙
125.
4.
145
=179012344050
ERROR
17.90123440
17.90123440
C•CE
(17.90123440×1010=179012344000)
SHIFT
0.
NEXT
200×10%=20
10 %
CAPS
EURO – – USD
• You can change each currency name by entering characters (up to
four in each) and using , if needed.
ENTER
. “0” starts to flash.
0.66
5. Press
ENTER
to store in the memory.
CAPS
CAD
– – USD
0.6 6
2. Converting currency/unit
You need to set the conversion rate before making the currency
conversion.
Example: Convert 500 CAD into USD using the rate that you have set.
1. Display the screen: “CAD → USD”.
2. Enter the value to be converted.
500
11
EL6991en_bdy0630.pm65
11
06/30/2003, 16:59
CAPS
3. Press to convert CAD into USD.
– – USD
CAD
• To convert in reverse order (e.g. 200
USD into CAD), enter 200 and press .
3 3 0.
• You can use the unit conversion in the
same manner. You cannot change the units or the rates for units.
• The conversion result may have a slight error as a result of
rounding off the number (e.g. up to two decimal places for
currency conversions). Use the conversion result for reference.
Game Mode
Each time GAME is pressed, the display switches between “ALPHA
ATTACK” and “BLACKJACK”.
BLACKJACK (Twenty-one)
Make your “hand” (the total of the numbers on the cards) as close to
21, without going over 21.
1. Press GAME once or twice to display
the Game mode screen.
4. Press SPACE to see your hand.
Each time SPACE is pressed, a new
card is dealt.
• “J”, “Q”, and “K” are counted as 10.
• “A” can be counted as 1 or 11.
• When the first two cards are “A” and
a face card (“J”, “Q”, or “K”), your
hand is “BLACKJACK”.
Your chips
2. Press ENTER to start a game. The left two cards are dealt for you.
(One card is faced up and the other is faced down.)
4
10
20
Your bet Your chips
The dealer’s
Your total
total
5. Press ENTER to stop being dealt and
CAPS
hold your hand. The dealer’s hand and
J28
3 2K4
the results are displayed.
20
19
• When you win, your total flashes and
20
20
your bet is doubled.
Your bet Your chips
• When you win with “BLACKJACK”,
your bet is tripled.
6. Press ENTER and display the Game mode screen.
• When you have no more chips to bet, the game is over.
• To quit the game, press C•CE or any mode key. Your chips are
stored for the next time.
• To return your chips to 30, press DEL and press ENTER on the
Game mode screen.
ALPHA ATTACK
Type in characters (A to Z, 0 to 9) displayed
on the first line to clear them. 20 levels of
speed are available.
1. Press GAME once or twice to display
the Game mode screen.
3. Agree the left-displayed maximum bet (up to ten) or enter fewer bet.
12
12
CAPS
J28
CAPS
B L ACK J ACK
30
EL6991en_bdy0630.pm65
Your hand The dealer’s
hand
06/30/2003, 16:59
CAPS
A L PHA A T T ACK
01
Level
2. Enter the level number (two digits, from
01 to 20).
01
• 01: slow, 20: fast
3. Press
ENTER
CAPS
Word Translator Mode
EY 3K W
to start a game.
4. Press the same key as the first character at the left end of the first
line. (In this case, press keys in the order: E → Y → 3 → K → W.)
• Pressing the correct key in the correct order deletes the character.
• When 12 characters are displayed in each level, the game
continues in the faster level (up to 20).
• When no more characters can be displayed, the game is over. The
Game mode screen with the level when the game is over is
displayed.
The Organizer offers an English-Spanish bi-directional word translation
function.
1. Press
to enter the English ➝ Spanish translation mode.
ENG – – SPA
Press
mode.
twice (or
then
) to enter Spanish ➝ English
2. Enter the desired source word and press ENTER .
“English…” or “Spanish…” is displayed while conducting search.
The matching English or Spanish word will then be displayed.
• When the symbol “ ” appears on, more letters exist. To view
remaining letters of long words that cannot be accommodated on
the screen, use to scroll right.
• If there is no matching word, “NOT FOUND!” is displayed. The
word next in alphabetical order will then be displayed.
• Press NEXT or PREV to scroll through word list, or edit
entry using the keyboard, and press ENTER for another search.
• Press or to return to the source word.
Caution
• Spanish words stored in this device are those of Spain.
• Only the masculine form of the noun will be displayed for nouns
with both masculine and feminine forms.
• Sometimes, two identical words will appear in the word list.
• Enter European characters and spaces correctly. Otherwise, the
unit may not be able to complete the search.
13
EL6991en_bdy0630.pm65
13
06/30/2003, 16:59
Backlight function
The Backlight allows you to view the display and use the Organizer
even in low-light conditions. Pressing z once illuminates the
display for as long as you continue to use the Organizer, or until no
key is pressed for 10 seconds.
• To turn the Backlight off, press z again.
• The Backlight may remain on for less than the preset interval or
it may not function if the battery level is low.
• The Backlight does not function in the PC Link mode.
Do not use the Backlight unnecessarily
• Since the Backlight drains power from the backlight battery,
excessive use of the Backlight will significantly reduce the life of
your battery.
Memory Storage
1. Checking memory storage
1. Press TEL ,
, or MEMO/ TO DO to display “NAME?”,
“SCHEDULE?”, “MEMO?” or “TO DO?”.
CAPS
2. Press SHIFT MENU , select “MEMORY
CAPA C I T Y
%
CHECK” by using k or m , and press
x. The number of remaining bytes is
99
displayed briefly.
Notes
• Approx. 8,000 telephone entries can be stored (when 14 characters
are entered for name, telephone and fax number fields, and 18
characters are entered for address field).
2. Deleting all the memory contents
Perform steps 2 and 3 as described in the section, “Using the
Organizer for the First Time” (see page 2).
• To cancel the deletion operation, press any key EXCEPT FOR
x in step 3.
14
EL6991en_bdy0630.pm65
14
< REVISED >
06/30/2003, 16:59
SHIFT
Adjusting the LCD contrast
1. Press
2. Press
CLOCK
NEXT
once or twice to display Home clock (with “
or PREV to adjust the LCD contrast.
”).
Secret Function
4. Enter the same password once more for verification and press
ENTER .
• The display returns to the Home clock.
The secret function turns on automatically.
• If you enter the wrong password, “ERROR !” appears briefly and
display returns to the Home clock. Follow the above steps again
to register a password.
2. Turning Secret function off
When the Secret function is on, it is necessary to turn off to perform
the Telephone, Schedule, To Do, and Memo modes.
1. Registering a password
A Secret function is valid for Telephone, Schedule, To Do, and Memo
modes.
Up to six characters can be registered as the password.
If the password is forgotten, you cannot delete the password only. You
have to delete all the memory contents. (Perform steps 2 and 3 as
described in the section, “Using the Organizer for the First Time” on
page 2.) As a safeguard, make a written record of the password.
Registering a password
1. Press CLOCK once or twice to display Home clock (with “ ”).
2. Press S.
3. Enter a password (case sensitive), e.g.
ABC and press ENTER .
• “RECONFIRM !” is displayed.
• If “ERROR !” appears briefly, the password has already been
registered.
1. Press TEL ,
, or MEMO/ TO DO .
• “PASSWORD?” is displayed.
2. Enter the password and press ENTER .
• If you enter an incorrect password, “ERROR!” appears briefly.
Follow the above steps and enter the correct password.
• Secret function will be automatically turned on after the power is
turned off manually or automatically.
3. Changing the password
1. Press S on the Home clock (with “ ”).
2. Enter the password and press ENTER .
• “EDIT PASS.?” is displayed.
3. Press ENTER .
• The initial character of the password starts to flash.
4. Modify the password and press ENTER .
• “RECONFIRM !” is displayed.
5. Enter the same password once more for verification and press
ENTER .
15
EL6991en_bdy0630.pm65
15
06/30/2003, 16:59
• The password is changed and display returns to the Home clock.
The secret function turns on automatically.
• If you enter the wrong password, “ERROR !” appears briefly and
display returns to the Home clock. Follow the above steps again
to change the password.
Using the Included PC Software
The CD-ROM contains software to enable exchange of data with a
PC.
The software can be used to backup/restore data in the Organizer and
export/import data to different file formats.
4. Deleting the password
1. Press S on the Home clock (with “
2. Enter the password and press ENTER .
• “EDIT PASS.?” is displayed.
3. Press ENTER .
• The password is displayed.
4. Press C•CE .
• “DEL PASS.?” is displayed.
5. Press ENTER to delete the password.
”).
Minimum System Requirements:
• IBM PC or 100% compatible
®
®
• Microsoft Windows 98/98SE/2000 Professional/Me/XP
®
• Pentium 300MHz or higher
• 50MB free hard disk space
®
®
• 64MB RAM for Microsoft Windows 98/98SE/2000
Professional/Me
®
®
• 128MB RAM for Microsoft Windows XP
• One available 9-pin serial port
• CD-ROM drive
• Mouse or compatible pointing device
16
EL6991en_bdy0630.pm65
16
06/30/2003, 16:59
Connecting the Organizer to Your PC
Desktop Utilities
1. Turn off your PC and the Organizer.
Launch "Desktop Utilities" from the
Start menu, or double-click on the
shortcut icon on the desktop. Utilize
the Desktop Utilities via the following
graphic interface:
2. Connect the standard 9-pin connector of the PC-Link cable to the
PC’s serial port.
• Using a 25-pin connector will require an additional adapter.
(Commercially available)
3. Connect the other end of the PC-Link cable to the Organizer’s
option port.
4. Turn on the PC and the Organizer.
Connect to the
option port of
the Organizer.
Serial port
Click “Auto Detect...” to allow the
communication to automatically
detect the appropriate serial port.
Make sure that the unit is physically connected with the PC first, then
click this button.
If the desired serial port is not found, manually select the serial port
from the drop-down list.
Backup/Restore
Installing
1. Insert the PC software CD-ROM into your CD-ROM drive.
Installation process should automatically start.
If the PC software screen does not appear, double-click “My
Computer” to locate the CD-ROM drive directory, then double-click
to launch “install.exe” found on the CD-ROM.
2. Click the "Install" button.
3. Follow the installation instructions that appear on the screen.
Note:
®
®
• For Windows2000 Professional and Windows XP, install/
uninstall programs after logging on as an Administrator.
• When the installation is complete, click the "Finish" button to finish
the installation process.
The Backup/Restore menu of the Desktop Utilities allows you to make a
backup file of the unit data, or to restore it back to the internal memory
of the unit. Be noted that the setup parameters won't be backed up.
• Backup: Select “Backup...” from button, then enter the desired
name of the file to be backed up.
• Restore: Select “Restore...” from button, then select the desired
name of the file to be restored.
17
EL6991en_bdy0630.pm65
17
REVISED
06/30/2003, 16:59
Export/Import
The Export/Import menu of the Desktop Utilities allows you to import
data created by each application to the unit, or export data created on
the PC to the unit by application data.
• Export: Select the desired application name, then click “Export...”,
then enter the desired filename to which you wish to export data.
• Import: Select the desired application name, then click “Import...”,
then enter the desired filename from which you wish to import
data.
Battery Replacement
Batteries used
Type
Lithium battery
Lithium battery
Model
Quantity
Use
CR2032
CR2032
1
1
Unit operation
Backlighting
• Be sure to write down any important information stored in the
memory before replacing the batteries.
Precautions
Since improper use of the batteries may cause leakage or explosion,
strictly observe the following instructions:
• If fluid from a leaking battery accidentally gets into your eyes, it
may result in serious injury. Should this occur, flush your eyes
with clean water and consult a physician immediately.
• Should fluid from a leaking battery come into contact with your
skin or clothes, immediately wash with clean water.
• If the Organizer will not be used for an extended period of time, to
avoid damaging the Organizer remove batteries and store in a
safe place.
• Do not leave exhausted batteries inside the Organizer.
• Do not use different types of batteries or partially used batteries.
• Insert the battery with its positive side (+) correctly orientated.
• Never throw batteries into a fire because they might explode.
• Keep batteries out of reach of children.
• When batteries become near exhaustion, remove them from the
Organizer immediately to avoid battery leakage and corrosion
inside the Organizer.
18
EL6991en_bdy0630.pm65
18
06/30/2003, 16:59
Because the batteries in the Organizer were installed at the factory,
they may become exhausted before the specified expiration time is
reached.
Operating Battery Replacement
Battery replacement time
When "LOW BATTERY" is displayed, immediately replace the
operating battery with a new one.
The operating battery holder is indicated as "For OPERATION" in
the battery compartment.
If the battery level is low, the alarm may not sound, or similarly
the Backlight may not function. Continued use of the Organizer
with low battery can alter or clear the memory contents. Memory
contents may be lost if the battery is improperly replaced or if the
following instructions are disregarded.
Caution:
• PC Link may not be available when the battery level is low.
• Under the low battery condition, new data entry and editing of
existing data may not be performed in some modes. Also Clock and
other settings may not be made.
Backlight Battery Replacement
When the Backlight cannot be turned on (except when "LOW
BATTERY" is displayed or the Organizer is in the PC Link mode),
replace the backlight battery.
The backlight battery holder is indicated as "For BACKLIGHT" in
the battery compartment.
Replacing the batteries
• Make sure the power is turned off before replacing the batteries.
• Do not press o until the battery replacement procedure is
completed.
1. Press o to turn the power off.
2. Loosen the screw (turn counterclockwise) and
remove the battery holder cover on the back
of the unit.
3. Remove one used battery using a ball-point
pen or similar object.
• Do not use a mechanical pencil or sharp
pointed object.
4. Install one new battery with the positive side
(+) facing up.
5. Repeat step 3 and 4 for replacing both
batteries, if necessary.
6. Replace the holder cover and secure with the
screw.
7. The power will be turned on 2 to 3 seconds
after o is pressed.
• If nothing appears on the display, press the RESET switch and
press C•CE .
• Do not press SHIFT and x. This key sequence will clear
all the memory contents.
8. Set the clock to the correct time (see page 3).
Caution:
• Clock settings and/or other settings and listings may be lost when
batteries are removed for a long time. Replace the batteries as
quickly as possible.
• Make sure to confirm all settings are set correctly after replacing
the batteries.
19
EL6991en_bdy0630.pm65
19
< REVISED >
06/30/2003, 16:59
Specifications
•
•
•
•
•
•
•
•
•
•
•
•
•
•
•
Model: EL-69916910
Product name: Personal Organizer
Display: 12 colums × 3 lines, with Backlight
Memory capacity: 768 KB Equivalent∗
Clock mode:
Accuracy: ± 60 seconds/month at 25°C/77°F
Display: Year, month, day, day of the
week, hour, minute, second, AM/PM
Clock function: 12-hour/24-hour format (switchable), 3 kinds of
date type (switchable), world clock function, daylight saving time
(summer time) display, daily alarm, hourly alarm
Telephone mode: Entry and recalling of telephone listings (name,
address, E-mail address, phone number, and web address (URL))
Schedule mode: Entry and recalling of schedule listings (details,
year, month, day, hour, and minute), schedule alarm
To Do mode: Entry and recalling of To Do listings (Due Date, Priority
and Description)
Memo mode: Entering and recalling of memo entry
Calculator mode: 10 digits (with calculation status symbols), arithmetic
calculations, percentage, square root, memory calculation, etc.
Currency/unit conversion mode:
5 types of currency conversion (editable) and 9 types of unit
conversion
Game mode: 2 games
Word Translator mode:
English from/to Spanish, approx. 1200 words for each language
Power consumption: 0.11 W
Operating temperature: 0°C to 40°C (32°F to 104°F)
• Power supply:
– (DC) (Lithium battery CR2032 x 1)
Operating battery: 3.0V ...
– (DC) (Lithium battery CR2032 x 1)
Backlight battery: 3.0V ...
• Auto Power Off Function: Approx. 5 minutes
• Battery life:
Operating battery (at 25°C/77°F)
Approx. 1 year at ambient temperature of 25°C/77°F, assuming the
following daily use: 30 minutes display, alarm sounding for 20 seconds
and key touch tone turned on/off 100 times.
Backlight battery (at 25°C/77°F)
• Approx. 4000 times
When the Backlight is turned on for 10 seconds and turned off for 50
seconds per minute.
• Weight: Approx. 110 g (0.24 lb.) (Including batteries)
• Dimensions:
Open: 143.0 mm (W) x 169.5 mm (D) x 9.5 mm (H)
5-5/8" (W) x 6-11/16" (D) x 3/8" (H)
Closed: 143.0 mm (W) x 88.0 mm (D) x 13.3 mm (H)
5-5/8" (W) x 3-15/32" (D) x 17/32" (H)
• Accessories: 2 lithium batteries (installed), CD-ROM software, PCLink cable, owner’s manual
∗ Memory at 768 KB Equivalent. Approx. 8000 telephone names &
numbers (name, telephone and fax number are 14 characters and
address is 18 characters per entry) can be stored by using
compression technology. (Compression Rate: Approx. 1.5:1)
20
EL6991en_bdy0630.pm65
20
< REVISED >
06/30/2003, 16:59
0.123456789
0.123456789
0.123456789
0.123456789
0.123456789
0.123456789
0.123456789
Declaration of Conformity
Personal Organizer : EL-6991
This device complies with Part 15 of the FCC Rules. Operation is subject
to the following two conditions: (1) This device may not cause harmful
interference, and (2) this device must accept any interference received,
including interference that may cause undesired operation.
Responsible Party:
RadioShack Corporation
100 Throckmorton, Fort Worth, TX 76102
TEL: 817-415-3200
Tested To Comply With FCC Standards
For Hardware Support
If you require assistance with the hardware or have any other productrelated questions, you can:
Visit our website:
www.RadioShack.com
For PC Software Support
If you have read the organizer owner’s manual, but still require PC
Software Support, you can:
FOR HOME OR OFFICE USE
Call our customer assistance center:
WARNING – FCC Regulations state that any unauthorized changes or
modifications to this equipment not expressly approved by the
manufacturer could void the user's authority to operate this equipment.
(630) 378-3590
Note: This equipment has been tested and found to comply with the limits
for a Class B digital device, pursuant to Part 15 of the FCC Rules.
These limits are designed to provide reasonable protection against
harmful interference in a residential installation. This equipment
generates, uses, and can radiate radio frequency energy and, if not
installed and used in accordance with the instructions, may cause harmful
interference to radio communications.
However, there is no guarantee that interference will not occur in a
particular installation. If this equipment does cause harmful interference
to radio or television reception, which can be determined by turning the
equipment off and on, the user is encouraged to try to correct the
interference by one or more of the following measures:
– Reorient or relocate the receiving antenna.
– Increase the separation between the equipment and receiver.
– Connect the equipment into an outlet on a circuit different from that to
which the receiver is connected.
– Consult the dealer or an experienced radio/TV technician for help.
Send an E-mail:
[email protected]
Note: A shielded interface cable is required to ensure compliance with
FCC regulations for Class B certification.
21
EL6991en_bdy0630.pm65
21
06/30/2003, 16:59
Limited One-Year Warranty
This product is warranted by RadioShack against manufacturing defects in material and workmanship under
normal use for one (1) year from the date of purchase from RadioShack company-owned stores and authorized
RadioShack franchisees and dealers. EXCEPT AS PROVIDED HEREIN, RadioShack MAKES NO EXPRESS
WARRANTIES AND ANY IMPLIED WARRANTIES, INCLUDING THOSE OF MERCHANTABILITY AND FITNESS
FOR A PARTICULAR PURPOSE, ARE LIMITED IN DURATION TO THE DURATION OF THE WRITTEN LIMITED
WARRANTIES CONTAINED HEREIN. EXCEPT AS PROVIDED HEREIN, RadioShack SHALL HAVE NO LIABILITY
OR RESPONSIBILITY TO CUSTOMER OR ANY OTHER PERSON OR ENTITY WITH RESPECT TO ANY LIABILITY,
LOSS OR DAMAGE CAUSED DIRECTLY OR INDIRECTLY BY USE OR PERFORMANCE OF THE PRODUCT OR
ARISING OUT OF ANY BREACH OF THIS WARRANTY, INCLUDING, BUT NOT LIMITED TO, ANY DAMAGES
RESULTING FROM INCONVENIENCE, LOSS OF TIME, DATA, PROPERTY, REVENUE, OR PROFIT OR ANY
INDIRECT, SPECIAL, INCIDENTAL, OR CONSEQUENTIAL DAMAGES, EVEN IF RadioShack HAS BEEN ADVISED
OF THE POSSIBILITY OF SUCH DAMAGES.
Some states do not allow limitations on how long an implied warranty lasts or the exclusion or limitation of
incidental or consequential damages, so the above limitations or exclusions may not apply to you.
In the event of a product defect during the warranty period, take the product and the RadioShack sales receipt as
proof of purchase date to any RadioShack store. RadioShack will, at its option, unless otherwise provided by
law: (a) correct the defect by product repair without charge for parts and labor; (b) replace the product with one
of the same or similar design; or (c) refund the purchase price. All replaced parts and products, and products on
which a refund is made, become the property of RadioShack. New or reconditioned parts and products may be
used in the performance of warranty service. Repaired or replaced parts and products are warranted for the
remainder of the original warranty period. You will be charged for repair or replacement of the product made
after the expiration of the warranty period.
This warranty does not cover: (a) damage or failure caused by or attributable to acts of God, abuse, accident,
misuse, improper or abnormal usage, failure to follow instructions, improper installation or maintenance,
alteration, lightning or other incidence of excess voltage or current; (b) any repairs other than those provided by
a RadioShack Authorized Service Facility; (c) consumables such as fuses or batteries; (d) cosmetic damage; (e)
transportation, shipping or insurance costs; (f) costs of product removal, installation, set-up service adjustment
or reinstallation.
This warranty gives you specific legal rights, and you may also have other rights which vary from state to state.
RadioShack Customer Relations, 200 Taylor Street, 6th Floor, Fort Worth, TX 76102
12/99
EL6991en_cvr0630.pm65
3
06/30/2003, 15:32