1
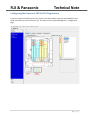
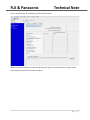
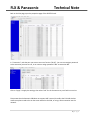
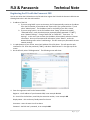
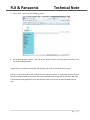
Technical Note
FLX – VoIP
Registering with Panasonic
KX-TDE100, KX-TDE200, KX-TDE600, KX-NCP500, KX-NCP1000
Date: April 6th, 2012
This technical note gives a detailed description on how to register a Revolabs FLX conference phone with
a Panasonic IP PBX. In the management interface of the Panasonic IP PBX a SIP extension and user has
to be created. Once that user is created, the FLX can be set up to register with the Panasonic IP PBX.
To perform the tasks described in this document, the user needs to have administrative rights on the
Panasonic PBX. While the steps in this document are not difficult, we recommend that a trained
administrator should perform them.
1|Page
FLX & Panasonic
Technical Note
Configuring the Panasonic PBX for FLX Registration
If you do not have SIP enabled yet on your system, you need to add a virtual SIP card (SIPEXT32 Virtual
Card) to the PBX if you do not have one yet. This is done on the System Management – Configuration
page.
2|Page
FLX & Panasonic
Technical Note
Click on Activation Key, and add the license for the SIP stations.
Make sure that you restart the virtual IP cards after this step to activate the licenses. Please consult
your Panasonic manuals for the exact procedure.
3|Page
FLX & Panasonic
Technical Note
Back on the Slot page, open the properties page of the SIPEXT32 card.
In “Connection”, take the port you want to use out of service (“OUS”). You can now assign a password
to the extension you want to use, in our case we assign password “469” to extension 469.
Click on “Apply” to apply the settings, then select “INS” for the Connection to put it back into service.
Please note that the Panasonic PBX does not support NAT traversal, therefore the FLX VoIP wireless
conference phone needs to be on the same network as the PBX, or using a VPN connection into the
network.
4|Page
FLX & Panasonic
Technical Note
Registering the FLX with the Panasonic PBX
You can use either the FLX handset or the FLX web UI to register the FLX with the Panasonic PBX. We are
showing how to do it with the web interface.
1. IP address of the FLX.
a. If you are using DHCP in your environment, the FLX automatically receives an IP address.
From the FLX handset, choose Menu and “System Info” (the symbol with the “i”) and
select “About System”. The IP address (static or via DHCP) of your FLX is shown.
b. If you are using static IP, on the FLX handset chose “Setup” (the wrench symbol),
“Advanced Setup”, enter the administrator password (default password is “7386””),
enter “Network Settings”. Change “DHCP ON” to “DHCP OFF”. Then enter “IP
Settings”. In this menu you can enter the IP address, Subnet Mask, and other relevant
information. Once you have entered all information, select “Return”, and in the
Network Settings menu select “Load Settings. This will restart your phone with the new
network settings.
2. In a web browser of your choice, enter the IP address of the FLX phone. This will open the web
interface for FLX. Enter the password (“7386”), and select “Administrator” in the right top of the
screen.
3. On the left side, select “SIP Registration”. The following screen will show:
4. Enter the registration info for the Panasonic PBX:
Registrar – the IP address of your Panasonic PBX, in our example 10.1.1.1
ID – User ID for the End User, most likely the extension number, in our example 469
Display Name – this can be any friendly name for the user
Username – enter the same User ID as above
Password – the End User’s password, in our example 469.
5|Page
FLX & Panasonic
Technical Note
5. Press “Save”. You will see the following screen.
6. On the left side select “Restart”, and click on the “Restart” button. Your FLX phone will restart. You
can close the Web browser.
If registration is successful, the handset will show the user ID at the top of the home screen.
If there is a registration failure, the handset will show that the phone is not registered. Please verify that
the user ID and password are the same as the ones specified when configuring the Panasonic PBX. Also,
in the Panasonic Management UI verify that the device was correctly set up and associated with the
user.
6|Page