1
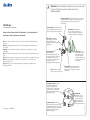
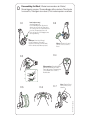
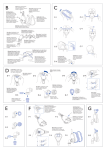
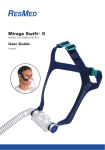
Ultra Mirage™
Non-vented full face mask
Clinical Guide
English
A
Mask Parts / Teile der Maske / Composants du masque / Parti della
maschera / Piezas de la mascarilla / Peças da máscara /
Maskeronderdelen
Forehead support pad / Stirnpolster / Tampon du support frontal /
Imbottitura del supporto frontale / Almohadilla del apoyo para la
frente / Almofada do suporte da testa / Kussentje van
voorhoofdsteun
Ultra Mirage
TM
NON-VENTED FULL FACE MASK
Illustrations Sheet / Illustrationsblatt / Fiche d'Illustrations / Fogolio delle Illustrazioni /
Forehead support / Stirnbauteil / Support
frontal / Supporto frontale / Apoyo para la
frente / Suporte da testa / Voorhoofdsteun
Hoja de Figuras / Folheto de Ilustrações / Illustratieblad
Note: For complete instructions, read the text section in conjunction with the illustrations on
this sheet.
Hinweis: Vollständige Anweisungen finden Sie im Textabschnitt und in den Illustrationen auf
diesem Blatt.
Remarque : pour les instructions complètes, veuillez lire le texte du guide avec cette fiche
d'illustrations.
Nota: Per istruzioni complete, leggere la sezione con il testo insieme alle illustrazioni su questo
foglio.
Nota: Para tener instrucciones completas, lea el texto en conjunto con las figuras de esta hoja.
Nota: Para obter as instruções completas, leia a secção de texto em conjunção com as
ilustrações deste folheto.
Opm.: Raadpleeg voor een volledige beschrijving het tekstgedeelte en de bijbehorende
illustraties op dit blad.
Mask frame / Maskenhalter /
Entourage rigide / Telaio della
maschera / Armazón de la
mascarilla / Armação da máscara /
Maskerframe
Luer lock ports cap /
Anschlusskappen für
Luer-Verbindungsstück / Bouchon(s)
d'entrée de raccord Luer / Tappi porte
con connessione Luer / Tapas de
puerto Luer lock / Tampas das portas
com fecho do tipo Luer /
Poortkap(pen) met luer-vergrendeling
Elbow / Kniestück / Coude /
Gomito / Codo / Cotovelo / Bocht
Upper Velcro™ straps / Die oberen
Velcro-Bänder / Bandes Velcro
supérieures / Cinghie laterali
superiori (Velcro) / Correas laterales
superiores (Velcro) / Correias Velcro
laterais superiores / Bovenste Velcro
klittenbandbevestiging
Lower Velcro straps / Die unteren
Velcro-Bänder / Bandes Velcro inférieures /
Cinghie laterali inferiori (Velcro) / Correas
laterales inferiores (Velcro) / Correias Velcro
laterais inferiores / Onderste Velcro
klittenbandbevestiging
Cushion clip / Clip des
Maskeneinsatzes / Clip de
la bulle / Fermaglio del
cuscinetto / Traba de la
almohadilla / Dispositivo de
fixação da almofada / Klem
voor kussentje
Elbow retainer / Kniestückhalter / Anneau
de retenue du coude / Fermo del gomito /
Retenedor del codo / Retentor do cotovelo /
Bochthouder
Headgear clip /
Kopfbandclip / Clip du
harnais / Fermaglio del
copricapo / Broche del
arnés / Dispositivo de
fixação do arnês para a
cabeça / Hoofdbandklem
© 2011 ResMed Ltd.
Component of: 608323/1
Mask cushion / Maskeneinsatz /
Bulle du masque / Cuscinetto della
maschera / Almohadilla de la mascarilla /
Almofada da máscara / Maskerkussentje
B
B-1
Fitting the Mask / Anlegen der Maske / Mise en place du masque /
Come indossare la maschera / Colocación de la mascarilla / Colocação
da máscara / Het masker opzetten
Forehead support tab / Stirnbauteillasche /
languette du support frontal / Linguetta del
supporto frontale / Lengüeta del apoyo para la
frente / Dispositivo de fixação do suporte da
testa / Tab van de voorhoofdsteun
C
C-1
B-2
Disassembling for Cleaning / Demontage zu Reinigungszwecken /
Démontage pour le nettoyage / Smontaggio per la pulizia /
Desmontaje para la limpieza / Desmontagem para limpeza /
Demontage voor reiniging
L-shaped ridge / L-förmige Leiste / Bord en L /
Costa sinistra a L / Borde en forma de L / Saliência
em forma de L / L-vormige rand
C-2
PUSH / DRÜCKEN / POUSSER /
SPINGERE / EMPUJE /
EMPURRE / DUWEN
LIFT / HEBEN /
SOULEVER /
SOLLEVARE /
LEVANTE / LEVANTE /
OMHOOGDOEN
4
3
2
1
C-4
C-3
B-3
Elbow retainer / Kniestückhalter /
Anneau de retenue du coude /
Fermo del gomito / Retenedor del
codo / Retentor do cotovelo /
Bochthouder
B-4
a
B-5
b
B-6
C-5
b
C-6
a
© 2011 ResMed Ltd.
© 2011 ResMed Ltd.
D
Reassembling the Mask / Wiederzusammenbau der Maske /
Remontage du masque / Riassemblaggio della maschera / Montaje de
la mascarilla / Montagem da máscara / Het masker opnieuw monteren
D-1
Luer lock ports cap /
Anschlusskappen für
Luer-Verbindungsstück / Bouchon(s)
d'entrée de raccord Luer / Tappi porte
con connessione Luer / Tapas de puerto
Luer lock / Tampas das portas com
fecho do tipo Luer / Poortkap(pen) met
luer-vergrendeling
D-2
Mask port / Anschlussöffnung /
Port(s) du masque / Porta della
maschera / Puerto(s) de la mascarilla /
Orifício da máscara / Masterpoort(en)
Elbow / Kniestück / Coude /
Gomito / Codo / Cotovelo /
Bocht
D-4
D-3
Elbow retainer / Kniestückhalter /
Anneau de retenue du coude /
Fermo del gomito / Retenedor del
codo / Retentor do cotovelo /
Bochthouder
a
b
D-5
D-6
D-7
Pivot / Zapfen / Pivot /
Perno / Pivote / Pino /
Scharnier
© 2011 ResMed Ltd.
English
608323.book Page 1 Tuesday, December 6, 2011 9:40 AM
Ultra Mirage™
NON-VENTED FULL FACE MASK
The Ultra Mirage NV (non-vented) Full Face Mask is a non-invasive device used
for channelling air flow with or without supplemental oxygen.
Intended Use
The Ultra Mirage NV Full Face Mask is intended to be used with active-exhaustvalve ventilator systems, to provide ventilatory assistance to patients with
respiratory insufficiency and respiratory failure.
The Ultra Mirage NV Full Face Mask is to be used on adult patients (>30 kg),
requiring non-life-support ventilatory assistance.
The Ultra Mirage NV Full Face Mask is intended for single-patient re-use in the
home or multipatient re-use in the hospital/institutional environment.
.
•
•
•
•
•
WARNINGS AND CAUTIONS
The Ultra Mirage NV Full Face Mask, must not be used without qualified
supervision for patients who are unable to remove the mask by themselves.
This mask is not for use on patients with impaired laryngeal reflexes or other
conditions predisposing to aspiration in the event of regurgitation or
vomiting.
The mask should not be worn unless the ventilator system is turned on and
operating properly.
At a fixed rate of supplemental oxygen flow (if used), the inhaled oxygen
concentration will vary depending on the pressure settings, patient
breathing pattern, mask size selection and the mask leak.
If oxygen is used with the ventilator, the oxygen flow must be turned off
when the ventilator is not operating.
Explanation: When the ventilator is not in operation, and the oxygen flow
is left on, oxygen delivered into the ventilator tubing may accumulate within
1
608323.book Page 2 Tuesday, December 6, 2011 9:40 AM
the ventilator enclosure. Oxygen accumulated in the ventilator enclosure
will create a risk of fire. This warning applies to most types of ventilators.
• Please refrain from smoking while oxygen is in use.
•
Using a mask may cause tooth, gum or jaw soreness or aggravate an
existing dental condition. If symptoms occur, consult your physician or
dentist.
About the Mask
The mask system does not contain latex, PVC or DEHP materials. If the
patient has ANY reaction to any part of the mask system, discontinue use
and investigate the possible causes.
• ResMed has tinted the Ultra Mirage NV Full Face Mask elbow blue to
identify it as a non-vented mask for use with active exhaust non-invasive
ventilator systems only.
• The mask has a standard female 22 mm tapered fitting (ISO5356-1) for
external connection to the ventilator.
• Refer to the section “Technical Specifications” of this guide for information
about mask leak, dead space and resistance.
•
CAUTION
The mask must be cleaned and disinfected/sterilised if it is used between
patients. Refer to the section “Cleaning the Mask between Patients” for
details.
Parts of the Mask
See section A on the illustrations sheet.
Fitting the Mask
Note: Refer to the relevant ventilator system operating instructions for detailed
information about connecting the mask.
See section B on the illustrations sheet.
The Ultra Mirage NV Full Face Mask is supplied fully assembled.
1 Move the forehead support tab to Position 3. (Refer illustration B-1 for
location of Positon 3.)
2 Disconnect one lower headgear clip. Place the mask on the face and pull the
headgear over the patient’s head (B-2). Ensure that the upper straps pass
across the forehead and the lower straps below the ears.
3 Reattach the headgear clip to the mask frame.
4 Gently tighten the upper headgear straps (B-3).
2
5 Gently tighten the lower headgear straps (B-4).
The pads of the forehead support should sit comfortably on the forehead
when the mask is in place. If the pads are at an angle and not completely
seated on the forehead, change the position of the forehead support tab.
Note: Do not overtighten the headgear straps as this may cause discomfort,
cushion creases and mask leak. The Ultra Mirage NV Full Face Mask has
been designed to provide a comfortable seal without the need to
overtighten the headgear.
6 The fitted mask should look like this (B-5).
7 Connect the main air tubing to the elbow (B-6). Then connect the free end
of the air tubing to the ventilator and turn the ventilator on. If the patient
experiences air leaks around the cushion, it may be necessary to gently
tighten the headgear straps.
8 If the patient is unable to get a proper seal:
reposition the mask by lifting it and placing the cushion comfortably on
the face.
• adjust the position of the forehead support tab by testing all four
positions and finding the one that best prevents leaks.
• gently tighten the headgear straps.
Notes:
• If it is not possible to resolve any leaks, your patient may require another
mask frame and/or another cushion size.
• As with all mask ventilation systems, significant leak may occur between
the mask and the patient's face. The leak may vary depending on such
factors as the patient's position and sleep stage. Variation in leak may
significantly affect patient ventilation, potentially producing profound
hypoventilation or hyperventilation. The magnitude of this effect depends on
the ventilator's ability to compensate for leak.
• Leak or variation in the leak may cause mistriggering of the ventilator.
•
Removing the Mask
Normal Release
To remove the Ultra Mirage NV Full Face Mask, squeeze one of the lower
headgear clips and pull the mask and headgear up over the patient’s head.
Emergency Release Cord
The Emergency Release Cord (Figure 1) allows the mask to come away from
the face quickly in the event of an emergency.
3
English
608323.book Page 3 Tuesday, December 6, 2011 9:40 AM
608323.book Page 4 Tuesday, December 6, 2011 9:40 AM
Simply pull the Emergency Release Cord and the two part clip separates,
allowing you to remove the mask from the face.
Figure 1: Emergency Release Cord.
Note: The Emergency Release Cord should only be used to remove the mask
in the event of an emergency. Overuse of the Emergency Release Cord may
result in the deterioration of the two part clip mechanism.
Disassembling for Cleaning
See section C on the illustrations sheet.
1 Detach the mask from the air tubing.
2 Disconnect the headgear clips to release them from the mask frame. It is
not necessary to remove the headgear clips from the headgear.
3 Remove the ports caps from the mask frame.
4 Detach the cushion assembly from the mask frame by depressing the
cushion clip at the base of the mask frame and gently pulling it off. This
releases the cushion and cushion clip.
Then, separate the cushion from the cushion clip.
5 To detach the elbow from the frame, lift (C-1) and push (C-2) the right wing
of the elbow retainer over the right L-shaped ridge on the mask frame.
6 Rotate the elbow retainer to the position shown in C-3. The elbow retainer
is now in the correct position for removal.
7 To remove the elbow retainer, hold one wing of the elbow retainer down,
and firmly pull the other wing out (C-4a) and then up (C-4b) over the top of
the elbow. Remove the elbow retainer and elbow from the mask frame.
8 To remove the forehead support from the mask, press the tab (C-5a) and
move it upwards until it is possible to slide it off the mask frame (C-5b).
9 Pull firmly at the base of the forehead support pad plugs to release the pads
from the forehead support (C-6).
4
Cleaning the Mask in the Home
Notes:
• Wash your hands before cleaning the mask.
• It is important to always handwash the headgear.
• The headgear may be washed without being disassembled from the
headgear clips.
Daily/After each use
Handwash the mask components in warm (approximately 30ºC) water for one
minute using mild soap or detergent. Rinse the components well with drinking
quality water and allow them to air dry out of direct sunlight.
Weekly
Handwash the headgear in warm (approximately 30ºC) water using mild soap
or detergent. Rinse well and allow to air dry out of direct sunlight.
CAUTION
Do not use bleach, chlorine, alcohol, or aromatic-based solutions,
moisturising or antibacterial soaps, or scented oils to clean any of the mask
components. These solutions may cause damage and reduce the life of the
product.
• Do not expose any part of the mask system or tubing to direct sunlight as it
may cause the product to deteriorate.
• The headgear is sensitive to heat and must not be ironed.
• If any visible deterioration of a mask component is apparent (cracking,
crazing, tears, etc), the mask component should be discarded and replaced.
•
Reprocessing the Mask between Patients
The mask should be reprocessed when used between patients.
Cleaning, disinfection and sterilisation instructions are available from the
ResMed website, www.resmed.com/masks/sterilization.
If you do not have Internet access, please contact your ResMed
representative.
Reassembling the Mask
See section D on the illustrations sheet.
1 Twist the luer lock port caps onto the mask ports (D-1).
2 Hold the mask frame and the elbow firmly together (D-2).
5
English
608323.book Page 5 Tuesday, December 6, 2011 9:40 AM
608323.book Page 6 Tuesday, December 6, 2011 9:40 AM
3 To attach the elbow retainer, fit one side of the elbow retainer against the
groove of the elbow. While holding one wing of the elbow retainer down
(D-3a), press the other wing down until it clicks into place (D-3b).
4 Rotate the elbow retainer to its original position (D-4).
5 Check that you have fitted the elbow and elbow retainer correctly by firmly
pulling the elbow away from the frame. If the elbow is fitted correctly, it
should not separate from the frame.
If the elbow comes away from the frame, try refitting the elbow retainer as
described in Steps 3 and 4. If the elbow still comes away from the frame
when you pull on it, you may need to replace the elbow retainer.
6 Fit the grooved edge of the mask cushion to the mask frame. Fit the top
section first, then work your way around the mask, pushing the cushion
onto the frame, ensuring a good seal has been achieved.
Then push the cushion clip over the cushion and onto the mask frame,
ensuring it clicks into place in all locations (D-5).
7 Attach the forehead pads to the forehead support by inserting the pad plugs
into the two holes on the back of the forehead support (D-6). Push the pads
firmly against the forehead support to ensure that the pads fit securely into
the forehead support.
8 Connect the forehead support to the mask frame. Slide the pivots into the
pivot slot on the mask frame (D-7). Depress the forehead support tab and
move it into any of the tab positions.
9 Insert the headgear clips into the slots on the mask frame. The headgear
label should face outward and be near the patient’s neck when fitted.
Note: The Emergency Release Cord must be attached to one of the bottom
headgear straps in order to function correctly.
Disposal
The Ultra Mirage NV Full Face Mask does not contain any hazardous
substances and may be disposed of with your normal household refuse.
Technical Specifications
When determining ventilator settings, and in particular the tidal volume for
volume cycled ventilators, make appropriate allowances for mask dead space
and leak.
Unintentional Mask Leak
The Unintentional Mask Leak comprises leak between the cushion-frame and
elbow-frame interfaces.
6
Pressure
(cm H2O)
Maximum Leak
(L/min)
4–20
6
English
608323.book Page 7 Tuesday, December 6, 2011 9:40 AM
Dead Space
Dead space is the empty volume of the mask up to the elbow.
The dead space of the mask varies according to cushion sizes but is less than
260 mL.
Standards
CE designation in accordance with EC directive 93/42/EEC, class IIa.
EN ISO 14971, ISO 5356-1, ISO 594-1, ISO 10993-1 and ISO 13485.
Operating Pressure
0 to 40 cm H2O
Resistance
Drop in pressure measured
at 50 L/min: 0.5 cm H2O
at 100 L/min: 1.5 cm H2O
Dimensions
The dimensions of the mask (Medium) are:
H = 200 mm, W = 100 mm and D = 100 mm
Symbols
System and Packaging
Caution, consult accompanying documents
LOT
Batch Code
REF
Catalogue Number
European Authorised Representative
Humidity limitation
7
608323.book Page 8 Tuesday, December 6, 2011 9:40 AM
Temperature limitation
Does not contain natural rubber latex
Manufacturer
Clinical Guide
Indicates a Warning or Caution and alerts you to a possible injury or
explains special measures for the safe and effective use of the device.
Ordering Information
Part No.
Item
System
60643
UM NVFFM System Small, Standard – Europe 1
60642
UM NVFFM System Small, Shallow – Europe 1
60645
UM NVFFM System Medium, Standard – Europe 1
60644
UM NVFFM System Medium, Shallow – Europe 1
60647
UM NVFFM System Large, Standard – Europe 1
60646
UM NVFFM System Large, Shallow – Europe 1
Replacement Parts
16604
Cushion, Small, Standard (1 pk.)
16671
Cushion, Small, Shallow (1 pk.)
16605
Cushion, Medium, Standard (1 pk.)
16672
Cushion, Medium, Shallow (1 pk.)
16606
Cushion, Large, Standard (1 pk.)
16673
Cushion, Large, Shallow (1 pk.)
16674
Cushion clip, Small (1 pk.)
16675
Cushion clip, Medium (1 pk.)
16676
Cushion clip, Large (1 pk.)
60678
Elbow (1 pk.)
60683
Elbow retainer (1 pk.)
60681
Luer lock ports caps (2 pk.)
60682
Luer lock ports caps (10 pk.)
60115
Headgear clip (2 pk.)
60116
Headgear clip (10 pk.)
60123
Forehead pad (1 pk.)
8
Part No.
Item
60124
Forehead pad (10 pk.)
60675
Mask Frame, Small (1 pk.)
60676
Mask Frame, Medium (1 pk.)
60677
Mask Frame, Large (1 pk.)
60673
Forehead Support (1 pk.)
60917
Headgear (1 pk.)
English
608323.book Page 9 Tuesday, December 6, 2011 9:40 AM
60618
Emergency Release Cord assembly (1 pk.)
60619
Emergency Release Cord assembly (10 pk.)
Europe 1 - English, German, French, Italian, Spanish, Portuguese, Dutch.
Consumer Warranty
ResMed acknowledges all consumer rights granted under the EU Directive
1999/44/EG and the respective national laws within the EU for products sold
within the European Union.
Note: Translations are based on the English version in this guide. However, there
may be minor variations based on the disinfection/sterilisation procedures
applicable in some countries. ResMed has reviewed these changes and all
procedures included here have been validated.
9
Manufacturer:
ResMed Ltd 1 Elizabeth Macarthur Drive Bella Vista NSW 2153 Australia
Distributed by:
ResMed Corp 9001 Spectrum Center Boulevard San Diego CA 92123 USA
ResMed (UK) Ltd 96 Milton Park Abingdon Oxfordshire OX14 4RY UK
See www.resmed.com for other ResMed locations worldwide.
For patent information, see www.resmed.com/ip
Ultra Mirage and Mirage are trademarks of ResMed Ltd and Mirage is registered in the U.S. Patent and Trademark Office.
CIDEX and STERRAD are trademarks of Johnson & Johnson. Alconox is a trademark of Alconox
Inc. Neodisher Medizyme is a trademark of Chemische Fabrik Dr Weigert. Aniosyme and Anioxyde
are trademarks of Laboratoires Anios.
© 2011 ResMed Ltd.
608323/1
2011-12
Ultra Mirage NVFFM
CLINICAL
EUR 1 - ENG
608323
Global leaders in sleep and respiratory medicine
www.resmed.com