1
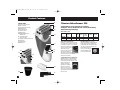
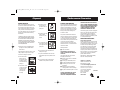
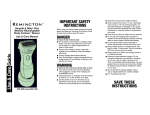
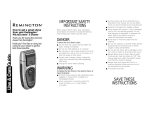
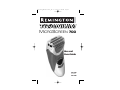
CS27660_MB5100/5200_IB 9/1/05 10:38 AM Page 1
®
®
M
MICROSCREEN 700
™
Use and
Care Guide
MS-5100
(not shown)
MS-5200
CS27660_MB5100/5200_IB 9/1/05 10:38 AM Page 2
IMPORTANT SAFETY
INSTRUCTIONS
When using an electrical appliance,
basic precautions should always be
observed, including the following.
Read all instructions before using this
appliance.
DANGER
To reduce the risk of electric shock:
■ Do not reach for an appliance that
has fallen into water. Unplug it
immediately.
■ Do not place or store this appliance
where it can fall or be pulled into
a tub or sink while it is plugged in.
■ Except when charging, always
unplug this appliance from the
electrical outlet immediately
after using.
■ Unplug this appliance before
cleaning it.
■ Do not use an extension cord
or a voltage converter with this
appliance.
2
WARNING
To reduce the risk of burns, fire,
electric shock or injury to persons:
■ This appliance is for household
use only.
■ An appliance should never be left
unattended when it’s plugged in,
except when charging a rechargeable appliance.
■ Close supervision is necessary
when this appliance is used by,
on, or near children or invalids.
■ Use this appliance only for its
intended use as is described in
this manual. Do not use attachments not recommended by
manufacturer.
■ Keep the cord away from heated
surfaces.
■ Never operate this appliance if it
has a damaged cord or plug, if it is
not working properly, if it has been
dropped or damaged, or if it has
been dropped into water. If any
of these things happen, return
the appliance to an authorized
service center for examination
and repair.
■ Never drop or insert any object into
any of the appliance’s openings.
■ Do not use outdoors or operate
where aerosol (spray) products are
being used, or where oxygen is
being administered.
■ Always store this appliance and
cord in a moisture-free area.
Do not store it in temperatures
exceeding 140°F (60°C).
■ Do not plug or unplug this appliance when your hands are wet.
■ Do not wrap the cord around
the appliance.
■ Always attach the plug to the
appliance, then to the outlet. To
disconnect, turn all controls to
OFF, then remove plug from outlet.
Detach removable power cords
from appliances for storage.
■ Do not use this appliance with
a damaged or broken screen or
cutters, as injury may occur.
KEEP AWAY FROM CHILDREN
SAVE THESE INSTRUCTIONS
Contents
English ..............................1
Spanish ...........................13
French .............................25
3
CS27660_MB5100/5200_IB 9/1/05 10:38 AM Page 4
Product Features
(B)
Shaver Parts
Titanium MicroScreen 700
®
(A) Screen & cutter assembly
(B) Pop-up mini-foil
(C) Mini-foil push tab (on back)
(D) Beard-lifting fins
(E) 3-position trimmer
(F) Trimmer push tab
(G) ON/OFF button
(H) POWER RESERVE button
(I)
(MS5200 only)
(I) Head release button
(one on each side)
(J) Charging indicators (MS5200 only)
(K) Head guard
(L) Cleaning brush
(M) Travel pouch
(A)
(E)
Which model is yours?
Power
system
(F)
(J)
(G)
(H)
(B)
Congratulations on your purchase of a premium
Remington® shaver. The MicroScreen® 700 has Revolutionary
Titanium Shaving Technology.
(D)
(E)
(C)
(F)
(K)
(M)
Washable
Run
time
MS-5100 Cordless
X
55 min
MS-5200
X
55 min
Cord/cordless
Power Reserve (MS-5200 only)
MicroScreen® shavers will run 55 minutes
on a single charge. If those 55 minutes end
in the middle of a shave, you can push the
Power Reserve button to get
an extra 5 minutes of power.
While using the Power
Reserve, the plus sign on the
Power Reserve button will
glow green. The Power Reserve button will
not activate the shaver if there is any
charge left on the battery.
Power
reserve
Complete
battery
gauge
Worldwide
voltage
5 min
X
X
Pop up
mini foil
X
X
Worldwide Voltage (MS-5200 only)
The MS-5200 features worldwide automatic dual voltage conversion, providing AC
current between 100-240 volts AC, 50-60 Hz.
Just plug it in to the local outlet (you may
need an adapter plug) and
use as usual. Your shaver will
convert automatically to the
local current requirements.
Complete Battery Gauge (MS-5200 only)
When the shaver is on, the battery gauge
displays the amount of charge remaining,
in 20% increments. When only 20% of the
charge remains, the red
recharge warning light
illuminates. The indicator
lights turn off when the
shaver is off. You can find
out how much charge is left on your shaver
by pushing the Power Reserve button while
the shaver is off.
(L)
4
5
CS27660_MB5100/5200_IB 9/1/05 10:38 AM Page 6
How to Use
Charging
Before using your shaver for the first time, put
it on charge for 24 hours.
To Charge Your Shaver
The MS5100 and MS5200 can be
recharged by plugging it into the cord
directly.
■ Use only the charging adapter supplied
with the shaver.
■ Make sure your shaver is turned off.
■ Connect the cord to the shaver, then
plug the charging adapter into the
electrical outlet. A charging indicator
light will come on.
■ Your shaver cannot be overcharged, so
you can leave it plugged in and charging
between shaves.
■ To preserve the life of the batteries, let
them fully run out every six months,
then recharge them for a full 24 hours.
■ Cord/cordless rechargeable shavers
(MS5200 only) can run directly off the
cord if necessary. They will not recharge
while you are shaving, so after shaving
with the cord, turn the unit off and set it
aside to charge. Cord/cordless shavers
should not be used strictly as cordoperated shavers, as continued cordonly use will result in reduction of
battery life.
■ If your shaver’s charge runs out in the
middle of a shave, you can push the
power reserve button to get an extra 5
minutes of power, on the MS5200.
NOTE: If your shaver battery is completely
discharged or the shaver has not been used
for a long time, the shaver may not start
when operated using the cord. If this
happens, charge the shaver for approximately five minutes before shaving.
Removing the Headguard
Before operating your
shaver, remove the headguard, which protects the
screen and cutter assembly. Simply push up from
the front or the back until
it pops off.
! Always keep the protective head guard
on the shaver head and keep the trimmer
in the OFF position when the shaver is not
in use.
Operating the Trimmer
Your shaver is equipped
with a 3-position trimmer. Use the trimmer
push tab to extend or
retract the trimmer.
Operating the Pop-up
Mini-foil
Your shaver is equipped with a 2-position
mini-foil. Use the mini-foil push tab to
extend or retract the mini foil.
1. Completely retracted (down), the mini-foil
works with the 2 large screens to provide
a close and comfortable shave.
2. Fully extended (up), the mini-foil can be
used to provide a close shave for small
or difficult-to-reach areas, for a detailed
look.
! Do NOT retract the mini-foil by pressing
down directly on the screen. This could
permanently damage the screen.
1. Completely retracted (down), the trimmer
is out of the way and off, for when you
want to use the screens alone. Press the
trimmer down with your thumb to get it
into this position.
2. In the middle position, the trimmer works
with the screens, cutting the longer,
hard-to-shave hairs so the screens can
get in extra close. Slide the trimmer into
the position level with the foils.
3. Fully extended (up), the trimmer can be
used to trim your sideburns and mustache. Slide the trimmer into the top
position, above the foils.
6
7
CS27660_MB5100/5200_IB 9/1/05 10:38 AM Page 8
Usage Tips
Adjusting to your new shaver
As with every shaver, your shave will
improve over time. So allow about three
weeks to develop an effective shaving style
and for your beard to adjust to the new
shaver. The adaptation period may take a
little longer if your skin is sensitive, or if
you alternate between shaving methods.
To help smooth the transition to your new
shaver, Remington has applied a special
lubricant to the shaver’s screens and
cutters. The lubricant looks like fine, white
or gray powder, and disappears with use.
Before you begin
■ Wait at least 15 minutes
after getting up before
shaving, to ensure your
face is free of puffiness
that may be present
from sleeping.
■ Make sure your face is
clean and dry before
starting.
■ Always use a clean, dry
shaver.
1
3
9
6
To shave
Push the ON/OFF button.
Hold the shaver so all of
the screens touch your
face at the same time.
This allows the shaver to
work the way it was designed for the closest shave and minimum wear. Avoid holding
the shaver at an angle so only one screen
touches the skin at a time. This will distort
the screen and could cause skin irritation.
Shave with short,
circular strokes. Use
your free hand to stretch
your skin. This encourages your whiskers to
stand out, making it
easier for them to enter
the cutting chamber.
Never press hard.
Pressing only flattens
your whiskers, making
it harder for them to
enter the cutting
chamber. It will also
wear out the cutting
surface more quickly.
For an Even Better Shave…
Remington® Pre-Shave Powder Stick (SP-5)
can help maximize your shaver’s performance. Just rub the product over your beard
and it absorbs moisture and facial oils,
helping set up the hairs so they enter the
cutting chamber more easily. It makes
shaving quicker and more comfortable.
8
Maintenance
Replacing Cutters and
Screens
To prevent inadvertent damage to the cutters and screens, do not attempt to remove
them from the head assembly unless you
are replacing them. Removal instructions
are included with the cutter and screen
replacement packages.
To replace a cutter assembly that is
removed unintentionally:
1. Hold the cutter in the middle. The blades
will not cut your fingers, so no special
handling techniques are
necessary.
2. Align the cutter so the little
bar on the bottom meets
the opening in the clip.
3. Press down on the center of the cutter
until it snaps into place. Do not push
down on the ends of the cutter, as you
may bend the cutter, reducing its ability
to cut cleanly.
4. Do not separate the cutter’s blades from
the plastic pieces they are attached to,
as this may damage the assembly.
When is it time to replace your screens
and cutters?
Because they are subject to daily use, the
cutters and screens of your shaver will
wear and eventually require replacement to
maintain a close, comfortable shave. It is
very important to replace your screens and
cutters when necessary to ensure a close,
comfortable shave without irritation.
Depending on your shaving technique and
habits, the screens will usually last 6
months; the cutters, 12 months. If you are
replacing the cutters, it’s a good idea to
replace the screens at the same time.
Here are some signs that your screens and
cutters need replacing:
Irritation: As screens get worn, you may
notice that your skin feels more sensitive
after a shave, particularly when you apply
aftershave.
Pulling: As cutters wear, your shave may
not feel as close and you may feel your
shaver is pulling at your whiskers.
Wear-through: You may notice that the
cutters have worn through the screens.
The replacement part for this shaver is
model SP-95 (screens) and SP-96 (screens
and cutters).
U.S. residents:
To order shaver accessories call
800-736-4648, visit
www.remington-products.com,
or visit your local retailer.
Canadian residents:
To order shaver accessories, please call
800-268-0425 or visit
www.remington-products.com
9
CS27660_MB5100/5200_IB 9/1/05 10:38 AM Page 10
Disposal
Battery Removal
When your rechargeable shaver reaches
the end of its useful life, the batteries must
be removed from the shaver and be recycled or disposed of properly in accordance
with your state and local requirements. If
this is not required by law, you may elect to
dispose of the shaver without removing
the batteries.
CAUTION: DO NOT PUT IN FIRE OR MUTILATE YOUR BATTERIES WHEN DISPOSING
AS THEY MAY BURST OR RELEASE TOXIC
MATERIALS. DO NOT SHORT CIRCUIT AS
IT MAY CAUSE BURNS. DISPOSE PROPERLY
IN ACCORDANCE WITH YOUR LOCAL AND
STATE REQUIREMENTS.
! Make sure shaver is unplugged before
Full Two-Year Warranty
3. Remove the screw
from the back of
the shaver near the
power port.
4. Remove the two side
panels to allow
removal of 2 more
screws.
5. Pry off the back cover
of the shaver, starting
at the gap below the
power port.
1. Press the two side
buttons and pull
off the shaver head
assembly. Remove
the cutter blades by
pulling up.
2. Remove the 4 outer
screws from inside
the shaver head.
Loosen the top
assembly from
the body.
10
Rayovac Corporation warrants this product
against any defects that are due to faulty
material or workmanship for a two-year
period from the original date of consumer
purchase. This warranty does not include
damage to the product resulting from
accident or misuse.
If the product should become defective
within the warranty period, we will repair it
or elect to replace it free of charge. Return
your product and sales receipt with your
name, address and day time phone number
to: Rayovac Corporation, Attention:
Consumer Services, 601 Rayovac Drive,
Madison, WI 53711. For more information
call 800-736-4648.
Warranty excludes:
■ Screens and cutters
you begin, to avoid a possible electric
shock hazard.
Only follow these instructions when you are
ready to dispose of your shaver, as your
shaver will no longer be operable.
Performance Guarantee
6. Cut or break the wires attached to the
battery on the right.
7. Pry both of the batteries loose from the
foam adhesive tape on the printed circuit
board.
8. Cut or break the wires connecting the
batteries to the printed circuit board.
KEEP ORIGINAL SALES RECEIPT AS
PROOF OF PURCHASE FOR WARRANTY
PURPOSES.
This warranty does not cover products
damaged by the following:
■ Accident, misuse, abuse or alteration
of the product
■ Servicing by unauthorized persons
■ Use with unauthorized accessories
■ Connecting it to incorrect current
and voltage
■ Wrapping cord around appliance
causing premature wear & breakage
■ Any other conditions beyond our control
RAYOVAC CORPORATION SHALL NOT BE
RESPONSIBLE FOR ANY INCIDENTAL,
SPECIAL OR CONSEQUENTIAL DAMAGES
RESULTING FROM THE USE OF THIS PRODUCT. ALL IMPLIED WARRANTIES INCLUDING
BUT NOT LIMITED TO IMPLIED WARRANTIES
OF FITNESS AND MERCHANTABILITY, ARE
LIMITED IN DURATION TO TWO YEARS
FROM DATE OF ORIGINAL PURCHASE.
This warranty gives you specific legal rights
and you may also have other rights which
vary from state to state or province to
province. Some states do not allow the
exclusion or limitation of incidental, special
or consequential damages.
Performance Guarantee
Rayovac Money-back Offer
If within 30 days after you have purchased
your Remington® branded product, you are
not satisfied and would like a refund, return
it with the sales slip indicating purchase
price and date of purchase to the retailer
from whom it was purchased. Rayovac
Corporation will reimburse all retailers who
accept the product within 30 days from the
date of purchase. If you have any questions
concerning the money-back guarantee,
please call 800-736-4648.
100-240 VAC 50/60 Hz (MS-5200)
120 VAC 60 Hz (MS-5100)
Questions or comments:
Call 800-736-4648 in U.S.or
800-268-0425 in Canada.
Or visit www.remington-products.com
REMINGTON and MICROSCREEN are
trademarks of Rayovac Corporation.
©2005 RAYOVAC CORPORATION
03/05 Job# CS27660
Rayovac Corporation
800-736-4648
T22-17031
MADE IN CHINA
11
CS27660_MB5100/5200_IB 9/1/05 10:38 AM Page 12
MICR
®