1
DVD
User's
Changing
aln.
Player
Manual
Important
Information
WARNING
This symbol indicates
"dangerous voltage" inside the
product that presents a risk of
electric shock or personal injury
FCC NOTE
To reduce the risk of fire or shock hazard, do
not expose this DVD player to rein or moisture.
No objects filled with liquids, such as vases,
shall be placed on the apparatus.
This symbol indicates
important instrections
accompanying the product.
(for U.S.A.):
Thisequipmenthas been tested and foundto complywiththe limitsfor a
Class B digitaldevice,pursuantto Part 15 of the FCC rules,These limitsare
designedto providereasonable protectionagainstharmfulinterferencein a
residentialinstallation.This equipmentgenerates, usesand can radiateradio
frequency energy and, if not installedand used in accordancewiththe
instructions,may cause harmfulinterferenceto radio communications.
However,there is no guaranteethat interferencewill not occurin a particular
installation.If this equipmentdoes cause harmfulinterferenceto radioor
televisionreception,whichcan be determinedbyturningthe equipmentoff
and on, the user is encouragedto try to correct the interferenceby one or
more of the following measures.
CAUTION
THIS PRODUCT UTILIZES A LASER. USE OF
CONTROLS OR ADJUSTMENTS OR
PERFORMANCE OF PROCEDURES OTHER
THAN THOSE SPECIFIED HEREIN MAY
RESULT IN HAZARDOUS RADIATION
EXPOSURE. DO NOT OPEN COVERS AND
DO NOT REPAIR YOURSELF. REFER
SERVICING TO QUALIFIED PERSONNEL.
CAUTION
FCC Regulations state that unauthorized
changes or modifications to this equipment may
void the user's authority to operate it,
• Reorientor relocate the receivingantenna.
• Increasethe separationbetweenthe equipmentand receiver.
Note:
• Connectthis equipmentinto an outleton a circuit differentfrom thatto which
the receiveris connected,
• Consult the dealer or an experienced radio/TV technician for help.
This class B digital apparatus meets all requirements
Intederence--Causing Equipment Regulations.
Product
of the Canadian
Registration
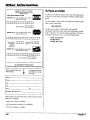
Please fill out the productregistrationcard and return it immediately,Returning
this card allowsus to contactyou if needed.
Keep yoursales receiptto obtainwarrantyparts and serviceand for proofof
purchase.Attach it here and recordthe serial and model numbersin case you
need them.The numbersare located on the backof the player.
Model No.
This DVD player is designed and manufactured
to respond to the Region Management
' Information. If the Region number of a DVD
I disc does not correspond to the Region
number of this DVD player, this DVD player
cannot play the disc. The Region number for
this DVD player is Region No 1.
RC5227P
Seda| No.
Purchase Date:
Dealer/Address/Phone:
Note:
This device is protected by U.S. patent numbers
4,631,603 and 4,577,216 and 4,819,098 and
other intellectual property dghts. The use of
Macrovision's copy protection technology in the
device must be authorized by Macrovision and is
intended for home and other limited pay-perview uses only, unless otherwise authorized in
writing by Macrevision. Reverse engineering or
disassembly is prohibited.
LASER
CLASS 1
PRODUCT
Introduction
Introduction
Your DVD player is equipped
with some special features.
The On-Screen Information
The following information
summarizes
some of these features.
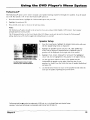
Display
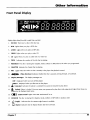
The lnfo Display is a menu bar that you can bring up to access certain features while discs are playing. Icons in the display
represent the different features supported by your DVD player. By selecting different Info Display icons, you can access
features including Scene Snip TM, Repeat, Audio, Subtitles, Bookmarks and Camera Angle.
Time Search
The Time Search feature lets you go to a point on a disc by entering the elapsed time in the on-screen time display. For
example, if your favorite scene in a movie is one hour and twelve minutes after the beginning of the movie, you can enter
01:12:00 into the time display and go right to that point in the movie.
The Bookmarks Feature
You can mark a point on a disc that you can go to quickly with the bookmark feature. You can store up to six bookmarks.
For example, if you have a favorite scene in a movie, you can bookmark it so you can return to it without having to fast
forward or reverse to find the exact scene.
Ratings
Limits and Scene Snip TM
Your DVD piayer allows you to set ratings limits and passwords. For example, you can set the DVD player so that any
movie with a PG-13 rating or above requires a password to be entered. You can use Scene Snip to edit out sections of a
disc. When this disc is played, you must have the password to view the original version.
Since not all discs contain ratings, you can also decide if you want to allow free access or require a password
unrated discs.
Scene Again
to view
TM
When you are watching a DVD disc, you can replay a scene instantly by pressing the GO BACK,,AGAIN button on the
remote. The Scene Again TM feature goes back approximately ten seconds and replays both video and audio while turning
on the subtitles.
Ce)'l' Sunound
The TmSurround
Voice+
®option can be used to simulate a six-speaker
listening experience
through
two speakers.
TM
This feature allows you to adjust the volume of the voices on a disc's soundtrack. For example, the background music might
be very loud, so the dialog is difficult to hear. The Voice+ TM feature allows you to raise the volume of the voices while
keeping the remaining background sounds at a normal level.
SRS/TruSurround and the (0) symbol are trademarks of SRSLabs, Inc. in the United States and selected
foreign countries. TruSurround technology is incorporated under license from SRSLabs, Inc.
Table
Introduction
Chapter
..............................................................................................
1: Connections
of
1
& Setup
Things to Consider Before You Connect .........................................................................
Protect Against Power Surges ...................................................................................
Protect Components from Overheating ...................................................................
Position Cables Properly to Avoid Audio Interference ............................................
Connection Pictures ...................................................................................................
Types of DiscsYour DVD Player will Play ..................................................................
Choose Your Connection ..................................................................................................
6
6
6
6
6
6
7
Cables Needed to Connect Components to Your TV ...............................................
DVD Player + TV with AudioNideo
Input Jacks .......................................................
DVD Player + "iV + VCR ............................................................................................
DVD Player + "IV + Dolby Digital or DTS Receiver ..................................................
DVD Player + TV + Dolby Pro Logic or Stereo Receiver ..........................................
DVD Player + TV + 5.1-channel AudioNideo Receiver ...........................................
DVD Player + TV + VCR + Satellite Receiver ............................................................
8
9
11
13
15
17
19
The Jacks on the Back of the DVD Player .....................................................................
Install Batteries in the Remote ......................................................................................
Important Battery Information
...............................................................................
20
21
21
How to Find Your TV's Video Input Channel ................................................................
22
How to Move Around the DVD Player's Menu System ...............................................
23
Set the Menu Language .................................................................................................
23
Setting Other Options ....................................................................................................
23
A Quick Tour of The Remote ..........................................................................................
Component Buttons .................................................................................................
DVD Buttons .............................................................................................................
24
24
24
Chapter
Contents
2: Playing DVDs
Regional Coding .............................................................................................................
28
Using Different
Menus ...................................................................................................
28
Loading and Playing Discs .............................................................................................
28
Using a Disc Menu ..........................................................................................................
29
Using the On-Screen Info Display .................................................................................
Time Display ..............................................................................................................
Selecting a Title ........................................................................................................
Selecting a Chapter ..................................................................................................
Scene Snip Editing ....................................................................................................
Turning Subtitles On and Off ..................................................................................
Changing the Audio Language ...............................................................................
The Repeat Feature ..................................................................................................
Using Bookmarks ......................................................................................................
Changing the Camera Angle ...................................................................................
31
32
32
32
33
35
36
37
38
39
Manufactured under license from Dolby Laboratories. "Dofby" and the double-D symbol are trademarks of Dolby Laboratories.
Confidential unpublished works. O1992-1997 Dolby Laboratories, Inc. All rights reserved.
DTS is a registered trademark of Digital Home Theater Systems, Inc.
2
Table
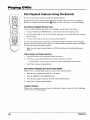
Disc Playback Features Using the Remote ....................................................................
Fast Motion Playback (Picture Scan) .......................................................................
Freeze Frame and Frame Advance ..........................................................................
Slow Motion Playback ..............................................................................................
Chapter Advance ......................................................................................................
Scene Again TM ...........................................................................................................
Subtitles ....................................................................................................................
Audio Language .......................................................................................................
Camera Angle ...........................................................................................................
Scene Snip TM Edit ......................................................................................................
Zoom .........................................................................................................................
Chapter
of Contents
40
40
40
40
40
41
41
41
41
41
42
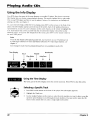
3" Playing Audio CDs
Using the Info Display ....................................................................................................
44
Using the Time Display .............................................................................................
44
Selecting a Specific Track .........................................................................................
44
Selecting a Play Mode ...............................................................................................
45
The Repeat Feature ..................................................................................................
46
Using IntroScan TM ...............................................................................................................................................................................
47
The Bookmark Feature ............................................................................................
48
Dub Assist .................................................................................................................
49
Chapter
4: Playing
MP3 CDs
What is MP3? ..................................................................................................................
52
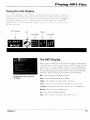
Using the Info Display ....................................................................................................
53
The MP3 Display .............................................................................................................
Using the Time Display .............................................................................................
Selecting a Track .......................................................................................................
53
53
54
Selecting a Play Mode ....................................................................................................
54
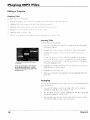
Using the Program Play Feature ....................................................................................
Creating a Program ..................................................................................................
Editing a Program ....................................................................................................
Autoplay ...................................................................................................................
The Repeat Feature ..................................................................................................
55
55
56
56
57
Using IntroScan ...............................................................................................................
The MP3 Screen Saver ....................................................................................................
57
57
Chapter
5: Playing Video CDs
What is a Video CD? .......................................................................................................
60
The Video CD Disc Menu ................................................................................................
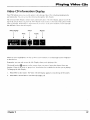
The Video CD Information
Display ..........................................................................
Selecting a Specific Track .........................................................................................
Selecting a Specific Index .........................................................................................
The Repeat Feature ....: .............................................................................................
Changing the Audio Channel Output .....................................................................
60
61
62
62
62
63
Skipping Tracks ...............................................................................................................
Zoom ................................................................................................................................
63
63
3
Table
Chapter
of
Contents
6: The DVD Player's Menu System
The DVD Player Menu System .......................................................................................
66
The Play Mode Menu .....................................................................................................
Selecting a Play Mode ..............................................................................................
How to Create a Program ........................................................................................
Creating a Program List for a DVD Disc ............................................................
Creating a Program List for an Audio CD .........................................................
Creating a Program List for an MP3 disc ..........................................................
Editing a Program ....................................................................................................
Autoplay ...................................................................................................................
Dub Assist .................................................................................................................
67
67
68
68
69
69
70
71
71
The Lock Menu ................................................................................................................
Locking Your DVD Player .........................................................................................
Changing Your Password .........................................................................................
Editing Your Scene Snip Disc Library .......................................................................
Setting the Ratings Limits ........................................................................................
Front Tray Lock .........................................................................................................
System Test ................................................................................................................
The Display Menu ...........................................................................................................
TV Image ...................................................................................................................
Front Display .............................................................................................................
On-Screen Displays ...................................................................................................
The Sound Menu ............................................................................................................
Digital Output ..........................................................................................................
TruSurround ..............................................................................................................
Speaker Setup ...........................................................................................................
Enhancements ..........................................................................................................
72
72
72
73
73
75
75
76
76
77
77
78
78
79
79
81
The Languages Menu .....................................................................................................
Changing the Player Menus Language Preferences ..............................................
Changing the Disc Menus Language Preference ...................................................
Changing the Audio Language Preference ............................................................
Changing the Subtitle Language Preference .........................................................
82
82
82
83
84
Glossary ...........................................................................................................................
85
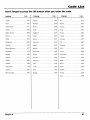
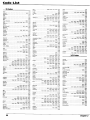
Language Code List ........................................................................................................
86
Chapter
7: Other
Information
Troubleshooting ..............................................................................................................
Handling Cautions ....................................................................................................
Maintenance of Cabinet ..........................................................................................
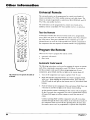
Universal Remote ...........................................................................................................
Test the Remote ........................................................................................................
Program the Remote ................................................................................................
Automatic Code Search .....................................................................................
Direct Entry ........................................................................................................
Operate Components after Programming the Remote .........................................
Front Panel Controls .......................................................................................................
90
93
93
94
94
94
94
95
95
98
Front Panel Display .........................................................................................................
99
Limited Warranty RCA Digital Video Disc (DVD) Player ........................... : ................ 100
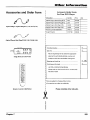
Accessories and Order Form ........................................................................................
103
Index ..............................................................................................................................
106
4
Chapter
Connections
Chapter
1
& Setup
Overview:
•
Things to Consider Before You Connect
•
Choose Your Connection
•
The Jacks on the Back of the DVD Player
•
Installing
•
How to Find Your TV's Video Input Channel
•
How to Move Around the DVD Player's Menu System
•
Set the Menu Language
•
The Remote Control
Batteries in the Remote
Changing
31n.
5
Connections
Ik Setup
Things to Consider Before You Connect
Protect Against Power Surges
•
Connect
all components
before you plug any of their power cords into the wall outlet.
•
Turn off the TV and/or
•
Make sure all antennas and cables are properly
sheet packed with your DVD player.
components
Protect Components
before you connect
or disconnect
grounded.
any cables.
Refer to the Important
Safeguards
from Overheating
•
Don't block ventilation
can circulate freely.
holes on any of the components.
Arrange the components
•
Don't stack components.
•
When you place components
•
If you connect an audio receiver or amplifier, place it on the top shelf so the heated air from
it won't flow around other components.
in a stand, make sure you allow adequate
so that air
ventilation.
Position Cables Properly to Avoid Audio Interference
•
Insert each cable firmly into the designated
•
If you place components
above the TV, route all cables down the side of the back of the TV
instead of straight down the middle of the back of the TV.
•
If your antenna uses 300-ohm twin lead cables, do not coil the cables. Also, keep the twin
lead cables away from audio/video
cables.
Connection
jack.
Pictures
Audio/video cables are usually bundled together. For better visibility, the connection
this book show each cable separately (audio left, audio right, and video).
pictures
in
Types of Discs Your DVD Player will Play
•
DVD video discs - DVD video discs contain high quality picture and sound content.
•
Audio discs - Audio CDs contain musical or sound content
•
Video CD discs - Like DVD video discs, Video CDs contain picture and sound content.
difference is the amount of information that can be stored on the disc.
•
CD-R - A disc the you can write information
•
CD-RW - A re-writable disc. You can write information onto this type of disc more than
once. For example, if you have previously downloaded MP3 files to a CD-RW disc, you can
write information to the disc again, but it will erase the previously written information.
_rN.,,_o
6
only.
to once (for example,
download
The
MP3 files).
VIDEOCD
Chapter
1
Connections
& Setup
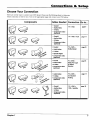
Choose Your Connection
There are several ways to connect your DVD player. Please use the following chart to determine
which connection is best for you. Turn to the appropriate page and connect your DVD player,
Cables Needed
Components
• Coaxial
Connection
"IV + DVD
• Audio/video
Go to...
page 9
• S-Video
• Component video
(optional)
• Coaxial
• Audio/video
TV + DVD + VCR
page 11
• S-Video
• Component video
(optional)
• Coaxial
TV + DVD +
• Audio/video
Dolby Digital
paget3
• S-Video
• Optical Digital
• Component video
(optional)
• Coaxial
TV + DVD +
• Audio/video
Dolby Pro Logic
or Stereo
Receiver
• S-Video
• Component video
(optional)
page15
¢a_.e'
• Audio/video
TV+ DVD +
• S-Video
5.1-Channel
• Component video
(optional)
Analog
• Coaxial
TV+ DVD+
VCR + Satellite
• Audio/video
page 17
page 19
• S-Video
• Component
(optional)
Chapter
1
video
7
Connections
Setup
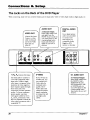
Cables Needed to Connect Components
to Your TV
The pictures below show the cables needed for the connections represented
Note: Audio/Video cables (A/V cables for sbort) are usually sold as a bundled
show each cable separately for better visibility.
Audio/Video
Component
8
cables
RF coaxial cable
in this book.
set, but the connection
S-Video cable
pictures
in this book
Optical digital audio cable
Video cables
Chapter
1
Connections
&
Setup
TV
AUDIO OUT
R
S-VIDEO
VIDEO IN
L
CABLE
OR
OFF-AIR
SIGNAL
AUDIO IN
R
L
ANT IN
DVD
PLAYER
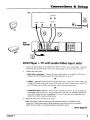
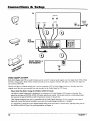
DVD Player + TV with Audio/Video
1.
2.
Input Jacks
Connect the audio cables to the AUDIO OUT FRONT L (left - white) and R (right - red) jacks
on the back of your DVD Player, and to the corresponding
Audio Input jacks on your TV.
Connect
the video cable.
• Basle video connection
- Connect the video cable (yellow) to the VIDEO OUT jack on
the back of your DVD Player, and to the Video Input jack on your TV.
OR
• S-Video - (optional) If your TV has an S-Video Input jack, connect the S-Video cable to the
S-VIDEO OUT jack on the back of your DVD Player and to the S-Video jack on your TV. If
your TV doesn't have S-Video, use the basic video connection listed above.
OR
• Component video (optional) - If your TV has component video (Y, Pn, and PR jacks) use
video-grade cables for the Y, PB, and PR connections. Note that it is essential to match the
color-coded connectors with a compatible TV. If your TV doesn't have component video,
use the basic video connection listed above.
3.
Plug in the AC power
cord
into an AC outlet.
Note: Your cable or off-air connection to the television should not be affected by this
connection. Connect your cable or off-air antenna to your television as you normally
would. You may need to consult your television manual for details.
Go to page
Chapter
1
21
9
Connections
ik Setup
TV
AUDIO
OU_
AUDIO
IN
_o _,o;; _,_
_
OFF-AIR
VCR
10
°°'3,? o
R v;
,.o?
SIGNAL
ou'r
Chapter
I
Connections
& Setup
DVD Player + TV + VCR
1.
2.
Connect the audio cables to the AUDIO OUT FRONT L (left - white) and R (right - red) jacks
on the back of your DVD Player, and to the corresponding
Audio Input jacks on your TV.
Connect
•
the video cable.
Basic video connection
- Connect
the video cable (yellow) to the VIDEO
the back of your DVD Player, and to the Video Input jack on your TV.
OUT jack on
OR
•
S-Video
- (optional)
If your
'IV has an S-Video
Input
jack, connect
the S-Video
cable
to the
S-VIDEO OUT jack on the back of your DVD Player and to the S-Video jack on your TV. If
your TV doesn't have S-Video, use the basic video connection
listed above.
OR
•
Component
video-grade
color coded
use the basic
video
(optional)
- If your TV has component
video (Y, PB' and PR jacks) use
cables for the Y, PB, and PR connections.
Note that it is essential
to match the
connectors
with a compatible
TV. If your TV doesn't have component
video,
video Connection
listed above.
3.
Connect a coaxial cable to the antenna
on the television.
output jack on the VCR and to the antenna
4.
Connect the antenna
5.
Plug in the AC power cord into an AC outlet.
input jack
or cable to the Antenna Input jack on the VCR.
Go to page
Chapter
I
21
11
Connections
&
Setup
TV
AUDIO OUT
R
I_
AUDIO IN
S-VIDEO
PLAYER
DVD
VIDEO PN
R
L
ANT IN
CABLE OR
OFF-AIR
SIGNAL
I- ®
L.p
DOLBY DIGITAL
DTS RECEIVER
--
or
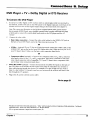
Dolby Digital ® and DTS e
Both Dolby Digital and DTS are audio formats used to record 5.1-channel audio signals onto the digital track of film (while
the film is being made). Both of these formats provide up to six separate channels: left, right, center, left rear, right rear,
and common subwoofer.
The disc will play 5.1-channel sound only if you've connected a DTS or Dolby Digital receiver or decoder
original movie the disc was recorded from was encoded in the Dolby Digital or DTS format.
and if the
Please Read This Before Using the DIGITAL AUDIO OUT Jack!
Thisplayer's digital ouq)utjack is designed for a connection to a Dolby Digital or DT5 receiver or decode_ This
player has two types of DIGITAL AUDIO OUT jacks: optical and coaxial. Use the jack (and the corresponding cable)
that matches the type of DIGITAL AUDIO IN jack your receiver or decoder has.
Older digital equipment may not be compatible with the Dolby Digital bitstream. Such a connection
high level of noise that may be harmful to your ears, and could damage headphones or speakers.
It is important to choose the correct Digital Output setting in the DVD Player's Sound menu,
the DIGITAL AUDIO OUT jack. For more information, see chapter 6,
12
can create a
especially when you use
Chapter
1
Connections
& Setup
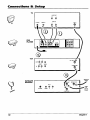
DVD Player + "IV + Dolby Digital or DTS Receiver
To Connect the DVD Player
1.
If you have a Dolby Digital or DTS receiver, insert an optical digital cable (not provided) to
the DIGITAL AUDIO OUT jack on the DVD player to the Digital Input jack on the back of the
receiver. You must also set the Digital Output setting in the Sound menu (see chapter 5).
Note.. The connection illustration on the left shows a digital optical cable. If your receiver
has a coaxial AUDIO IN jack, use a shielded (coaxial) video or audio cable with RCA plugs
at both ends to connect the coaxial digital audio jacks on the DVD player and the A/V
receiven
2.
Connect
the video cable.
• Basic video connection
- Connect the video cable (yellow) to the VIDEO OUT jack on
the back of your DVD Player, and to the Video Input jack on your TV.
OR
• S-Video - (optional) If your TV has an S-Video Input jack, connect the S-Video cable to the
S-VIDEO OUT jack on the back of your DVD Player and to the S-Video jack on your TV. If
your TV doesn't have S-Video, use the basic video connection listed above.
OR
• Component
video (optional) - If your TV has component video (Y, Pw and PR jacks) use
video-grade cables for the Y, PB, and PR connections. Note that it is essential to match the
color coded connectors with a compatible TV. If your TV doesn't have component video,
use the basic video connection listed above.
,
4.
Down Mix Audio (optional) - Connect the second set of AUDIO OUT jacks on the back of
the DVD player to the AUDIO IN jacks on the back of the TV. This allows you to listen to
discs without going through the receiver. For example, if it's late at night and you want to
listen to a disc without 5.1-channel sound on, you can turn off the receiver and listen to the
disc through the TV speakers.
Plug in the AC power cord into an AC outlet.
Go to page
21
Manufactured under license from Dolby Laboratories. "Dolby" and the double-D symbol are trademarks of Dolby Laboratories.
unpublished works. ©1992-1997 Dolby Laboratories, Inc. All rights reserved.
Confidential
DTS is a registered trademark of Digital Home Theater Systems, inc.
Chapter
I
13
Connections
8= Setup
CABLE OR
OFF-AIR SIGNAL
TV
AUDIO OUT
R
L
@
@
AUDIO IN
S-VIDEO
VIDEO
IN
R
ANT IN
L
@
@ @
®
PLAYER
DVD
L
mo
PRO LOGIC
OR STEREO
RECEIVER
)R
14
Chapter
1
Connections
&
Setup
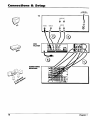
DVD Player + TV + Dolby Pro Logic or Stereo
Receiver
To Connect
1.
2.
the DVD Player
Connect tile left and right audio cables to your audio/video receiver and to the AUDIO OUT
FRONT L (left - white) and R (right - red) jacks on the back of your DVD Player.
Connect
the video cable.
• Basic video connection
- Connect the video cable (yellow) to the VIDEO OUT jack on
the back of your DVD Player, and to the Video Input jack on your TV.
OR
• S-Video - (optional) If your TV has an S-Video Input jack, connect the S-Video cable to the
S-VIDEO OUT jack on the back of your DVD Player and to the S-Video jack on your TV. If
your TV doesn't have S-Video, use the basic video connection listed above.
OR
• Component
video (optionai)If your TV has component video (Y, PB, and PR jacks) use
video-grade cables for the Y, P_, and PR connections. Note that it is essential to match the
color coded connectors with a compatible TV. If your TV doesn't have component video,
use the basic video connection listed above.
.
4.
Down Mix Audio (optional) - Connect the second set of AUDIO OUT jacks on the back of
the DVD player to the AUDIO IN jacks on the back of the TV. This allows you to listen to
discs without going through the receiver. For example, if it's late at night and you want to
listen to a disc without 5.1-channel sound on, you can turn off the receiver and listen to the
disc through the TV speakers.
Plug in the AC power cord into an AC outlet.
Go to page
Chapter
1
21
15
Connections
8,: Setup
CABLE OR
OFF'AIR SIGNAL
TV
AUDIO OUT
R
L
AUDIO IN
S-VIDEO
VIDEO IN
R
ANT IN
L
®
DVD
PLAYER
tl
®
AUDIO/VIDEO
RECEIVER
16
Chapter
I
Connections
&
Setup
DVD Player + TV + 5.1-channel Audio/Video
Receiver
To Connect the DVD Player
Connect the audio cables from the AUDIO OUT FRONT R and L, SURROUND R and L,
SUBWOOFER, and/or CENTER jacks on your DVD player to the corresponding
Audio Input
jacks on your audio/video
receiver. Set up the speakers using the Speaker option from the
Sound menu (see chapter 5).
1.
2.
Connect the video cable,
• Basic video connection
- Connect the video cable (yellow) to the VIDEO OUT jack on
the back of your DVD Player, and to the Video Input jack on your TV.
OR
•
S-Video - (optional)
If your TV has an S-Video Input jack, connect
the S-Video cable to the
S-VIDEO OUT jack oo the back of your DVD Player and to the S-Video jack on your TV. If
your TV doesn't
have S-Video, use the basic video connection
listed above.
OR
•
.
4.
Component
video-grade
color coded
use the basic
video (optional)
- If your TV has component
video (Y, PB, and PR jacks) use
cables for the Y, Pu, and PR connections.
Note that it is essential to match the
connectors
with a compatible
TV. If your TV doesn't have component
video,
video connection
listed above.
Down Mix Audio (optional)
- Connect the second set
the DVD player to the AUDIO IN jacks on the back of
discs without going through
the receiver. For example,
listen to a disc without 5.1-channel
sound on, you can
disc through the "IV speakers.
of AUDIO OUT jacks on the back of
the "IV. This allows you to listen to
if it's late at night and you want to
turn off the receiver and listen to the
Plug in the AC power cord into an AC outlet.
Go to page
Chapter
I
21
17
Connections
Ik Setup
TV
AUDIO OUT
R
L
AUDIO IN
E-VIDEO
VIDEO
IN
R
L
ANT
IN
PLAYER
DVD
VCR
SATELLITE
RECEIVER
_e
18
Chapter
I
Connections
8t Setup
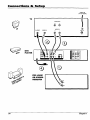
DVD Player + TV + VCR + Satellite Receiver
1.
2.
Connect the audio cables to the AUDIO OUT FRONT L (left - white) and R (right - red) jacks
on the back of your DVD Player, and to the corresponding
Audio Input jacks on your TV.
Connect the video cable.
• Basic video connection
- Connect the video cable (yellow) to the VIDEO OUT jack on
the back of your DVI) Player, and to the Video Input jack on your TV.
OR
•
S-Video - (optional)
If your TV has an S-Video Input jack, connect
the S-Video cable to the
S-VIDEO OUT jack on the back of your DVD Player and to the S-Video jack on your TV. If
your TV doesn't
have S-Video, use the basic video connection
listed above.
OR
• Component
video (optional) - If your TV has component video (Y, Pm and PR jacks) use
video-grade cables for the Y, Pv and PR connections. Note that it is essential to match the
color coded connectors with a compatible 'IV. If your TV doesn't have component video,
use the basic video connection listed above.
3.
Use a coaxial cable to connect
on the VCR.
the antenna
output on the satellite receiver to the antenna
4.
Plug in the AC power cord into an AC outlet.
Go to page
Chapter
1
input
21
19
Connections
& Setup
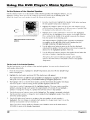
The Jacks on the Back of the DVD Player
When connecting,
make sure you connect Output jacks to Input jacks, Video to Video, Right Audio to Right Audio, etc.
f
VIDEO OUT
(Composite Video Ou_ut)
Connect a video
cable to this jack
and to the Video
Input jack on
your TV.
_
f
AUDIO OUT
DIGITAL AUDIO
z-channel
O UT
Output:
Insert audio cables (left
and right) from the
FRONT R and L jacks on
your DVD player to the
corresponding Audio
Input jacks (left and
righ0 on your TV or
receiver,
Use a digital optical
cable (not provided)
to connect your
DVD Player to a
compatible Dolby
Digital or DTS
receiver or decoder.
J
.°
JL,
,o ,_ ,o Io'
f
Y, PB' PR
Use these
(Component
jacks
V_ulto Output)
to connect
to
a TV with Component
video
input jacks. Unlike a single
video input, component
video
maintains
the video signal as
three separate
signals through
these three jacks. This
connection
provides
optimum
quality. To ensure maximum
picture quality, use three
video-grade
cables for the Y,
PB, and Pa connections.
Note
that it is essential to match the
color-coded
connectors
with a
compatible
20
S-VIDEO
5.1 AUDIO OUT
If your TV has an
S-Video jack, you
can connect an SVideo cable for
increased video
5.1..Channd
Output:
Insert audio cables from
the FRONT R and L,
SURROUND
R and L,
SUB (subwoofer),
and/
or CENTER jacks on
your DVD player to the
corresponding
Audio
Input jacks on your A/V
receiver.
quality. The SVideo cable only
carries the picture
signal; remember
to connect the left
and right audio
cables.
TV.
Chapter
1
Connections
&
Setup
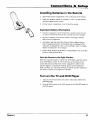
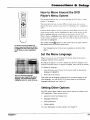
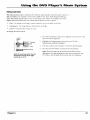
Installing Batteries in the Remote
1.
Remove the battery compartment
2.
Insert new batteries. Match the polarities (+ and -) on the batteries
with the diagram on the remote.
3.
Put the battery compartment
Important
cover on the back of the remote.
cover back on the remote.
Battery Information
•
If you're not going to use the remote for a month or more, be sure
to remove the batteries because they can leak and cause damage.
•
Dispose of batteries in the proper manner, according
state, and local regulations.
to federal,
Any battery may leak electrolyte if mixed with a different battery
type, if inserted incorrectly, if all batteries are not replaced at the
same time, if disposed of in fire, or if an attempt is made to charge a
battery not intended to be recharged.
•
Discard leaky batteries immediately.
burns or other personal injury.
Point
the Remote
in the Right
Leaking batteries can cause skin
Direction
When you want the remote to operate the DVD Player, point the remote
at the DVD Player, not the TV. The remote has to be pointed in the
correct direction and toward the correct component in order for the
remote's signal to communicate with the sensor on the component.
Make sure there is a clear path between the remote and the component
you want to operate so the signal isn't blocked.
Turn on the TV and DVD Player
Chapter
I
1.
Turn on your TV and tune to the correct video input channel (see
following page).
2.
Press the DVD button on the DVD remote or the ON*OFF button on
the DVD player.
21
Connections
Ik Setup
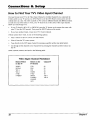
How to Find Your TV's Video Input Channel
You need to tune your TV to the Video Input Channel (or S-Video Channel if you connected the
S-Video cable to your TV and to your DVD Player) to see the DVD Player's menu and to see the
content that's on a disc. The video channel on TVs varies for different brands and different models.
In order for your DVD remote to work, your TV must be set on the correct video input channel.
Below are some things to try.
•
If your TV brand is RCA, GE, or PROSCAN, press the TV button on the remote that came with
your TV (not the DVD remote). Then press the INPUT button on the remote.
•
If you have another
If those options
brand, consult your TV's Owner's
don't work, try one of the following options.
•
Press a button on the TV remote (see table below).
•
Select it from the TV's menu system.
•
Tune direcdy to the DVD input channel
•
Go through
the TV.
Some common
Manual.
all the channels
scenarios
by pressing
in the channel
a specific number (see table below).
list by pressing
the channel
up/down
buttons
on
are listed in the following table:
Video Input Channel
Variations
Button/Switch
on the TV
Button on the
TV Remote
Channel
VIDEO
VID 1
00
SIGNAL
VID 1
VID 2
S-VID
S-VIDEO
LINE
VID
VIDEO
S-VID
INPUT
S-VIDEO
SOURCE
90
91
92
93
VID 1
VID 2
#
AUX
22
Chapter
I
Connections
&
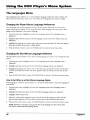
How to Move Around
0 _
D
the DVD
Player's Menu System
Tile technical term for how you move through
systen-t is "Navigation."
,©,©,©
'©'0'0
Setup
the DVI)
Player's
menu
Tl'ds [)()ok tells you how to select different menu items, hut you can
explore the menu system on your own hy following a few "'navigational
17.les. '
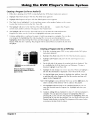
Press the DVD button to put the remote into DVD mode. Then use the
arrow buttons on the remote (highlighted in gray on the picture on the
left) to highlight different menu items on the screen. (In your DVD
Player's menu, a highlighted item appears brighter than the other items
on the screen.) To select a menu item, press OK on the remote when the
menu item is highlighted.
The invalid symbol _ appears on the screen when you press a button
that doesn't have any function for that disc.
The buttons used for navigation are
shown in gray. Use these arrow buttons
to highlight an item on the screen. Press
the OK button to select a highlighted
item.
Note.. Navigational
player
controls are also available on the front of the
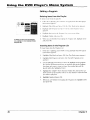
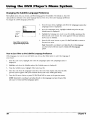
Set the Menu Language
When you turn on your DVD player for the first time, the Auton'tatic
Language Selection Screen appears.
By default, the player's on-screen displays are shown in English. If you
want the on-screen menus to appear in English, press OK on the remote.
To change the language:
This is the Automatic Language
Selection Screen. English is the default
language, and automatically appears
highlighted when the screen comes up.
1.
Press the down arrow button on the remote until the appropriate
language is highlighted.
2.
Press OK on the remote.
This screen sets all language preferences for on-screen displays to the
same language. You can use the DVD player menu to set individual
language preferences (see chapter 6).
Setting Other Options
The DVD player menu contains many options
DVD experience. These options include:
•
password
control and ratings limits
•
language
preferences
•
audio preferences
•
display options
For more information
Chapter
1
on menu options,
which can enhance
see chapter
your
6.
23
Connections
8, Setup
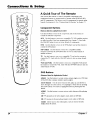
A Quick Tour of The Remote
VCNa
ON,OFF
"iV
DUO VGR2 AUX SAT-CABLE
&&°&&
MUTE
You can use this remote to control compatible components. The
component buttons are programmed to operate some PROSCAN, RCA
and GE components. The buttons must be programmed to operate other
brands of components. (See "Programming the Remote" in chapter 7.)
ZOOM
Component
(Buttons
9 ou-GUIDE
listed
Buttons
in alphabetical
order)
Use these buttons to turn on the component
control the selected component.
and set the remote to
INFO
AUX Use this button to turn on a compatible TV, VCR, satellite receiver,
or cable box after it has been programmed (see chapter 7). Used with
the ON,OFF button to turn on some brands of components.
MENU
CLEAR
,0,0 0
'O
°0
,0,0,0
INPUT
ANTENNA
©°0
REVERSE
0
PLAY
DVD Use this button to turn on the DVD player and set the remote to
control the DVD player.
SAT,CABLE
Use this button to turn on a compatible satellite
receiver. Used with the ONoOFF button to turn on some brands of
satellite receivers.
TV Use this button to turn on a compatible TV and set the remote to
control the TV. Used with the ON,OFF button to turn on some brands
of TVs.
FORWARD
RECORD STOP
PAUSE
VCR1 and
the remote
some
VCR2
Use this button to turn on a compatible
VCR and set
to control the VCR. Used with the ON-OFF
button to turn on
brands
of VCRs.
OPEN.LOSE
OOOO
SUiffffLE /Ull_9
ANGLJE F_qME-
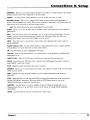
DVD Buttons
(Buttons
Listed
in Alphabetical
ANGLE
Use this button
(if the DVD disc contains
Arrow
buttons
Order)
to access
various
camera
multiple
camera
angles).
Use the arrow
buttons
angles
(left, right, up,
on a DVD disc
and down)
to
move through
on-screen
menus. You highlight
a menu item by pressing
the arrow buttons. You select a highlighted
item by pressing the OK
button.
AUDIO
a disc.
Use this button
CH +m advances
CH-m
CLEAR
display
24
reverses
Allows
from
to access
to the next
chapter,
to the preceding
you
to clear
various
audio
track,
chapter,
information,
features
index
track,
such
while
playing
or MP3 title.
index
or MP3 title.
as remove
the Info
the screen.
Chapter
I
Connections
8. Setup
FORWARD Allows you to search forward through a disc while it is in play mode (or slow speed
search in pause mode). Press repeatedly to increase speed.
Press this button during playback
GO BACK-AGAIN
to reverse the disc one frame at a time.
When you're using the DVD Player's menu system, press this button to
return to the preceding menu screen. When you're watching
button to go back 10 seconds to see/hear missed content.
Note: The AGAlN feature
or listening to a DVD disc, press this
may not be available for some DVD titles.
GUIDE Allows you to see the titles that are available on the current disc (if the disc contains
guide menu).
a
INEO Press this button while you're playing a disc to see the on-screen Info Display. The Info
Display contains various playback features and gives you information about the disc you're
playing (press again to remove the Info Display from the screen).
MENU Press this button to see the disc's menu when you're playing a disc (press it again to
resume playback).
Number buttons (0-9)
Use the number buttons to input information
track numbers, or to make selections on some menu screens.
OK
Press
this button
to select
a highlighted
menu
When
the STOP button
is held
down,
PAUSE Pauses disc play. When disc play is paused,
press FRAME - to go back a frame.
PLAY
numbers,
item.
ON°OI_
Turns on the player when it is in standby
when power is on.
OPENoCLOSE
such as chapter
mode or puts the player in standby
opens
and closes
mode
the disc tray.
press PAUSE again to advance
a frame or
Begins disc play (and closes disc tray if it is open).
REVERSE Allows you to search backward
search in pause mode).
tbrough
a disc while it is in play mode (or slow speed
SNIP Displays the Scene Snip Info Display so you can edit out selected
DVD disc.
scenes from the
STOP
Stops disc play. You can also press STOP to remove the screen saver from the screen to
see the DVD Player's main menu. When you hold the STOP button down, it acts as the
OPEN-CLOSE button to open and close disc tray.
SUfflTrLE
Use this feature to turn the subtitles off and on. While the subtitle info area is
displayed press the arrow up and down buttons
(if available).
ZOOM
Chapter
on the remote to change subtitle languages
Use this button to zoom in on certain areas of the screen.
1
25
This page left intentionally
blank.
Chapter
Playing
Chapter
2
DVDs
Overview:
•
Regional Coding
•
Using Different
•
Loading and Playing Discs
•
Using a Disc Menu
•
Using the On-Screen Info Display
•
Disc Playback Features Using the Remote
Changing
Menus
Entertainment.
Again.
27
Playing
Regional
DVDs
Coding
Both the DVD player and the discs are coded by region. These regional codes must match in
order for the disc to play. If the codes don't match, the disc won't play. This player's code is
region 1.
Using Different
Menus
Each disc is programmed with different
can use to access features:
features. There are three separate
menu paths that you
•
The Disc menu - The Disc menu is part of each disc and is separate from the DVD player's
menu. The contents of each Disc menu varies according to how the disc was authored and
what features are included. The Disc menu is turned on and off (while the disc is playing)
with the MENU button on the remote or the front of the player.
•
The DVD player's Info Display - The Info Display appears as icons across the top of the
screen when a disc is playing. It can only be accessed while you are playing a disc. It's turned
on and off with the INFO button on the remote or the front of the player.
•
The DVD player menu - The DVD player's menu system is accessed
playing. It appears automatically when the STOP button is pressed.
only when a disc isn't
Remember that a feature will only work if the disc was programmed with that feature. For
example, if you choose subtitles on the Info Display, the subtitles will only appear if the disc was
created with subtitles. If a menu item is "grayed out" it means that item isn't available.
Loading and Playing Discs
Your DVD player plays DVD discs, Video CD discs, Audio CD discs, CD-R discs and CD-RW discs.
Before you load a disc, make sure that it is compatible with the player. The following discs
CANNOT be used with this player:
•
Laserdiscs
•
CD-I, CD-ROM (computer-only
•
Discs recorded
discs), DVD-ROM
using other broadcast
standards
(i.e. PAL or SECAM)
Notes:
If the message "Tray Locked" appears on the screen:
•
The retail lock feature has been accidentally engaged.
press and hold a combination of keys simultaneously:
To unlock the disc tray you must
On the frontpanel
of the DVD Player, at the same timepress and hold the SKIP FWD,
OPEN• CLOSE, and TS SURROUND buttons for at least 3 seconds.
•
28
The Front Tray Lock feature
highlightFront
Tray Lock.
is turned on. From the Lock menu (see chapter 6),
Press OK to toggle the Front Tray Lock setting Off
Chapter 2
Playing
DVDs
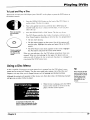
To Load and Play a Disc
Turn on the TV and your DVD Player (press ON-OFF
the remote control).
1.
2
on tile player or press the DVD buuon on
Press tile OPEN-CLOSE bulton on the l:ront of the DVI) Hayer or
on the remote. The disc tray opens.
Place a disc gently into the tray with the disc's label facing up
(double-sided
discs have content on both sides, so you can place
either side up).
This is an example
of a one-sided
disc.
3.
o] PI.AY button. The disc uay closes.
Press the OPEN.CLOSE
The DVD Player reads the disc's table of contents, and then one of
three things happens depending on how the disc was programmed:
• The disc starts playing.
• The disc menu appears on the screen. One of the options will
start disc play. Highlight that option and press OK on the DVD
remote.
This is an example
of a 2-sided disc.
The title is in the
center.
• The DVD Player's main menu appears on the screen. Highlight
the Play option and press OK on the DVD remote.
When you stop playing a disc, the DVD player remembers where you
stopped. When you start playing the disc again, the player picks up
where you left off unless the disc is removed, the player is unplugged,
you pressed the STOP button twice.
or
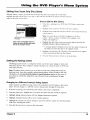
Using a Disc Menu
A disc is capable of having an on-screen menu that is separate from the DVD player's menu
system and on-screen Info Display. The disc menu might only contain a list of the titles and
chapters, or it may allow you to change features such as language and playback settings.
Although the content and operation of disc menus vary from disc to disc, the following example
will give you an idea of what to expect.
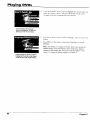
1.
Tip
Many discs skip the disc
menu and start playing
automatically. To access
the disc menu when
you're playing a disc,
press MENU on the
remote.
While the disc is playing, press the MENU
button on the remote or the front of the
player. The disc menu appears.
An example of a disc menu. The
menus on discs vary because the disc
menu is created by the disc's author.
Chapter
2
29
Playing
DVOs
2.
Press the up/down
nlenl.l
you
example
arrow buttons to highlight tile section of tile disc
choose, all(l press OK on tile relllOte.
[11 tile
on the left. //.tgaage has been selected.
want
to
In this example, The Language
setting is highlighted. To select this
option, press OK on the remote.
3.
4.
Press tile up/down
remote.
_{rro'_,sto select a language,
and press OK on tile
Press MENU on the remote or the front of tl_e player to resume
playback.
Note: Any setthlgs you cbaug4e on the disc menu onto' override the
default settings in the DVD Player's menu temporal_ly. Default
settings are the settings that you set up in the DVD Player_" menzt
system. To change the deJ_tult se*tings, see ChapIer 6.
In the example on the left, English is
highlighted. Press OK on the remote
to play the disc with English dialog.
30
Chapter
2
Playing
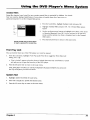
Using the On-Screen
DVDs
Info Display
The on-screen Info Display contains many playback features. To see the Info Display, press the
INFO button on the remote or the front of the player while a disc is playing. Tile Info Display
appears across the top of tile screen. Each feature is represented by an icon. Use the left/right
arrow buttons on the remote or the front of the player to move through tile different icons in the
lnfo Display.
When an icon is highlighted, use the up/down aoow buttons on the remote or the front of the
player to scroll through the choices displayed in the text box under the icons.
Remember, you can only access the Info Display when you're playing a disc. Also, the Inlk)
Display features are only available if the disc was created with that particular feature (i.e.. if you
select the Subtitle icon, you won't be able to change the subtitle language unless the author of the
disc created the disc with subtitles).
The invalid symbol _ appears on the screen when you press a button that doesn't have any
function. If one of the icons is "grayed out," that lnfo Display feature isn't available for the disc
you're playing. To make the Info Display disappear from the screen, press INFO on the remote or
the front of the player.
Scene
Snip
Subtitles
Ant le
Chapter
Title
Repeat
Audio
Time Display
Bookmarks
1
1
PLAY
Transport mode
Text about your
Info Display selection
appears here
The Info Display differs depending
the Info Display for DVD discs.
Chapter
2
on the type of disc that is in the player. The illustration
above shows
31
Playing
DVDs
Time Display
This feature displays the audio/video time. For I)VD discs, the time displayed ic'__,lsto the current
title time. For Audio CDs and MP3 discs, it refers t() tile curn_.nt track [inlt..
For DVD video
discs,
the Time
Display
also acts as a Time
Search
Ik'amle
particular
scene ill a movie by entering
tile time that scene is played.
dogfight scene in Top Gun, you can enter the elapsed
lime the scene
use Time Search:
['his
lets you g() to a
For example,
if you like the
plays and skip right to it. To
l.
Press INI:O on the remote or the ['font of playt.'t to bl'ing up the halo I)ispla,, I liRhlight I e
Time l)isplay and enter the ehtpsed time of the scene you wish to go to For example, enter
01:12:00 to go to tile scene that plays at 1 hour and twelx c mimltes int(/ the mo\'ic.
2.
When you've entered
the time. Press OK on the [enlote.
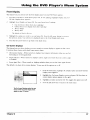
Selecting a Title
Some discs contain more than one title. For example, there lnight be four movies on one disc
(each movie might be considered a title). Each title is divided into chapters, To select a title:
or the front of the player to bring up the
1.
While the disc is playing, press INFO on the remote
Info Display.
2.
If the Title icon on the Info Display isn't highlighted,
highlight it.
3.
Use the number button(s) on the remote
buttons to go to the next/previous
title.
4.
Press OK on the remote when the title you ,:,,'ant to play appears
Note:
Some discs
use the left/'right ao'ov,' buttons
to
to enter the title number or press the up,down
arrow
in the text window.
have one title.
on@
Selecting a Chapter
C:12
Because DVD discs use digital technology, a title can be divided into individual chapters (similar
to tracks on a CD). You can skip to a specific chapter by using the Chapter feature in the Info
Display.
1.
While a disc is playing, press 1NFO on the remote or the front of the player to bring up the
Info Display.
2.
Press the arrow buttons
3.
Use the number buttons on the remote to enter the number of the chapter you want to play or
press the up/down arrow buttons to go to the next/previous
title.
4.
Press OK on the remote.
to highlight the Chapter icon.
Notes:
The Chapter feature
You can also advance
won't work if the disc isn't formatted
to the next chapter b!:pressing CH + _
the front of the player) and go to the preceding
(SKIP BACK on the front of the player).
32
with separate chapters.
on the remote (SKIP FWD on
chapter bv pressing CH- _ on the remote
Chapter
2
Playing
DVDs
Scene Snip Editing
The
Scene
_nip
l_.'ature
lets y<)L.i edi(
()Lit select
scen_s
on
a dis(.
Otlce
yoti
have
made
_dils,
Ihe
disc's title is stored in the Scene Snip LibralT so you can play either the edited or unediied version
of thai disc
Editing
1.
a Disc
While the disc is
playii-ig,
press SNIP on the remote
to bring
up the ,S'_e*lg',S'zz//9
lnfo Display.
Note." } bu (:(il! a/so press/,_Tq) op_/be remote or lbcj)o_zt <!i'lbe plco'e_: s¢,l_,ctthe Scene Snip
jc¢Jll (sgisSol_)
2
_#Jul press
OK.
The Scene ,S'_iipdispla$ appears. An available icon will be highlighted (a scissors icon with the
word
WnCLIl
nt-x{
1o
ill
When you reach the beginning of the scene you want to edit out, press OK on the remote.
The number of the cut and a time display appear next to the icon. For example, in the
illustration above, the first cut is indicated by the number 1 followed by the time the cut
begins
00:06:18.
4,
5.
Chapter
2
When you reach the end of the scene you want to edit out, press the OK button on the
remote. The icon changes to a trash can with the cut number and beginning time displayed
next to it. The edited version of the disc is added to the Scene Snip library.
Press the INFO or CLEAR bcltton on the remote
screen.
to remove
the Scene Snip display from the
33
Playing
DVDs
Using Scene Snip
The DVD Player must be locked to play the edited version of a disc. If you play the disc in an
unlocked
state, it will play as if there are no edits. The player is locked and unlocked
from the
DVD player
When
edited
Lock menu
(see
chapter
the DVD Player is locked,
version of a disc:
1.
Make
sure the DVD Player
2.
When
a disc including
Play
6).
you must
enter
the password
to play
the edited
disc.
To play the
is locked.
Scene
Snips
is inserted,
a message
box with two options
appears:
Unedited
Play Edited
3.
Highlight
If you want
and select
to play an unedited
enter
a password.
Each
side of a 2-sided
Note: Random
Clearing
and
Press
version
disc must
Program
The edited
of the disc is played.
of a disc that has been
be edited
play
version
assigned
Scene
Snips,
you
must
separately.
are not available
when
Scene
Snip is on.
Scene Snips
To clear an edit while
1.
Play Edited.
the disc is playing:
SNIP on the remote
to bring
up the Scene
Snip Display.
You will be prompted
for a
password.
,
Enter your password
4.
Highlight
5.
The edit is cleared
(the Scene
the trash can icon next
Info Display
vdll appear).
to the edit you want
and the trash can icon
If all 6 edits are in use, you
34
Snip
can only add
changes
a new
to clear.
Press
OK.
back to the scissors
edit by clearing
an existing
icon.
one.
Chapter 2
Playing
DVDs
Turning Subtitles On and Off
By default, subtitles are off. To turn subtitles on:
1.
While the disc is playing, press INFO on the remote.
2.
Highlight the Subtitles icon. The Subtitles icon acts as a toggle to turn subtitles on and off.
When subtitles are on, the text box below the icons will display the current subtitle language.
You can also turn on subtitles by pressing the SUBTITLE button on the remote control. When the
lnfo Display comes up the Subtitles icon will be highlighted. Press the up/down arrow buttons to
change the subtitle language (if available on that disc).
Selecting the Subtitle
Language
You can change the subtitle language while you're watching
created with subtitles.
a DVD disc, but only if the disc was
1.
While the disc is playing, press INFO on the remote or the front of the player.
2.
Press the arrow buttons to highlight the Subtitle icon and, if subtitles are off, press OK to turn
them on.
,
4.
Use the up/down arrow buttons to
the disc. If subtitles aren't available,
subtitles are available, the language
The subtitles will be shown in that
To make the Info Display disappear,
player.
scroll through the subtitle languages that are available on
the text in the text box will read Subtitles.- Not Available. If
currently showing in the text box is the active selection.
language.
press the INFO button on the remote
or the front of the
Notes:
Changing the subtitle language with the Info Display will only affect the disc currently
being played. When the disc is removed or tbe player is turned off tbe subtitle language
revert to the language setting specified tbrougb the DVD player main menu.
The subtitle language
can also be changed
will
through the DVD player menu.
You can also display the subtitle lnfo Display by pressing SUBTITLE on the remote. Press
SUBTITLE again to toggle subtitles on or off Use the up/down arrow buttons to select a
different subtitle language (if available). Press INFO to remove the Info Display from the
screen.
Chapter
2
35
Playing
DVDs
Changing the Audio Language
If the disc was created with different language tracks (recorded in different languages),
use the Info Display to temporarily change the DVD Player's Audio Language setting.
1.
While a disc is playing, press INFO on the remote
Info Display.
you can
or the front of the player to bring up the
Note: You can also bring up the info display by pressing the AUDIO button on the remote
(the Audio icon will be highlighted).
2.
Highlight the Audio icon. The current audio language
of icons.
appears
in the text box below the row
3.
Press the up/down arrow buttons to scroll through the audio languages that are available on
the disc until the audio language you want to use appears in the text box. Audio will be
played in that language.
4.
To make the Info Display disappear,
player,
press the INFO button on the remote or the front of the
Notes:
The language feature
only works if the disc was created with multiple audio tracks.
When you choose an audio language from the Info Display, you only override the audio
language setting in the DVD Player's main menu temporarily.
The audio language
36
can also be changed
through the DVD player menu.
Chapter 2
Playing
DVOs
The Repeat Feature
The default mode for the Repeat feature is Off. There are four Repeat options:
•
Disc - repeats the disc that is playing
•
Title - repeats the title that is playing
Chapter - repeats the chapter that is playing
•
A•B - Set the beginning
movie play repeatedly.
To Use Title or Chapter
(point A) and the end (point B) of a segment
to make this part of the
Repeat:
1.
While a disc is playing, press INFO on the remote
lnfo Display.
or the front of the player to bring up the
2.
Highlight the Repeat icon. The text in the text box below the icons will read Repeat Mode: Off
3.
Press the up/down arrow buttons to scroll through the Repeat options until the Title or
Chapter Repeat option is displayed in the text box.
4.
Press OK. The selected repeat option will loop continually until you turn Repeat off. Repeat is
turned off by completing steps 1 through 3 above, and selecting the Off option.
AoB Repeat
A,,B Repeat lets you define a specific segment on the disc that you want to repeat. For example,
you might like to watch the dogfight in the movie Top Gun. To watch this scene over and over:
1.
Find the spot on the disc that is a few seconds before the beginning of the scene you want to
repeat (this gives you time to access the Info Display and the Repeat feature).
2.
Press INFO on the remote and select the Repeat icon from the Info Display.
3.
Press the up/down arrow buttons until the A*B Repeat option is shown in the text box
underneath the icons. The text box reads Repeat Mode: A-B Press OK to Set A Point.
4.
At the beginning
5.
When you get to the part of the disc that you want to be the end of the repeated
B point), press OK. The segment will repeat until you turn Repeat off.
6.
To make the Info Display disappear
the front of the player.
of the scene you want to repeat, press OK to set the A point.
segment (the
from the screen, press the INFO button on the remote or
How to Cancel Repeat
There are three ways to cancel Repeat:
Chapter 2
°
Press STOP twice.
•
Go to the Repeat icon in the Info Display and select Off
-
Eject the disc.
37
Playing
DVDs
Using Bookmarks
The
up
booknlark
t_att]re
lo six booknlarks
lets you
per
disc.
mark
When
a point
you
on
ttlri_ Ihc
the disc
player
that
you
off or
can go to quickly.
relno\
c the' dis_,
YoU can store
bookmarks
are
ck, ared.
Storing
a Bookmark
1.
While a disc is playing, press INFO on the remote.
2.
l lighlight tile Booknlarh
3
The Br_okma*k Display appears
[\VO
a n'o\vs
icon and press ()K.
An a\railab]l_' utnnarked
_00:06:18
C2
Unmarked
4
icon will be highlighted
(a disc with
).
00:28:04
C4
03:24:09
02:12:56
C12 I--_-IUnmarked
When you reach the scene you want to mark, press OK. The unmarked
icons (side-by-side):
C24
icon changes to two
• An arrow that is used to activate the bookmark.
• A trash can that is used to clear the bookmark.
Next to the icons, the bookmark
5
start time and chapter are displayed
Press the INFO button on the remote to make the Info Display disappear
from the screen.
Using a Bookmark
1.
While you're playing a disc, press INFOnn
2.
Highlight the Bookmark
3.
Highlight the arrow next to the bookmarked
4.
Press OK to start playback
5.
To make the Info Display disappear
the remote. The Info Display appears.
icon and Press OK. The Bookmark
display appears.
scene you want to activate.
from the place you bookmarked.
from the screen, press INFO on the remote.
Clearing a Bookmark
The bookmarks are cleared each time a disc is removed from the player or when the power is
turned off. If you want to clear a bookmark while the disc is playing:
1.
Press INFO on the remote
2.
Highlight
3.
Highlight the trash can icon next to the bookmark you want to clear. Press OK. The
bookmark is cleared and the trash can icon changes back to the unmarked disc icon.
the Bookmark
If all six bookmarks
38
to bring up the Info Display.
icon and press OK.
are m use, you can only mark a new scene by clearing an existing bookmark.
Chapter 2
Playing
DVDs
Changing the Camera Angle
Some discs contain multiple angles of a particular scene or sequence. If the disc only has one
angle, this feature won't work. When multiple angles are available, the Camera Angle icon
appears in the upper right comer of the screen. To change the camera angle:
1.
While a disc is playing, press INFO on the remote
Display appears.
or the front of the player. The Info
2.
The Camera Angle icon will display the number of angles available. For example, if there
are 3 different angles, the icon will read 1 of 3. This means angle 1 is currently being
played.
3.
The text box beneath the icons displays Camera Angle: 1. Use the up/down arrow buttons
to scroll through the camera angle choices. The camera angle number displayed in the text
window is automatically shown.
4.
To make the Info Display disappear,
player.
press the INFO button on the remote or the front of the
Note:
You can also display the camera angle Info Display bypressing
the up/down
arrow buttons to switch between different
camera
remove the Info Display from the screen.
Chapter 2
ANGLE on the remote.
angles. Press INFO to
Use
39
Playing
DVDs
Disc Playback Features Using the Remote
You can use the remote control to activate disc playback
&&°_&
m
9
Playback features aren't usually available during the opening credits of a movie. If a playback
feature isn't available, the invalid symbol _ appears on the screen when you press that button.
Fast Motion
Playback
To scan quickly through
,0,0,0
'0'0'0
'0,0,0
OOOO
features.
(Picture
Scan)
the disc when you're playing it, use the Picture Scan feature.
1.
Press the REVERSE or FORWARD button on the remote when you're playing a disc.
2.
Press the button again to scan at a faster speed. Each time you press the button, the scanning
speed increases.
3.
Press the PLAY button at any time to resume
normal playback.
You can also use the Picture Scan feature by rotating the shuttle on the front of the DVD player.
Rotate the shuttle clockwise (forward search) or counterclockwise
(backward search). The farther
you rotate the shuttle, the faster the speed.
Note:
You won't
feature.
Freeze
Frame
hear the sound
and
Frame
(audio)
on DVD discs when
using
thepicture
scan
Advance
1.
Press PAUSE when a disc is playing to freeze the picture.
2.
Each time you press the PAUSE button, the picture advances
,, Press FRAME - on the remote to advance
3.
you're
one frame.
one frame backwards
(frame-by-frame).
Press PLAY to resume normal playback.
Slow
Motion
Playback
(in Freeze
Frame
Mode)
While the disc is in freeze frame mode, you can use slow motion playback.
1.
While the disc is playing, press PAUSE on the remote.
2.
Press the REVERSE or the FORWARD button.
3.
Press the button again to decrease
4.
Press PLAY to resume normal playback.
the slow motion playback
Chapter
Advance
While a disc is playing, you can go forward or backward
CH +'_ or CH - _ on the remote.
40
speed.
a chapter or track at a time by pressing
Chapter 2
Playing
Scene Again
DVDs
TM
When you're watching
or listening to a DVD disc, press the GO BACK-AGAIN
button on the remote to go back
approximately
10 seconds
to see and hear missed content.
Subtitles will automatically
be displayed
until the end of the
replayed scene (to select the subtitle options,
see chapter 6). This feature only works if the disc is encoded
with navigation
control.
Multiple presses of the GO BACK•AGAIN button will go back further. For example,
times in rapid succession, play will go back 30 seconds.
if you press the GO BACK button three
Subtitles
When
a DVD is recorded
with subtitles,
you
can use the Subtitle
feature
to view
the subtitles
on-screen.
1.
Press the SUBTITLE button on the remote when you're playing a disc to bring up the Info Display.
2.
Press the button again to toggle subtitles on or off.
3.
Use the up/down
4.
Press INFO to remove
arrow buttons
on the remote to switch between
different languages
(if available).
the Info Display from the screen.
Audio Language
You can temporarily
change the default audio language
1.
Press AUDIO to bring up the Info Display.
2.
Use the up/down
3.
Press
Camera
INFO
arrow
to remove
buttons
to switch
the Info Display
between
from
(if different
different
audio languages
languages
are available on that disc).
(if available
on that disc).
the screen,
Angle
Some DVDs are recorded
using multiple camera angles (if available on that disc).
1.
Press ANGLE to display the Angle icon.
2.
Use the up/down
3.
Press INFO to remove
arrow buttons
to switch between
different camera angles (if available on that disc).
the Angle icon from the screen.
Scene Snip Edit
You can edit out sections
of a disc.
1.
Press
SNIP to bring
up the Scene
2.
Select
the time you want
Snip display.
the first edit to start and press
• You carl edit out up to six sections
Press
INFO or CLEAR to remove
Chapter 2
OK. Press
OK again
where
you
want
the edit to end.
of a disc.
the Info Display
from the screen.
41
Playing
DVDs
Zoom
When playing DVD discs and Video CDs, you can magnify
For DVD discs, Zoom has 3 levels (1.5x, 2x, 4x). For video
magnifies
by using
from
the center
the arrow
of the screen.
Once
in Zoom
the screen during normal playback.
CDs, Zoom has 2 levels (lx, 2x). Zoom
mode,
you can pan right,
left, up or down
buttons.
1.
Press ZOOM on the remote control to magnify. (The zoom level will be displayed in the
corner of the screen. Press CLEAR to clear the zoom Info Display from the screen.)
2.
Press the ZOOM button again to go to the next level of magnification.
3.
To turn Zoom off, press the ZOOM button until you cycle through
normal playback.
all the levels and return to
Note:
You can use the 1.5x zoom mode to alter a 16x9 letterbox movie (black bars top and
bottom) to a 4x3 format.
This will eliminate
the black bars at the top and bottom and allow
you to use left/right arrow keys to pan and scan.
42
Chapter 2
Chapter
Playing
Chapter
Audio
3
COs
Overview:
•
Using the Info Display
•
Using the Time Display
•
Selecting a Specific Track
•
Selecting a Play Mode
•
The Repeat Feature
•
Using IntroScan
•
The Bookmark
•
Dub Assist
Feature
DIGITAL AUDIO
Changing
Entertainment.
Again.
43
Playing
Audio
CDs
Using the Info Display
Your DVD player has many of the same features as an audio CD player. The player's on-screen
lnlT_ Display lets you choose various playback features. This section explains how to play audio
CDs in your DVD player and how to use the player's features. For instructions on loading and
playing your CDs, see Chapter 2.
To access the Info Display while the CD is playing, press INFO on the remote or the front of the
player. The Info Display appears across the top of the screen. Each of the playback features is
represented by an icon. To access a feature, use the arrow buttons on the remote to highlight the
icon. Each feature that can be accessed from the on-screen lnfo Display is described on the
lollowing pages. To clear the lnfo Display from the screen, press INFO on the remote control or
the fi'ont of the player.
Notes
To see the Info Display whileplaying audio CDs, you must turn on your TV and tune it to
its _qdeo Input Channel. For more information about the 717_ Video Input Channel, see
Chapter 1.
Some transport modes (reverse and fast forward)
Time Display
are not available for audio CDs.
Bookmarks
Track
Repeat
Play Mode
IntroScan_
1
Using the Time Display
The Clock part of the Info Display shows the current track time. Press INFO to clear the screen.
Selecting a Specific Track
44
1.
Press INFO on the remote or the front of the player (the Info Display appears).
2.
Highlight the Track icon.
3.
Use the number buttons on the remote to enter the track number you want to play, or use the
up/down arrow buttons to scroll through the track numbers. You may need to press the OK
button on the remote after you enter a single digit track number.
Chapter 3
Playing
Selecting
TilL, ft. :IL'L'
I)Dti(_i/n:
IhI'L'L'
tl/u. tl:l_.'l.;., pl:t_
Random:
fl_u t_;tt ks on
dvl:mh
i
in Ill,.. _rch..i
ill,.' _.:1) pLt\
li_t ill the" Ph O' Uode
_l;ll_ditld
CDs
a Play Mode
St;llldard:
I_lo_r;in/
Audio
(!hu, I)l¢[u.r
INu.cl
<m tilt+ t_l ) (st:illJl/_.,
in r:md_,m
mu>nu ot thv
\\ ith Itac b. l/
<,tdc'_.
1)\ I) PLl_'r
lislu,_! ()ll Ihu' 111)1 in lilL" _]_'!,_ull
s m;lm
nu'ltil!_
mu'nu
l_lt _lll
l_l;I\c'I
'I'<> cl_;m_'
thu'
St'triLlS:
l>t_.'>,s INF()
<m thL + iu'tn_+tc'
(+t tl_c' lumt
t,t ihL + l+lay<_+r '+,+hilt'
it di _-, is i+Lt\ ]n_
the'
Inlo
I)inp+:; S :q+pc'+n_
2
l li_hliRht
k_ms
[i_C
/_/_(l
Press
thu
n'_)d,..+ you
Note:
1
i_<>_I "1']IC' U_I_i_'_It l+l;t)' Int>dt:
'II_I_"
ttl)'do\\
n ;nix>\\
",>,ant al'>l+,Uar.s in the
_I7+_]_l_Y_+_s
Using
the
_
Program
lo
u_,'.: thL + PrcLgr_im
lhu
CI)
to pluy
huttoi]
tuxt
2.
I lighlight
P/(()' Mode
tiacks
_+_J_(i_++_¢`_
P!_iyb_tc')-: {L'attii'_'.
It tixu cli:_c is pl:iyin_,
I+(+x ['h+
on
pi;t)
the
the
_]+_H_V_(_Y
CI)
V_I_
t('xI l)<)x und<:rnc.ath
m<+dv
\\ ill tit)x\
_)_
_
ll(+ll
ch_,icu'+
pl_l_
(.'])
unti!
ill their
lll/(J
l'(Jlll"
thL>
play
ordct.
])[(I)'t+l
.
Play Feature
by cic_tting
1
aI+I+-+';U'S in th,J
,+,to _,LII>II thli)tigh
u pzo_rtm_
'_cltt niti'.t
li_t
'!hi_
t.,ntu.r IhL + ()rd,:r
is d(>n_" from
in ,,\ l]i_h
the _ l)\
pru, ss _q'I'()P t<> -,t_>l', l+l;t_+butcl,: ith,. + i)\'l)
_illcl i)tL+ss Olx
(the
3.
tTdll t>mtc_r(llt# :incl prc'ss
Highlight
/J/a " Mode
tllcntl
_+ott \',ant
I) pla_cr_
tl]L, tr_tc-k:4 on
m_'nu
l>Izty L,I re;tin
I))L'I)LI :t!}pt_tn'S).
:il_l)C.:lts)
()i _. I lhL' lfdit
P +gqr_t
screen
_lp|)e_iis )
Trick
program
"['he
List
7)Ylck
to c'lllc'r
is highlightL.cl,
box
Iht" tt;ic'k
t.+lltc'rt'_.l ;ippc';tlS
124)
you
t'sc > the
\\':iill
t() pl;iy
t]uml'_L+r bcittOilS
lirsl
"l'tac [i:ick
thu t'tlrsor
i11 the 77"+H.]¢I)o× ;Incl
PL't'S_, ()1_+ tO ;trio! their tiac'],; t_) the' /'++tqr+tm
th_
i_L.×t v.]_ot in tl_
highlighted
O.
This it where
the
will bs located¸
two
lines
of conttxl
sensitive
help
Cot]tintlc,
3
acldin<<4
Y()IA
()K,
pi+t+_'>_';il]_ ()l_
l)b, pl;ly
the + pl;tyc'i
Chapter
atlCl enter
is col]]pll+'[c.
l]rc"+Mn7
Use the Edit Program screen to create
your own program list.
lh' _RsYl/i [i_t _,_c' i
),()tit
trctckx
()t + _,()tl
I1" )t>\i
;is
t'clll
)'(>tit"
s{i\l.'
++;i;C + the'
The J !+tt)_l:tll_ ,,_i!1
(+i the J pl:t)c'l
I)t'
ill
_urc'
you
Add.
Li,+L Thc+ tUl'Sor
_|;ikt_
_,tC+l]S +t-_, Lli]til
I'll'o_t';tM
t_)'
tilt + pi'()_l';ll/I
pi'o+12>lCllil
u'r;i',c'c!
i<4 ltill/c't]
highlights
lumps
to
thL. 7)_+'c_box
is
tr:lc'k
c+xpl;iillc+d
plcly
C_tll
next
]
on the remote
nttlill+_t:r
_,'Otl C;ll_
\\l/C+ll
yol.ir
pix)giam
hi_hlightin_
I-V_
O' and
I+) hiThlighiin+4 I)oll¢ _and
Vtltl
xc'lc'tt
rc'l//i)t
it
h'oill
thv
lt]t])
m
the+ disc
l'ronl
<>11
45
Playing
Audio
CDs
Editing a Playlist
1.
If the disc is playing, press STOP to stop playback.
2.
Highlight Play Mode and press OK (the Play Mode nrenu appears).
3.
Highlight Edit Program and press OK (the Edit Program screen appears).
4.
Highlight the item in the playlist you want to delete.
5.
Highlight Delete, and press OK.
6.
When you've rearranged
the program
list and/or
The DVD player main menu appears.
deleted
all the tracks necessary,
press OK.
The Repeat Feature
The default mode for the Repeat feature is Off. There are three Repeat options for Audio CDs:
•
Disc - repeats
the disc that is playing
•
Track - repeats the track that is playing
•
A•B - Set the beginning
repeatedly.
(point A) and the end (point B) to make this segment of the CD play
To Use Disc or Track Repeat:
1.
While a disc is playing, press INFO on the remote
Info Display.
or the front of the player to bring up the
2.
Highlight the Repeat icon. The text in the text box below the icons will read Repeat Mode.. Off
3.
Press the up/down arrow buttons to scroll through
Repeat option is displayed in the text box.
4.
Press OK. The selected repeat option will loop continually until you turn Repeat off. Repeat is
turned off by completing steps 1 through 3 above, and selecting the Off option.
the Repeat options until the Disc or Track
A*B Repeat
A.B Repeat lets you define a specific segment
46
on the disc that you want to repeat:
1.
Find the spot on the disc that is a few seconds before the beginning of the part you want to
repeat (this gives you time to access the Info Display and the Repeat feature).
2.
Press INFO on the remote or the front of the player and select the Repeat icon from the Info
Display.
3.
Press the up/down arrow buttons until the AoB Repeat option is shown in the text box
underneath the icons. The text box reads Repeat Mode: A-B Press OK to Set A Point.
4.
At the beginning
5.
When you get to the part of the disc that you want to be the end of the repeated
B point), press OK. The segment will repeat until you turn Repeat off.
6.
To make the lnfo Display disappear
the front of the player.
of the part you want to repeat, press OK to set the A point.
segment
(the
from the screen, press the INFO button on the remote or
Chapter 3
Playing
How
are three
ways
•
Press
STOP
•
Go to the Repeat
•
Eject the disc.
to cancel
The IntroScan
feature
that's
1.
Press
2.
Highlight
icon
system
on many
plays
If you
the IntroScan
want
and select
the first ten seconds
car radios).
INFO on the remote
The current
•
in the Info Display
Off
TM
• After the IntroScan
•
Repeat:
twice.
Using IntroScan
3
CDs
to Cancel Repeat
There
Chapter
Audio
or the front of the player
icon.
system
Press
goes
You can also access
main menu.
playing
track
on the CD (similar
through
system
(the Info Display
all of the tracks,
while
to the scan
system:
OK. The first ten seconds
to stop the IntroScan
track starts
of each
To use the IntroScan
of each
appears).
track
will play.
it stops.
it's in progress,
press
PLAY on the remote.
in its entirety.
the IntroScan
system
from the Play Mode
menu
in the DVD Player's
47
Playing
Audio
CDs
The Bookmark
Feature
The bookmark
I_ature lets you mark a p(_int on the disc that you can go to quickly. "/ou can store
up lo (_ I_()kmai'ks
per disc When you (tlrn the player off or r_.nlove the2 <lisc. bookn;arks
are
t Iczlled
Storing
a Bookmark
I
While a disc is playing, press INFO on the remote or the front of the player.
2
t lighlight the Bookmark
3
The 13(Jokola#_ Menu appears.
two ali<_ws)
00:06:18
icon and pless OK
An available
unrnarked
icon ,,',.'il!be higMighted (a disc with
T2
Unmarked
t.
When you reach the place
icons (side-by side):
•
An arrow
•
A trash
that is used
can that is used
Next to the icons,
5.
you
want
to activate
to clear
the bookmark
Press the INFO button on the
disappear
from the screen.
tn mark,
press
OK
The unmarked
icnn
changes
to two
the bookmark.
the bookmark.
strut time and track
remote
are displayed.
or the front of the phlyer
to make
the Info Display
Using a Bookmark
48
1.
While you're playing a disc, press INFO on the remote or the front of the player. The Info
Display appears.
2.
Highlight the Bookmark
3.
Highlight the arrow next to the hookmark
4.
Press OK to activate the b,ookn_,ark.
5.
To make the Infn Display disappear
icon and Press OK. The Bookmark
menu appears.
you want to activate
from the screen, press INFO on the remote.
Chapter3
Playing
Audio
CDs
Clearing a Bookmark
The booknlarks
are cleared
each
time
a disc
is rem()ved
fl-onl
the p]ayc't
or when
the p(_\vc, r is
turned off, If you \\'ant to clear a I)ooklllarl-; \_ililc tile disc is playing:
1,
Press INFO on Ihe rellll)l12i11 the 1]()111
(if lilt'
2.
ffighlight
the Bo+Jkmark icon and press ()K,
3.
Higlrligl_t
the' trash
4,
The
If all 6
I)ookmark
bookularks
call
ic()u
is cleared
arc'
in
USe,,
ilt'xl
I(i the
h<)()kmark
and tile, [rashcan
Ve)tl
tall
<lnl)
pla)cl
Ill;Irk
icon
)()tl
\\anl
c]langes
Ile\\
up the Inlo I)isplay
Io I)ring
a
I() tlcqu
hack
st'uric'
h)
I(I
Press ()K.
tl_c,tlnlnarked disc
clc'alin
7
€tI]
c'XiSling
icon.
bookinark
Dub Assist
Dub Assist helps you lecord a CI) onto an audio cassette tape by determining the number t)f
tracks that will fit on one side of the tape so you have time to turn the tape over to record on the
other side• Dub Assist does not have an icon on the lnfo Display har. It is activated through the
DVD player's menu.
To
use
Dub
Assist
when
you're
recording
a El-) onto
all audio
cassette:
Press STOP if a CD is pla) ing (tire DVD Players
appears).
n'iain menu
ttighlight
l)lco ' .ll(Jde and press OK (the t_1_(I' Mode options appeal )
Highlight
Dub Assist and
press
OK (the Dub Assist screen
The highlight sho_.i[d be in the PI60' Order window.
Standard, Opnmized, or Program.
appears).
Ch(_ose
Standard:
This is the default nrode. The tracks are recorded in
the order on the CD ttrack 1 is recorded first, track 2 second, etc.)
Use the Dub Assist screen to determine
how many CD tracks can fit on a
cassette,
Optimized:
the number
The tracks are recorded in the order that optimizes
of tracks that can fit on one side of the auclio
cassette so you have the least amount
of the tape•
Program:
You must
in the
of dead space at the end
The tracks are recorded
in the order you
create your program
in the Edit Pl'(JgrcXl?l
DVD Player's
program,
that's
menu
Play menu.
Use the arrow keys to highlight the S_'gment Length box. When the
Segment Length box is highlighted, use the up/down arrow buttons
to enter the length of one side of the audio cassette.
Chapter
3
6.
The order the tracks will be recorded in appears in the SeRment list
on the right, Use the arrow keys to highlight the Start box and
press OK.
7.
Follow the instructions
on the screen to begin recording,
49
This page left intentionally
blank.
Chapter
Playing
Chapter
MP3
4
Files
Overview:
•
What is MP3?
•
Using the Info Display
•
The MP3 Display
•
Selecting a Play Mode
•
Using the Program Play Feature
•
The Repeat Feature
•
Using IntroScan
•
The MP3 Screen Saver
Changing
Entertainment.
Again.
51
Playing
MP3
Files
What is MP3?
MP3 is a format for storing digital audio. An audio CD-quality song can be compressed
format with very little loss of quality, while taking up much less space.
into MP3
CD-R or a CD-RW discs that have been encoded in MP3 format can be played on your DVD player.
In this manual, CD-R and CD-RW discs will be referred to as MP3 discs. MP3 files, or songs, are
referred to as titles.
Obtaining
MP3 files
There are two ways to obtain MP3 files:
•
By using computer
software necessary
software to encode MP3 files from an audio CD - You can download
to encode MP3 files from the internet.
the
When encoding MP3 files, you can include information such as title, artist, genre, and
comments that will be displayed by your DVD player at the time the title is played. This
information must be included at the time the file is encoded in order for it to be displayed
the time you play it or/the player.
•
at
Downloading MP3 files from the internet - There are many internet sites that allow you to
download MP3 files fro free, and many sites that require a fee.
Creating an MP3 Disc on Your Computer
Your DVD player handles MPEG-1, layer III audio, tf you encode your own MP3 files from an
audio CD, avoid using the features of MPEG-2, such as the 22kHz sampling frequency.
Be sure to make a data CD rather than an audio CD. If you make an audio CD, you will lose the
extra features and compression of MP3.
When you burn a CD, take the following steps to get optimal use of the CD for playing in your
DVD player.
•
In your CD burning
software, select ISO-9660 for the file system.
Note: TheJoliet f!le system is not recommended.
shortened f!le names.
Using theJoliet f!le system may result in
The DVD player can support up to 30-character names. Your computer software may let you
specifi/this option as ISO-9660 level 2, ISO-9660 with Rock Ridge extension, or simply as ISO9660 with long directory or file names, If your computer software doesn't support the above
options, name your files and directories using eight characters or less.
Notes
52
For more information
www.lyrazone.com.
regarding
Some
(reverse
transport
modes
MP3 encoding
and fast forward)
software
and MP3 sites, visit http..//
are not available
for MP3 CDs.
Chapter 4
Playing
MP3
Files
Using the Info Display
'['(t
_I<(.'ess
die playel
lhe Info I)i_pla_ x_Idle ;ll_
The hdo I)i_ptay :ll_p_.':ll',
I'UpIC_Ullt_'d
icon
]]a_h
the
II()I11Ill
h\
:Ill
_I_I[[IIL'
lllu
Time
I_1)11 "lit
_1__c,'s-,
lhal
Ilu
(.all
_.[P_
di'_<
a¢ rl!,,,,
:1 _L':IILIr_'.
At l¢.'5N_'d
holll
i" Ifla\in_,
Ihl..
(lip
ill
ptc_
lhe
Ll'_' Ih_.' alIi_\%
I}1_' ()11%(
[Nl:t)
:_cIL'el_
htlltOll_
l(,C.,ll
Inh_
iin
lhc
1"_1_II i!f
(111 thc
])i>pl:l,.
iuII/O[_.'
(ll
[h_.' pl:l_l_;l_
IUlll()l_'
i> dcst
Ii)
file
k
ll'lll]l
lii_tllli_lll
itbcd
on
I)t
tL':it[llL.",
1',
lhc
the
pla_c_
Display
Title
Repeat
Play Mode
IntroScan
The MP3 Display
When you play an MP3 disc, the MP3 display will appear below the Into
Display
MP3 disc>, conzain individual
songs
_allcd dries A disc can hold
several lit]e_. Titles ca[_ I_e oL_,anizcd into dilcCtofics
and SLlbdirecrolies
W!lctl
yoLI play all MP3 disc, the lnfo Disl)lay
text box
shows
the authol
of the currently
playing title (song) atld the current title• The follov,,ing
information
appears
beneath
fl_e lnfo Display in the MP3 display
Title
The MP3 display is shown under the
Info Display.
- Title of eurlei_t]y
Artist
- Allist
Album
Genre
The
Bit rate
Size
Patl_
Chapter
4
{if tfie playing
collection
- The t}pe
Colnlnent
paying
file in the playlist
of songs
ol music
In[<)rn/;_tion
file in playlist
the title _<)mes fiom
file title is classified
acklcd
at file tinle the [fie _\:ts _om[)lessed.
- Bit rate the title is being
- Size ol the currently
Iqacu
playing
on Ifie dis_ wficre
as (rex k, jazz, etc).
[he
played
at.
title•
ctu]cI_t
litle
IS stIHt?d
53
Playing
MP3
Files
Using the Time Display
The Clock part of the Info l)isplay shows tile cun'ent title time, Press INFO to clear the screen.
Note:
7"0 see lbe
h{/b
Dt_'plr(l'
tebile
plc(t,ittg
MP3
CDs, ),ou
it tr_its 17deo Dqmt Cl._aHmq. For more it{ft.'marion
see Chgqger 1.
Selecting
111HSI tilth
Oil yottr
7M alld
lttHe
about the TI'_" Video l_q_ttl Channel,
a Title
Prc.ss PI.AY to begin playl_ack. The player will begin playing the songs (titles) in the order they
_ere burned on the disc (unless you've created a progranr/playlist
(see below),
1.
Ilighlight
and select the Title icon in the Inl_ Display.
2
! Tse the up, down ar]ow butt(ms to highlight the desired title from the title list. As a title is
highlighted it will begin to play and tile infonnation associated with that title will be displayed
in the MP3 screen.
You can also select a title by entering
in the number of the title.
Alter approximately one minute, the screen saver will be displayed instead of the MP3 Info
Display and screen. To bring up the MP3 menu again, press INFO on the remote.
Skipping
Titles
Use the CH+ button to move to the next title, Use the CH- button to move to the beginning
cun-ently playing title. Press CH- again to move to the previous title,
Selecting
of the
a Play Mode
The Phty Mode feature lets you set up the order in which you want the titles on the MP3 disc to
play. There are three options:
Standard:
the titles play in the order listed on the disc (starting with title 1).
Random:
the titles on the disc play in random order.
Program: the titles on the disc play in the order you've programmed.
program list in the Plal' menu of the DVD Player's main menu.
You must first create a
Standard (the order listed on the CD) is the default setting for your player. To change the
defauh setting:
1.
Press INFO on the remote or the front of the player while a disc is playing. The Info
I)isplay appears.
2,
Highlight the PlayMode icon. The current play mode appears in the text box underneath the
icons. Press the up/down arrow buttons to scroll through the play mode choices until play
mode you want appears in the text box. The titles on the CD will now play in that order,
Note: Theplaver
plave_
54
dq/_tults to Standardplayback
whenever)xou put a new disc into your
Chapter
4
Playing
Using the Program
Creating
"['oLIS()the
MP3
Files
Play Feature
a Program
Program
/qc(l'opllon,
die tides on the dis(
_otI tlm'q
ClCatc
a 1)lOg[';LIll
IislIo SOL lhc
(rider hl \\hi_h
VOLl X\;LIII
to pl;l_
Creating
I
a Program
List for
an MP3
Disc
IIthe dis<ispla_,ing,
plc',,_I()P I(_,,IHppla_h:_<k(lhc l)\I) plmc_
inaill
III(LnLI appuals)
2
llighlig]ll
I'lql'Uod(':Lnd
3
l lighlighl
appears)
l:dit I';q_lYIm
4
On the left side of the screen the standard
playlist is displayed
lhi:_
is a scrollable
list of all the directories
and [ilenames
on the disc
•
To open
Im.'_,s ()ix ((he t'l_(l'Uodenlcml
and pro,> ()K (thu /:'dig I'rqu_wm sciccn
a directoI T, highlight
()pen and the contents
Sta it da rd PlcO'hst)
appcan'_l
it and
press
(d: the directory
OK (tire directol 3' wi!l
will be displayed
m the
P
Thll
will
|
bl
IIhI
I
I_
_|0
Ilta
(I
C_II!!X_
senaitiVe
help
•
I_aloa
The Standard Playlist from the disc
displays the directories and titles
(songs) that are on the disc.
To close a directory,
use the arrow
playlist until the LP S(BDIRt'C'[OR}
press OK.
keys to scroll to d3e top of the
o aton is highlighted
and
-5 Use the arrow keys to highlight the title (SOl'_g) VOOwant to pla_,
first, When you highlight a title fl)e title information will be
displayed at the bottom of the screen.
6,
Use the left/right arrow buttons to highlight the Add box, Press OK
to add that title to the Program List(the title number and time will
appear in the Program List)
Note lf he highlight
is on a directo_ 3, when you use tbeAdd
option, the entire contents
_f tbe directo W will be added to tbe
Program
List.
Chapter4
7.
The highlight ,,viii move back to the Standard
PIKvlist SO you
enter the next directory
or title into the Program
LisL
cat)
8.
Continue adding titles as explained in steps 4-7 until your program is
complete, You can play your program by highlighting Pla9, and
pressing OK, or you can save the program by highlighting Done anti
pressing OK, If you save the program, you can select it from the
lnfo Display while the disc is playing The program ,,viii be erased
when you remove the disc from the player,
55
Playing
Editing
Files
a Program
Deleting
"111 dc'lt'k'
IVlP3
Titles
rifle',
high/
Ihc
I_la_ Ii',l:
I
II Ill,.' di_,t
i_, iiI;l_ N/_.
2
Ili_hli,,4]ll
/'hi1
I ligh]ighl
I:}h!/_qcr{sm
I
[[iR]lli_}ll
lilt
_,
Iligll[i_l_t
/,_q_,h _ :rod pru,_ <, t)E
0
\\hun
',_u
ph ".', ",l!
lh_d¢;nld
)P h, "q_p
pit',',
;n/d
( )!',, (I}lC
plu-s
JtwIII ill Ihw Pl_L_l;Hn
;_lu lini',hc'd
ic;Hi;ll]_lIl_
pl;l_,h;i_
k _ll/_
I)\
/_/_11"lll,di'lllUi/tl
* It\ /Iht,
!,1i!
I}lC I',]:l_ li',l
II)AIII
IIl_.'nu
.ll_l)t<:llS)
;Ipl_u;Ir'_l
I_n!_lwm
li<,[ ",_U \\anl
I) pl;l_Cl
_,t lt.'t'll
;I!_I_c'_H_)
[(_ dc Iclc
Ild_h]lj_hl
l)_//_'
Inserting
an_.l pi_'-'-
()Ix
Titles
To ins_it titles into the playlist:
1
I1 tilt'
disc
Ill{IJI]
IllUI_LI
P/_II Wodc';md
above, the contents
u) st()p
i)laybatk
()K tlhu
3
lliMhlig}/t t:7111/'_q_*_/s* :lnd i)lc',_s ()1',. /the
;11)pt,;Hs )
lch
[.isl
[st,
List
v, huru
lighl
In\'
;nl<>\\
Lip d(l\',l]
_,
l lighlighl
scit'<l
lilt"
picss
(tile
DVI)
_,<_u ,.,,ant
l'lc!l' Uodt, mcnu
I:dl/ l_ro,_ranl
]<c'}s I<_ ill()_ c lilt'
;!IH)\\
kt'_s
I_ il]stnl
bq/ore the highlightud
of the directory SUB-John's,.. will be
inserted in the Program List before the
song My music1.
STOP
lli£hlighl
Iov_loa
In the illustration
piuss
player
;Ipl>.';us)
2
! ",c' the
will bl
is I)];tyin£.
]ligh]ighl
1€/ Ill;ilk
I]/U
(the
h]_;crtt'd
;i lillt,
_cluun
u_ thu Ploglam
spot
in thu I)lOgfa]]l
titlu
'.',ill
plac,_d
Ix-
title)
the ._,lamlard/>/al'll_l
and use Ihc tip el<)\\ I]
title.' 3()LI \\ant Io insuH
/_lserland
al]pu;irs)
;lI'l'O_A
keys IO
6
llighlight
press OK
7
When you aru finished c: i " _mng the playlisl, highlifaht l)o_w and
press OK
Autoplay
YOLI ({Ill
ok)st
I
2
disc
]:i(li/]
lhc
Aui<)pla)
I)VI)
The
lqr{i,,4,4rJd_,oph<>I1
M(xlu
st,Ic'cli<ms
pI'L'SS OK
to I<)gglc'
Prt%,;
lufl
Ihu
to play
_,'o{11 dis_
playc, i s 111;1111
!l/t'lltl
lhc
Play
ophon
atitomaIically
after
you
If;i)
highli<qhl
G()
56
St'l lilt'
tilt,
I_ACKoAGAIN
;LI'I'O\V
;il_pt'al.
thc option
htllt_n/
1o
It'tIl!'l]
(player
and
()N,
no disc
playing)
]'nc',,s ()K
l lighlight
ihc, Atlllil'Jkly
(>plion
af'id
on/off
to
Itqtlln
tl)
tilt'
Io
tilt'
I)lt'vil)tlS
illt'l]ti
Ol
prl'ss
II/11111 iiIt'ntl
Chapter
4
Playing
MP3
Files
The Repeat Feature
The default mode for the Repeat feature is Off. There are two Repeat options for MP3 discs:
•
Disc - repeats the disc or playlist (if you've created
•
Title - repeats the title (song) that is playing
one) that is playing
To Use Repeat:
1.
While a disc is playing, press INFO on the remote
Info Display.
2.
Highlight the Repeat icon. The text in the text box below the icons will read Repeat Mode.. Off
3.
Press the up/down arrow buttons to scroll through
you want is displayed in the text box.
4.
Press OK. The selected repeat option will loop continually until you turn Repeat off. Repeat is
turned off by completing steps 1 through 3 above, and selecting the Off option.
Using IntroScan
or the front of the player to bring up the
the Repeat options until the Repeat option
TM
The IntroScan system plays the first ten seconds of each title (song) on the disc (similar to the scan
feature that's on many car radios). To use the IntroScan system:
1.
Press INFO on the remote or the front of the player (the Info Display appears).
2.
Highlight the IntroScan
icon. Press OK. The first ten seconds of each title will play.
• After the IntroScan system goes through
all of the titles, it stops.
• If you want to stop the IntroScan system while it's in progress,
The current title starts playing in its entirety.
• You can also access the IntroScan system from the PlayMode
main menu.
press PLAY on the remote.
menu in the DVD Player's
The MP3 Screen Saver
The MP3 screen saver appears when an MP3 disc is in the player. Once you begin playback, the
screen saver disappears and the MP3 Info Display and screen appear. After one minute of no user
input, the Info Display and screen will disappear. Press any key to bring up the display again.
Press CLEAR or INFO to remove
Chapter
4
the Info Display and bring up the _IP3 screen saver.
57
This page intentionally
left blank.
Chapter
Playing
Chapter
Video
5
CDs
Overview:
•
What is Video CD?
•
The Video CD Disc menu
•
The Video CD Info Display
•
Selecting a Specific Track
•
Selecting a Specific Index
•
The Repeat Feature
•
Skipping Tracks
VIDEOCD
Changing
Entertainment.
59
Playing
Video
CDs
What is a Video CD?
Like DVD video discs, Video CDs contain picture and sound content. Video CDs (VCDs) are
encoded in a different format. VCDs don't hold as much information as DVD discs and the
picture quali W is not as high.
VCDs are divided
into tracks, and each track is divided
into indexes. A track is similar to a title
and an index is similar to a chapter.
The Video CD Disc Menu
A Video CD disc" is capable of having an on-screen menu that is separate from the DVD player's
menu system and on-screen Info Display. If the disc has a menu, the menu will appear after the
disc is loaded into the player.
The content and operation of disc menus varies from disc to disc. Check the instructions that
accompany the Video CD for more information on how to use the playback control function for
that specific disc.
If a disc menu appears:
1.
Use the number
buttons
on the remote to select a track (similar to a title).
2.
Press OK or PLAY on the remote to begin playback of the selected track.
3.
Press CH + ,,N or CH - _
through the tracks.
4.
Press MENU to stop playback and return to the disc menu or press STOP to stop playback
and return to the DVD player menu.
on the remote (SKIP FWD or SKIP BACK on the playe19 to scroll
To bring up the disc menu during disc play, press the MENU button on the remote.
60
Chapter 5
Playing
Video CD Information
lnfo 1)isplay
top of the screen when
a disc is playing)L Each
the diftOrent
icons
contains
tnany
playl'_ack
yotl press tile INF()
!_atLue is represcllted
features
CDs, including skipping
Th,., lnlo
l
appears
across
tile
button on thu remote or file front of the player
(while
by an iCon. |'se lhe ano\v buttons to move through
Index
Track
When an icon is highlighted,
in the text box.
l
Repeat
Audio
use the up down
arrow buuons to scroll through
choices
displayed
you can only access the Info Display when you're playing a disc.
The invalid syl"nbol _
appears
on the screen v,'l'_en you press a button that doesn't have any
function. If one of the icons is "grayed out." that feature isn't available
To bring up the Info Display:
1.
Press INFO on the remote. The Video CD lnfo Display appears
2.
Press INFO a second
Chapter
Display
tracks
in the Info l)isp[ay.
Time Display
Remember,
CDs
Display
Your DVD player gives you several options \_hen playing \kleo
The on-screecL
Video
5
for the disc yon're playing
across the top of the scr.een.
time to turn the Info Display off.
61
Playing
Video
CDs
Selecting a Specific Track
1.
Press
INFO on the remote
2.
t'st.' the arrow
3
t s,.., the nunabcr button(s)
on the remote to c'nter the tlack nttllll_er y(_u want t(, play. (+r tt_,t++
the t.lpidown
ano\\' bt.]ttc)ns t¢) sen)l] tlu'ougl+_ the track mLmb,+'rs. When a t++L*\\"
track nunlbLr is
entered,
that track ,.,,'ill hcgin pktying.
I)uttons
to brirlg
up the lnfo
on the tcmotc
Disp[a,,.
to highlight
the
7)'ack icon from the Inl(i I)isplay
Selecting a Specific Index
I.
F'rcss INFO on the remote to hring up the h'tfo I)ispla_,
2
Highlight the Dtd+.,.vicota from the Info I)isphty
3+
Use the ntlnql3cr
])utton(s)
on the remote to enter t11¢_
+ indt_'x
nt.lnll3_q
you \\anl to pla\
(>1
+LISt_
+
the up/d,)v,,n arrow buttons to scroll through tilt' index numbers. XXhc'n ant+\,+ index i+mmbt_,r
is entered, that index will begin playing
The Repeat Feature
You can tell the player to repeat the entire disc, a track, or an index. The default mode for the
Repeat feature is Off. There are three Repeat options:
Disc - repeats the disc that is playing
Track
•
repeats the track that is playing
Index - repeats the index that is playing
1"o Use Repeat:
1.
While a disc is playing, press 1NFO on the remote to bring up the ]nfo Display,
2.
Highlight the Repeat icon. The text in the text box below the icons will read Repeat Mode. Q/S
3.
Press the up/down arrow buttons to scroll through
you want is displayed in the text box.
4.
The selected repeat option will begin immediately and loop continually until you turn Repeat
off. Repeat is turned off by completing steps 1 through 3 ahove, and selecting the Off option.
the Repeat options
until the Repeat option
How to Cancel Repeat
There are three ways to cancel Repeat:
•
Press STOP twice.
•
Go to the Repeat icon in the Info Display and select Off
•
Eject the disc.
Note:
Your repeat settings are erased each time you remove a Video _7) /i+om the plarer
62
Chapter
5
Playing
Video
CDs
Changing the Audio Channel Output
If you are playing a stereo Video CD, you can change the channel
output from the player.
1.
Press AUDIO (or INFO) on the remote to bring up the Info Display.
2.
Highlight the Audio Channel
3.
The audio channel choices appear in the text box. Use the up/down arrow keys to scroll
through the choices: Stereo, Left, Rightor Mono. Whatever choice is displayed becomes the
active choice.
icon on the Info Display.
Skipping Tracks
To skip forward to the beginning of the next track on a VCD, press CH + ,.M on the remote
(SKIP FWD on the front of the player). Press the button again to go to the beginning of the
next track.
To skip backward to the beginning of the track that is playing on a Video CD, press
CH + _ on the remote (SKIP BACK on the front of the player). Press the button again to
go to the beginning of the preceding track.
Note: If the VCD disc was authored
with Playback
on the front panel of the D VD player) navigating
Control (indicated
by the PBC light
with CH + "+ or CH- w buttons may
not work.
Zoom
When playing Video CDs, you can magnify the screen during normal playback. Zoom has 2 levels
(lx, 2x). Zoom magnifies from the center of the screen. Once in Zoom mode, you can pan right,
left, up or down by using the arrow buttons.
1.
Press ZOOM on the remote control to magnify. (The zoom level will be displayed in the
corner of the screen. Press CLEAR to clear the zoom Info Display from the screen.)
2.
Press the ZOOM button again to go to the next level of magnification.
3.
To turn Zoom off, press the ZOOM button until you cycle through
normal playback.
Note:
all the levels and return to
You can use the 1.5x zoom mode to alter a 16x9 letterbox movie (black bars top and
bottom) to a 4x3 format. This will eliminate the black bars at the top and bottom and allow
you to use left/right arrow keys to pan and scan.
Chapter
5
63
This page intentionally
left blank.
Chapter
Using
Menu
Chapter
the DVD
System
6
Player's
Overview:
•
The DVD Player Menu System
•
The Play Mode Menu
•
The Lock Menu
•
The Display Menu
•
The Sound Menu
•
The Languages Menu
•
The Glossary
Changing
65
Using
the
DVD
Player's
Menu
System
The DVD Player Menu System
The DVD player menu system is not the same as the disc menu or the lnfo Display• The DVD
player menu comes up when there is no disc playing. If you are playing a disc, press STOP on the
remote control to stop playhaek and bring up the DVD player menu.
Two Types of Menu Items: Path and Action
Path Items
A path menu item has an arrow on the right side to let you know this
item is a path to MORE options. To see the path menu options, highlight
the path menu item and press OK, The next set of menu choices appears
to the right of the menu item.
The Solmdmenu
is an example of a path menu item-- when the Sound
menu is highlighted, press OK. The Sound options appear on the screen.
The Sound menu is an example of a
path menu item.
Action Items
Action menu items are used in two ways:
With an action menu item, what you see is what you get. When an action
menu item is highlighted, press OK and that action is taken. Resume PlcO,
on your player's menu system is an example of an action menu item.
Press OK when Resume Pla_, is highlighted; the menu disappears and
playback is resumed.
The Play option is an example of an
action menu item.
Sometimes an action menu item is used as a "toggle." You highlight the
action menu item, press OK, and the selection (shown to the right of the
menu item) changes from one choice to another. SRS/TruSurround
in the
Soundmenu
is an example of an action menu item that is a toggle. If you
highlight SRS/TruSurround
and press OK. the selection changes from On
to Off and vice versa, each time you press OK. To return to the previous
screen, press the left arrow button.
The Play/Resume Play Option
To get to the DVD Player menu, press STOP on the remote control. The
DVD Player menu will appear whenever a disc stops playing. The first
item in the main menu is the Play/Resume Play option. If there isn't a
disc in the player, the option reads Play with the prompt Insert Disc to
the right. If there is a disc in the player and it was previously playing, the
option reads Resume Play and the name of the disc is displayed on the
right.
Press OK to clear the screen and
resume play.
66
Any time you stop playback, you will be returned to the DVD player
menu, and the Play option will read Resume Play. To resume play,
highlight the option and press OK, or press the PLAY button on the
remote.
Chapter
6
Using
the
DVD
Player's
Menu
System
The Play Mode Menu
The DVI) Players
Pit O' Mode menu lets you choose difl_'rent
.ll()+le tnenu options,
a dis,: must I',c in the l)Vl) player
ways
to play thu disc, To
see
1)l_(I
'
Selecting a Play Mode
The first three options
on a disc
it1 tilt.' l'k O' Mode tll+._+l]t.i
detemline
in what ofdef the" titles
or
tfacks \\ i[l pla_+
Standard
Play: pla_.'s the discs titles, chapters, indexes, of tracks (depet+tdirtg on the type of
disc itl the player) in their default order (i.e.. chapter 1 of Title 1 plays first, then cl'*aptcr 2 ol
Title 1. etc.)
Random
Play: plays the chapters
(11each title in random order.
Program Play: Plays the chapters on the disc in the order you have programnaed (you must
select k'dit Program and set up the order in which you \-,,ant the tracks on the disc to play).
This _s where I he two
w.I t_ 10tilled,
fl+_*.sot cD,11e_t
1.
[f the disc is playing, press STOP (the DVI) Player's main menu
appears).
2.
Highlight the Plai, Mode menu option
3.
Press OK. The PlayMode
_.
I-{ighlight the desired option and press OK. Pr(gram
"+workunless you have created a program fist
menu items appear
Pk O, will not
_enl, tllve hell+
Selecting Random Play plays the
disc's tracks in random order.
Chapter6
67
Using
the
How to Create
DVD
Player's
Menu
System
a Program
To use tile l"roj4ran_ IqcO' opcion, you must create a pn)gram list to set the order in which you want the tracks (or titles and
chapters
on a I)VI) vMeo disc and titles on ;u'J MP3 disc) on the disc to play. The Program
Play screen varies depending
on
the type of disc (I)VI), (71), or MP3) you are playing
Creating
lille
Chapter
124)
(1221
Program
tisl
1
ml
When the Title box is highlighted, enter
the title number you want to place in
the list.
68
I1](_nl_l
a DVD
Video
Disc
appears).
2.
l li_hlight
/q_(l'Mode
3.
Ilighlight
appears).
l'dit P'qqran
4
List for
If the disc is playing, press STOP to stop playback (the I)VI) player
main
m
a Program
and press
OK (the l:'lcO,Mode menu
_ lcl press
appears).
OK {the k'dil Pr(hq_zcm screen
The 77111'hox is higltlighted. {ise the up,down arrows or the
number buttons on the remote to enter the title you want to play
first. The title number you entered appears in the Title box. The
number of chapters available appears under the Chapter box.
5.
I-fighlight the Chapter box and use the up/down arrows or the
number buttons on the remote to enter the chapter yon want to
play first and press OK. The highlight jumps to the Add button.
6.
Press OK to add that chapter to the Program List. The highlight
jumps back to the Title box so you can add more titles and/or
chapters. Make sure the Title box is highlighted and enter your next
title and/or chapter.
7,
Continue adding titles/chapters
as explained in steps 4-6 until your
program is complete. You can play your program by highlighting
PI_O' and pressing OK, or you can save the program by highlighting
Done and pressing OK. If you save the program, you can select it
from the Inlk) Display while the disc is playing. The program will be
erased when you remove the disc fl'om the player.
Chapter
6
Using
Creating
a Program
the
DVD
Player's
Menu
System
List for an Audio CD
1.
If the disc is playing, press STOP to stop playback (the DV1) player main menu a])pears).
2.
Highlight PigO' Mode and press OK (tile PIc(t' Mode menu appears).
3.
Highlight Edit t:'rogratn and press OK (the EditPro, qra*_ screen
4.
The Track box is highlighted, tse the up/dov,'n arrows or tile number
to eilter the track you want to play first. Press OK.
5.
Tile highlight will move to the Add box. Press OK to add that
List (the track number and time _,ill appear in the Program List).
6.
The highlight will move back to the Track box so you can enter tile next track into the
Program List. Make sure the 7)'ack box is highlighted and enter your next track.
7.
Continue adding titles as explained in steps 4 5 until your program is complete. "_k_ucan pla_,
your program by highlighting Ph O' and pressing OK. or you can save the program by
highlighting Done and pressing OK. If you save the prngram, you can select it from the Info
Display while the disc is playing. The program will be erased when you remove the disc fiom
the player.
Creating
When the Track box is highlighted,
enter the track number you want to
place in the list.
H)pe: s).
buttons on Iht: run/otu
track
a Program
to tile l_ro/_rr it
List for an MP3 Disc
1.
If the disc is playing, press STOP to stop playback
main menu appears).
(the DVD player
2.
Highlight PR4vMode and press OI'.:.(tile Plc(l'.lfocle menu appears}
3.
Highlight Edit Program and press ON tthe Edit Pr(4gram
appears).
4.
On the left side of the screen the standard playlist is displayed. This
is a scrollable list of all the directories and filenanles. To open a
directolT, highlight it and Press OK
5.
Highlight the title (song) you ",_,ant to play first. When you highlight a
title the title information is displayed at tile bottom of the screen
6.
Use the left/right arrow buttons to highlight the Add box. Press OK
to add that title to the Program List (the title number and time will
appear in the Program List).
screen
Note: If the highlight is on a directory when you use the Add option, the
entire contents of the directo W will be added to the playlist.
Chapter
6
7.
The highlight will move back to the Standard Pla),list so you can
enter the next title into the Program List. Highlight and enter your
next title.
g,
Continue adding titles as explained in steps 4-7 until your program is
complete. You can play your program lay highlighting Play and
pressing OK, or you can save the program by highlighting Done and
pressing OK. If you save the program, you can select it from the Infl>
Display while the disc is playing. The program will be erased when
you remove the disc from the player.
69
Using
the
DVD
Player's
Menu
Editing
a Program
Deleting
Items
from
To deh-'t,-' items lrotn tht.
If tilt.' disc
Main
i
i
I
is pktying,
metal
System
the
playlisl:
press
lJho ' Mode.' and
3.
1lighlight
Edit
2.
4.
appears}.
5.
Highlight Dek,W. al'ld
6.
X,Vhen yotl
To delete an entry from the Program
List, highlight it, then highlight Delete
and press OK.
and
press
Inserting
SIOP
to +hip
p!:tylxtck
(lilt'
pit.,_,_, ()N
(the
/Y<O' Mode
I)VI)
play_'r
appeclrs).
Higidight
Ilighlight
Playlist
the
are
]JlTJ_J'atll
ilc'lll
in the
:Ill'.] piC'SS t)lq
i}ltl_r:lll/
press
finished
(t hc
List }(}tl
I/]entl
I:)/it/Jrqtemnz
\\ant
appt:al-+)
st-rl2ell
t{} dc'lete
Oh2.
iearranghlg
the
Pr(lgram
List,
highlight
1)o#w
OK.
Items in the Program
To insert items into the Program
List
List:
1.
If the disc is playing, press STOP to stop playback
main menu appears).
2.
Highlight Pie(t/Mode and press OK (the Plr_l, Mode menu appears).
.
(the DVD player
Highlight Edit Program and press OK (the Edit Program screen
appears).
4.
Use the left/right arrow keys
list. Use the up/down arrow
List where you want to insert
placed bqlbre the highlighted
5.
Highlight the Chapter/Track/Standard
down arrows or tim nuinber buttons
to move the highlight to the program
keys to mark the spot in the Program
an item (the inserted item will be
item).
Playlist box and use the up/
on the remote to enter the item
you want to play first.
70
6.
Highlight
Insert and press OK.
7.
When you are finished
and press OK.
rearranging
the Prograln List, highlight Done
Chapter 6
Using
the
DVD
Player's
Menu
System
Autoplay
You can set the Autoplay option to play your disc automatically
1.
From the DVD player's
option and press OK.
2.
The Play Mode selections
option on/off.
3.
Press the left arrow button to return to the previous
return to tile main menu.
after you close the disc tray.
main menu (player ON, no disc playing) highlight the Pl(41'Mode
appear.
Highlight the Autoplay option and press OK to toggle the
menu or press GO BACK,.AGAIN to
Dub Assist
Dub Assist helps you record an Audio CD onto an audio cassette tape by determining the number
of tracks that will fit on one side of the tape so you have time to turn the tape over to record on
the other side.
To use Dub Assist when you're recording
an Audio CD onto an audio cassette:
Press STOP if a CD is playing (the DVD Player's main menu
appears).
1.
2.
Highlight PlayMode
3.
Highlight Dub Assist and press OK (the Dub Assist screen appears)•
4.
The highlight should be in the Play Order window.
Standard, Optimized, or Program.
and press OK (the Plc{},Mode options
appear).
Choose
Standard: This is the default mode. The tracks are recorded
in
the order on the CD (track 1 is recorded first, track 2 second, etc.)
The
Dub Assist
Screen.
Optimized:
the number
The tracks are recorded in the order that optimizes
of tracks that can fit on one side of the audio
cassette so you have the least amount
of the tape.
of dead space at the end
Program: The tracks are recorded in the order you program.
You must create your program in the Edit Program menu that's
in the DVD Player's Play menu.
.
Use the arrow keys to highlight the Segment Length box. When the
Segment Length box is highlighted, use the up/down arrow buttons
to enter the length of one side of the audio cassette.
.
The order the tracks will be recorded in appears in the Segment list.
Use the arrow keys to highlight the Start box and press OK.
7.
Chapter
6
Follow the instructions
on the screen to begin recording.
71
Using
the
DVD
Player's
Menu
System
The Lock Menu
Tile padlock
unlocked.
icon on the fi'ont of your
DVD player
shows
whether
your
player
is locked
or
_
A password
Locked:
is needed
in order to play discs that aren't included
in the raling
limits you have set. When the player is locked, no one can access the Lock Menu items
without entering the password.
I_
Unlocked:
A password
isnt
required
to play discs.
Locking
Use the numbers on the remote to
enter a password.
Your DVD Player
1.
If the disc is playing, press STOP (the DVD Player's main menu
appears).
2.
Highlight Lock and press OK (the Lock menu items appear).
3.
Highlight Lock Plc(ver and press OK. The Enter New Password screen
appears.
4.
Press the number keys on the remote to enter the password you
want to use (similar to entering your PIN when you use a bank
machine).
5.
After you've entered the last number
Co*{firm Password appears.
6.
Enter the numbers you entered the first time and press OK when
you're finished. You are returned to the main menu.
in the password,
press OK.
Unlocking Your DVD Player
1.
If the disc is playing, press STOP (the DVD Player's main menu appears).
2.
Highlight
3.
The Enter Password box appears.
appear).
4.
Highlight
Changing
Lock and press OK.
Enter your password
and press OK (the Lock menu options
Unlock Player and press OK. The locked icon changes
to unlocked.
Your Password
The player must be locked to change the password.
1.
If the disc is playing, press STOP (the DVD Player's main menu appears).
2.
Highlight Lock and press OK. Enter Password appears
3.
Highlight
4.
Press the number huttons on the remote to enter the new password
press OK. Confirm Password appears.
5.
Press the number
72
on the screen. Enter your password•
Change Password and press OK. Enter New Password appears.
keys to enter the password
you want to use and
again and press OK when you're finished.
Chapter
6
Using
the
DVD
Player's
Menu
System
Editing Your Scene Snip Disc Library
The Disc Library consists of a munbered list of titles that have been edited. If no disc title is
available, tire title will he DVD. If you play a disc flom tile disc library he player must he locked in
order for the edits to take aflk_,ct.
How to Edit the Disc Library
to lake effect
_Remove
& Reetore
]
'YOU here 5 discs
avnitable
fotsce_e
snip
1.
If the disc is playing, press STOP (the I)\q) Player's main menu
appears).
2
Itighl g _ Lock and press OK (the Lock ]neml appears)
3
Highlig at Scelze ,S'*zg_Edit and press OK _.the Scene Snip Disc Library
I
screen
edit.
Note:
lbtt mttst edll a i_lollie hc./bre it appeatx ilt the Disc
Library.
Movies you have izot edited will not cq_pear ip_the
Library (see chapter 2).
Th_ IS Where the tWO lines of Context senstthte help
W!II be Iocaled.
Select a title and highlight Remove &
Restore to remove all edits and restore
appears).
Highlight the title of the movie you want to remove
Highlight Remove & Restore and press OK.
4.
the disc to its original version.
from the list.
• A message appears asking if you are sure you want to remove all
the edits and restore the disc to the original version.
.
6.
Setting
the Ratings
Highlight Yesand press OK. The disc will be restored
version and removed from the Disc Library.
to its original
Press the left arrov,, key to return to the main menu,
Limits
The Ratings Limits feature is a rating limit system, sort of like movie ratings. It works with
DVD discs that have been assigned a rating. This helps you control the types of DVDs that
your family watches.
"Note: The pla_er alerts you when you try to play a movie with a rating that exceeds the
limit you've set, Some discs include a rating override feature. When you play a disc with
this feature, the messageOverrtde
Limit or Cancel Selection appears o12the screen..1[
you choose to override the rating limit, you will need to enter your password to begin
playback.
Changing
to a Different
Country's
Rating System
Some countries use different rating systems. The default for this DVD player is the United
States. You can change to a different country's rating system through the Lock menu.
1.
If the disc is playing, press STOP (the DVD Player's main menu is displayed).
2.
From the main menu, highlight the Lock option and press OK (the Lock menu appears).
3.
Highlight Ratings Limits and press OK (the Ratings Limits menu appears).
4.
Highlight
5.
Highlight the country you want to change to and press OK (the country you selected
next to the Country path menu).
6.
Press the left arrow key to return to the main menu.
Chapter
6
Countryand
press OK (a list of countries
appears).
appears
73
Using
the
DVD
Player's
Menu
System
Rated Titles
The Rated Titles option lets you determine how your player ,,viii react to discs tbat contain movies
that are rated (in the U.S.A., the Motion Pictures Association of America (MMPA) rates movies as G,
PG, PG-13, etc.).
You decide which ratings require a password and which ones do a t. Th's system ranks the ratings 1
through 8 in order to accommodate
different countries' ratings systems (1 is considered a movie title
with tbe least offensive material).
In order for the Rating l.evel feature to work, tire disc must be encoded with rating information. If
the author of the disc did not encode rating information, then this feature ,,viii not work for that disc.
The DVD Player must be locked
the Lock menu.
in order for it to enl_rce the settings in the Ratings Limits part of
1.
From the Lock menu, bighlight Ratings Limits and press OK (the
Ratings Limits menu is displayed).
2.
Highlight Rated Titles and press OK (the &level rating limits list
appears).
3.
To change the rating limit, press the up or down arrow button.
• The ratings that don't require a password (free access) appear
under the bar, in the green part of the block.
• The ratings that require a password
the red part of the block.
above the bar, in
4.
When you have moved the bar to the desired setting, press OK. You
are returned to the .Rated Titles screen and the setting appears to the
right of the Rated Titles option. For example, if you set 3 as the
highest rating for Free Access (green), then the Rated Titles selection
appears as 3 (that's the player's number for PG in the 8-level system)
for the movie studio's rating. This means when the player is locked,
it will require you to enter the password to play any discs that are
rated higher than 3 (i.e., PG-13 or NC-17).
5.
Press the left arrow button to return to the main screen.
The Rated Titles screen lets you set
the Rating Limit
74
appear
Chapter
6
Using
Unrated
the
DVD
Player's
Menu
System
Titles
Some titles (movies) aren't rated, but may contain material that is unsuitable for children. You decide
how you want the Ratings Limits feature of your player to handle these discs: free access or
password required. To set the Unrated Titles option:
1.
From the Lock Menu, highlight Ratings Limits and press OK.
2.
Highlight
appear.
3.
Use the up/down arrow buttons to highlight your choice: Free Access
or Password Required. Press OK. You are returned to the previous
screen, and the option you chose is displayed next to the Unrated
Titles option.
4.
Press the left arrow key to return to the main menu.
Unrated Titles and press OK. The Unrated Titles options
Edit
tt_
Imlt_
Choose Unrated Titles to set free access
or require a password for unrated titles.
Front Tray Lock
You can lock the front tray of the DVD player so it can't be opened.
1.
From the Lock menu, highlight Front Tray Lock. Press OK to toggle the Front Tray Lock
setting On or Off
• "Tray is locked" appears when the player is locked (the Front Tray Lock feature is turned
on) and you try to open the front tray of the DVD player.
2.
Press the left arrow key to return to the main menu.
Note: If the player is locked, you will be prompted for the paasword
the Tray Lock option from the Lock menu.
before you can access
System Test
1.
Highlight System Test within the Lock menu.
2.
Press OK to display the System Test Results screen.
3.
Press the left arrow key to return to the main menu.
Chapter
6
75
Using
the
DVD
Player's
Menu
System
The Display Menu
The Display tnunu contait-_s the settings that affL'ct how
the ft(mt display panel
of the DVD player looks
dis+. content
looks
on your
TV and how
TV Image
Tl+u.` ]+V Image
Dep,.nding
on
mc]++u adjusts
the
th+++ way
t_. p__+ of tel€+\ ision
a movit_ + appears
you
have.
on
yot.i
may
yot.ir
want
+I__, Standard
to adjt.lst
the
TVs
screen
aru
½ × 3 for]flat.
settit+_g (also
caltcd thu aspect t'alio).
l,
From the DVI) F'layt.'r's nlain menu (p +,+'e ON, a c isc playing)
highlight
Displg(l' and press OK (the l)isp]c(l' options appear).
2.
lIighlight
71"hna2e
Press OK. The 71 +Image options appear.
4 x 3 Letterbox
- Choose this setting if you want to see movies in
their original aspect ratio (height to-width ratio). You'll see the entire
frame of the movie, but it will take up a smaller portion of the screen
vertically. The movie might appear with black bars at the top and
bottom of the screen.
4x3 Letterbox
4 x 3 StandardChoose this setting if you want the movie to fill
the entire screen of }'our TV. This might n+tean that parts of the
picture (the left and right edges) won't be seen.
Most discs produced in a widescreen format can't be cropped in this
fashion. This means the black bars will appear at the top and the
bottom of the screen.
4x3 Standard
I6 ac 9 Widescreen
- Choose this setting if your DVD Player is
connected
to a widescreen
TV, If you choose this setting and you
don't have a widescreen
TV, the images on the screen may appear
distorted
due to vertical compression.
If you play a disc recorded in 4 x 3 format on a widescreen
left and right side of the screen will appear black.
16x9Widescreen
TV, the
Some movies are actually slightly wider than 16 x 9. In this case,
black bars will appear at the top and bottom of the screen even in
Widescreen mode.
Note: Some discs are already fi)rmatted with black bars so the
entire image can be seem on a standard TV screen. If you have a
widescreen TV and you are pldying this type of disc, you will need
to set your TV to expand the image. See your TV User.+Manual.
76
Chapter
6
Using
the
DVD
Player's
Menu
System
Front Display
This i_atnre
lets you choose
1.
Fronl the I)VI) Playc(s
OK (the l)is/)l_(l, menu
2.
Highlight l')'ottt
l)i,q)lt(l'
how
the
n'tain menu
appears).
front display
(player
(m your
I)VI) Playe_r appears.
ON, no disc playing),
and press OK. You can choose
I)im for Moxies {dims when disc
Off |or Movies (no display when
Ahvays Bright
Always l)im
The default
pand
highlight
l)is[)l((l'and
prt.,ss
fn)m "_settings:
is playirLg)
disc is playing)
is I)itu for Moxies.
3.
Highlight tile setting you xvant t¢) use and press OK. Press the left arrow button to relurn to
the previous menu. "_2_urselection is displaye_l next to the Front Di_?lcO, path mentt.
4.
Press the left arrow button to go back to the main menu.
On-Screen
Displays
This feature lets you select whether you want certain on-screen
It contains three choices with check boxes next to them:
displays to appear
information
on the screen.
•
Infornration Display - When turned on, displays time transport
fotwarding or reversing playback.
when you are fast
•
Angle Indicator - When turned on, displays camera angle icon if more than one camera angle
is available.
•
Scene Again Text - When turned
on, displays subtitles when you use the Scene Again feature.
The default is to show all on screen displays. To turn one of the options on or off:
1.
iii _ii
From the main menu, highlight the Disl_lco_option and press OK (the
Display menu appears).
2.
Highlight the On-Screen Displays option and press OK (the three on
screen display options appear on the right).
3,
Highlight an option and press OK. This toggles the option on or off.
4.
Press the left arrow key to return to the main menu.
The On-Screen Displays option lets you
choose which on-screen display items
appear on your TV screen.
Chapter
6
77
Using
the
DVD
Player's
Menu
System
The Sound Menu
The Sound menu [ets you select different
connected to your I)VD l)]ayer.
sound
settings to match the eqtlipn]ent
you ha\c'
Digital Output
Digital OIAtpLI[lets you choose
you'\,..'
usc'd
an optical
cabk!
which type of digital audio is output frona your D\q)
to connect
IllLISlselect a digital OUtl_Ut\\ilh this
I)olby l)igit:tl: Choose
•
a I)olbv
setting
Prc_ Logic.
There are
this setting if you connected
DTS: Choose' tl/is setting i[ you connected
two
I)olby
Digital
(:,r dec,:_der to ','our D\D
< i D,g)la KILdTlaUl
Pktyer.
both types of audio
The
1.
From the main menu. highlight and select the Sound option and
press OK (the Sound menu is displayed)
2
Highlight the Digital Output option and press OK.
M,a_e
Disg*+a't
II
you
a l)o[by Digital rccci',er
:1 DTS recei\er
Re+urn*, pl_ v
t_!*
player.
t,..c_:i',_..r,
optioi-Js:
You can check both options if your receiver is Cal',,able of decompressing
default is Dolby Digital. To change the digital output:
_y
()] DTS
) Dolby _Ollll
Highlight the desired output and press OK.
G o
a_¢
Tn)s is wh_=r_ the two
will be 10c,=ted
............
Enhtmcemenls
li.,_ s of o)ntext
Select the Digital Output
from the Sound menu.
78
Nann
se_t_ttbve _lp
option
4.
Press the left arl'ok_:key to I'ettlrll 10 the 0._ain Illelltl.
Notes:
If you set Digital Ozttput to D75'. l'ou must have yotu" DI 7) PIro'er
connected to a receive*" or decoder with the DTN fealure and the
disc you plal_ must support the DTS audioJormal,
lf 3'ou choose
DTS a**d.l'ottr receiv#r or d_,coder doesJz 't stff)porl DTS. .l'ott won 'l
hear a_zl' audio.
Chapter
6
Using
the
DVD
Player's
Menu
System
TruSurround ®
The TmSurround _ option can be used to simulate a six-speaker listening experience
on or off. The default is off. To turn the TruSurround + option on:
1.
From the Sound menu, highlight the 7)7tSum'ound option and press OK.
2.
Highlight
3.
Press the left arrow key to return to the previous
through
two speakers.
It can be turned
On and press OK.
menu.
Notes:
7be TruSurrottnd _ option should not be turned on (/'t'ott are using a Dolb_, Digital or DTS receive_: Your receiver
provides optimum sottnd q_talit3,.
The TS Surrotnzd btttton on the Front Panel of the DI'D Pla},er ca** be also be used to cha*tge the Tnt&nround
setting. Each press r?[the button toggles the setting between on and off
_
Speaker Setup
1.
From the Sound menu, highlight the Speaker Setup option and press
OK (the Speaker Setup menu is displayed).
Highlight the Speakers option and press OK. (The Speaker Size
screen will be displayed. Representations
of different types of
speakers will be displayed on the right side of the screen.)
2.
Highlight Front, Cente_ Subwooferor Surround. The highlighted
choice will also be highlighted in the graphic _o the right of the list.
,
Use the right arrow button to move to the Speaker Size list
(,underneath the graphic on the right). Select the size of your
speakers (or None if you don't have that type of speaker hooked up)
and press OK.
4,
Use this Speakers menu to select
and set up your attached speakers.
.
Use the left arrow button to return to the speaker list and select the
next type of speaker, repeating the process above.
TruSurmund and the (0) symbol are trademarks of SRSLabs, Inc. in the United States and selected foreign
countries. TruSurround technology is incorporated under license from SRSLabs, Inc.
Chapter
6
79
Using
the
DVD
Player's
Set the Distance of the Attached
Menu
System
Speakers
Use tile l)i._tance option to set the distam:e of the attached speakers. By setting the distance, you are
letting the speakers know how far the sound has to travel to reach your set listening point. This
allows the SOLind frol/1 L'ach speaker to reach the listener at the same time.
1.
2.
5peake_
Level
Use the
3.
up/down
arrow
keys
to se_ the
listening
dislance
Adjust the Distance and Level of the
From the Sound metro, highlight the _S})eakerSr,tnp option and press
OK (the Speaker &,t*tp menu is clisplayed).
Highlight the Distance option and press OK. (Tbe Dista*_ce screen
,.,,'illbe displayed. I._epresentatious of ,.lifl'erent types of speakers ",_.il!
be displayed on the right side {_fthe screen.)
ltighlight I"l'olzl, C¢,lllel; Sllhll'o(_/_,r or Snrr(mlld
The highligV_ted
choice will also be highlighted in the graphic to the right of the list.
The + symbol in the middle of tbe graphic represents the distance
fl'om the speaker to the listening point.
Note: Representatio*ts c?fdif[Z,rent O,pes c_/'speake*_ are displayed
ill a graphic on the t_ght side of the screen. Speakers that you
havenot hooked up will appear grayed out.)
speakers.
4.
Use the right arrow button to move to the Feet box displayed
underneath the graphic. Use the up/down arrow keys to adjust the
distance for the highlighted speakers. Press OK.
Use the left arrow button to return to the speaker list and select the
next type of speaker, repeating the process above.
Note: If you dcm't waTtt to make any changes, press CLEAR to
return to the main menu or GO BACK to return to the Speaker
Setup menu.
Set the Level of the Attached Speakers
Use the Leveloption to set the volume of the attached
each speaker individually.
speakers.
You can set the volume level of
1.
From the Sound menu, highlight the Speaker Setup option and press OK (the Speaker Setup
menu is displayed).
2.
Highlight
the Level option and press OK (The Level screen will appear).
Note: Representations of different {t,pes of speakers are displayed in a graphic on the right
side (>[the screen. Speakers that you havenot hooked up will appear grayed out.)
3.
The highlight will be on the left front speaker, and the text beneath the graphic will display
"left front speaker" with the setting for that speaker displayed under the text.
A test tone is emitted, heginning with the highlighted graphic. The tone rotates around the
speakers, playing through each speaker for approximately 2.5 seconds. If you highlight a
speaker or change the setting on a speaker the test tone moves to that speaker.
4.
Use the down arrow button to move to the Settings box. The setting is measured in decibels.
Use the up/down arrows to change the level setting for the highlighted speaker. Press OK to
return the speaker graphic.
5.
Use the left/right arrow buttons t,:) navigate to the next speaker. As each speaker is
highlighted, the text changes to indicate which speaker it is. Repeat steps 3 and 4 to set the
level for each speaker you have hooked Ul).
Note' {[you don't want to make a*zF changes, press
GO BACK to return to the Speaker Setup menu.
80
CZEAR to return
to the main
menu
or
Chapter
6
Using
the
DVD
Player's
Menu
System
Enhancements
The Enhancements
feature compresses the dynamic range (quietest sound to loudest sound) of a
disc's soundtrack. For example, action scenes t'night be ve D" loud, while whispered dialog is
quiet. The Enhancements
feature evens out the range of tile volume by making loud sountls
quieter and soft sounds louder. The Enhancenlents
feature has three options.
•
None - No change to tire range. Sottnd is played as it was recorded
•
Compressed
•
Voice+ TM - Increases
- The range between
on the disc.
loud and soft is smaller.
tire volunle of voices.
To change the Enhancement:
Select the Sound Logic option from the
Sound menu and press OK to toggle
Sound Logic on or off.
Chapter 6
1.
From the DVD Player's main menu, highlight S(nHId and press OK
(tile Sou_td menu appeal:s).
2
Highlight tile E*zhanceme+tts option and press OK (the
Enhancements options will appear).
3,
Press the up/down
4.
Press the left arrow button to return to the Sound menu.
arrow buttons
to select the desired
option.
Note: The perJbrmance of the Enhance*nents fi, ature varies
depertdiJTg on the type of equipme*+t you have connected to your
D179 Plai'er atta the audio forntat of the disc you're playiHg.
81
Using
the
DVD
Player's
Menu
System
The Languages Menu
The Languages menu enables you to choose different language options for audio, subtitles, Disc
Menu items and DVD player menu items. The default for all language menu items is English.
Changing
the Player
Menus
Language
Preferences
You can choose one of three languages for the text that appears within the on-screen menu
system. The default is English. If you change the Player Menu language, the entire player menu
system will be displayed in the selected language.
1.
From the main menu, highlight and select the Languages
displayed).
option (the Languages
menu is
2.
Highlight Player Menus and press OK (the language
displayed).
3.
Highlight the language you want to use for the menu items and press OK. The menu appears
with your selection shown next to Player Menus.
4.
Press the left arrow button or press GO BACK.AGAIN to return to the previous menu.
choices for the DVD Player's menu are
Changing the Disc Menus Language Preference
The Disc Menus option enables
menus.
you to choose
which language yon want to use to display the disc
1.
From the main menu, highlight
displayed).
and select the Languages
2.
Highlight Disc Menus and press OK (the Disc Menus language
3.
Highlight the language you want to use for the disc menus and press OK. Press the left arrow
to return to the previous screen. The menu appears with your selection shown next to Disc
Menus.
4.
Press the left arrow button or press GO BACK°AGAIN to return to the previous
How to Set Other as an Disc Menus
If the language
your choice.
Language
option (the Languages
options are displayed).
menu screen.
Option
you want to use isn't listed, you can use the Otheroption
and select the Languages
menu is
to select the language
1.
From the main menu, highlight
displayed).
option (the Languages
2.
Highlight Disc Menus and press OK (the Disc Menus language
3.
Highlight
4.
Enter the code from the Language Codes list at the end of this chapter and press OK (the
previous menu appears with your selection shown next to the Disc Menus path menu).
5.
Press the left arrow button or press GO BACK°AGAIN to return to the previous
options
of
menu is
are displayed).
Other and press OK.
menu screen.
NOTE." Remember, yourplayer can 't play the disc in the language you have chosen if the
disc wasn't created with that language option.
82
Chapter 6
Using
the
DVD
Player's
Menu
System
Changing the Audio Language Preference
The Audio Language
movie in.
menu enables
you to choose
which language
you want to listen to the
1.
From the main menu, highlight and select the Languages option (the Languages
displayed).
2.
Highlight Audio and press OK (the audio language
3.
Highlight tile language you want to use for the audio portion of the discs and press OK. Press
the le_ arrow button. The menu appears with your selection shown next to Audio.
4.
Press the left arrow button or press GO BACK.AGAIN to return to the previous
How to Set Other as an Audio Language
If the language
your choice.
menu is
options are displayed).
menu screen.
Option
you want to use isn't listed, you can use the Other option to select dm language
1.
From the Languages
is displayed}.
2.
From the Audio menu, highlight
3,
Enter the code from the Language Codes list at the end of this chapter and press OK. The
menu appears with your selection shown next to Audio.
4.
Press the left arrow button or press GO BACK*AGAIN to return to the previous
of
menu, highlight and select the Audio option (the Audio menu
Other and press OK.
menu.
NOTE: Remember, yourplaver
can'tplay the disc in the language you have chosen if the
disc wash 't created with that language option.
Chapter
6
83
Using
the
DVD
Player's
Menu
System
Changing the Subtitle Language Preference
The Subtitles menu lets you choose a preferred language for the subtitles. The default is Auto. The
Auto preference defaults to the same language that has been set as the audio language preference.
To change the subtitle language preference:
1.
From the main menu, highlight
Languages menu is displayed).
2,
From the Languages menu, highlight Subtitles and press OK (the
Subtitle menu is displayed).
3,
Highlight the language you want to use for subtitles and press OK.
Press the left arrow button. The menu appears with your selection
shown next to Subtitles.
4.
Press the left arrow button or press GO BACK-AGAIN to return to
the previous menu.
OAul0
t _tr_
Mtmull
Select Other and enter the
appropriate
and select the Languages option (the
language code.
Note: Remember, your player can 'tplay the disc in the language
you have chosen if the disc wash 't created with that language
option.
How to Set Other as the Subtitle
If the language
your choice.
Language
Preference
you want to use isn't listed, you can use the Other option to select the language
1.
From the main menu, highlight and select the Languages
displayed).
option (the Languages
2.
Highlight and select the Subtitles option (the Subtitles menu is displayed).
3.
From the Subtitles menu, highlight
4.
Enter the code from the Language Codes list at the end of the chapter and press OK (the
previous menu appears with your selection shown next to the Audio path menu).
5.
Press the left arrow button or press GO BACK*AGAIN to return to the previous
of
menu is
Other and press OK.
menu.
NOTE: Remember, yourplayer
can'tplay the disc in the language you have chosen if the
disc wasn't created with that language option.
84
Chapter
6
Using
the
DVD
Player's
Menu
System
Glossary
The glossary
contains
del'initions
and in[ornlation
;d_out
tilL' lt";tttlt't'S
_lnt[
t'tlnlr,)l,,
_tl
"xt>tll
1)\1)
Player.
If 1hr. di,,,,
is pl _x iJ_.
2.
Hixllli_ht
+,'/++,+,;<'u_r
;ultl lUU'_-,_ )t,. (tlw
/),
I St+'
lhk'
_ttt
t;r,_+_,_,", I(')l'
\\ l)tLtitJll_,(>il \(+t+I
ulk'
D\
l) I>l:lx_'l':_ lll,lil_
I//t.'lltl
_ih v+,_,,u>:q_Uu;tI'_
I_+tll(+It.'
t(l
hixhtg
i
dill<+Ic'131
tt+]lll3.
"l'ht.' ++k,litmi<m'< ;q+l+_,it t,u tlL_' Mvhl -,id,. _+1tll_, ,._i,_-,:n
S_>mt+' gl(l_,',:u)
_,t't.'c )lit[
The Glossary explains terms used
regarding your DVD player and discs.
&-til/ili,
,n<
:ll<.
i11_,_'
Ih:m
ixlf4,. • I i:_- -,_lOl]
i,.<)t]
l_;114t_'
To nt',++ tht" rt_st ()1 th,:
,Au'lildti,,t+:
I>I'L'Sstlt+..
+ right :m_+,+\ hult_>Ii
highlightc,.I.
]_
,,i],.'
PL'_-'_, th+
d_+th+ition
[)l't?_,
tilt+'
cl,_finiti_]_
(It)',',t't
;lrr<>\_
I h_.. ghr_s;u5
I_Ltllt,I]
dutirdtior_
I i!_+ ",_++_
oii(l
])H_L"
is
C>l' th(. +
ul_pu:lr,,
LII'J ;Itl'_+\'
_r
]_rt.,>,_
l+qltt_,t+
I_] it_l_llI]
_(
_ t',:\_ _i\,
It+
t_ltLll]
It)
>.+_ \IN
th,J
t_
tiI'q
r,.'Itu_]
l];let+
to
I_f tile
t]t_ + nt;tit]
l]l_l]_l
-i.
])I'LL_;Sth<.+ lt:t't
;Lt'I(IV,
])tttl(+l;
L,, Ill'.
i)\[)
l+l;t+_ ¢1
", ill;till
tl'£_+t]Ll,
Chapter
6
85
Code
Don't
Language
List
forget
to press the OK button
Code
langtmge
after
you enter
Oxle
the code.
langtmge
Code
Abkhazian ........................................... 6566
Dutch .................................................. 7876
Japanese .............................................. 7465
Afar ..................................................... 6565
English ................................................ 6978
Javanese .............................................. 7487
Afrikaans ............................................. 6570
Esperanto ............................................ 6979
Kannada .............................................. 7578
Albanian .............................................. 8381
Estonian .............................................. 6984
Kashmiri .............................................. 7583
Ameharic ............................................. 6577
Faroese ................................................ 7079
Kazakh ................................................ 7575
Arabic .................................................. 6582
Fiji ....................................................... 7074
Kinyarwanda ...................................... 8287
Armenian ............................................ 7289
Finnish ................................................ 7073
Kirghiz ................................................. 7589
Assamese ............................................ 6583
French ................................................. 7082
Kirundi ................................................ 8278
Aymara ................................................ 6588
Frisian ................................................. 7089
Korean ................................................ 7579
Azerbaijani ............................ '.............. 6590
Galician ............................................... 7176
Kurdish ............................................... 7585
Bashkir ................................................ 6665
Georgian ............................................. 7565
Laothian .............................................. 7679
Basque ................................................ 6985
German ............................................... 6869
Latin .................................................... 7665
Bengali; Bangla .................................. 6678
Greek .................................................. 6976
Latvian, Lettish .................................... 7686
Bhutani ............................................... 6890
Greenlandic ........................................ 7576
Lingala ................................................. 7678
Bihari .................................................. 6672
Guarani ............................................... 7178
Lithuanian ........................................... 7684
Bislama ............................................... 6673
Gujarati ............................................... 7185
Macedonian ........................................ 7775
Breton ................................................. 6682
Hausa .................................................. 7265
Malagsy ............................................... 7771
Bulgarian ............................................ 6671
Hebrew ............................................... 7387
Malay ................................................... 7783
Burmese .............................................. 7789
Hindi ................................................... 7273
Malayalam ........................................... 7776
Byelorussian ....................................... 6669
Hungarian ........................................... 7285
Maltese ................................................ 7784
Cambodian ......................................... 7577
Icelandic ............................................. 7383
Maori ................................................... 7773
Catalan ................................................ 6765
Indonesian .......................................... 7378
Marathi ................................................ 7782
Chinese ............................................... 9072
Interlingua .......................................... 7365
Moldavian ........................................... 7779
Corsican .............................................. 6779
Interlingue .......................................... 7369
Mongolian ........................................... 7778
Croatian .............................................. 7282
lnupiak ................................................ 7375
Nam .................................................... 7865
Czech .................................................. 6783
Irish ..................................................... 7165
Nepali .................................................. 7869
Danish ................................................. 6865
Italian .................................................. 7384
Norwegian .......................................... 7879
86
Chapter 6
Code
Don't
forget
to press the OK button
Language
Language
Code
after
you enter
Code
List
the code.
Lartgtmge
Code
Occitan ................................................
7967
Sesotho ............................................... 8384
Thai .....................................................
8472
Oriya ...................................................
7982
Setswana ............................................. 8478
Tibetan ................................................
6679
Oromo (Afan) .....................................
7977
Shona .................................................. 8378
Tigrinya ...............................................
8473
Panlabi ................................................
8065
Sindhi .................................................. 8368
Tonga ..................................................
8479
Pashto, Pushto ....................................
8083
Singhalese ........................................... 8373
Tsonga
................................................
8483
Persian ................................................
7065
Siswati ................................................. 8383
Turkish ................................................
8482
Polish ..................................................
8076
Slovak ................................................. 8375
Turkmen
8475
Portuguese
..........................................
8084
Slovenian ............................................ 8376
Twi ......................................................
8487
.............................................
8185
Somali ................................................. 8379
Ukrainian
8575
8277
Spanish ............................................... 6983
Urdu ....................................................
8582
............................................
8279
Sundanese ........................................... 8385
Uzbek ..................................................
8590
Russian ................................................
8285
Swahili ................................................ 8387
Viemamese
.........................................
8673
Samoan
...............................................
8377
Swedish ............................................... 8386
VolapOk ...............................................
8679
Sangho ................................................
8371
Tagalog ............................................... 8476
Welsh ..................................................
6789
Sanskrit ...............................................
8365
Tajik .................................................... 8471
Wolof ...................................................
8779
Scots Gaelic ........................................
7168
Tamil ................................................... 8465
Xhosa ..................................................
8872
Serbian ................................................
8382
Tatar .................................................... 8484
Yiddish ................................................
7473
Servo-Croatian
8372
Telugu ................................................. 8469
Yoruba ................................................
8979
Zulu .....................................................
9085
Quechua
Rhaero-Romance
Romanian
Chapter
6
................................
....................................
.............................................
............................................
87
This page left intentionally
blank.
Chapter
Other
Chapter
7
Information
Overview:
•
Troubleshooting
•
Care and Maintenance
•
The Universal Remote
•
Front Panel Controls
•
Front Panel Display
•
Limited Warranty
•
Accessory Ordering
Information
,ging Entertainment.
89
Other
Information
Troubleshooting
If you are experiencing product operation problems, please review the troubleshooting
to the Limited Watrantyfi)r
information on how to obtain repair service.
section before you call for service. Refer
Player won't work
Reset the DVD Player by unplugging the AC power cord and plugging it back in.
No Power
Plug in the DVD Player. Make sure both ends of the AC power cord are securely plugged into the player and into an AC outlet.
Disc won't play
•
Insert a disc with the label side facing up.
Check the type of disc you put into the player. This player only plays DVD video discs, Video CDs, audio CDs, CD R discs and CDRW discs.
•
If the disc is a DTS music CD, it requires a DTS decoder. If you have a DTS receiver hooked up to your DVD player and you are still
not getting sound, make sure the Trusurround ®option is turned off.
•
Both the player and the disc are coded by region. If the regional codes don't match, the disc can't be played. This player is Region
No. 1.
Play starts, but then stops immediately
The disc is dirty. Clean it.
•
Condensation has formed. Allow player to dry out.
No picture
•
Turn your TV to its Video Input Channel
(see chapter
1).
Turn on the TV.
Make sure your player is connected properly. Make sure all cables are securely inserted imo the appropriate jacks.
No sound or distorted sound
•
Make sure your player is connected properly. Make sure all cables are securely inserted into the appropriate jacks.
•
You may need to readjust the
•
Turn your "IVto its Video Input Channel (see chapter 1).
•
Sound is muted during still, frame advance, or slow-motion play.
•
If you connected an audio or audio/video receiver to your DVD Player, make sure you chose the correct input setting on the
receiver.
Digital
Output or Analog Ouqgut settings from the Sound menu (see chapter 6).
If you are NOT using a stereo TV for your sound source, turn off the TruSurround*option
SURROUNDbutton on front of DVD player).
(from the Analog Output menu or TS
•
Make sure you have checked the Dolby Digital and DTS boxes in the Digital Output menu.
•
If you are playing an audio CD with DTS set as your digital output, Trusurround must be off.
Player skips over songs on my MP3 disc
Be sure that you have encoded the file as MPEG-1 layer III.
Increase the bit rate (quality) the next time you create a CD.
The ID3 information is not displayed for some files
When creating a disc, use ID3 version 1 tags.
90
Chapter
7
Other
Information
Troubleshooting
Remote
control
won't
If you are using
you
press
Insert
•
any other
new
batteries
the
Remove
any obstacles
cabinet,
the glass
remote
remote
the remote.
to reset
remote,
buttons.
you
If you're
control
at a distance
between
doors
be in the wrong
the TV, press
of no more
the remote
Remove
it. Reinstall
than
the remote
To operate
your
DVD Player,
press
DVD on the remote
before
first, etc.
20 feet.
batteries
and
batteries
and try the remote
hold
down
control
or other
from
one or more
component.
operating
buttons
If your
the unit.
for about
one
DVD Player
Open
the doors.
minute
to drain
is in an entertainment
the microprocessor
inside
the
again.
credits and warning
information
that appear
at the beginning
of movies because
the disc is
icon appears on screen
feature or action canuot be completed at this time because:
The disc's software restricts it.
The disc's software doesn't support that feature (e.g., angles).
The feature is not available at the moment.
You've requested a title or chapter number that doesn't exist.
The picture is distorted
Did you connect your VCR to the DVD Player? Disconnect
•
mode.
the TV button
and the DVD Player
may be obstructing
Can't advance through a movie
You can't advance through the opening
programmed
to prohibit that action.
The _
The
1.
2.
3.
4.
might
operating
in the remote.
Operate
Reset
work
a universal
The disc might be damaged.
Try another
it. See chapter
1 for the correct setup and connection.
disc.
Picture is distorted during forward
and reverse scan
•
It is normal for some distortion to appear while scanning.
A screen saver appears on the TV
Your player is equipped with a screen saver that appears on the 'IV after your player has been idle for several minutes. Press STOP
or GO BACK•AGAIN on the remote to make the screen saver disappear from the screen and return to the player's main menu.
Subtitle and/or
audio language is not the one selected from the initial setting
•
If the subtitle and/or audio language you've chosen as the default does not exist on the disc, the initial settings will riot be seen/
heard. The disc's priority language is selected instead. Set the subtitle and/or audio language manually through the Info Display or
the player menu.
The menu is displayed
in a foreign language
The Menu Language preference is set to that language. From the DVD player's main menu, select the Languages option (In Spanish,
shown as Idioma_, in French, as Langues). From the Languages menu, select the Player Menus option (In Spanish, shown as Men_ts
delLector, in French, as MenusLecteur).
Highlight the language you prefer and press OK.
Play doesn't begin
•
The rating of the title on the disc exceeds
change the rating limit in those menus.
Chapter
7
the rating limit set in the Ratings Limits when you press pLAy. Unlock the player or
91
Other
Information
Troubleshooting
No forward
or reverse
scan
Some discs have se_,lions that pu_hibit rapid scanning,
If you're flying to skip tluough
the movie is ot_en ploglammed
Camera
angle
cannot
Some discs dont
or title and chapter
skip.
lhe warning information and credits at the beginning
t_ ptohil_il skipping through h.
of a movie, you won't be able to. This part of
be changed
ha_e the r_lulli-cln_eta arl_t_.s, and sonle discs only have it in certain parts of the movie.
Picture is too tall and thin
Change the aspect ratio using the 7 IIma,_, senmg in the Display menu (see chapter 6).
Picture is too short
Change
and wide
the aspect lalio usin R the "/_ Imc_c, setting in the Display menu (see chapter 6).
Cannot copy discs to video tape
You can't record DVI) disc_;onto videocassettcs because the discs are encoded with anti-copy protection.
Disc tray won't
open
Disengage the retail kxk 1_2attlle. Pl¢'SS _lnd hold a combinalion of huttons
FWD, OPEN,CLOSE. and TS SURRt_UND for at least three seconds.
Front "l'my D)ck _;.!ature is mined
on the front panel at the same time. Press and hold SKIP
on ( Nlock the player from the Lock menu or turn Tray Lock feature off (see chapter 6).
Full Version of Disc Does Not Play
If the DVD player is locked, tile disc may have been edited using the Scene Snip feature. Unlock the player (see
Disc won't
chapter 2).
eject
When you put a disc into the playen lhe player nlay take up to 15 seconds
during this time. Wait IS seconds and try again.
to read tile disc. You won't be able to eject the disc
Forgot password
•
Point the remote at the DVD player Press and hold the STOP button on the front of the DVD Player and the STOP button on the
remote control at the same time (hold both buttons down at the same time for at least 3 seconds). The player will unlock. Follow the
instructions for locking your player and changing the password in Chapter 5.
92
Chapter
7
Other
Information
Handling Cautions
•
Before connecting
other components
to this player, be sure to turn all components
•
Don't move the player while a disc is being played. The disc may get scratched
parts may be damaged.
•
Don't put any container
•
Be careful not to put your hand into the disc tray.
•
Don't place anything other than the disc in the disc tray.
off.
or broken, and the player's internal
filled with liquid or any small metal objects on the player.
Exterior influences such as lightning and static electricity can affect normal operation of this player. If this occur's, turn
the player off and on again with the ON-OFF button, or disconnect and then reconnect the AC power cord to the AC
power outlet. The player will operate normally•
Be sure to remove the disc and turn off the player after use.
Maintenance
of Cabinet
For safety reasons, when cleaning
the cabinet be sure to disconnect
•
Do not use benzene,
•
Wipe the cabinet wRh a soft cloth.
Formation
the AC power cord from the AC outlet.
thinner, or other solvents for cleaning.
of Condensation
•
Due to sharp changes in temperature
parts inside the player.
•
When condensation
forms inside the player, the player may not operate correctly. If this occurs, leave the player at
room temperature until the inside of the player becomes dry and operational.
•
If condensation
forms on a disc, wipe the disc with a soft, dry cloth by moving the cloth from the center hole toward
the outer edge.
Handling
and humidity,
condensation
may form if warm air comes in contact with any cold
Discs
•
Don't touch the disc's signal surfaces.
•
Don't affix labels or adhesive
•
Do not use damaged
(cracked
Hold by the edges or by one edge and the hole in the center.
tape to label surfaces.
or warped)
Don't scratch or damage
the label.
discs.
Cleaning Discs
•
Dirty discs can cause reduced video and audio performance.
cloth from the inner edge toward the outer perimeter.
•
If a disc becomes very dirty, wet a soft cloth in water, wring it out well. Wipe the dirt away gently, and remove any
water drops with a dry cloth.
•
Do not use record-cleaning
sprays or anti-static agents on discs. Also, never clean the discs with benzene,
other volatile solvents which may cause damage to the disc surface.
Chapter
7
Always keep discs clean by wiping them gently with a soft
thinner, or
93
Other
Information
Universal Remote
¥CRI
DVD
ON'OFF
VCR_
W
_IJX SAI.CAllLE
MUTE
The universal remote can be programmed to control most brands of
remote controllable TVs, VCRs, satellite receivers and cable boxes. The
remote is already programmed to control most RCA, PROSCAN, and GE
TVs, VCRs, and satellite receivers.
ZOOM
The AUX button can be programmed to control most brands of an
additional remote controllable TV, VCR, satellite receiver, or cable box.
GUIDE
tRFQ
ME;4U
CLEAR
Test the Remote
To determine whether the universal remote needs to be programmed,
turn a device ON, such as a VCR. Point the remote at the VCR, and press
the VCR1 button. Then press ON-OFF or CH + (channel up) or CH (channel down) to see if the VCR responds to the remote commands. If
the component
"0,0
INPU1
°©
--_.
ANTENNA
REVERSE
pLAy
FORWARD
REGORD
STOP
PAUSE
© o,0
O
does not respond,
the remote needs to be programmed.
Program the Remote
There are two ways to program the remote control:
OPE_CLOSE
•
•
automatic code search
direct entry
OOOO
_,lmll_.E
auom
_QLE
F_E
Automatic
Code Search
The following instructions can be used to program the remote to operate
each of the components connected to your DVD Player. If you want to
exit the automatic code search without programming any of your
components, press CLEAR until the red light on the remote turns off.
The remote may not operate all models of
all brands.
Turn on the component
1.
2.
.
you want to operate
(VCR, TV, etc.)
Press and hold the component button you want to program (VCR1,
VCR2, etc.). While holding the component button, press and hold
ON-OFF until the red light on the remote turns on, then release both
buttons.
Point the remote at the component. Press and release PLAY, then wait
5 seconds or until the red light on the remote stops flashing.
At this point the remote is searching for the correct code to program.
If, after 5 seconds, the component you want to operate does not turn
off, press PLAY again to tell the remote to search the next set of
codes.
Continue pressing PLAY until the component turns off or you have
searched through all of the codes. There are 20 total sets of codes. If
the component does not turn off after pressing PLAY 20 times, then
the remote cannot can't be programmed to operate that component.
94
Chapter
7
Other
If the component
1.
2.
Information
you want to control does turn off:
Press and release REVERSE, then wait 2 seconds.
back ON.
Repeat this step until the device turns
Important
To finish, press and hold STOP until the red light on the remote turns off.
Direct Entry
1.
Turn on the component
to be programmed.
2.
Look up the brand and code number(s)
section.
l_0rthe component
on the code list in tiffs
Tips!
You must continue pressing
the component button while
you enter the code.
Let's say you have a Zenith
T_ To program the universal
remote to operate the TV
you would:
Press and hold the TV button
while you enter the first
code listed for Zenith in the
TV Codes column.
3.
Point the DVD Player's remote
at the component.
4.
Press and hold the component
button on the remote you want to program.
5.
Enter the code from the Remote Control code list on the following pages.
Release the TV button. Press
ON.OFF to see if the 73/
6.
Release the component button, and then press ON-OFF to see if the component
responds to the command. If it doesn't, try pressing the component button and then
ON • OFF again.
responds, if it doesn't, follow
the same steps, but enter the
second code instead of the
first.
7.
If you get no response, repeat these steps using the next code listed for your brand,
until the component responds to the remote commands.
Operate Components after Programming the
Remote
Because this universal remote can control several different components (TV, DVD, VCR,
satellite receiver, etc.) it uses operational modes triggered by the component buttons. For
example if you want the remote to control the TV, you would press the TV button to put
the remote into TV mode before you could control the TV.
1.
Press the appropriate component button (DVD, TV, VCR1, VCR2, SAT-CABLE, or AUX)
to set the remote to Control the component.
2.
Press ON.OFF
3.
Use the remote buttons
to turn the component
ON or OFF.
that apply to that component.
/Vote: This remote may not be compatible
components.
Chapter
7
with all brands and models of
95
Code
List
Codes
Abex .............................................................................
Admiral ..............................................................
Adventura ......................................................................
Aiko ............................................................................
Mleron .............................................................................
Amtron ..........................................................................
Akai ..............................................................................
Anam National .......................................................
AOC .............................
1004, 1005, 1006, 1007.
Audiovox ......................................................................
Belcor .......................................................................
Bell & Howell ..............................................
lOOh
Bradford ........................................................................
Brokwood
..........................................................
Candle .............................................
1004, 1006,
1172
1001.1173
1174
1016
1046
1038
1002
1003, 1038
1175. 1176
1038
1004
1083, 1162
1038
1004
1008. 1174
Capehart .........................................................................
Celehrity .....................................................................
Cen_.urion ..................................................................
Citizen .........................................................
t004,
........................................
10!6, 1038, 1105. 1171.
Clairtone ....................................................................
Colortyme ...............................................................
Concerto .................................................................
1004,
1004,
1175
1002
1009
1008,
1177
1176
1006
1006
Contec/Cony
............................
1012, 1013, 1014, 1038,
Craig .................................................................................
Crown ....................................................................
1038,
Curtis Mathes ...............................................
100Q, 1004,
...........................................................
1015, 1105, 1162,
CXC ...................................................................................
Daewoo .......................................................
1004, 1005,
..................................................
1016, 1017, 1018, 1127,
Daytron .....................................................
1004+ 1006,
Dimensia .....................................................................
Dumont ...............................................................
1004,
1176
1038
1171
1006,
1171
1038
1006,
1171
1171
1000
1151
1006,
1174.
Dynatech ......................................................................
1178
Electroband
........................................................
1002, 1176
Electrohome
.............................
1003, 1004, 100@ 1019, 1022
Emerson .........................
1004, 1006, 1012, 1014, 1023, 1024,
..............................
1025, 1026, 1027, 1028, 1029,1030, 1031,
............................
1032, 1033, 1034, 1035, 1036, 1037, 1038,
.............................
1039, 1041, 1042, 1043, 1044, 1046, 1047,
....................
1123, 1124, 1162, 1171, 1176, 1177, 1179, 1191
Envision ..................................................................
1004, 1006
Pisher ..............................
1048, 1049, 1050, 1051, 1162, 1180
Fujitso .............................................................................
1046
Funai .......................................................................
1038, 1046
Futuretec ..........................................................................
1038
GE ......................................................
1000, 1003, 1004, 1006,
................................................
1022, 1052, 1054, 1055, 108"7,
........................................
1164, 1165, 1166, 1167, !168, 1181
Gibraher .................................................................
1004, 1151
Goldstar ...................................
1004, 1005, 1006, 1012, 1019,
..............................
1056, 1057, 1058, 1155, 1156, 1171, 1172
Grundy .........................................................
1038, 1046, 1171
Hallmark .................................................................
1004, 100_
Harvard .............................................................................
1038
Hitachi ...............................................
1004, 1006,1012, 1015,
.................................................
1059, 1060, 1061, 1135, 1136,
........................................
1137, 1138, 1139,1140, 1141, 1142,
.............................
1143, 1144, 1145, 1146, 1148, 1150, 1179
1M& ..................................................................................
1038
Infinity ..............................................................................
1062
Janeil .................................................................................
1174
JBL ....................................................................................
10(52
JCB ...................................................................................
1002
JC Penny ..................................
1000, 1004, 1005, 1006, 1008,
.......................................
1022, 1052, 1054, 1058, 1063, 1064,
............. :................ 1072, 1087, 1105, 1128, 1171, 1172, 1181
Jensen .....................................................................
1004, 1006
JVC ...........................................
1012, 1013, 1054, 10(a0, 1(365,
..............................
1066, 1067, 1089, 1157, 1158, 1159, 1182
Kawasho .......................................................
1002, 1004, 1006
Kaypani ...........................................................................
1175
Kenwood ......................................................
1004, 1006, 1019
Ydo6s Novabeam
................................
1068, 1069, 1174, 1183
96
KTV ...........................................
1038, 1070, 1171,
Loewe
.....................................................................
Logik .........................................................................
Luxman .............................................................
Lxi .............................................................
1000,
.....................................
1062+ 1071, 1072, 1073,
Magnav<:_x................................
1004, 1006, 1008,
.....................................
1068, 1069, 1074, 1075,
....................................
1088, 1089, 1130, 1131,
............................................................
1134,
1176, 1177
1062
1083
1004, 1006
1006, I049,
1162, 1181
1019, 1062,
1076, 1077,
1132. 1133,
1 t83. 1184
Maies0c ...................................................................
Marants .................................................................
Marantz .......................................
1004, 1006, 1062,
Megatron .........................................................
1006,
Mei .................................................................................
Memorex .................................
1001, 1006, 1082, 1083,
MGA ..............................................
1004, 1005, 1006,
.........................................
1022. 1051, 1079, 1080,
Midland ....................................
1054, 1151, 1171, 1172.
Minutz .....................................................................
Mgsubishi ..........................
1004, 1005, 1006, 1019,
......................................
1051, 1079, 1080, 1081, 1082.
Montgomery" Ward ...................................................
Motorola ............................................................
1003,
MTC ................................
1004, 1005, 1006, 1105, 1176,
Multgech ..........................................................
1038,
Muhivision ......................................................................
NAD ...................................................
1006, 1071, 1072,
NEC ...........................................
1003, 1004, 1005, 1006,
Nikko .....................................................................
1006,
NTC .................................................................................
Onwa .........................................................................
1083
1062
1078
1059
1176
1162
1019,
1082
1181
10"32
1022,
1125
1083
1173
!178
1178
1084
1185
1089
1016
1016
1038
Oplimus .......................................................................
Optonica ...........................................................
Orion ...........................................................
Panasonic ......................................
1003, 1054,
Phflco ............................................
1003, 1004,
......................................
1008, 1012, 1019, 1062,
.................................................
1074, 1075, 1077,
Philips ...............................................
1003, 1004,
.....................................
1019, 1062, 1068, 1069,
..................................................
1076, 1086, 1087,
Pilot .......................................................................
Pioneer ............................................
1004, 1006,
.....................................................................
1092,
Portland ...................................
1004, 1005, 1006,
Pdce Club ..................................................................
1095,
1035,
1062,
1005,
1068,
1183,
1008,
1074,
1088,
1004,
1090,
1179,
1016,
1185
1173
1191
1170
1006,
1069,
1184
1012,
1075,
1089
1171
1091,
1185
1171
1105
Prism; ...............................................................................
PROSCAN ..............................................................
1000,
Proton .......................................
1004, 1006, 1012, 1093,
Pulsar ...............................................................................
Pulser ..............................................................................
Quasar ...............................................
1003, 1054, 1070,
Radio Shack/Realistic
.................................
1000, 1004,
............................
1012, 1038, 1049, 1095, 1162, 1171,
RCA ...............................
1000, 1003, 1004, 1005, 1006,
..............................
1019, 1096, 1098, 1099, 110,9, 1101,
................................................
1103, 1129, 1179, 1181,
Rhapsody ........................................................................
Runco ............................................................................
Sampo .......................................
1004, 1006, 1171, 1172,
Samsung ...........................................
1004, 1005, 1006,
.............................
1015, 1019, 1104, 1105, 1106, 1171,
Samsux ...........................................................................
Sansui ........................................................................
1054
1181
1175
1151
1004
1094
1006,
1172
1007,
1102
1187
1176
1151
1175
1012,
1172
1171
1191
Sanyo ...............................................
1004, 1048, 1049, 1050,
......................................
1080, 1107, 1108, 1162, 1169, 1180
Scotch .........................................................................
1006
Scott ...................... 1004, 1006, 1012, 1024, 1035, 1038,
Sears ..............................
1000, 1004, 1006, 1013, 1019,
.....................................
1048, 1049, 1050, 1051, 1066,
.............................
1072, 1109, 1110, 1162, 1180, 1181,
Sharp ..........................................................
1004, 1006,
..............................
1029, 1111, 1112, 1113, 1122, 1171,
Shogun ........................................................................
Signature ....................................................
1001, 1083,
Simpson ...........................................................................
1046
1046,
1071,
1189
1012,
1173
1004
1115
1008
,Sonic ......................................................................
Sony .......................................................................
Soundesign ...................
1004, 1006, 100_,
Squareview ............................................................
SgS ...............................................................
Starlite ...............................................................
Supre-macy ............................................................
Supreme ................................................................
Sylvania ............................................
1004,
.........................
1019, 1062, 1068, 1069,
..................
1076, 1077, 1088, 1116, 1161,
Symphonic .....................................
1033,
Tandy .....................................................................
Tatung ........................................................
Technics .................................................................
1038,
1004,
1006,
1074,
1183,
1038,
1003,
1176
1002
1046
1189
1038
1038
1174
1002
1008,
1075,
1184
1189
1173
1178
1054
Techwtx',d ..........................................
1004, 1006, 1054
Teknika ...................................
1004, 1005, 1006, 1008,
.......................
1012, 1013+ 1016, 1038, 1046, 1076,
.....................................
1082, 1083, 1105, 1170, 1171
Tele<apdon ...........................................................
1117
TMK .........................................................
1004, 1006
Toshiba ....................................
1049, 1071, 1072, 1089,
.............................
1105, 1109, 1117, 1118, 1160, 1162
Totevision ..............................................................
1171
Universal .....................................................
1052, 1087
Victor ...........................................................
1066, 1182
Vidtech ..............................................
1004, 1005, 1006
Viking ....................................................................
1174
Wards .............................
1000, 1001, 1004, 1005, 1006,
............................
1019, 1024, 1033, 1046, 1052, 1062,
................... 1068, 1069, 1074, 1075, 1076, 1083, 1087,
........................................
1088, 1095, 1119, 1120, 1184
Yamaha .....................................
1004, 1005, 1006, 1019
Zenith .................. 1004, 1083, 1151, 1152, 1153, 1154
VCR Codes
Admiral ..................................................................
2131
Adventura
..........................................................
2026
Aiko ....................................................................
2027
Aiwa ...........................................................
2002, 24)26
Akai ................................
2003, 2004, 2005, 2007, 2008,
...........................................................
2111, 2112, 2113
American High ......................................................
2021
hsha .......................................................................
7,013
Audio Dynamics ..........................................
2009, 2010
Audiovox ...............................................................
2014
Bell & Howell .......................................................
2011
Beaumark ..............................................................
2013
Broksonic ....................................................
2012) 2025
Calix .......................................................................
2014
Candle .....................................
2013, 2014, 2015, 2016,
...........................................................
2017, 2018, 2019
Canon .................................................
2021, 2022, 2114
Capehart ......................................................
2020, 2110
Carver ....................................................................
2062
CCE ..............................................................
2027, 2061
Citizen .........................................................
2,013, 2014,
.............................
2015, 2016, 2017, 2018, 2019, 2027
Colortyme ..............................................................
2009
Colt ......................................................................
2061
Craig .........................................
2013, 2014, 2023, 2061
Cur0s-Mathes
...........................
2000, 2002, 2009, 2013,
.............................
2016, 2018, 2021, 2022, 2024, 2115
Cybernex ...............................................................
2013
Daewoo .........................
2015, 2017, 2019, 2025, 2026,
2027, 2028, 2110
Daytron ..................................................................
2110
DBX .............................................................
2009, 2010
Dimensia ..............................................................
2000
Dyt t_.tech .....................................................
2002, 2026
Elect rohome ................................................
2014, 2029
Elect rophonic .......................................................
2014
'
Chapter 2
Code
VCR Codes
Ernemon .............. 2002, 2012, 2014, 2015, 2021, 2024, 2025,
............................
2026, 2029, 2030, 2032, 2033, 2054, 2035,
......................................
2036) 2037, 2038, 2039, 2040, 2041,
......................................
2042, 2044, 2045, 2047, 2065, 2105
..........................................................
2113, 2116, 2117, 2130
Fisher ..........................................................
2011, 2023, 2048,
.................................................
2049, 2050, 2051, 2052) 2118
Fuji .........................................................................
2021, 2119
Funai ......................................................................
2002, 2026
Garrard ............................................................................
2026
GE ...............................................................
2000, 2001, 2013,
.................................................
2021, 2022, 2053, 2115, 2120
Goldstar ...................................
2009, 2014, 2018, 2054, 2121
Gradiente .........................................................................
2026
List
Memorex .......................................................................
5026
Quarter ............................................................................
2011
Movie Time .................................................
5002, 5027, 5028
Quartz ..............................................................................
2011
NSC ..............................................................
5002, 5027, 5028
Quasar .........................................................
2021, 2022, 2125
Oak ........................................................
5002, 5016, 5029
RCA ..................... 20CO, 2001, 2003, 2013, 2021, 2055, 2056,
Panasonic ...................................................
5048, 5052
.................
2082, 2003, 2084, 2005, 2006, 2067, 2088, 2069,
.......................................
2O90. 2091, 2107, 2115, 2120, 2125
Paragon .........................................................................
5026
Radioshack/Realistic
.............. 2002, 2011, 2013, 2014, 2021,
Philips .......................................................
5011, 5012, 5013,
................................................
5019, 5025, 5030, 5031, 5032
................... 2022, 2023, 2026, 2029, 2049, 2050, 2096, 2131
Pioneer .............................................................
5033, 5034
Radix................................................................................
2014
Pulsar .....................................................................
5026
Randex .............................................................................
2014
RCA ..............................................................
5047, 5049, 5052
Ricoh ................................................................................
2128
Realistic ............................................
5009, 5049
Runco ..............................................................................
2104
Regal .....................................................................
5022, 5035
Samsung ........................
2005,2013,2015,2033, 2053,2112
Regency ....................................................................
S01 _
Sanky .....................................................................
2104,2131
Rembrandt ...............................................................
5003
Sansni ................................................
2010,2O92,2111,2123
Runco ..........................................................................
502b
Sanyo ...........................................................
2011,2013,2023
.
Samsung ...........................................................
5014, 5034
Scott ........................................
2012, 2015, 2025, 2032, 2O35,
Harley Davidson .............................................................
2026
Scientific Atlanta .............................
5006, 5036, 5037, 5038
2038, 2065, 2O93, 2116
Harman Kardon ..............................................................
2009
Sears .......................................
2011, 2014, 2021, 2023, 2048,
Signal ..............................................
5014, 5018
Harwood .........................................................................
2061
............................
2049, 2050, 2051, 2055, 2056, 2107, 2118
Signature .......................................................................
5003
SI Marx .........................................................................
5014
Headquarter ....................................................................
2011
Sharp .................... 2002, 2017, 2029, 2094, 2095, 2096, 2131
Hitachi........................................................
2002,2055,2056,
Shimom .............................................
2004, 2056, 2061, 2098
Sprucer ........................................................................
5052
.................................................
2057,2107,2111,2120,2122
Starcom ......................................................
5007, 5018, 5053
Shogun ............................................................................
2013
Hi-Q .................................................................................
2023
Stargate ..................................................................
5014, 5018
Signature ................................................................
2002, 2131
Instant
Replay .................................................................
2021
Starquest ..........................................................................
5018
Singer ...........................................................
2021, 2061, 2128
JCL ...................................................................................
2021
"randy ...............................................................................
5040
Sony ...............................
2002, 2004, 2098, 2099, 2119, 2128
Teleview .........................................................................
5014
JC Penney .........................................
2009,2010,2011. 2013,
STS .........................................................................
2021, 2107
................................................
2014,2021, 2022,2055,2056,
Tocom ..........................................................
5004, 5023, 5041
Sylvania ......................................................
2002, 2021, 2022,
.................................................
2058, 2059,2060,2107,211g
Toshiba ...........................................................................
5026
................................................
2026, 2062, 2063, 2065, 2124
Jensen ..........................................................
2055,2056,2111
Tusa .................................................................................
5018
Symphonic .............................................................
2002, 2026
TV86 ................................................................................
5027
JvC .......................
2009,2010, 2011,2018,2058,2111,2123
"randy .....................................................................
2002, 2011
Kenwood ....................................................
2009,2010,2011,
Unika .........................................................
5008, 5009, 5011
Tashiko ............................................................................
2014
................................................
2016,201g,2058,2111,212.5
United Artists .......................................
5002
Tatung ....................................................................
2058, 2111
g2,.H
..................................................................................
2061
United Cable ...................................................................
5053
TEAC ........................................
2002, 2026, 2058, 2085, 2111
Kodak ....................................................................
2014,2021
Universal ............................................
5008, 5009, 5010, 5011
Teclmics .................................................................
2021, 2109
Lloyd ......................................................................
2002, 2026
Videoway .........................................................................
5044
Teknika ..........................
2002, 2014, 2021, 2026, 2100, 2129
togik................................................................................
2061
Viewstar ...........................................
5015, 5025, 5027, 5040
TMK .............................................................
2013, 2024, 2047
I.X1 ...................................................................................
2014
Zenith .........................................................
5026, 5050, 5051
Toshiba .......................................................
2015, 2049, 2051,
Magnavox ...................................................
2021, 2022, 2062,
..........................................................
2055, 2065, 2093, 2116
Satellite Receiver Codes
...........................................................
2063, 2104, 2108, 2124
Totevsion ...............................................................
2013, 2014
Magnin .............................................................................
2013
Unitech ............................................................................
2013
Marantz .......................................................
2009, 2010, 2011,
Chappara[ ..............................................................
5006, 5057
Vector Research .................................
2009, 2010, 2015, 2016
D_ke ....................................................................
5058, 5059
......................................
2016, 2018, 2021, 2058, 2062, 2064
Victor ...............................................................................
2010
Marta ................................................................................
2014
GE ..........................................................................
5000, 5001
Video Concepts ....................... 2009, 2010, 2015, 2016, 2113
General lnstuments ...................................
5060, 5061, 5062
Masushita .........................................................................
2021
Videc_onic .......................................................................
2013
Mei ...................................................................................
2021
Panasonic ........................................................................
5075
Wards ......................................
2002, 2013, 2014, 2015, 2021,
Prlmestar ........................................................................
5076
Memorex ....................................................
2002, 2011, 2013,
.....................................
2023, 2026, 2029, 2055, 2056, 2061,
.......................................
2014, 2021, 2023, 2026, 2104, 2131
PROSCAN .............................................................
5000, 5001
............................
2O96, 2101, 2102, 2103, 2107, 2116, 2131
RCA ........................................................................
5000, 5001
MGA .............................................................
2029, 2065. 2113
XR-1000 .......................................................
2021. 2026, 2061
Realistic ............................................................................
5063
MGN Technology ............................................................
2013
Yamaha ..........................
2009, 2010, 2011, 2018, 2058, 2111
Midland ............................................................................
2053
Sony .................................................................................
5072
Zenith ......................................
2(}04.2O9_, 2104, 2119, 2128
MinoRa .........................................................
2055, 2056, 2107
STS1 ................................................................................
5064
MRaubishi ........... 2029, 2055, 2056, 2065, 2066, 2067, 2069,
Cable Boxes
STS2 .................................................................................
5065
STS3 .................................................................................
5066
..................
2070, 2071, 2072, 2073, 2O74, 2106, 2113, 2123
STS4 .................................................................................
5067
Montgomery Ward ................................................
2075, 2131
Toshiba ..................................................................
5068, 5073
Motorola ................................................................
2021, 2131
ABU...................... 5002, 5003, 5004, 5005, 5006, 5007, 5053
.............................................................
2002, 2013, 2026
Uniden .............................................................................
5069
AntronLx................................................................. 5008, 5009
MuRitech ........................
2002, 2013, 2016, 2026, 2053, 2061
Archer ................................................ 5000, 5009, 5010, 5011
Audio
Codes
NEC ..........................................
2009, 2010, 2011,2016, 201g,
Cabletenna ...................................................................... 5008
.............................
2058, 2064, 2076, 2078, 2079, 2111, 2123
Cableview ........................................................................ 5008
Nikko ...............................................................................
2014
Century ............................................................................ 5011
RCA and Dimensia
Noblex
.............................................
2013
Citizen .............................................................................. 5011
AMIFM .........................................
4003
olympus
..........................................................................
2021
Colour Voice .......................................................... 5012, 5013
AUX ...........................................
4004
Op0mus .................................................................
2014, 2131
ComU-onics ............................................................ 5014, 5015
Phono .........................................................................
4005
Optontca..........................................................................
2096
Contec ............................................................................. 5016
Orion ...............................................................................
Panasonic ......................
2021, 2022, 2109, 2125, 2126,
Pentax ......................................
20161 2055, 2056, 2107,
Funtex Research ..............................................................
philco .................................................
2021, 2022, 2062,
2035
2127
2120
2018
2063
Philips ................................................
2021, 2062, 2096,
Pihi¢ ..................................................................................
Pioneer ....................................
2010, 2055. 2000, 2081,
portland .............................................
2016, 2017, 2019,
PROSCAN ..............................................................
2000,
Protec ...............................................................................
Pulsar ...............................................................................
2124
2014
2123
2110
2001
2061
2104
Chapter 2
Eastern ............................................................................. 5017
Garrard ............................................................................ 5011
GE Electlonics ................................................................. 5009
Gemini ......................................................... 5018, 5019, 5049
General I_t
......................................................... 5003
Hamlin ..................................... 5020. 5021, 5022, 5035. 5045
Hitachi .............................................................................
5003
Hy_ex ............................................................................... 5002
Jasco ................................................................................ 5011
Jerrold ............................................... 5003, 5005, 5007, 5018,
........................................................... 5023, 5024, 5046, 5053
Maguavox ........................................................................ 5025
Tape ............................................................................
CD ...............................................................................
4006
4007
Sony .................................................................................
Kenwcod
.........................................................................
Aiwa .................................................................................
4266
4264
4261
Other
Information
Front Panel Controls
PLAY button
OPEN.CLOSE
button
SKIP BACK
SKIP FWD button
/
Shuttle
button
t
I
I
PAUSE button
/
, _,,,7 , f
ON.OFF
button
and
/
Front
Ir;L_
indicator
panel
light
\
_
,J
/
Headphone
volume control
Navigational
Disc tray
controls
MENU
Headphone
button
RANDOM
jack
button
"ISSURROUND button
INFO button
(listed alphabetically)
Disc tray
Press OPEN,CLOSE
Front panel display
Headphone
jack
Headphone
volume
INFO
to open and close the disc tray.
(See following page for details.)
Plug in headphones
control
here.
Controls volume to headphones.
Brings up the Info Display.
MENU Brings up the DVD disc menu.
Navigation
controls
ON-OFF
button
the player is on.
Use to navigate through
and
ON-OFF
indicator
OPEN-CLOSE
Press
to open
and close
PAUSE
disc play. Advances
PLAY
Pauses
Begins
RANDOM
disc play (and
Changes
Play Mode
closes
Info Display or menus.
light
Turns
the player
on and off. The ON-OFF
one
frame
at a time during
pause
STOP
Stops
TS SURROUND
setting between
98
when
mode.
disc tray if it's open).
(plays
disc tracks, chapters
or MP3 titles in random
Shuttle
Rotate clockwise
to search forward through a disc. Rotate counterclockwise
a disc. The farther you turn the shuttle, the faster the speed of the search.
SKIP FWD
Allows you to move
"skipping"
the tide, chapter, track
lights
the disc tray.
playback
to Random
SKIP BACK
Allows you to move
effect, "skipping"
the title, chapter,
indicator
to the beginning
of the preceding
track or MP3 title).
to the beginning
or MP3 title).
of the next
title, chapter,
title, chapter,
track
to search
track
order).
backward
through
or MP3 title on a disc
(in
or MP3 title on a disc (in effect,
disc play.
Use the TS SURROUND
on and off.
button
to simulate
surround
sound.
Each press
of the button
toggles
the
Chapter 7
Other
Information
Front Panel Display
Display lights listed from left to right (top row first)
1.
NO DISC There isn't a disc in the disc tray.
2.
DVD Lights when you play a DVD disc.
3.
AUDIO
Lights when you play an MP3 disc.
4.
VIDEO
Lights when you play a video CD.
5.
CD Lights when you play an audio CD or a video CD.
6.
TrrLE
7.
PROGRAM The disc is playing the chapters, tracks, indexes
8.
CHAPTER
9.
PBC
Lights when the Video CD disc currently
10.
,_|
|_
11.
Display
Messages
OFF
Displayed
Indicates the number
of the title that is playing.
or MP3 titles in the order you programmed.
Indicates the chapter that is playing.
(Play direction)
whether
The display messages
the disc is paused,
when you first turn on the player.
_
13.
_
Locked Player is locked. You must enter your password
entered in the Ratings Limits menu.
14.
(0)
15.
RANDOM
L
17.
C_
Chapter
Indicates the player is unlocked
Tl'uSurr°und®
Repeat
7
Indicates that the camera
Indicates
(no password
required
to play discs).
to play discs with rating limits higher than those you
Lights when SRS TruSurround ® is on.
The disc is playing the chapters,
(Angle)
moving forward, or backward.
are:
12.
16.
control.
when you turn off the player.
FIELLO Displayed
unlocked
Indicates
in the player has playback
tracks, indexes or MP3 titles in random order.
angle feature is available.
that the Repeat feature has been activated.
99
Other
Information
Limited Warranty RCA Digital Video Disc (DVD) Player
What your warranty covers:
• Any defect in materials or workmanship.
For how long after your purchase:
•
90 days - Unit exchange,
•
•
91 days to 1 year - Unit exchange, which includes parts only; you pay the labor.
The warranty for rental units begins with the first rental or 45 days from date of shipment
whichever comes first.
What
which includes
parts and labor.
we will do:
During the initial 90 days:
Exchange the DVD unit with a new or, at our option, refurbished
After
to the rental firm,
the 90 days and within
unit.
one year:
Exchange the DVD unit with a new or, at our option, refurbished unit. We will bill you a fiat exchange
charge to replace a defective unit. This charge covers the labor cost for its repair.
How you get service:
•
Call 1-800-311-9263 and have your unit's date of purchase
number information is on the back of your unit.
•
A representative
•
If the representative
determines that you should receive a replacement unit you will be provided with a
Return Authorization (RA) number and the location of a nearby exchange point if one exists. No returns will
be accepted without the RA number.
will troubleshoot
To receive a replacement
your problem
unit before
and model/serial
number ready. The model/serial
over the phone.
you return yours:
Option I"
1. Provide your Discover, Mastercard or Visa account number and expiration date to your phone representative.
This is for security purposes only and your account will not be charged at this time.
2.
We will send you a replacement
3.
If you return the unit to us within 14 days from the date you were provided a RA number, only items not
covered by warranty will be charged to your account. If your unit is not received within 14 days, the
suggested retail value of the receiver will be charged to your credit card. This amount will be credited, less a
$10 handling fee, if the unit is subsequently received.
4.
Ship your defective unit back to us using the replacement unit's carton. Shipping instructions will be
included on the carton along with your RA number which will allow you to easily ship the unit back to us.
Make sure you insure your shipment in case of damage or loss. Include with the shipment:
•
Evidence of purchase date such as a bill of sale.
•
•
100
unit.
A brief note describing your unit's problem.
Your name, address and phone number.
Chapter 7
Other
Option I1:
1. We will send a replacement
unit to our exchange
Information
point.
2.
The exchange
3.
Take your unit and evidence of purchase date, such as a bill of sale, to the exchange location and you will be
provided the new or refurbished unit. Please retain all accessories such as the remote control hand unit.
location will notify you of its arrival.
4.
If the repairs are covered by your warranty, you will not be billed.
Thomson assumes no responsibility
for warranty shipments
from the customer
shipped
in the manner prescribed
by Thomson.
Return transportation,
storage, handling
responsibility
in case of damage or loss.
and insurance
to the factory if not
costs are your responsibility.
We accept
no
To receive a replacement
unit after we have received your unit:
•
Write the RA number on the outside of the carton used to return the unit. Make sure you insure your shipment
in case of damage or loss.
•
Carefully pack the unit using the original box and packing material if possible.
were included with your unit such as the remote control hand unit.
•
Include
1.
2.
3.
with the shipment:
Evidence of purchase
Please retain all accessories
date, such as a bill of sale, to verify your unit's warranty
that
eligibility.
A brief note describing your unit's problem.
Your name, address and phone number.
•
The representative will advise the address to mail a cashier's check or money order for payment
any out of warranty labor or parts charges, and you elect not to use your credit card.
•
After we receive your product,
a new or refurbished
unit will be shipped
if there are
to you.
What your warranty
does not cover:
• Acts of God, such as but not limited to lightning damage.
•
*
•
•
Adjustment of customer controls.
Damage from misuse or neglect.
A unit that has been modified or incorporated
commercial purposes.
Batteries.
•
Units purchased
•
•
Shipping damage if the unit was not packed and shipped in the manner prescribed by Thomson.
Storage fees may be charged by the exchange point if you fail to pickup the replacement unit in a timely
manner.
into other products
or is used for institutional
or other
or serviced outside the U.S.A.
Product
Registration:
•
Please complete and mail the Product Registration Card packed with your DVD product. It will make it easier
to contact you should it ever be necessary. The return of the card is not required for warranty coverage.
How state law relates to warranty:
• This warranty gives you specific legal rights and you may have other rights that vary from state to state.
If you purchased your product outside the United States:
• This warranty does not apply, See your dealer for warranty information.
Chapter
7
101
This page left intentionally
blank.
Other
Accessories and Order Form
Information
Accessory
for
Order
Your
DVD
Plug
to Optical
Plug
DV3 (3 ft.) DV6 (6 ft.)
Plug to Optical
Plug (3 ft.)
DV3
515.95
Optical
Plug to Optical
Plug (6 ft.)
DV6
$19.95
Optical
Plug to Mini
Plug (3 ft.)
DV3M
515.95
Optical
Plug to Mini Plug (6 ft.)
DV6M
$19.95
246773
$19.95
5CTV160
$49.95
Control
(CRK76DG1)
Surge Protector
Plug
to Mini
Plug
DV3M
(3 ft.) DV6M
Qty
Optical
Remote
Optical
Player
Pa_ No.
Description
Optical
Form
(6 ft.)
Total Merchandise
............................................................
Sales Tax ............................................................................
$
$
We are required by law to collect the appropriate
Surge
Protector
(SCTV160)
sales tax for each individual
locality
Shipping
state, country,
to which the merchandise
and Handling
and
is being sent.
....................................................
Total Amount Enclosed ....................................................
&_o&&
$
5.00
$
Use VISA or MasterCard preferably.
.o%
Money order or check must be in U.S. currency only.
g_g
No COD or CASH.
,O,O,O
'O ,O 'O
'0,0'0
0_0
0
Prices are subject to change without
notice.
All accessories are subject to availability.
Remote
Chapter
7
Control
(CRK76DG1)
Please complete other side also.
103
Other
Information
ToPlacean Order
Charge your order on your VISA,
MasterCard, or Discover Card by
filling in below
USE YOUR
CREDIT
IMPORTANT:
To place your order by phone, have your Visa, MasterCard
or Discover Card ready and call the toll-free number listed
below.
CARD
Copy complete account number
from your VISA card
Use this number only to place on order for accessory
listed on this order form.
N-r-_ N-_ CEzES]
ffl--_
My card expires:
IMPORTANT:
1-800-338-0376
_
To place your order by mail, detach and mail the
completed order form with credit card information, money
order or check in US currency (made payable to Thomson
Consumer Electronics, Inc.) to the following address:
Copy complete account number
from your MasterCard
rr--rl-q rT-N-G_-r--_ Fr--r--N
My
card
I--1--1
I--I-G
Copy Number
above
your
naifle
items
Video Accessories
PO Box 8419
Ronks, PA 17573
expires:
on
MasterCard
IMPORTANT:
Copy complete account number
from your Discover Card
CI2EZ3N--T-_ r-_-r-q N--N-G
My card expires:
(Credit
_
AUTHORIZED
SIGNATURE
card order will not be processed without
signature)
Print or type your name and
_
A complete and correct
address clearly.
+
order
will save you days
of waiting.
I
] Name:
] Street:
Apt.
I City:
I State:
Zip:
I
I Daytime Telephone
No.:
I
Please make sure that both sides of this form have been
filled out completely.
• Allow 4-6 weeks for delivery.
• All accessories
are subject to availability.
• Prices are subject to change.
104
Chapter 7
This page left intentionally
blank.
Index
Index
Symbols
16 x 9 Widescreen
77
2-channel stereo 80
4 x 3 Letterbox 77
4 x 3 Standard 77
5.1-Channel out audio 16, 20, 80
A
A'B Repeat 37, 46, 57
AC IN jack 20
Accessories
103
Analog Output
2-channel 80
5.1-channel
16, 20, 80
Angle, camera 39
Angle icon 99
Arrow buttons 24
Aspect ratio 77
Audio
Dolby Digital 12
AUDIO button 24
Audio CD
creating a program 68
Playing 44, 52
using Dub Assist 49
audio CD
using Dub Assist 56
Audio channel output
changing, video CD 63
Audio equipment
Dolby Digital 12
DTS 12
Audio language
36, 41, 83
Automatic code search 94
AutoPlay 56, 70, 71
B
Batteries, remote 21
Bookmarks
clearing 38, 49
recalling 38, 48
storing 38, 48
using 38, 48
Buttons
ANGLE 24
arrow buttons 24
AUDIO 24
CH+andCH24
CLEAR 24
component
24
DVD 21
FORWARD 24
106
Index
Buttons
FRAME- 24
GO BACK,,AGAIN 25, 41
GUIDE 25
INFO 25
MENU 25
Numbers (0-9) 25
OK 25
ON.OFF 21, 98
OPEN'CLOSE
25, 98
PAUSE 25, 98
PLAY 25, 98
RANDOM 98
REVERSE 25
SAT-CABLE 24
Shuttle control 98
SKIp FWD 98
SKIP REV 98
SNIP 25, 33, 4I
STOP 25
SUBTITLE 25, 41
TS SURROUND 98
TV 24
VCR1 24
VCR2 24
ZOOM 25, 42
C
Cable box codes 96, 97
Camera ar_gle 39, 41
Cancelling repeat featme 37, 47, 57, 62
CH+andCH24
Changing the audio Language Preference
85
Changing the Disc Menus Language 84
Changing the Menu Language 84
Chapter advance 40
Chapter, selecting 32
Cleaning discs 93
CLEARbutton 25
Clearing a bookmark 38, 49
Codes
cable box 96
language g6
TV 96
VCR 97
Codes for remote
cable box 97
satellite receiver 97
'IV 96
VCR 97
Connections
5.1 channel digital audio 13
6-Channel Audio Out 17
Dolby Digital
13
DTS receiver 13
DVD Player + 'IV 9
DVD Player + TV + VCR 11
DVD player + TV + VCR+ Satellite
Receiver 19
Connections, types of 7
Controls
front panel 98
remote 24
Country rating systems 74
D
DIGITAL AUDIO OUT jack
Digital Output 78
Dolby Digital 13, 78
DTS 13, 79
Direct entry 95
Disc Menu 29, 77
Disc Menus language
84
Discs
12, 20
cleaning 93
digital video discs 29
handling 93
menu 29
Parental Edit library 74
tray 98
Display
front panel 99
Display menu 76
Distance
Speakers 80
Dolby Pro Logic 13, 15
DTS 12
DTS Receiver 13
Dub Assist 49, 71
Dub Assist menu 71
DVD buttons 24
DVD disc
programming
70
DVD Limits Menu
unrated tides 76
DVD Limits menu
rated Titles 75
E
Edit Program menu 67
Enhancements
81
Enter New Password 73
F
Fast motion playback 40
FORWARDbutton 24, 25
FRAME- button 25
Frame advance 40
Freeze frame (pause) 40
Front Display menu 77
Front panel controls 98
Chapter
6
Index
Front panel display 99
Front panel icons
angle 99
locked 99
play direction 99
repeat 99
unlocked 99
Front tray lock feature 75
G
Glossary 85
GO BACK*AGAINbutton 25, 41
Grayed out 31, 61
GUIDE button 25
H
Handling
cautions 93
discs 93
DVD Player 93
How to find your TV's video input channel
23
I
Icons 31, 61
Image
4x3 letterbox 76
4x3 standard 76
16x9 widescreen 76
Index
selecting, video CD 62
INFO button 25
Info Display
Audio CD 44, 52
using 31
video CD 61
lntroScan
Audio CDs 47
MP3 discs 58
Installing batteries 21
Invalid icon 23, 31, 40, 61
P
Language
changing the menu 82
subtitles 84
Languages menu 82
Language preference 82
Level, speakers 80
Lock Menu 72
Locked icon 99
Parental edit 41
disc library 74
storing 33
Password 72
Path menu item 66
PAUSEbutton 25, 98
Picture scan 40
PLAy button 25, 98
Play direction icon 99
Playlist
Audio CD 46
Play Menu
program play 67
random play 67
standard play 66
Playmode
Menu 66
Standard 45, 54, 67
Random 45, 54, 67
selecting 45, 54, 67
Playback features
audio language 36, 41
bookmarks 38, 48
camera angle 39, 41
chapter advance 40
fast motion 40
parental edit 41
repeat 37, 46, 57, 62
scene again 41
selecting a chapter 32
slow motion 40
subtitles 41
using remote 40
Playing
audio CD 44, 52
digital video discs 28
Video CD 61
Play/Resume option 66
Playlist
inserting items 56, 71
MP3 69
Program
creating audio CD 68
creating MP3 55
creating DVD disc 70
editing 56, 70
Program List 55, 69, 70
Program Play 45, 54
Program the remote 94
M
Main menu items
Display menu 77
Glossary 86
Language 84
Lock 73
Play 66
Play Mode 67
Sound menu 79
Maintenance 93
MENU button 25
Menu Language 23
Menu system 23, 66
Menus
action 66
path 66
types 66
Modes, remote control 95
Motion Pictures Association of America 75
MP3 52
Discs, creating 52
files, obtaining 52
lnfo Display 53
lntroscan 57
MP3 Display 53
repeat 57
screen saver 57
selecting a title 54
selecting a Play Mode 54
N
Navigation 23
Number buttons 25
J
Jacks
(>-channel out 20
AC IN 20
AUDIO OUT CENTER 20
AUDIO OUT FRONT R L 20
AUDIO OUT SUB 20
AUDIO OUT SURROUND R L 20
DIGITAL AUDIO OUT 20
S-VIDEO 20
VIDEO OUT 20
Chapter
L
6
o
OK button 25
ON*OFF button 24, 98
On-screen info display 31, 44, 52, 77
OPEN*CLOSE button 25, 98
Operate components
after programming remote 95
Order form, accessories
103
R
RANDOM button
Random Play 54
98
107
Index
Rated Titles 74
Rating Limits 73
Recalling bookmarks
38, 48
Regional Coding 28
Remote 24
cable box codes 97
component buttons 24, 94
direct entry 95
DVD buttons 24
installing batteries 21
pointing 21
program 94
satellite receiver codes 97
test 94
tour 24
TV codes 96
VCR codes 97
Repeat 37, 46, 57, 62
A-B 37, 46, 57, 62
Chapter 37, 46, 57, 62
Title 37, 46, 57, 62
cancelling 37, 47, 57, 62
Repeat icon 99
REVERSE button 25
S-VIDEO jack 20
SAT-CABLE button 24
Satellite receiver codes 97
Scene Again 41
Scene Snip 33
clearing 34
editing 73
using 34
Selecting a chapter 32
Selecting a track
video CD 58
Setting Ratings Limits 74
Shuttle control 40, 98
SKIP FWD button 98
SKIP REV button 98
Skipping tracks
video CD 63
Skipping titles 54
Slow motion playback 40
SNIP button 25, 33, 41
Sound menu 78
TSSURROUND button 98
TVbuttons 24
TVcodes 96
TVlmage menu 76
TV'sVideo Input Channel 22
Types of Discs the Player Can Play 21
U
Speaker setup 79, 80
Standard Play 54
STOP button 25, 98
Storing bookmarks
38, 48
Storing edits 33
SUBTITLE button 25, 41
Subtitle language 84
Subtitles 35, 41
Surround sound, simtflated
System test 75
Universal remote 94
programming to control other brands of
components 95
Unlocked icon 99
Unrated titles 75
Using bookmarks 38, 48
V
T
98
Time Display 44, 53
Titles
MP3 titles
deleting 56
insetting 56
selecting 32
Rated 75
Unrated 76
Track
selection, video CD 58
skipping, video CD 63
MP3 54
Trashcan icon 38
Troubleshooting 90, 91, 92
TruSurround® sound 79
VCR codes 97
VCR1 button 24
VCR2 button 24
Video CD
description 60
Disc Menu 60
Info display 61
Playing 61
Repeat 62
selecting a track 62
selecting an index 62
Video Input Channel 22
VIDEO OUT jack 20
Voice+ 81
W
Wa_anty
100
Z
ZOOM button 25, 42, 63
Zoom feature 42, 63
Chapter
6
108
Please do not send any products to the Indianapolis address listed in this manual or on the carton. This will only
add delays in service for your product.
fo_"II'IOMSON CONSUMER ELECTRONICS
10330 North Meridian
Indianapolis,
Street
IN 46290
©2000 Thomson Consumer Electronics, Inc.
Trademark(s)® Registered
Marca(s) Registrada(s)
Printed in USA
TOCOM
15535920