1
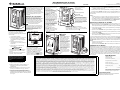
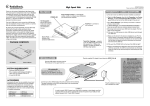
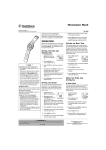
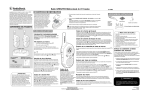
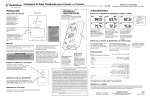
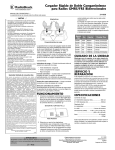
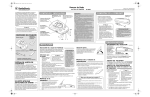
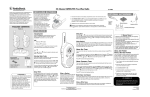
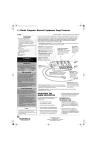
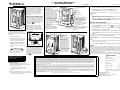
Large Display Multifunction Desktop Alarm Clock www.radioshack.comSM Thank you for purchasing the RadioShack Large Display Multifunction Desktop Alarm Clock. It combines a clock, a picture frame, a pen holder, and a thermometer into one convenient desktop item. The detachable clock design lets you use the thermometer / clock and pen holder / photo frame separately. Removing the Insulation Strip To prevent battery drain during shipping, your clock is shipped with an insulation strip that you must remove before use. Turn the clock over then firmly grasp the strip by its end and gently pull it out. The clock beeps. 12:00 and the current temperature appear. Note: For protection during shipment, the photo plastic cover of the photo frame and the clock display are both covered by a piece of PVC film. Peel off these films before you using either item. REPLACING THE BATTERY Ô BATTERY NOTES Ô • Use only fresh batteries of the required size and recommended type. o WARNING o Pen Holder Metal strip Detaching the Clock Battery Resetting the Clock If the clock displays segmented digits, locks up, or does not work properly, you can use a pointed object, such as a straightened paper clip, to press RESET on the back of the clock. The clock beeps once. The default time is set to 12:00. Reset the date and time, as necessary. Framing the Photo 1. Detach the clock from the pen holder. 2. Slide up the plastic cover and sample photo from the front of the pen holder. 3. Cut the photo to a width of 213/16 inches (72 mm) and a height of 41/4 inches (108 mm). 4. Slide the photo into the slots on the front of the pen holder all the way up until it stops. Repeat this step to install the plastic cover in place. DATE AND TIME 1. Hold down TIME SET until the clock sounds a long beep and the hour digits flash. 2. Repeatedly press (or hold down) ) or 12/24/( to set the hour. 3. Press TIME SET to store the hour. The minute digits flash. Alarm On.Off Notes: • While setting the time, if you do not press a key within 30 seconds, the clock returns to the default or previously set time/temperature display. • When you set the date, the clock automatically sets the day of the week. • If you press ALARM SET, C/F, or ALARM ON.OFF while setting the time, the clock automatically returns to the previous setting. SETTING THE ALARM TIME You can set the clock to sound an alarm to remind you of a daily event. 1. Hold down ALARM SET until the clock beeps. 12:00 or any previously set alarm time appears. The hour digits flash. 2. To set the alarm hour, repeatedly press (or hold down) ) or 12/24/(. 3. Press ALARM SET. The minute digits flash. 4. To set the alarm minute, repeatedly press (or hold down) ) or 12/24/(. Thumb groove Keep button-cell battery away from children. Swallowing a button-cell battery can be fatal. THE Repeat Steps 2 and 3 to set the minutes, year, month, and date. When you finish, the current time displays. 12 / 24 Hour format selection — To switch between the 12- and 24- hour formats, press 12/24/(. In the 12-hour time format, P appears for a PM hour. You may use the clock and pen holder as two separate units by detaching the clock from the pen holder. To reunite both into one item, align the two slots on the bottom of the clock with the two tabs on the bottom front of the pen holder, then push the back of the clock against the frame until the magnets on the back of the clock lock onto the metal strip at the top of the frame. Battery tray 3. Insert a new battery in the battery compartment with the positive (+) side up. SETTING Alarm Set Degree Format Selection Repeatedly press C/F to switch the temperature format from Fahrenheit (°F) to Celsius (°C) on the display. The thermometer automatically measures the temperature and updates its display every minute. Back of Clock 2. Insert the edge of your thumbnail into the slot on the battery compartment cover and pull it out of the clock. Dispose of old batteries promptly and properly. Do not burn or bury batteries. Time Set Note: Pressing SNOOZE or ) during the snooze alarm time initiates a new snooze cycle. Photo Frame 1. Pull up the metal stand. • Snooze Control To temporarily silence the alarm for five minutes by turning on the snooze function, press SNOOZE or ). ñ appears. After five minutes, the alarm sounds for one minute, then automatically turns off. This cycle is repeated four times. You may temporarily silence the alarm during the snooze cycle by pressing any key (except SNOOZE and )). This will not end the snooze cycle. To cancel the snooze function, press ALARM ON.OFF twice. ñ and ï disappear. Reset button Your clock comes with one CR2025 lithium battery for power. When the display dims, follow these steps to replace the battery. 4. Replace the cover. The clock beeps once. 60-Year Calendar gives you the calendar from 1990 to 2050. Large Display lets you easily read all information at the same time. OWNER’S MANUAL Please read before using this equipment. 63-1413 41/4” Photo’s dimensions 2 13/16” Tabs 5. Press ALARM SET to store the alarm time. The clock beeps once. The alarm turns on and ï appears. At the preset alarm time, the alarm sounds for 1 minute then automatically turns off. To silence the alarm sooner, press any key (except SNOOZE and )). To turn the alarm on or off at any time, repeatedly press ALARM ON.OFF. ï only appears when the alarm is on. Notes: • While setting the alarm time, if you do not press any key for about 30 seconds, the clock returns to the current time display. • Pressing SNOOZE or ) during the alarm time activates the snooze function. CARE Keep the clock dry; if it gets wet, wipe it dry immediately. Use and store the clock only in normal temperature environments. Handle the clock carefully; do not drop it. Keep the clock away from dust and dirt, and wipe it with a damp cloth occasionally to keep it looking new. If your clock is not performing as it should, take it to your local RadioShack store for assistance. To locate your nearest RadioShack, use the store locator feature on RadioShack's website (www.radioshack.com), or call 1-800-The Shack (843-7422) and follow the menu options. Modifying or tampering with the clock's internal components can cause a malfunction and might invalidate its warranty. SPECIFICATIONS Power ................................................. One CR 2025 Battery Limited One-Year Warranty This product is warranted by RadioShack against manufacturing defects in material and workmanship under normal use for one (1) year from the date of purchase from RadioShack company-owned stores and authorized RadioShack franchisees and dealers. EXCEPT AS PROVIDED HEREIN, RadioShack MAKES NO EXPRESS WARRANTIES AND ANY IMPLIED WARRANTIES, INCLUDING THOSE OF MERCHANTABILITY AND FITNESS FOR A PARTICULAR PURPOSE, ARE LIMITED IN DURATION TO THE DURATION OF THE WRITTEN LIMITED WARRANTIES CONTAINED HEREIN. EXCEPT AS PROVIDED HEREIN, RadioShack SHALL HAVE NO LIABILITY OR RESPONSIBILITY TO CUSTOMER OR ANY OTHER PERSON OR ENTITY WITH RESPECT TO ANY LIABILITY, LOSS OR DAMAGE CAUSED DIRECTLY OR INDIRECTLY BY USE OR PERFORMANCE OF THE PRODUCT OR ARISING OUT OF ANY BREACH OF THIS WARRANTY, INCLUDING, BUT NOT LIMITED TO, ANY DAMAGES RESULTING FROM INCONVENIENCE, LOSS OF TIME, DATA, PROPERTY, REVENUE, OR PROFIT OR ANY INDIRECT, SPECIAL, INCIDENTAL, OR CONSEQUENTIAL DAMAGES, EVEN IF RadioShack HAS BEEN ADVISED OF THE POSSIBILITY OF SUCH DAMAGES. Some states do not allow limitations on how long an implied warranty lasts or the exclusion or limitation of incidental or consequential damages, so the above limitations or exclusions may not apply to you. In the event of a product defect during the warranty period, take the product and the RadioShack sales receipt as proof of purchase date to any RadioShack store. RadioShack will, at its option, unless otherwise provided by law: (a) correct the defect by product repair without charge for parts and labor; (b) replace the product with one of the same or similar design; or (c) refund the purchase price. All replaced parts and products, and products on which a refund is made, become the property of RadioShack. New or reconditioned parts and products may be used in the performance of warranty service. Repaired or replaced parts and products are warranted for the remainder of the original warranty period. You will be charged for repair or replacement of the product made after the expiration of the warranty period. This warranty does not cover: (a) damage or failure caused by or attributable to acts of God, abuse, accident, misuse, improper or abnormal usage, failure to follow instructions, improper installation or maintenance, alteration, lightning or other incidence of excess voltage or current; (b) any repairs other than those provided by a RadioShack Authorized Service Facility; (c) consumables such as fuses or batteries; (d) cosmetic damage; (e) transportation, shipping or insurance costs; or (f) costs of product removal, installation, set-up service adjustment or reinstallation. This warranty gives you specific legal rights, and you may also have other rights which vary from state to state. RadioShack Customer Relations, 200 Taylor Street, 6th Floor, Fort Worth, TX 76102 12/99 Clock Accuracy.................................................. ±0.67 Sec./Day Temperature Accuracy ........................................... ±2°F (±1°C) Operating Temperature................................... 16°F to 128°F ......................................................................(−9°C to 54°C) Battery Life ............................................................ One Year Photo Size (HW).....................................41/4 × 213/16 Inches ...................................................................... (108 × 72 mm) Dimensions (HWD).......................429/32 × 31/8 × 27/8 Inches .............................................................. (125 × 80 × 73 mm) Weight .................................. 7.76 oz. (220 g) (with Battery) Specifications are typical; individual units might vary. Specifications are subject to change and improvement without notice. © 2003 RadioShack Corporation. All Rights Reserved. RadioShack and RadioShack.com are trademarks used by RadioShack Corporation. 03A03 Printed in China Reloj Multifuncional de Alarma con Desplegamiento Grande para un Escritorio www.radioshack.comSM Le agradecemos la compra del Reloj Multifuncional de Alarma con Desplegamiento Grande para un Escritorio de la marca RadioShack. Reúne un reloj, un marco para fotografía, un guardaplumas y un termómetro en una sola unidad de escritorio. El diseño de reloj separable le permite utilizar por separado el termómetro / reloj y el guardaplumas / marco para fotografía. Remoción de la tira aislante Para evitar el escurrimiento de la pila durante el envío, el reloj se embarca con una tira aislante que debe retirarse antes de utilizar la unidad. Voltee el reloj, sujete firmemente la tira por el extremo y tire de ella con suavidad. El reloj emite un pitido. A continuación aparecen los dígitos 12:00 y la temperatura presente. CAMBIO DE LA PILA El reloj viene con una pila CR2025 de litio como fuente de energía. Cuando se oscurezca la pantalla, siga estos pasos para cambiar la pila. Nota: Como protección durante el envío, la cubierta de plástico para la fotografía y la pantalla del reloj vienen cubiertas con una pieza de película de PVC. Desprenda la película antes de utilizar dichos artículos. Botón “Reset” (Reiniciar) 2. Introduzca el borde de la uña del pulgar en la ranura situada en la tapa del compartimiento de la pila y extráigala del reloj. 3. Introduzca un pila nueva en el compartimiento, con el lado positivo (+) hacia arriba. 4. Coloque de nuevo la tapa. El reloj emite un pitido. Ô NOTAS ACERCA DE LAS PILAS Ô • • Deseche las pilas viejas con prontitud y de manera adecuada. No queme ni entierre las pilas. Solamente utilice pilas nuevas del tamaño requerido y del tipo recomendado. o ADVERTENCIA Control de dormitar Para silenciar temporalmente la alarma durante cinco minutos activando la función de dormitar, oprima el botón SNOOZE [DORMITAR] o ). Aparece el símbolo ñ. Después de cinco minutos suena la alarma durante un minuto, y se apaga automáticamente. Este ciclo se repite cuatro veces. Se puede silenciar temporalmente la alarma durante el ciclo de dormitar; para ello, oprima cualquier botón (excepto SNOOZE y )). De esta manera no se termina el ciclo de dormitar. Para cancelar la función de dormitar, oprima dos veces el botón ALARM ON.OFF [ALARMA - ENC./APAG.]. En seguida desaparecen los símbolos ñ y ï. Marco para fotografía Guardaplumas o Pila Reiniciación del reloj Si el reloj muestra los dígitos segmentados, se queda fijo o deja de funcionar adecuadamente, con un objeto puntiagudo, como un clip enderezado, oprima el botón RESET de la parte posterior del reloj. El reloj emite un pitido. La hora prefijada son las 12:00. Reajuste la fecha y la hora según sea necesario. Mantenga la pila tipo botón fuera del alcance de los niños. La deglución de una pila tipo botón puede causar la muerte. Enmarcado de la fotografía 1. Separe el reloj del guardaplumas. 2. Deslice hacia arriba la cubierta de plástico y la fotografía de muestra de la parte frontal del guardaplumas. 3. Recorte la fotografía a una anchura de 213/16 pulg. (72 mm) y a una altura de 41/4 pulg. (108 mm). 4. Con un movimiento de deslizamiento introduzca la fotografía en las ranuras de la parte frontal del guardaplumas completamente hasta que se detenga. Repita este paso para instalar la cubierta de plástico en su lugar. 41/4” Dimensiones de la fotografía 2 13/16” AJUSTE DE LA FECHA Y LA HORA 1. Mantenga apretado el botón TIME SET [FIJAR HORA] hasta que el reloj emita un pitido largo y destellen los dígitos de la hora. 2. Para ajustar la hora, oprima repetidamente (o mantenga apretado) el botón ) o 12/24/(. 3. Oprima el botón TIME SET para fijar la hora. En seguida destellan los dígitos de los minutos. Alarm Set (Fijar alarma) Alarm On/Off (Alarma - Enc./Apag.) Selección de formato de grados Oprima repetidamente el botón C/F para cambiar el formato de la temperatura de grados Fahrenheit (oF) a Celsius (oC) en la pantalla. El termómetro mide la temperatura de forma automática y actualiza la pantalla cada minuto. Para ajustar los minutos, el año, el mes y la fecha, repita los pasos 2 y 3. Al terminar, aparece la hora actual. Notas: • Al ajustar la hora, si no oprime un botón en menos de 30 segundos, el reloj vuelve a mostrar la hora y la temperatura prefijadas o las fijadas previamente por usted. • Al ajustarse la fecha, el reloj ajusta automáticamente el día de la semana. • Si se oprime uno de los botones ALARM SET, C/F, o ALARM ON.OFF mientras se ajusta la hora, el reloj vuelve automáticamente a la hora previamente fijada. AJUSTE DE LA HORA DE LA ALARMA El reloj puede ajustarse para sonar la alarma con el fin de recordarle un acontecimiento diario. 1. Mantenga apretado el botón ALARM SET hasta que emita un pitido el reloj. 12:00, o la hora de alarma previamente fijada, aparece en la pantalla. En seguida destellan los dígitos de la hora. Selección de formato de 12 o de 24 horas — Para alternar entre el formato de 12 y de 24 horas, oprima el botón 12/24/(. En el formato de 12 horas, para las horas después del mediodía aparece la letra P. Tira metálica Separación del reloj Bandeja de la pila Ranura para el dedo pulgar Time Set (Fijar hora) Nota: Oprimiendo el botón SNOOZE o ) durante el tiempo de la alarma de dormitar se inicia un nuevo ciclo de dormitar. Parte posterior del reloj 1. Levante la base metálica. Calendario de 60 años Muestra el calendario desde 1990 hasta 2050. Pantalla grande Permite leer fácilmente toda la información al mismo tiempo. MANUAL DEL PROPIETARIO Le suplicamos leer el manual antes de utilizar este equipo. 63-1413 El reloj y el guardaplumas pueden utilizarse como dos unidades separadas separando el reloj del guardaplumas. Para volver a unir ambos y formar una sola unidad, alinee las dos ranuras situadas en la parte inferior del reloj con las dos orejetas de la parte inferior del guardaplumas, y después empuje la parte posterior del reloj contra el marco hasta que los imanes de la parte posterior del reloj se fijen en la tira metálica situada en la parte superior del marco. Orejetas 2. Para ajustar la hora de la alarma, oprima repetidamente (o mantenga apretado) el botón ) o 12/24/(. 3. Oprima el botón ALARM SET. En seguida destellan los dígitos de los minutos. 4. Para ajustar los minutos de la alarma, oprima repetidamente (o mantenga apretado) el botón ) o 12/24/(. 5. Oprima el botón ALARM SET para fijar la hora de la alarma. El reloj emite un pitido. Se enciende la alarma y aparece el símbolo ï . A la hora, fijada la alarma suena durante un minuto, y después se apaga automáticamente. Para silenciar la alarma más pronto oprima cualquier botón (excepto SNOOZE y )). Para encender o apagar la alarma en cualquier momento, oprima repetidamente el botón ALARM ON.OFF. El símbolo ï aparece solamente cuando está puesta la alarma. Notas: • Al ajustar la hora de la alarma, si no oprime un botón en menos de 30 segundos, el reloj vuelve a mostrar la hora presente. • Oprimiendo el botón SNOOZE o ) durante el tiempo de la alarma se activa la función de dormitar. CUIDADO DE LA UNIDAD Mantenga seco el reloj; si se moja, séquelo de inmediato. Utilice el reloj y guárdelo solamente en entornos con temperatura normal. Maneje con cuidado el reloj; no lo deje caer. Mantenga el reloj alejado del polvo y la suciedad, y límpielo ocasionalmente con un trozo limpio de tela para mantener su aspecto nuevo. Si el reloj no funciona como debiera, llévelo a un establecimiento RadioShack de la localidad para que lo revisen. Si desea localizar la tienda RadioShack más cercana, use la función de localización de tiendas en el sitio web de RadioShack (www.radioshack.com), o llame al 1-800-The Shack (843-7422) y escoja las opciones necesarias del menú. Cualquier modificación o alteración de los componentes internos del reloj puede causar una falla e incluso la anulación de la garantía. Especificaciones Garantía limitada de un año Este producto está garantizado por RadioShack contra defectos de fabricación en el material y mano de obra bajo condiciones normales de uso durante un año a partir de la fecha de compra en tiendas propiedad de la empresa RadioShack, franquicias y distribuidores autorizados de RadioShack. EXCEPTUANDO LO AQUÍ ESTABLECIDO, RadioShack NO OFRECE GARANTÍAS EXPLÍCITAS Y LAS GARANTÍAS IMPLÍCITAS, INCLUYENDO LA GARANTÍA DE QUE EL PRODUCTO PODRÁ SER COMERCIALIZADO Y QUE ES ADECUADO PARA UN FIN ESPECÍFICO, TIENEN UNA DURACIÓN LIMITADA AL PERÍODO DE VIGENCIA DE LAS GARANTÍAS LIMITADAS AQUÍ EXPUESTAS POR ESCRITO. EXCEPTUANDO LO AQUÍ ESTABLECIDO, RadioShack NO TENDRÁ RESPONSABILIDAD NI OBLIGACIÓN ALGUNA HACIA EL CLIENTE U OTRA PERSONA O ENTIDAD CON RESPECTO A LAS RESPONSABILIDADES, PÉRDIDAS O DAÑOS CAUSADOS DIRECTA O INDIRECTAMENTE POR EL USO U OPERACIÓN DEL PRODUCTO O RESULTANTES DE UNA VIOLACIÓN DE ESTA GARANTÍA, INCLUYENDO PERO SIN LIMITARSE A, DAÑOS CAUSADOS POR INCONVENIENCIA, PÉRDIDA DE TIEMPO, DATOS, BIENES, INGRESOS O GANANCIAS, O DAÑOS INDIRECTOS, ESPECIALES, INCIDENTALES O CONSECUENCIALES, AÚN SI SE HA NOTIFICADO A RadioShack DE LA POSIBILIDAD DE TALES DAÑOS. Algunos estados no permiten limitantes a la duración de una garantía implícita ni la exclusión o limitación de los daños incidentales o consecuenciales, por lo que es posible que las limitaciones o exclusiones mencionadas más arriba puedan no ser de aplicación. En caso de defecto del producto durante el período de garantía, lleve el producto y el recibo de compra que sirve de comprobante de la fecha de compra a cualquier tienda RadioShack. Salvo si la ley dispone lo contrario, RadioShack a su opción: (a) corregirá el defecto reparando el producto sin cargo alguno por componentes y mano de obra; (b) reemplazará el producto por otro igual o de características similares; o (c) reembolsará el precio de compra. Todos los productos y componentes reemplazados, así como los productos cuyo costo es reembolsado, pasan a ser propiedad de RadioShack. Pueden utilizarse componentes y productos nuevos o reacondicionados para llevar a cabo el servicio de garantía. Los componentes y productos reparados o reemplazados están garantizados por el período remanente de la garantía original. La reparación o sustitución del producto no serán gratuitas después de la expiración del período de garantía. Esta garantía no cubre: (a) daños o averías causadas por o atribuibles a causa fortuita, abuso, accidente, mal uso, uso anormal o impropio, falta de atención a las instrucciones, instalación o mantenimiento impropio, alteración, caída de rayos u otra incidencia de excesivo voltaje o corriente; (b) reparaciones no efectuadas por un taller autorizado por RadioShack; (c) consumibles tales como fusibles o pilas; (d) daños a la apariencia; (e) costos de transporte, envío o seguro; o (f) costos de recogida, instalación, servicio de ajuste o reinstalación. Esta garantía le otorga derechos legales específicos, si bien también puede tener otros derechos que varían de un estado a otro. La traducción al español se provee solamente para su conveniencia. En caso de discrepancias entre las versiones en inglés y en español, prevalecerá la versión en inglés. RadioShack Customer Relations, 200 Taylor Street, 6th Floor, Fort Worth, TX 76102 12/99 Fuente de energía .....................................Una pila CR2025 Precisión del reloj................................................±0.67 seg./día Precisión de temperatura.......................................±2°F (±1°C) Temperatura de funcionamiento ......................16°F a 128°F ........................................................................(−9°C a 54°C) Duración de la pila ................................................... Un año Tamaño de la fotografía (alt./anch.) .......... 41/4 × 213/16 pulg. .......................................................................(108 × 72 mm) Dimensiones (AAP) ........................ 429/32 × 31/8 × 27/8 pulg. ...............................................................(125 × 80 × 73 mm) Peso ....................................... 7.76 onzas (220 g) (con pila) Estas especificaciones son estándar; pueden variar en ciertas unidades. Las especificaciones están sujetas a cambios y mejoras sin previo aviso. © 2003 RadioShack Corporation. Todos los derechos reservados. RadioShack y RadioShack.com son marcas comerciales empleadas por RadioShack Corporation. 03A03 Impreso en China