1
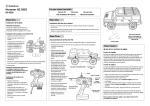
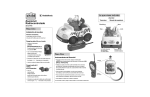
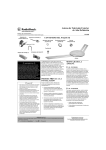
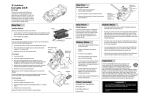
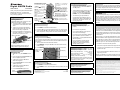
Neck-strap anchor— To attach
the supplied neck-strap, loop the
thin cord under this metal bar.
Digital AM/FM Radio
with Clock
#12-829
Thank you for purchasing the RadioShack Digital
AM/FM Radio with Clock. You will find this
powerful radio’s compact size makes it easy to
carry and enjoy anywhere.
+TUNING– /e d — Press to
tune the radio or set the time.
MEMORY — Press to store
radio stations into one of ten
preset locations.
PRESET — Press to cycle
through stations stored in
memory.
BAND — Press to toggle
between AM and FM.
Step One
POWER — Press to turn
the radio on or off.
Installing Batteries
Headphones
Your Digital AM/FM Radio requires two AAA
batteries (not included) to operate.
1. To open the battery compartment, push the
compartment cover in the direction of the
arrow.
2. To allow easy removal of the batteries,
position the black fabric strip across the
bottom of the battery compartment.
3. Insert two AAA batteries as indicated by
the polarity markings (+ /–) inside the compartment. Then replace the cover.
Battery Compartment
VOLUME – / + — To increase the
volume, press +. To decrease the
volume, press –.
LOCK ON OFF — To secure the
settings so that they cannot be
accidentally changed, slide LOCK
to ON. > appears on the display
and none of the buttons (except
DBBS) will respond. To release the
controls slide LOCK to OFF.
DBBS ON OFF — To turn the
Dynamic Bass Boost (DBBS) on or
off, slide this control to ON or OFF.
DBBS appears on the display when
Dynamic Bass Boost is active.
Helpful Hints
Care
•
If none of the function buttons seem to be
working, be sure to check that LOCK is in
the OFF position.
•
The backlight functions whenever a button
is pressed, even if LOCK is in the ON
position. To activate the backlight when
POWER is off, press CLOCK ADJUST.
Keep the radio dry; if it gets wet, wipe it dry immediately. Use and store the
radio only in normal temperature environments. Handle the radio carefully;
do not drop it. Keep the radio away from dust and dirt, and wipe it with a
damp cloth occasionally to keep it looking new.
•
PHONE — To listen to the radio,
plug the supplied headphones into
this jack.
Step Three
Battery Notes
Manual & Auto Tuning
•
1. Press BAND to select between AM and FM.
2. Press e or d once to move through frequencies one step at a time.
Batteries
Compartment Cover
Replace the batteries when; (the low
battery indicator) appears in the display.
Do not burn or bury batteries.
3. Press and hold e or d for auto tuning. The radio scans through the
band’s frequencies and stops when it receives a broadcast signal.
•
Use only fresh batteries of the required
size and recommended type.
Step Four
•
Do not mix old and new batteries, different
types of batteries (standard, alkaline, or
rechargeable), or rechargeable batteries of
different capacities.
You can program 20 preset stations into memory for quick recall. There
are ten memory locations in the AM band, and ten additional locations in
the FM band.
1. Tune the radio to the desired band and station.
2. Press MEMORY. Then press e or d to select the desired memory
location (1–10).
3. Press MEMORY again to save the station to the selected location.
Step Two
Setting the Time
Memory Locations
Display — (1–10
per band)
Band Display
1. If the radio is on, press POWER to turn it
off.
If you do not plan to use the radio for
several weeks, remove the batteries.
Batteries can leak chemicals that can
damage electronic parts.
Specifications
FM frequency coverage....... 87.3 – 108.1 MHz
AM frequency coverage.......... 520 – 1720 KHz
Max. output (headphones)..... 20 mW + 20 mW
(32 Ohms)
Nominal Operating Voltage..................... 3VDC
Dimensions (HWD).......... 4.2 x 1.9 x.9 Inches
Weight (radio without batteries)................. 70g
Specifications are typical; individual units might
vary. Specifications are subject to change and
improvement without notice.
Step Five
What’s Included
4. Press CLOCK ADJUST to set. The minute
digits begin to flash.
Recalling Stations in Memory
5. Continuously press e or d until the
desired minute appears.
1. Press BAND to select between AM and FM.
2. Press PRESET once to move through the memory locations one at a
time.
6. Press CLOCK ADJUST again to set.
CLOCK
ADJUST
•
If your radio is not performing as it should, take it to your local RadioShack
store for assistance. To locate your nearest RadioShack, use the store
locator feature on RadioShack's website (www.radioshack.com), or call
1-800-The Shack (843-7422) and follow the menu options. Modifying or
tampering with the radio’s internal components can cause a malfunction
and might invalidate its warranty and void your FCC authorization to
operate it.
The FCC Wants You to Know
This equipment has been tested and found to comply with the limits for a
Class B digital device, pursuant to Part 15 of the FCC Rules. These limits
are designed to provide reasonable protection against harmful
interference in a residential installation. This equipment generates, uses
and can radiate radio frequency energy and, if not installed and used in
accordance with the instructions, may cause harmful interference to radio
communications.
However, there is no guarantee that interference will not occur in a
particular installation. If this equipment does cause harmful interference to
radio or television reception, which can be determined by turning the
equipment off and on, the user is encouraged to try to correct the
interference by one or more of the following measures:
• Reorient or relocate the receiving antenna.
• Increase the separation between the equipment and receiver.
• Consult your local RadioShack store or an experienced radio/TV
technician for help.
• If you cannot eliminate the interference, the FCC requires that you
stop using your radio.
Changes or modifications not expressly approved by RadioShack may
cause interference and void the user’s authority to operate the equipment.
Frequency Display
2. Press and hold down CLOCK ADJUST until
the hour digits begin to flash.
3. Continuously press e or d until the
desired hour appears.
Dispose of old batteries promptly and
properly.
•
Storing a Station in Memory
CLOCK ADJUST
To avoid losing your preset stations,
promptly replace the batteries when;
appears in the display. If the batteries are
removed for more than 30 seconds, the
memory may be lost.
Service
AM/FM Radio 6 Neck-strap 6 Headphones 6
Belt-clip 6 User’s Guide
Optional Accessories
©2003. RadioShack Corporation.
All Rights Reserved.
RadioShack and RadioShack.com are trademarks
used by RadioShack Corporation.
12-829
Printed in China
05A03)
Rechargeable Batteries 6 Battery Chargers 6
Replacement Headphones
Limited 90 Day Warranty
This product is warranted by RadioShack against manufacturing defects in material and workmanship under normal use for [ninety (90) days] from the date of purchase from
RadioShack company-owned stores and authorized RadioShack franchisees and dealers. EXCEPT AS PROVIDED HEREIN, RadioShack MAKES NO EXPRESS WARRANTIES AND ANY IMPLIED WARRANTIES, INCLUDING THOSE OF MERCHANTABILITY AND FITNESS FOR A PARTICULAR PURPOSE, ARE LIMITED IN DURATION TO
THE DURATION OF THE WRITTEN LIMITED WARRANTIES CONTAINED HEREIN. EXCEPT AS PROVIDED HEREIN, RadioShack SHALL HAVE NO LIABILITY OR
RESPONSIBILITY TO CUSTOMER OR ANY OTHER PERSON OR ENTITY WITH RESPECT TO ANY LIABILITY, LOSS OR DAMAGE CAUSED DIRECTLY OR INDIRECTLY
BY USE OR PERFORMANCE OF THE PRODUCT OR ARISING OUT OF ANY BREACH OF THIS WARRANTY, INCLUDING, BUT NOT LIMITED TO, ANY DAMAGES
RESULTING FROM INCONVENIENCE, LOSS OF TIME, DATA, PROPERTY, REVENUE, OR PROFIT OR ANY INDIRECT, SPECIAL, INCIDENTAL, OR CONSEQUENTIAL
DAMAGES, EVEN IF RadioShack HAS BEEN ADVISED OF THE POSSIBILITY OF SUCH DAMAGES.
Some states do not allow limitations on how long an implied warranty lasts or the exclusion or limitation of incidental or consequential damages, so the above limitations or exclusions may not apply to you.
In the event of a product defect during the warranty period, take the product and the RadioShack sales receipt as proof of purchase date to any RadioShack store. RadioShack
will, at its option, unless otherwise provided by law: (a) correct the defect by product repair without charge for parts and labor; (b) replace the product with one of the same or similar design; or (c) refund the purchase price. All replaced parts and products, and products on which a refund is made, become the property of RadioShack. New or reconditioned
parts and products may be used in the performance of warranty service. Repaired or replaced parts and products are warranted for the remainder of the original warranty period.
You will be charged for repair or replacement of the product made after the expiration of the warranty period.
This warranty does not cover: (a) damage or failure caused by or attributable to acts of God, abuse, accident, misuse, improper or abnormal usage, failure to follow instructions,
improper installation or maintenance, alteration, lightning or other incidence of excess voltage or current; (b) any repairs other than those provided by a RadioShack Authorized
Service Facility; (c) consumables such as fuses or batteries; (d) cosmetic damage; (e) transportation, shipping or insurance costs; or (f) costs of product removal, installation, setup service adjustment or reinstallation.
This warranty gives you specific legal rights, and you may also have other rights which vary from state to state
RadioShack Customer Relations, 200 Taylor Street, 6th Floor, Fort Worth, TX 76102
12/99
Radio AM/FM Digital
con Reloj
#12-829
Le agradecemos la compra del radio AM/FM digital con
reloj de la marca RadioShack. Descubrirá que el tamaño
compacto de este potente radio facilita llevarlo y disfrutarlo
en todas partes.
Asidero para la correa del cuello —
Para unir la correa del cuello, ensarte
el cordón delgado bajo esta barra
metálica.
+TUNING– /e d [SINTONIZACIÓN] —
Para sintonizar el radio o ajustar
la hora, se oprime este botón.
MEMORY [MEMORIA] — Este
botón sirve para guardar
estaciones de radio en diez
lugares prefijados.
PRESET [ESTACIONES
PREFIJADAS] — Este botón
sirve para recorrer las estaciones
guardadas en la memoria.
Paso Uno
BAND [BANDA] — Para
alternar entre AM y FM se
oprime este botón.
Instalación de las pilas
POWER [CORRIENTE] —
Este botón sirve para encender
o apagar el radio.
El radio AM/FM digital necesita dos pilas AAA (no vienen
incluidas) como fuente de electricidad.
1. Para abrir el compartimiento de las pilas, empuje la
tapa del mismo en la dirección de la flecha.
2.
Para permitir una fácil remoción de las pilas,
coloque la tira de tela negra a través de la parte
inferior del compartimiento de las pilas.
3.
Introduzca dos pilas AAA en la forma indicada por
los símbolos de polaridad (+ / –) marcados en el
interior del compartimiento. Después coloque de
nuevo la tapa.
VOLUME – / + [VOLUMEN] — Para
aumentar el volumen, oprima el botón +.
Para disminuir el volumen, oprima el
botón –.
LOCK - ON/OFF [BLOQUEO - ACTIV./
DESACT.] — Para asegurar los ajustes,
de manera que no puedan ser cambiados
por accidente, ponga el botón LOCK en
ON. En seguida aparece el símbolo > en
la pantalla, y nadie (excepto DBBS)
responderá. Para liberar los controles,
ponga el botón LOCK en OFF.
DBBS ON OFF [DBBS - ACT./DESACT.] —
Para activar o desactivar la función de
Refuerzo Dinámico de Graves (DBBS),
ponga este control en ON o en OFF, según
corresponda. Cuando está activa la
función DBBS, en la pantalla aparece el
rótulo DBBS.
Cuando aparezca en la pantalla el símbolo ;
(el indicador de pilas bajas) reemplace las pilas.
Si está encendido el radio, oprima el botón POWER
para apagarlo.
2.
Oprima y no suelte el botón CLOCK ADJUST hasta
que comiencen a destellar los dígitos de la hora.
3.
Oprima continuamente el botón e o d hasta que
aparezca la hora deseada.
4.
Para fijar el ajuste, oprima el botón CLOCK
ADJUST. En seguida comienzan a destellar los
dígitos de los minutos.
5.
Oprima continuamente el botón e o d hasta que
aparezcan los minutos deseados.
6.
Para fijar el ajuste, oprima de nuevo el botón
CLOCK ADJUST.
CLOCK ADJUST
[AJUSTE DEL
RELOJ]
•
La luz posterior funciona cada vez que se oprime
un botón, incluso si el botón LOCK está en la
posición ON. Para activar la luz posterior cuando
el botón POWER esté en la posición de apagado,
oprima el botón CLOCK ADJUST [AJUSTE DEL
RELOJ].
•
Para evitar perder las estaciones programadas,
cambie las pilas cuando aparezca en la pantalla el
símbolo ;. Si se retiran las pilas durante más de
30 segundos, puede perderse la memoria.
Sintonización manual y automática
•
Deseche las pilas viejas con prontitud y de
manera adecuada.
No queme ni entierre las pilas.
1.
Para seleccionar AM o FM, oprima el botón BAND.
2.
Para desplazarse por las frecuencias un paso a la vez, oprima el botón e o d.
•
3.
Para sintonización automática, oprima y no suelte el botón e o d . El radio recorre
las frecuencias de la banda y se detiene al recibir una señal de radiodifusión.
•
Solamente utilice pilas nuevas del tamaño
requerido y del tipo recomendado.
•
No mezcle pilas nuevas y viejas, diferentes tipos de
pilas (estándar, alcalinas o recargables) o pilas
recargables de diferente capacidad.
•
Si no tiene pensado utilizar el radio durante varias
semanas, retire las pilas. Las pilas pueden despedir
compuestos químicos capaces de dañar
componentes electrónicos.
Pueden programarse hasta 20 estaciones prefijadas en la memoria para sintonizarlas
con rapidez posteriormente. Hay diez lugares de memoria en la banda AM, y diez
lugares adicionales en la banda FM.
1. Sintonice el radio en la banda y estación deseadas.
Servicio
Si su radio no funciona como debiera, llévelo a un establecimiento RadioShack de la
localidad para que lo revisen. Si desea localizar la tienda RadioShack más cercana, use
la función de localización de tiendas en el sitio web de RadioShack
(www.radioshack.com), o llame al 1-800-The Shack (843-7422) y escoja las opciones
necesarias del menú. Cualquier modificación o alteración de los componentes internos del
radio puede causar una falla e incluso la anulación de la garantía y de la autorización de la
FCC para utilizarlo.
Información de la FCC para usted
Este equipo ha sido probado y se ha determinado que cumple con los límites
correspondientes a los dispositivos digitales de Clase B, de conformidad con la Parte 15
de las reglas de la FCC (Comisión Federal de Comunicaciones de EE.UU.). Estos límites
están establecidos para proporcionar una protección razonable contra interferencias
dañinas en las residencias. Este equipo genera, utiliza y puede emitir energía de
radiofrecuencia por lo cual, si no se instala y se emplea de conformidad con las
instrucciones, puede causar interferencia dañina en las comunicaciones de radio.
No obstante, no hay garantía de que tal interferencia no vaya a ocurrir en alguna
instalación en particular. Si este equipo causa interferencia dañina en la recepción de las
ondas de radio o de televisión, lo cual puede determinarse apagando y encendiendo el
equipo, se exhorta al usuario a tratar de corregir la interferencia con una o más de las
siguientes medidas:
• Cambie la orientación o la ubicación de la antena receptora.
2.
Paso Dos
1.
Mantenga seco el radio; si se moja, séquelo de inmediato. Utilice el radio y guárdelo
solamente en entornos con temperatura normal. Maneje con cuidado el radio; no lo deje
caer. Mantenga el radio alejado del polvo y la suciedad, y límpielo ocasionalmente con
un trozo limpio de tela para mantenerlo con su aspecto nuevo.
Notas acerca de las pilas
3.
Ajuste de la hora
Si ninguno de los botones de función parece
funcionar, asegúrese de que el botón LOCK
se encuentre en la posición OFF.
Paso Tres
Almacenamiento de una estación en la memoria
Tapa del compartimiento de las pilas
•
Audífonos
Paso Cuatro
Pilas
Cuidado de la unidad
PHONE [TELÉFONO] — Para
escuchar el radio, conecte los audífonos
suministrados en este enchufe.
Compartimiento de
las pilas
CLOCK ADJUST
[AJUSTE DEL RELOJ]
Sugerencias útiles
Oprima el botón MEMORY. Después, para seleccionar el lugar de memoria
deseado (del 1 al 10), oprima el botón e o d.
Para guardar la estación en el lugar de memoria escogido, oprima el
botón MEMORY.
Lugares de
memoria —
(del 1 al 10 por banda)
Banda
Frecuencia
Especificaciones
Cobertura de frecuencias de FM .De 87.3 a 108.1 MHz
Cobertura de frecuencias de AM... De 520 a 1720 KHz
Potencia máx. de salida (audífonos) .. 20 mW + 20 mW
(32 ohmios)
Voltaje nominal de funcionamiento.......... 3 voltios C.C.
Dimensiones (AAP) .......................... 4.2 x 1.9 x 9 pulg.
(10.7 x 4.8 x 22.9 cm)
Peso (radio sin pilas) .............................................. 70 g
Estas especificaciones son estándar; pueden variar en
ciertas unidades. Las especificaciones están sujetas
a cambios y mejoras sin previo aviso.
Paso Cinco
Sintonización de estaciones guardadas en la memoria
Lo que viene incluido
1.
Para seleccionar AM o FM, oprima el botón BAND.
2.
Para desplazarse por la memoria, un paso a la vez, oprima una vez
el botón PRESET.
Radio AM/FM 6 Correa para el cuello 6 Audífonos 6
Clip para el cinto 6 Guía del usuario
Accesorios optativos
©2003. RadioShack Corporation
Todos los derechos reservados.
RadioShack y RadioShack.com son marcas
comerciales empleadas por RadioShack Corporation.
12-829
Impreso en China
05A03)
Pilas recargables 6 Cargadores de pilas 6
Audífonos de repuesto
• Aumente la separación entre el equipo y el receptor.
• Consulte al personal de una tienda RadioShack de la localidad o a un técnico de
radio y televisión.
• Si no puede eliminar la interferencia, la FCC requiere dejar de utilizar el radio.
Todo cambio o modificación no aprobado expresamente por RadioShack puede causar
interferencia y anular la autorización del usuario de utilizar este equipo.
Garantía limitada de 90 días
Este producto está garantizado por RadioShack contra defectos de fabricación en el material y mano de obra bajo condiciones normales de uso durante noventa (90) días a
partir de la fecha de compra en tiendas propiedad de la empresa RadioShack, franquicias y distribuidores autorizados de RadioShack. EXCEPTUANDO LO AQUÍ
ESTABLECIDO, RadioShack NO OFRECE GARANTÍAS EXPLÍCITAS Y LAS GARANTÍAS IMPLÍCITAS, INCLUYENDO LA GARANTÍA DE QUE EL PRODUCTO PODRÁ SER
COMERCIALIZADO Y QUE ES ADECUADO PARA UN FIN ESPECÍFICO, TIENEN UNA DURACIÓN LIMITADA AL PERÍODO DE VIGENCIA DE LAS GARANTÍAS LIMITADAS
AQUÍ EXPUESTAS POR ESCRITO. EXCEPTUANDO LO AQUÍ ESTABLECIDO, RadioShack NO TENDRÁ RESPONSABILIDAD NI OBLIGACIÓN ALGUNA HACIA EL
CLIENTE U OTRA PERSONA O ENTIDAD CON RESPECTO A LAS RESPONSABILIDADES, PÉRDIDAS O DAÑOS CAUSADOS DIRECTA O INDIRECTAMENTE POR EL
USO U OPERACIÓN DEL PRODUCTO O RESULTANTES DE UNA VIOLACIÓN DE ESTA GARANTÍA, INCLUYENDO PERO SIN LIMITARSE A, DAÑOS CAUSADOS POR
INCONVENIENCIA, PÉRDIDA DE TIEMPO, DATOS, BIENES, INGRESOS O GANANCIAS, O DAÑOS INDIRECTOS, ESPECIALES, INCIDENTALES O CONSECUENCIALES,
AÚN SI SE HA NOTIFICADO A RadioShack DE LA POSIBILIDAD DE TALES DAÑOS.
Algunos estados no permiten limitantes a la duración de una garantía implícita ni la exclusión o limitación de los daños incidentales o consecuenciales, por lo que es posible que
las limitaciones o exclusiones mencionadas más arriba puedan no ser de aplicación.
En caso de defecto del producto durante el período de garantía, lleve el producto y el recibo de compra que sirve de comprobante de la fecha de compra a cualquier tienda
RadioShack. Salvo si la ley dispone lo contrario, RadioShack a su opción: (a) corregirá el defecto reparando el producto sin cargo alguno por componentes y mano de obra; (b)
reemplazará el producto por otro igual o de características similares; o (c) reembolsará el precio de compra. Todos los productos y componentes reemplazados, así como los
productos cuyo costo es reembolsado, pasan a ser propiedad de RadioShack. Pueden utilizarse componentes y productos nuevos o reacondicionados para llevar a cabo el
servicio de garantía. Los componentes y productos reparados o reemplazados están garantizados por el período remanente de la garantía original. La reparación o sustitución
del producto no serán gratuitas después de la expiración del período de garantía.
Esta garantía no cubre: (a) daños o averías causadas por o atribuibles a causa fortuita, abuso, accidente, mal uso, uso anormal o impropio, falta de atención a las instrucciones,
instalación o mantenimiento impropio, alteración, caída de rayos u otra incidencia de excesivo voltaje o corriente; (b) reparaciones no efectuadas por un taller autorizado por
RadioShack; (c) consumibles tales como fusibles o pilas; (d) daños a la apariencia; (e) costos de transporte, envío o seguro; o (f) costos de recogida, instalación, servicio de
ajuste o reinstalación.
Esta garantía le otorga derechos legales específicos, si bien también puede tener otros derechos que varían de un estado a otro. La traducción al español se provee solamente
para su conveniencia. En caso de discrepancias entre las versiones en inglés y en español, prevalecerá la versión en inglés.
RadioShack Customer Relations, 200 Taylor Street, 6th Floor, Fort Worth, TX 76102
12/99