1
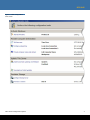
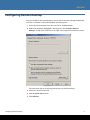
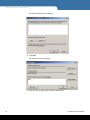
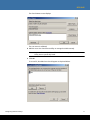
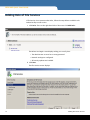
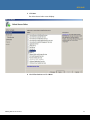
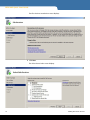
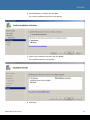
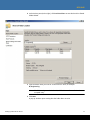
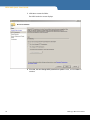
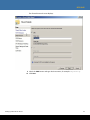
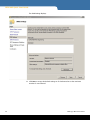
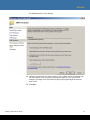
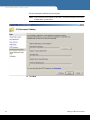
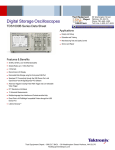
NDX NAS
Contents
Configuring NDX NAS for First Time ......2
Other Initial Configuration Options.......2
Quantum NDX NAS
Quick Start Guide
Activating Windows Operating System .4
Setting Date /Time on Server .................4
Configuring Networking ........................4
Specifying Computer (or failover cluster)
and Domain Names................................5
Enabling Windows Automatic Updates .7
Installing Important Windows Updates.7
Provision Storage ...................................8
Configuring Remote Desktop ................9
This quick start guide provides basic installation and configuration
instructions for the NDX NAS system. For more information, see the
Quantum NDX NAS Tower User’s Guide and NDX NAS 1U Rack User’s Guide
on the documentation CD provided with your system.
This instruction uses the following conventions:
Note: Notes emphasize important information related to the main topic.
Caution: Cautions indicate potential hazards to equipment and are
included to prevent damage to equipment.
Adding Role of File Services .................12
Adding Role of File Services .................12
Setting Up NDX as File Server ..............12
Helpful Links.........................................25
WARNING: Warnings indicate potential hazards to personal safety and
are included to prevent injury.
For the latest Tech Bulletins please go to :http://cp-quantum.kb.net
www.quantum.com
NDX NAS Quick Start Guide
Configuring NDX NAS for First Time
To configure your NDX NAS for the first time, follow the steps below.
1 Attach your NDX NAS System to a keyboard, monitor and mouse.
2 Connect to your network by attaching an Ethernet cable to one of the Ethernet
ports on the rear of the unit—closest to the graphics or video port.
3 Plug the power cord into the system and power on the unit.
Caution: Do not unplug the device during start up - it may cause the Microsoft
setup process to fail.
The unit boots up showing the Quantum logo, the RAID Configuration, and then the
Quantum Logo again.
Microsoft Windows begins initial setup and shows a message Setup Installing
Devices.
The unit reboots.
4 Provide your Country, Language, and Regional Settings.
5 Input the Windows Product Key from the Windows sticker located on the unit. If
connected to the Internet, check the box to automatically register and activate
Windows.
6 Check the box I accept License Terms if you accept the Microsoft Software License
Terms shown, and click Start.
7 Provide a New Password.
Note: This system is RAID 5 factory configured to protect against failure of any single
disk. The resulting usable storage of this system is approximately 5.4TB
Other Initial Configuration Options
Using the Initial Configuration Tasks screen as shown below in Figure 1, perform the
following tasks: Activate Windows, set the time zone, configure networking, provide a
computer and domain name, enable automatic updates, and download and install
updates.
Note: Some of the configuration tasks will require a reboot to take effect. It is not
necessary to reboot the server until all the desired configuration tasks are
completed.
2
Configuring NDX NAS for First Time
NDX NAS
Figure 1 Initial Configuration
Tasks Screen
Other Initial Configuration Options
3
NDX NAS Quick Start Guide
Activating Windows
Operating System
Note: You must be connected to the internet to complete Windows activation.
If the Activate Windows section of the screen is viewable, then Windows is not yet
activated. Follow the steps below to activate Windows:
1 Choose Activate Windows Online.
The Activation Successful dialog box displays.
2 Click Close.
Setting Date /Time on
Server
1 Click Set Time Zone to set the correct time and time zone.
2 Click Change Date and Time to set the time.
3 Click Change Time Zone to set your time zone.
4 Click OK in each dialog box when done.
Configuring
Networking
Network settings are automatically configured in Windows Storage Server Workgroup
2008 R2 using DHCP to assign IP addresses by default.
To configure a static IP address, do the following:
1 From the Initial Configure Tasks screen, click Configure Networking (see Figure 1).
Note: Alternately, in Server Manager click View Network Connections.
2 Right click the network connection that you want to configure, and select
Properties.
3 Double click Internet Protocol Version 4 (TCP/IPv4), and then click Properties.
4 On the General tab, click Use the following IP address.
5 In the IP address field, type the IP address that you want to use.
6 Press the Tab key to place the cursor in Subnet mask.
A default value for subnet mask is entered automatically.
7 Either accept the default subnet mask, or type the subnet mask that you want to
use.
8 In Default gateway, type the IP address of your default gateway.
9 In Preferred DNS server, type the IP address of your DNS server. If you plan to use
the local computer as the preferred DNS server, type the IP address of the local
computer.
10 In Alternate DNS Server, type the IP address of your alternate DNS server, if any. If
you plan to use the local computer as an alternate DNS server, type the IP address of
the local computer.
11 Click OK, and then click Close.
4
Other Initial Configuration Options
NDX NAS
Specifying Computer
(or failover cluster) and
Domain Names
1 Click Provide Computer Name and Domain.
The System Properties screen displays.
2 In the Computer Description field, type the description of the server, for example,
Engineering Server.
Other Initial Configuration Options
5
NDX NAS Quick Start Guide
3 Click Change.
The Computer Name/Domain Changes screen displays.
4 To change the Computer name, type in the new name.
5 In the Member of section, choose one of the following:
• Click Workgroup and type the workgroup name you wish to join.
• Click Domain and choose the domain you want to join.
You are prompted to type your user name and password for that domain.
6
Other Initial Configuration Options
NDX NAS
6 Click OK.
If successful you may be prompted to restart the computer.
Enabling Windows
Automatic Updates
To allow Windows to get the latest updates automatically, do the following:
1 Click Enable Windows automatic updating and feedback or choose to Manually
configure settings.
Manual configuration allows you to control download and installation of updates
and to control whether error reports are sent automatically or if you are prompted
first. You can also choose to participate in the Customer Experience Improvement
Program.
2 Click Close.
Installing Important
Windows Updates
Note: Two types of updates are offered from Microsoft—important updates
(mostly security) and optional updates (driver and hardware related
updates).Updates should be installed regularly to keep the system up-todate.
1 Click Download and Install Updates.
2 Click the links describing how many of each type of update are available to add or
remove updates from installation.
Other Initial Configuration Options
7
NDX NAS Quick Start Guide
3 Click Install Updates to complete the download and install process.
Provision Storage
8
No action is required. Storage is already provisioned at the factory.
Other Initial Configuration Options
NDX NAS
Configuring Remote Desktop
Once you configure the remote desktop, you are able to remotely manage the NDX NAS
unit from a computer running the Windows operating system.
1 Access the Server Manager from the icon next to the Start button.
2 With Server Manager highlighted in the left pane, click Configure Remote
Desktop—found in the small box to the right in the Computer Information section.
There are three choices for allowing Connections via remote desktop.
3 Select your desired connection.
4 Click the Select Users button.
5 Click Add User.
Configuring Remote Desktop
9
NDX NAS Quick Start Guide
The Remote Desktop screen displays.
6 Click Add.
The Select Users screen displays.
7 Enter the user or group name and click check names.
10
Configuring Remote Desktop
NDX NAS
The Check Names screen displays.
The user name is validated.
8 Add the users who should have ability to manage the NDX remotely.
Note: Any users that are members of the Administrators group can connect even
if they are not specifically listed.
9 Click OK.
If successful, the added user should appear as depicted below.
Configuring Remote Desktop
11
NDX NAS Quick Start Guide
Adding Role of File Services
If File Services is not present under Roles, follow the steps below to add this role.
Otherwise skip to next section.
1 Click Roles. Then on the right hand side of the screen click Add Roles.
The Before You Begin screen displays asking you to verify that:
• The administrator account has a strong password.
• Network settings are configured.
• All security updates are installed.
2 Click Next.
The File Services screen displays.
12
Adding Role of File Services
NDX NAS
3 Click Next.
The Select Server Roles screen displays.
4 Check Files Services and click Next.
Adding Role of File Services
13
NDX NAS Quick Start Guide
The Files Services Introduction screen displays.
5 Click Next.
The Select Server Roles screen displays.
14
Adding Role of File Services
NDX NAS
6 Check File Server, if needed, and click Next.
The Confirm Installation Selections screen displays
7 Confirm your installation selections and click Install.
The Installation Results screen displays.
8 Click Close.
Adding Role of File Services
15
NDX NAS Quick Start Guide
Setting Up NDX as File Server
To use the NDX NAS devices as a file server, do the following:
1 In the Server Manager, double click Roles.
2 Double click File Services.
Note: If File Services does not appear then choose Add Roles and Add File
Services.
3 Select Share and Storage Management.
The Share and Storage Management screen displays.
16
Setting Up NDX as File Server
NDX NAS
4 In the Actions pane (to the right), click Provision Share to start the Provision Shared
Folder Wizard.
5 Type the folder name you wish to create on the D: drive, for example
D:\Engineering.
Note: The folder string must be in the D:\<Folder Name> format for it to be an
accepted entry.
6 Click Next.
A pop-up window opens stating that the folder does not exist.
Setting Up NDX as File Server
17
NDX NAS Quick Start Guide
7 Click Yes to create the folder.
The NTFS Permission screen displays.
8 Select No, do not change NTFS permissions option button, and click Next to
continue.
18
Setting Up NDX as File Server
NDX NAS
The Shared Protocols screen displays.
9 Check the SMB button and type the share name, for example: Engineering.
10 Click Next.
Setting Up NDX as File Server
19
NDX NAS Quick Start Guide
The SMB Settings displays.
11 Click Next to accept the default settings or click advanced to set the maximum
number of users allowed.
20
Setting Up NDX as File Server
NDX NAS
The SMB Permissions screen displays.
12 Choose the permissions you wish to grant to users. Under custom permissions you
can select specific users or groups to provide the types of access you wish.For
example, you might want to provide only the group Engineering with read and
write access.
13 Click Next.
Setting Up NDX as File Server
21
NDX NAS Quick Start Guide
The DFS Namespace Publishing screen displays.
Note: If you need more information on this topic, click the Namespace link in blue
as depicted in screen below.
14 Click Next.
22
Setting Up NDX as File Server
NDX NAS
The Review Settings screen displays.
15 Review the settings. Click Create.
Note: if changes need to be made, click < Previous to return to the previous
screens and make the necessary changes.
Setting Up NDX as File Server
23
NDX NAS Quick Start Guide
A message displays that you have successfully complete the Provision a Shared
Folder Wizard.
16 Click Close.
24
Setting Up NDX as File Server
NDX NAS
Helpful Links
Quantum Technical Support
USA 800-284-5101
EMEA 00800-4-782-6886
APAC +800 7826 8887
Worldwide: http://www.quantum.com/ServiceandSupport
Microsoft Technet
http://Technet.microsoft.com
Windows Storage Server 2008 R2 Getting Started Guide
http://technet.microsoft.com/en-us/library/gg214166(WS.10).aspx
Windows Storage Server 2008 R2 Standalone Storage
http://technet.microsoft.com/en-us/library/gg232694(WS.10).aspx
Helpful Links
25
NDX NAS Quick Start Guide
*6-67519-02*
26
For assistance, contact the Quantum Customer Support Center:
USA:
800-284-5101 (toll free) or 949-725-2100
EMEA: 00800-4-782-6886 (toll free) or +49 6131 3241 1164
APAC:
+800 7826 8887 (toll free) or +603 7953 3010
Worldwide: http://www.quantum.com/ServiceandSupport
Preserving the World’s Most Important Data. Yours.™
©2011 Quantum Corporation. All rights reserved. Quantum, the Quantum logo, and all
other logos are registered trademarks of Quantum Corporation or of their respective owners.
6-67519-02 Rev B, December 2011
About Quantum
Quantum Corp. (NYSE:QTM) is the leading global storage company
specializing in backup, recovery and archive. Combining focused
expertise, customer-driven innovation, and platform independence,
Quantum provides a comprehensive range of disk, tape, media and
software solutions supported by a world-class sales and service
organization. This includes the DXi™-Series, the first disk backup
solutions to extend the power of data deduplication and replication
across the distributed enterprise. As a long-standing and trusted
partner, the company works closely with a broad network of
resellers, OEMs and other suppliers to meet customers’ evolving
data protection needs.