1
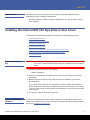
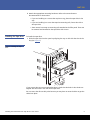
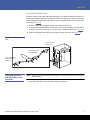
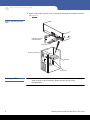
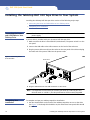
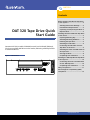
DAT 320
Contents
Before Installing the DAT 320 Tape Drive
in Your System........................................2
Avoiding Electrostatic Damage..........2
Preinstallation Requirements .............2
DAT 320 Tape Drive Quick
Start Guide
Unpacking and Inspecting the Drive..2
Required Tools ....................................3
Installing the Internal DAT 320 Tape Drive
in Your Server .........................................3
Preparing Mounting Bay ....................3
Attaching Mounting Hardware ..........3
Installing the Tape Drive.....................5
Attaching the USB Cable ....................6
Quantum DAT 320, models CD320UH (Internal) and CD320UE (Tabletop),
are the most reliable DAT drives on the market, delivering reliability features
to extend media life.
Connecting the USB Cable from the
Tape Drive to the Server .....................6
Attaching the Power and USB Cables to
the Tape Drive.....................................7
Securing the Drive..............................8
Figure 1 Internal Drive
Completing Your Installation .............9
Installing the Tabletop DAT 320 Tape Drive
to Your System .....................................10
Connecting the Power and USB Cables
to Your Tabletop Drive......................10
Completing Your Installation ...........10
Safety Compliances ..............................11
Electromagnetic Compatibility (EMC)
Compliances .........................................12
www.quantum.com
DAT 320 Quick Start Guide
Before Installing the DAT 320 Tape Drive in Your System
Avoiding Electrostatic
Damage
Your internal tape drive has very sensitive components that are prone to damage from
electrostatic discharge (ESD). Use extreme care when handling the drive, as it can be
damaged by ESD.
Before handling the drive, read the ESD instructions that follow to prevent damage to
the drive.
• Wear an ESD-preventive grounding wrist strap or observe similar ESD precautions
when working with the drive. Be sure the wrist strap makes good skin contact. Do
not remove the wrist strap until you finish working with the drive.
• Before you remove the drive from the antistatic bag, touch a metal or grounded
surface to discharge any static electricity buildup from your body.
• Avoid contact between the drive, other equipment, and clothing. The wrist strap
only protects the equipment from ESD voltages on the body; ESD voltages on
clothing can still cause damage.
• When the drive is not being used, keep it in its antistatic bag.
• Hold the drive by its edges only. Avoid touching any exposed parts on the printed
circuit board.
• Always place the drive on top of or inside the antistatic bag to reduce the chance of
ESD damage
Preinstallation
Requirements
In addition to the contents included with your internal tape drive, you need the
following items to install your internal tape drive.
• A USB 2.0 port
• 5.25-inch half-height bay (for internal drive)
• Backup application software that supports the internal tape drive. For a list of the
latest backup software applications tested with the internal DAT 320 tape drives,
please visit our Web site at http://www.quantum.com/ServiceandSupport/
Index.aspx#
Unpacking and
Inspecting the Drive
Before you unpack the contents of your drive package, inspect the shipping containers
for damage. If you spot damage to the container, notify your carrier immediately.
When you unpack the package, compare the items received with those on the packing
list. If any item is missing or damaged, please contact your place of purchase
immediately.
2
Before Installing the DAT 320 Tape Drive in Your System
DAT 320
Required Tools
The following is a list of the tools you will need. You may need additional items,
depending on your installation requirements.
• Flat blade, Phillips or TORX screwdriver, depending on the type of screws used by
your computer
Installing the Internal DAT 320 Tape Drive in Your Server
Installing the internal DAT 320 tape drive consists of the following major steps:
• Preparing Mounting Bay
• Attaching Mounting Hardware
• Installing the Tape Drive
• Attaching the USB Cable
• Connecting the USB Cable from the Tape Drive to the Server
• Attaching the Power and USB Cables to the Tape Drive
• Securing the Drive
Preparing Mounting
Bay
Caution: To avoid personal injury or damage to the server or tape drive, ensure that
the server is disconnected from the main power supply while you install the
drive.
1 Assemble the necessary tools and materials:
• Phillips screwdriver
2 Perform a normal system shutdown and turn off the server and any connected
peripherals.
3 Remove the cover and front panel from the server, as detailed in your server’s
documentation.
As you work inside the server, you may have to disconnect other signal cables or
power cables from other devices to maneuver the new drive into place. If you have
to do this, make a note of their position and connections so you can put them back
correctly later.
4 You are now ready to install your tape drive.
Attaching Mounting
Hardware
If your server requires special rails or other hardware to install the tape drive, mount
them on the tape drive now. If your server does not require special mounting hardware,
proceed to Installing the Tape Drive.
Installing the Internal DAT 320 Tape Drive in Your Server
3
DAT 320 Quick Start Guide
Caution: Static electricity can damage electronic components. Always wear an
antistatic wrist strap if one is available. If not, after you have disconnected
power from the server and removed the cover, touch a bare metal part of
the chassis. Similarly, touch a bare metal part of the drive before installing
it.
Note: If mounting hardware is supplied with your tape drive, it may not be exactly the
same as shown in the illustrations.
Different models of server require different mounting methods. The server may also
incorporate a locking mechanism to hold the tape drive in place.
Please check your server documentation to ascertain the correct method of mounting
and to check whether mounting hardware is provided with the server.
Mounting Rails
Some servers require mounting rails. These may be metal or plastic rails attached to the
filler panel of the server's drive bay.
1 Use a regular Phillips screwdriver to attach the appropriate rails. Use M3 screws 5
mm (0.2 in).
Ensure you have the M3 screws. The rails may be attached to the filler panel by
screws of a different thread/size type and these should not be used. If in doubt,
refer to your server documentation.
Mounting Screws
Other server models only require the use of special locating screws with no mounting
rail.
1 Use a screwdriver to attach the appropriate screws. You may need to purchase the
M3 screws separately. Position the screws (see Figure 1).
Figure 1 Attaching Mounting
Screws
4
Installing the Internal DAT 320 Tape Drive in Your Server
DAT 320
2 Attach the appropriate mounting hardware. Refer to the manufacturer’s
documentation for instructions.
• If you are installing on a server that requires a tray, place the tape drive in the
tray.
• If you are installing in a server that requires mounting rails, fasten the rails to
the tape drive.
• Some servers have snap-on mounting rails attached to the filler panel. These can
be removed and attached to the tape drive with screws.
Installing the Tape Drive
To install the tape drive:
1 Slide the tape drive into the open bay aligning the tray or rails with the slots in the
bay (see Figure 2).
Figure 2 Installing the Tape
Drive
If your server does not use mounting hardware, check that the holes in the chassis are
aligned with the holes in the side of the tape drive.
Do not secure the drive at this point because you may have to move the drive to get the
cables into place.
Installing the Internal DAT 320 Tape Drive in Your Server
5
DAT 320 Quick Start Guide
Attaching the USB
Cable
Connecting the USB
Cable from the Tape
Drive to the Server
Decide Which Cable to Use
There are several options for connecting the tape drive to your server:
To an . . .
Use . . .
Notes
Internal standard
USB port
standard
USB cable
May be connected to the server’s system board or
an internal USB card.
External USB port
standard
USB cable
Cable routing kit is required.
To an Internal USB 2.0 Port
1 Use the schematic on the inside of the server panel to check whether your server has
an internal USB 2.0 port and locate its position.
2 Use the appropriate cable to connect to the server.
• A standard 5-pin USB Type B cable is provided with the tape drive (see Figure 3).
Figure 3 Connecting to an
Internal USB Port
6
Installing the Internal DAT 320 Tape Drive in Your Server
DAT 320
To an External USB 2.0 Port
Purchase a special USB cable and Cable Routing Kit. The Cable Routing Kit consists of a
bracket with attached cable on one side that connects to the server’s external port and a
Type A USB socket on the other side. Make sure you orientate the bracket correctly when
you fit it (see Figure 4).
1 Remove a spare blanking plate from the rear panel of the server.
2 Fit the bracket with attached the cable and fix it to the server. Make sure the cable is
outside of the server and connect it to the server’s external USB port (see Figure 4).
3 Attach the standard USB cable to the bracket (type A connector) (see Figure 4).
Figure 4 Connecting the USB
Cable
Type B connector
to tape drive
Type A connector on
inside of bracket
Type A connector to
server’s external
USB port
Attaching the Power
and USB Cables to the
Tape Drive
Note: The drive is not powered from the USB bus. It must be connected to the server's
power supply.
1 Attach the USB cable to the tape drive (Type B connector).
Installing the Internal DAT 320 Tape Drive in Your Server
7
DAT 320 Quick Start Guide
2 Attach a spare cable from the server’s internal power supply to the power connector
(see Figure 5).
Figure 5 Attaching the Power
Cable
USB cable to server’s
external USB Port
Power cable
Server’s power supply
Tape drive
Power cable
Securing the Drive
8
Note: The server latches and side views of your server model may not be exactly the
same as shown in the illustrations. Please refer also to your server
documentation.
Installing the Internal DAT 320 Tape Drive in Your Server
DAT 320
Mounting Hardware Used
1 Use M3 screws. Check that the holes in the chassis are aligned with the holes in the
sides of the drive and use a regular Phillips screwdriver to secure the M3 screws (see
Figure 6).
Figure 6 Securing Drive, No
Mounting Hardware Used
M3 screws, supplied
with tape drive
2 Ensure blanking plates are in place over empty bays and replace the cover on the
server.
Completing Your
Installation
To complete and test your internal tape drive installation:
1 Use the screws you removed earlier to secure the drive in place.
2 Replace the computer cover.
3 Reconnect the power cord to the computer’s power connector.
4 Turn on the computer.
5 If necessary install the DAT320 O/S driver.
6 Install your backup software program. The documentation that came with your
software should describe this procedure.
7 Gently insert a tape cartridge into the internal tape drive’s slot. Slide the cartridge
into the slot until the drive accepts the cartridge and loads it. A brief delay occurs
while the drive identifies the cartridge type and state, and moves the tape to the
data area. Then the green Ready LED goes ON.
8 Use your backup software application to perform a sample backup-and-verify
operation. The Ready green LED flashes as data is written to and/or read from the
tape.
9 At the end of the operation, press the Eject button on the front of the internal tape
drive to eject the cartridge from the drive.
Installing the Internal DAT 320 Tape Drive in Your Server
9
DAT 320 Quick Start Guide
Installing the Tabletop DAT 320 Tape Drive to Your System
Installing the tabletop DAT 320 tape drive consists of the following major steps:
• Connecting the Power and USB Cables to Your Tabletop Drive
• Completing Your Installation
Connecting the Power
and USB Cables to Your
Tabletop Drive
Note: The drive is not powered from the USB bus. It must be connected to the main
power supply.
A power cable is provided with your Quantum DAT 320 tape drive.
1 Make sure that the drive is switched OFF (O side down). The power switch is on the
rear panel.
2 Connect the USB cable to the USB connector on the back of the enclosure.
3 Plug the power cable securely into the socket on the rear panel of the drive and plug
the other end of the power cable into the power outlet.
Figure 7 Connecting Power
and USB Cables
On/off switch
Power cable
USB cable
4 Plug the USB cable into the USB connector on the server.
Note: It is important to ensure that you connect your drive to a USB 2.0 port. The
drive will work on a USB 1.1 port but performance will be severely degraded.
Completing Your
Installation
10
To complete and test your tabletop tape drive installation:
1 Use the On/Off Switch on the back of the tabletop tape drive to turn on the drive
(see Figure 7). The Ready LED should be ON, the other three front-panel LEDs should
be OFF.
Installing the Tabletop DAT 320 Tape Drive to Your System
DAT 320
2 Turn on the computer.
3 If necessary install the DAT320 O/S driver.
4 Install your backup software program. The documentation that came with your
software should describe this procedure.
5 Gently insert a tape cartridge into the tabletop tape drive’s slot. Slide the cartridge
into the slot until the drive accepts the cartridge and loads it. A brief delay occurs
while the drive identifies the cartridge type and state, and moves the tape to the
data area. Then the green Ready LED goes ON.
6 Use your backup software application to perform a sample backup-and-verify
operation. The green Ready LED flashes as data is written to and/or read from the
tape.
7 At the end of the operation, press the Eject button on the front of the tabletop tape
drive to eject the cartridge from the drive.
Registering Your Tape Drive
After you install the tape drive, be sure to register it. Registering your drive ensures that
you will receive the latest information about your drive, as well as other product, service,
and support information. For your convenience, you can register your drive through our
Web site.
• Please visit www.quantum.com/registration to register your product.
Safety Compliances
The DAT 320 Tape Drives are safety compliant with the following regulatory
organizations and codes in the countries indicated:
Registering Your Tape Drive
Country
Regulatory Organization
Compliant to:
US / CANADA
Underwriters Laboratories UL
or Canadian Standards
Association CSA
UL/CSA 60950-01,
2nd Ed.
EU member nations
Comité Europèen de
Normalisation
Electrotechnique – the
European Committee for
Electrotechnical
Standardization (CENELEC)
EN 60950-1
:2006+A11:2009
11
DAT 320 Quick Start Guide
Country
Regulatory Organization
Compliant to:
IECEE member
nations*
IECEE International
Electrotechnical Commission
on Electrical Equipment
(IECEE) for Mutual
Recognition of Test
Certificates for Electrical
Equipment “CB Scheme”
CB Scheme per IEC
60950-01, 2nd Ed.
with details and
exceptions for each
member country
Taiwan
BSMI
BSMI certification,
CNS 14336
* IECEE member nations include: Austria, Australia, Belgium, Brazil, Canada,
China (PR), Czech Republic, Denmark, Finland, France, Germany, Hungary,
Ireland, Israel, Italy, Japan, Netherlands, Norway, Poland, Singapore, Slovakia,
Slovenia, Spain, Switzerland, United Kingdom, and USA.
Jotta asiakasta Suomessa
Laite on liitettava suojakosketinpistorasiaan
For kunder i Norge
Apparatet ma tilkoples jordet stikkontakt
Dette produktet kan tilkobles et IT strøm distribusjonssystem
För kunder i Sverige
Apparaten skall anslutas till jordat uttag
Electromagnetic Compatibility (EMC) Compliances
The DAT 320 Tape Drives are EMC compliant with the following regulatory organizations
and codes in the countries indicated:
12
Country
Regulatory Organization
Compliant to:
Australia/New
Zealand
Australian Communications and
Media Authority (ACMA)
AS/NZA 3548 (same as
CISPR 22)
Canada
Industry Canada Digital
Apparatus - Interference Causing Equipment Standard
(ICES-003)
ICES-003 Digital
Apparatus
EU member nations
CE
Emissions per CISPR 22,
EN55022 and Immunity
per CISPR 24, EN55024
Japan
Voluntary Control Council for
Interface (VCCI)
VCCI
Electromagnetic Compatibility (EMC) Compliances
DAT 320
Country
Regulatory Organization
Compliant to:
Taiwan
Bureau of Commodity Inspection
and Quarantine (BSMI)
BSMI EMC certification,
CNS 13438
United States
Federal Communications
Commission (FCC)
Title 47: Code of Federal
Regulations, Part 15,
Subpart B (47CFR15B)
Jotta asiakasta Suomessa
Laite on liitettava suojakosketinpistorasiaan
For kunder i Norge
Apparatet ma tilkoples jordet stikkontakt
Dette produktet kan tilkobles et IT strøm distribusjonssystem
För kunder i Sverige
Apparaten skall anslutas till jordat uttag
Note: Use these drives only in equipment where the combination has been
determined to be suitable by an appropriate certification organization (for
example, Underwriters Laboratories Inc. or the Canadian Standards Association
in North America).
You should also consider the following safety points:
• Install the drive in an enclosure that limits the user’s access to live parts, gives
adequate system stability, and provides the necessary grounding for the drive.
• Provide the correct voltages (+5 VDC and +12 VDC) based on the regulation
applied—Extra Low Voltage (SEC) for UL and CSA, and Safety Extra Low Voltage for
BSI and VDE (if applicable).
Electromagnetic Compatibility (EMC) Compliances
13
DAT 320 Quick Start Guide
*6-66928-01*
14
6-66928-01 Rev B September 2010
For assistance, contact the Quantum Customer Support Center:
USA:
800-284-5101 (toll free) or 949-725-2100
EMEA: 00800-4-782-6886 (toll free) or +49 6131 3241 1164
APAC:
+800 7826 8887 (toll free) or +603 7953 3010
Worldwide: http://www.quantum.com/ServiceandSupport
Preserving the World’s Most Important Data. Yours.™
©2010 Quantum Corporation. All rights reserved. Quantum, the Quantum logo, and all
other logos are registered trademarks of Quantum Corporation or of their respective owners.
Protected by Pending and Issued U.S. and Foreign Patents, including U.S. Patent No. 5,990,810.
About Quantum
Quantum Corp. (NYSE:QTM) is the leading global storage company
specializing in backup, recovery and archive. Combining focused
expertise, customer-driven innovation, and platform independence,
Quantum provides a comprehensive range of disk, tape, media and
software solutions supported by a world-class sales and service
organization. This includes the DXi™-Series, the first disk backup
solutions to extend the power of data deduplication and replication
across the distributed enterprise. As a long-standing and trusted
partner, the company works closely with a broad network of
resellers, OEMs and other suppliers to meet customers’ evolving
data protection needs.